All Activity
- Today
-

Replacing slotted rubber tracks around the side windows
dewdev replied to Nan's topic in Mechanical & Technical Tips
I would suggest that you first go to the Oliver web site and open up a service ticket and ask the question. You can also add your photo to help with the question. Southland may be too new to help you on this issue. -
Replacing slotted rubber tracks around the side windows
Nan replied to Nan's topic in Mechanical & Technical Tips
Maybe Southland in Rincon, Georgia would give me an answer. They are the authorized Oliver dealer closest to me. Thanks everyone. -

Made in USA leaf springs
MAX Burner replied to Mountainman198's topic in Mechanical & Technical Tips
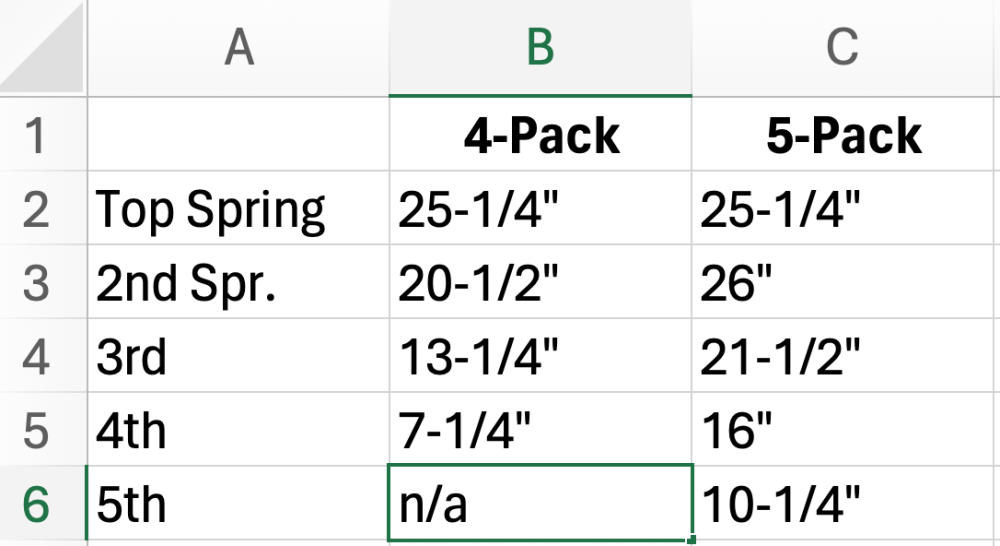
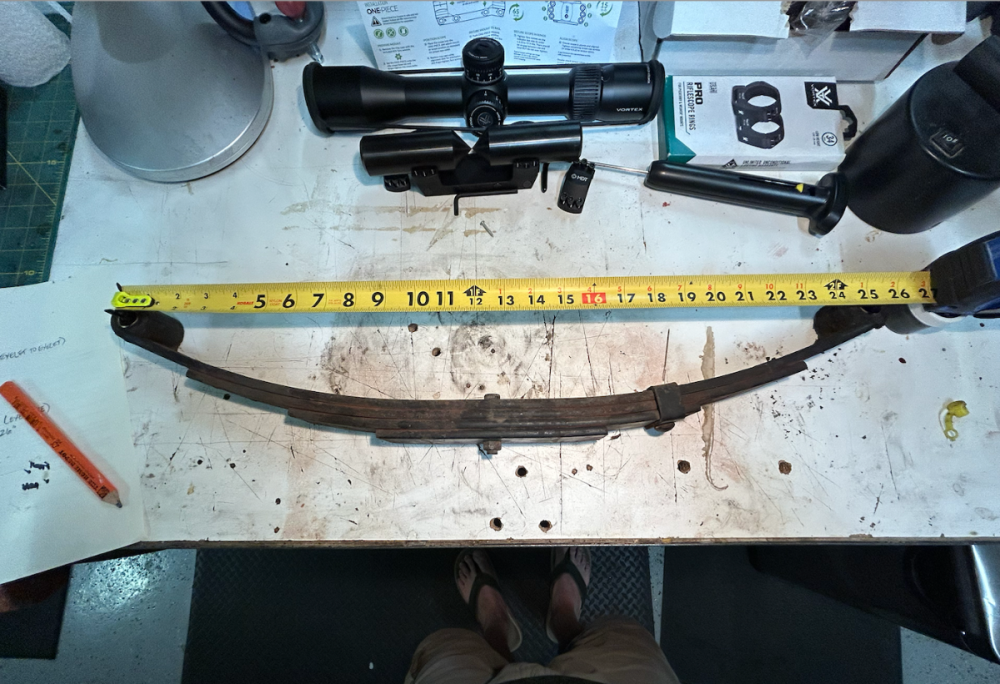
Hey, John: There's at least 4 or 5 "reported" broken springs from reading these forums. Obviously, no clue how many haven't been reported here. But I've learned that there are some good reasons for switching out the 4-packs to higher rated 5-pack springs. Let me summarize: 1. Spring Rating: There's evidence that the Chinese-made "AxleTek" 4-packs, although rated at 1,750# may actually less than that rating. Mike at Alcan informed me of this. The 5-packs are rated in the 2,250# range. So, the 5-packs have somewhere in the range of 500# more weight rating. Can an owner "feel" the difference? I tried. My wife drove me around our country road neighborhood for several miles before and after swapping out springs. FWIW: I couldn't "feel" any difference. 2. Weak Area Near Eyelets: Of the reported broken springs - the break occurs within a couple inches from the eyelet on the top spring - this break is near the end of the second spring which is about 4.5" from the eyelet. On the 5-packs, the second spring extends beyond the center of the eyelet about 7/16" on either side - doubling the spring material where reported ones break. To experience a broken 5-pack spring - the break would have to take-out the two top springs. That's likely why there's never been a reported 5-pack break. 3. Bushings: The bronze bushings in the Chinese-made spring eyelets are measured at 1/16" thickness on my springs - the replacement Alcan spring bushings are right at 1/4" thick - 4x the material, which will take much longer to wear out. Also, to get that 1/4" thick bushing into that eyelet. The OD of the AxleTek eyelet is 1.34" while the Alcan eyelet is 1.53", giving the 5-pack eyelets a more robust configuration. 4. Steel Composition: The Chinese steel is of unknown pedigree - unless someone wants to pay for an NDA test (which I'm not interested in) we'll only know subjectively that their steel sucks compared to the recognized high-quality of US-made steel. 5. Comparative Weight: OK, the 5-packs have one extra leaf, right? How much more do you think that extra leaf weighs? I weighed both - the Chinese AxleTek is right at 10#; where the Alcan comes in at 18#. Here's why: The total length of spring material in the 4-packs is 66-1/4" versus 99" for the 5-packs, or 49% more material in the 5-packs. 10# versus 18# = an 80% increased weight for the 5-packs. Above shows the eyelet-to-eyelet measurement of the 4-pack top spring. Each subsequent spring length was measured straight across from end to end. Notice the "flattening" of the arc of the 4-pack. The other 4-packs were flattened like this one. JFTR: We never even come close to the 7k# GVWR of the OTT on any of our excursions. 6. Price Point: New 5-packs/U-bolt kit will cost owners approximately $800 plus shipping from Grand Junction, CO. I'm in NM and shipping was $110. FYI: No tax if purchased outside of CO. For us it was a no-brainer. One of the last issues we want to handle is a broken leaf spring in the middle of a boon docking location in the middle of EBF somewhere. Cheers! - Yesterday
-

What are you listening to? Video Thread
Mike and Carol replied to JWalmsley's topic in General Discussion
Rambin’ man…. -
I used 3M VHB 4950 on the panels on our (ex-) Bigfoot. The project was 4-5 years ago. I double the standard solar mounts, 8 vs. 4 to be extra safe. Each panel had eight times 3x1" VHB tape ONLY, no screws. VHB is CERTAINLY all you need! Still holding strong and you don't have to put Dicor mess over top of it as VHB resists sun and weather nicely.
-
Steve-Gwenne started following Replacing slotted rubber tracks around the side windows
-
Further to my above post, here’s a thread from the AS forum with good info about VHB tape. https://www.airforums.com/forums/f37/3m-vhb-tape-204288.html …and a Google search revealed VHB tape #5962 is actually best for fibreglass applications. That said, I also remember reading on a AS thread a few years ago where 3M stated VHB tape should be used in conjunction with mechanical fasteners. However, like I said before AM Solar have been using VHB tape, as well a bunch of people in the AS world without issues.
-
Yes, unless they have changed what they use now in the last 12 months, they have always used 3M VHB 4950. However, 4611 has a higher temperature range and is also commonly used.
-
No, they are not redundant both do specific functions that you cannot do with the GX. So in my opinion necessary to get full functionality with Victron system. The only thing that might get rid of smart shunt and BMV is if you use Epoch batteries because their BMS communicates with Victron via BMS Bus on Cerbo or the VE. Bus on the Ekrano. I can't confirm how well that works yet because I installed the Ekrano and I am waiting on a cable that converts CAN bus to VE. Bus. So Epoch batteries BMS is not talking to Victron yet. Doesn't matter if you're using Cerbo GX it will work but Ekrano not sure yet.
-
rich.dev started following Window Screen Removal
-
Do this from the inside. Remove shades. Slide screen to middle of window frame. Grasp lower left and lower right corners of screen frame. Lift the lower corners at the same time so that the bottom of the screen frame clears the track. Pivot the lower edge of the screen frame towards you and drop the top edge of the screen frame out of the top track. The rear screen is different. It has 2 clips on the bottom and 2 clips on the top. If trailer is not on fire, gently pull on the bottom frame until clips release then the top of the frame will fall free. The rear screen does not fit in a track so note the positions of the clips before removing the screen. If trailer is on fire, grab the red trapezoidal shaped tab, yank the screen out, fling it to the side, then dive head first out the window.
- 1 reply
-
- 3
-

-
I had no idea. Yep you are right! I'm not even going to ask how many butyl tapes there are. Nope, not me..... GJ
-
There are many types of vhb tape. Anyone know which type AM Solar uses?
-
I didn’t find anything in threads about removing window screens, I thought I’d ask before breaking anything. Any guidance on the secret handshake of screen removal?
-
Thank for the input. @dewdev was correct, pump replacement did not fix issue. I put in a ticket with Oliver and sent Mike video of flow. He said I will need to go to a service center for further troubleshooting. I am currently on the road so trying to figure out on my own. I did some additional testing and can't get water from the freshwater tank or from boondocking port (with valves configured for boondocking). I have removed and cleaned all fittings from water tank to pump. No leaks found. I isolated and drained Truma Aquago. Looking at manual @topgun2 recommended, I confirmed valve configuration. I see check valves at freshwater tank fill and city water inlets. Could a failure of one of these cause air leak and pressure failure? How do I access these to check or bypass?
-
AM solar has been using 3M VHB to mount solar panels for many years without issues from what I’ve heard.
-
Lost a great guitar player today..
-
I contacted RougeRV about their solar panels. Ryoma's responses to my questions were: A: The tape of this solar panel is mainly made of butyl rubber. We will sell this tape separately in the near future. B: 3M VHB does not seem to be stable enough to fix the solar panel frame to the car roof. C. We do not recommend excessive longitudinal bending >15°. D, It has 12 bypass diodes which have less impact on partial occlusion for partial sun/shade use. E. Its working environment range is -45℉-185℉. There is such a risk if it exceeds or reaches the critical maximum temperature. Basically they shot down my hope of a full coverage solar panel on our OE2 roof space from the max fan forward to the antenna and side to side to our awning mounts. Also using 3M VHB tape to install. So, back to this layout.
-
I already had this feeling, but you have all thoroughly convinced me that there is no way in the world I will ever polish our Oliver! I'd rather install new leaf springs, a new fridge, new A/C, add lithium and upgraded charger/inverter, and rework the furnace ducting than buff the Oliver in 2x2' increments, three times over! This detailing sounds like prison life working a rock pile. Save money on that buffer. For now, our Oliver stays oxidized. The upper front is/was pasty flat when we purchased it used last summer. When we get home from our next trip (leaving Sunday for 3 weeks) I will pressure-wash it quickly upon return and cover it for the summer. After Labor Day, I'll look for a local detailer. If we were any reasonable distance from CGI, I would make an appointment there for sure. I already contacted a Phoenix based ceramic coating chain. They advised me that they would not work on our Oliver due to its age and oxidation. They prefer to quickly coat new paint on new vehicles only. I need to find a company like CGI in the SW.
-
We also had this issue while up in northern Canada last summer. We believe it was a problem for a couple of years, we just were not aware of it until it was loose enough to start coming apart. When we returned home I got ahold of Dometic and received the following email reply. ===================== From: CustomerSupportCenter [mailto:customersupportcenter@dometic.com] Sent: Friday, September 1, 2023 9:46 AM To: BryanB Subject: RE: Dometic.com Support Form - US - productsupport - rv - b2c Hello Mr. Bjornstad: I was able to reach out to our engineering department. The engineer indicated the information directly below: “the bolts used to secure the burner caps are common M3x24mm socket head screws. They can be found at most hardware stores. He should apply blue Loctite to the screws before putting them in.” ===================== Yes, there are threads in the underside of the burner caps. The burner cap is made of 'pot metal' so if the screws are not of the exact sizing and ARE NOT 'Loctite-d' in, they may vibrate out again or worse yet, they may strip (as ours did) out of the soft pot metal burner cap. There was no indication (blue) of there being any Loctite around our screw heads when we were taking it apart to repair it. So the Loctite comment above may be a revision based upon customer experience. The following is what we did to fix the issue. We only had one screw per element and no Loctite at the time so we were at a less than ideal situation. turn off the gas at the tanks, remove the stove from the countertop, disco your gas fitting, turn stove upside-down and, make a note of the 'ignition wiring' if you have to disco more than one of them, remove the underside heat shield, (you have to cut the zip ties to remove it, replace zip ties to reduce vibration on re-install), re-insert the screws, apply Loctite where the screw head comes in contact with the assembly, then re-install the stove ‘Check Gas fitting for leakage’. We actually became quite proficient at this and I would be able to do it (less Loctite) as Maggie was doing 'meal prep', so I was done when she needed the stove. That is until the loosening of the screws and vibrating caused the 'burner tube' coming into the mixing bowl to break. At that point the stove was UNSAFE to use. So I put it in the back of the truck, got a brass plug for the gas supply line and covered the area with the 'Oliver supplied' sink cover, and taped that down. That gave us a larger meal prep area, and more outside cooking. Our final resolution when we returned home (because stove was basically shaken apart) was to replace our D21 (AMZN Dometic outlet), because we were unable to find the replacement parts that broke as a result of the ‘burner caps’ coming loose, and shaking/breaking apart the internals of the stove. When the new stove arrived, I took it apart at the bottom and made sure all 4 screws were there and sure enough, signs of blue Loctite on the screw heads. I have discussed using Red (hi-heat) Loctite thru PM's with others on the forum. The caveat is 'if you want it to stay put, Red would not hurt, if you have need to get in there and remove those screws and do other work, Blue would be better'... So I will stick with the Blue for now, as I do not believe that the original stove had any Blue on it. In fact, I do not believe we had two screws in each burner cap to start with. Never did find the two missing screws and I searched the entire enclosure and behind the false back of the drawer area. We can now look back at it as a learning adventure. Yah, may not take as many 'wash-boardy' roads less travelled, and will probably even go slower than we did... We learned a lot about the Oliver, Appliances (lost the WH too), about repair in remote locations, phone conversations with SeaDawg & Outlaw Oliver, and our own tolerances to experiences when dealing with and overcoming unexpected issues that arise, but GAWD, did we enjoy the adventure even with the adversities. So much so, WE ARE GOING BACK again this camping season, with the intent to make it to AK this time. Cannot wait to try (after a local shake-down weekend) our new Dometic stove and WH (another thread)... the adventure continues. B~Out, First edit, if others end up purchasing a new Dometic D21 Stove... the Brass elbow attached to the stove is now pointed 180 deg. opposite the supply line. So I just disco'd it, put on some YELLOW Teflon tape and then tightened it up to the orientation of the old one, and hooked the gas line back up. Second edit, Some of your appliances are going to have 'Metric' in them, especially if they are used outside the US. Just be Aware. Third edit with pics: once you have the stove exposed, you remove the heat shield screws (sm. red circles), notice wht. zip ties.. Your burner cap screws pass thru here (black arrows). The large red circle is the broken supply tube between control knob & mixing bowl. I tried to get some aluminum tubing to repair it. Even thought of sacrificing the stem to the coffee pot... I was told, that was NOT an option.
-
Newbies taking the plunge - Are we missing anything
John Welte replied to Dennis and Melissa's topic in General Discussion
I second that recommendation. Wait until it's maybe 75% full. John -
This is solid evidence that Oliver continues to do the right thing. Regardless of how the 5K rated coupler got to Oliver, Oliver installed it on an Elite II, and took financial responsibility for replacement when it failed, even after expiration of the 1-year warranty. This confirms one of our reasons for choosing an Oliver: a culture of integrity.
-
Spot On👍


undersideofstove12vdccomingin..jpeg.79ea61d199dd8b4e33a78f44d289b461.jpeg)
afterheatshieldremoved.jpeg.f146698fa58116135949f641b71669a2.jpeg)

