Leaderboard


Popular Content
Showing content with the highest reputation on 11/07/2018 in all areas
-
Some time ago, I requested suggestions on "must have" items to have on hand when we take delivery of our Elite II (early spring, 2019). This is our first trailer so seasoned suggestions are great and we got plenty of them via the forum. I am putting together a short list of items to procure starting now and would ask for additional finite details for the items I list as well as suggestions for some absolutely necessary items that I have omitted. I will try to break it down by categories of hardware vs interior items (dishes, towels, sheets, etc.) In all instances, suggestions as to specific brands and places to procure are most welcome. Here is the starting point: <p style="text-align: center;">Hardware: </p> Plug converters: 50 AMP to 30 AMP: 120 volt (house) to 30 AMP (any others??) External Surge Protection: (In addition to the built in one) Yes or No?? If yes, which one? Wheel chock or "X" blocks: Which one? Both? How many of each? Extra 25' potable water hose: (brand?) Extra 25' water hose. Extra 25' 10 gauge extension cord. Jack stand blocks: which ones? External water filters. On this point, is there not one already in-line inside the trailer? In either case, do I need an external filter too and which one? Hitch lock for BullDog 2 5/16" coupler. Which one? Extra grey water discharge hose: Yes/No? What if any accessories for discharge lines? For composting toilet: What kind of toilet paper? What kind of media and how much? Tool Kit: List of tools that are needed or desired. Is there a fairly comprehensive tool kit for RVers that already exists? <p style="text-align: center;">Interior Items (Donna's domain)</p> Cookware: (Pots, Pans,etc. )Suggestions as to "what" and where to purchase RV specific items (also looking for good sources). Utensils: Spatulas, serving pieces,, forks, knives, spoons, etc. (also looking for good sources) (RV specific?) Dishware: plates, bowls, glasses, cups, coffee mugs, serving items, etc. (also looking for good sources) (RV specific?) Napkin and paper towel holder/dispenser. Utensil and plate organizers: Suggestions Dish soap and hand soap (storage). Paper towel dispenser: Type, location, how to attach? Towels (bath and hand) RV unique? Fitted linens sheets for the upgraded single bed mattresses available as an option from Oliver. Inside entrance matt:(brand/size?) Ground matt at exterior entrance to trailer: Extra matt for outside of bath area: (Yes/No?) (We're getting the teak floor covering for bath and sink from Foy) Trash receptacle: (??) Toiletry organization suggestions: Any kind of cabinet or closet organizers that are essential: Toasters: Coffee maker: (We like GOOD coffee and grinder but want to know if there is something smaller for an RV) <p style="text-align: center;">Other stuff that we MUST HAVE at pickup???????</p> We'll worry about food, drink etc. Please feel free to comment add or delete but please keep in mind that we're trying to prepare for essential items needed at time of delivery and time of pickup and don't intend to purchase every nice-to-have item. If we did that, we probably couldn't pay for the trailer. All for now. Thanks1 point
-
The standard heater will give off some heat and will help keep the area between the hulls warm in cold weather. It is also easier to find someone that knows how to work on it and find parts if something goes wrong. You just pull the anode rod to winterize which is not a big deal.1 point
-
Wow! What a thread... sorry I have been remiss on checking the forums and didn't see it sooner. I will add three things. (ok... maybe say some again) One.... Get the Tow Ready 20142 now and take it with you. https://www.amazon.com/Tow-Ready-20142-7-Flat-Adapter/dp/B00C4AYR3U Amazon has it for $18 bucks and its cheap insurance to eliminate the annoying trailer disconnect message. Trust me, even if you know lights and brakes are working it is a major pain and startling when it goes off. Thanks again to David S for saving us Ford 150 owners from this hell! Two ... I have recently been driving back and forth from NC to NJ. 650 miles and we have been doing it without towing in one long day. When you add the trailer to long days like that it is just HARDER to do. Can't put my finger on why that is but IT IS! So, please give yourself every break that you can and support each other on the trip. Adding winter.. mountains.. and multiple long days in a row is a LOT to deal with. Three... When towing and needing to burn some miles, we use what we call the meander strategy. Start damn early, share the driving, take breaks when we need them and hit Wal Marts, Craker Barrels, casinos and any other place that will allow an overnight stay. We use the All Stays app for ipad - worth every penny of the $10 it cost. Sleeping this way is very efficient as you can get a meal, buy supplies, and bed down early so you can get up early and start all over again. Finally.. Please keep us informed of how you make out. Best of Luck and if the going gets tough the tough can GET A MOTEL ROOM and be safe and sound. Better late than never. Have a better one and looking forward to hearing of your safe and successful trip home with your new Oliver. Scotty1 point
-
geO, This is interesting. On my 2015, all the windows, maxxair vent, bathroom fan, plumbing vent, and all the other penetrations were factory sealed with 3M Fast Cure 4000 UV. Oliver uses this all over the trailer inside and out. The porch lights and the markers were factory sealed with silicone. Many of those sealed with the silicone have failed. I would not use silicone over the 3M 4000. I had a few gaps here and there in the window trim that I redid. And I also cleaned up some "less than adequate" joints on the interior, especially in the bathroom and around the kitchen sink. The only issue with the 3M 4000, other than it's cost, is that once opened, it has a very short shelf life. So get all your spots lined up and do the inside and outside all at once. Cut the tip on your tube sparingly! Clean your rig well to remove any dirt and wax. Give a quick pre-wipe with acetone or MEK (my preference) on a rag around where the joint is. On the inside, I then tape both sides of the joint with thin blue tape (delicate surfaces). Carefully squeeze a fine bead in the joint and smooth out with your finger. Immediately pull the tape and lightly swipe again to get the ridges from the tape to blend in. You may not like to, but I wipe a little paint thinner on my finger to lubricate it a bit, works good. Too much sealant in the joint and you'll have a mess. Use the sealant sparingly. The first wipe should be tight to the tape edge, not going over the top. It's a judgement call depending on the size of the fill. The 3M 4000 can clean up with paint thinner so if there is some that gets away from you, you can carefully clean up with that. The stuff skins over pretty fast so be organized, work small areas, and don't forget to breathe! On the outside, I just very carefully apply the bead and smooth it out with my finger. If the sealant line gets messy, some thinner on a rag drawn along the edge of the sealant cleans it up nicely. Warning though: don't use thinner or any other solvent around your chromed plastic light fixtures, it will mess up the finish! I don't know why Oliver recommended silicone to you when most of what you'll be sealing was done with the 3M product. Good luck! RE: the marker lights, I would like to hear how others have sealed those as I think I have a few leakers, and yes they were factory sealed with silicone! Can the chromed escutcheon ring be removed somehow for sealing? Dave1 point
-
George - while you're looking around, don't forget to take a close look at your "marker" lights on both the top and bottom of the hull. Like Steve, I've never had to do much on the roof, but, several of those lights on mine have needed a bit of re-sealing. Bill1 point
-
Geo, my elite2 is about the same age as yours, I would advise just checking the caulking around your vent, maxair fan etc... mine is still in good shape even after being outside since I took delivery on 5/1/17. If there are no gaps there is no need to replace it. Steve1 point
-
Today I was watching the amperage while the compressor was on and was getting 18-23amps. I remember when Matteo installed the easystart during the last rally and watched him go through a start up procedure. My A/C was changed out last July and I'm beginning to think the easy start was not started properly. Jason returned my phone call and we talked about possible problems. What I did was hook up both of my Honda generators and went through the start up procedure again. Well so far so good! My single gen now is running the A/C and reading a constant 15amps and no more overloading. The gen is not struggling anymore! I will conduct some more testing tomorrow and hope this issue is resolved. Thanks Jason for returning my call!1 point
-
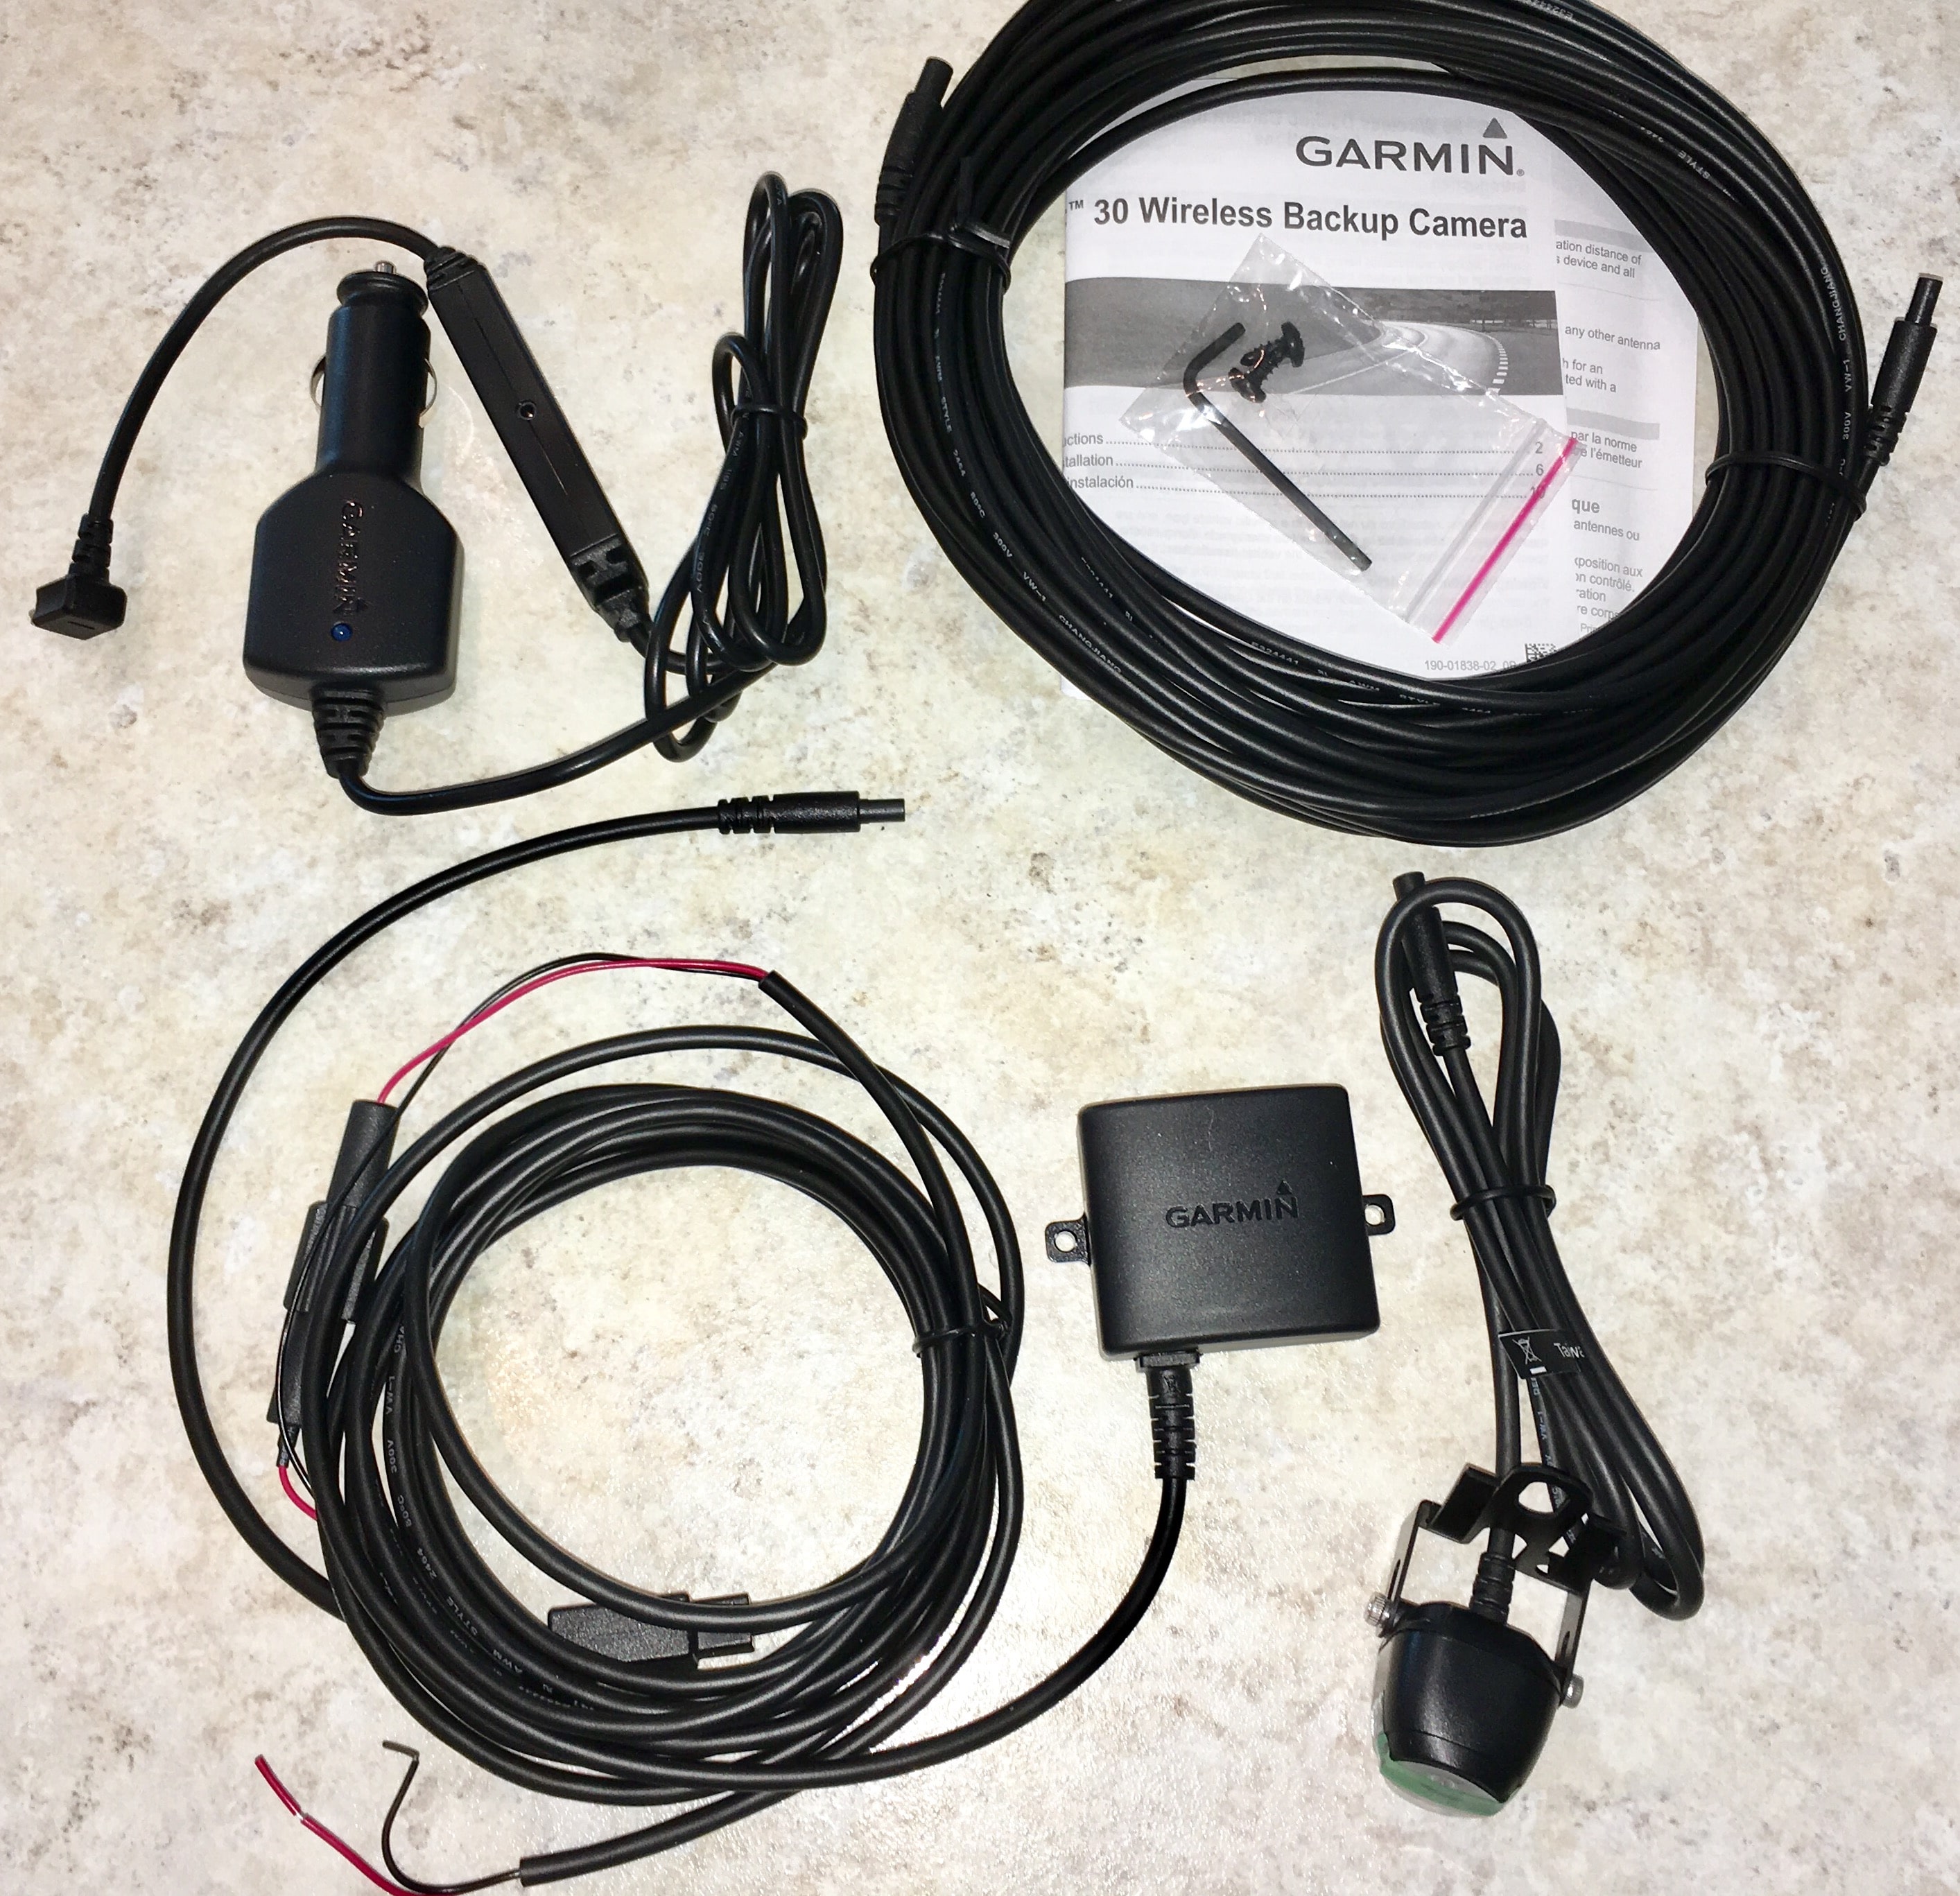
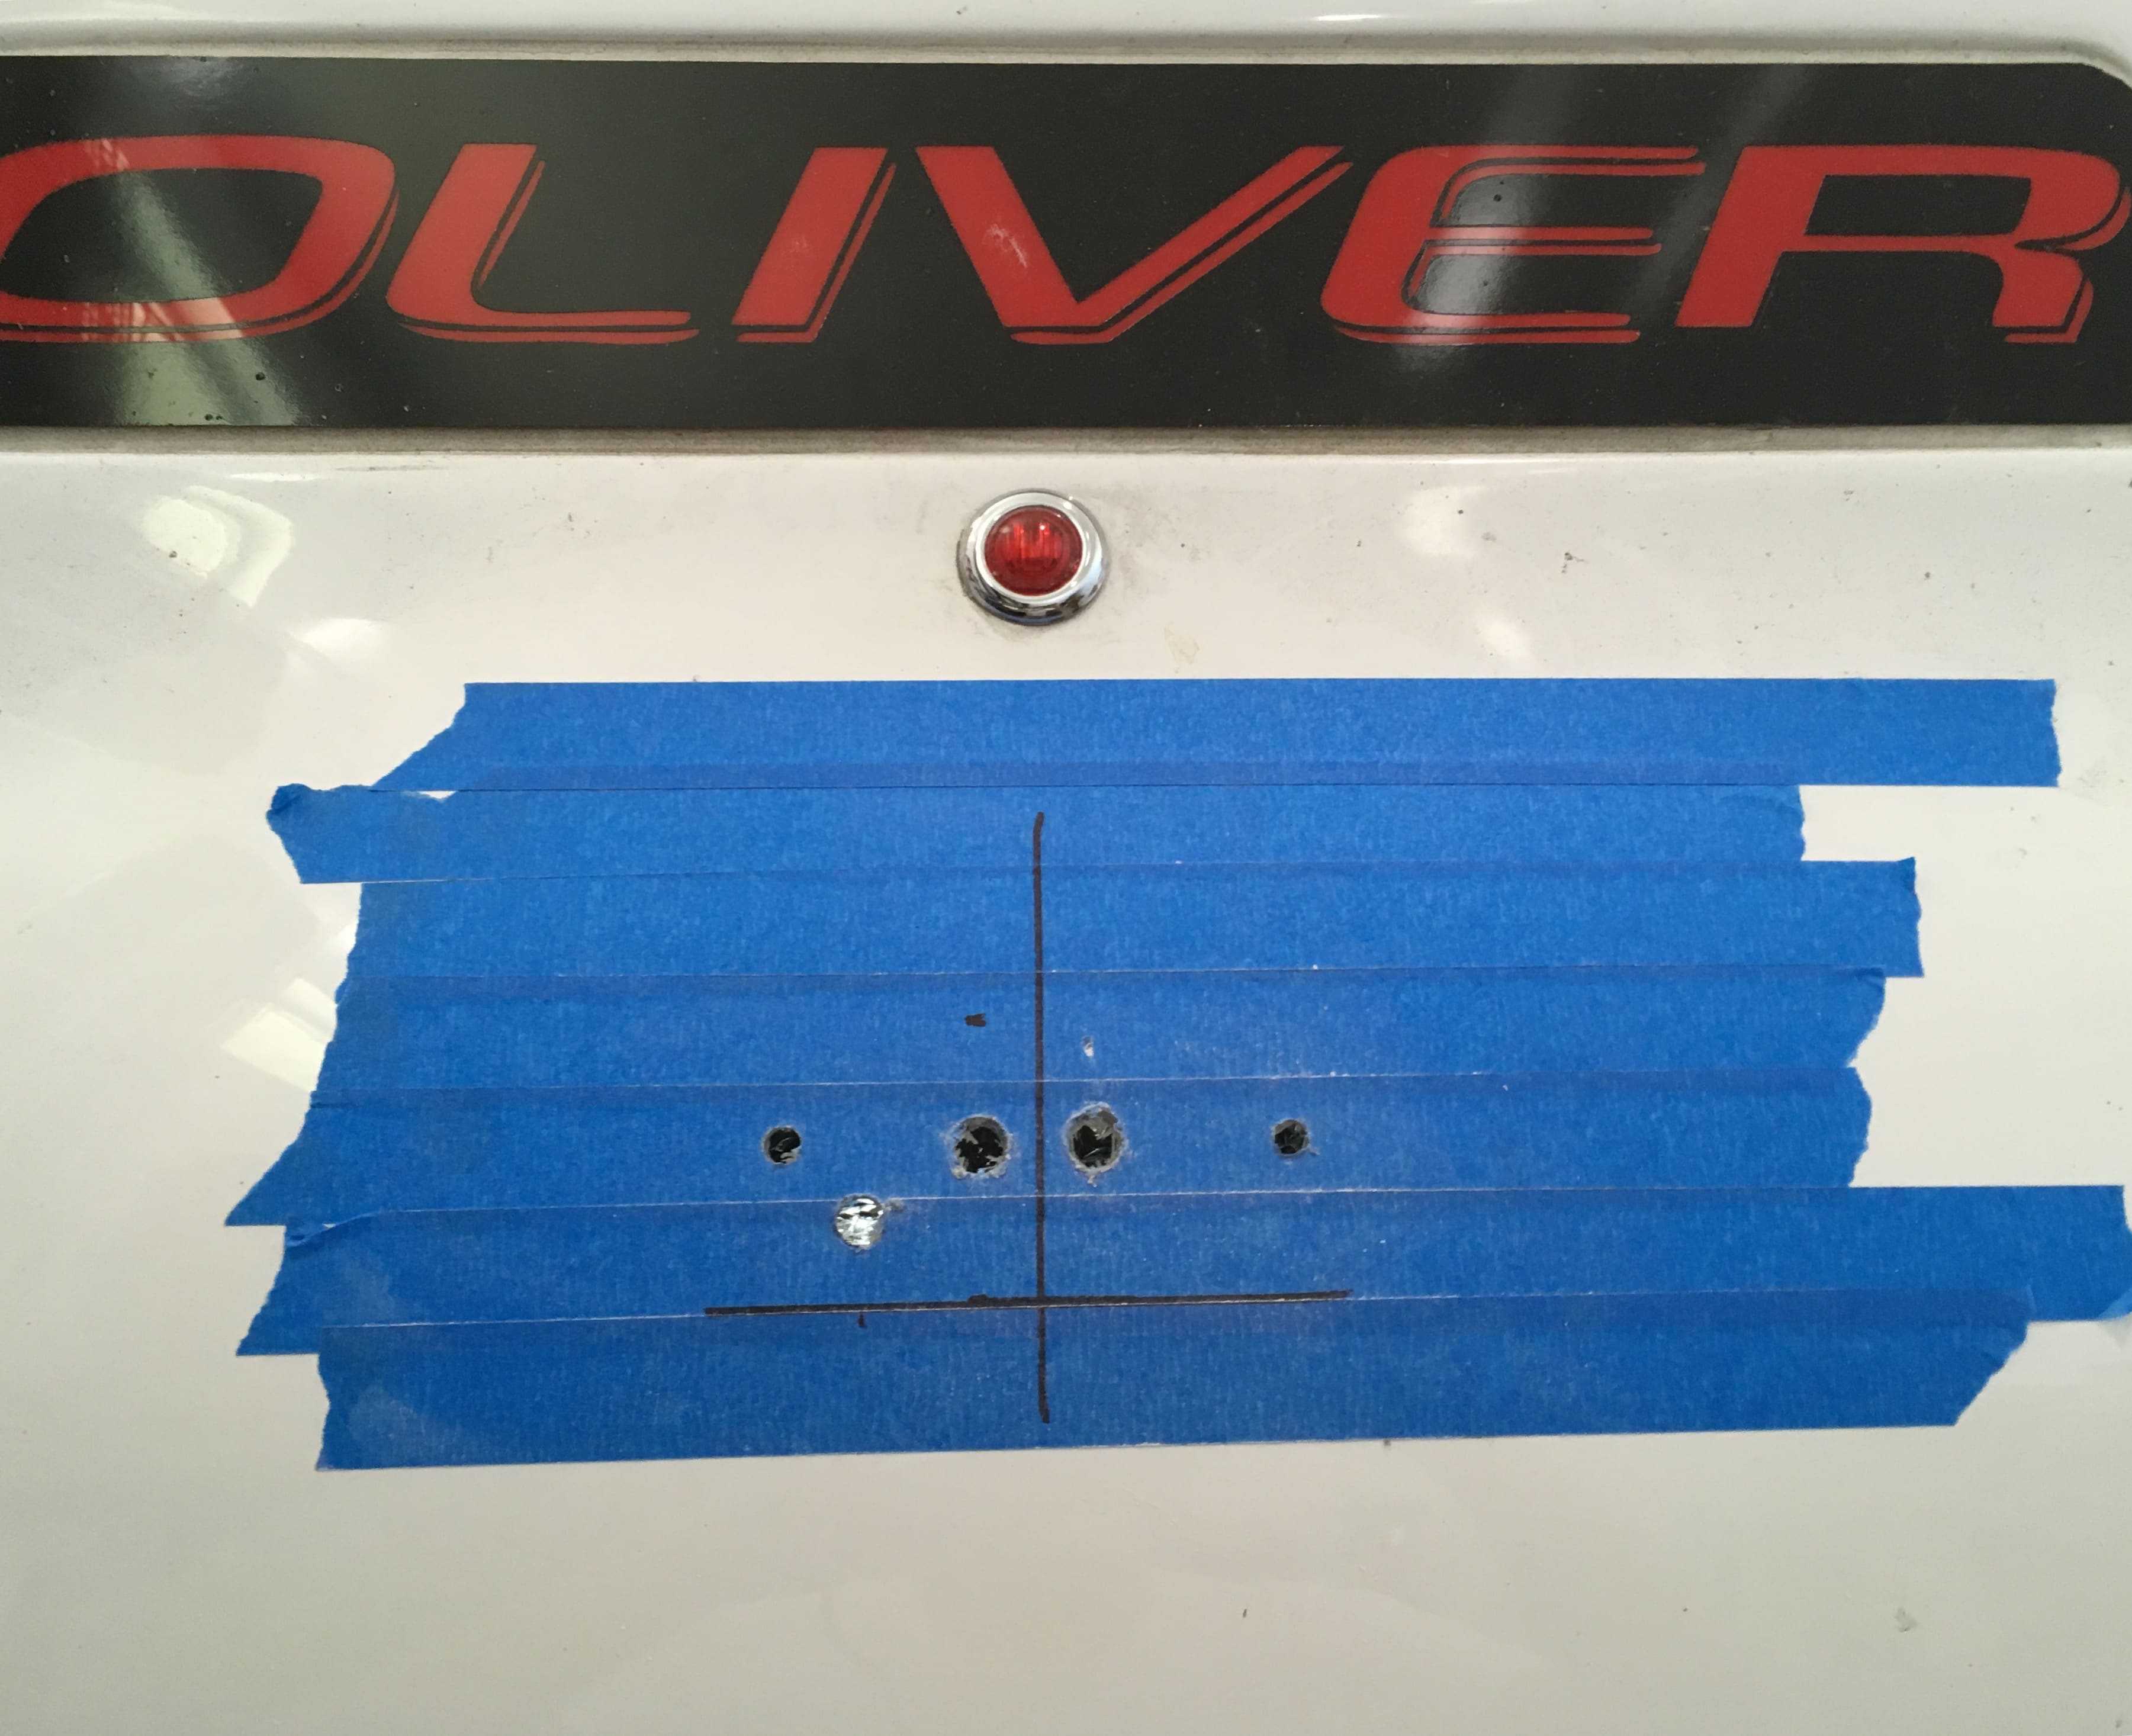
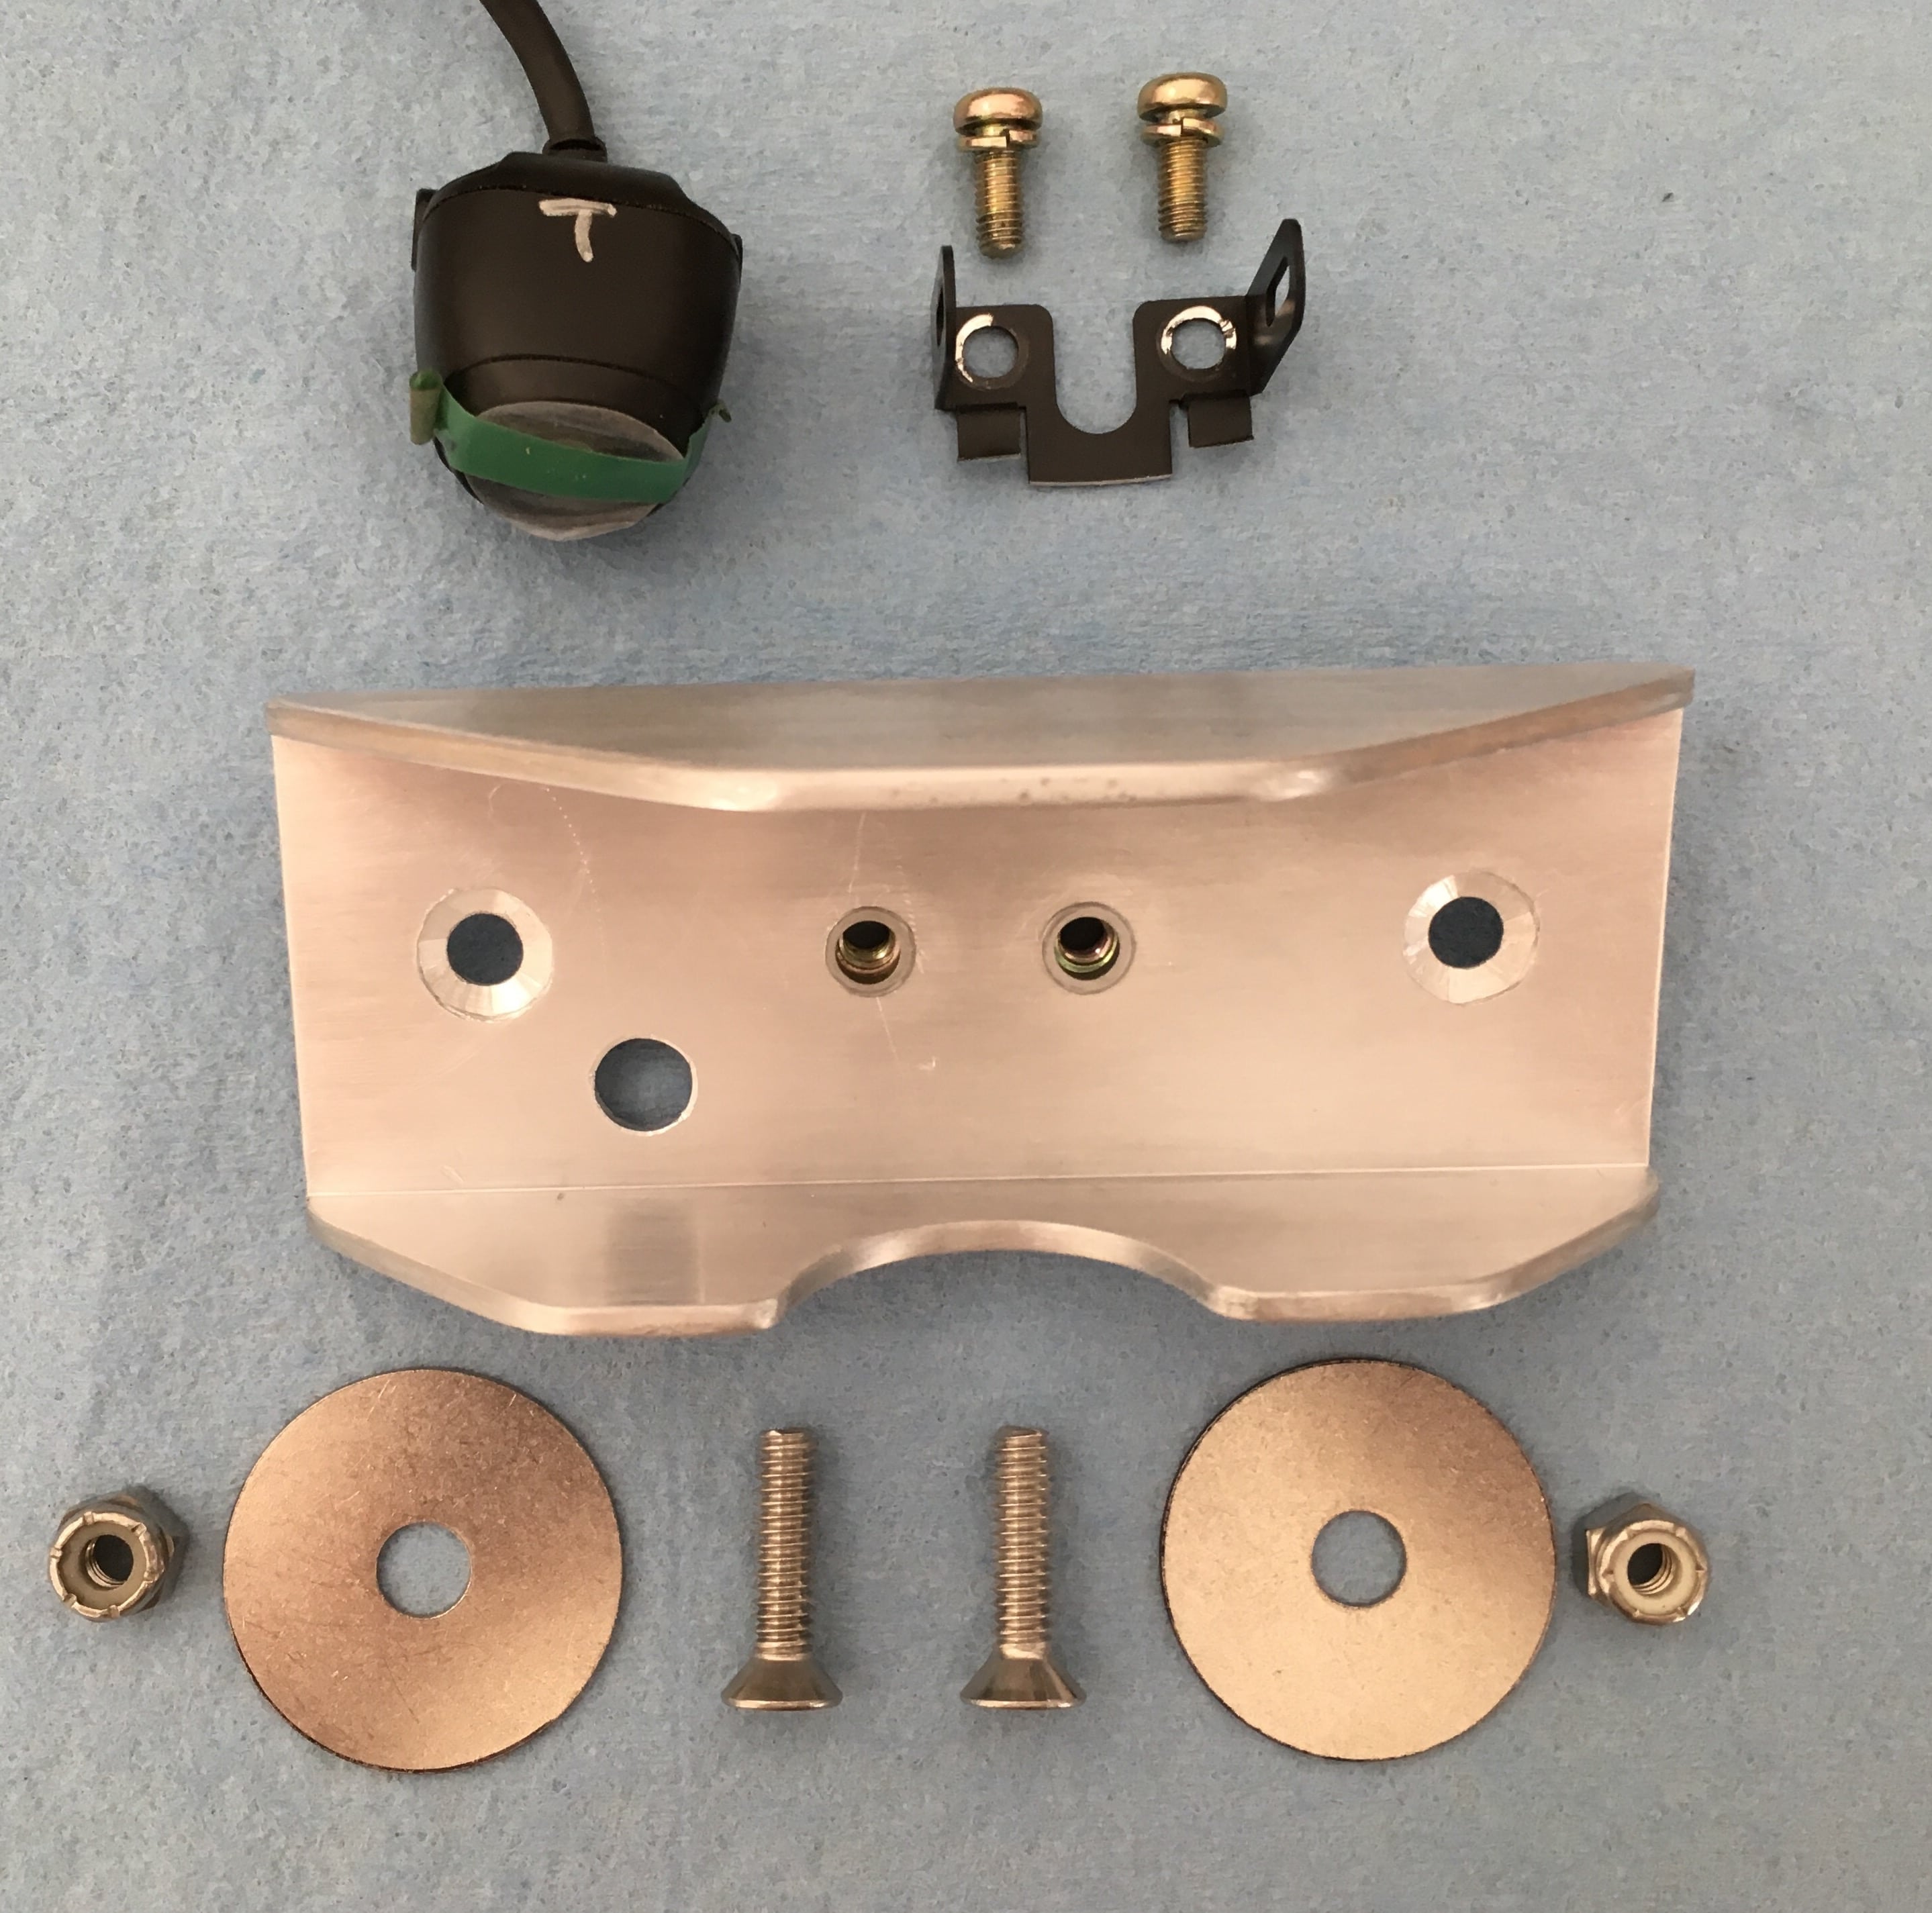
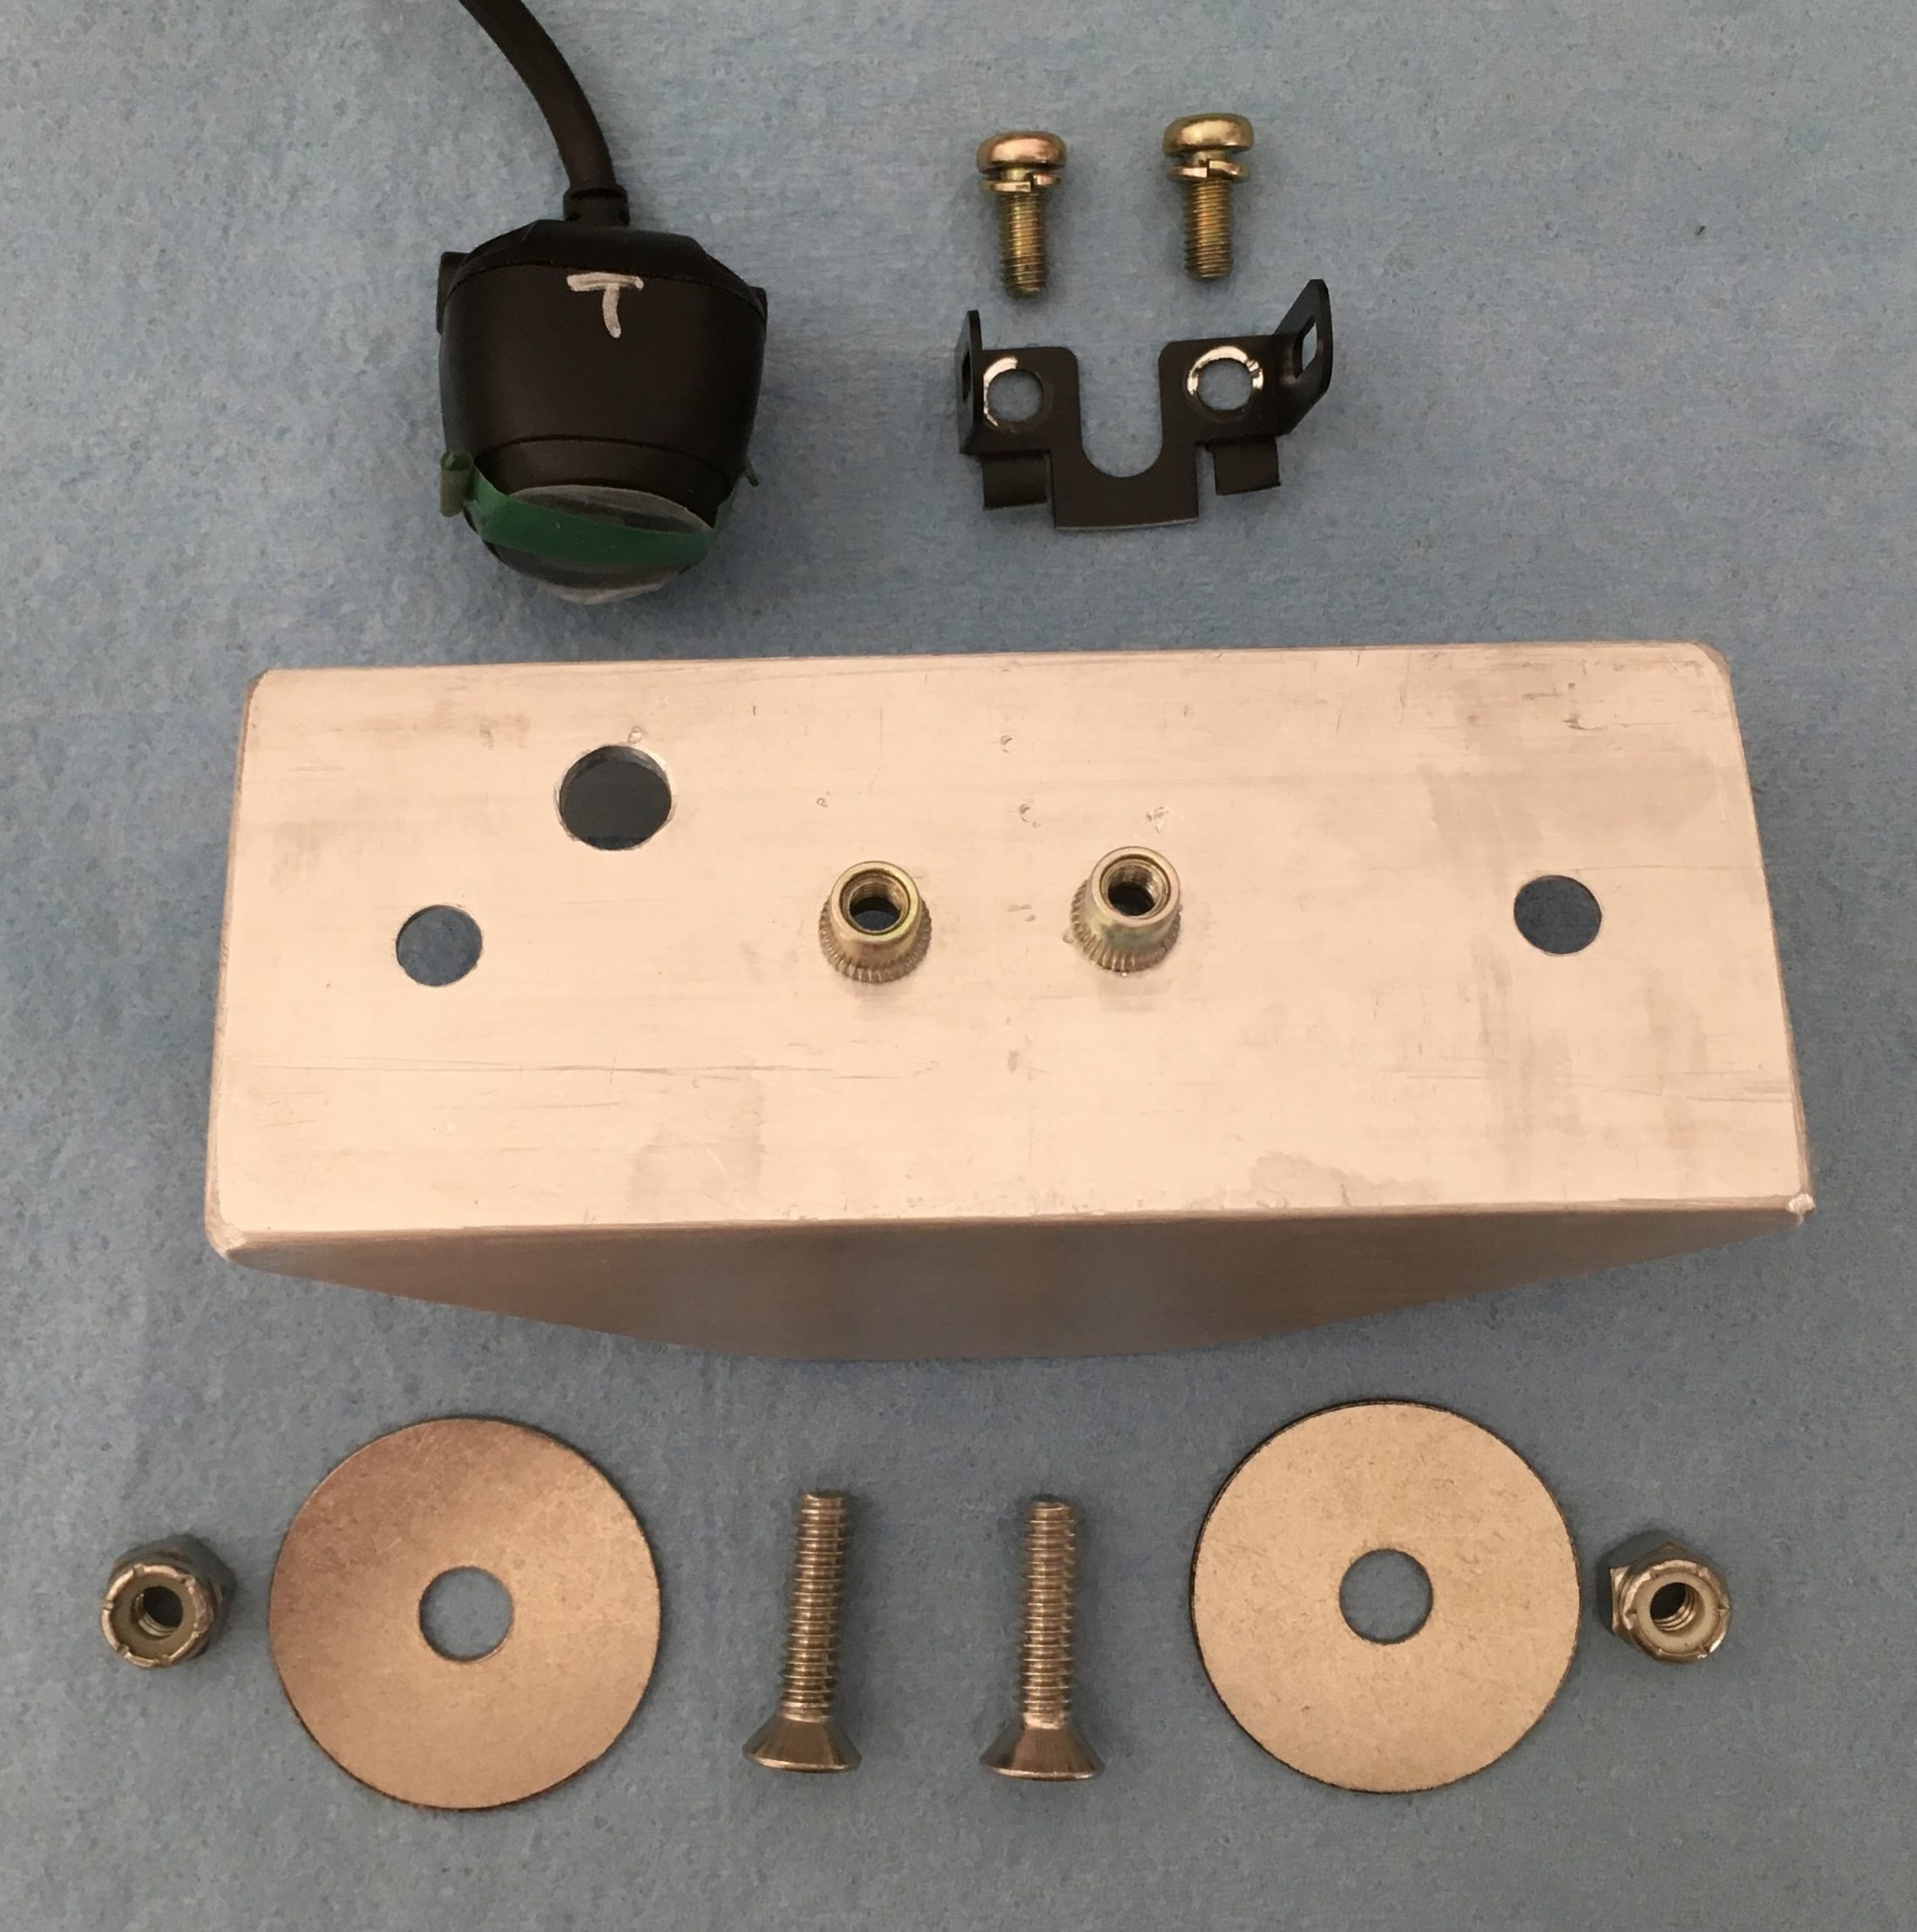
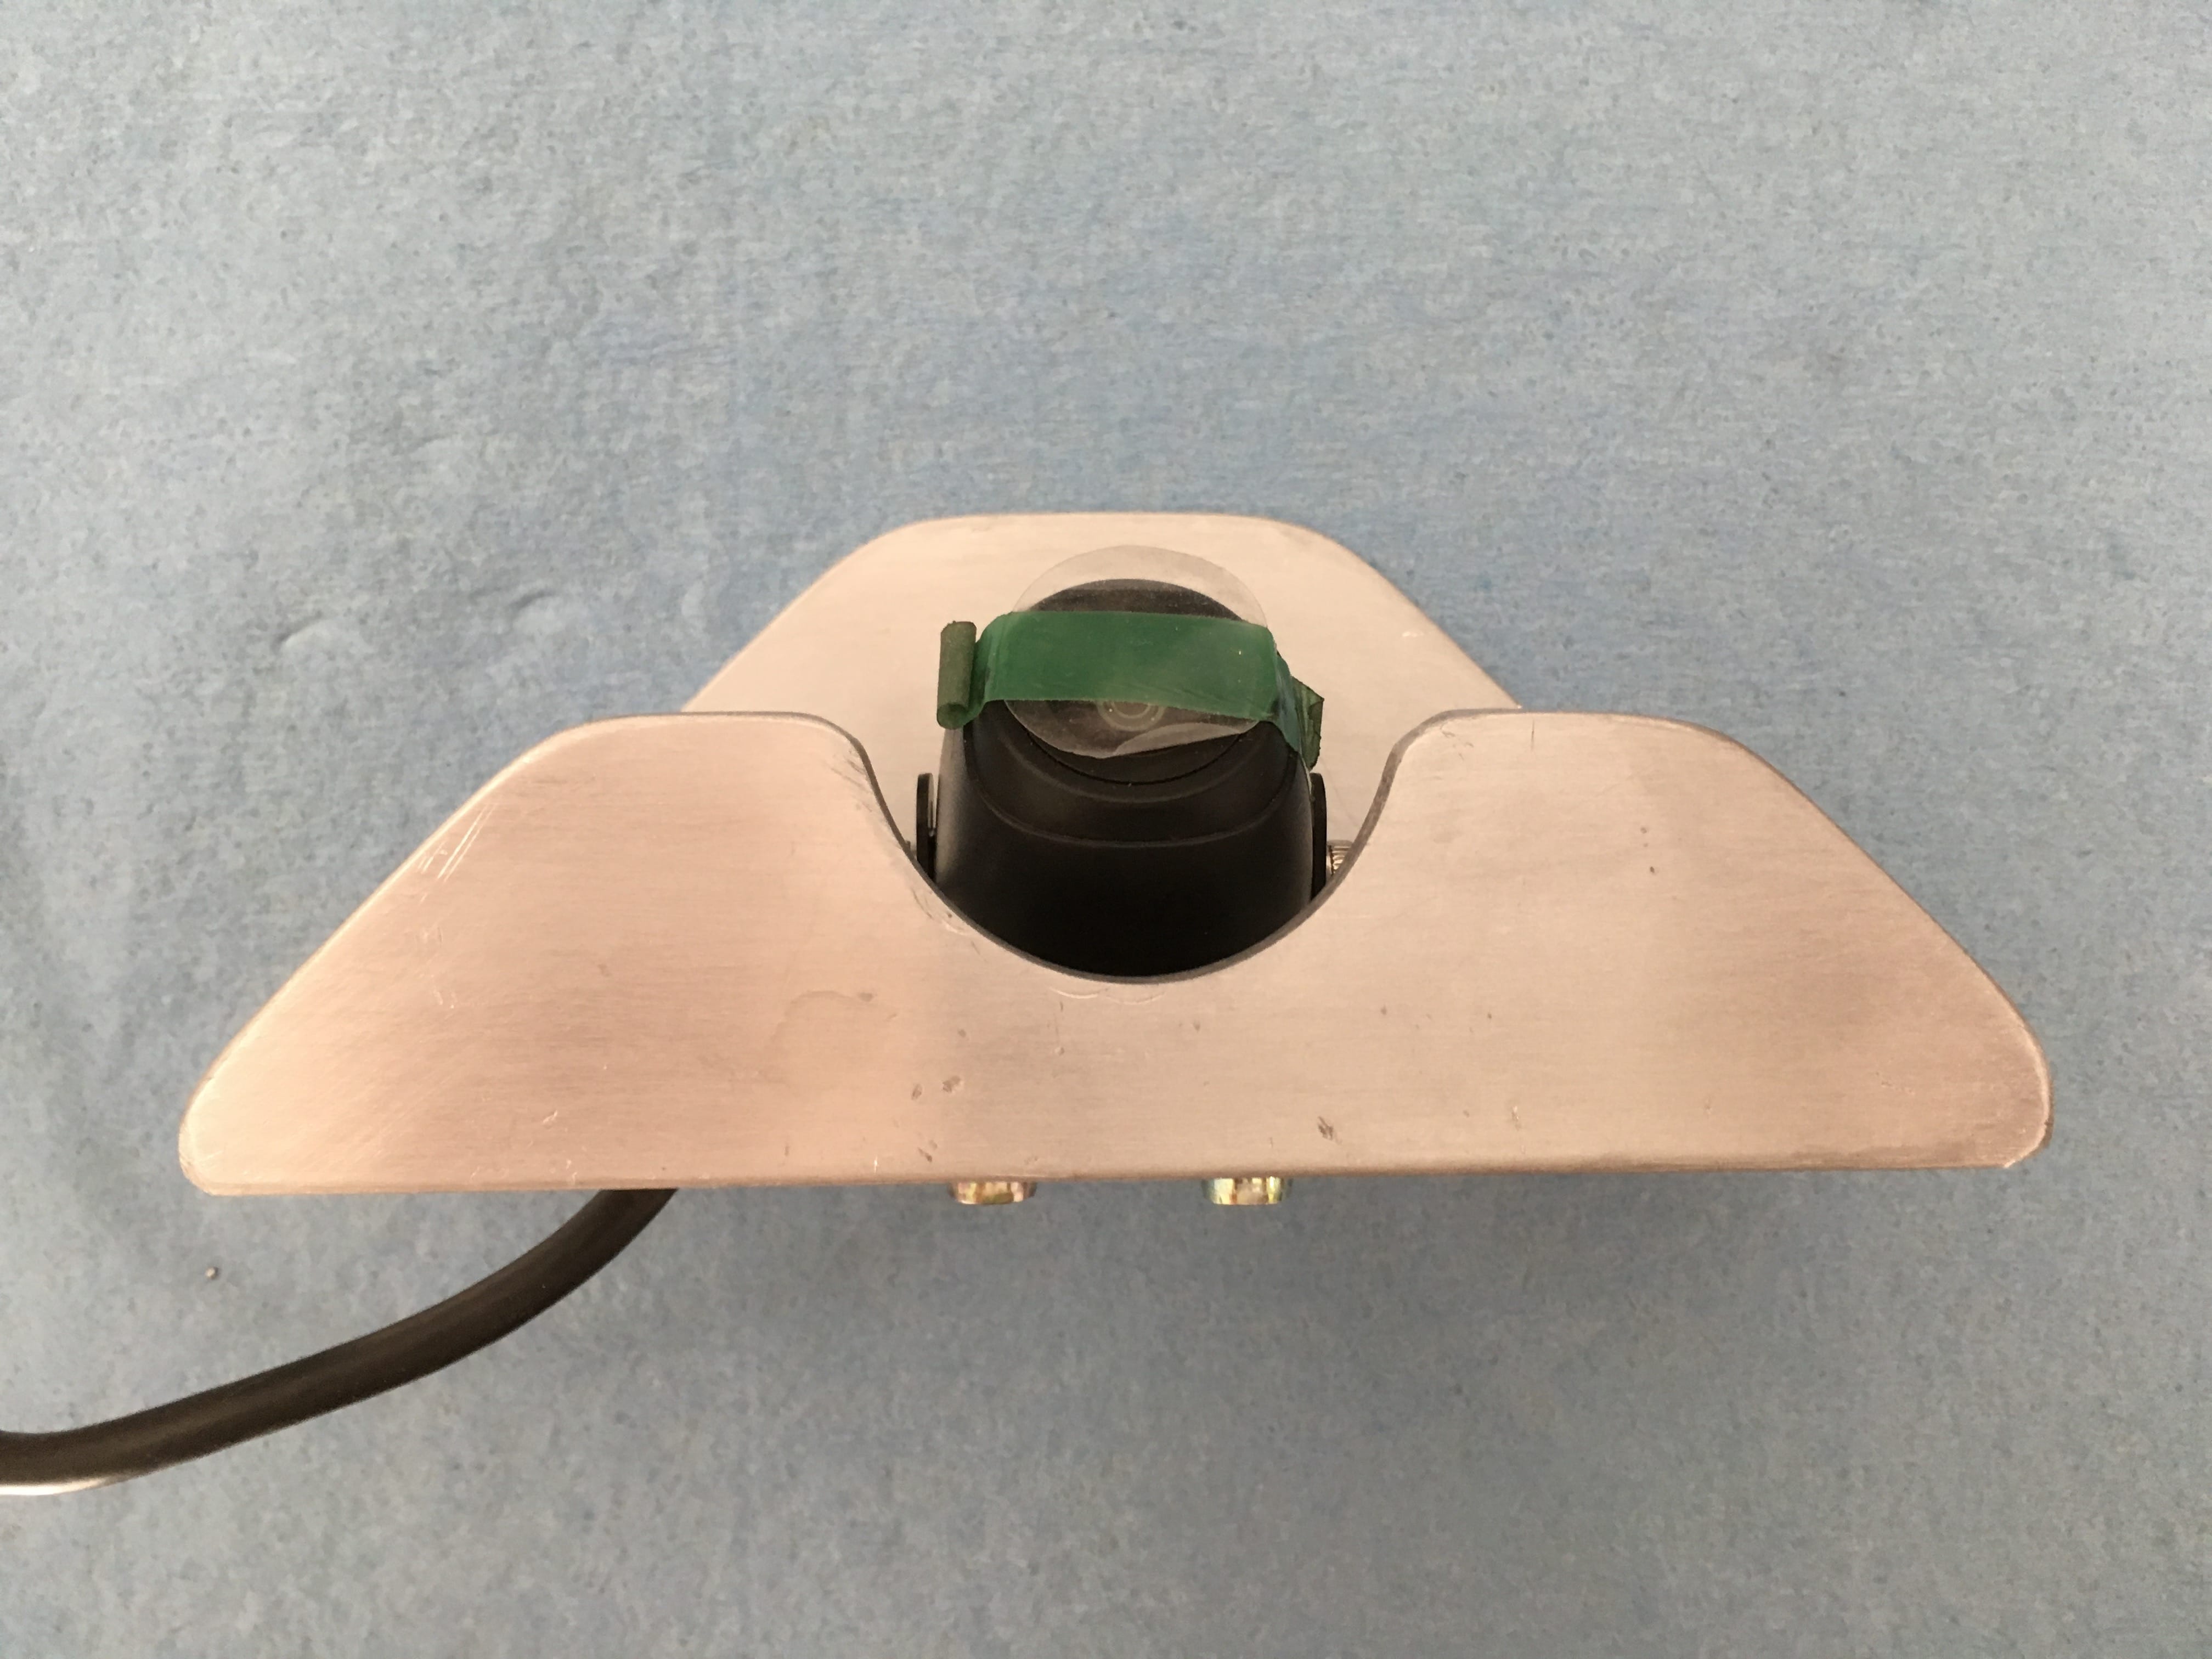
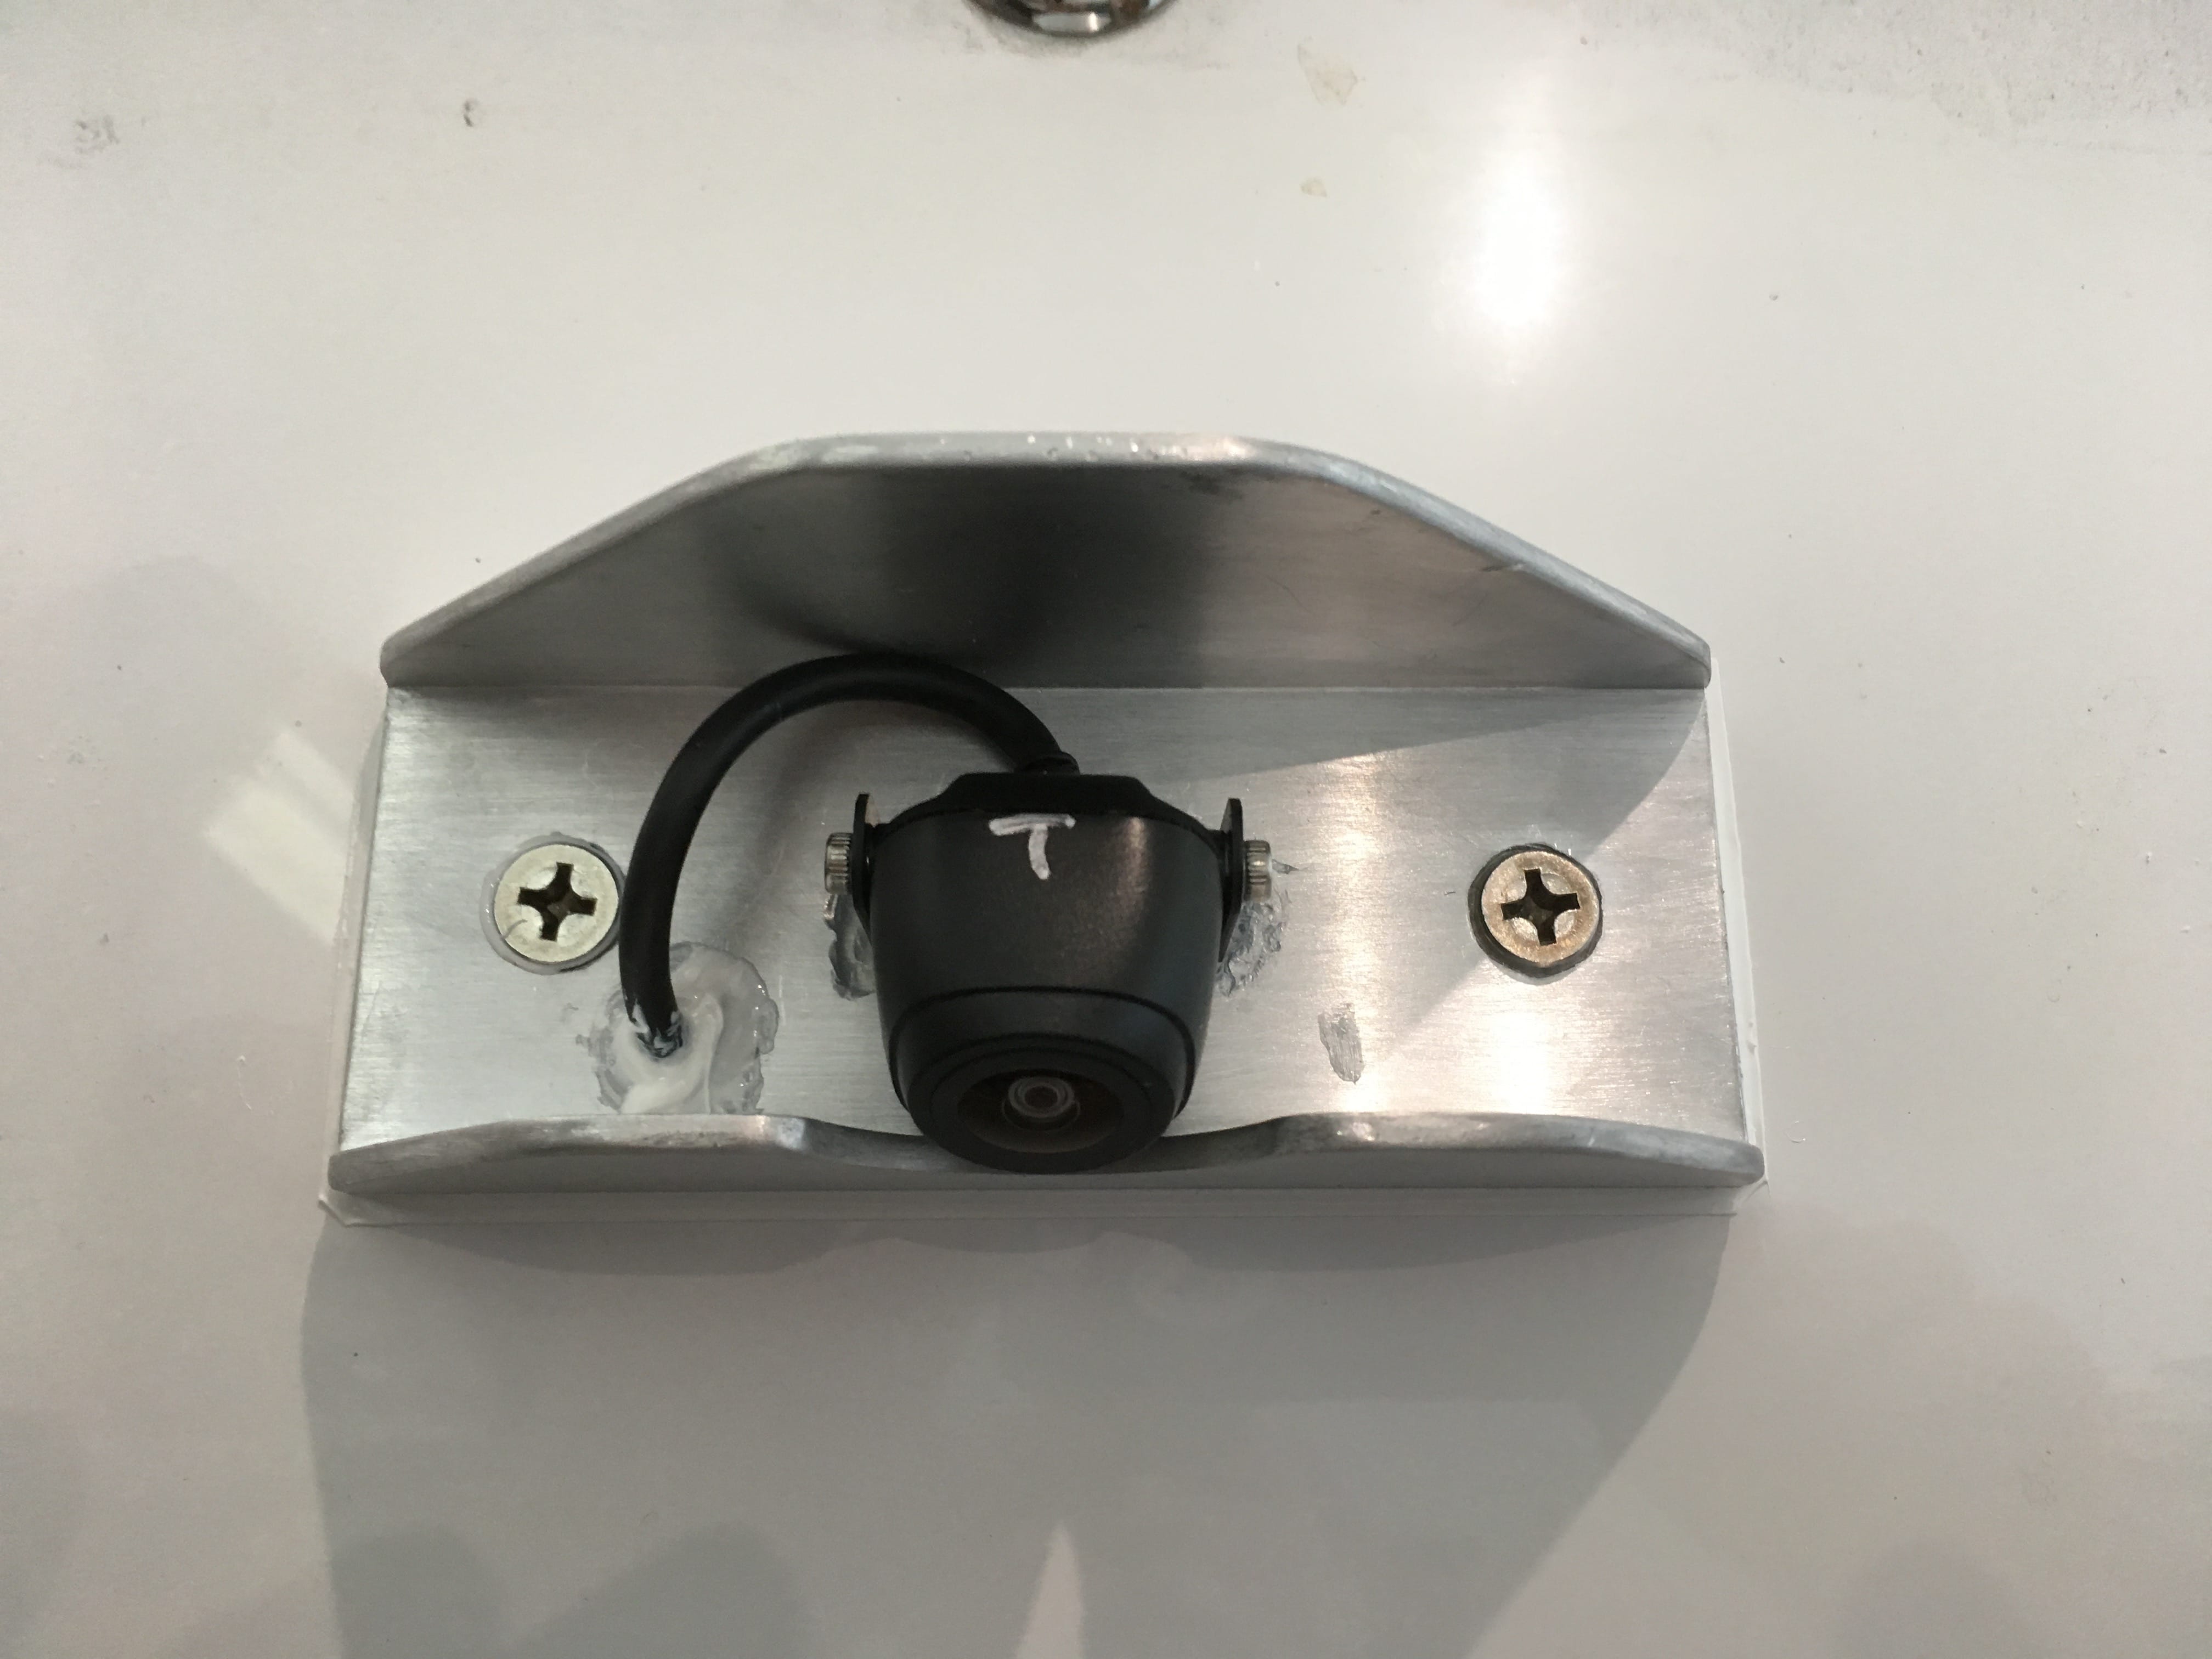
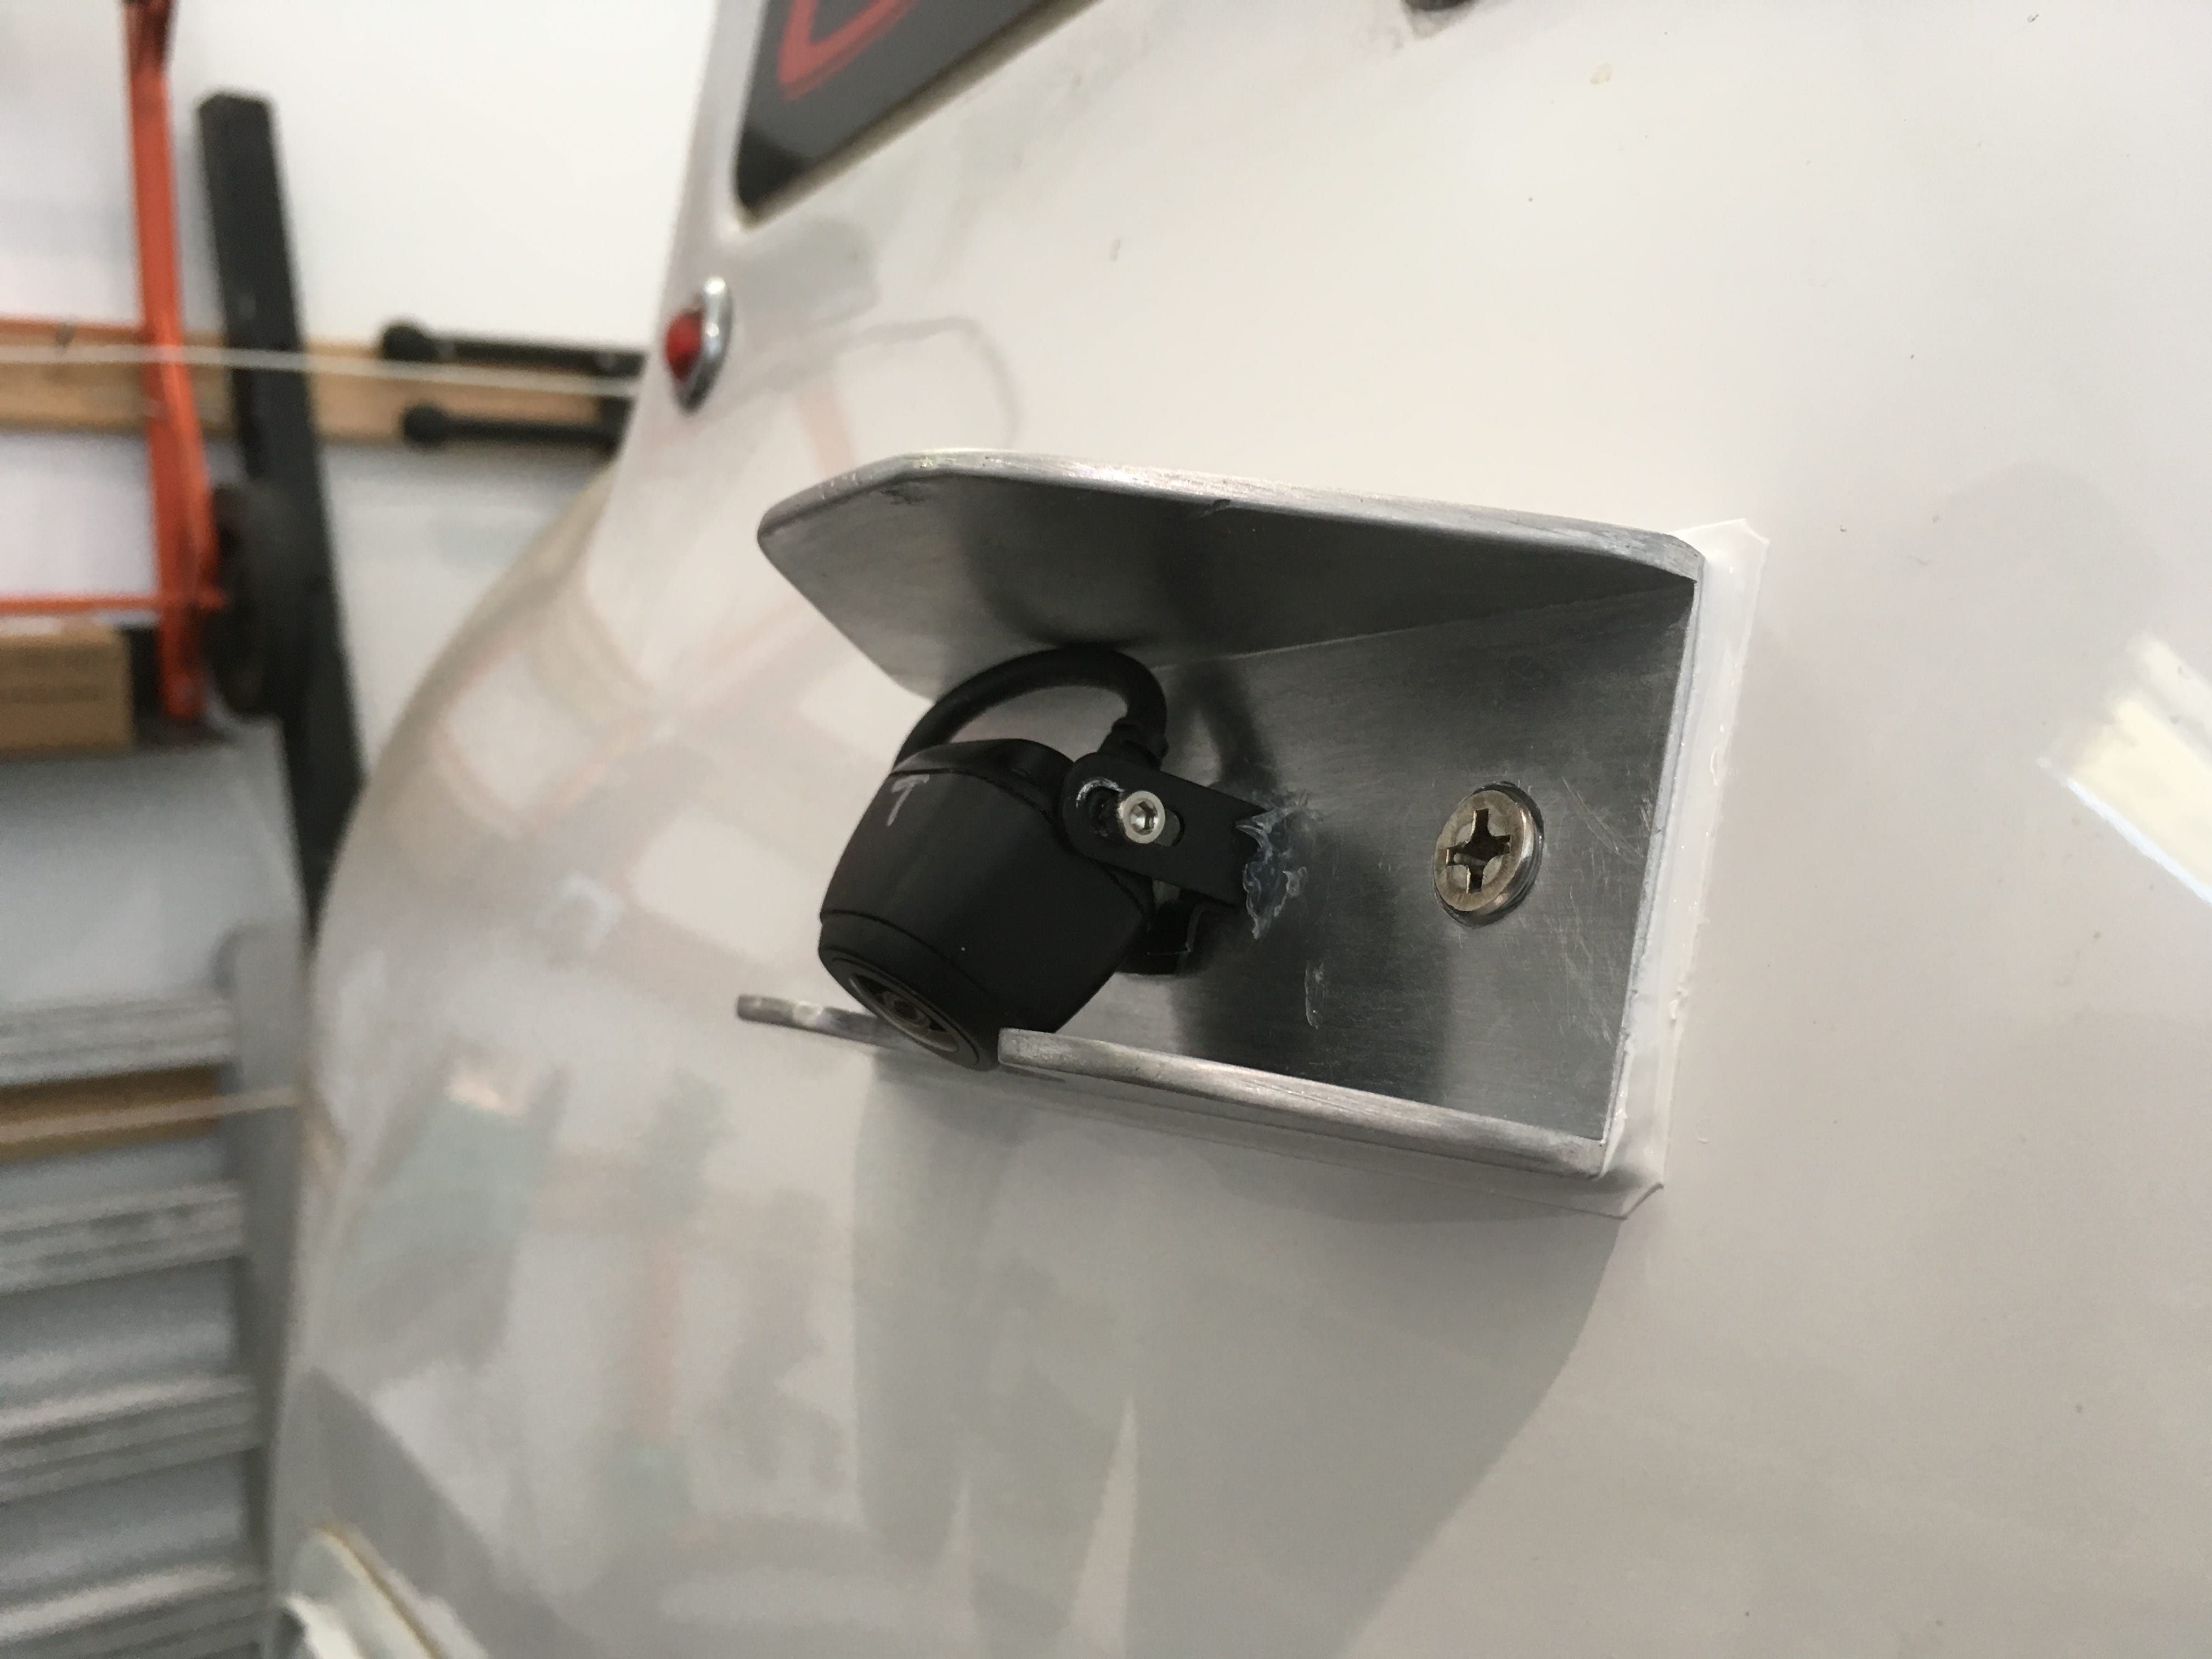
For mounting the transmitter, I was originally going to run dc power and the Garmin antenna coax to the front closet, but in looking at the limited access at the entry door I decided it was going to be too much of a pain, so I settled on the small wiring compartment immediately aft of the head, street side... It has easy access from the 6 inch round port in the head cabinet. Running the coax is easy since there is a continuous wiring "trough" all the way along the left side. The only tricky part is behind the pantry insert. Access to the inside of the rear wall of the hull is easy once you lower the two side panels and pull down the insulation. Revealed to you is more crappy wiring ;( There is 6 inches of free hull area below the LED riding lights and lots of room to maneuver if you stand on a small step stool. I laid everything out carefully using a bubble to align with the trailer cross belt line, and positioned the bracket on a relatively flat part near the bottom of the available space. This will get the camera up high where it can get a good panoramic view and also be up and out of the way. The camera and mount are delicate, but in the mount I fabricated they are well protected from a wayward branch or hail stone. I ordered the 50 extension cable that is optional, since the camera pigtail is only about three feet long. I wish they had shorter ones available. The material is 6064 T6 (tempered aircraft grade) aluminum, from a 2x2x10 inch a scrap I picked up at the local metal supplier for $4. I wanted a full shield on top to divert rain and objects, and also a smaller lip on the bottom to protect the underside. I can easily access the camera and adjustment screws from the sides. I added a crescent cutout so that the camera could point down far enough and still be protected. All work was done with a hacksaw, file and hand drill, with finish work on a bench top belt sander. It's very easy material to work with. The camera and bracket can easily be removed from the mount without disturbing that part, in case the camera fails. I used 5 mm steel threaded nutserts and metric Philips panhead screws to hold the steel bracket on, after trimming the bracket ears that are intended to clip over a license plate. I used clear RTV sealant on the bracket and screws for easy removal. Since the nutserts flare out behind the aluminum plate, I had to drill larger holes in the fiberglass for clearance. I masked around the area, and with the help of my daughter inside the trailer, I mounted the assembly onto the hull with a thick bed of 3M 4200 adhesive sealant. A word of warning: 4200 is great stuff, but expensive and once opened, you have to use the tube within 24 hours or it will harden in the tube . It always pays to read the instructions: I was going to use isopropyl alcohol to prep the parts, but it specifically says that alcohol will prevent the 4200 from curing! I used MEK, as advised... http://3mmarine.com/3mtm-marine-adhesive-sealant-fast-cure-4200fc-white-3-oz-tube-05260.html More to come, I haven't finished the wiring, and am waiting on a switch panel from Jason. I'll post pics of the inside work and transmitter. John Davies Spokane WA
 1 point


-
Recent Achievements
-


")
