Leaderboard


Popular Content
Showing content with the highest reputation on 12/04/2020 in all areas
-
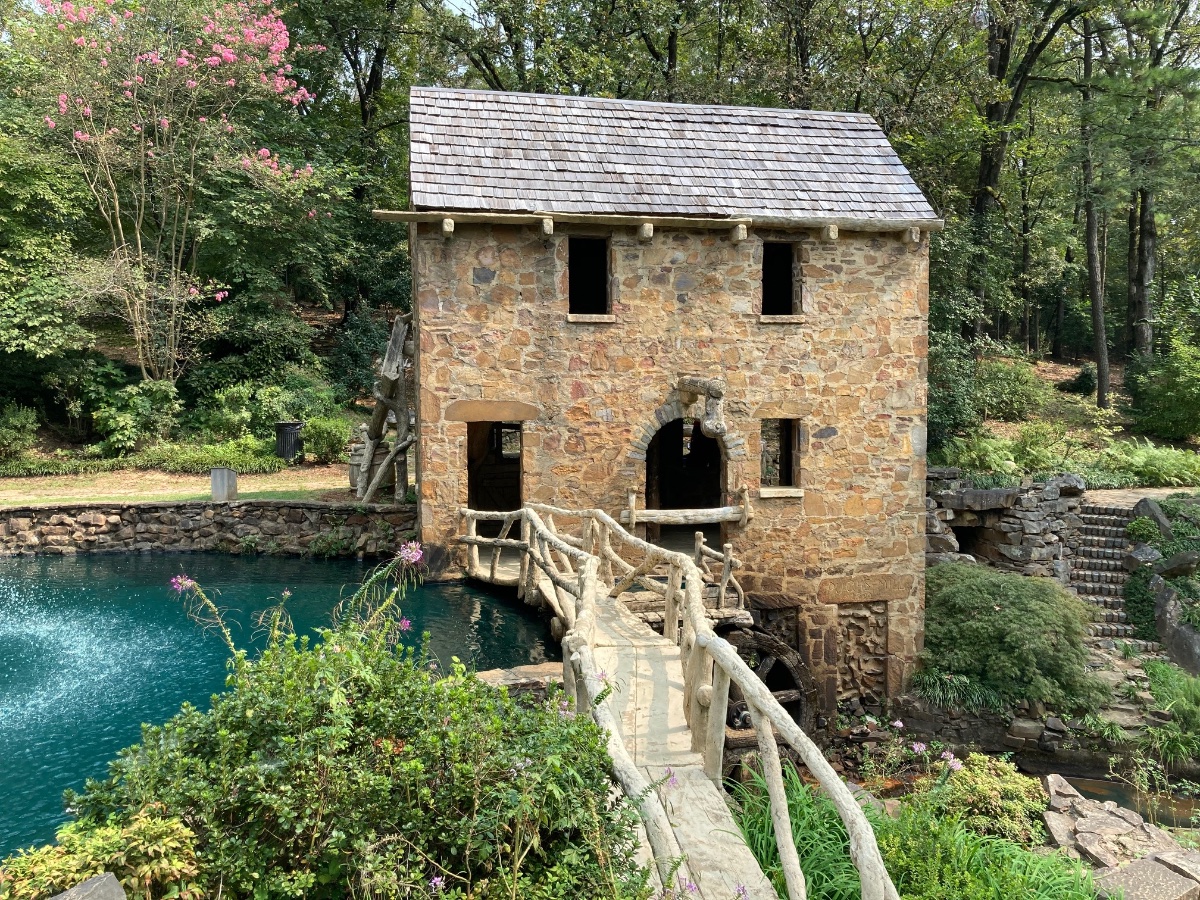
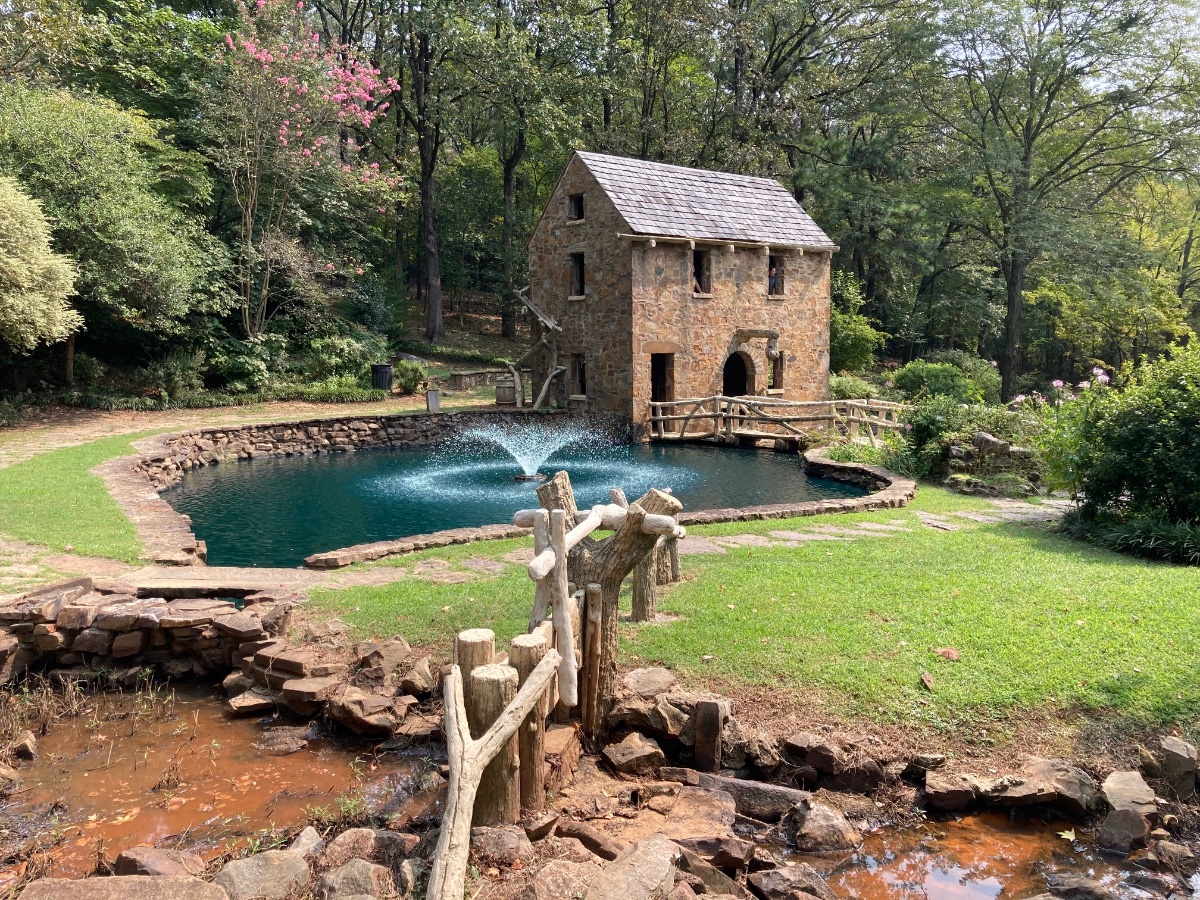
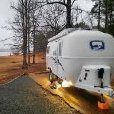
On our drive back home to SE Texas after picking up our Ollie, we stayed at the COE Maumelle Park (Highly recommend). After unhooking the trailer, we made a short drive of about 10 min. to the TR Pugh Memorial Park located within Little Rock. I thought I would share the photos as it was a wonderful place to see and highly recommend you visit if you find yourself in the Little Rock Area.
 7 points
 -
We joined the forum about 3.5 months ago but have never introduced ourselves. We are Charlie & Cindy from the DFW area of Texas. We took a trip to Hohenwald in August after our 17 day trip to Europe for our 40th anniversary was canceled due to COVID. We are not new to camping. We have had two travel trailers in the past. A 24’ starter trailer for a couple of years and then we upsized to a 42’ fifth wheel which we had planned to retire in and travel the country. We had it 5 years and decided it was way too big to drag across the country. Charlie retired a few months ago but I have about 5 more years to work and then we’ll be doing some long distance trips. In the meantime there will be lots of local camping on weekends and a few occasional 1-2 week trips where we’ll do some boondocking out west. We had just put our 5th wheel up for sale before our trip to the factory. The weekend after we returned home it sold for full asking price so we placed our order for a May 2021 delivery. Not too long afterwards we got a call that someone cancelled and we were offered a February 2021 pick up date so we jumped on it. Our final selections were made just before Thanksgiving and we forked over half the balance. We’ve enjoyed reading and learning about the Ollie differences and been buying a few things for the trailer along the way. The majority of the camping stuff we already have. This past weekend we camped old school with our son’s family who tent camp. We used our new truck topper to sleep and had a great time. Can’t wait to take delivery of our Oliver Legacy II in just 2.5 months so we won’t have to rough it in the future. We are still working on a name for our trailer and what graphic we want for the front end. We are also anxiously waiting to find out our hull number when it goes in to production on 12.22.2020. We look forward to meeting other Oliver owners out on the road and hope to see you at the non-rally Rally in 2021. Cindy & Charlie3 points
-
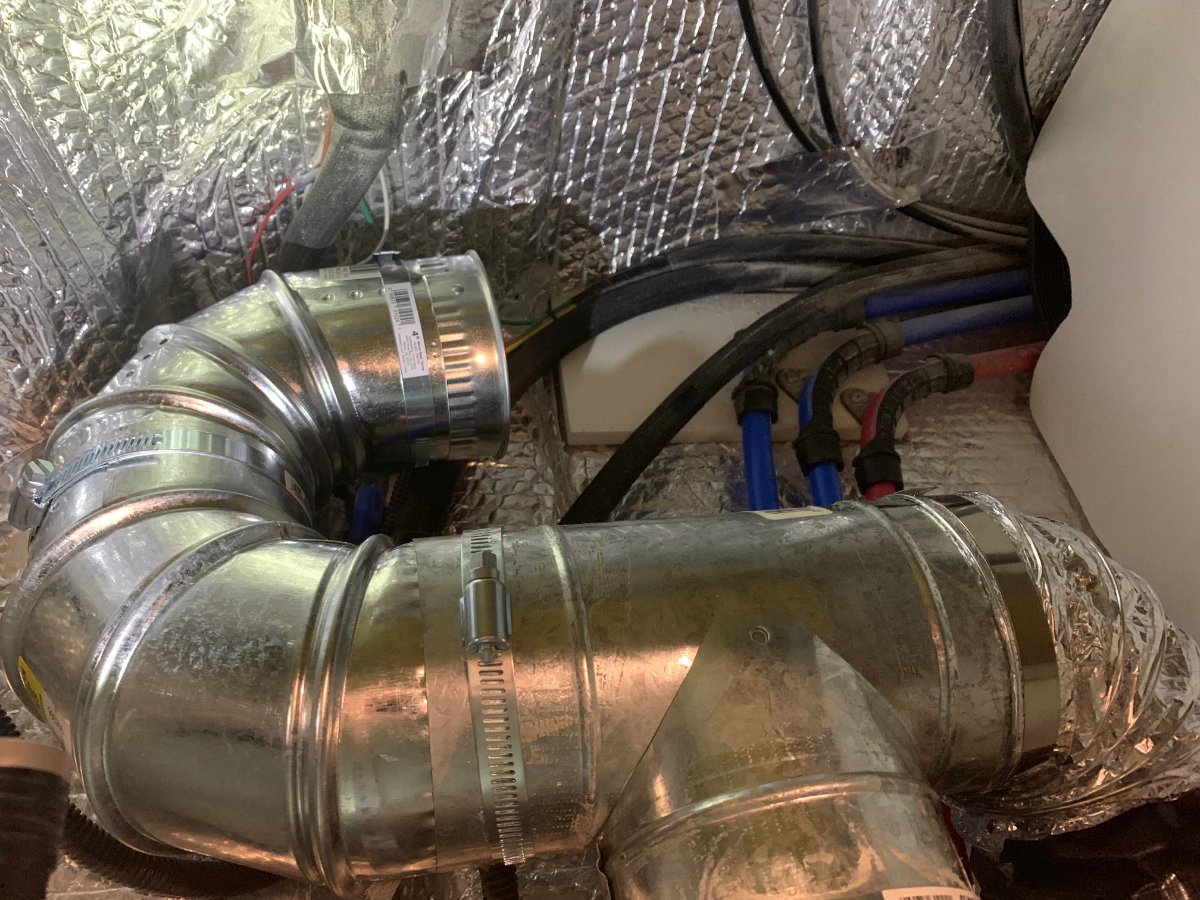
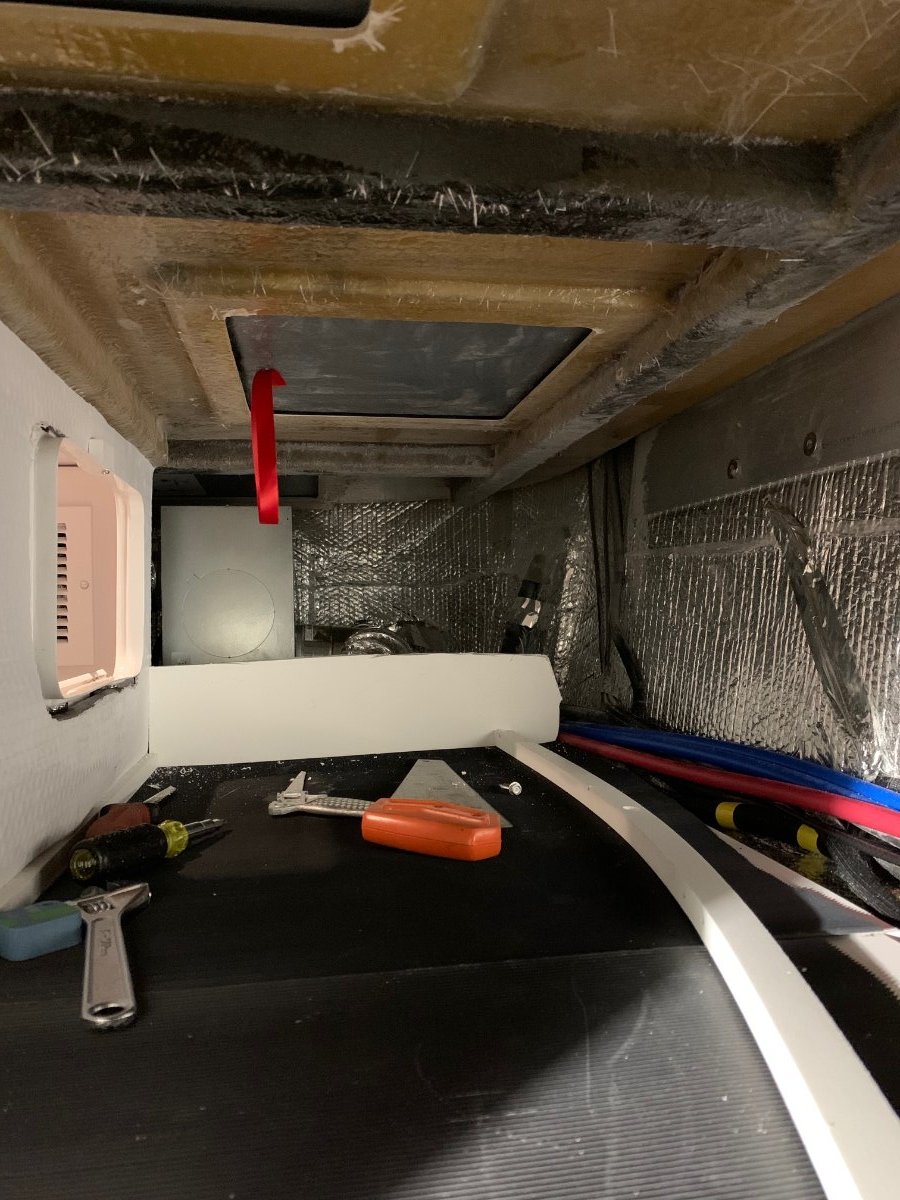
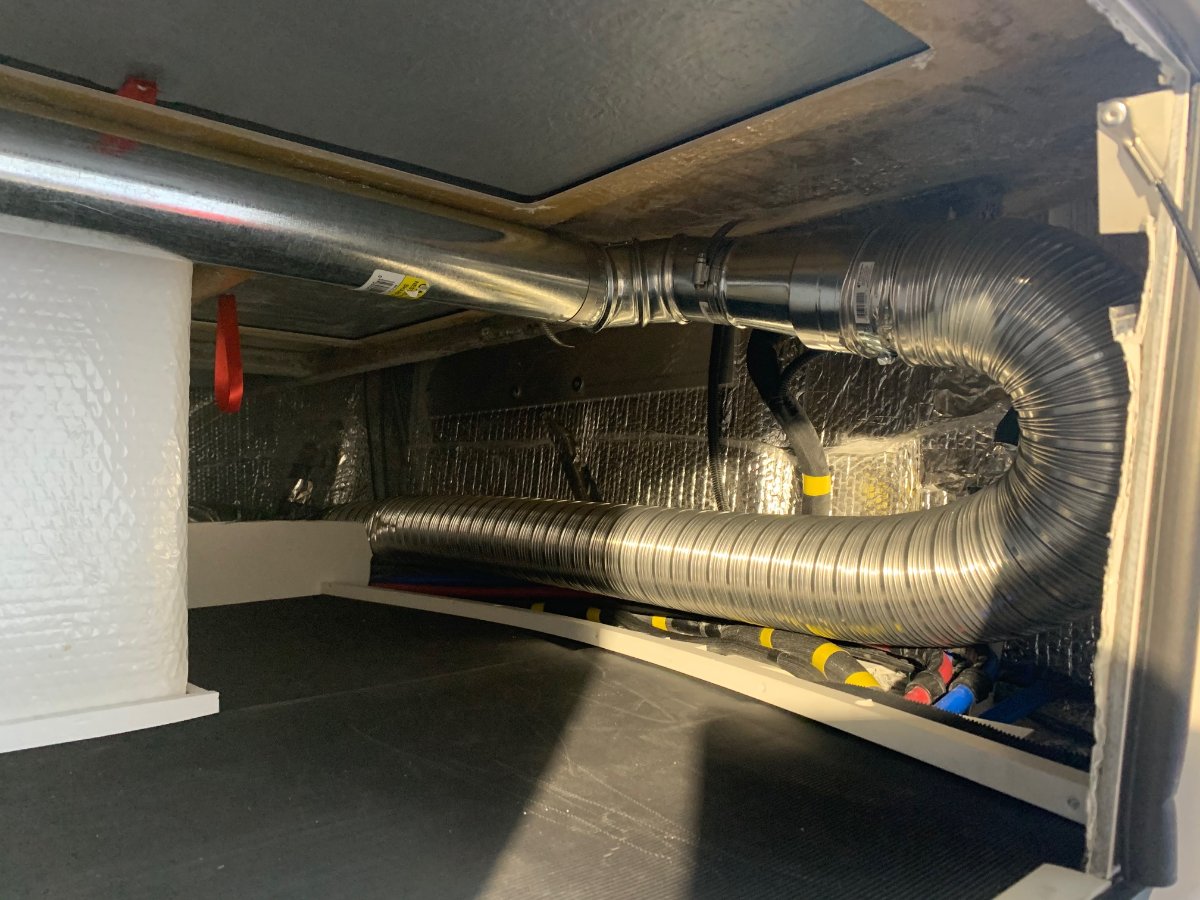
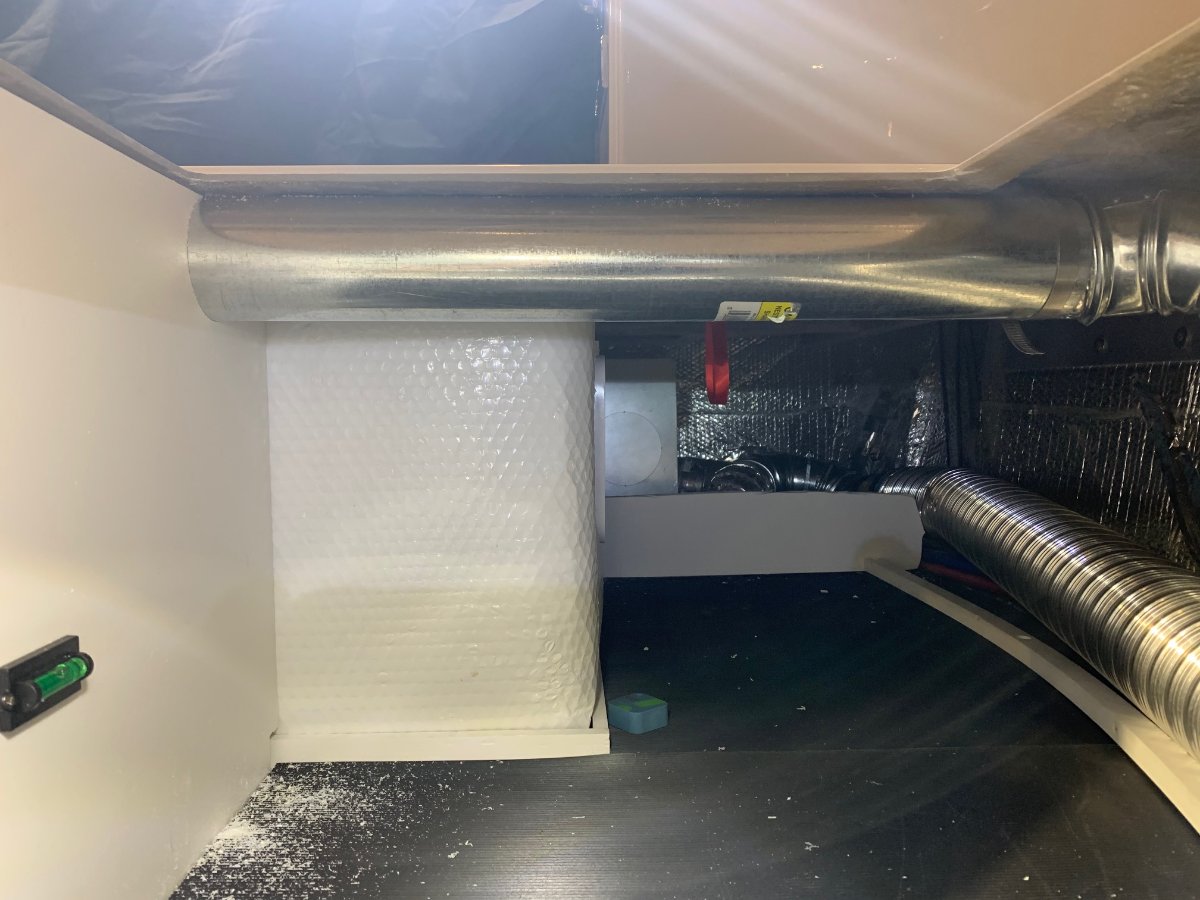
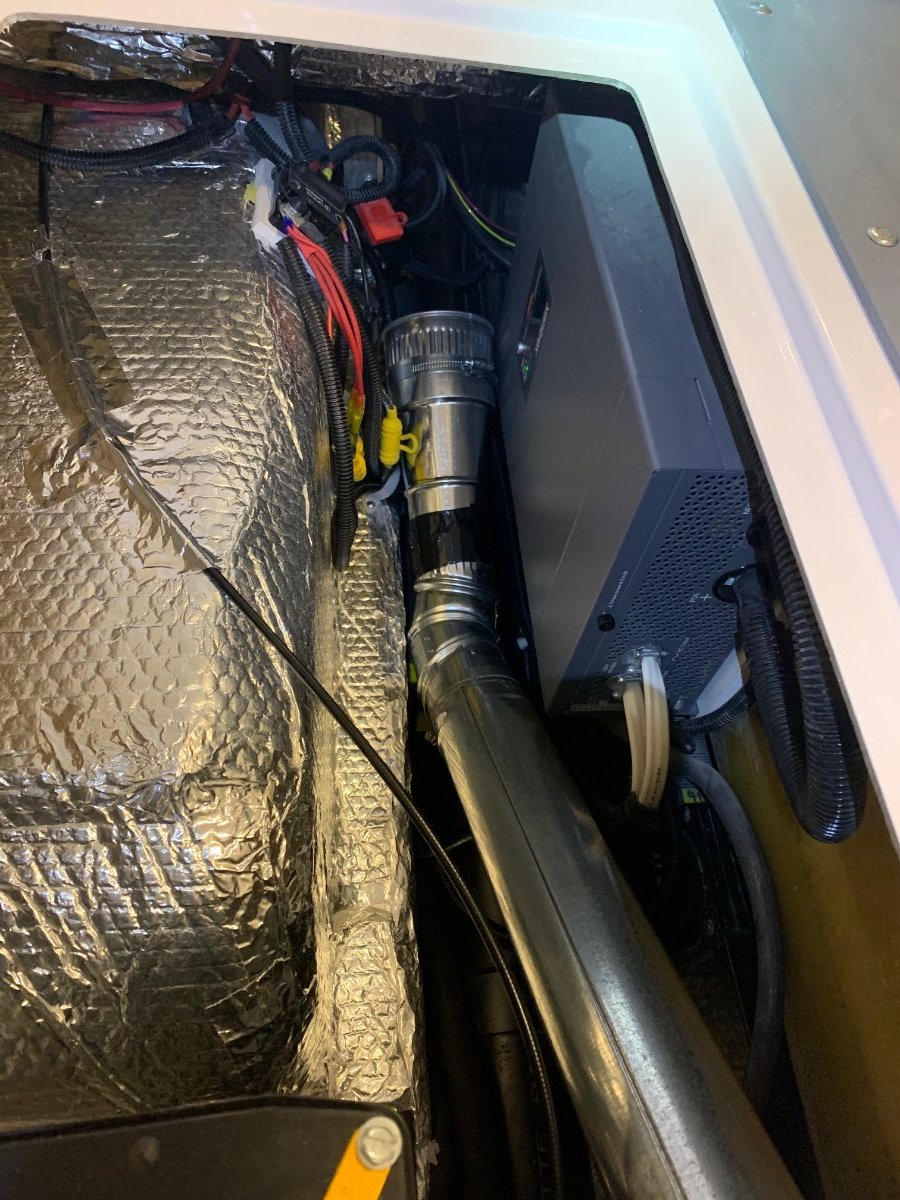
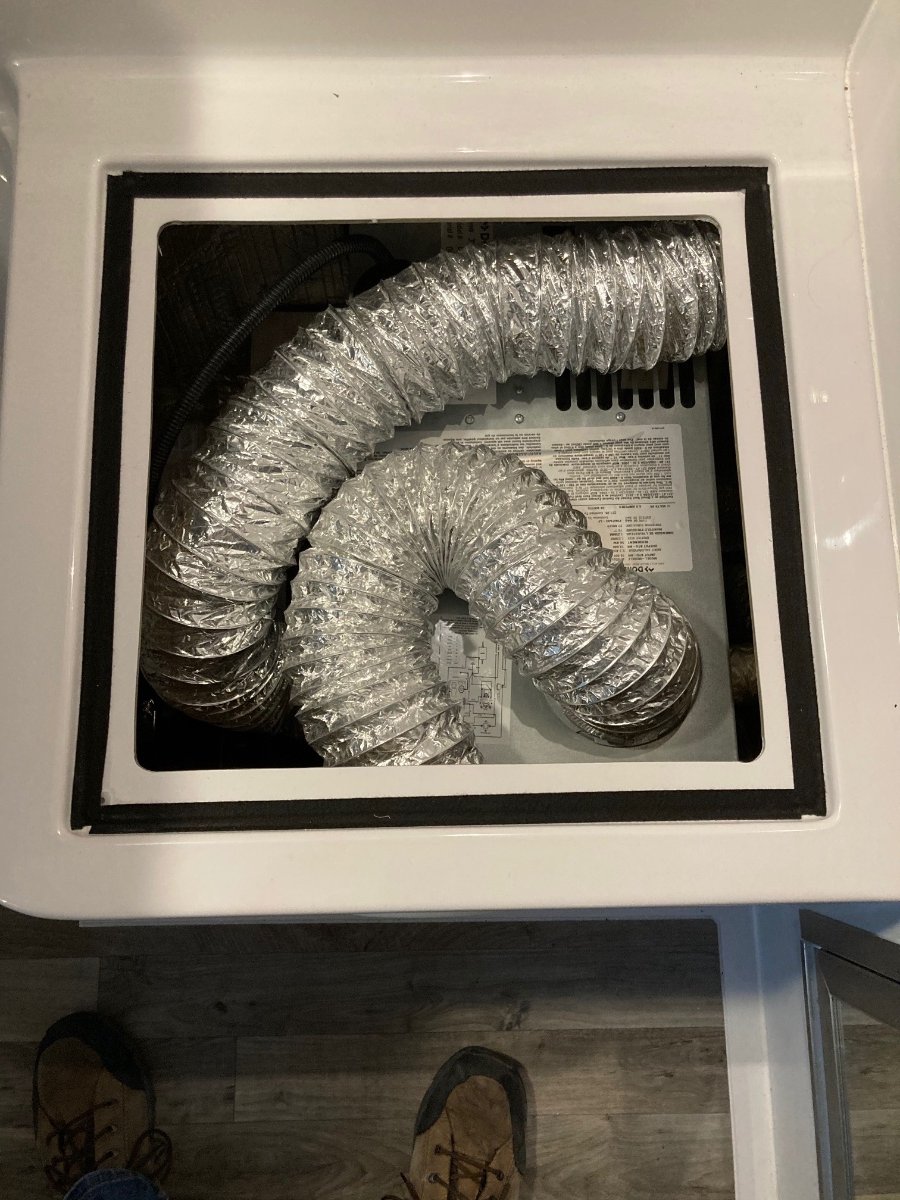
Here's a propane-dependent solution I'm implementing to warm problem areas along the curb-side basement. I have found that by default, the street side basement runs about 10 degrees cooler than the curb-side basement when the furnace is on. The difference increases as the outside temp decreases. My simple goal is to balance the basements in order to protect the street-side plumbing. It's not particularly difficult to run another HVAC line down the curb-side and it takes advantage of the existing furnace. First, I just used a T connector on the back side of the furnace and tied into the line that goes up to the curb-side all the way to the bathroom. Here's a picture. I'm going to install a manual damper inline so I can restrict flow as needed. I then removed the flimsy plastic walls on the side and rear of the basement to make room. Here's the view looking into the basement from outside after removal: You can see the plumbing running along the back bumper area. This area runs a few degrees cooler than the street-side basement, so it's important to get some heat here as well to prevent freezing. I used 4" dryer duct to run along the back bumper plumbing. Then it's reduces down to a 3" solid duct that runs along the basement roof out of the way. Here goes the 3" duct through the basement wall (pvc board) into the street-side basement: Here's the final picture for now, looking from the back of the trailer towards the front (you can see the inverter on the right). I ran out of time yesterday so I just terminated the connection inside the street-side basement. It's super easy to finish running the 3" duct the rest of the way up the black tank drain pipe to where the footwell for the dinette is. I'm going to put some strategically placed holes along the duct now in order to balance out the temps on both sides at something reasonable. Still need an all-electric backup, but I feel like this is a good start. Easy, quick and takes advantage of the existing components.
3 points
-
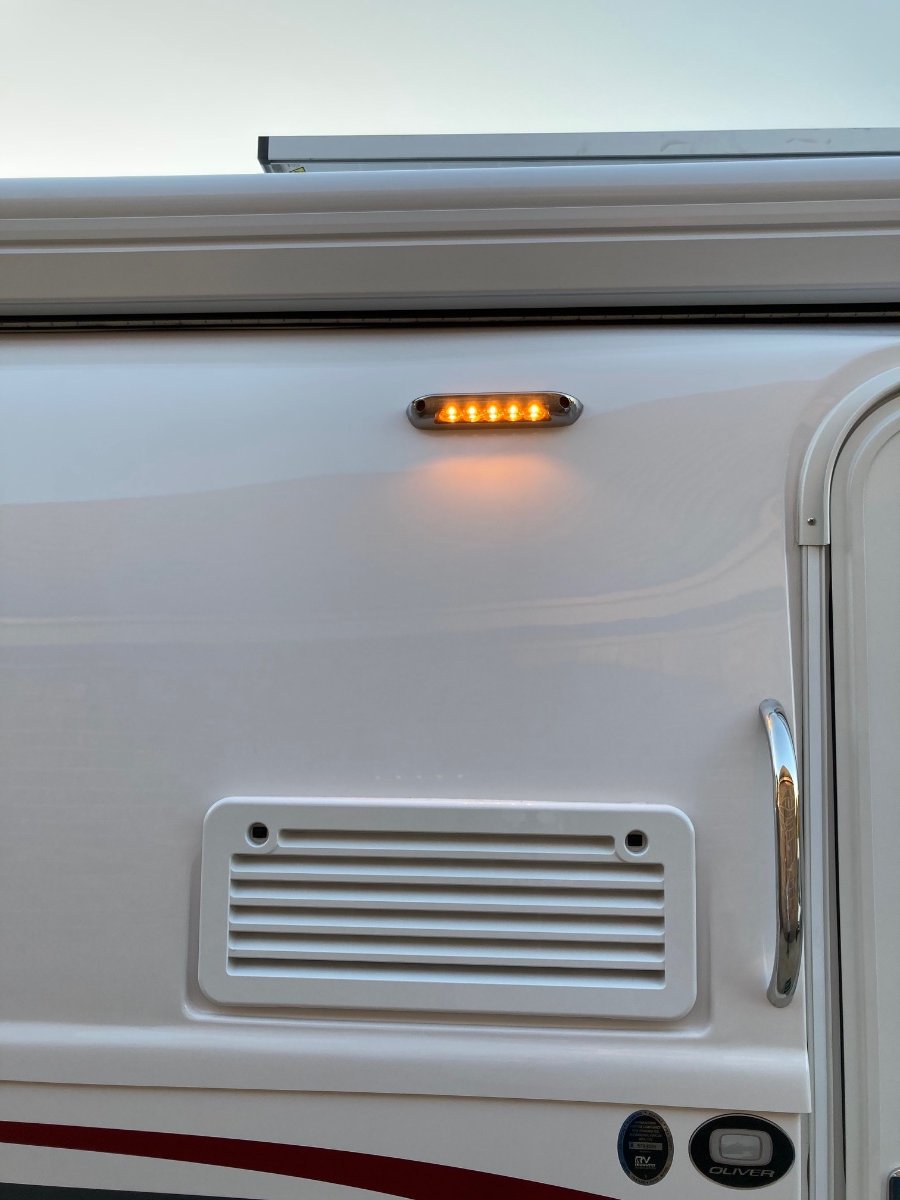
Not sure if everyone else in the country experiences this but, here in South East Texas our Bright White Porch Light attracts every flying creature known to man. After doing some research, it appears yellow light is less attractive to flying insects. We recently purchased some yellow film to place over the porch light and have found it to help out considerably. Of course, we are not in the middle of summer now so only time will tell next spring if the theory holds true. Below is the link to the film I purchased and applied to the lens portion of the light along with a couple of photos of how it looks. I now have enough film to redo the lens another 100+ times if needed in the future as it is easy to pull off. Time needed to place the film over the lens and cut to fit was around 5 min. https://www.amazon.com/dp/B01N4PDXBD/ref=twister_B01N7TJDQG
2 points
-
So, back to sealant testing. I found a few articles on various forums, and more importantly, testing by Practical Sailor, on a (relatively) inexpensive adhesive sealant, Loctite pl Marine fast cure. We had to order it, from our local Lowe's. Not on the shelf. It has a 12 month shelf life from date of manufacture, unopened, so important to read the date code. Opened, a few months, maybe, if sealed and refrigerated. I'll let you know. It's double sealed, in the workshop fridge, now. Like 3m 4000 uv , it's polyether, not silicone. Cleanup is alcohol, uncured, or mechanical, cured. We'll see how it works out. It's supposed to be non yellowing, and we used it next to butyl with a bead around the new maxxair bath vent, among other places. If it does yellow, we should see it earlier, on the roof, is my guess. I think it's a good place for a test, as appearances aren't much of a concern. Workability was ok, according to Paul. No worse than 3m 4000 uv. https://www.practical-sailor.com/boat-maintenance/mildew-resistant-caulks-for-boats https://www.practical-sailor.com/boat-maintenance/marine-sealant-adhesion-tests I can't recommend at this point, but we'll see what it looks like in a year or two2 points
-
ICE vehicle - Internal Combustion Engine vehicle2 points
-
 We elected not to utilize the screws provide to secure the panels down as we wanted to ensure easy access for any maintenance needed. Therefore, we noticed the rubbing between the panel and the body of the trailer made a little noise. An easy fix was to apply this felt tape to the body of the trailer where the panel makes contact. I must say it worked great and still allows you to screw the panels down if you desire. For ~$15 we would highly recommend if you find yourself wanting make the seats a little quieter. I will try to go out and get some pictures this weekend to share on this post. Another positive is you can remove at anytime without much effort, if so desired. JVCC FELT-06 Polyester Felt Tape, 1mm Thick, 75' Length x 3/4" Width, Black https://www.amazon.com/gp/product/B000QDRRNE/ref=ppx_yo_dt_b_asin_title_o09_s00?ie=UTF8&psc=1 Happy Traveling, Mark
2 points
We elected not to utilize the screws provide to secure the panels down as we wanted to ensure easy access for any maintenance needed. Therefore, we noticed the rubbing between the panel and the body of the trailer made a little noise. An easy fix was to apply this felt tape to the body of the trailer where the panel makes contact. I must say it worked great and still allows you to screw the panels down if you desire. For ~$15 we would highly recommend if you find yourself wanting make the seats a little quieter. I will try to go out and get some pictures this weekend to share on this post. Another positive is you can remove at anytime without much effort, if so desired. JVCC FELT-06 Polyester Felt Tape, 1mm Thick, 75' Length x 3/4" Width, Black https://www.amazon.com/gp/product/B000QDRRNE/ref=ppx_yo_dt_b_asin_title_o09_s00?ie=UTF8&psc=1 Happy Traveling, Mark
2 points -
This is quite cool (warm actually😬) but I have comments. Do you have concerns about crushing the overhead duct in the rear storage area? Up high is good, but I push 12” high milk crates loaded with hard items in and out of that spot. Could you use a different shaped duct that was more rectangular in cross section? Ideally Oliver would have a molded in place fiberglass warm air passage there in the roof of the compartment or along the water lines! It actually would not be too hard to manufacture a ‘glass duct that could be bonded to the ceiling there.... but that might overheat the mattress and its occupant. Could you make a big hole at the rear wall and run the air duct underneath the floor itself? I have never looked under that floor. Exposed steel in an electrical compartment probably violates RVIA codes, plus it is not good practice. Consider wrapping it in some non-conducting material in that location, maybe a layer of thin neoprene with self adhesive backing. You need to make sure the duct can easily be removed for wiring access there. You really do not want a sharp edge of steel to cut a wire! I personally would never do it your way. If you have the good toilet (AKA Natures Head) you could use the unused 3” black drain pipe as an air duct and eliminate the fragile steel one on that side of the trailer. And you could use the black tank as an air plenum to heat the bathroom floor and under the vanity (using the existing 1.5” tank vent). This also violates codes but at least it is in a non-conducting way. Thanks for your comments, I have been pondering a similar mod. My main hangup has been getting the warm air across the back of the trailer.... John Davies Spokane WA2 points
-
Zero emission vehicle. Yeah, right.2 points
-
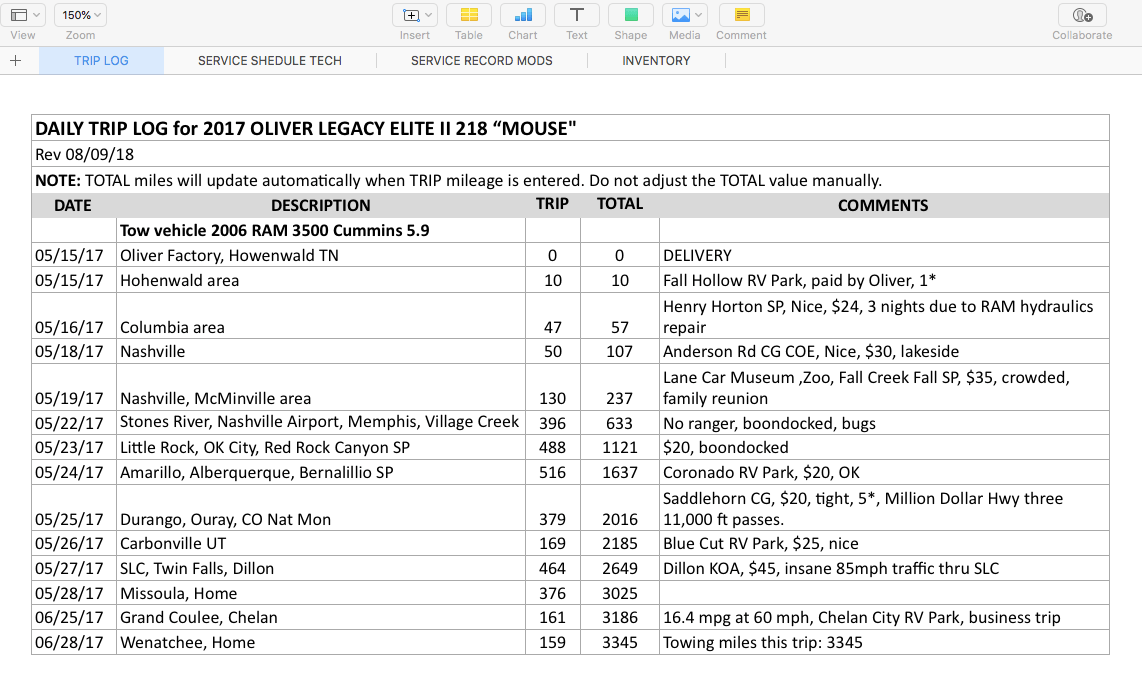
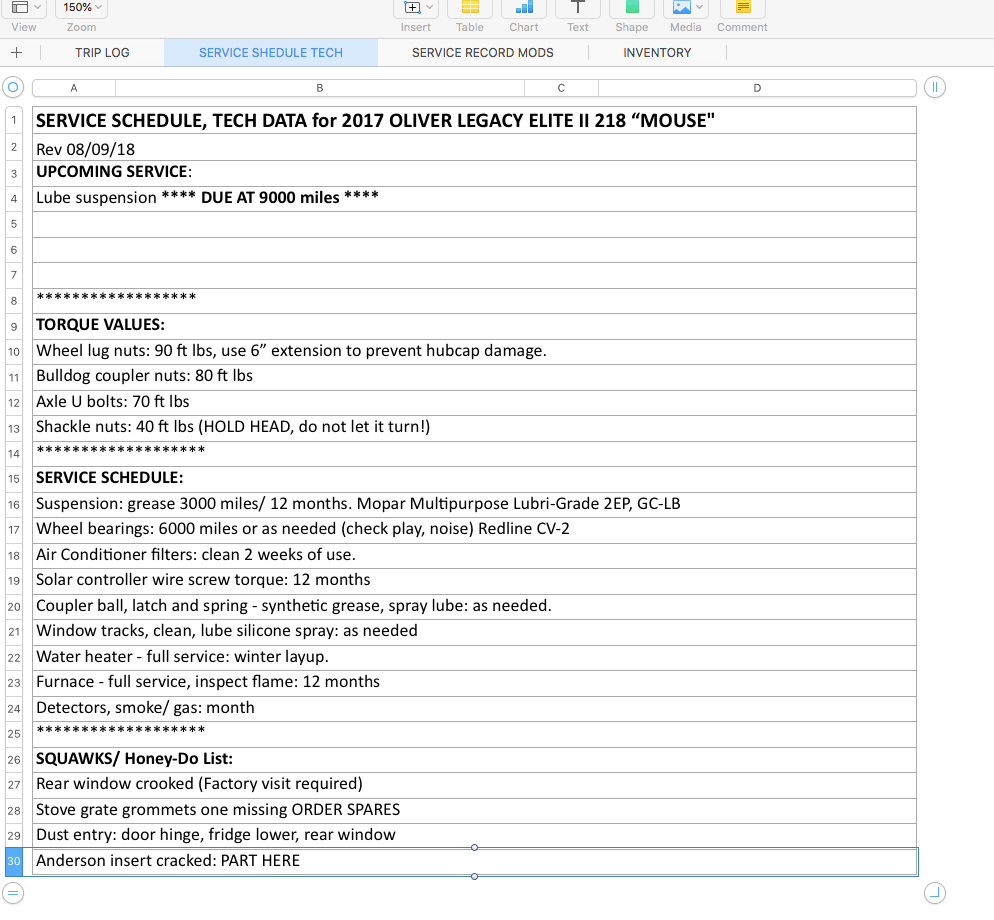
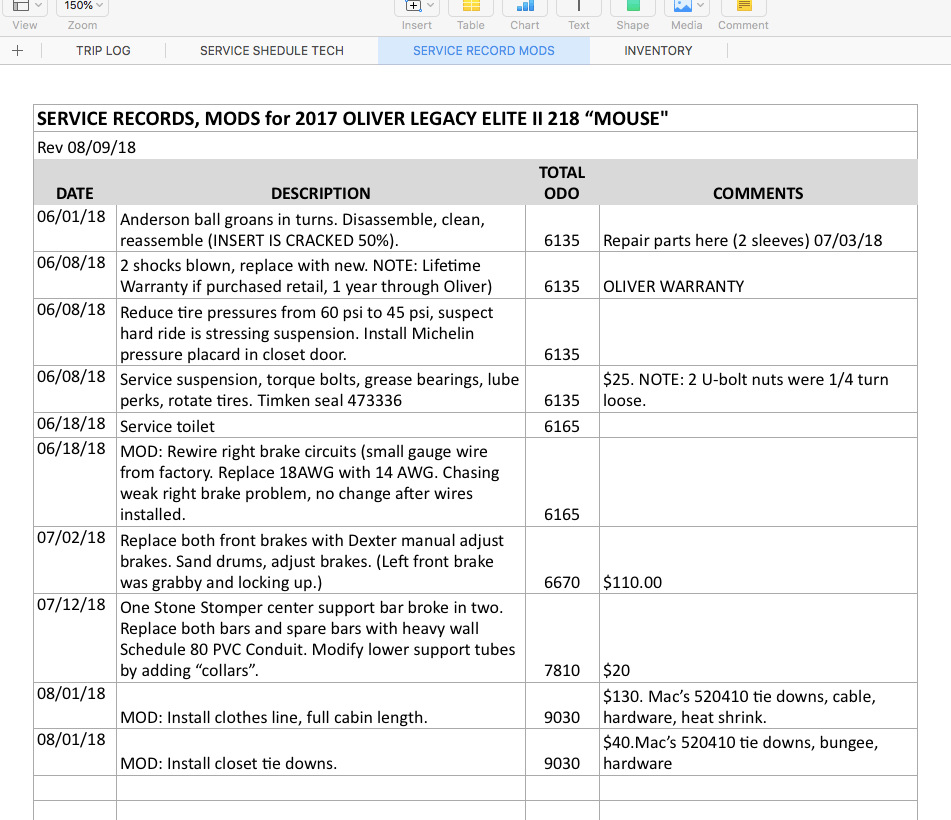
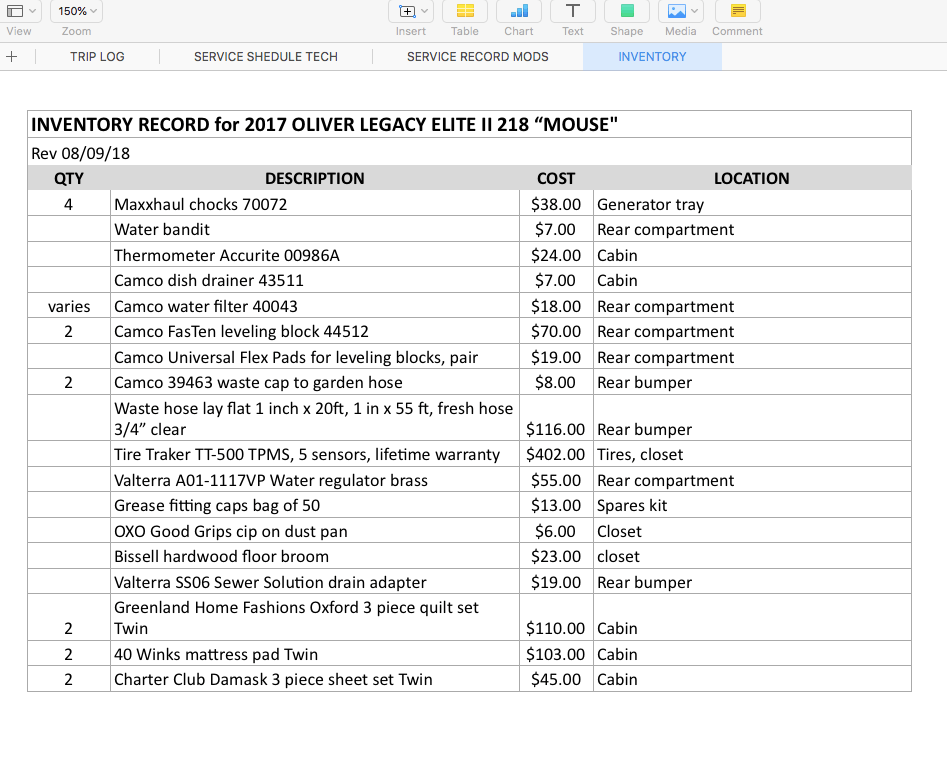
EDIT 08/11/18 Uploaded a (corrected) Numbers Revision 01 file and a (new) Excel Revision 01 file. Note: I will keep any future major updates or important comments in this first post. I do not want for them get lost in subsequent replies. If you are at all familiar with Excel or Numbers, this may be helpful. I was keeping my records in a variety of forms, and the data was getting increasingly messy and hard to interpret, so with the help of my wife I now have an all-in-one spreadsheet that I can update on-the-fly, as long as I have an internet connection. I back it up in the Cloud, so I can do data entry from my iPad at a campsite as easily as I can from my iMac at home. It has four tabs or sections. The first is the Trip log. The Date column "self-formats" so all the dates look alike. The Total column automatically updates when you enter the Trip (daily) number of miles. Don't mess with the figures in the TOTAL column. [attachment file=Trip log capture.png] The second tab is the Service Schedule/ Tech page. I have service reminders (stuff I need to do soon), torque values, service info and my Squawk List (aka the "Honey-Do List") - stuff I either want to or need to address, eventually. [attachment file=Service Tech Capture.png] The third tab is the actual Service Record, which includes all routine work, repairs, and mods. I did not include extra columns for cost and detailed lists - I summarized since a future owner would only need that rough data. The paper records are there if I need to get down to small part costs. [attachment file=Service Record capture.png] The last tab is an Inventory section, for me to keep track of loose stuff that is carried in the trailer, in case of loss. [attachment file=Inventory Capture.png] The sample file, which includes the data shown in the screen captures above, but not all my history, can be found at my Dropbox page. Follow this link for the NUMBERS file: https://www.dropbox.com/s/u4fmo7ko7oxde6y/DAVIES%20SAMPLE%20RV%20LOG%20Serv%20Rec%20Inv%20REV01%20%20NUMBERS.numbers?dl=0 Follow this link for the EXCEL file: https://www.dropbox.com/s/07kvpx7u1d9l7bc/DAVIES%20SAMPLE%20RV%20LOG%20Serv%20Rec%20Inv%20REV01%20%20EXCEL.xlsx?dl=0 I strongly suggest that you save your file as a Master, duplicate it and work with the copy in case you mess up some how. Change all the entries and headers as you see fit. I hope it is useful to some of you. The first and third tabs print very nicely in Landscape, the other two work in Portrait. Use the "Fit to Page" option, print one tab at a time, and they will all stay on one printed page, so they are easy to read. Please let me know if there are any problems downloading or opening the file. I know very little about spreadsheets, but way more than I used to ;) John Davies Spokane WA
1 point
-
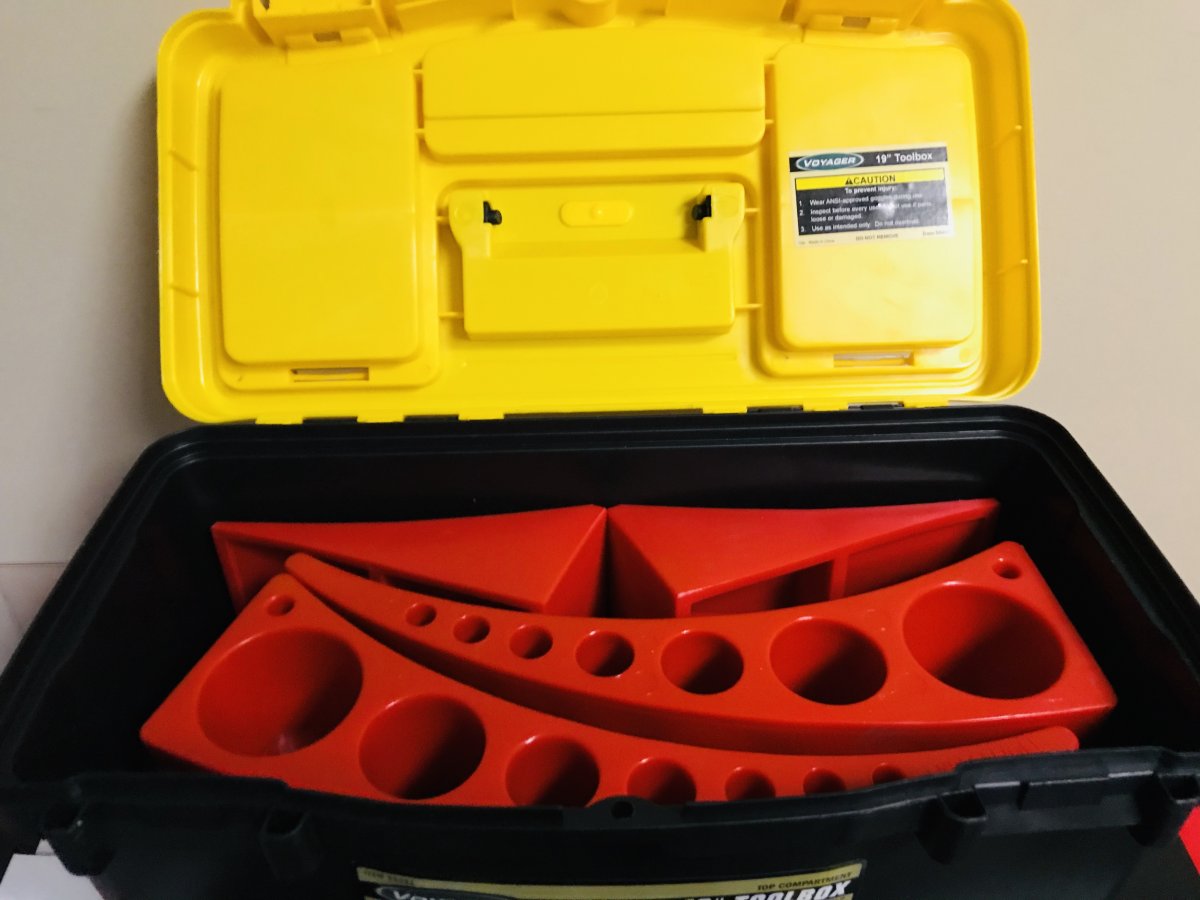
In making good use of our time between now and the time we take delivery of our Ollie in May, I have been ordering a few items that I know we will need and use. Our Andersen levelers arrived today and I spent a whopping $7.68 with a 20% coupon on a plastic tool box from Harbor Freight. I like to keeping all our camp gear organized and so here are a few pics of the tool box. Nothing fancy, but I think it will get the job done. Hope this might help anyone thinking about storing their levelers. Just passing forward an idea. 👍🏻 Happy Camping!
1 point
-
You can do that - that's how the house battery in my truck is wired - but I wouldn't depend on it unless you've verified that your alternator will produce a continuous charge. Mine doesn't - after a few minutes recharging the start battery, the voltage drops. We had a discussion on here a few months back with the LifeBlue owner about it - short version is that he and I disagree. That may be changing with hybrid trucks, since the hybrid battery bank is constantly being charged and discharged. That's why I'm really interested in details about the Ram e-torque, and of course the new F150 as well.1 point
-
Not added. Good try though. 😛1 point
-
As follow up on this, I reweighed at a CAT scale during our camp trip earlier this week. With a full fresh water tank, the tongue weight was 498 so much less than the 640 that I earlier estimated and thanks to those who pointed out that possibility. The truck with trailer attached weighed in at 6,960 - a good 90 pounds under GVWR. And I still have yet to trade out that heavy rubber bed mat so I'm in pretty good shape weight-wise. By the way, I recommend Calhoun Falls State Park (SC). Level RV sites with large, level living area pads, good spacing between sites and right on Lake Russell. - Brian1 point
-
The Tesla receiver is a wonder, like the rest of the car. It is plug and play into the frame, so you can just store it away when not in use. I never knew that. Do they rattle? https://www.teslarati.com/how-to-install-tesla-model-x-hitch/ However I am 99.5% ignorant about these cars, so this is no real surprise. I would not want to smash it hard onto a concrete driveway apron, but OTH the rear overhang is so short that may not be a problem, unlike, for example, a Ford Flex. John Davies Spokane WA
1 point
-
Since we're talking about this, I think after experimenting with the ducts, my 'ideal' setup (excluding the bath) would be one vent at the rear under the nightstand, blowing forward, and another at the side of the fridge, facing the closet. IMO, that would heat the cabin the most evenly and efficiently. Of course, I don't think that a vent at the front like that is possible with the standard fridge, and the rear vent would be in the basement. But, if you start at that point and then work back to something practical, I don't think that I'd have settled on the vent arrangement that Oliver uses. I think the kitchen vent would be as far forward as possible, and the rear vent probably going where the return air is located. I'd put the return air vent on the frontmost dinette seat to maximize airflow through the hull space.1 point
-
I think at that space you only have two or two and a half inches. It's just a bit more than the width of the plumbing plus insulation. I mean, you could squeeze down a flexible duct to go through there, I suppose. I think if it were me, I'd use a piece of semi-rigid duct to make the bend around the back of the valve, and then switch back to rigid, if that's what you're doing. What would be awesome is if that valve had been placed just a few inches out, and facing up.1 point
-
Wow! Your "easy" is several orders of magnitude beyond mine. What a great job!1 point
-
SeaDawg, Your approach is another great solution to the noisy seat opportunity. I used the 3/4" felt tape on mine but it might have been a little easier for me to use the 1" as there was ample surface area to attach it to and it is only a couple of bucks more. The 75' of tape was plenty and I now have a lot left over for replacement at a later date, if needed.1 point
-
 Nice idea. I installed shower antislip strips when our trailer was new (13 years ago.) Our panels don't have screws to secure them. The antislip keeps them in place, and it's very thin.
1 point
Nice idea. I installed shower antislip strips when our trailer was new (13 years ago.) Our panels don't have screws to secure them. The antislip keeps them in place, and it's very thin.
1 point -
Not for the back. I cut holes in the bottom of the kitchen and fridge cabinets and one in the front corner of the closet to get the bath lines run. I completely agree about the outdoor shower hose. It needs some kind of basket or something, maybe even a bag of some sort would work.1 point
-
Welcome!1 point
-
This looks well done. I took a different strategy with my modifications, which was to first move the plumbing out of the basement and relocate it under the floor behind the grey water tank. Then I had planned to run the ductwork next to the relocated plumbing. There’s is plenty of clear area under the floor there for both. Then I moved the check valves for the water ports inboard so that they wouldn’t freeze, sloping the lines down toward the ports so that they fully drain when unplugged. So that way I don’t have to worry about heating the basement at all. Plus I eliminated about ten feet of plumbing in the process by not running the two fill lines to the back and then forward again. I’m actually not sure why Oliver doesn’t do it like that to begin with.1 point
-
Polly and I are recently retired Health Care workers from Saint Michaels, Maryland and we've decided to try the travel trailer life. We've done some sailboat cruising and see some similarities in the lifestyle. March 31 is the delivery date for our Elite II. Our TV is a 2018 Toyota Tundra with 5.7L and tow package. I have found this forum to be a great resource for information and have read it daily for over a month. I look forward to our new adventure and hope to meet some of our fellow Ollie owners along the way. Cheers, John and Polly Lacoco1 point
-
March 31 is a good pick up day. Lots of nice spring weather after that to try out your new Ollie and get it broken in! Welcome and we look forward to meeting you. Mike1 point
-
Welcome from Austin. We pick up in February too. An Elite 1 (the shorty). Hope to see you on the road.1 point
-
Welcome from Texas! Our pick up is mid-February. Hope to meet you at a Rally or Campground in the future.1 point
-
We live on a NJ farm and have traveled to Las Vegas several times using a Model S and Model X with no problem charging. Since 2011 we have used Tesla charging stations all over the country. Tesla charging network has been constantly updating and there are many apps you can use when traveling the northern, mid or southern routes across country. So, we are comfortable traveling with a Tesla even thru the energy draining mountains areas like Utah. If there is a problem, we will take the southern route to Vegas and visit the Hoover Dam. Our Model X currently gets an average of 295mpge. Add an Oliver Elite I TT with GVWR of 5000lbs and TW of 340lbs and things change significantly. On a nice day with sunny skies and a flat road and no head wind we estimate we will get an average of 100mpge. Down hill or with a good wind 100 to 150 (150 is stretching it). Uphill is a challenge and would cut the mileage significantly. So, we would definitely rely on map planning apps that included coefficient drag data and charging stations. If we did do a long-range trip, we probably would rely on campgrounds like KOAs to overnight stay and charge as well at stations along the way. Time is not a factor so many extra stops for charging is OK especially since it is not too often that we take such long trips. Plus, Vegas is a stop off where we spend a lot of time with family and friends. Most of our travels will be spent at parks closer to home with a visit to Florida and Vegas once in a while. As soon as we get the Cyber Truck it will be easier for us to do more boondocking across the country. We are aware of the negatives of pulling a TT out west but we have seen several videos where it is doable. Yes, a Casita is less weight but I have seen videos of people wasting energy driving them 80 mph and getting acceptable mileage. Several videos show larger frontage trailers that are longer, wider and taller than the Oliver being towed by smaller EVs averaging 100mpge. We have even seen model Ys that have towed 19’ and 20’ Airstreams at a reasonable distance. We have looked at the Alto Safari, Airstream Bambi, Caravel, and Basecamp and other small campers for their aerodynamics but chose the Oliver. We have looked at ICE trucks for towing but found them to be expensive to buy just to trade them in 11/2 years and lose money. We have looked at both the Elite and Elite II and love them both. Most of our travels will be just my husband and I so the Elite is perfect especially if we do a lot of hiking, biking, and running. We hope to get back to a lot of outdoor adventures. As far as Fenske’s hypothetical trailering scenarios, I thought his Model X video of a family driving a Model X up a 1-percent grade at 75 mph is unrealistic. Why would one use speed to carry a load up a mountain? The higher speed would affect his outcome. It sounded a little bias to me. Of course, an ICE vehicle will do great against an EV when elevation is included. Why would anyone doubt it? Watching results of the aerodynamic shape TTs and Teslas pulling them makes me feel we will be just fine. I hope to start building our Oliver Elite I this month to find out. Thank you again for all the input. It really help us to make a final decision. There were so many points that I jotted down from above: Be aware of traveling conditions including weather, speed and road inclination. Safety! Emergency -What If. Anita has on our list a composting toilet and other items mentioned above. If we could find a cheap ICE vehicle it should be something to consider. Are we letting the tail wag the dog or is this what we really want. Buy an adequate trailer for your car or truck. Plan your mileage correctly between sites. Charging stations anywhere. We see them even at gas stations. Aerodynamics is a major factor when towing. Audrey1 point
-
Welcome! We’re not-so-distant neighbors in Ellicott City and love your town. We’re also a little jealous of your March date. We are May. Looking forward to reading about your adventures here.1 point
-
1 point
-
Welcome to the Oliver forum, we are just a few miles south of you on the Chesapeake Bay. You will have no issues with your Tundra pulling an Elite II. We have been camping for 53 years and have pulled travel trailers all over this country and enjoyed every trip.1 point
-
I chose 100W heaters as a function of maximum load (three heaters, or 300W). That wattage at 12 volts equals 25 actual amps. I think even that amount of load will seriously deplete my battery bank by dawn on a really cold night. Hopefully the combination of my Honda 2200 for 3 to 4 hours the next day, PLUS the solar will allow full recovery. I will have the option to run one, two or all three heaters as needed/possible. I cannot see any way to get more reflectix between the two water lines and the lower hull on the drivers side... (Bummer!)1 point
-
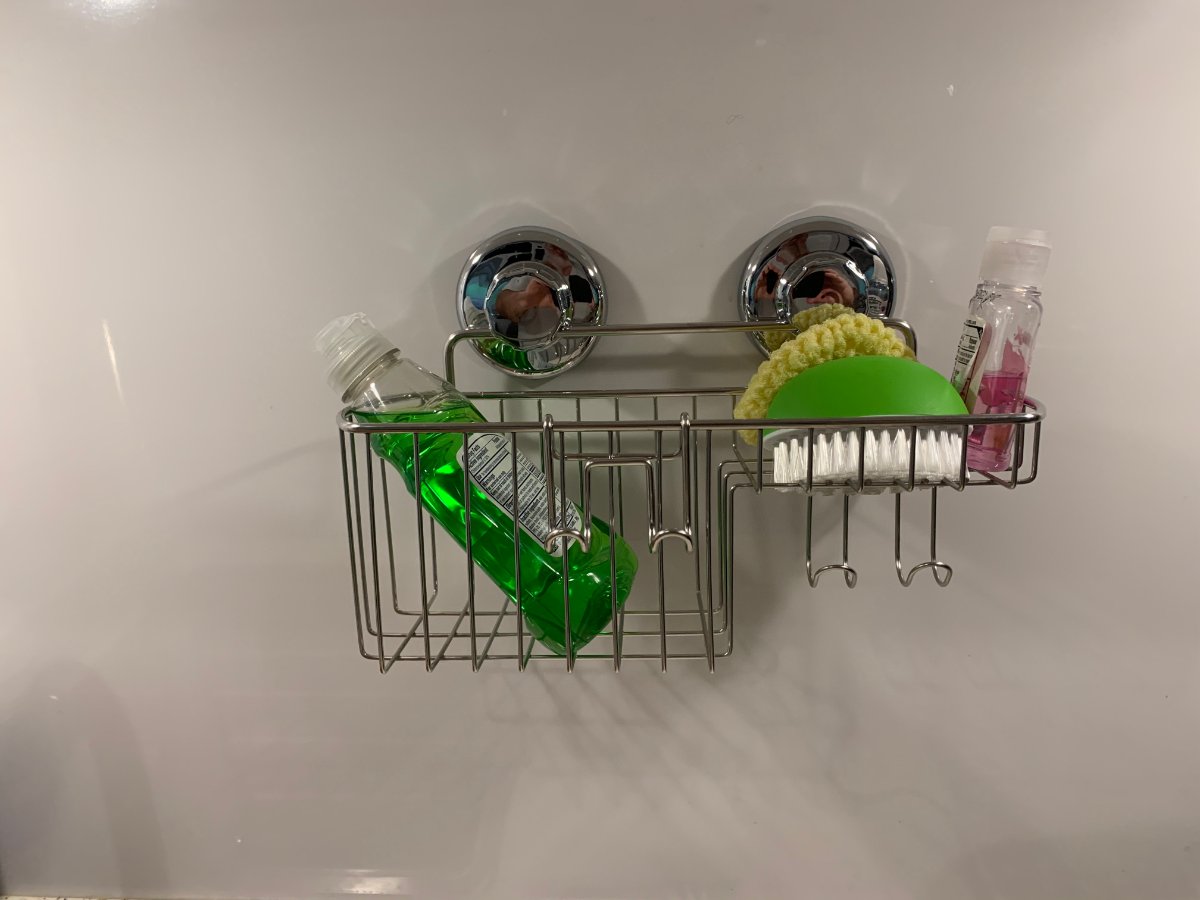
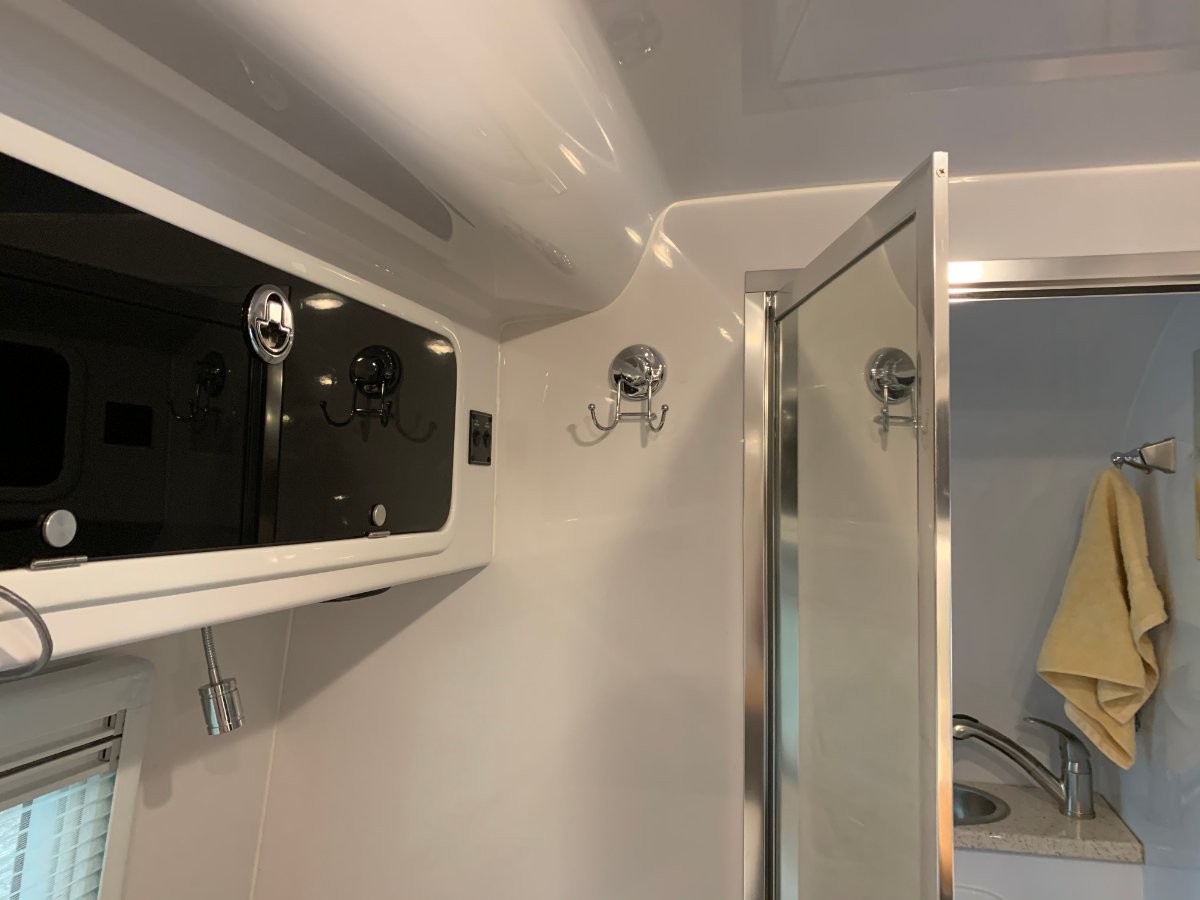
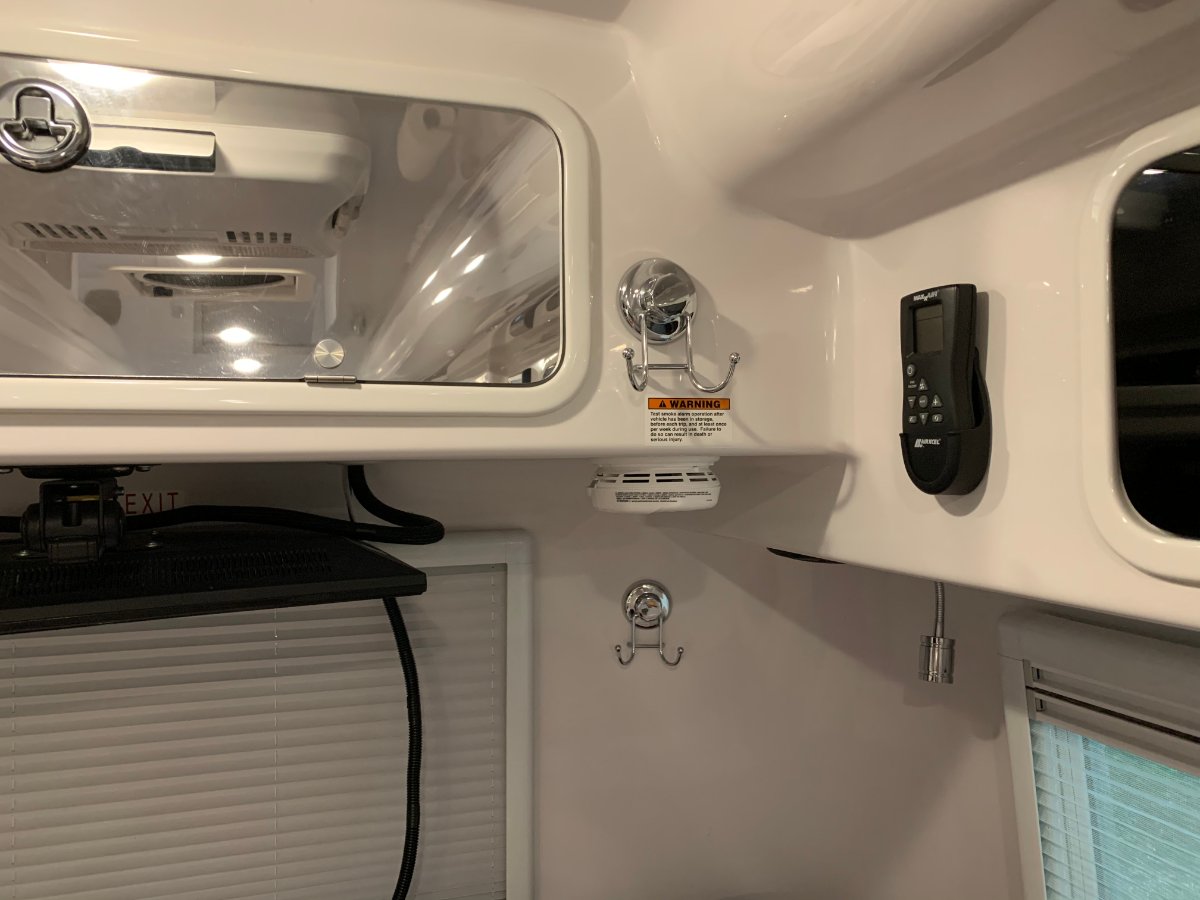
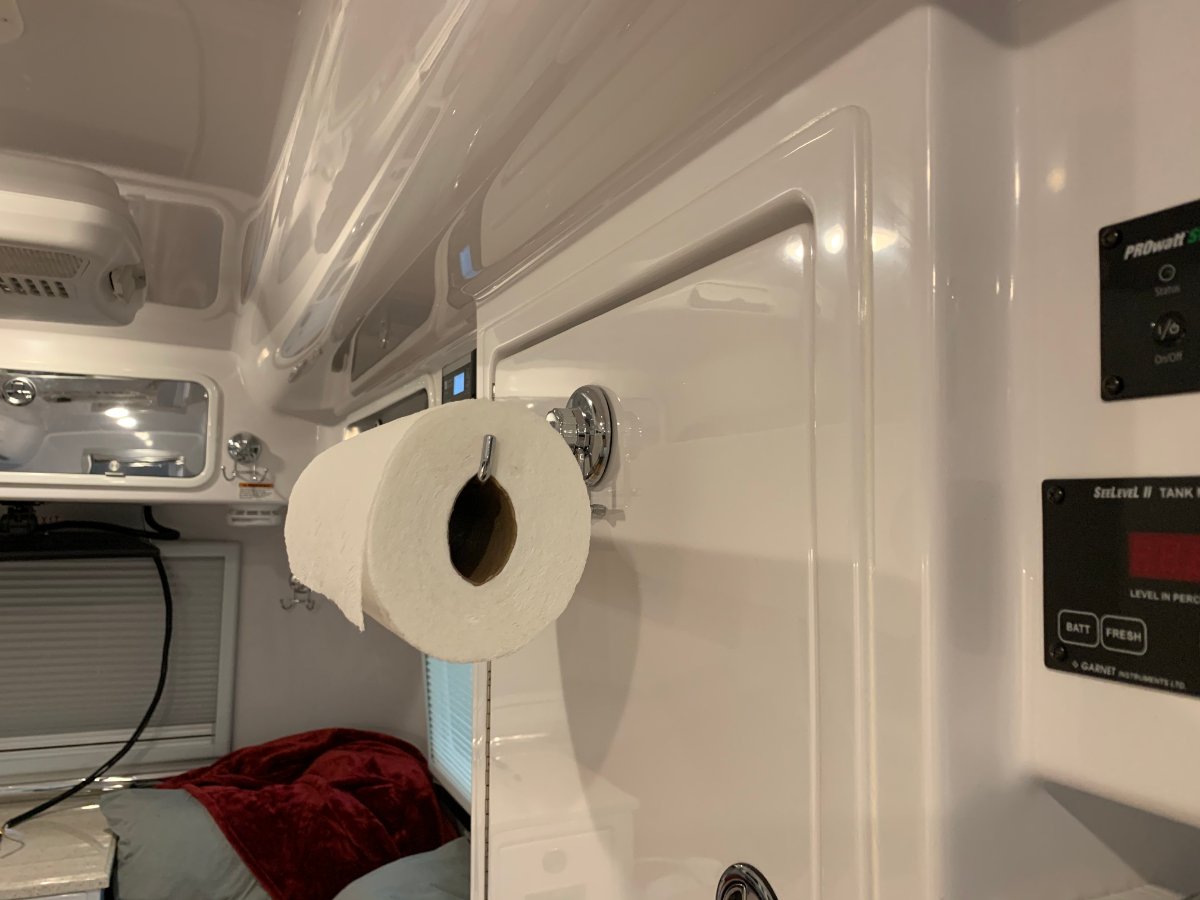
I am a big fan of HASKO suction cup fasteners (hooks). We use them for paper towel holders, kitchen item storage, hanging clothes, and other uses. Adhere strongly to Oliver fiberglass and can easily be moved around as needed. No glue mess. No holes. A simple suction cup attaches to wall. d as needs change. Can get them from Amazon.
1 point
-
Lol, I wish I had a picture of our dining room while we were waiting for our Ollie. It looked like a camping world annex.1 point
-
Here’s a whole romp of abbreviations for you: 4X2 or 2WD - 2 Wheel Drive 4X4 or 4WD - 4 Wheel Drive 5er or Fiver - Fifth Wheel A/C - Air Conditioning AC - Alternating Current A - Amp or Ampere Ah - Amp Hours Al - Aluminum AS - Airstream ATF - Automatic Transmission Fluid ATS - Automatic Transfer Switch AWG - American Wire Gauge BC - Brake Controller BLM - Bureau Of Land Management BTU - British Thermal Unit CCC - Cargo Carrying Capacity (payload capacity) CG - Camp Ground COE - Corp of Engineers CW - Camping World DC - Direct Current DEF - Diesel Exhaust Fluid DS - Dump Station Egg - Fiberglass Trailer FG - Fiberglass FHU - Full Hook Ups FT - Full Time FW - Fifth Wheel GAW - Gross Axle Weight GAWR - Gross Axle Weight Rating GCVW or GCW - Gross Combined Vehicle Weight GCWR - Gross Combined Weight Rating Gen - Generator GTW - Gross Trailer Weight GTWR - Gross Trailer Weight Rating GVW - Gross Vehicle Weight GVWR - Gross Vehicle Weight Rating HP - Horsepower LE - Legacy Elite LEII or LE2 - Legacy Elite II LED - Light Emitting Diode LFP or LiFePo - Lithium Iron Phosphate LP - Liquid Propane LT - Light Truck (tires) NCC - Net Carrying Capacity (payload capacity) NPS - National Park Service OTT - Oliver Travel Trailers OTTO or Otter - Oliver Travel Trailer owner OTTOR - Oliver Travel Trailer Owners Rally PU - Pop Up PSI - Pounds per Square Inch RV - Recreational Vehicle SP - State Park TPMS - Tire Pressure Monitoring System TS - Transfer Switch TT - Travel Trailer TV - Tow Vehicle TW - Tongue Weight V - Volts VA - Volt Amps (Watts) VIN - Vehicle Identification Number USFS - US Forrest Service W - Watts Wally World - WalMart Wh - Watt Hours WDH - Weight Distribution Hitch WES - Water/Electric/Sewer1 point
-
I learned at the rally that Oliver owners are called Otters, as in OTT-ers; which is not to be confused with a rally itself, which is an OTTOR, with an O, as in OTT Owners Rally. (OTT, of course being Oliver Travel Trailers.)1 point
-
No matter what power source you use, 30a shore power, generator or inverter/battery power, you should better understand power management. Your Oliver camper was designed with the 30amp power in mind so your factory installed components are designed to work within the constraints of 30 amps. The inverter option that we currently offer can provide about 15 amps of power to the 120v receptacles before it will max out and shut down. Generators can vary based on their rating but they will be constrained to the 30 amp max that the camper is designed for. How does this impact you or your style of camping? Campground Camping with 30a Shore Power What happens if you go over the 30 amps? The breaker will kick just like at home if you turn to many appliances on in a single room. This situation typically will only occur when you are plugging in high power demanding appliances or devices in the camper. Every appliance that you want to add to your camper should first be checked to see how many amps are required to power it. Many hair dryers can pull 1800 watts of power which will immediately take up about half of your available power. Add in a space heater and it may just put you over the limit. What this means is that you must be conscientious of what is plugged in and pulling power. The worst thing that could happen is it would kick the breaker and you would simply reset it and turn some things off that aren’t being used at the moment. Boondocking with Generator Power When you are connected to a generator power source you are limited within the 30 amps but also the max amp that the generator will put out. A typical 2000-watt generator will only supply 15-16 amps of power so this means the max power is limited to the generator and if you are demanding more than the generator can supply it will kick the breaker on the generator. The generator may continue to run but will not be supplying power into the camper. Some of the components in the camper like the Dometic Penguin II A/C will demand much of this power especially when the compressor engages (Start Phase). The optional MicroAir Easy Start does help to contain this short fast burst of power to about 11 amps but that is about 75% of what the 2000-watt generator supplies. Once the compressor moves into the run phase it requires less power and drops to about 9 amps. The compressor will continue to run until the cabin temperature reaches the requested temperature on the thermostat. The compressor will then disengage or shut down. Once the cabin temperature drops below a certain threshold the compressor will once again enter the starting phase which requires 11 amps of power. This is where you may run into an issue that is normal. You may have a coffee maker running or a laptop plugged in or a combination of any other type of added appliance that under the compressor running stage falls just under the max 15-16 amps provided by the generator but when the compressor re-enters the starting phase it can cause it to jump over the max long enough to kick the breaker on the generator. No worries, all you need to do is practice power management and unplug something temporarily and reset the breaker. TIP: When using a generator, the surge protector may see it as an ungrounded power supply and stop all power from entering the camper. The best resolution for this is to plug in a neutral ground plug into the 120v receptacle on the generator. Boondocking with the Inverter The optional inverter is a 2000-watt Xantrex inverter but it actually only supplies about 1800 watts of power. If you remember from earlier, we mentioned that many hair dryers require 1800 watts of power. Power hungry appliances they are! This means you are even more limited to what you can use at the same time or even by itself. The inverter is connected to the 120v receptacles and also the microwave. The microwave by itself will pull most of the power supplied by the inverter so when running the microwave on inverter power be sure not to have other things plugged in and running. Also keep in mind that the inverter is dependent on battery power. The inverter pulls battery power and converts it into 120v power. So, with this option you must manage both the available battery power and inverter power. For instance, the microwave under 120v power uses 12 amps but the converted rate from 12v battery to 120v through the inverter actually means you are using about 135 amps. Has this gotten a bit confusing yet? Putting it simply, you manage the 12 amps required by the microwave from 120v to the available amps of 15 amps provided by the inverter. With the 135 amps you simply need to know that this is draining the batteries at a much faster rate as they cannot sustain that rate of power consumption for too long before loss of 12v power would occur. However, the inverter will shut down before total power loss from the 12v battery system will occur as it requires at least 10.5v for it to operate. The good news is that the microwave is usually only used for short periods of time. You would however want to apply this way of thinking to other appliances that you may want to use while on inverter power so that you better manage the available power.1 point
-
As the cold season closes in on most of us, it is time once again to discuss proper winterization to protect all the plumbing and water systems inside the camper. First let's discuss what components are susceptible to freeze damage which would result in water leaks and potential costly service repairs. 1. Brass Check Valves – These valves are in-line valves that keep water from spilling back out of the water fill ports. These valves will be located on the Fresh Water Line, City Connection Line and the Black Tank Flush Line. 2. Plastic Check Valve – The Dometic Standard toilet has a plastic check valve located at the rear of the toilet. 3. Water Valves – These valves are used to control the flow of water. You may have 2 or 4 valves located next to the water pump, 1 located on the lower shell floor to drain the fresh tank, and 1 located on the black tank flush port line. 4. P-Traps – These are used in the sink and shower drain plumbing lines. It retains water and traps debris that has drained from the sink and prevents it from forming a clog deep within the plumbing system, and stops sewer gases from passing into the camper. 5. Water Pump & Filter – The water pump filter is used to trap debris and keep it from entering the pump and water line system that is delivered to the faucets. 6. PEX Push Fittings – These fittings are used to connect different runs of pex pipe through out the camper. Pex itself is freeze tolerant but these plastic and/or brass fittings are not. 7. Faucets – The kitchen, bathroom and external shower faucets all maintain water at the faucet when in use and thus present a potential freeze issue if not properly winterized. 8. Water Heaters – All water heaters should be fully drained of all water and the bypass valve must be set to winterization/bypass mode. This allows for RV antifreeze to be utilized in the plumbing system without filling the water heater itself. *Even when using the camper in cold weather it may be necessary to fully drain the water heater when traveling between campsites, especially the on-demand water heaters as they only hold a small amount of water that can freeze in a short period of time. *Proper winterization method to ensure that all components are protected. You can visit the following link for a walkthrough with John Oliver on how to winterize your Oliver Travel Trailer: Step by Step Methods provided below 1. Drain all water from the system (All tanks, water heaters) 2. Set bypass valve at water heater for winterization mode. 3. Change valve configuration at water pump for winterization mode. 4. Use water pump to draw RV Antifreeze (potable Safe) into the camper. 5. Turn on the kitchen faucet (Cold Line) and run until antifreeze comes out. 6. Change to the Hot line and run until antifreeze comes out. 7. Perform steps 5-6 for the bath faucet. 8. Ensure plenty of antifreeze drains into the P-Traps for the kitchen, bath and shower drains. 9. Flush the toilet until antifreeze starts to fill the bowl. Leave antifreeze in bowl to lubricate seal. 10. Turn off water pump. 11. Connect hand pump with antifreeze to the fresh tank fill connection. Pump at least 3- 4 times. Antifreeze is potable safe and will not hurt if it goes into the fresh tank. 12. Connect hand pump with antifreeze to city connection line, turn external shower cold line on and pump until antifreeze comes through shower faucet. *TIP: It will be hard to pump in the city line if the faucets are closed. 13. Turn cold line off and hot line on, pump until antifreeze comes through shower faucet. 14. Connect hand pump and antifreeze to black tank flush port. (You may have to go inside and turn the in-line valve open to allow the antifreeze to freely pump into the tank. One pump should be sufficient as we are only protecting the check valve.) For proper battery storage please visit: TIPS • The camper can be used in cold weather applications as long as the furnace is utilized to keep the components warm and above freezing temperatures. • If traveling between campsites during cold weather season it may be necessary to winterize depending on outside temperatures. • If water is left in the water heater during freezing temperatures even for short periods of time, it can cause damage. • RV Antifreeze is designed to replace water and should NEVER be mixed with water as diluting it will defeat its purpose. Oliver Travel Trailers Service: 866-205-26211 point
-
The Dexter EZ Flex system adds another layer of protection to your camper. The EZ Flex equalizer comes with a rubber dampener to lower the impact from cracks, potholes and other imperfections in the roads from causing unwanted stress on the camper shell. This system also replaces the standard bolt & plastic bushings inside each leaf spring eye with wet bolts and bronze bushings allowing you to keep them greased for longevity and less noise from heat and resistance. For this system to operate properly it is recommended that the bushings are greased every 3 months or 3,000 miles with a good high quality Hi-Temp grease. We use Citgo Mystik Hi-Temp at the factory but there are several other approved greases from Dexter. *2018 Elite I models utilize bronze bushings and wet bolts but does not have the equalizer as it is used on the dual axle only. The Dexter Axles used on the Oliver Elite and Elite II models are the 5,000 lb and 3500 lb axles. The Elite models have a single 5,000 lb axle with 12” brakes while the Elite II models have dual 3500 lb. axles with 10” braking. These axles and brakes do have a break-in period as they are Nev-R-Adjust braking and adjust automatically as you brake while pulling forward or backwards. The break-in period may vary slightly but usually adjusts to 100% somewhere between *50 brake applications from the brake controller only or over a period of about 500-700 miles with normal vehicle braking. *Please make sure that you do not overheat your brakes by trying to achieve the break-in too quickly. If you do choose to utilize the brake controller over 50 braking applications it should be done over a 75 mile trip at low speeds allowing the brakes to cool in between and not putting too much stress at high speeds on the trailer brakes to stop the tow vehicle. Both the 3500lb. and 5,000lb axles have serviceable bearings that require maintenance every 12 months or 12,000 miles. The same grease that is used for the EZ Flex will work with the bearings. Both the inner and outer bearings should be cleaned thoroughly and inspected for any imperfections or improper wear. This is also a great time to inspect your trailer brake components as well. These maintenances can be performed by most RV service centers or if you prefer, you can perform your own maintenance. For more information on how to repack your wheel bearings see the Dexter Bearing Maintenance Video.1 point


-
Recent Achievements
-


")


")


