Leaderboard
.thumb.JPG.c11094a6a8c73946473572dfe3e34685.JPG)

Popular Content
Showing content with the highest reputation on 12/17/2020 in all areas
-
Bill: When I replaced the battery tray, I added a device to prevent the tray from moving at all. It only takes a few minutes to remove when servicing the batteries. You might want to do something like this while you have the tray removed.
 4 points
 -
Agree with John on this. Knowing my limitations causes much research, questioning and learning. Some of what I’ve done amazes me on the one hand and is very satisfying on the other. I’m a bit apprehensive about my upcoming battery and charger project resulting in more digging and learning. The input on this forum is quite a resource and the experiences and lessons learned from fellow owners is invaluable. Add to that some private tutoring from knowledgeable owners and impossible sounding projects become possible. Mike3 points
-
I'm a former Oliver owner. Replaced it with a Conqueror and now have a Kimberley Kruiser almost ready to ship to the U.S. from Australia. I learned about using the Andersen Plug and wiring to charge my lithium batteries in my Conqueror. I responded to a question today from an Oliver owner about charging with a 7-pin connector. The Andersen plug/wiring will charge your lithium batteries at a much, much higher rate. I've attached a document that provides info on how to install. Vehicle Prep for Conqueror Trailer.pdf2 points
-
we’re UPSIDE DOWN with happiness!!
2 points
-
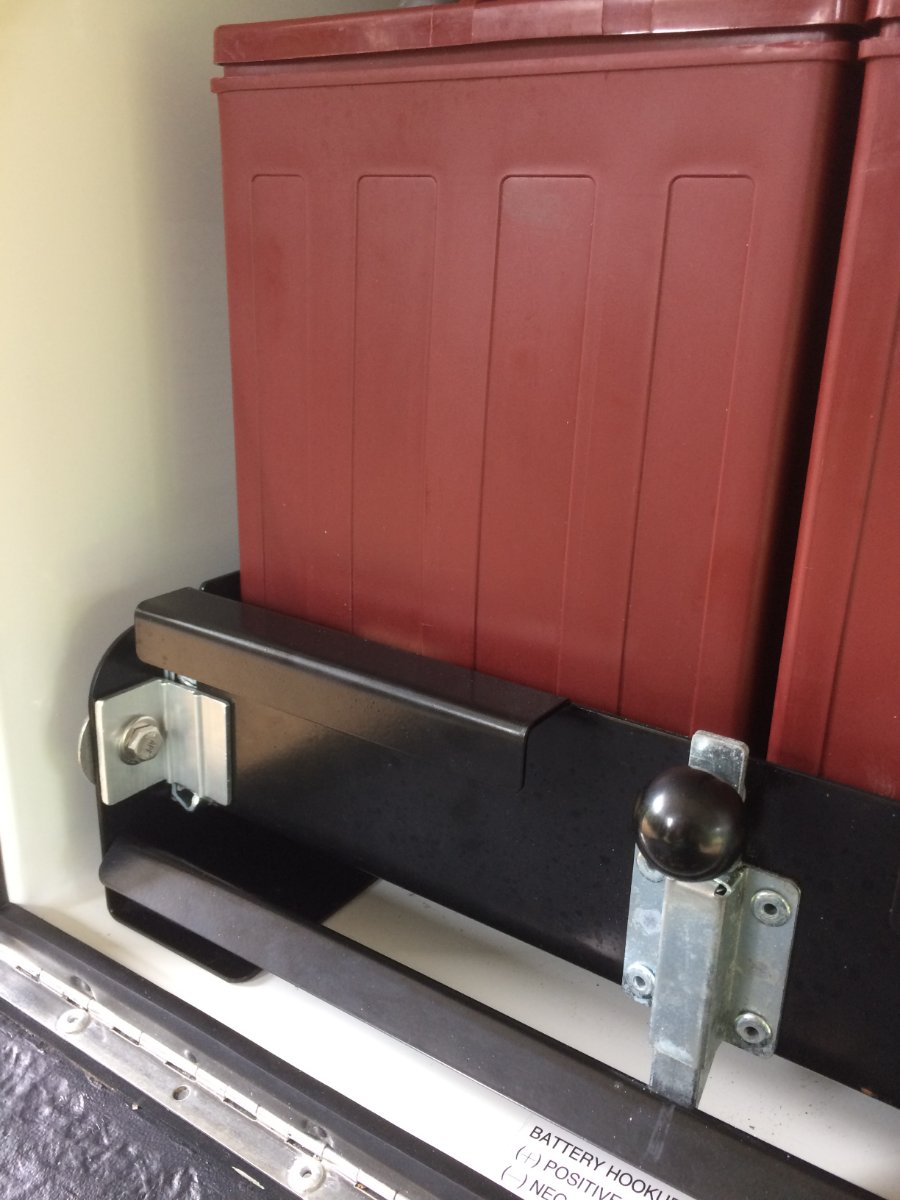
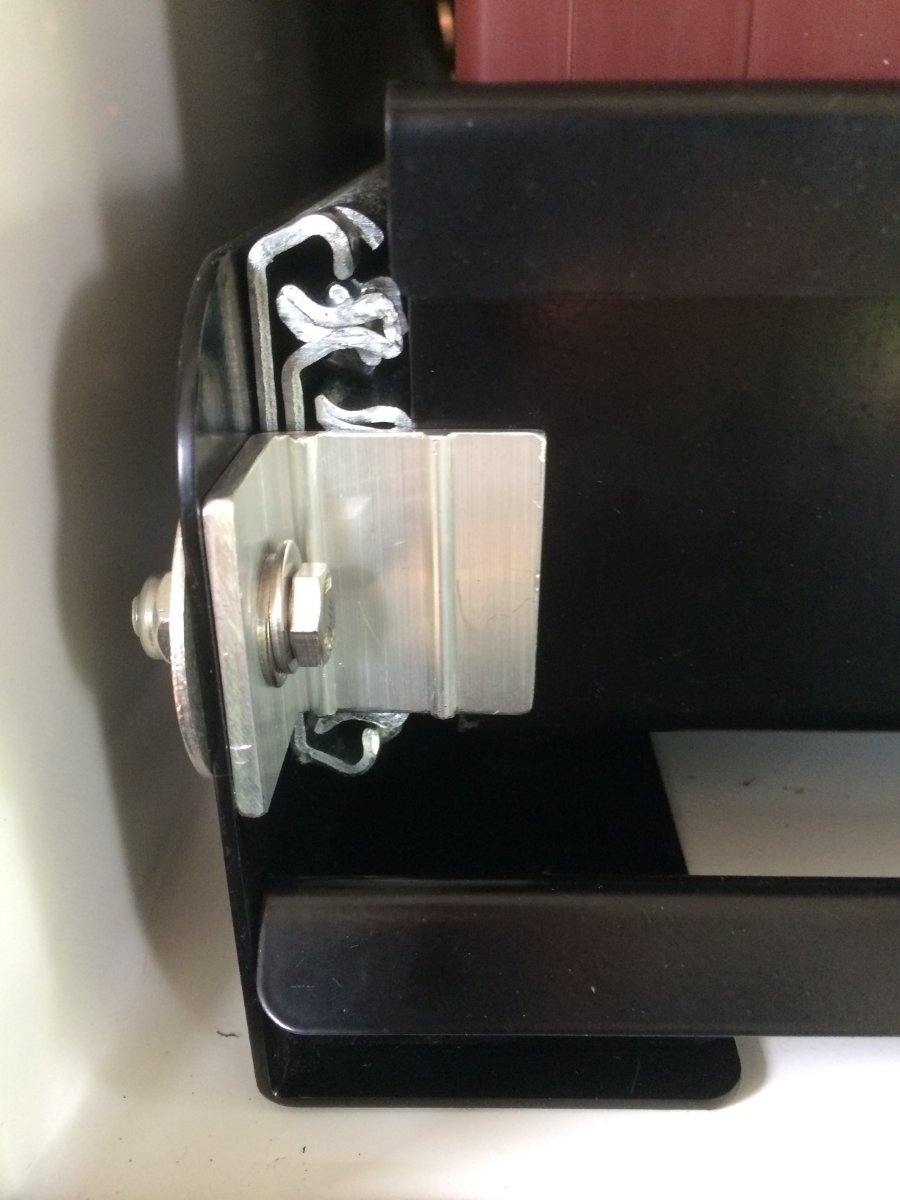
Ride and Fly: As our Ollie is often on mountain fire roads, I have had my concerns about the latch as well. Good idea. Do you bolt both sides, or just one? OWNERS: I am going to use "Blind Flange Nuts" (BFN) on mine so that I am not fishing for the washers and nuts behind the frame. For those not familiar with BFN's, below is how they work: A. With the battery slide tray locked with the Oliver slide lock, dill a bolt diameter size hole through the battery slide tray and the stationary frame of the unit. This will assure that you have them properly aligned so that the Oliver slide lock and your supplemental bolt lock work together for bolt insertion and travel. B. Remove the battery tray and drill a slightly oversize hole into the frame to accommodate the BFN. Your hole should ensure that the splines of the BFN "dig in" to the frame material. This gives a tight fit and aids crushing. C. Insert the BFN into the larger hole. I D. There are two ways to "crush" the BFN onto the stationary frame: Use a BFN Crush Tool. I use this when at home. Make your own BFN Crush Tool. I do this when "on the road" as I don't need to carry around the Crush Tool. Start by getting a longer grade 8 bolt (with all threads) and grade 8 nut that have the same threads as the BFN. You'll also need some washers and lubricant. Finally you'll need wrenches. Put the nut on the bolt and then your lubricated washers. Insert the bolt/nut/washers though the frame and through the BFN. With one wrench, hold the bolt steady. Then tighten the nut against the washers. This will pull the BFN bottom (BNF threaded section) towards the frame. In doing so, the center section of the BFN will be crushed forming a second "flange" on the back side of the frame that keeps it in place. Remove the bolt from the BFN. E. Reinstall the tray, lock it, and insert a bolt and lock washer to fix the tray in place. On final thought: It would be handy if you procure BFN's and bolts that use the same wrench size as the terminal bolts. Would save having more tools laying around hot terminals than absolutely necessary. ZAP! FLASH1 OUCH! Geronimo John2 points
-
I owned an Oliver Elite II for four years and loved it. Like Raspy, I wanted better off-road performance. I stubbed my toe by purchasing a Ram Rebel and a Conqueror 490. The combo was incredibly capable off-road, but the Rebel's range was too limited and the 490 was way to much work and lacked the creature comforts I was accustomed to. So, I now have a Ram 2500 diesel and a Kimberley S3 should be in a container headed my way in early January. I'm pretty confident I've found the right combination for the type of travel and camping I love.2 points
-
Zef, Here is a picture of the 707 Prototype in the Udvary Hazy pavillion of the Smithsonsian at Dulles airport. I was the Flight Engineer on the airplane when we flew it from Boeing Field in Seattle to the museum in August of 2003. This is the airplane that Tex Johnston did the barrel roll with at Seattle Seafair in 1954.
2 points
-
We were delighted when we found out our hull number was to be 707. In 1959, Zef’s godfather Capt. C. Macatee flew the first transcontinental US commercial 707 flight LA to NY. Could there be a more perfect coincidence? We’re ready for our flight!2 points
-
Ft. DeSoto you say? This is us a couple of years ago. We were in our tent. Our son's inlaws in the fancy RV. Great memories all around.
2 points
-
Sak - I'm guessing that somewhere in the Airstream handbook there is a rule that states that one should not order an Oliver while sitting inside the Airstream. However, nice choice and really a nice way to do it! Welcome aboard. Bill2 points
-
Hello to all, Zef and 00na Fessenden awaiting our 9 AM launch!1 point
-
Hi, This is Sak. Just wanted to drop in and say hi. We are new to towing but we have been tent camping for a while. During Thanksgiving, we rented an Airstream and my kids (high schooler & 1st grader) loved it! While Airstream is nice, the Oliver would work better for us in the PNW weather as we plan to use the Oliver year round. So... we just called Phil and ordered our LE II from inside that Airstream 😁 Our delivery is around late July. Can't wait! Best, Sak1 point
-
I just posted my video to YouTube. If you search "Oliver Travel Trailers Factory Tour, Sept. 29, 2020," you will find it in my channel named "Kelley Custom Leather."1 point
-
GOOD BARREL ROLL on that Ollie Pic. Welcome to the Ollie Family from Western North Dakota.1 point
-
John, I would have PM'd you with the question, had I known that it would cause you to re-live such a cathartic moment 🤣 It would be too cool, if an Ollie Owner of the caliber of all of you was centrally located in the US, and owned enough of a Garage/Shop that a few (2,3,5) Ollie Owners could gather and do one Mod/Upgrade at a time, each doing their own work, and helping when that 3rd hand/2nd pair of eyes was needed. I do not know if Wifey would agree to some of the mods/upgrades, for just everyday creature comfort & vacationing... but with her fascination with being able to "SURVIVE THE ZOMBIE APOCALYPSE", in our Ollie she would probably insist & assist to get them done sooner than later. Again, to the FORUM members your contributions make up for me not being able to hang out with the "Older Guys" in the neighborhood garages, listening & watching them modify their Cars & Hot Rods. Keep it up, and if you see BRIGHT in the Northern Sky, hopefully it will be "the Lights" and not our "SNY SD UP" as a result of me using the wrong gauged wire when converting over to Lithium's.1 point
-
You can do the same thing by skipping Maverick’s angle pieces, just drill 1/4” holes in the end of the slides, insert bolt and self locking nut in each. Or just one bolt is enough. It is mainly to prevent the rack of batteries from smashing into the door if the latch fails. Which has happened to some here.... But it appears the newer trays have dual latches. John Davies Spokane WA
1 point
-
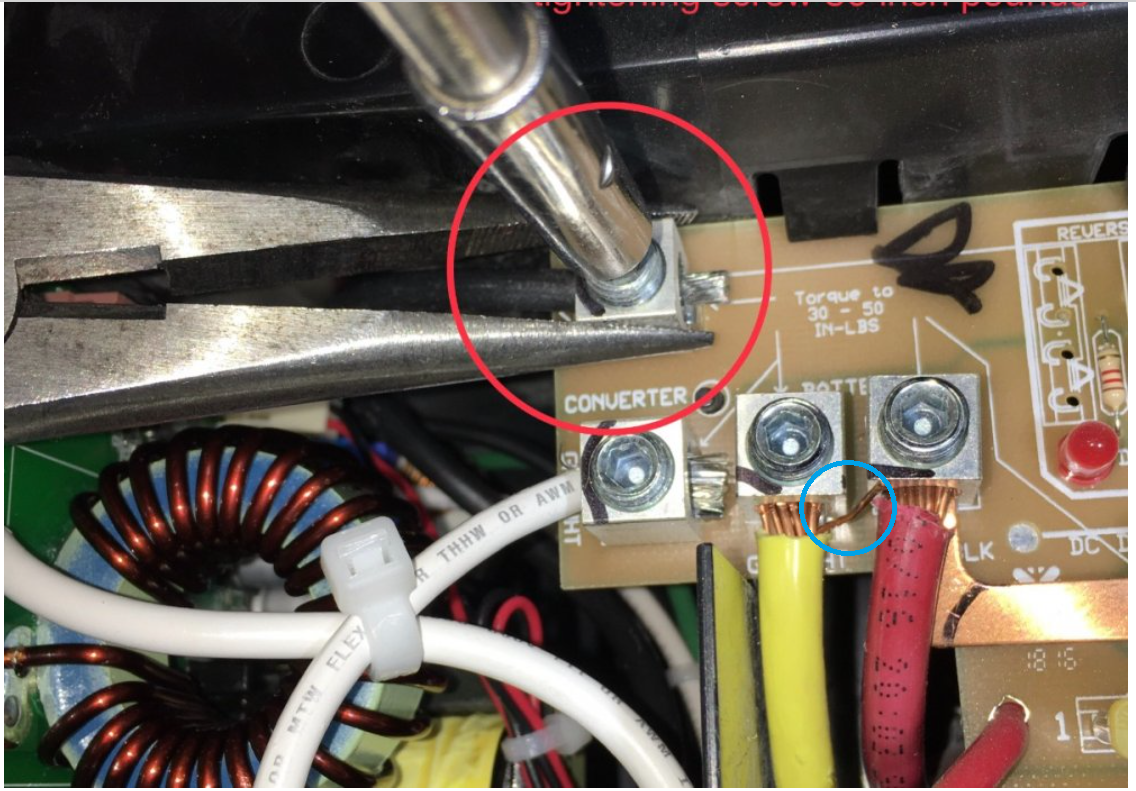
So that's where that white smoke came from... Actually, those wires are not involved in this project, as they are not part of the charger/converter replacement. I do notice in an earlier picture that strand of wire is not there. Perhaps it was an errant clipping that just fell onto the board. Hopefully, it fell off at some point.1 point
-
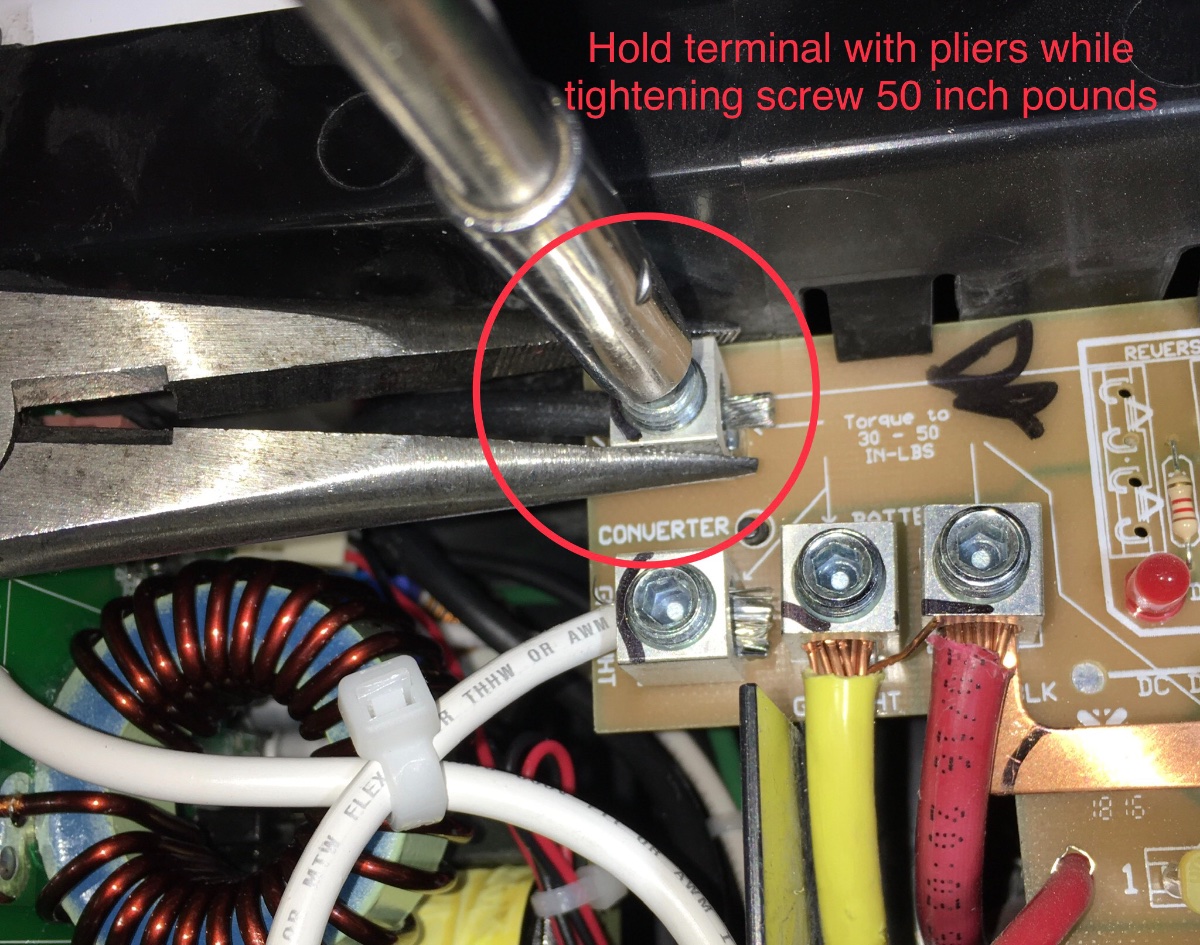
JD, what is with the single strand of wire (see blue Circle) from one terminal contact to another? Did you remove it later when doing the QC Inspection??? I find all these forums and the wealth of cumulative knowledge shared here to be Confidence Inspiring when I begin to tackle some of these Mods & Repairs.
1 point
-
They probably have a dab of silicone (type) caulk behind them to "glue" them on. Try harder...1 point
-
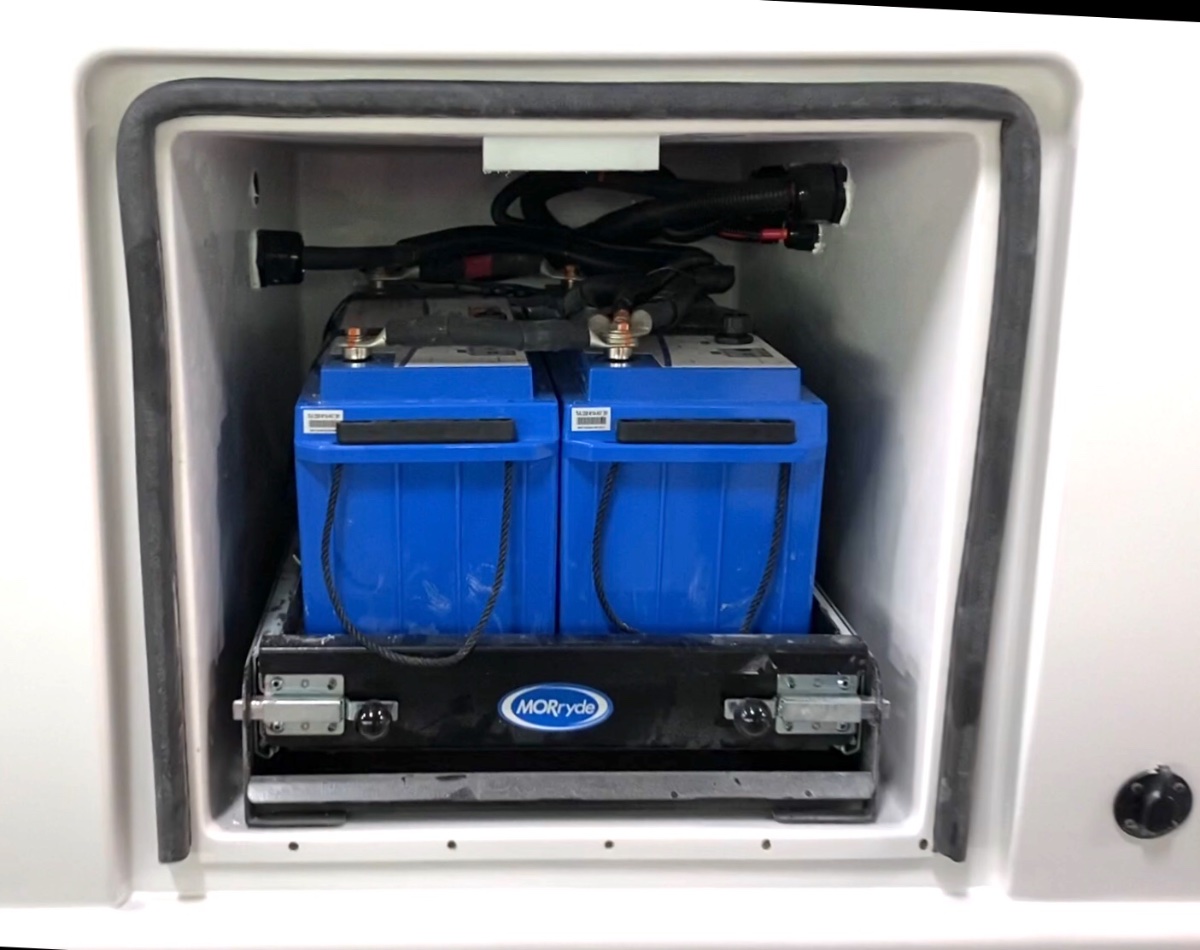
Bill: Our original battery tray looked the same as your's with the rivets head on the outside. In 2017 we had to replace the battery tray due to all the slide bearings came out plus other damage to the slides themselves. The replacement tray came from Oliver and looks just like the picture in JD's reply; with the rivet heads on the inside where the batteries are located. Our 2015 Elite II we opted for the four Trojan T105 wet cells, I keep a monthly check on the batteries and they are doing great, hopefully a couple more years of use from them before replacement.1 point
-
We have two batteries and use the rest of tray space for other electrical stuff. One or two Lithium batteries would work for us, too! I'm all about reducing weight and Lithium batteries are great for that. Will see.1 point
-
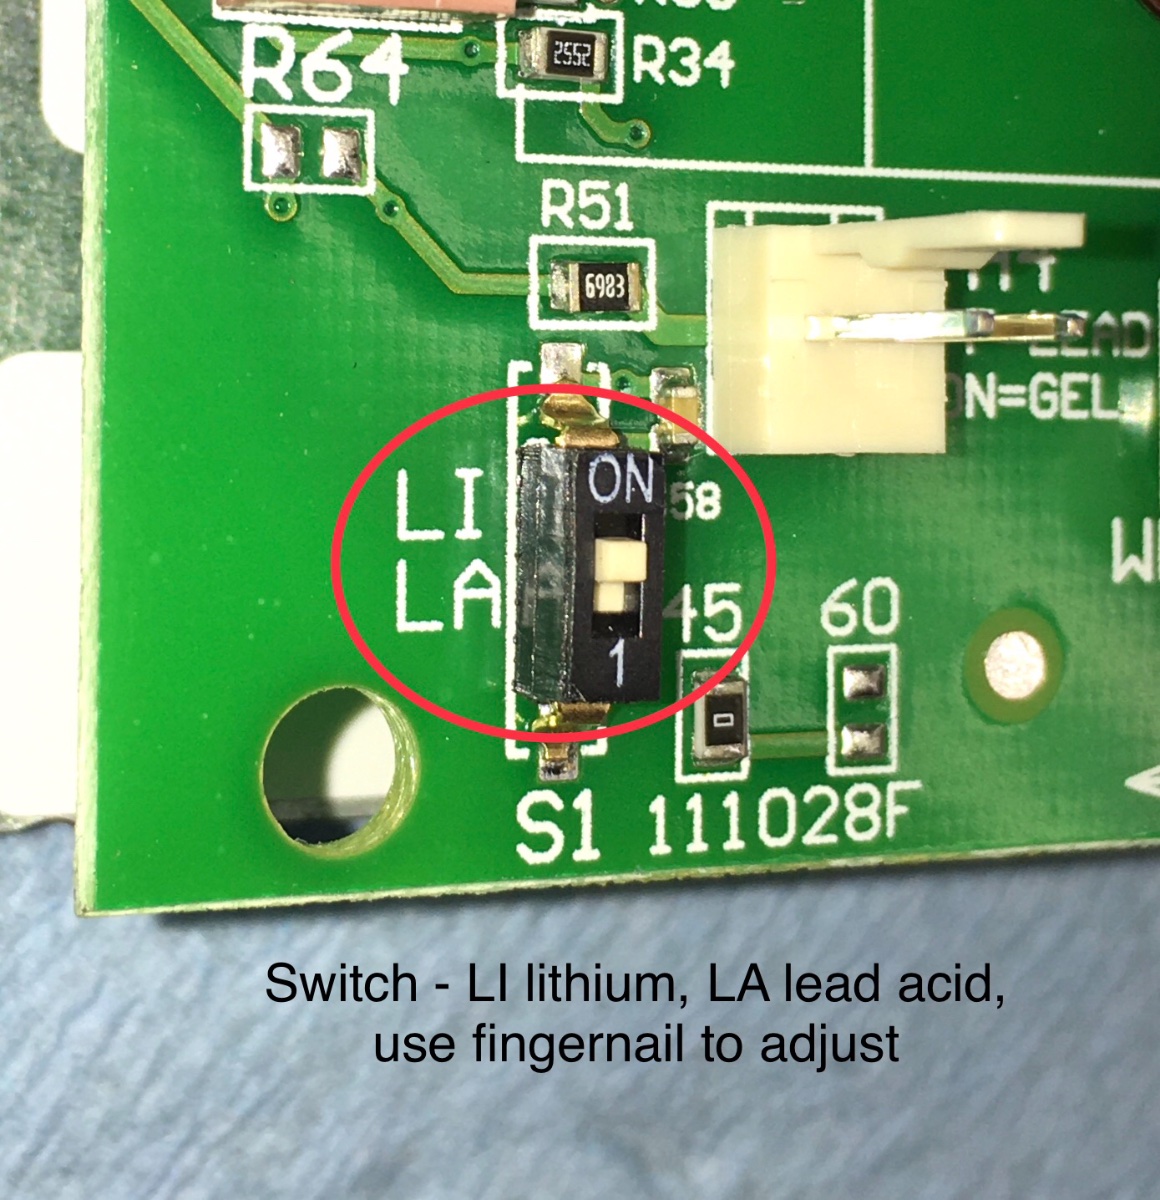
I used a plastic razor blade and my fingernail. Mike1 point
-
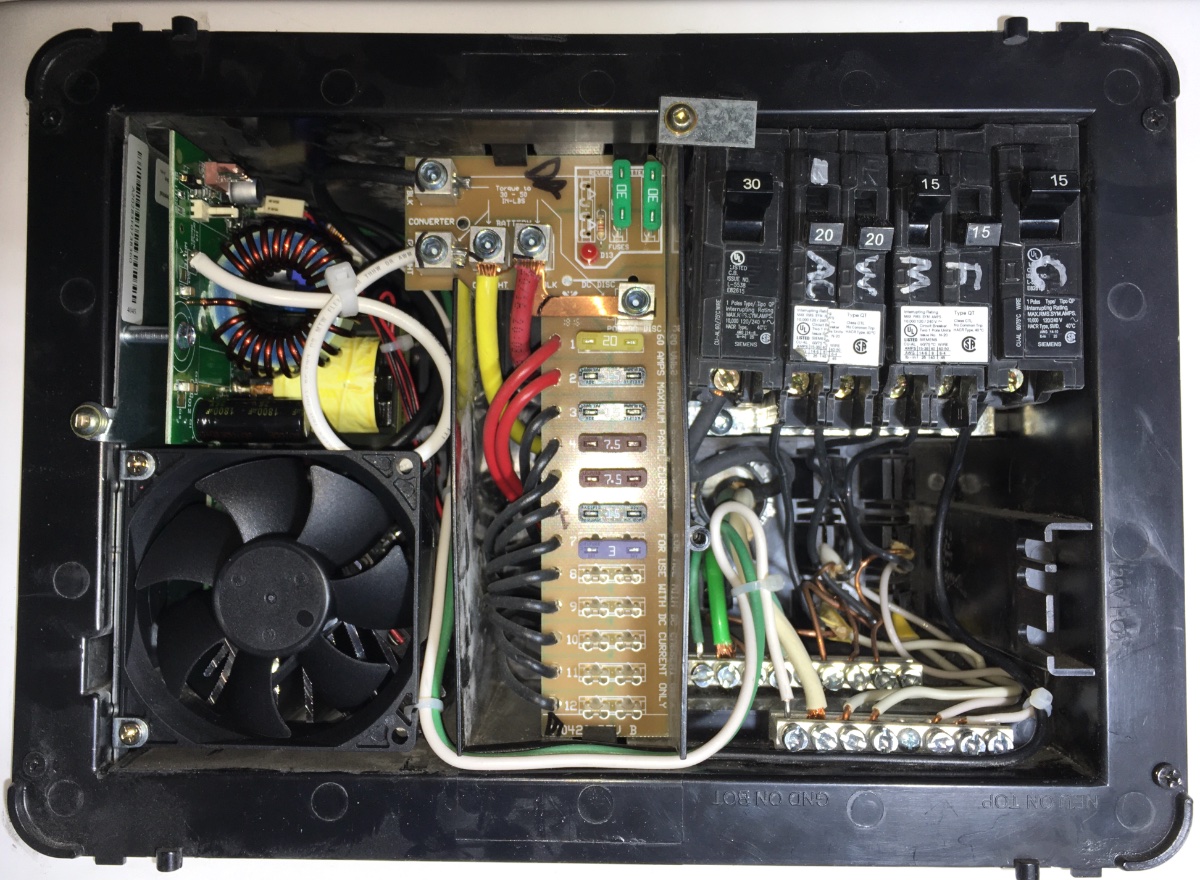
Prep the new unit. Secure the three small 120 volt AC wires with nylon ties. Also secure the black and red fan wires if necessary. This provides "strain relief" for the soldered joints and reduces the chance of damage from rough roads. Plus it looks a lot better. Here is the Lithium/ Lead Acid selector switch which alters the charging parameters to allow a 100% charge. It is an actual microswitch, you slide it back and forth with a fingernail or tiny screwdriver. Make sure it is in the upper ON "LI" position. Slide the new unit into place and install the retaining screw and washer. Connect the wires. The two big wires need to be tight. Mine were actually a little loose. Hold the terminal block with a pair of pliers to reduce strain on the circuit board. You don't need a torque wrench, hand tight is fine. Secure the white wire in a loop as shown. You can't get access to the black one. Add some ties to secure the AC wires. Done: BTW, the circuit breakers just snap into place, I tried to align mine so that they were close to even, but had no luck. The silver letters are lables I added with a Sharpie: C converter (charger), F fridge (or use R for refrigerator), M microwave/ outlets, W water heater, AC air conditioner. The big 30A one on the left is the MAIN breaker that shuts off power to all of the others. BTW also, each 12 volt fuse in the center is held held in place by little brass clips. The "ears" are very soft and can be distorted easily, causing an intermittent connection. (My fridge kept shutting down due to this.) Always be careful removing or installing a fuse, do not rock it sideways or the connection will be loose! You can very CAREFULY squeeze the ears together with mini pliers to make a tighter fit. This is a poor design. Reinstall the cover. Reconnect your NEW lithium batteries and shore power, and make sure the system is charging. I plan blow the dust off my used unit so I can sell it on here or on eBay. I hope this thread is helpful. John Davies Spokane WA
1 point
-
Bath vents are easy to deal with. Just reach in and rip them out - all fixed. The kitchen vents you might want to be more careful with, but those are easy, just use a router and the cabinet walls as your guide. You'll have to be a little careful with the front cut. You can try to use the cabinet trim as a guide, but it flexes, so I held a 2 x 4 tight to the lip of the trim and used that instead. The result is a nice clean hole, big enough to do most any repair or modification you'd like. The one under the sink is that same one Oliver will cut if you ever need them to reattach your fresh tank overflow. You'll of course want to cut some ¼" plywood to screw down over the holes. or anything that bumps out of your drawers while traveling will end up who knows where.
1 point
-
I sure would be interested in your recommendations for access holes...and the crimper while you’re at it...1 point
-
We had a few shake down issues - one broken elbow and something that came loose inside the Truma. This was some time ago, but it was a similar situation. Gravel and rough roads testing the limits of the trailer. The broken elbow was caused by a water line that had been cut short, and so was pulling on the all the nearby connections. The truma problem was possibly related, possibly an install problem, possibly a truma problem - who knows. But after the initial issues, I went through and tied down a lot of the plumbing to something solid with zip ties and we haven’t had any problems since, even with rough roads. Maybe my zip tying did the trick, or maybe on the first trip we just broke everything that was ever going to break. Now, recently I’ve gone through and replaced all the plastic fittings with brass. Basically replaced all the plumbing. It was an already ambitious project that got out of hand - don’t ask. Will it be better? I’ll find out. But to answer your question, yes I do think that the brass fittings are far stronger than plastic and that crimped connections are far stronger than the press to fit kind. Though I don’t think that either are necessarily inappropriate for Oliver to use. I guess any advice would depend on how you plan to travel from here on. If you think your bumpy road experiences will be few and far between, then I’d say chill, but maybe make up a small kit of pex fittings and some tubing, and learn some basics on doing field repairs. Or if you’re like me and can’t keep your trailer on pavement, then I can recommend a nice crimper and some good places to cut access holes.1 point
-
If you want a pretty decent pump with a very high flow rate and not pay for a larger Viair, consider this one. https://www.amazon.com/Smittybilt-2781-5-65-Universal-Compressor/dp/B004K25GMG https://www.fourwheeler.com/product-reviews/1306-4wd-smittybilt-2781-air-compressor/ John Davies Spokane WA1 point


-
Recent Achievements
-


")


")


