Leaderboard


Popular Content
Showing content with the highest reputation on 01/11/2021 in Posts
-
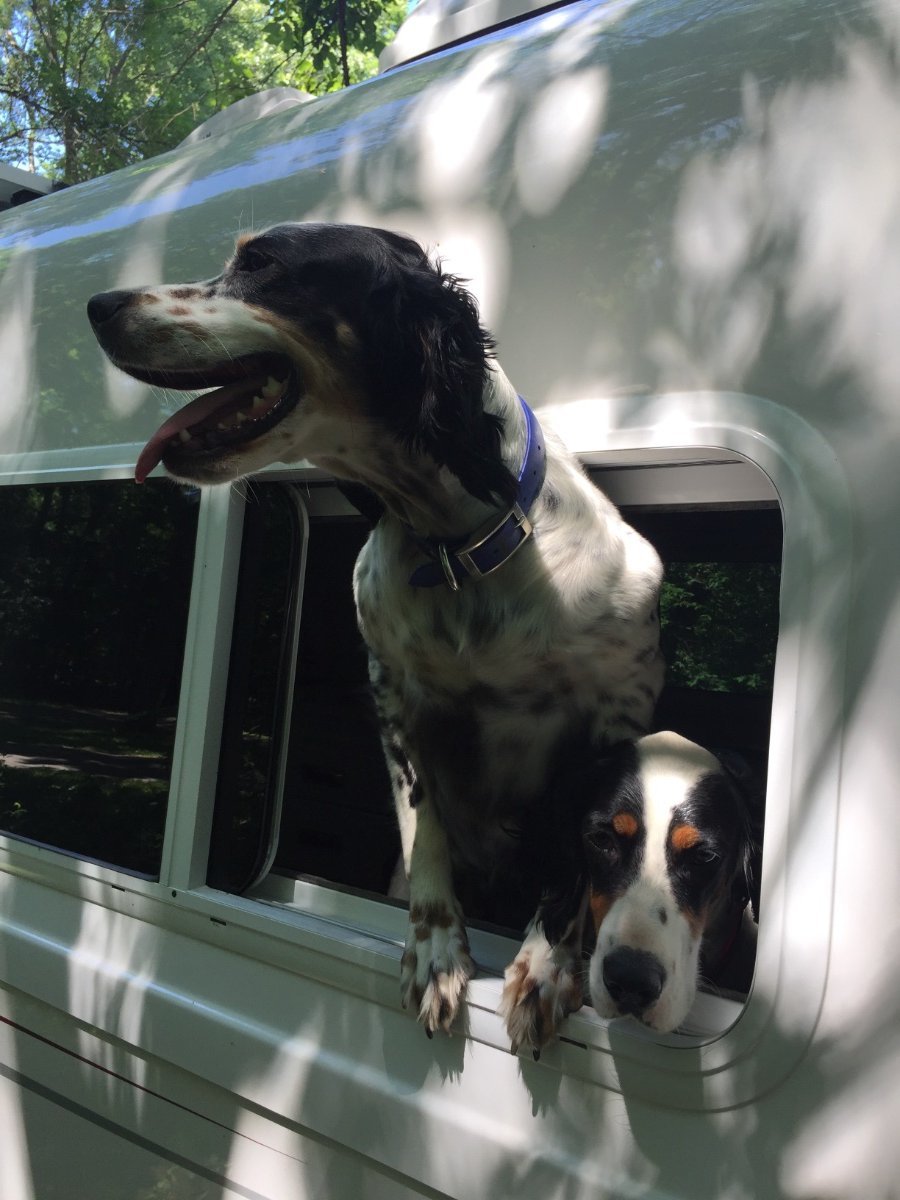
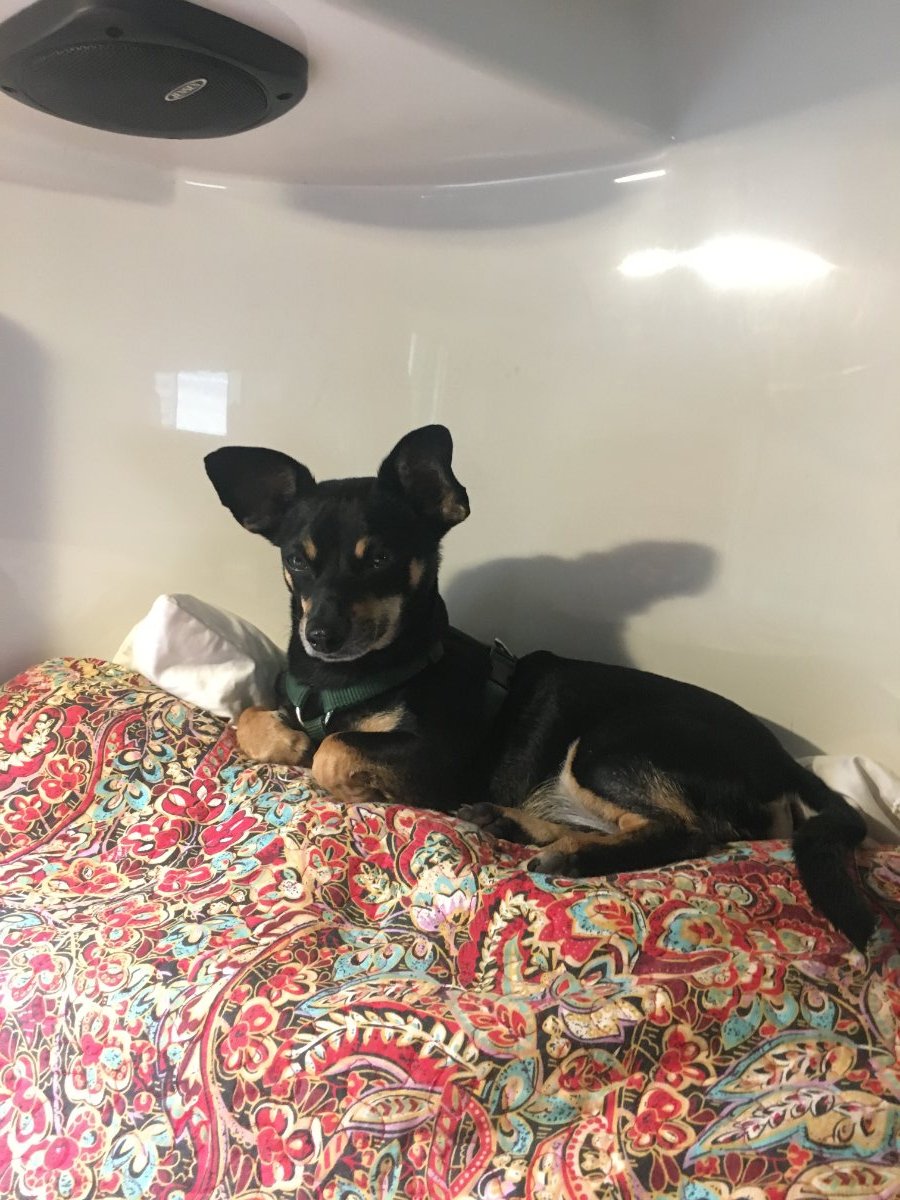
Here are a couple of field-trails-wanabees that love to travel in our Elite II. They’re English Setters for the non-bird dog audience. We hunt ruffed grouse together.
 4 points
 -
Hello sir. Thanks for responding. I live in midland Texas. Our trials are March and April in spring and September through December in fall. Trials are held in remote locations. Usually no hookups. Shade seldom available. Have seen events temps reach 95. Have stayed with 2 wetcell batteries as you are correct battery life here is short. I also will be traveling to upstate New York for vista with relatives. Not too concerned about high temps in New York. Very sure the 4 seasons trailer is best for me. I am a little technically challenged. Would love to show photos of my dogs just not sure how to get it done. Appreciate response.
4 points
-
Craig - Thanks to both you and Patriot for the kind words. The 12 volt outlet that I used is THIS. I mounted this to the underside of the Builtright rack with double sided 3M VBR tape. Then I drilled a small hole in the bottom of the Ford's dash tray to feed the outlet's wires through and attached the negative to a bolt (to ground to the frame of the truck) that is located directly below the tray. Then I ran the power wire down to the 12 volt outlet that is in the Ford's dash and spliced into the power wire coming out of the back of that socket. All of this is fairly easy as long as you are "gentle" making sure that you do not break any of the plastic clips holding your dash together. There are a number of YouTube videos showing how this is done. Bill p.s. The actual outlet I purchased at WalMart has one 12 volt socket and two USB ports in it versus the two 12 volt sockets shown in the socket on Amazon. I did this because I plan on using the 12 volt outlet for the Garmin and at least one of the USB ports for a cell phone. Also, as far as I'm aware, most of the dash cams and my TPMS can/are powered by USB and if I want to mount either or both on the rack I will have the power right there. Further, I should note that when all is put together, I can not see the outlet from either the driver's or passenger's seat. I take the Garmin's power cord, plug it into the outlet and then stuff the excess wire under the rack - you can't see any of it and yet the Garmin can easily be dismounted from the rack and transferred into another vehicle.3 points
-
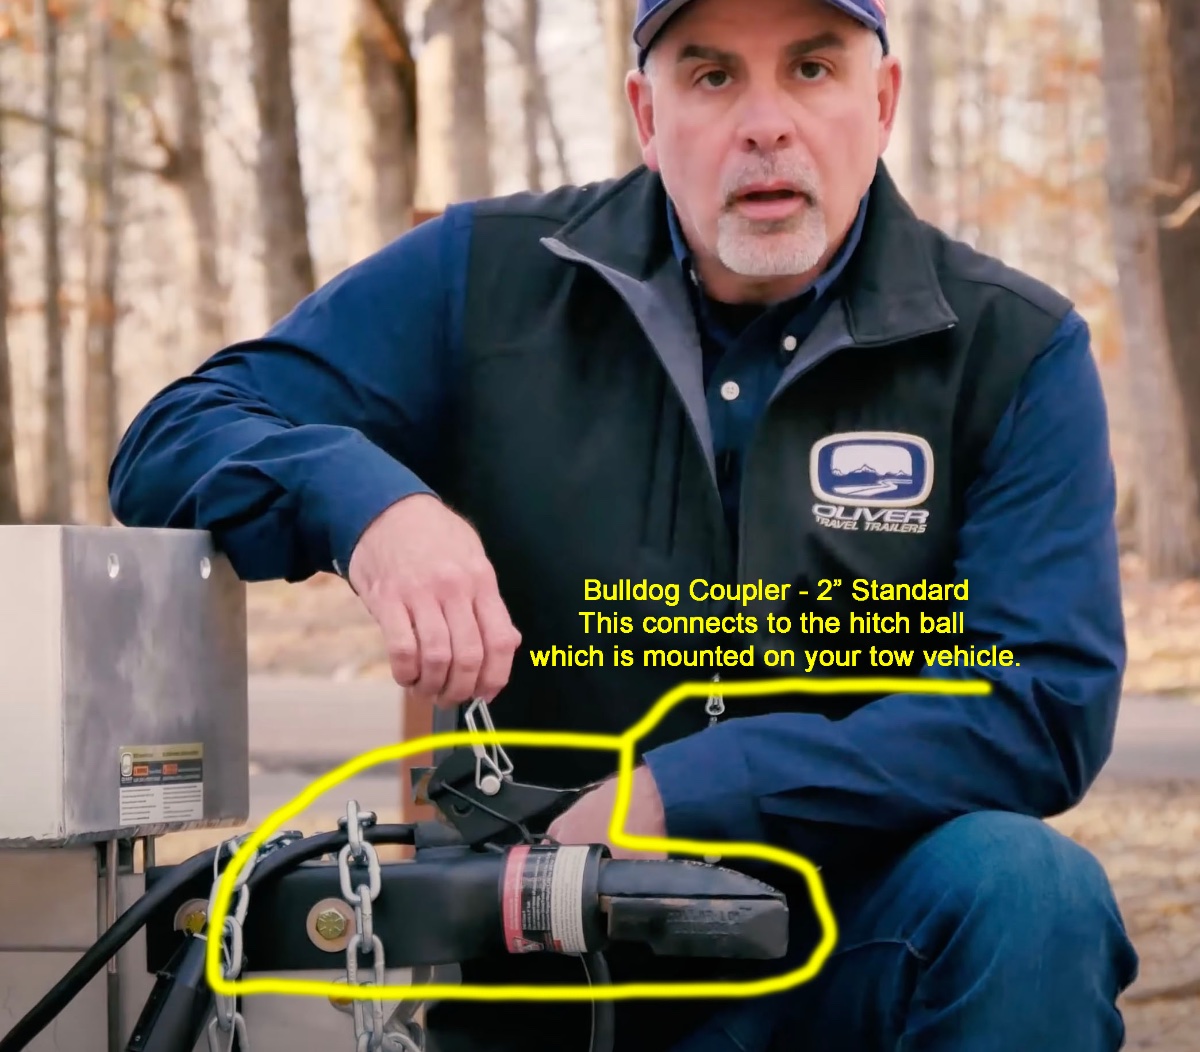
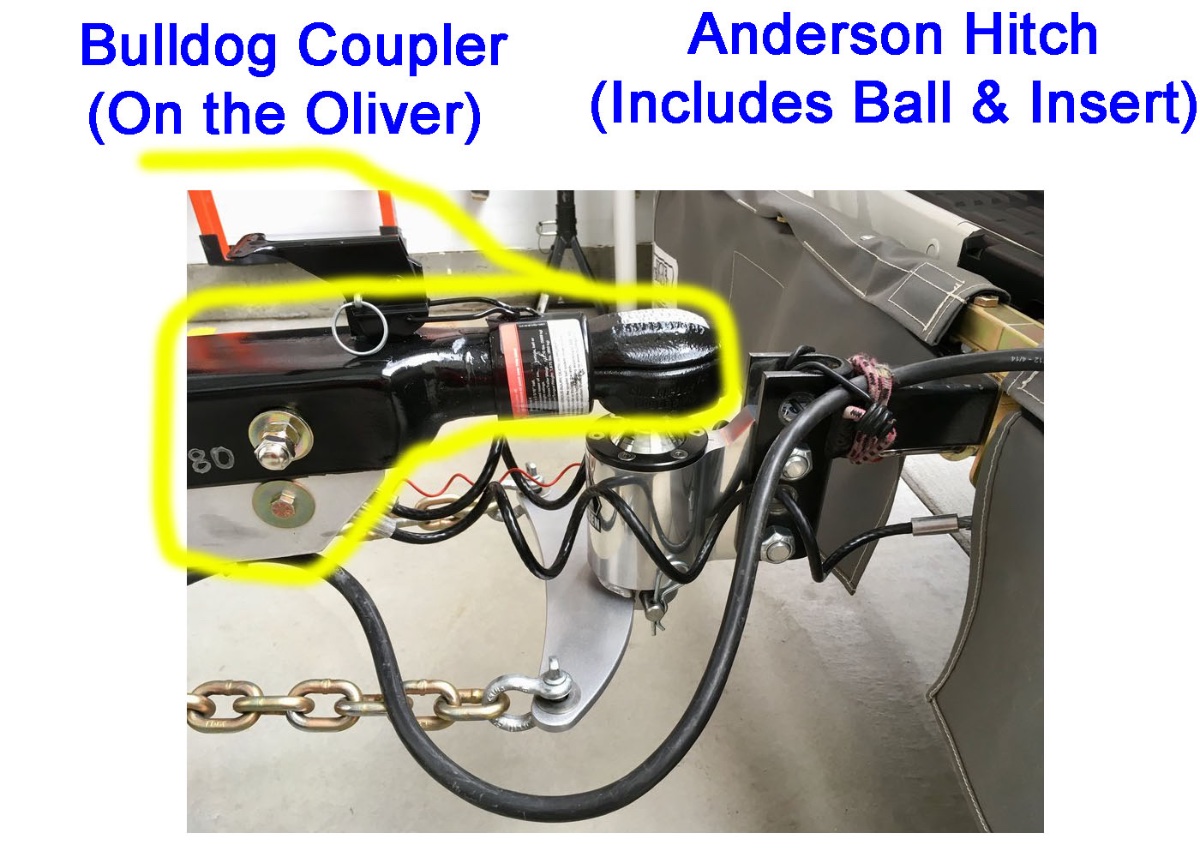
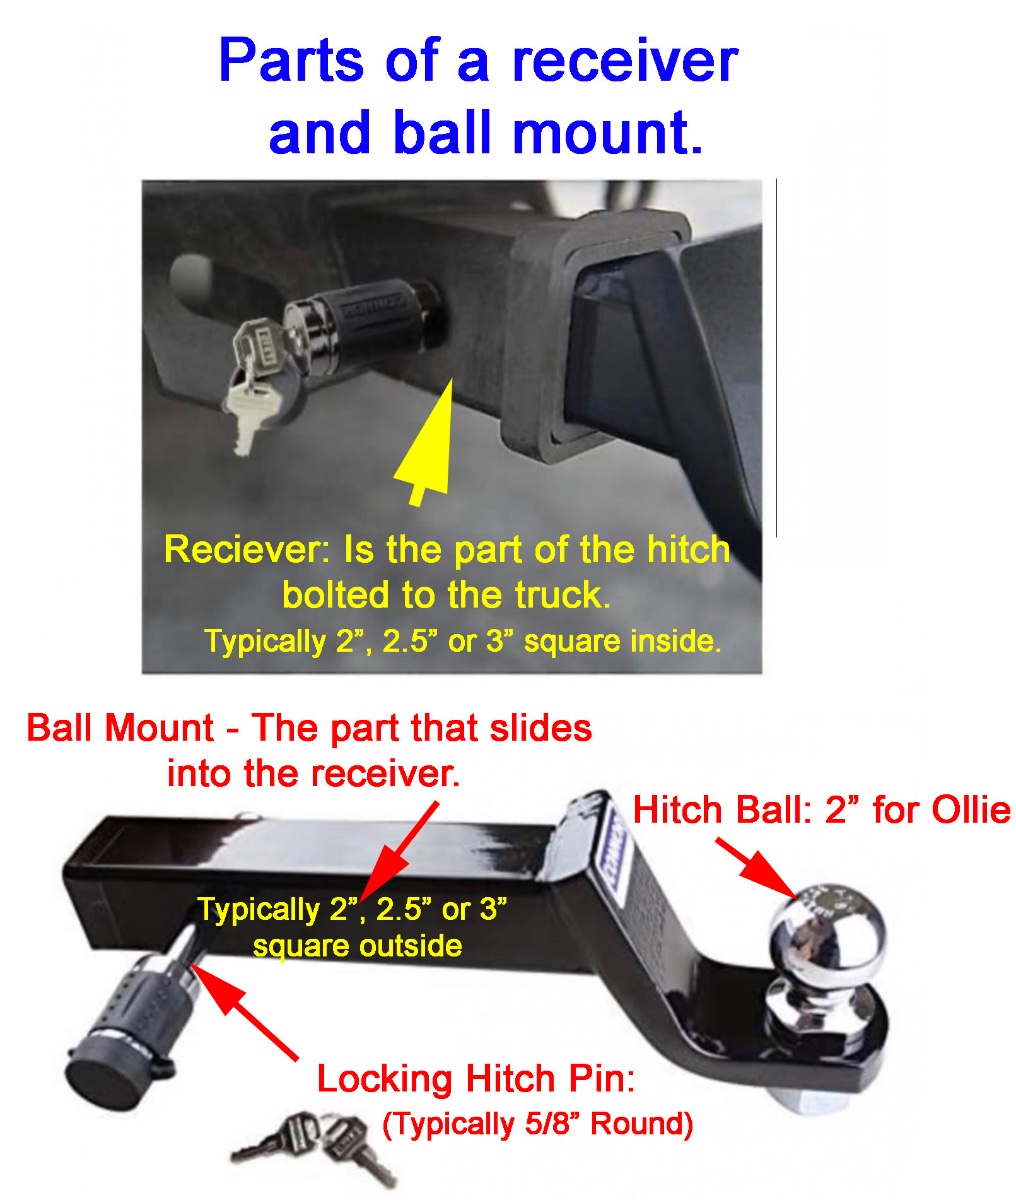
The "bulldog coupler" is the connection point bolted on the trailer. The bulldog coupler connects to the Anderson trailer hitch ball which is slid into the "receiver" on the tow vehicle. When you hook up that the "Bulldog Coupler" is lowered down onto the "Anderson Hitch Ball" as shown below: That picture of the hookup is from John Davies...(thanks for the great post John.) Have fun with your new Ollie. CS
3 points
-
Hitch parts definition based on your pix...you'll be fine and we hope to see you on the road some day.
2 points
-
Not to throw any more fuel on your “worry fire”, but you also need to be thinking about how to make your Ram look less tempting to a casual smash and grab thief. That is probably a good subject for a new thread, but basically try not to leave anything unusual or valuable exposed. At the very least, a dark blanket over the top of loose gear is a good start. Heavy window tint is good, but I don’t like that method. Removing the rear seats entirely and installing secure storage lockers is much better but big $. You can go crazy with window anti-theft film and extra door locks ... https://expeditionportal.com/forum/threads/recommended-overland-hardware-lock-hasps.15697/ ... but that is more appropriate for visiting Third World areas. In reality you are most likely to find a stranger hanging around waiting for your return, so he can beg you to let him look inside your cool trailer..... Get used to that. John Davies Spokane WA2 points
-
Hey John, If I come up with a way to test a low velocity approach I'll do it, but I don't have a low velocity fan at the moment. I do agree that low velocity kept on or run longer should work better. 🤔 I'll try a similar test (with the same fan) using the ductwork as that's not hard to do either, but my guess is that's not going to be effective at moving the temps that much either - just good to have a comparison. Ultimately, as @Mcb alluded to with the light bulb approach, heat strips might be the optimal way to solve this particular problem but I will have to take my time with that as it's more involved than these simple air/fan tests. Working with electricity is nowhere near as fun for me! Thanks again for the suggestions. I'm having a blast (pun intended) trying this stuff!2 points
-
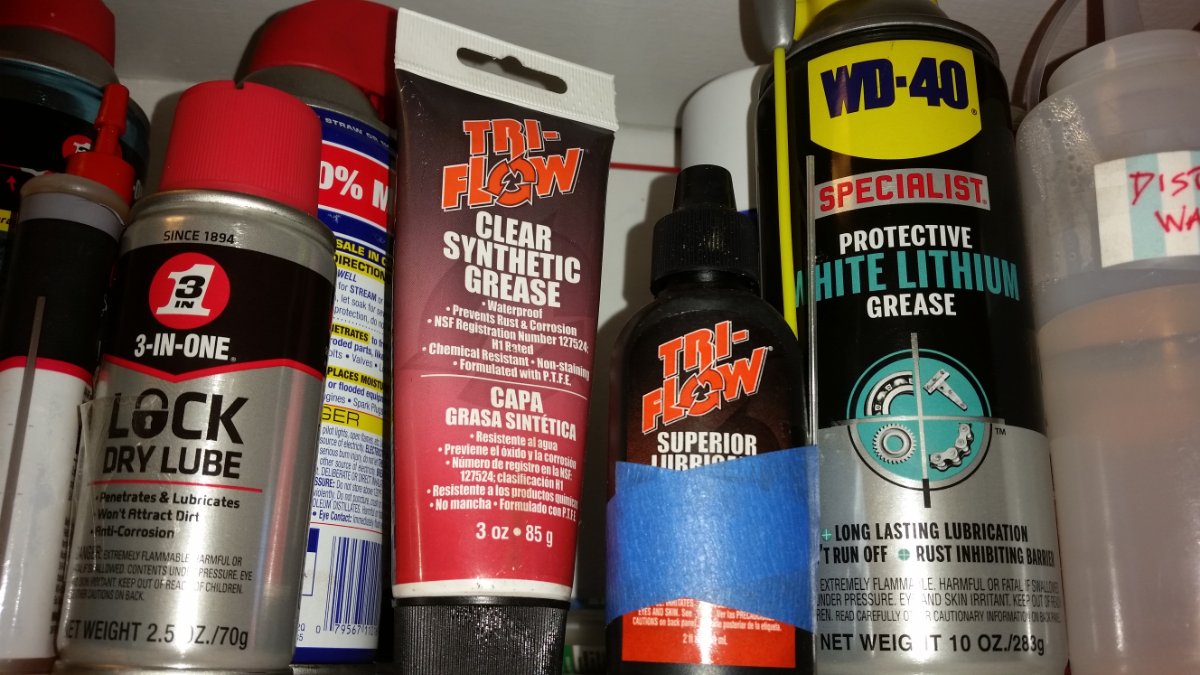
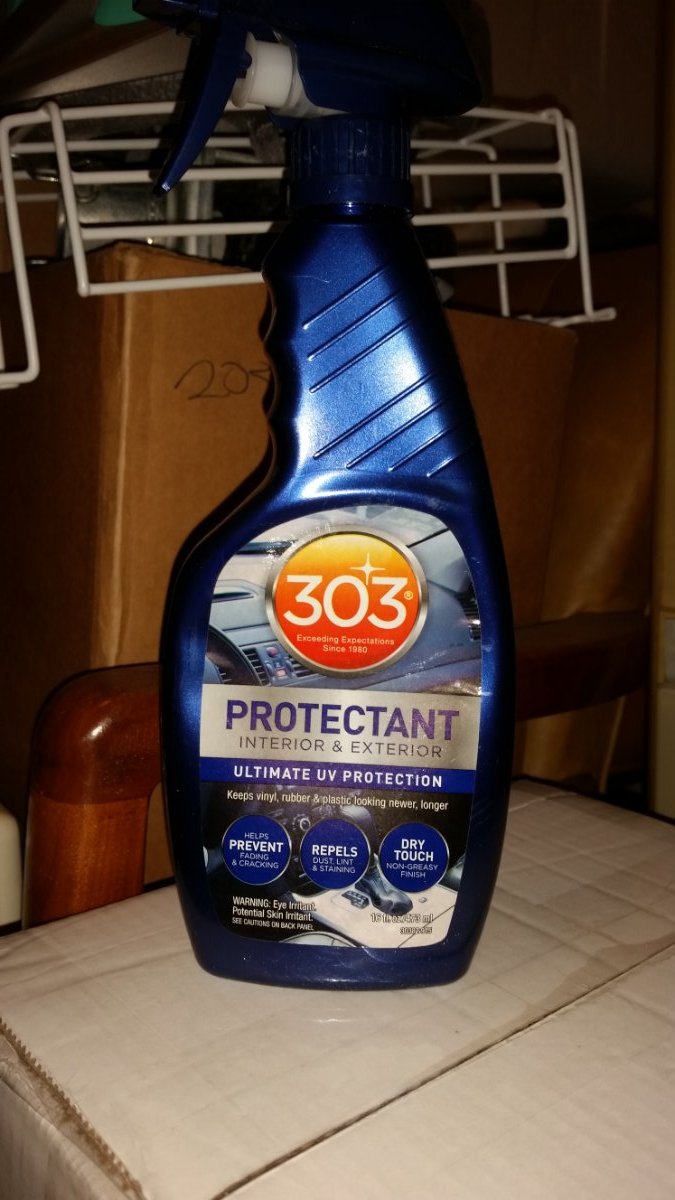
I used rustoleum spray paint after a light sanding to remove flaking or bubbling paint. After sanding, remove dust and oil (from hands) with a rag dampened with mineral spirts...let air dry before spraying paint ( make sure to let rags with mineral spirits air dry for a few days before putting in trash (possible fire ) . I used a heavy grease pushed down into gear area of openings. I used a lighter oil for hinged moving parts. The 303 on the seal of the lid and plastic covers.
2 points
-
Well, I gave JED's idea a try and the results were "mixed". I used a 400 CFM inline fan mounted on a piece of plywood that fit over the dinette seat hatch. I ran the fan for 10 minutes once per hour and monitored my temp sensors around the Ollie. In general, the cabin temp dropped dramatically and the humidity came up just as dramatically. The cabin dropped about 8 degrees each time I ran the fan and the humidity came up about 25% each time as well (expected as temps go down). In addition, the basement temps came up (dramatically) in the curb side basement (warm air was being pulled in) and the front street (where the fan was pulling from). The rest of the basement didn't budge much though (the other two corners) and the bathroom vanity actually got a few degrees colder each time I ran the fan. I suspect if I kept running the fan longer, eventually the basement and cabin air would equalize. I'm not really keen on making the basement and cabin the same temp though (super inefficient for the cabin) - just keeping the basement above freezing. Bottom line is there's a LOT of cold, humid air in the basement and mixing it around with a big fan doesn't accomplish what I'm after and mitigate "cold" spots in the basement. Furthermore, it significantly brings the cabin temp way down and the humidity way up. So... back to the drawing board. I'm going to test running some cabin air through the ducts now to see if the "targeted" approach works at all. This may not work well at all if the cabin isn't 90 degrees first! There may not be a feasible way to keep the trailer safe in freezing temps with electric only. 😞2 points
-
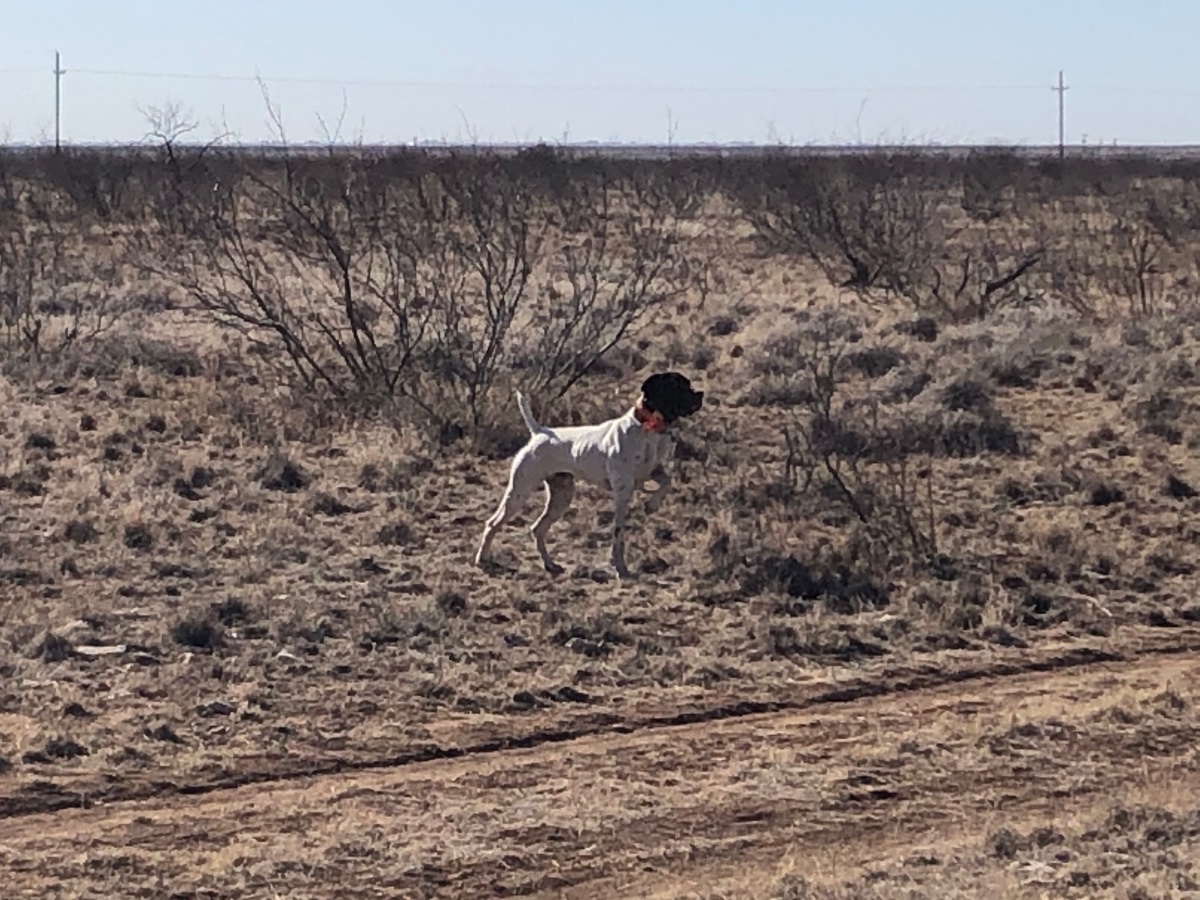
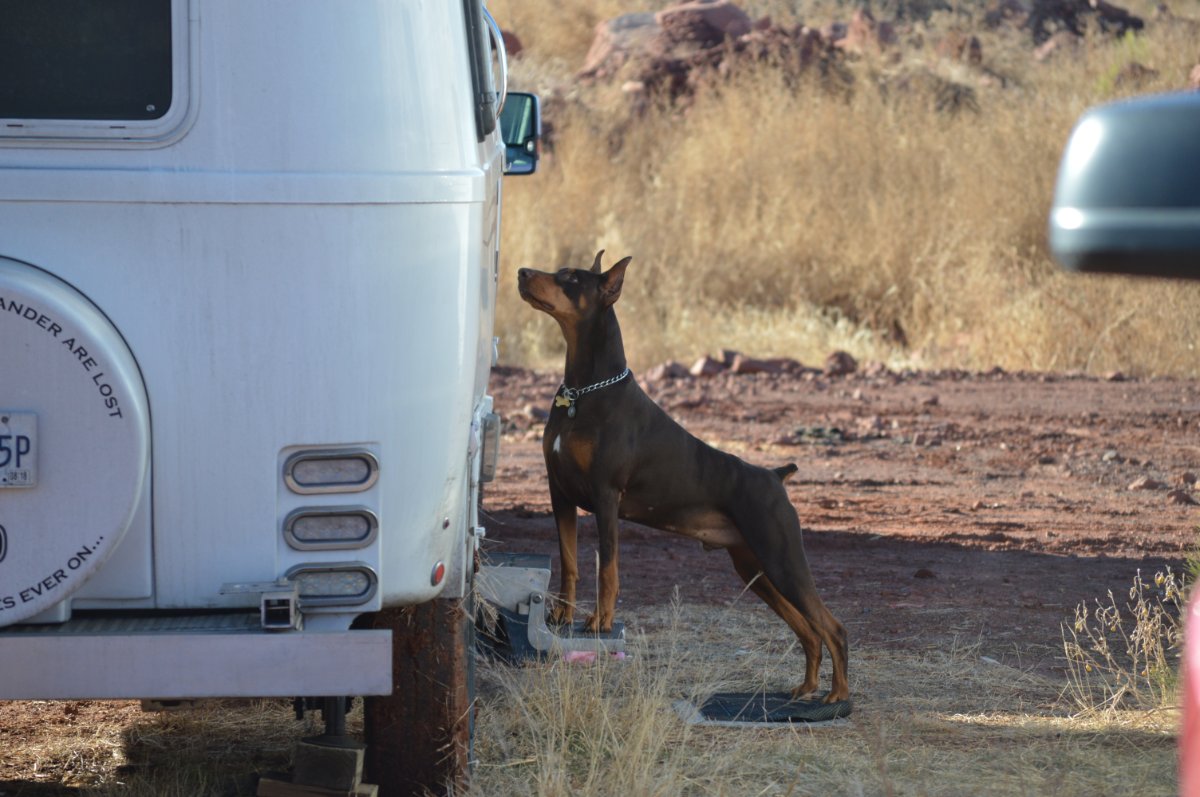
That's a very good looking dog. Is it an English Pointer? We travel with three dogs. We find that in warmer temps, if we need to be away from them for shorter (one to two hours) periods of time it's best to leave them in the trailer with the air conditioner running on the generator. In colder weather, under the same time constraints, we just leave the furnace on low. We've been doing it this way for 13 years and it has never been a problem. Here's Reacher, Rocky and Lucy...
2 points
-
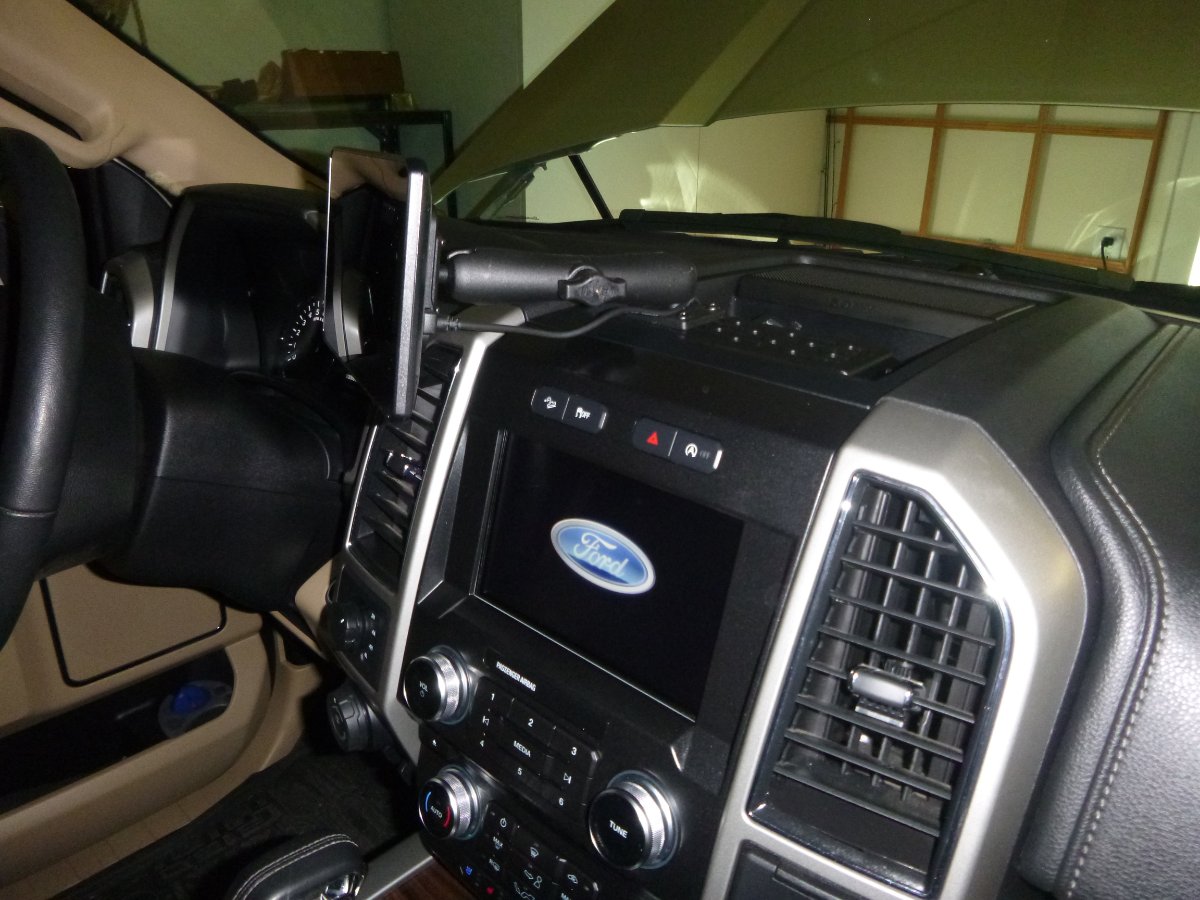
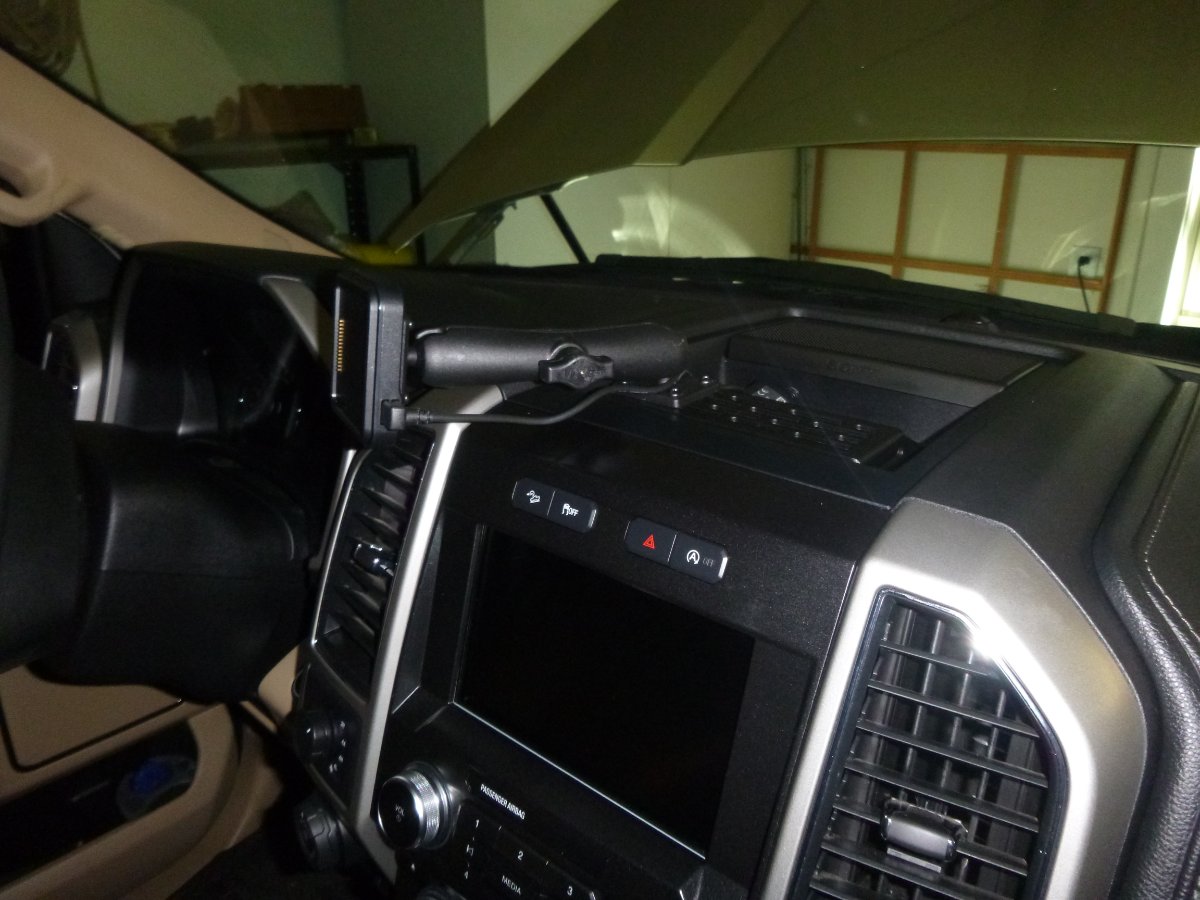
Now that I have the Garmin 890 installed along with the Builtright rack for the dash tray on the Ford (150 or 250), here are a couple of pics. Hardwiring the 12 volt/2 slot USB that used 3M double sided tape to attach to the underside of the Builtright rack was a bit un-nerving but not really difficult - let me know if you want details. With the adjustable RAM mount I can move the GPS to a more comfortable position as compared to my old GPS which actually had to sit up on the dash a bit too far away to make changes on the fly. And, even given the weight of the 890, the RAM mounts hold the screen securely and without vibration. The Garmin 890 is really very nice - it should be for its "sale" price of $400. But, the inclusion of data for campgrounds, dump stations, propane outlets, truck stops, Walmarts, Cracker Barrels, etc., really make this unit much more useful as compared to my old Garmin. The traffic and on the fly fuel price functions of the 890 are obtained via a Garmin app connected to the 890 via bluetooth. I've not had a chance (yet) to test these features. Questions? Bill
2 points
-
We are all wishing you well. Take a night off, or, two, to breathe and relax and recharge. This is a really big change, but many others have done it. You're as capable as most, even if it's all new. None of this is rocket science . I would also like to add my sympathies for the loss of your brother. And, for the deteriorating health of your mom. You'll be fine, eventually. Keep your head up and clear. You have friends here that you've never (personally) met. Sherry1 point
-
Perfect thanks for the info.1 point
-
Welcome to the group! We normally fill our tanks at a Tractor Supply, or other supplier that charges by the pound instead of "flat rate fill." 20 lb tanks are easier to handle. Tractor supply attendants will not lift the tanks out for you. A spare is easy to carry in the truck bed, if necessary. (Always contained/strapped to insure it stays upright.) We camp in shoulder season, not winter, if we can avoid it. 🙂 I've never really spent much time monitoring our propane usage, as we refill when one bottle empties. In an Elite with just 2 batteries, usually without hookups, I'm more concerned about 12v to run the power greedy furnace fan. If you have 110, you can easily supplement the furnace with a small electric heater. If you normally camp at serviced campgrounds, with electric hookups, I certainly don't see much advantage to lithium. Nor full solar. Your suitcase solar, with 4 batteries, will probably give you enough power to manage a long weekend, or a week, if you can conserve power. I do love agm for many reasons, including cold weather, and no real maintenance. Will you be parking your trailer at home? (Many of us here cannot.) If you are, and can keep the fla batteries plugged into a charger, so they remain fully charged, and are willing to do the appropriate checks and maintenance, flooded is fine. And included. As I said, we don't have hookups most of the time. We make our power from the sun. So, our situation is very different. Good luck with your decisions. It's really difficult these days, with all the available options.1 point
-
Thank you all!1 point
-
I am still in my Casita but wanted to say that I use my sink very little. I don't cook inside so clean up is done outside. I enjoy long hot showers and stay in campgrounds....I enjoy the walk to the showers...find them clean...I still wear shower shoes. And this may be TMI, but I never use the the camper toliet for anything but #1 and dispose of paper in a small lined container/trash can that I empty daily. Dumping is a breeze and I have zero issues. I really like having the camping adventure which reminds me of my younger days of tent camping...except now my sleeping is dry, warm/cool, not on the hard ground/... comfortable...lol. I'm sure I will try boondocking someday but until now this is how I travel....1 point
-
Thank you, I am all done with this for now, I think. Just gonna try to finish packing and errands and chill the rest of the day and maybe tomorrow. I cannot BELIEVE I "lost" that hitch pin thingy! I looked everywhere. Sigh. I think like you said, when I SEE this stuff, hands-on, it will make sense. Visual! I will figure it out.1 point
-
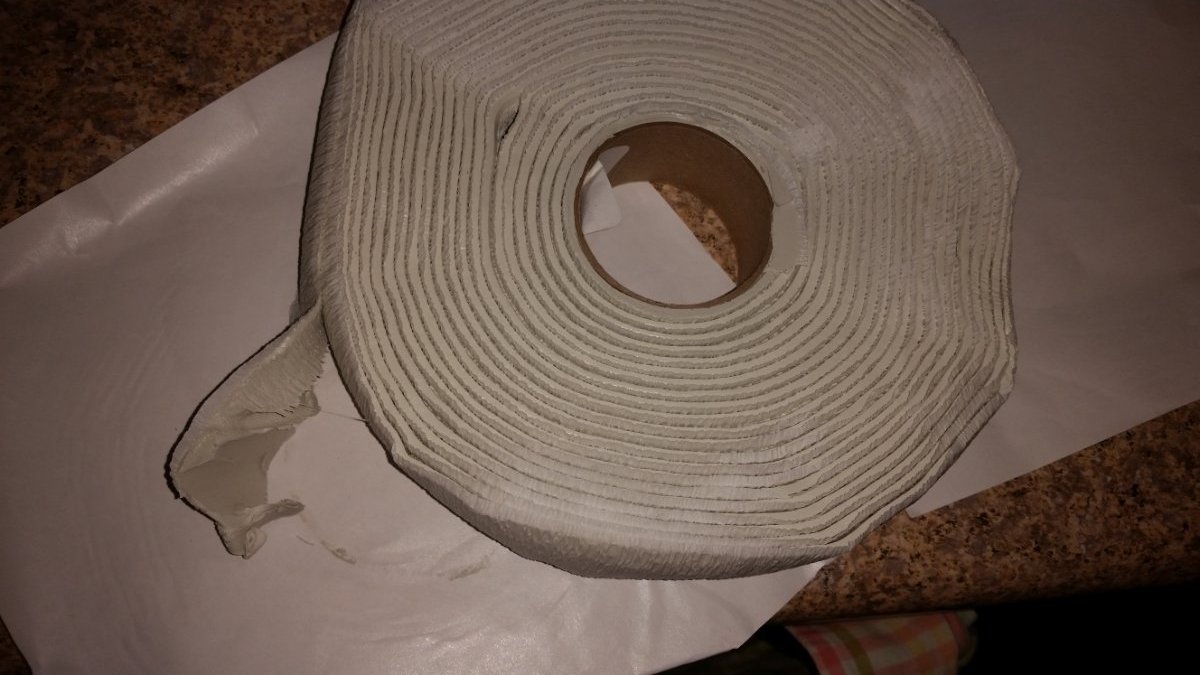
Our third taillight has had its issues over the 13 years, requiring resealing every 3 years or so. This year, it developed some hairline cracks, as well. We decided to remove and replace the lens. Ours was held mostly by (probably 4200) adhesive, and a few dabs of epoxy. The adhesive loosened with a heatgun on low in the attic, and a plastic scraper. The epoxy was mostly mechanical, plus heat. And not fun. We broke the lens in several places removing it. We installed the new lens from Oliver with a bed of grey butyl tape. Since that's not truly an adhesive, Paul added 6 small stainless screws. We felt pretty comfortable with the addition of the screws, since butyl is pretty much self-healin, self-sealing. After a couple days for the butyl to rest, he applied loctite marine to the exposed edge of the trimmed butyl, to protect it from uv and dirt . Today, we added a lip of eze rv gutter on the eyebrow, for good measure, extending beyond the length of the bottom of the trapezoid lens. I can't tell you for another 5 or 6 years if this is a better solution, but I'll be able to tell sooner if it fails. We'll see. We're both very happy with tried and true old school butyl as window and hatch bedding.
1 point
-
Bill, Fantastic install ...thanks for posting. I would like some more info on the 12V adapter. Did you wire in a USB/12V outlet plug into that upper tray? I'd be interested in knowing the part for that plug. Craig1 point
-
It will all make a lot more sense when you see the system put together. You can try your hitch lock without the hitch. Run it through the holes in the "square thingy," your truck's "receiver, to make sure it's long enough, and whether it's the right diameter for the hole drilled in your receiver.1 point
-
All: some day I will look back on all this and laugh. I am already laughing at myself. Need a clue bat upside the head, I do. They probably sell clue bats on Amazon. Heh. I drive to pickup the Elite one in 10 days. The OTT people will be laughing too, I’m sure. “So, you’ve NEVER towed anything, have a new truck that can launch missiles, don’t understand your new truck’s features yet, and don’t know anything about hitches and couplers and receivers and locks. Well played!” Haha1 point
-
SherMica, If you camp somewhere and leave your camp to drive off...you may want to consider adding a lock for the whole coupler like this one from Progressive Industries. (The big yellow thing the rep is telling you to buy is another form of this type of "Wholer Coupler Lock". They are hard to defeat (compared to other locks) but they are not cheap. We use this lock for peace of mind when we leave our trailer alone and take our truck out sightseeing. The model for the 2" coupl the Progressive Industries 2178-B: *B stands for Bulldog Coupler* https://www.provenlocks.com/collections/2-trailer-coupler-locks/products/model-2178-b Here's a "youtube" video here to explain how it fits on the Bulldog couplers used with Olivers. Video of Progressive Industries Lock for Oliver Finally, here's a pix of it on our Oliver. We put this on any time we're disconnected from the trailer and plan to be away from our campsite. Craig & Rose Hull 505 - Galway Girl
1 point
-
You may still want to purchase the Reese ball lock, or something like it, for use when you are camped. Most of us do. It's one more key to carry, but one more lock to make your trailer a slightly less attractive target. The ball bearing John suggested is a good idea, and no key. But it's not readily visible, and would drop out if the lock on the bulldog collar were defeated.1 point
-
Easily. Even in 90 degree temps I think you could hang meat inside. The issue is the noise from the AC. Kicking in an out during the night isn’t very restful. We shut it off whenever possible. The ability to control humidity is what we enjoy the most.1 point
-
1 is fine, as long as it fits into your receiver OK. Try it now to make sure. 2 is extra fine, but you need a better lock for it. Your storage unit lock is probably junk. This one is very good, not the best but a hell of a lot of lock for the money. .... Stanley high security padlock ... I have been using one for four seasons and it is most excellent. 3 isn't that just like number 1? 4 no, you don’t need that. If you are super concerned about somebody lowering the coupler onto a smaller ball and driving away, buy a hardened 2” steel ball bearing ($10) and lock it into the coupler opening using the coupler lock you already have. But that really isn’t necessary unless you leave it unattended in Detroit or Chicago... Buy the better padlock and call it good. John Davies Spokane WA1 point
-
You say you want to secure the trailer while it is still hitched to your truck. What you have purchased will do that. The lockable hitch pin ensures someone can‘t easily remove it. The collar lock ensures someone can’t easily open the bulldog hitch and remove your trailer from the ball. I don’t think your nice rep understood your question. The yellow Reese lock is for when you are unhitched to secure the bulldog hitch. You can use the collar you purchased for both situations, both when hitched to your truck and in combination with the yellow Reese lock (or any number of others) when unhitched. Since you already have a lockable hitch pin you don’t need another one. Mike1 point
-
Bill, Thanks for the great write up on the Garmin 890 and install. We placed our order for the 890 and look forward to possibly a similar install. - David1 point
-
Thanks for the feedback guys. I figured for sure it was the board or the igniter. Like I said the thermostat initiated the furnace and the blower went on. The last thing I thought it would be was the T-stat. Well I did a reset on my T-stat today and the thing fired up I could hear the infighter and the flame. Here's a screenshot of the procedure. Wish I knew why this happened. Peter
1 point
-
I would suggest making it as simple as possible and based on 12V with three temp sensors, one each in both basement sides as well as the coach. Using an Adruino unit or Raspberry pi one could program the device to turn each side on/off independently when the basement temps are either high or low and the coach temp is in a beneficial range. An automated control could be done with < 3watts when idle and 5-10 watts when all of the fans are running.1 point
-
Roughneck 24 Gal - Outside Dimensions 26.000 in. L x 18.500 in. W x 17.000 in. H Inside Dimensions 20.000 in. L x 14.500 in. W x 15.000 in. H1 point
-
Is there a measurement index for the ELITE I? I can’t seem to locate one. Carl1 point
-
Interesting test, but I suspect your results may be due to your choice of fan. 400 cfm is a whole lot of air. My medium Vornado portable is about 300 cfm. Their large model for a 100 ft wide room is 500. In summer that might work great for making a breeze in the cabin, but for heating, a low flow will work better. Can you repeat your experiment with a much much smaller fan running all day? I don’t know enough about the physics to be able to predict the results, but I do know that plastic (your water lines and tanks) is a really poor heat conductor. Blowing high velocity air across them for a short time will not do much to raise their temperature. Here is an interesting article. https://sciencing.com/drink-metal-can-plastic-bottle-5518851.html Your water filled fresh tank is a VAST reservoir of heat. It takes a long time to adjust its temperature, and it tends to hold onto that heat. I wonder if an in-tank electric water heater could help with maintaining the under floor temp in winter. A regular RV tank heating pad located under the tank would do the same, but the Ollie design doesn’t allow for that. An automotive engine block heater with built in circulator pump would probably be excellent, if you could find one that worked at a lower temperature. Most car units run hot enough to damage pex tubing. An Alde hydronic heating system would be 100% perfect for this! Just add a little radiator coil wherever it is needed. Unfortunately you can’t buy a kit, it is for OEM builders only. I did check😢 I would love to be able to retrofit one in my Ollie. With the double wall hull it should work magnificently (and completely silently), but you would have to drill a whole bunch of holes for air circulation. I am pretty sure that heating the water inside the fresh tank to say 40 degrees F would work, but engineering a safe, reliable, affordable system may be a real hassle. Try the small fan, running all day, to see if that might work OK. The computer fan I am mounting under the batteries is 35 cfm (12 vdc, 70 milliamps) and I will probably just let it run all the time when it is needed. It comes with two inline resistor cables to drop rpm if needed. Good luck. John Davies Spokane WA
1 point
-
Interesting. Did you have the warm duct air running into the basement at the same time as the fans? Do you think that the moist air in the basement can be “drier” if the temperature is increased by the air from the ductwork? if the object is to keep pipes from freezing using electricity, it might be worth trying running an extension cord with a clamp light equipped with a 150w bulb into the basement.. There are crawl spaces under old houses throughout Maine that use that technique to prevent pipes from freezing.. might help an Ollie in NC🙂1 point
-
Our AC will freeze you out of the trailer.1 point
-
Yes, we have the one-piece cast iron grate. Our Oliver manual calls it the D21. The new grommet works with the hole and grate, same way as the original.1 point
-
Thanks . . . . Do you secure it to the pickup somehow? And do you lock it? Looking at the dimensions, it won't hold the Yamaha 2200i, which is 21.9 x 11.8 x 18.5 Maybe we should consider a smaller generator; a 2000w might even fit in a toolbox.1 point
-
Welcome to the forum. Where do you live? Where do you plan to camp? What truck? We need dog pictures. 😉 If you can’t easily find shade on blistering hot days, you should not pick the lithium battery option, those very expensive batteries can be damaged by long term exposure to excessive heat. Buy the AGMs, or if you are OK with the hassle of maintaining them monthly, the regular “wet” lead acid batteries. John Davies Spokane WA1 point
-
I don't think that it is sail switch either. I've never had this issue with the furnace but have had a similar issue with the fridge. I solved it by taking compressed air - a can of THIS kind of stuff is sufficient. Be careful to NOT blow back towards the needle valve but do blow out around the burner, the igniter, and up the flue. It doesn't take much dirt, dust, bug stuff to cause a failure on that igniter sensor. BIll1 point
-
From the light code. you are getting it doesn't sound like the sail switch, but you can time the blower run just to be sure. No light off would be the ignitor (spark) or gas supply (more than likely the valve) or the circuit board that makes them dance.1 point
-
I found this site, with several types of tonneau covers that work with toolboxes. Even Diamondback makes one. Pricey, though. https://www.autoanything.com/tonneau-covers/20A50299A1.aspx1 point
-
Read a little more carefully, it looks like you are getting the flame sense falt. The thing to troubleshoot would be are you getting ignition and it is the sensor or is ignition not happening? John's link goes into viewing the flame - but you should also be able to hear the light off.1 point
-
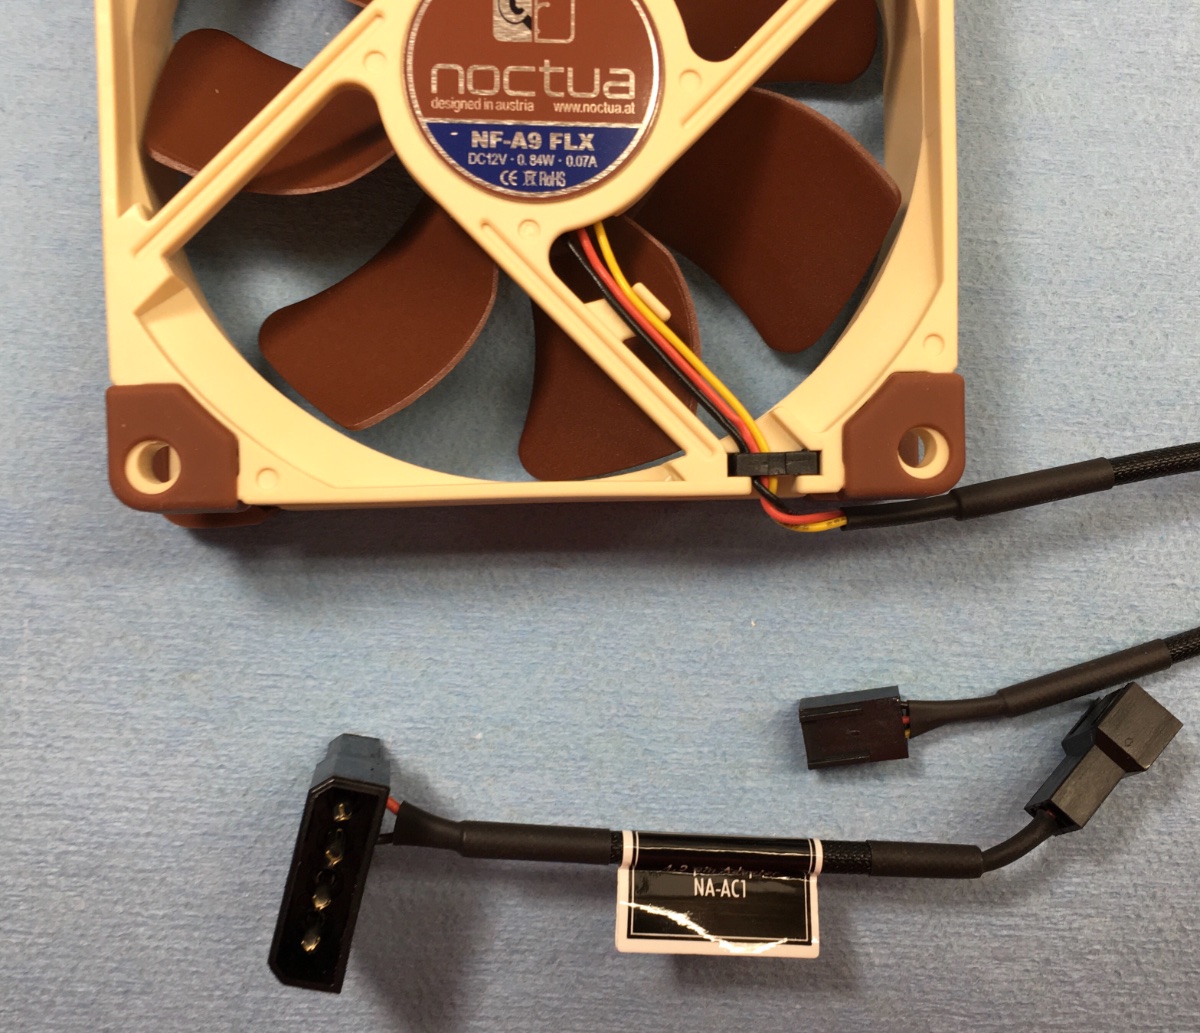
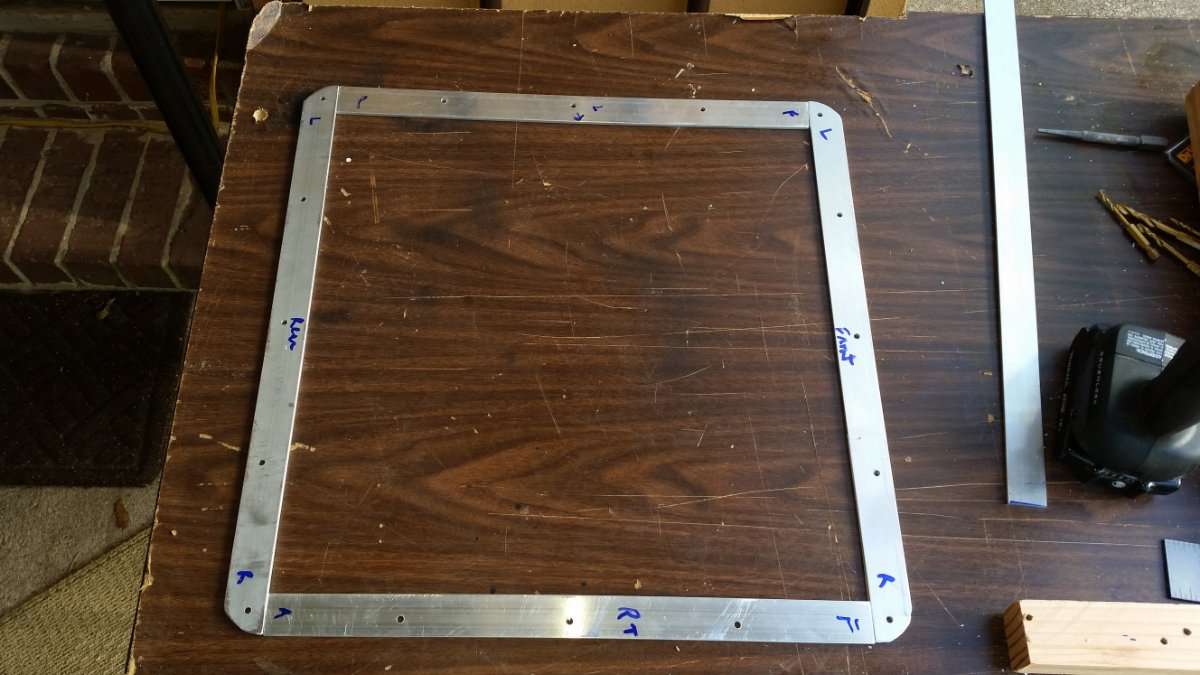
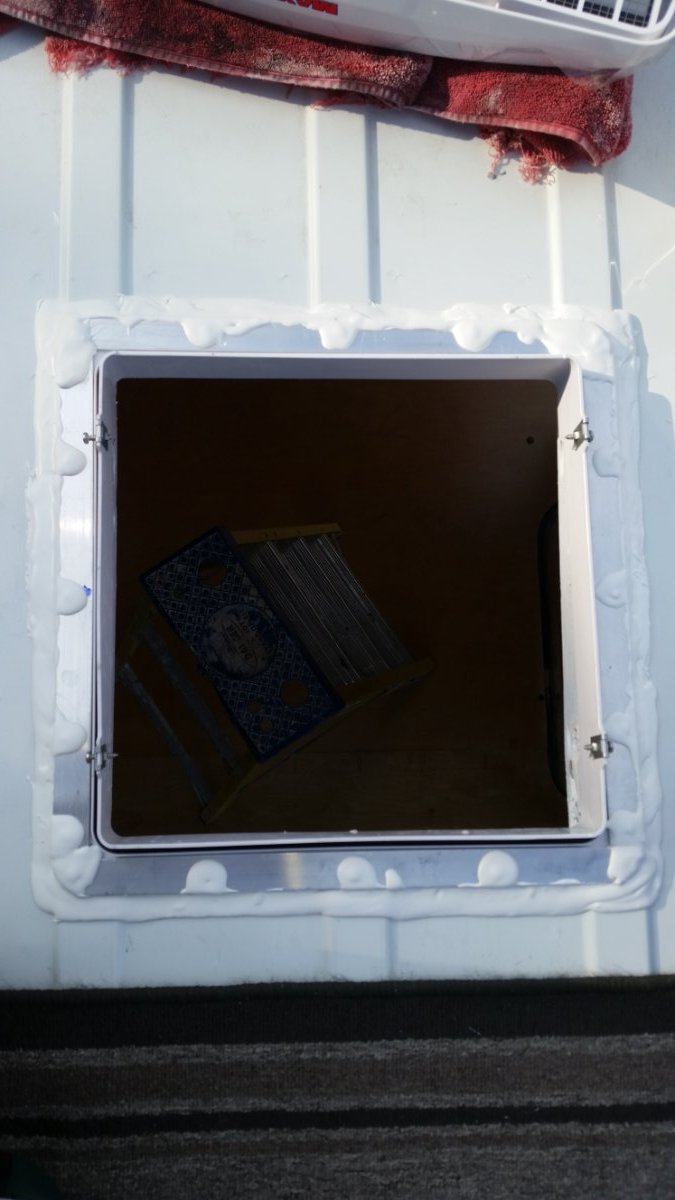
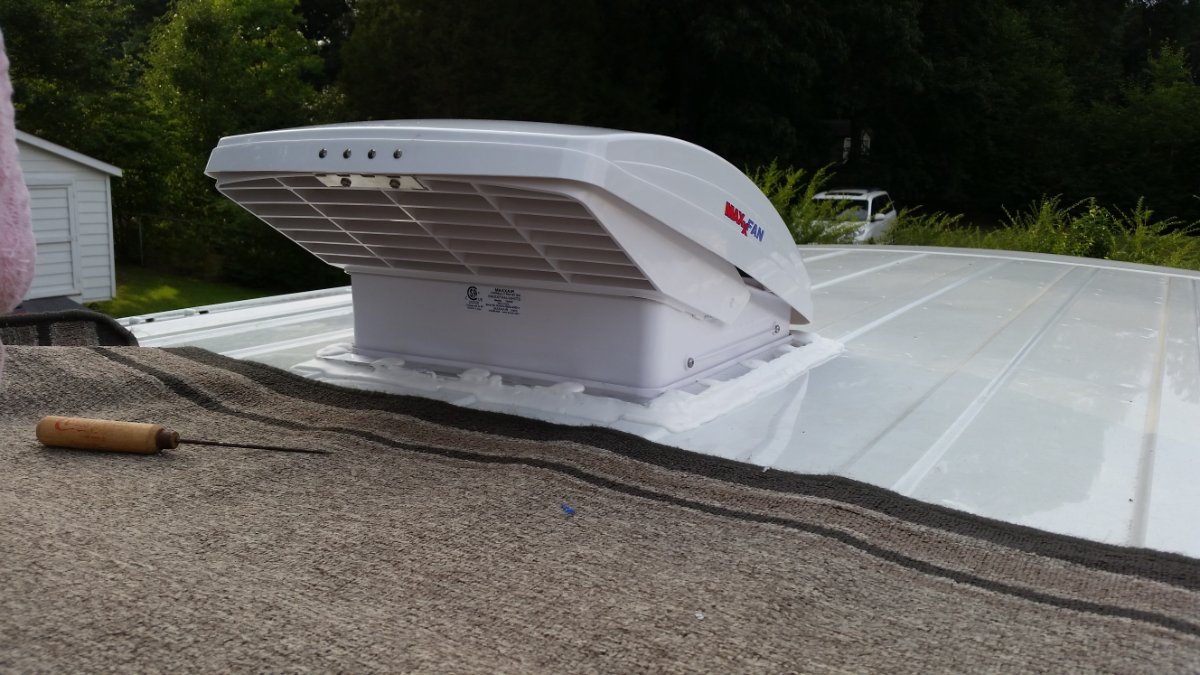
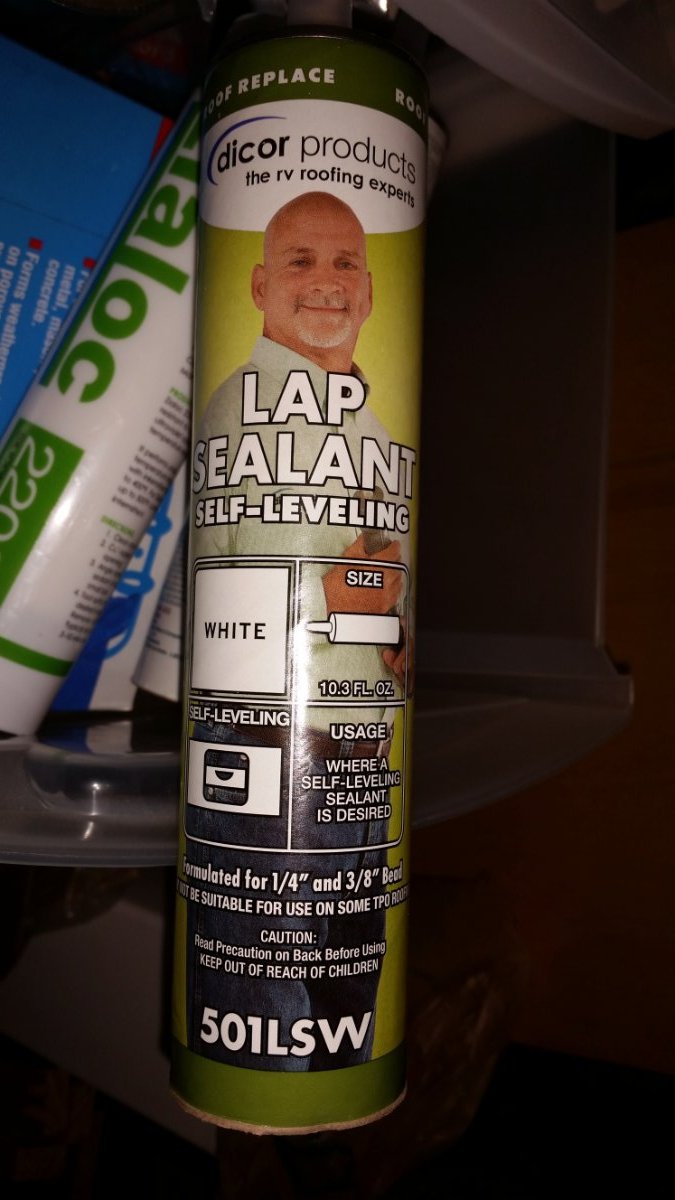
As far as the fit of the fan shroud base I chose to use a technique I found on utube. This was a fan I installed on a Nissan NV 2500 build but would be pretty much be the same on others . I cut 1/8 inch thick aluminum strips to go on top of the plastic to reinforce the base. I used mastic ( keep this in fridge until ready to use if it is hot outside...it will become a ticky mess if not kept cool/cold before use)and dicor self leveling caulk. I wanted to make sure the fan was not going to leak especially if the fan base became brittle in years to come. Overkill but I sleep well knowing I did extra.
1 point
-
Thanks! Great idea to give a try! I can test how this works with a fan mounted on a piece of plywood that fits over the access hatch under the dinette seat. I'll set it up and see how it moves the temps around the basement. If there are still some dead areas that stay cold I may be forced to use the ducts as I have those set up and targeted specifically at the problem areas. The entire basement really needs some heat all around as the plumbing wraps around 3/4 of the trailer. The battery compartment is staying surprisingly warm and looks like it won't need any venting specifically for heat. I have the Oliver provided heat pad in there anyhow as a last resort. Trying to keep the battery compartment cool(er) is a different problem than trying to keep all of the basement plumbing from freezing. I may be able to leverage some of this work I'm doing on the heat, but I don't necessarily have to. I'm going to wait and see how hot it gets in that compartment - I'm in NC and I won't have to wait long for some steamy temps - then I'll figure something out. You should have some great data on your venting project by then too!1 point
-
I am soon to be a new owner to a Oliver (previously only had a pop-up trailers) and I have a insurance question to everyone. When you insure your Oliver, is it just insurance from your automobile insurance company or do you need to buy insurance like homeowner insurance. If it is like homeowner insurance, what are the major companies that handle this type of insurance (that are reasonable to work with). Thanks Richard1 point
-
Bill, what a nice installation, it looks slick! FYI about map updates, do them often. They come out about every three months. When installing, look at Options and choose to install a copy on your computer. Their BaseCamp PC or Mac mapping application works pretty well for a free app, but any updated maps have to go onto your computer as well as your device. https://support.garmin.com/en-US/?faq=vxmflP3DAk2ajAJSmzVSW6 Map files are huge, try to delete older ones off your computer rather than just letting them accumulate. The new one that goes onto your device over-writes the old one; NOT so with the ones that go onto your home machine. Also you can add a few “custom” map types to your device and to BaseCamp, like 24K state topographic maps. These have to be downloaded from another site like .... https://www.gpsfiledepot.com/maps/ .... and then loaded using the Garmin Map Install app. https://www.gpsfiledepot.com/tutorials/ John Davies Spokane WA1 point
-
Yes, since I already have the Garmin Express program on my computer due to the nuvi2797, it was easy to bring that program up, plug in the new 890 to the computer and add the new device (the 890) to the list of Garmins I have. From there the "Express" program automatically checks for both GPS software and maps updates. In my case, both were needed. However, instead of this process taking a couple of hours to update, as was the case with my 2797, the 890 only took about 1/2 hour. These RAM mounts are really nice. I have used them in the past on various motorcycles but never before in the truck. Note that Garmin says that the ball mount on the 890 is 21.83 mm which is a bit smaller than the one inch ball of the RAM mounts. But, after comparing the two side by side, I really could not see any difference and can happily tell you that the one sent with the 890 works very well with the RAM extension arm. Frankly, I was pleasantly surprised by how stable the 890 is hanging off that 5 1/2 inch arm. I'd strongly suggest to wait until you have the 890 in hand before you decide where or how you want to mount it in your 1500. I found that simply having it attached to the windshield or sitting on the dash blocked way too much of the view out the front. Certainly the screen is big enough to mount in the center of the cockpit so both people can see it and the navigator can easily take the 890 off the "head" unit in order to more comfortably look for rest areas, gas stations, campgrounds, shopping, restaurants, etc.. As I tried to show in the pics above, my mounting area gets the screen out of my direct line of sight but still gives me access to all of the controls on the dash and even a view of the navigation screen in the center console. Perhaps Builtright Industries makes a mounting system similar to what they make for the Ford that gives you several different options. As you can see, I have plenty of room to mount my TPMS and/or a cell phone to the Builtright rack. I really think that you will enjoy the 890 when you get it. Bill p.s. My 890 was manufactured in November but still needed the updates mentioned above.1 point
-
I agree, the Sirocco ll fans are tops! I did not want a permanent mount, so I used heavy duty Velcro to secure the fans (His and Hers) in optimum locations to maximize their use and be more obscure. One over each bed at the cabin rear and another curbside at mid-cabin (see pic) to better serve the galley and dinette areas, as needed. If you look closely, the white Velcro to secure the rear curbside fan is hardly noticeable. The fans are stowed in the attic when not in use or underway. I did alter the wiring to facilitate use of the 12v female lighter sockets of proximity. The rear street side fan cable loops through the cord hole servicing the TV to the socket in the attic, and for now the rear curbside is routed through the attic doorway until I make a hole to route it in similar fashion as the street side. I utilize the under counter socket above the cooktop for mid-cabin fan use. I installed DC 2.1x5.5mm female socket jacks and connected the fans’ stock power wire internally in each. I then altered two DC 2.1x5.5mm power plug extension cables by replacing the female end with a male lighter socket plug connector. This set up now allows for ‘plug and play’ versatility if I want to use the fans in my TV or an outdoor setting.
1 point
-
We had these on our boat and were one of the first mods to the Oliver. They work great.
1 point
-
My single Caframo located in the rear curbside corner works extremely well and it sips power (0.35 amps on High). Normally it is pointed down a few degrees and rotated in a 45 degree angle toward the street bed, where my wife sleeps. We both sleep head to the front, so we get the air on our faces. Even on Low or Medium speed she gets plenty of air, I get enough leakage to stay comfortable. If I am camping alone I point it towards my side. I highly recommend this fan, you could always install two and both have full control, though as noted above they are not remote control. Yes they are pricey, but I look at expensive upgrades as “making it easier to resell the trailer” though you never ever get back your investment in the upgrade part and labor cost. If the labor is your own, it is easier to deal with. https://olivertraveltrailers.com/forums/topic/3305-how-to-caframo-sirocco-ii-12-volt-marine-cabin-fan/ These really are quite nice, and I think Oliver should offer a pair of them as factory options. John Davies Spokane WA1 point
-
Any 3/4 ton pickup will work fine without the Andersen hitch, choose whatever brand and 4wd model you like best. If you want to know about engines, search past topics here since this gets discussed about every couple of weeks.... there is an active “How many mpgs towing” thread, have you looked at that yet? Fuel economy is only a fairly small part of the overall ownership picture. I personally like the newer Ram 2500 trucks. Choose a nice interior because you will spend many long hours sitting inside, looking at it. Drive them all, choose your favorite, then shop for the best deal on it. BTW, we hear all kinds of reasons to change vehicles, I do not recall anyone choosing one because they already have a nice hitch....🙂 John Davies Spokane WA1 point


-
Recent Achievements
-


")


")


