Leaderboard


Popular Content
Showing content with the highest reputation on 02/22/2021 in all areas
-
Richard, We have experimented more than once with a one gallon propane tank to see how long it would last. This tank will last 4 days running the refrigerator and using the stove every morning to heat water for coffee and cook eggs. During experiments high temps during the day were 76 to 80F with low temps in the 60s. We use a gen-set daily for 30 minutes to power hot water heater for showers during the experiments.3 points
-
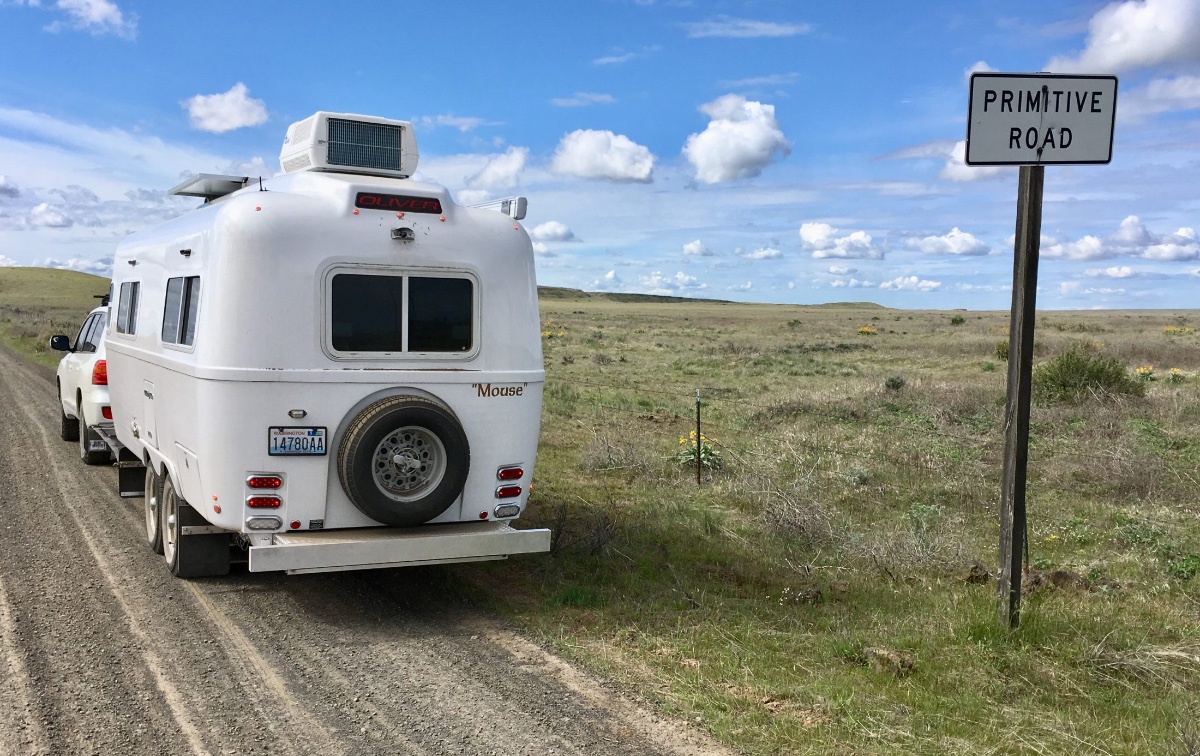
LCTraveler, There is enough room to fit the one leveler between the tires without problem. When coming off of them, you do need to be a little careful or you will wedge the middle one between the two tires. It is not a problem but you may need to move the trailer an inch or two one way or the other. If you find the need to talk to someone regarding your preparation, feel free to PM me with your contact information. I am always happy to talk about Rv'ing and the Oliver. I love the distraction! Andrew3 points
-
OMG. The Houghton is quiet. Really quiet. Just got it installed and hooked up. I'll post more info later but a very quick measurement with the unit running in heat or cool with high fan was about 64-65 dBA. The Dometic was about 78 dBA on my unit, so this very rough, unscientific measurement indicates the Houghton is less than half as noisy as the Dometic. The heat pump feature is a nice addition. OTT are you listening? Probably can't hear me over the sound of your noisy Dometic A/C 🤣3 points
-
Hi, Fritz. I came across this blog post on diy window awnings using pvc pipe and big command hooks. https://wackypup.blogspot.com/2017/06/easy-pvc-awnings-for-your-camper-fully.html?m=12 points
-
LC - On VERY RARE occasions (usually when the nose of the Oliver is either severely high or low) I've found my Andersen's to be fairly tight between the tires. For this and a couple of other reasons I carry a rubber mallet. A couple of taps and its free. June is going to be a great month to pick up your baby - like there really is such a thing as a bad month! Hopefully you are doing a bunch of trip planning so that you will be ready for the road. Bill2 points
-
Richard - Re propane usage - the fridge really doesn't use much and it runs best (stays coldest) on the propane setting. I've gone almost two months (during the summer) on one 20 pound bottle of propane with the fridge constantly on propane, cooking and the rare water heater use. I do travel with the fridge on propane unless it is prohibited by law. I do not know about charge state on the batteries since I never use the fridge on 12 volt power. Bill2 points
-
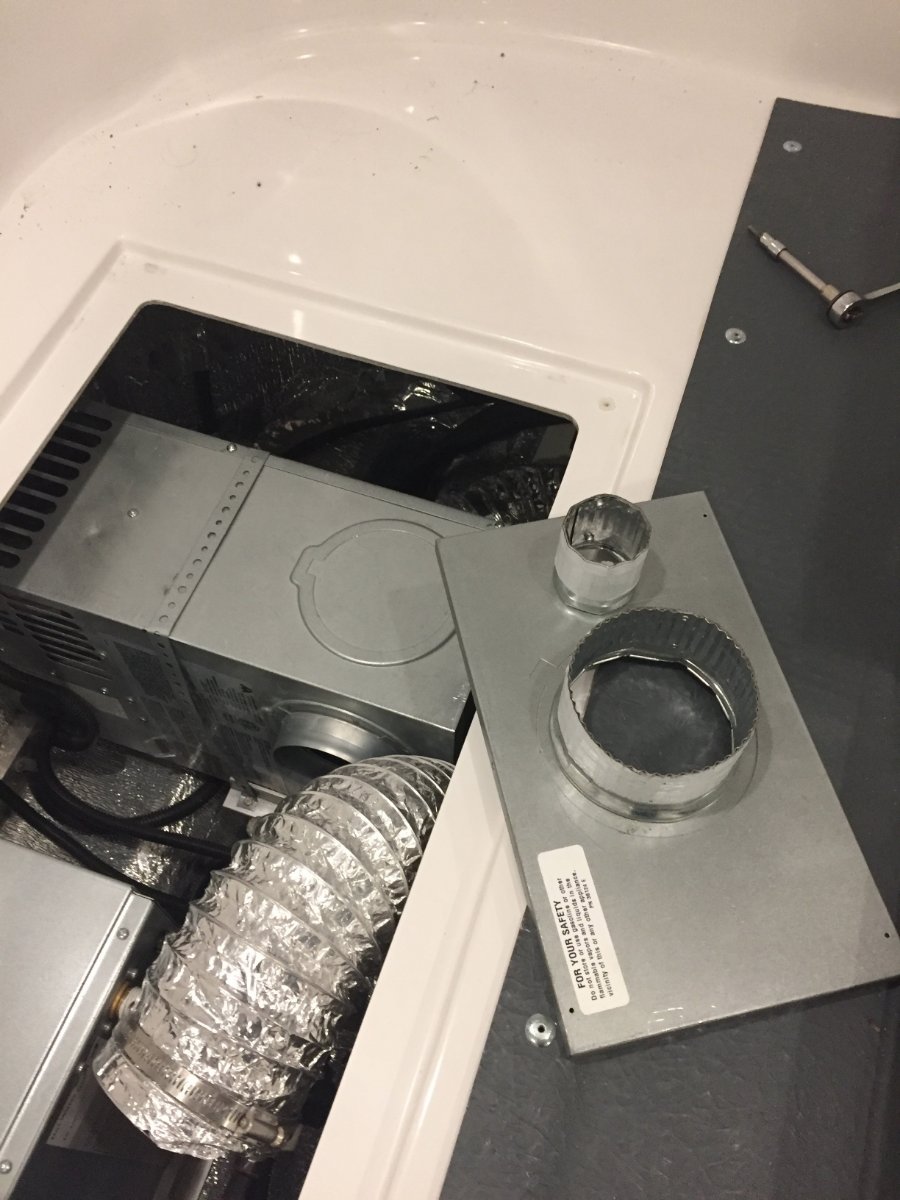
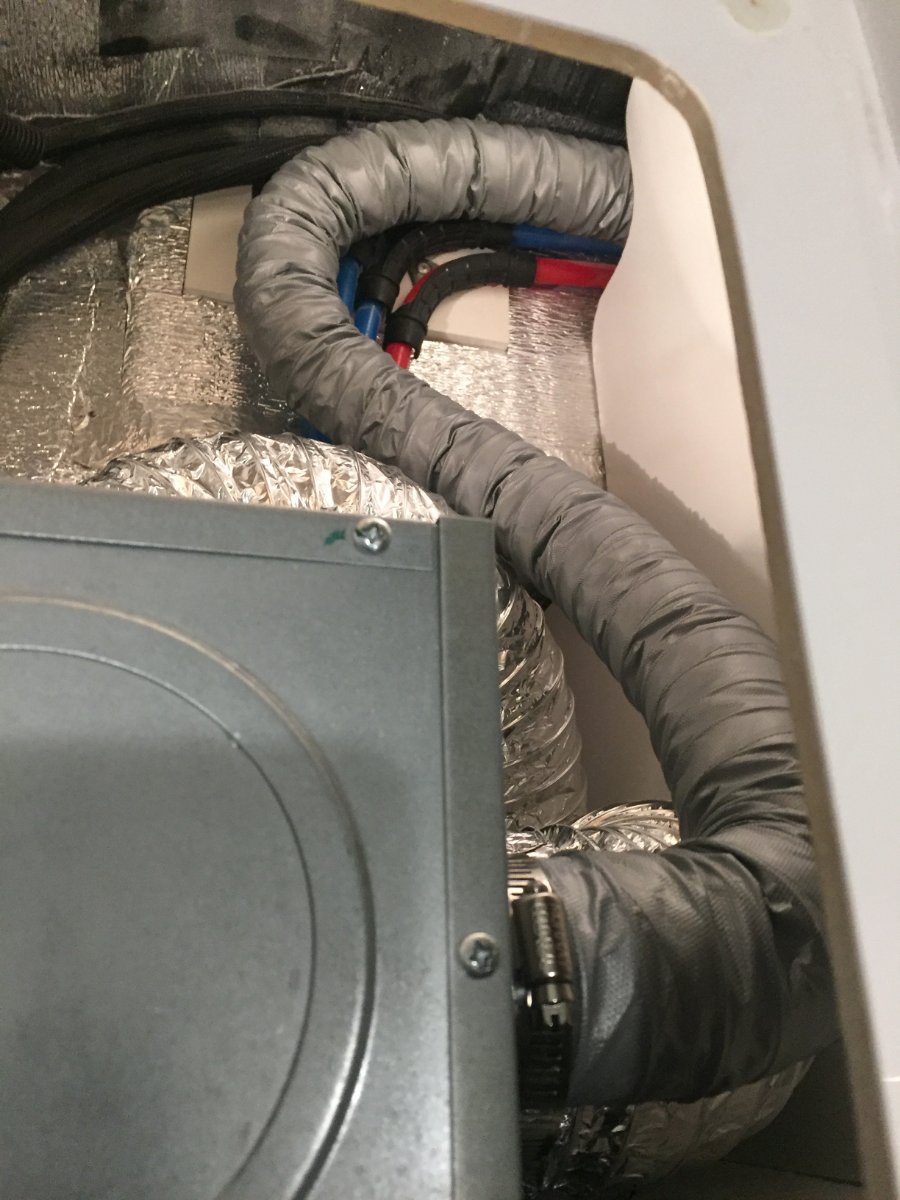
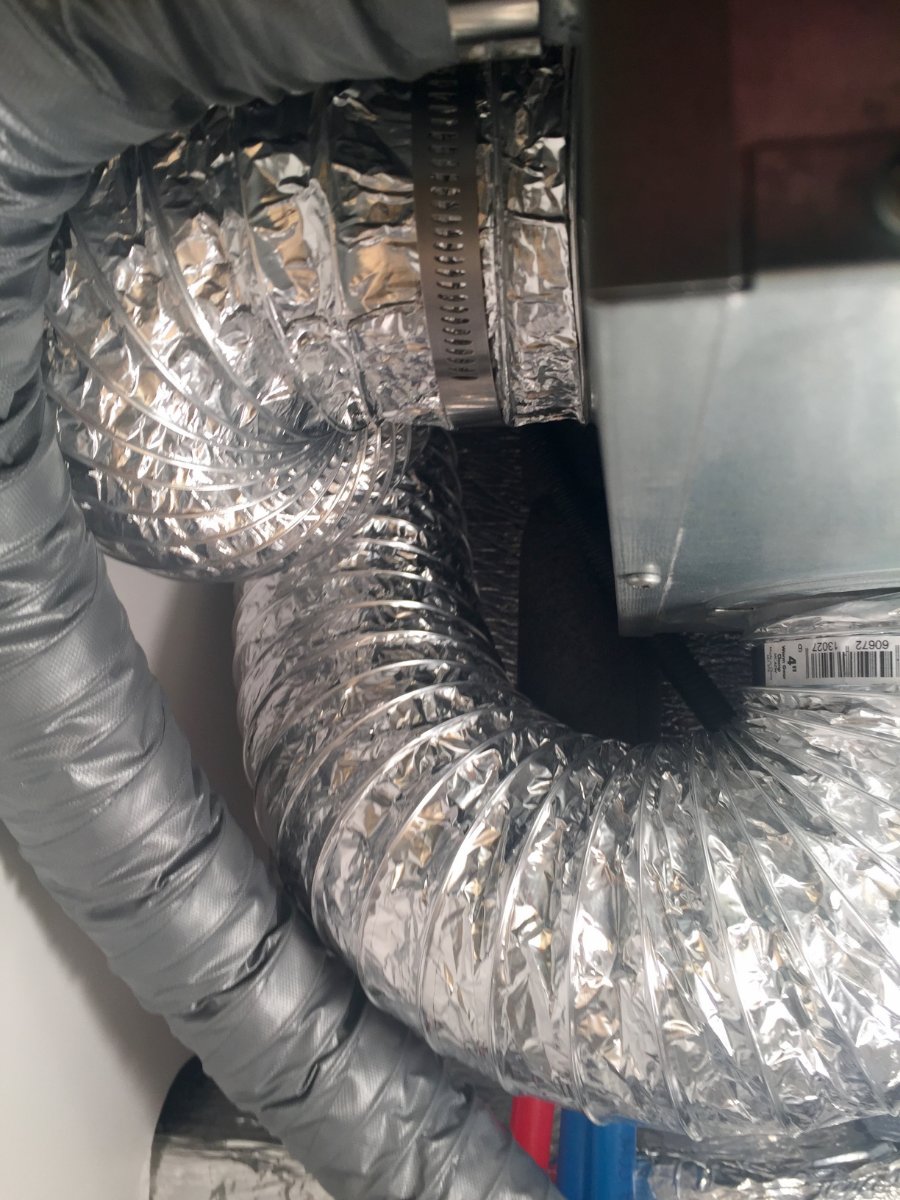
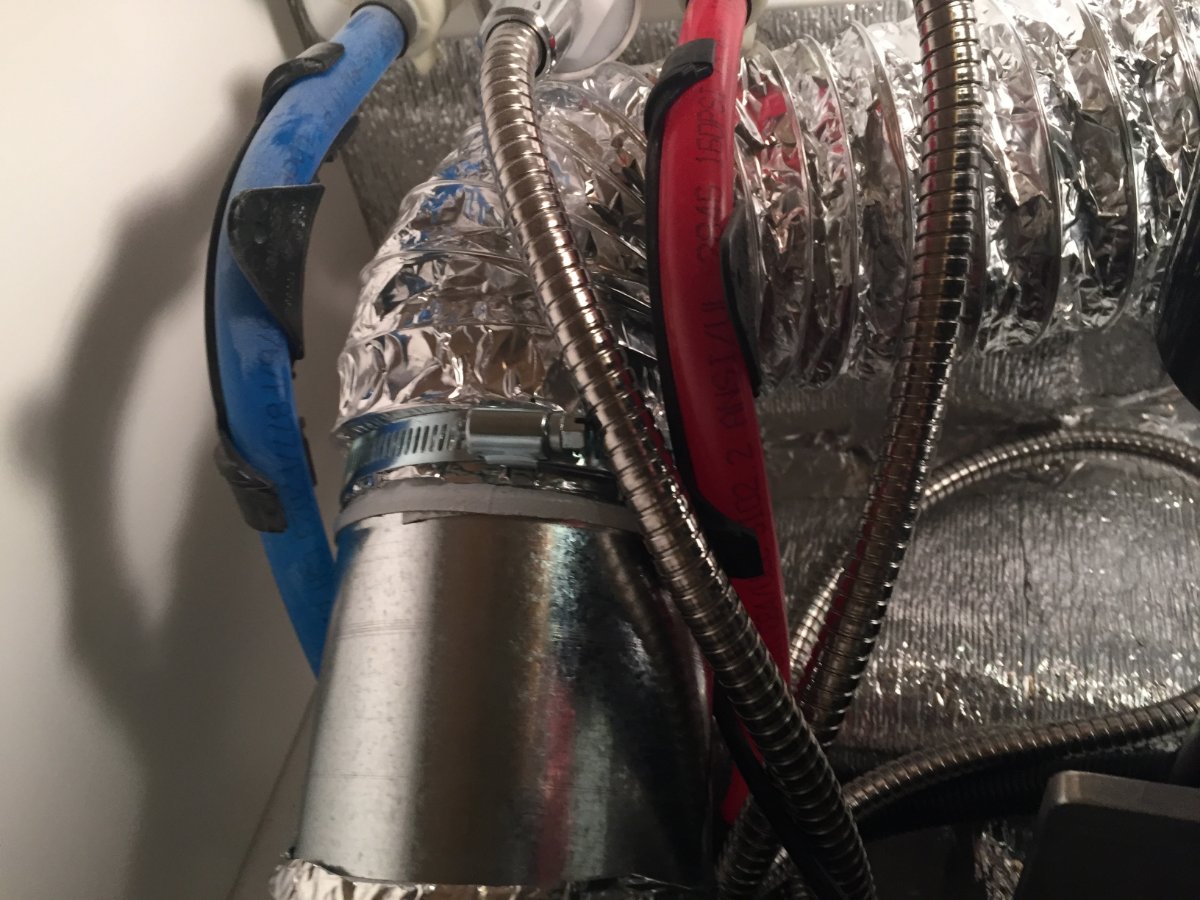
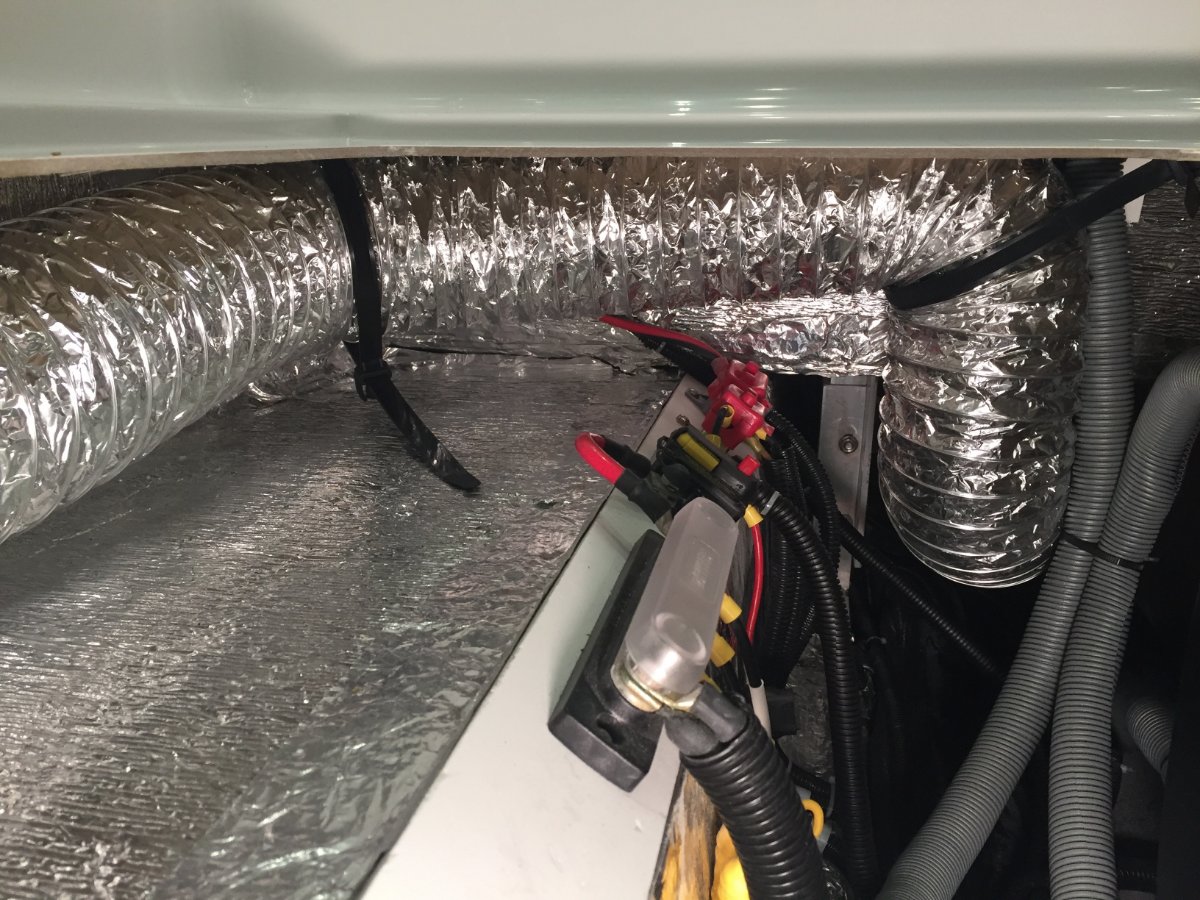
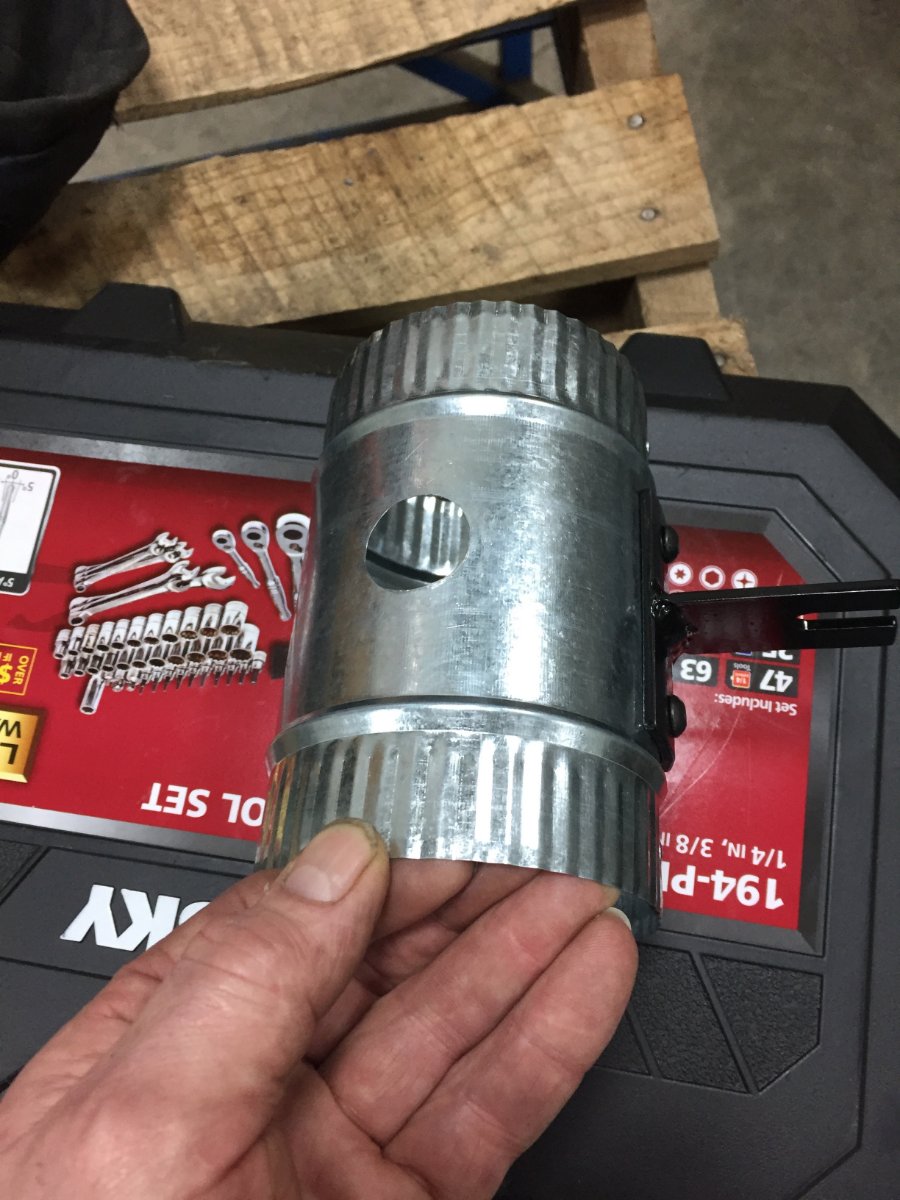
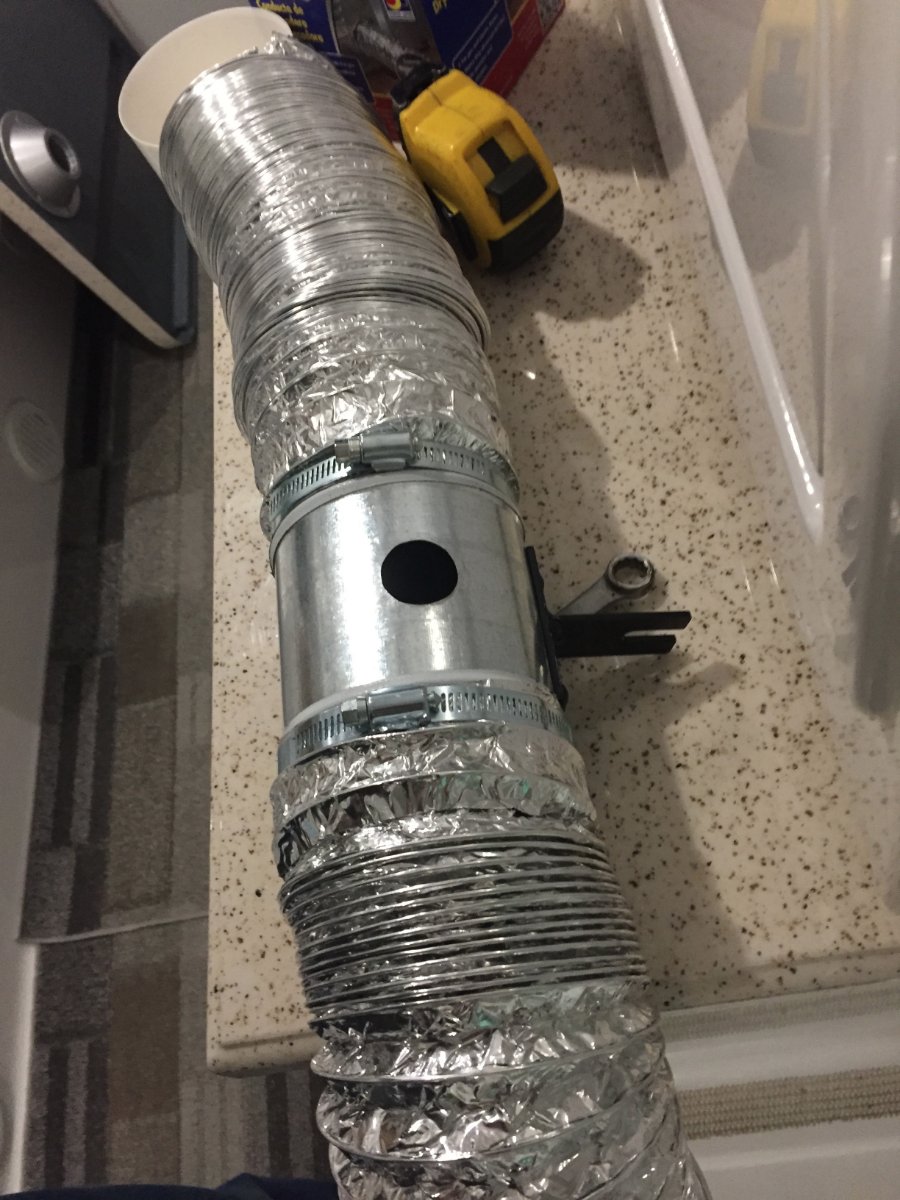
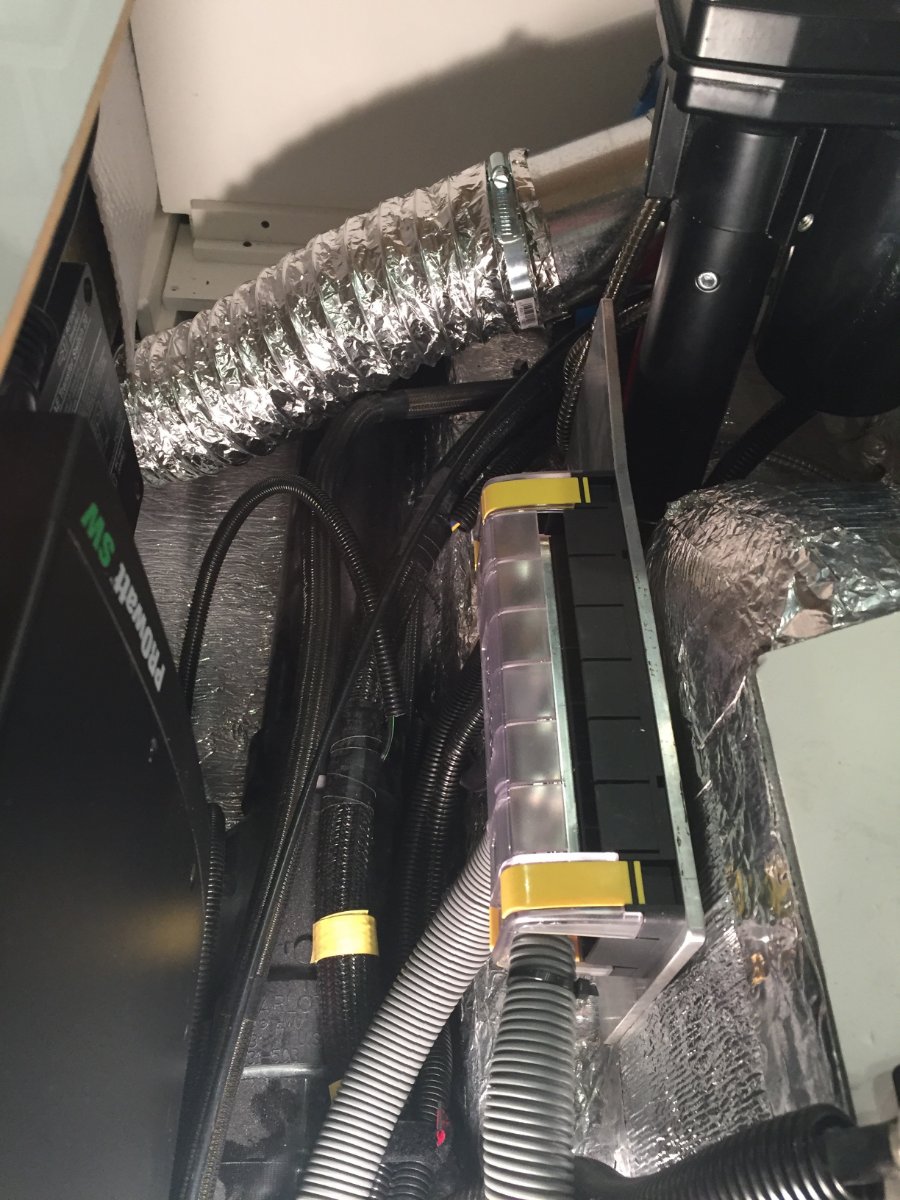
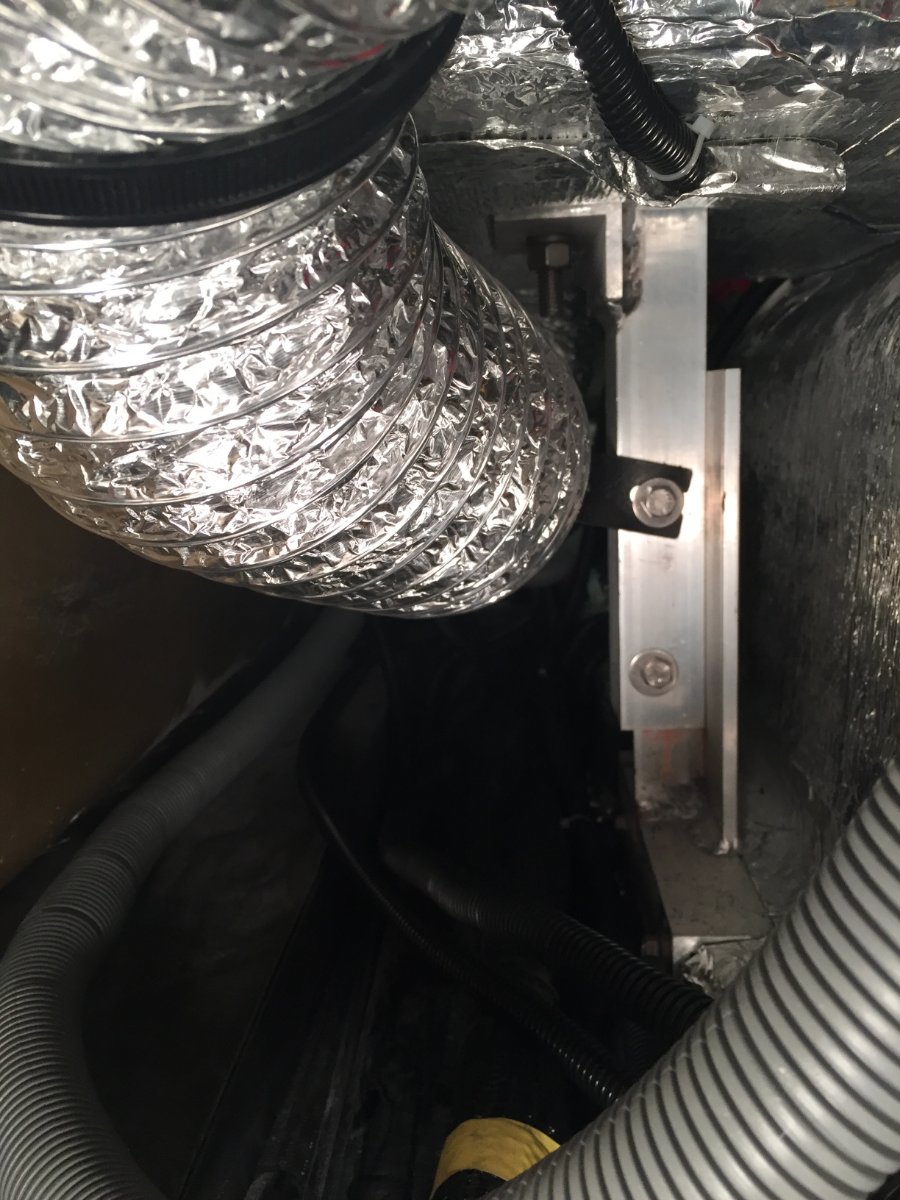
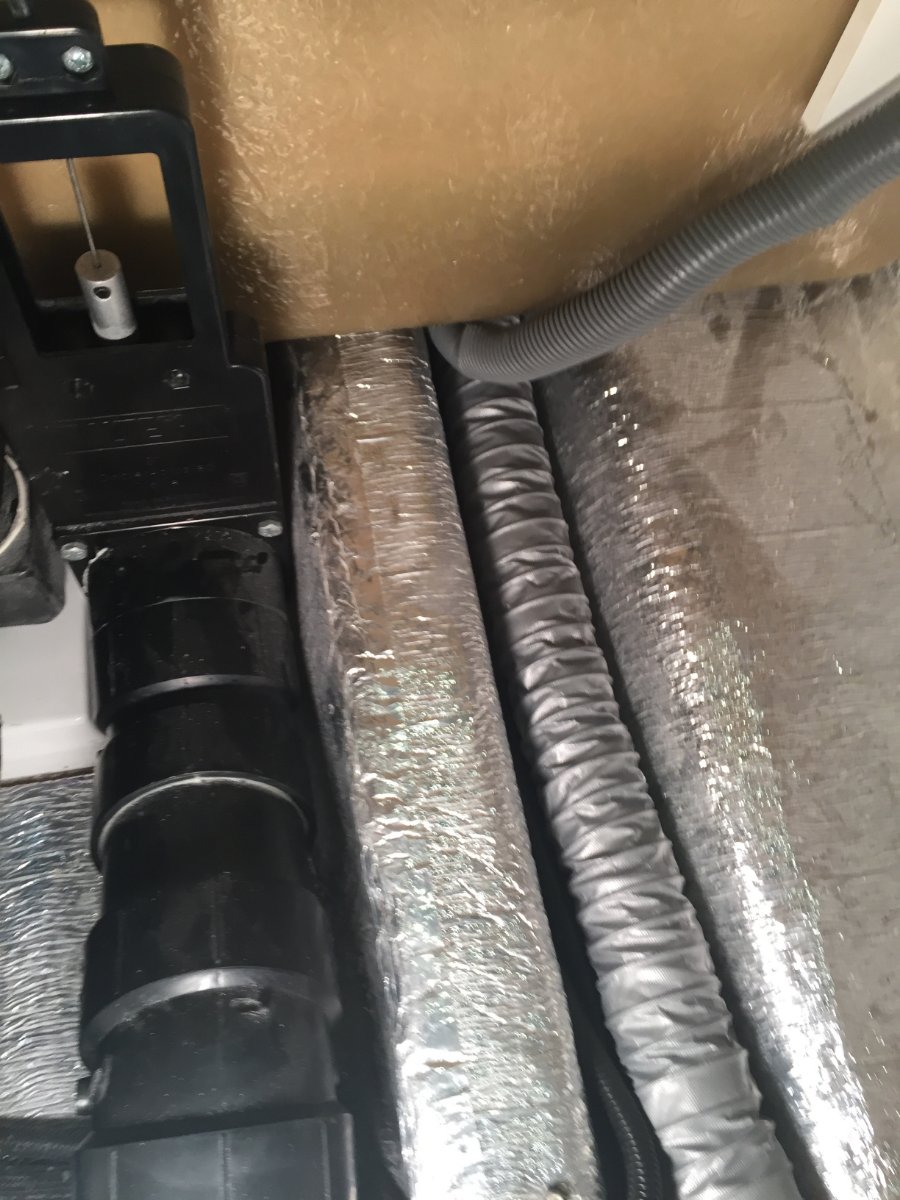
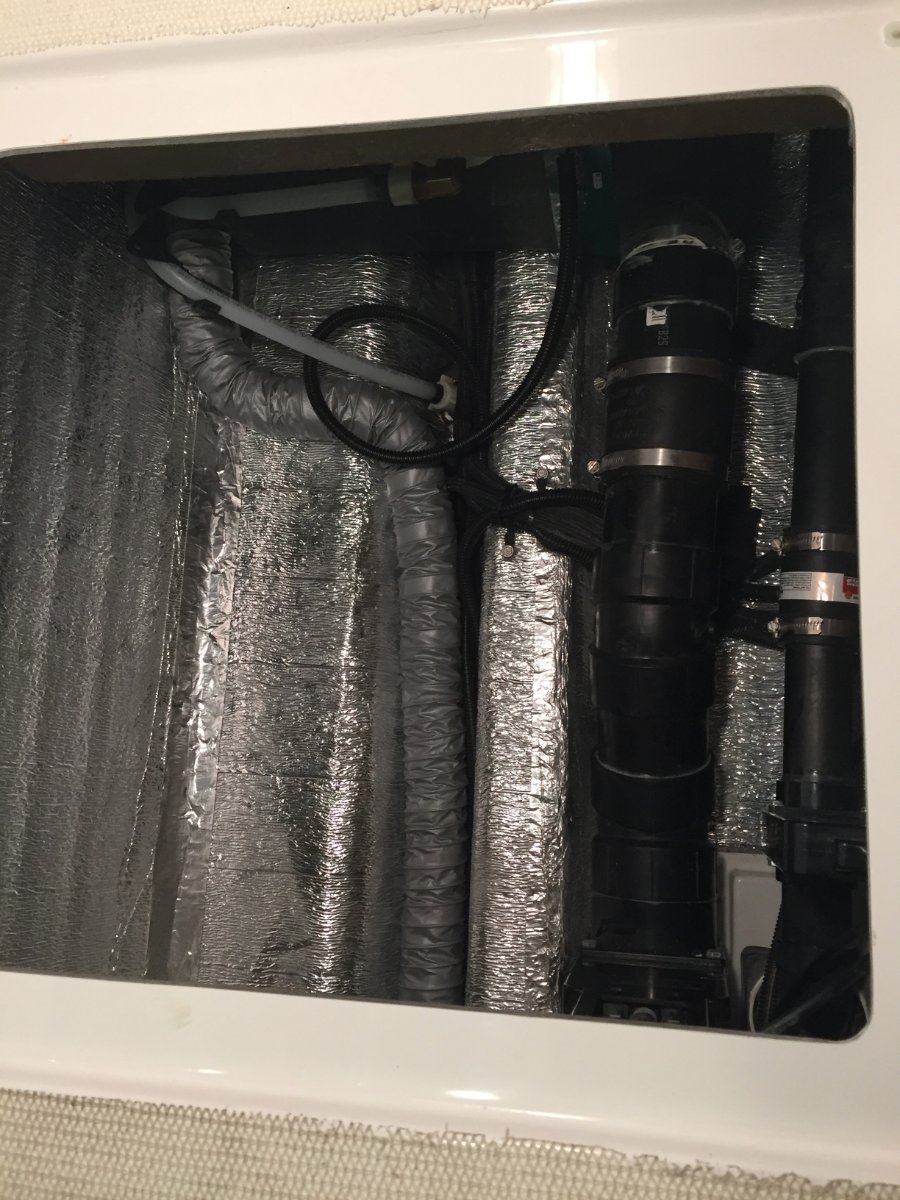
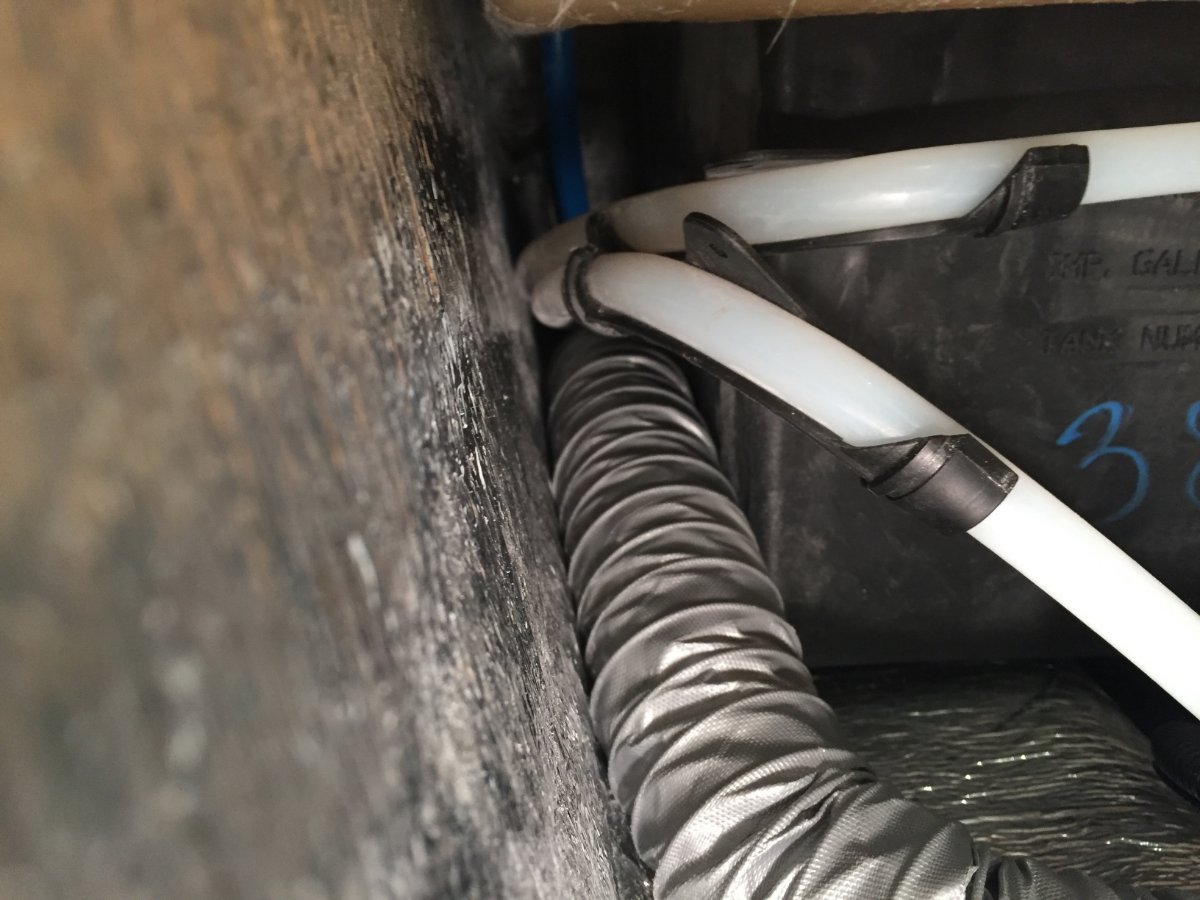
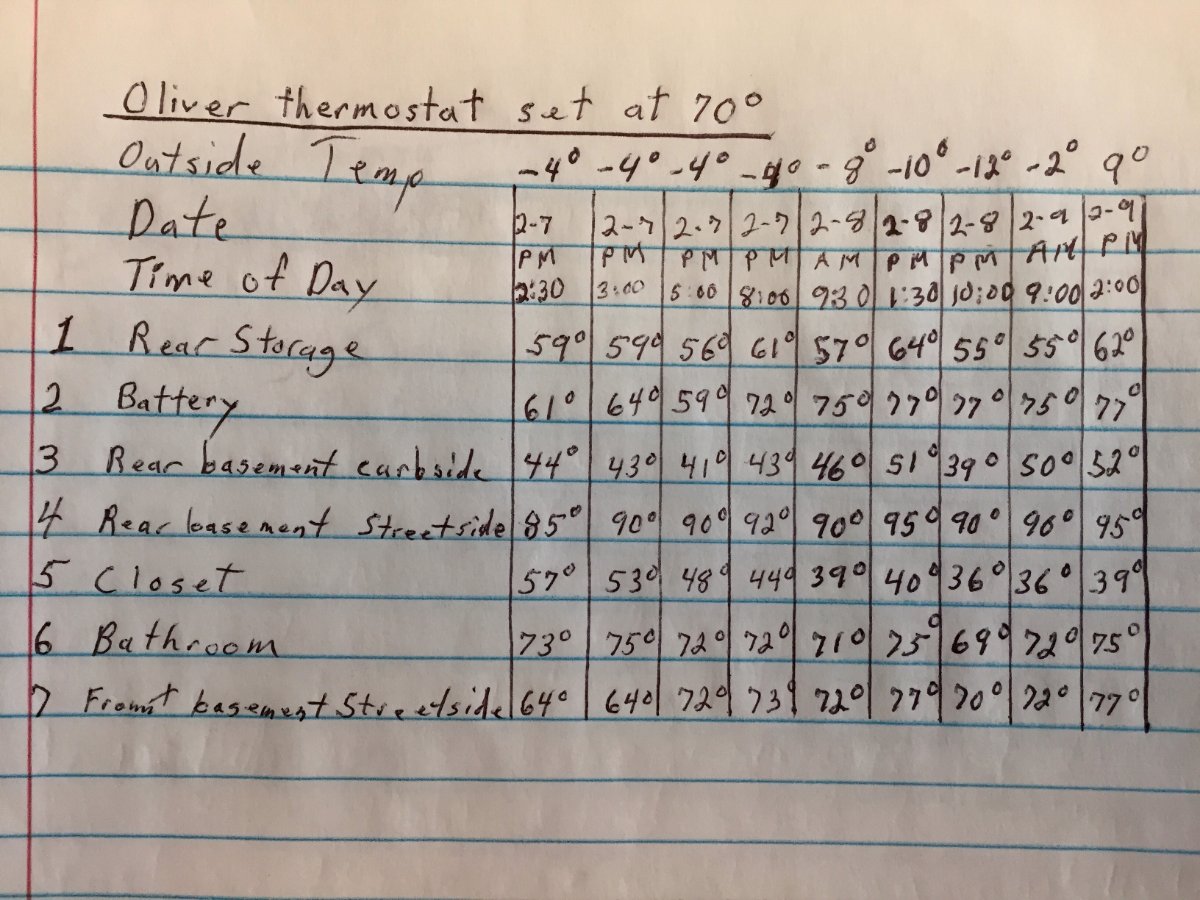
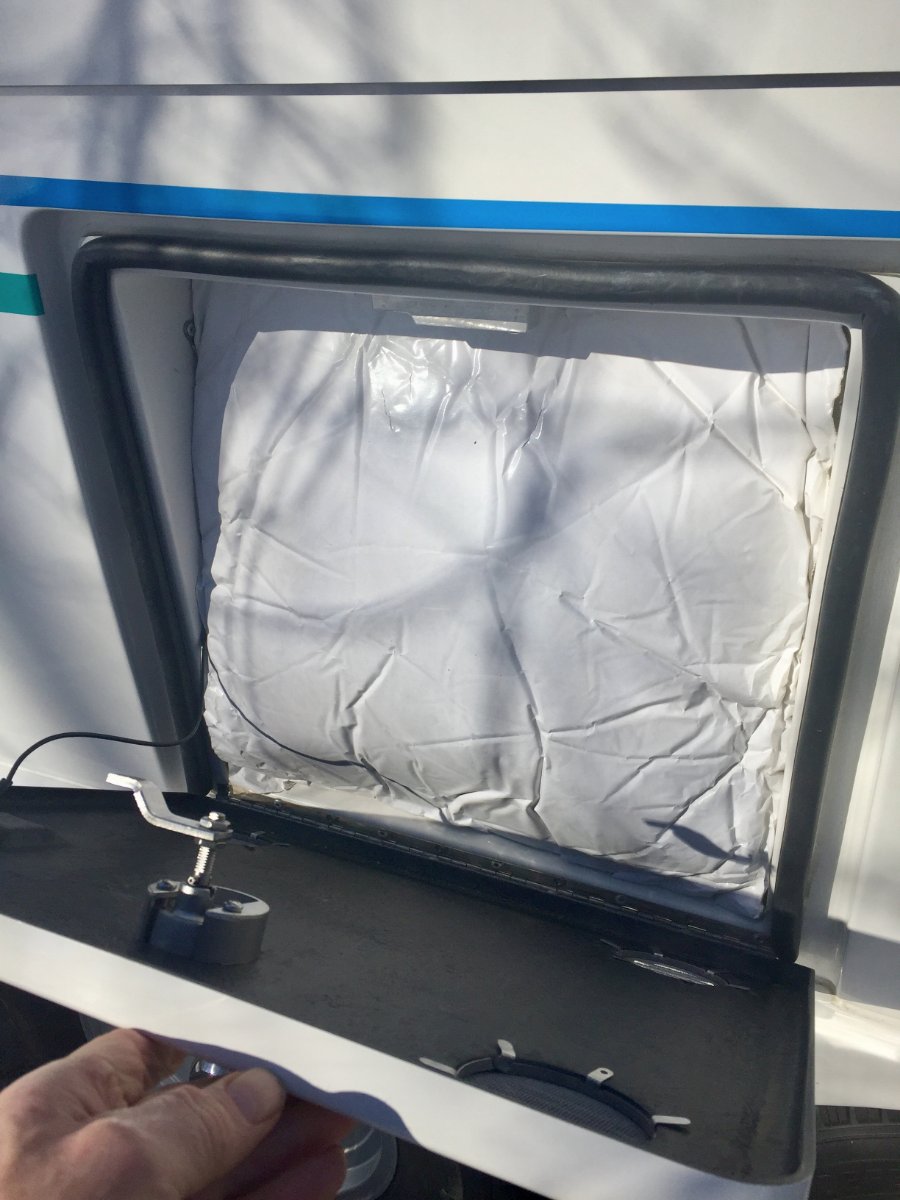
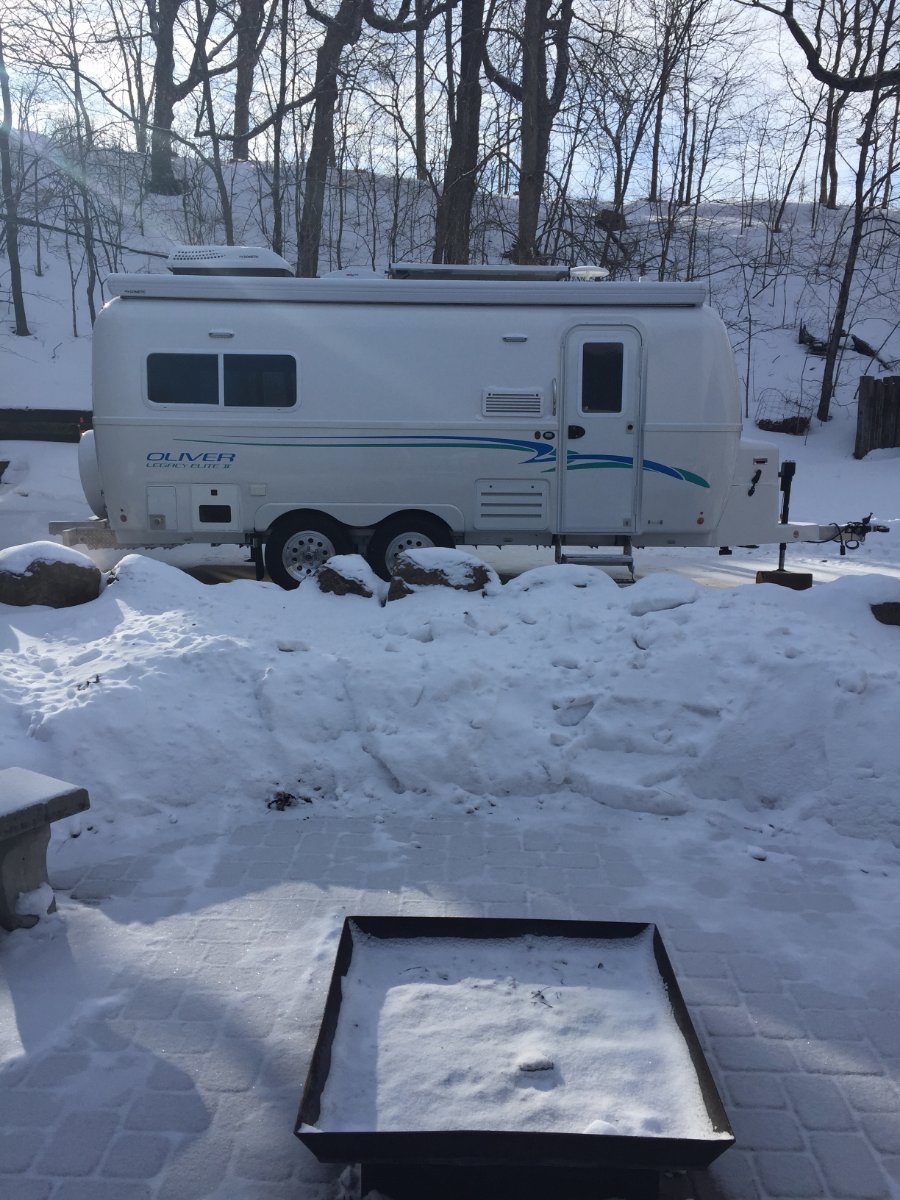
The seed was planted for this furnace mod when we grabbed a canceled reservation three weeks out at a Minnesota State Park. This reservation was mid October and when the date arrived the weather forecast had changed for the worse. We stayed for only two of the three days and we received our first snow of the season, 6 inches of wet snow. We had a non electric site and my batteries were having trouble making it through the night and I was concerned about the water freezing in the Oliver. I have already addressed switching to lithium batteries and posted about it on Oliver Forum. Now I want to share with you what I have done to relieve my worries about water freeze ups in the Oliver, provided that I have a functioning furnace. I first tried to identify the weak spots and came up with the following. Boondocking Inlet Outside Wash Station Fresh Tank Fill Inlet City Water Inlet Black Tank Flush Port Toilet Water Supply Line Hot & Cold Lines Crossing Back Of Oliver The Oliver has all of it's heat ducts run on the curbside which protect the kitchen and the bathroom faucets from freezing. My plan is to run a 2" ducting along the back to the street side and terminating in to the trough that the water lines run in for the city water inlet, fresh tank fill inlet and outside faucet. This trough also has the check valves for those two inlets and has the floor of the exterior storage compartment covering over the top of it. To get at the trough you will have to remove the back wall of the storage compartment and flip the mat back that covers the floor. This exposes the water lines that come across the back of the trailer and drop into that trough. There is a wall that separates the furnace compartment from storage and extends past the wall you just removed. It has a opening for the water lines and it is large enough to run the 2" duct through it and on top of the water lines across the back and into the trough. Now you can flip the mat back down and they are long enough to cover the water lines and the newly installed 2" duct, then the wall is put back in place. On the connection to the furnace I removed the back of the heat exchanger. There is one hard to get at screw on the bottom but the rest are easily accessible. I made two holes, a 2" and a 4" in that back plate. I could not find a 2" starter collar locally so I bought two 4" and removed the rivets on one of them and formed a two inch collar, cut to length and re-rivet. I then installed the 2" and 4" starter collars to the heat exchanger back panel and then the panel to the furnace. I then hooked up the 2" duct to the furnace. Looking in to the access hole under the street side bed you are able to see where the water lines come up and out of the trough and to the valve of the out side wash station. When the furnace fan is running it will blow out a lit Bic Lighter held in that area. So we're protecting water lines, the check valves and dumping warm air underneath the outside wash station valve. Now back at the furnace I attach a 4" heavy duty aluminum foil duct to the newly installed starter collar. It is routed forward a short distance until it can be routed across the basement to the street side and then fed between the hot and cold water lines that go to the outside wash station valve. At this point I need to use a 4" coupler that is 6" long to attach the next 8' piece of 4" duct. I use the 6" long coupler so I can add holes if I need to flood a area with heat, this particular coupler did not need to. I then routed the duct from the wash station valve along the outer wall and over the wheel well, make the corner by the battery compartment and then once getting past the wheel well go down and under battery compartment. Up in that corner I attach a adhesive base 3/4" cable anchor so I can loop a 20" releasable tie strap through it and around the 4" duct holding it up and out of the way. A second 20" tie strap is used were the duct heads down under the battery compartment, it utilizes the loop that anchors the 4/0 cable coming out of the battery compartment. Next I prep another 6" long 4" coupler by adding a metal mounting bracket. It is bolted to the coupler using two 10-24 machine screws that go through the bracket the coupler wall and then a backing plate that has tapped holes. This coupler I will add a1" hole that will be pointed up to flood heat at the battery compartment. The mounting bracket will be utilizing the upper bolt of the support leg for the battery compartment. This keeps the duct up and away from the inverter and electrical components and positions it to flood heat up against the bottom of the battery compartment. The next length of 4" duct is clamped to that coupler and routed up from under the battery compartment over to and along the wheel well. It is held by two 20" tie straps similar to the other side. Because I want to run the heat duct under the foot space of the dinette I need to transition to 2" duct. There is access via the same trough that I utilized in the back of the trailer, but at the front there is more room and I am able to pull the 2" ducting through. From there it continues toward the front until it reaches the black tank flush inlet where it then follows that pipe back along the black tank and terminates by the water supply line for the toilet. At the transition point I add two more short pieces of 2" duct and route them down to where the main black tank drain pipe goes under the dinette foot space, they are terminated on either side of that pipe. There was not enough room to run the 2" duct but enough to force air along either side. At the transition from 4" to the three 2" ducts I simply inserted the three 2" into the end of the 4" and used aluminum foil duct tape to seal the transition. I also want to mention that I used the aluminum foil duct tape to reinforce the ends of every 4" duct by wrapping outside and inside before clamping. That should cover the install, now lets talk about the results of the test in subzero weather. I rounded up seven digital thermometers and put them in the areas I was concerned about. Was placed just inside the empty rear storage compartment. Was placed on top of the batteries and a piece of acoustical insulation that was for large generator enclosure, it was 1-1/2" thick and 19" square. This was squeezed in the opening before the door was closed. Was placed in the rear basement curbside next to boondocking inlet. Was placed in the rear basement street side below the outside wash station valve. Was placed on the floor of the closet with the door left closed. Was placed on the lower shelf in the vanity in the bathroom with the door left closed. Was placed in front basement street side next to the black tank flush port line. I moved it out of the heated shed at 1:00 pm on Sunday 2-7-21. I moved it back in at 3:00 pm on Tuesday 2-9-21. The furnace was cycling off and on at -4 ' but I noticed at -8' and colder it ran continuous. I have the Truma water heater and that was also turned on. I checked propane consumption by putting on two 20 pound tanks that I had weighed and left them in place for 12 hours. It was -12' when I put them on and -2' when I took them off. Because of the subzero temperature the propane was not gasifying very well and the regulator automatically changed from the primary to the reserve after only consuming 2.353 gallons. The total consumed out of both tanks in 12 hours was 3.294 gallons, so that would be .274 gallons in one hour. My Victron BMV-712 was telling me that I had depleted my 400 Ah Battle Born batteries to 47% and at rate of use I had two days and nine hours left. I thought I would comment on a couple of things I like about the outcome of the project. The bathroom was comfy warm and the wall next to the bed was not icy cold. I am not planing to take up subzero camping but it does gives me a benchmark to go off of for any situation that I might run in to. If you have any suggestions or see something that is of concern please let me know. Paul
 1 point
 -
Well my build sheet is submitted! Thanks to everyone for sharing all your experiences. This forum has been a tremendous resource- much appreciated. I did decide to go with LE II. Two primary reasons. The LE I was just too short. I would be constantly grazing ceiling with my head. Secondly I just kept coming back to how much more practical floor plan was for my needs. Look forward to picking up in May!1 point
-
May will be a good time to pick up your new Ollie. That’s when we picked ours up and had a nice leisurely trip home. Maybe you can stop by the non-rally in Lake Guntersville and meet some other owners. You’d get lots of help if there were any issues!! Mike1 point
-
FYI: https://www.roadandtrack.com/new-cars/road-tests/a10159528/the-mercedes-benz-gls450-is-a-shockingly-capable-tow-vehicle/ I still think the tongue weight will be a worry, but the payload should not, I checked the specs and it appears to be 1745 pounds. Does that match your door sticker? That is pretty impressive. I am actually a little shocked, my 2013 Land Cruiser has a 1295 pound limit, due to the wimpy soft factory suspension. Does your Merc have a stiff ride when it is completely empty? What kind of tires do you have? LTs will make it ride harsher, but will also stabilize it when towing in strenuous conditions. FYI, the tongue weight on my LE2 with the Oliver accessory tray relocated to the back and with 100 pounds of cargo, and full fresh tank and 30 pound propane bottles, is 480 pounds (down from the original 620 pounds). It tows fine.If you can keep your TW light, your Merc should be fine too. https://olivertraveltrailers.com/forums/topic/3263-how-to-move-the-factory-cargo-tray-to-a-rear-rack/ John Davies Spokane WA
1 point
-
Very sorry for the late response! My Tow Vehicle will be a 2015 Mercedes Benz GL450, with the Factory Tow Package. This vehicle is rated to Tow a trailer up to 7500 Lb, with a max Tongue Weight of 600lbs. According to Oliver, I should be within this "Ball Park." However, I will be very careful about adding Options that add weight to the front end etc. For example, we had originally planned on the Front Storage Basket and 30 lb Propane tanks. In an effort to give us a little safety cushion we have eliminated the Storage Basket, although we will still order the 30lbs tanks (for resale value) we plan on using them only half full to save weight! Additionally, we will have two Bikes (around 125 lbs) on a Bike Rack which will act to Counter Balance any weight on the front of the trailer, like the 50 lb Hitch weight. I don't want to start a TV debate here, but the GL 450 has several characteristics that makes it an ideal choice for a Tow Vehicle. Many of these features produce incredible handling both Towing and under normal driving conditions. It also fits inside our Garage! Another benefit, that is often overlooked is the benefit of a Turbo Charged engines which the GL has. Generally speaking you will lose around 3% of Horse Power every 1000 feet of elevation. For example, Pikes Peak starts at 9,000 ft up to 14,000 ft. The V-6 engine in the GL has 362Hp, that equates to a 98-152 Horse Power Loss due to elevation alone. The other aspect of evaluating a TV capabilities is how much Payload it can carry. Admittedly, after we deduct the Tongue and Occupant Weights we don't have a lot of reserve capacity left!1 point
-
If you go here, and scroll down to the Elite II Measurement Index, you'll find all of those dimensions plus many more that you'll probably want to know at some point.1 point
-
If Dometic's threshold for consumer satisfaction is "Does our product cause you physical pain?", then that would explain a lot.1 point
-
"Dometic conducted extensive user research and pain point analysis to develop the Dometic FreshJet FJX3000 series RV rooftop air conditioners" All Dometic really needed to do was ask customers - we already completed the "Pain Point analysis!!" Really glad to see the new units hit our markets. Looking forward to the reviews and install updates. RB1 point
-
My wife and I are picking up our E2 in June. It’s a long wait but we have decided to treat it like a pregnancy since it is all told going to be a 9 month event. As with most pregnancies we have been purchasing massive amounts of stuff in anticipation of the big day. I had a particular question about the Anderson leveling system that I was hoping one of you kind folks could answer. Is the space between the front and rear tires wide enough for the the Anderson levelers to fit without being cut? I think you can cut as much as 4 inches off these levelers if need be and if it’s necessary I was going to do it ahead of time. There will be many more questions ahead as things get more real. We are now deep into the second trimester of this long pregnancy! 😳1 point
-
We've never had any issue with the fridge (Norcold 3 way) in our Elite II staying cold while operating on 12VDC while towing, even in high 90 degree summer weather. The fridge stays cold on 12VDC when towing since the fridge door isn't being opened and closed while in transit. The fridge stays cold and the trailer batteries stay charged from the tow vehicle 12VDC supply as long as the tow vehicle is running. 12VDC is NOT recommended for cooling the fridge down at start up if it's been off and warmed up. We do switch it to propane if we'll be at a rest stop on the road for a long lunch or dinner break, and also switch to propane when stopping at Harvest Host stays overnight. We use AC shore power when available as the first choice when at campgrounds, and for chilling the fridge down before leaving for a trip if the trailer has been sitting unused for a while. It doesn't seem to use much propane at all. We've done two camping seasons now and still haven't used up our first 20lb tank of propane, but we don't use the stove or furnace at all.1 point
-
Thanks so much for the response. we are looking so forward to being members of the unique Oliver family. Mike1 point
-
We have always used 12V on the frig, while underway. The TV provides plenty of power, plus whatever the solar provides. We certainly do use the propane to initially cool down the unit. We do switch to AC if we are plugged in somewhere. We had no issues doing this while "screaming" north to get out of the hot (100-109) humid south east in an early heat wave. The ice cream was still solid, when we finally found a campground with a plug in in Penn.. We just wanted a night in AC. The rain that night, as the temps dropped to the low eighties was so soothing. It may be habit, but we were taught early on not to travel with propane on. If illegal in some places, or you shut off in gas stations or tunnels, why bother? Especially if 12V works? The desert SW may be different, but we don't plan on being there, especially during the summer...1 point
-
We haven't had the opportunity to use our fridge in hot ambient temperatures . . . . still waiting for warm weather! However, in our camper van and 80-90 degree temps, the (awful) Dometic 3-way fridge could barely keep a safe temperature. We would always try to park with the fridge side of the van in the shade. The fridge being on the curbside, you can use the awning to protect the fridge from direct sun. Thus far, it seems the Norcold is a much better fridge. We do use a battery operated fan inside the fridge. https://www.amazon.com/Increase-Cooling-Circulation-Battery-Powered/dp/B07L22DMYR/ref=pd_lpo_265_t_2/144-8772324-6417040?_encoding=UTF8&pd_rd_i=B07L22DMYR&pd_rd_r=c1d14477-9394-414b-8d9b-5d8f8c5cfb4d&pd_rd_w=0e458&pd_rd_wg=WD3ml&pf_rd_p=16b28406-aa34-451d-8a2e-b3930ada000c&pf_rd_r=2SA13HKXQVX269P7CMYB&psc=1&refRID=2SA13HKXQVX269P7CMYB I don't remember paying that much for it, so shop around. It doesn't take up too much precious space; runs forever on 2-D cell batteries.1 point
-
When I look at the Xantrex website there are two upgrades: 1. inverter/charger firmware 818-2010 and 818-3010 2. Bluetooth Remote Panel Firmware 808-0817-02 It looks like one is for the actual inverter and the other for the remote panel. So we are only concerned with the one for the remote panel? (#2)1 point
-
Thanks much. The install is straightforward. I still have a few incomplete items like the Dometic tstat hookup and two small holes in the ceiling from the original cover - but I will install screws with white caps to fill. I will provide a more detailed write up when I get it all done.1 point
-
Actually, some places in Florida do have lizard warnings when it gets very cold. The iguanas start falling from the trees. Since they revive when warmed, it's not recommended that the general public pick the up. Even with a lizard shovel. https://www.nbcmiami.com/news/local/look-out-below-falling-iguanas-in-south-florida-possible-as-temperatures-dip-nws-says/2373858/1 point
-
I think the very best time to buy a travel trailer is when you have the time to use it. We never looked at our Ollie as a financial "investment, " but we do feel we've had a great return in memories and fun.1 point
-
Airtabs work best on a vehicle with a square butt - like 99% of the commercial trucks, travel trailers and motorhomes out there. But an Ollie is already well streamlined in back. It will accumulate dust there, for sure, at any speed. Tabs on the sides and top would most likely be a little helpful at speeds high enough for them to operate. But as I quipped earlier, you have to not slow down below the speed at which they can function. And there is no practical way to install them on the belly, unless you made a big pan there, behind the axles to provide a flat place for them to mount a foot in front of the rear bumper. http://www.airtab.com/how-do-they-work.htm They are easy to install and reportedly not too bad to remove, so you could be the first Ollie owner to try them, and post your before and after dirt road pictures here....;) If somebody were to give me a box of them I definitely would try them. But I won't spend a bunch of cash on what will most likely be a total bust. FYI these are used on aircraft with incredible results, but they are designed to keep the airflow attached to the wing surfaces at unusually high angles of attack (landing, takeoff, low speed). ... https://www.boldmethod.com/learn-to-fly/aerodynamics/vortex-generators/ John Davies Spokane WA
1 point
-
Welcome! Browse around and ask any questions you might have. This is a friendly place! Mike1 point
-
Hope this puts an end to this annoyance so we can all get on to enjoying our Olivers.1 point


.jpg.b4fb182c2dd38b005d42f99a3317e409.jpg)


-
Recent Achievements
-


")
")

")


