Leaderboard


Popular Content
Showing content with the highest reputation on 04/23/2021 in all areas
-
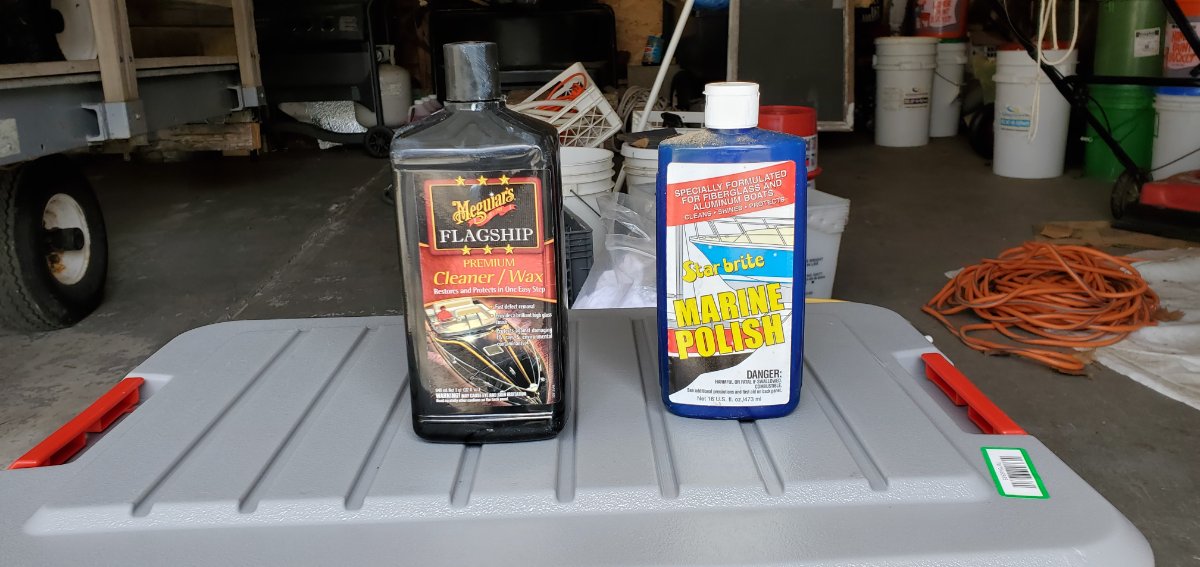
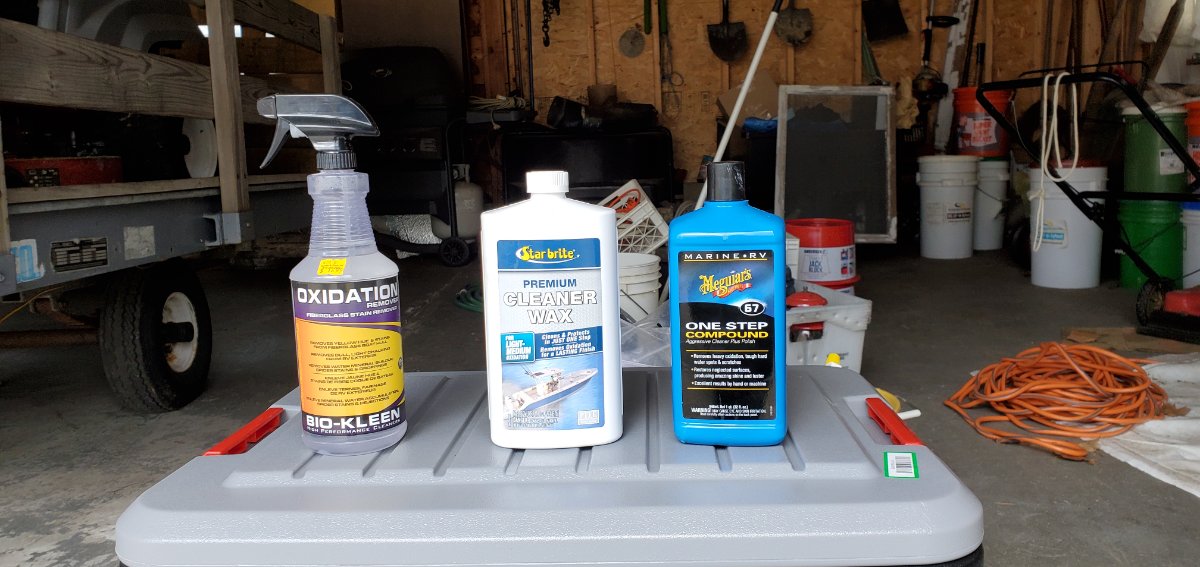
Thanks for all the suggestions and product recommendations. So here is my update and a product survey of products that I tried and the ones I settled on for removing the water stains on side of Ollie and then waxing. First: Cleaned and waxed the roof - I compared two waxes. The Starbright Marine Polish (left over from my many boating years) was used on one half the roof. The Meguiar's Flagship Cleaner/Wax was used on the other half of the roof. I found the Starbright wax easy to install and buff off (by hand) when dry. The Meguiar's wax was thicker and harder to get out of the bottle. It went on easier than the Starbright wax, and was easier to buff off (by hand) then the Starbright. Both finishes look great. I will see how each stands up to the environment. My recommendation though is the Meguiar's wax. Second and hardest - removing the water stains from the sides of the Ollie (see before picture attached earlier in this post): Washing the Ollie with a good Boat soap removed some of the water stain. I tired scrubbing the remaining water stains using the following products: 1) White vinegar which did almost nothing in removing the stains (maybe I should have used more "elbow grease". 2) White vinegar mixed with Joy kitchen soap which worked about the same as the white vinegar by itself. 3) Bio-kleen Oxidation remover, which was given to me by the previous owner. This would have worked (as reported by the previous owner) but the first try really did little and would have required a lot of "elbow grease" and multiply coats. I was a little nervous that the product might not be a friendly environmental chemical to use. 4) Star brite Premium Cleaner Wax which removed the water stains but some extra rubbing to remove the stain. (5) Meguiar's 67 One step compound. This product was thick and harder to get our of the bottle but I was amazed at how easy it went on and fully removed the water stains with only a little rubbing. The clear winner was the Meguiar's 67 One Step Compound which also had a polish componet in it. After using the Meguiar's 67 One Step Compound on the top half of the Ollie and before waxing, I took a picture of the side of the Ollie to show everyone. You can see the water stains on the lower half. Imagine these stains going up to the roof line before I removed them with the Meguiar's 67. With removal of the water stains and two coats of Meguiar's wax my Ollie now looks likes brand new just like fresh out of the factory. With this spring cleaning and waxing and washing throughtout the summer, (and washing and waxing before the winter layup hopefully the water stains do not reappear. Thanks again for everyones helpful suggestions. Richard
 6 points
 -
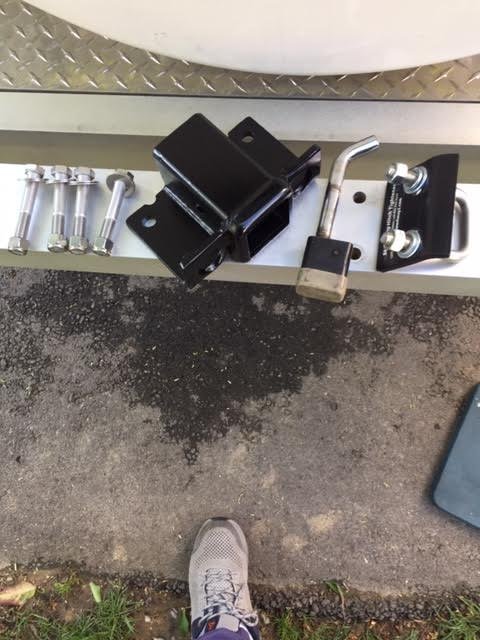
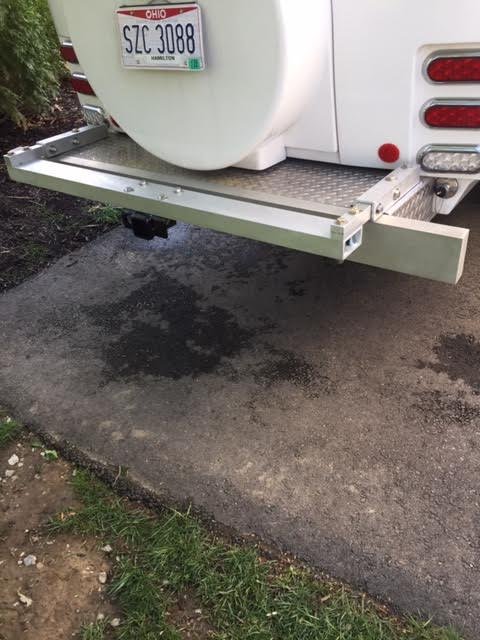
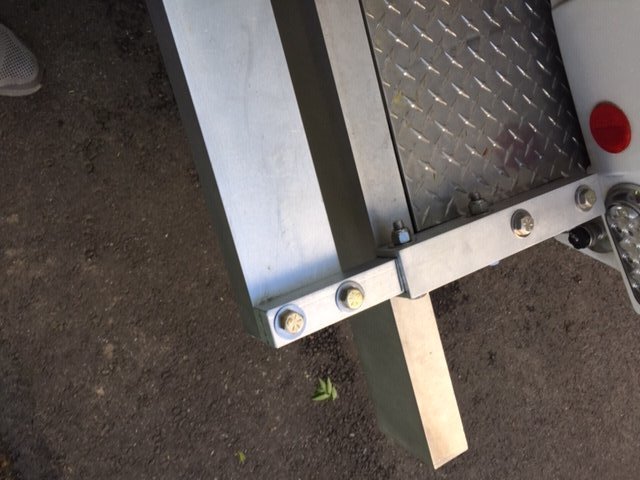
We bought our 2019 EL2 used, it was equipped with everything we needed except a Receiver Hitch to attach a Bike Rack. After reviewing all the Posts on the subject I got to work and made one, reference the attached pics. 1-1 jpg shows the Receiver Hitch and attaching Stainless Steel Bolts, Lock Pin, Anti Ratter Device. Receiver Hitch= Harbor Freight $20.00. 1-2 jpg shows the finished assembly. Not shown are the Spacers inside the Channels Beams to prevent the Beams from collapsing when the bolts are torqued. The Spare Tire cover can be removed and the Rear Bumper can be lowered to access the Sewer Pipes. 1-3/img0684 jpg shows the left/right hand ends of the assembly. Note all Aluminum is Aircraft 6016, and all fasteners are SS. Approx $150.00 in Bolts and $120.00 in Alum. img 0683 jpg show the underneath view. DSCF 1981 jpeg Shows a Stowaway 2 Storage Trunk mounted to the back of our MH to carry our 2 Folding Bikes at the time, Sold. I am thinking about getting another Trunk (this time used and White) to carry one of our ebikes (60 lbs) when we get them. I am not 100% sure of this idea yet, but it does have the benefit of greater security and protection for the ebikes. The Trunks weighs about the same as a Bike Rack (30 lbs), but is about $500.00 less expensive and can carry a few extra light weight things. Note: I plan on limiting the total weight on the rear to include the Alum Receiver Hitch, Bike Rack or Trunk, plus one ebike to around 125 lbs, or so.
5 points
-
This Raspy (John). I haven't stopped by to say hi in quite a while. As some of you great folks here know, I sold my Oliver (hull 92) and bought a Black Series HQ19, in 2019. As usual, I've done a lot of mods and we've been traveling a lot in the West. Utah has become our favorite area. I think it was 2017 when John Davies posted a picture of the suspension on a Black Series trailer and piqued my curiosity. Eventually, that lead to us getting one and that lead to me starting a business selling Australian articulating hitches (McHitch). I retired from my other job at the end of 2017, but now I'm back in business and looking to retire again! Sheesh. Every time I see an Oliver somewhere I smile. We would have been at the Rally in 2020 if it wasn't stopped by Covid. We won't be going to Guntersville this year either, but I'm hoping we can get clear over to North Carolina and Virginia, as we make a loop around the Country late Summer or Fall. I really enjoyed hanging out with all of you, both here on the forum and at the Rallies in 2018 and 2019. If any of you need a place to stop, near Lake Tahoe/Carson City, we have a full hookup site here at home. BTW, do any of you know where Hull 92 ended up? After we sold it, the new owners sold it again and I have no idea where it is. I hope they are out having fun with it. Take care everyone! John5 points
-
A short camping trip to Sherando Lake Recreation Area in Virginia. First night. Second night at Lake Powatan National Forest near Asheville, NC. We had dinner with topgun2 and his wife. No pictures because they kept us out after dark. Third, Fourth and fifth nights. Sixth night at "Key to Escape" a Harvest Host located in Statesville, NC. Seventh and eighth night. Mossey
4 points
-
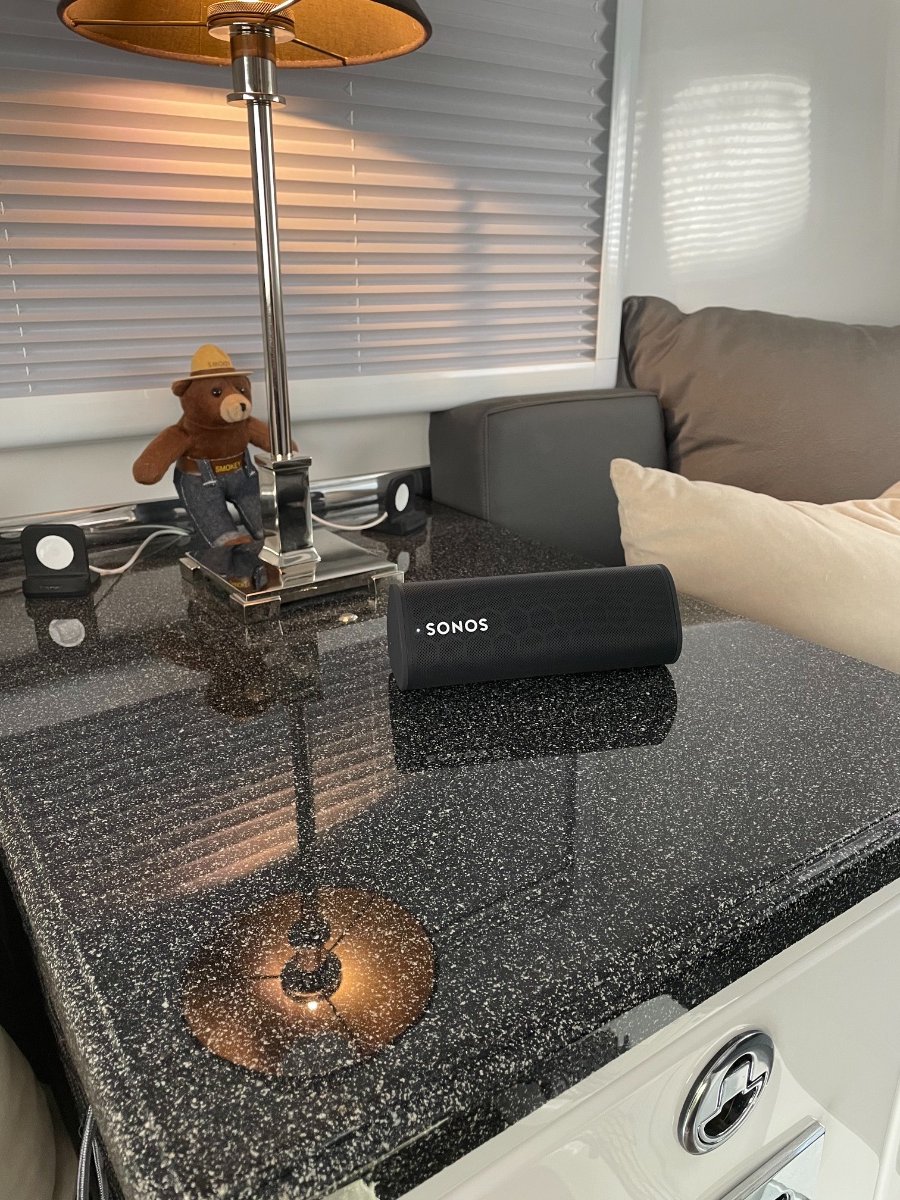
I've posted in other threads here and there about my experiments with speakers in the Ollie, but thought I'd make a separate topic. I don't think we have one for Sonos stuff, through I know we've talked about them in three or four other speaker threads. Anyway, any excuse to talk music. Background for those who don't know: We got our Ollie back when Oliver allowed customer modifications, and one of our mods was to eliminate the entertainment system completely. So no TV, radio, or speakers at all. My idea at the time was that we'd have a car stereo place do a really nice system for us. The cost of that though was prohibitive, and at the same time I was starting to look at wireless speakers for the house, so I decided that was the route to go with the trailer as well. Apple had just come out with their HomePod, so I figured I'd try one, use it in the kitchen when at home and move it to the Ollie when we travelled. I won't review the HomePod since they've discontinued it, but suffice to say that I think they had good reason to do so. I wasn't impressed, and it was kind of a pain both in and out of the trailer, so it went onto craigslist. But the idea behind it wasn't bad. My next experiment was a Sonos Beam, which did impress me, and is still in the trailer. It's a different philosophy than the HomePod was, since it's permanently mounted, but I decided on it since it would fit perfectly under the attic. In my opinion, it's not a bad solution especially if you have a TV and want a soundbar for it. It certainly sounds much better than the HomePod - even though it's still a single speaker, and fixed at the end of the trailer, it has a much broader sound than you'd expect. Though one of the drawbacks is definitely that it doesn't really immerse you in the music, at least not the way I like. There are two other drawbacks to mention: one, it's 120 volt so you've got to be plugged in or on your inverter for it to work; and two, it requires a wifi network for your trailer (which I think is included in the latest Ollies?). Overall though, thumbs up. The sound is really nice, and one of the things Sonos does well is in the way they have you tune their speakers to the space when setting them up. Basically, you walk around the space waving your phone around like a nut while the speaker plays tones, and at the end, they recalibrate the EQ of the speakers to give you the best sound and eliminate any boominess. For a small space like the Ollie, that can make a big difference. So we've been pretty happy with it. But of course shortly after I installed the Beam, Sonos came out with the Move, which has a similar form factor to the HomePod. But instead of plugging in, it's battery powered and so is truly portable. In fact it's waterproof to boot, and has a rugged rubber base so you can rest easy taking it outside and using it around the campfire. Plus it can be charged via USB and has Bluetooth audio in addition to WiFi, which means you don't need a WiFi system in the trailer, and don't need to use your inverter to power it. So sure I had to get one, took it with us on our last trip, and REALLY like it. It's easily the best sounding Sonos we have - it's larger than the Sonos Ones that I've been populating the house with, but smaller than the Sonos Five, so the sound is predictably somewhere in between. It just has a really nice resonant quality to it. As a single speaker, it has the same drawback as the beam, but AirPlaying to both simultaneously gives you a really great, immersive sound all through the trailer. With the bonus being that you can grab it and carry it outside. But like the Beam, there are three drawbacks: one, it's a bit big and cumbersome, so kind of difficult to find a spot in the closet or wherever to stow it while traveling; two, you can't do a stereo pair with the Beam (though if you have two Moves, you can pair those); and three, it costs over $300. But to justify the cost, the speaker isn't dedicated to the trailer like the Beam is. Ours has its home in the house, gets taken out to the patio, front porch, etc. Drawbacks aside, had you asked me yesterday what I thought the best system was for your Ollie, I'd have said buy a Move. Or two, if you want stereo or the ability to have music both inside and out at the same time. But ... in the mail today came the tiny Sonos Roam. It's a portable speaker like the Move, but small enough to fit in your hand, and I have to tell you that for such a small speaker, it really packs a punch. Not as good as the Move, of course, but inside the trailer, it actually comes surprisingly close, thanks to the trailer itself adding a great deal of resonance to the sound. Outside, the Move crushes it, but inside the trailer, it's difficult for my somewhat older ears to distinguish them once you've got the volume levels even and fiddled with the EQ (Sonos allows you to set a separate EQ for each speaker, and since the setting is held in the speakers themselves, they'll have the same sound whether you're playing through their app or through iTunes, Spotify, etc.). In fact, in the trailer I think the sound from the Roam is pretty much on par with the Beam, if not a bit better. Daddy bear, momma bear, baby bear, and a shy smokey bear: The size! This little guy could go anywhere - the versatility is fantastic. Bluetooth or wifi, so like the Move it will work without dedicated wifi in the trailer. It has a better waterproof rating than the Move, so you could actually drop it in a lake, if you need to do that. It's half the price, has USB charging (plus wireless charging), and you can stereo pair two of them together. Add velcro to the back, and you could mount them wherever you want, inside or out. Move them around the trailer depending on where you're sitting, etc., then grab one off the wall and take it out to the campfire. Drawbacks? None, really. The Move sounds better, but the versatility of the Roam trumps that, imo. So today if you ask me what I'd recommend for sound in or around the trailer, by all means get yourself a pair of Sonos Roams. They come in white, too, though I don't know if their white is color matched to the Ollie.
3 points
-
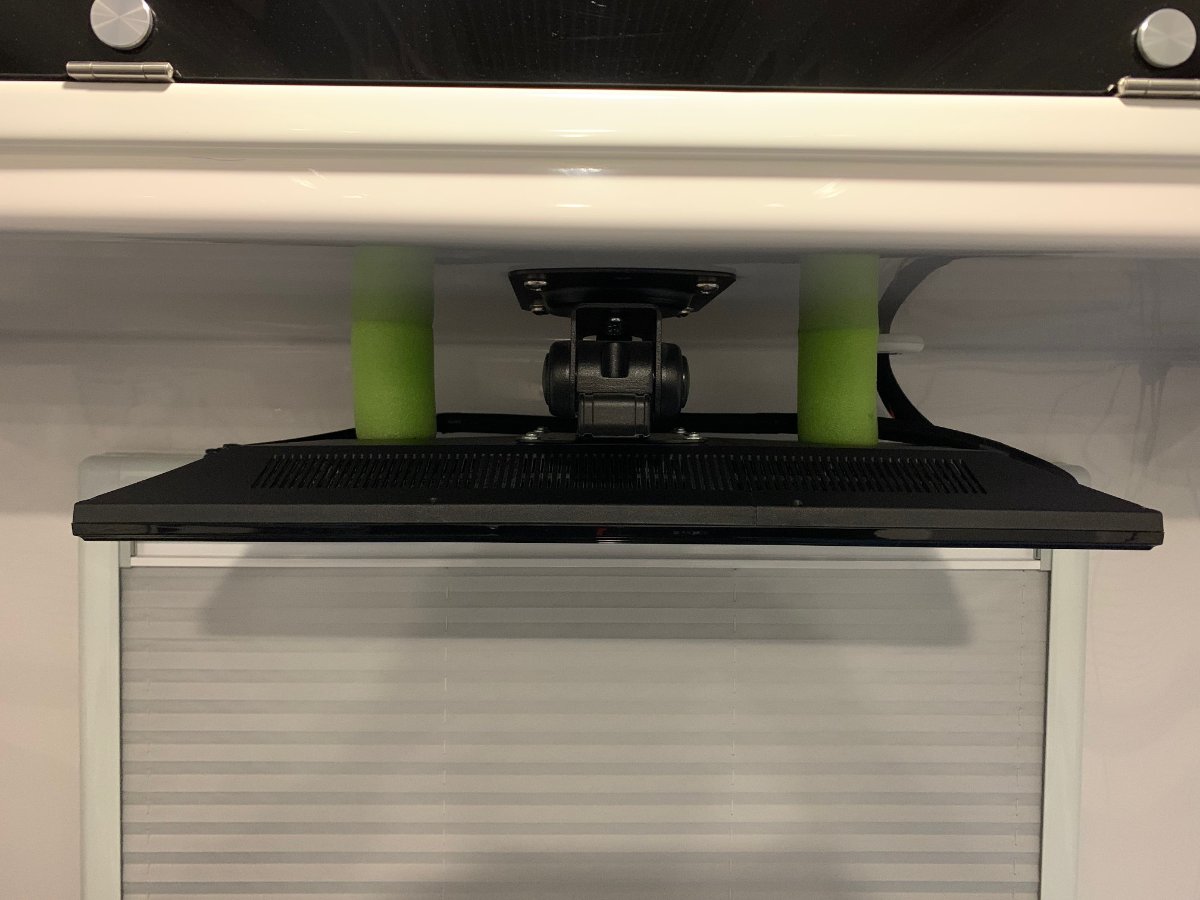
Our fold up television unclips itself and falls down frequently while towing our trailer. It's also very wobbly in general, so I was looking for a way to stabilize the television. I decided to try a couple pieces of pool noodle as stabilizing shock absorbers and so far so good. One will stop the television from unclipping itself, but two (one on each side) provide additional stabilization and prevent the wobble. The television hasn't fallen off since I put these up and although I haven't put a camera on it while towing, I can't imagine the television is wobbling any more either. The noodles don't flex much so they provide very stable support. Because of this they had to be perfect in size, so it was trial and error. Mine were both 3-3/8" thick. A softer type of material like foam or sponges would be easier and may even work better. I'm sure other owners have developed a slew of ways to stabilize the television while towing, but unfortunately forum "search" turned up . 🙂
2 points
-
The thing is, everyone is correct. Because everyone has different needs, wants, and situations. Overland knows the calcs as well as anyone. We are severe power misers, accustomed to camping without power, and no 110 appliances or inverters. JED uses an inverter, at least sometimes. I wouldn't recommend a dc fridge to most people who have our puny batteries, and limited solar. Even though we doubled our solar, I'm still not recommending dc fridge to those who aren't willing to monitor limited agm battery power. I've spent (as I've mentioned other times) hours, chasing the sun with portable solar. And, in crappy days, I still have to run a fossil fuel Honda 1000 for a half hour to an hour in the morning. Everyone has a different plan, situation, and certainly, most have more battery power than I do. And, most don't want to limit consumption as much as we do. If I had lithium, I could certainly relax for a weekend. But, hey. I'm the one who monitors pretty much everything, at home, or camping. I know what we "need", and yes, there is certainly more I'd love to have. But, indecisive if it's worth it, for us, and our habits. More power to you all with lithium. (No pun intended.)2 points
-
Bill, I fought with that microwave mounting until I gave up and remodeled the entire cabinet. It tried to jump out of the cabinet twice while I was on a trip to Death Valley. The re-model fixed it! I ended up with a smaller microwave, a wine rack, and utensil storage. Along with a drop down door that gave more workspace. All as part of the same original cabinet. Much more useful, I thought. There are pix of it around here somewhere. I remember showing the stainless countertop and microwave cabinet to Scott Oliver, but he sort of had no comment. I wanted him to offer the stainless as an option. It would be easy for them to get a bunch of blanks cut out and simply install them as off-the-shelf parts. It was the most durable and functional surface I could think of, while still being lightweight. John2 points
-
Raspy, Is hull #92 the one with the stainless steel counter top? if so,it is in San Diego being loved and towed with a diesel VW Touareg. Andrew2 points
-
I have just noticed some suspension creaking noise. My last suspension was at Oliver last September and have certainly traveled over 3000 miles since then so it is time to buy a grease gun and figure out what to do. You Tube to the rescue.1 point
-
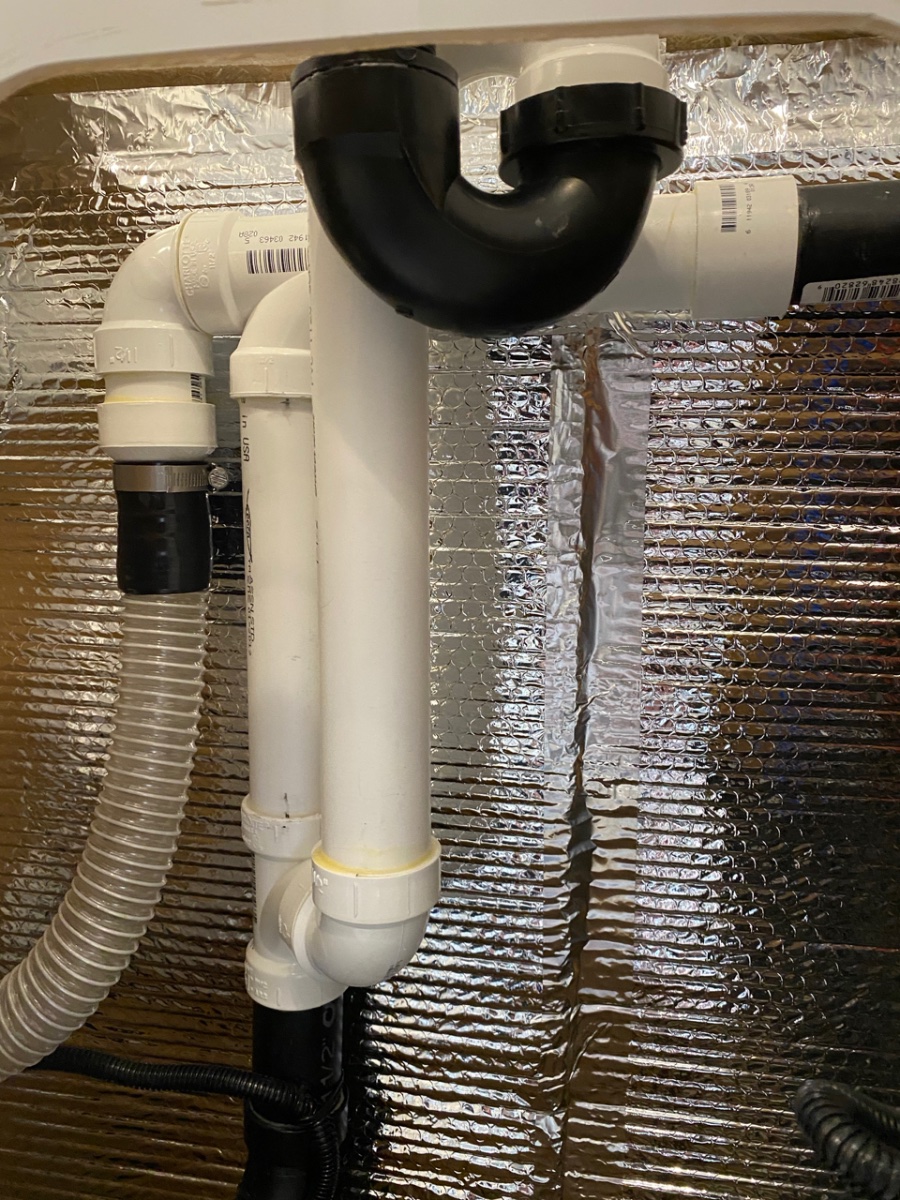
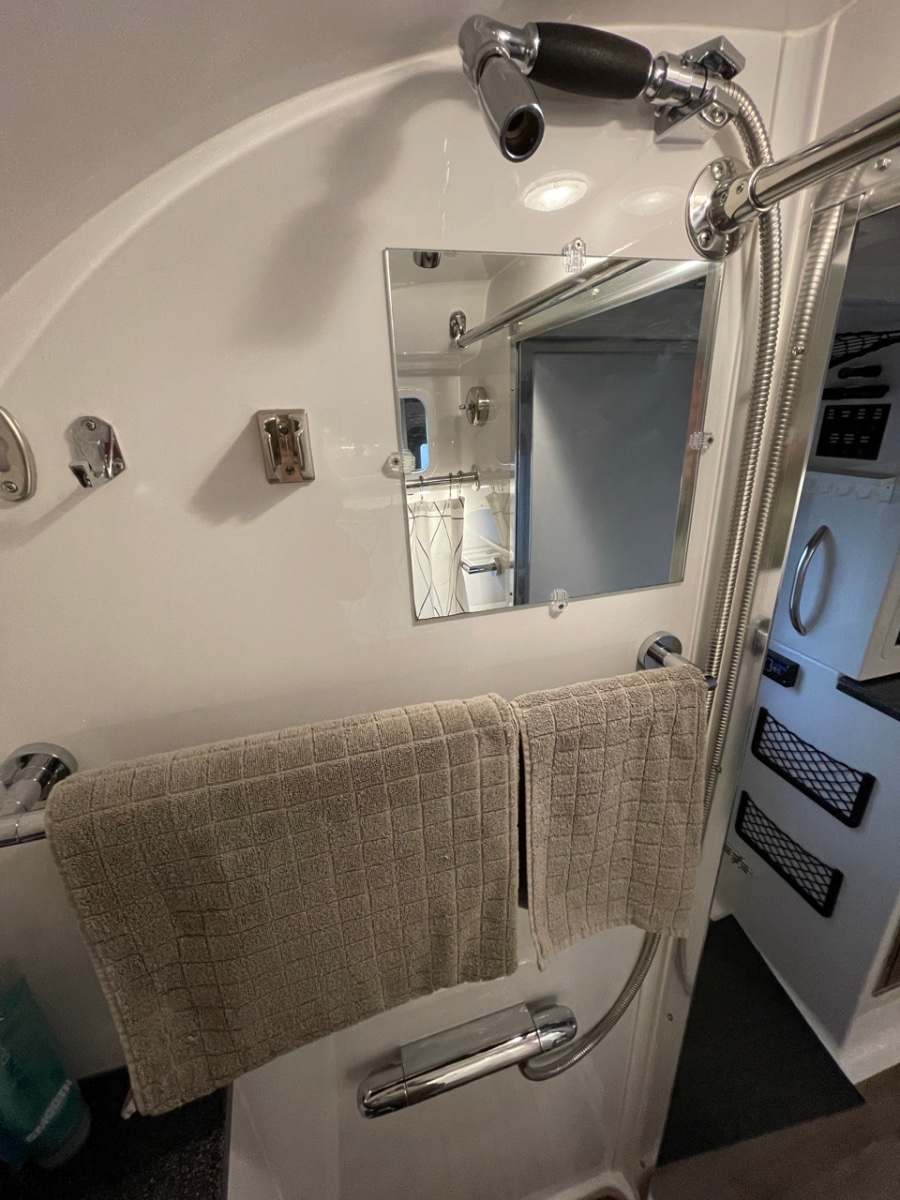
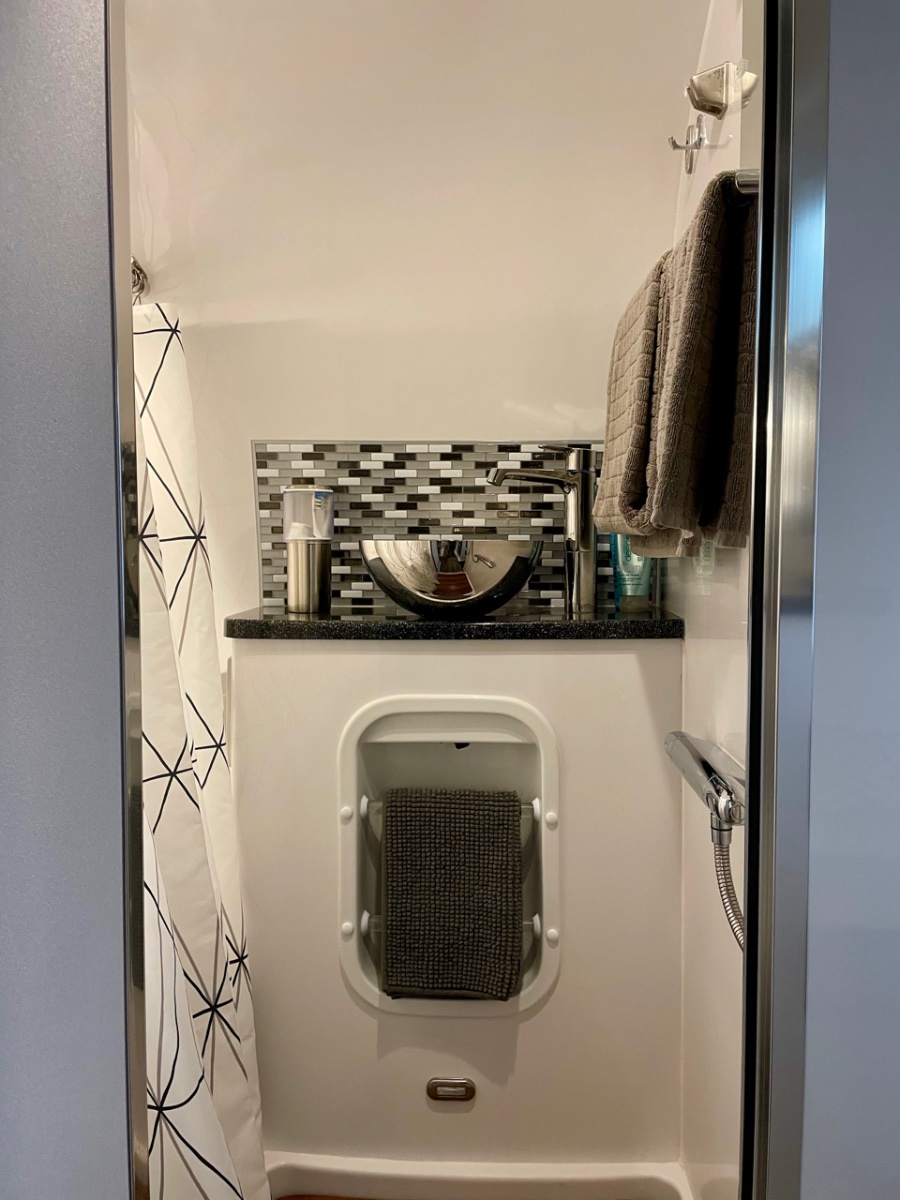
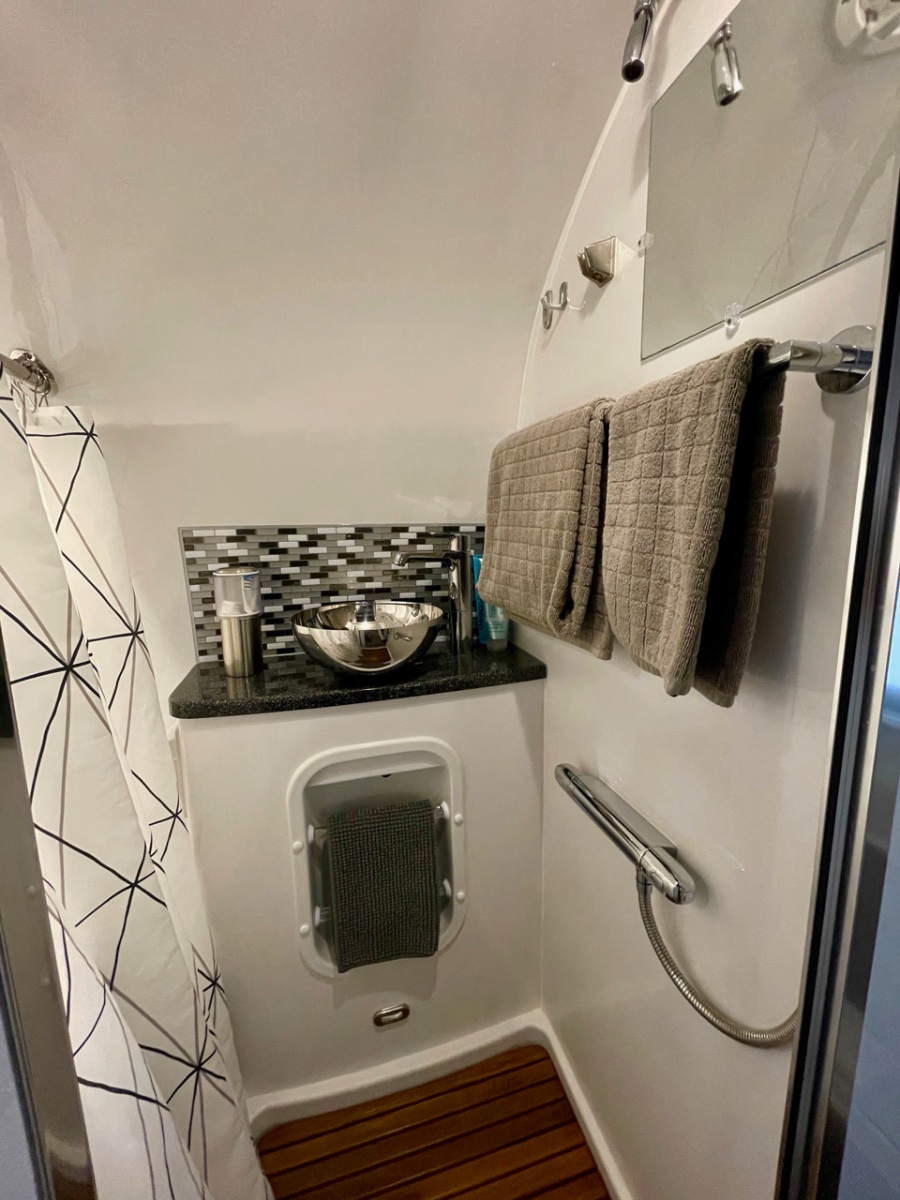
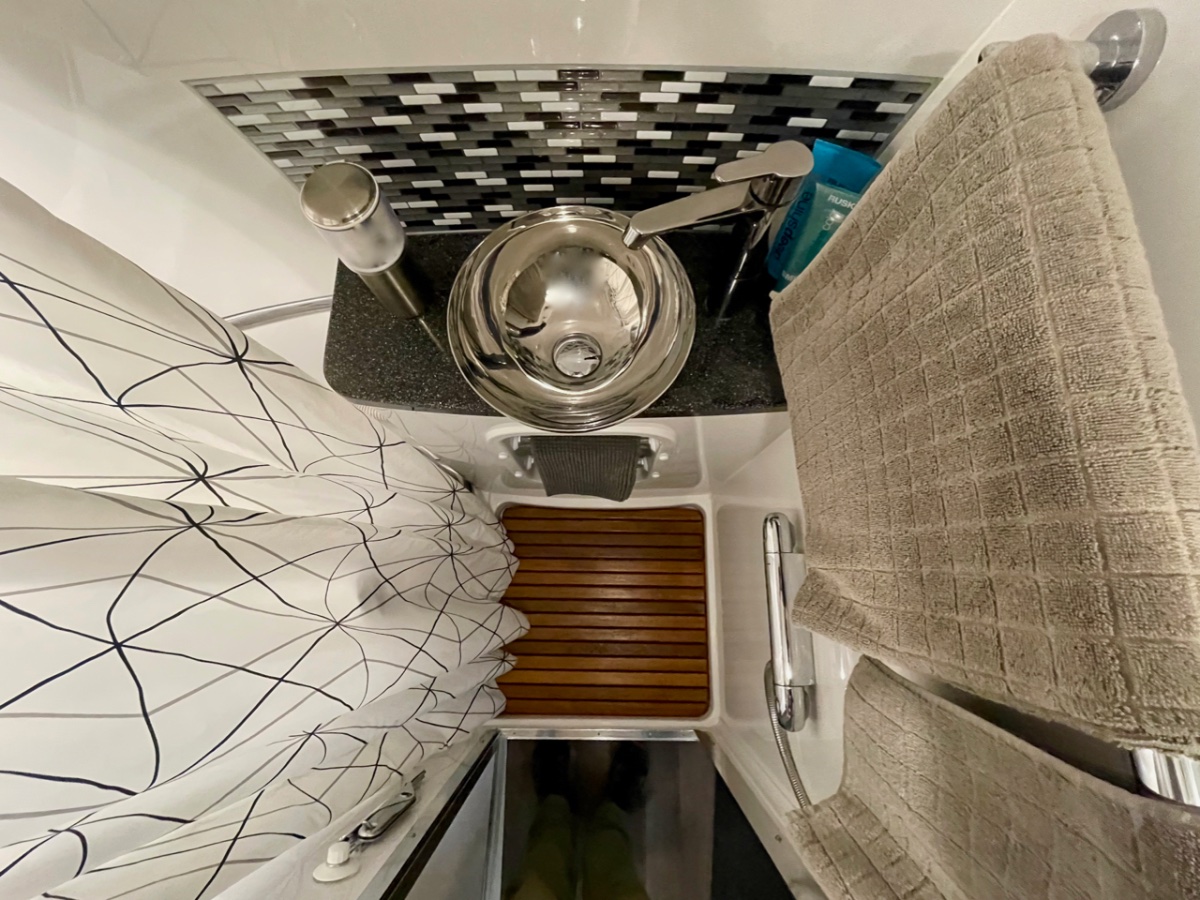
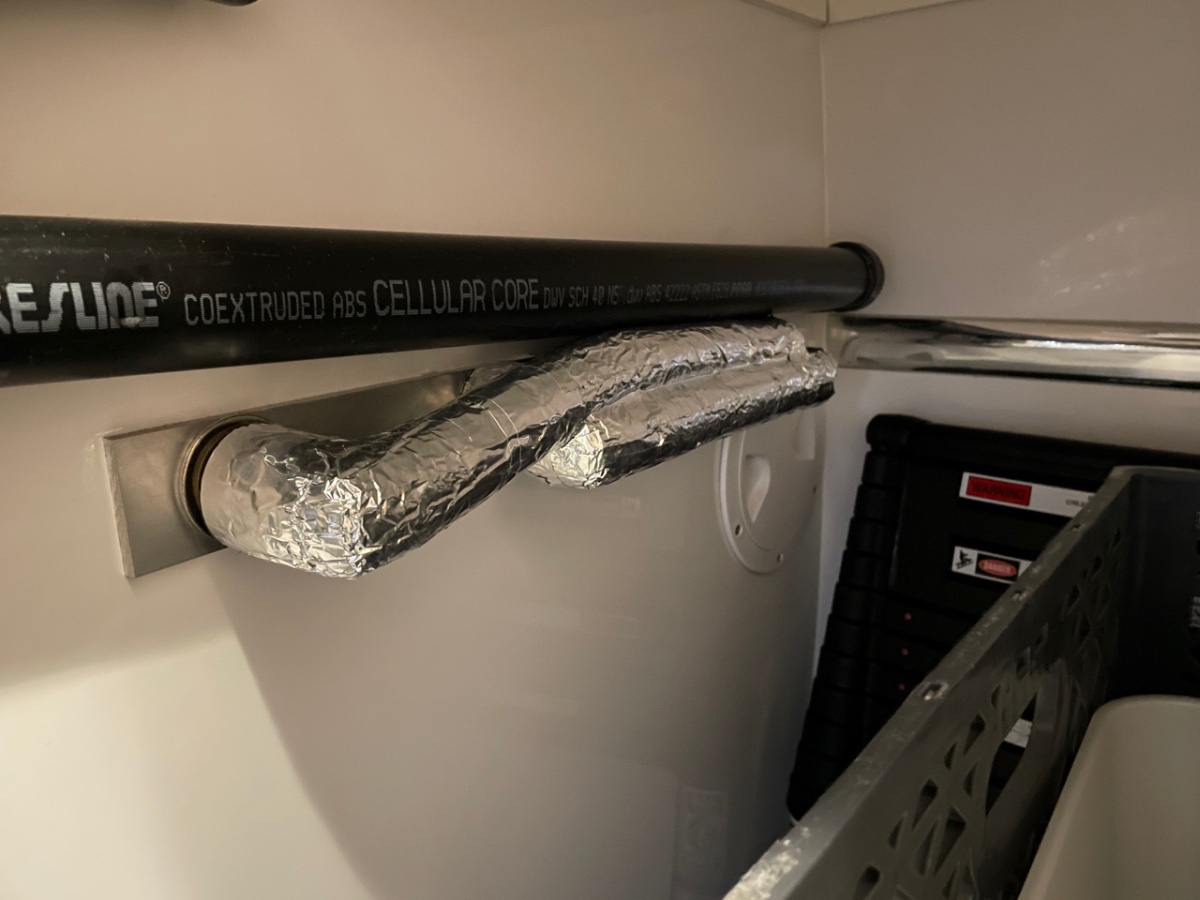
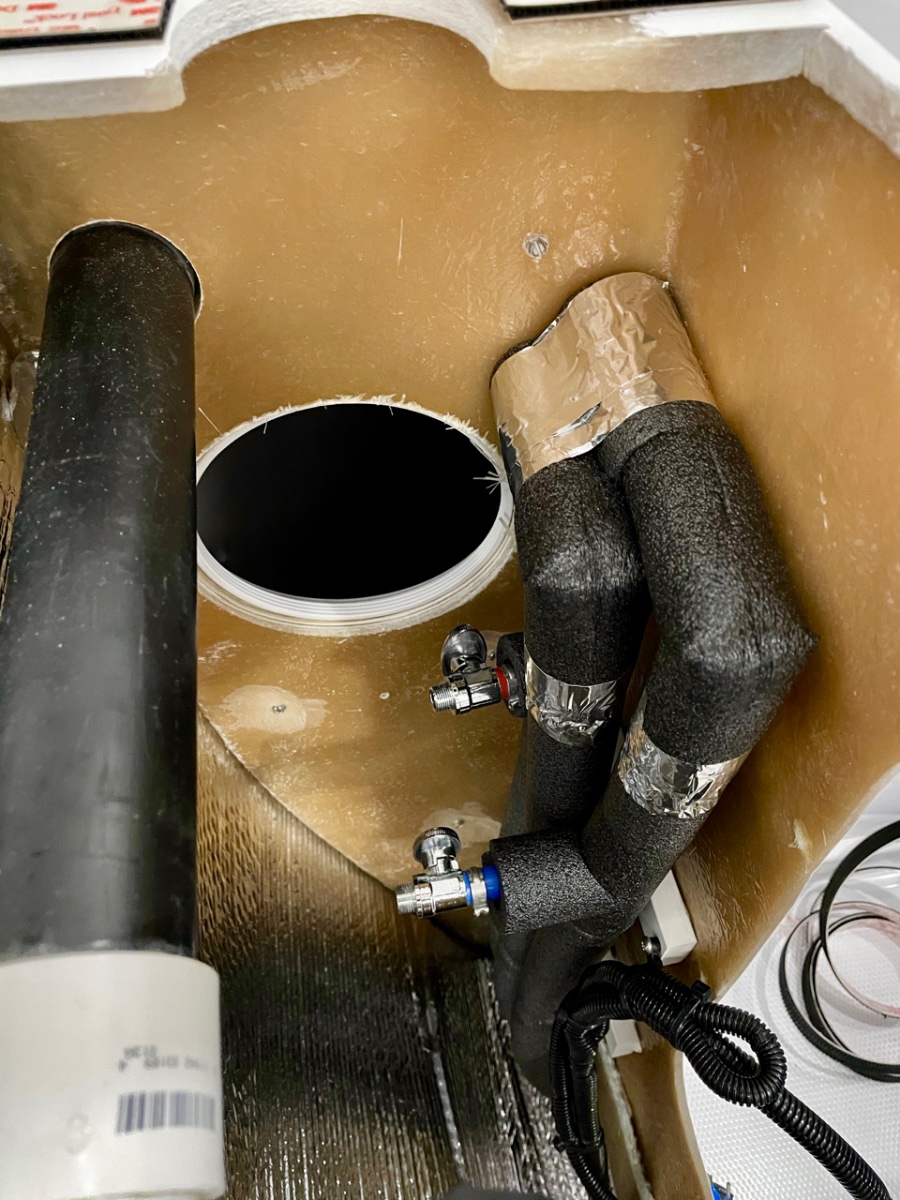
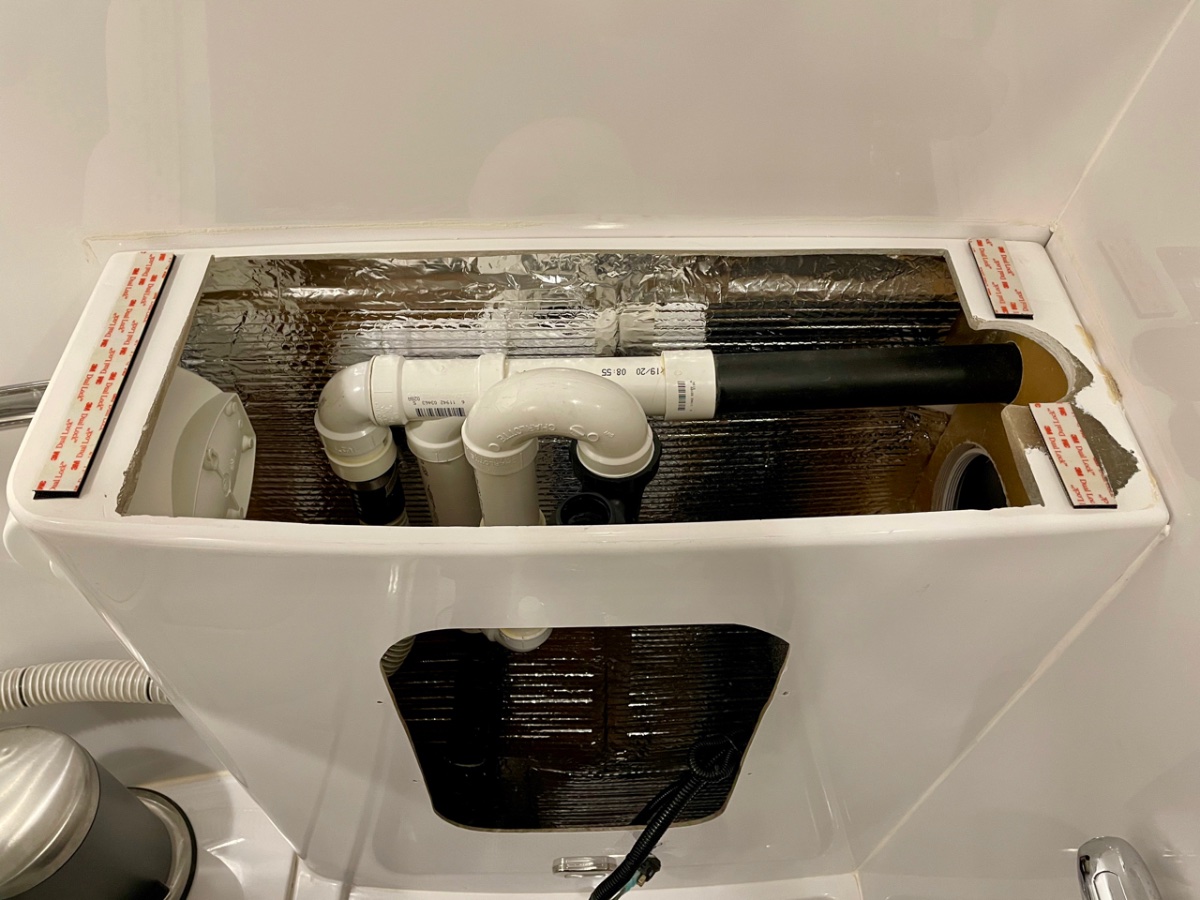
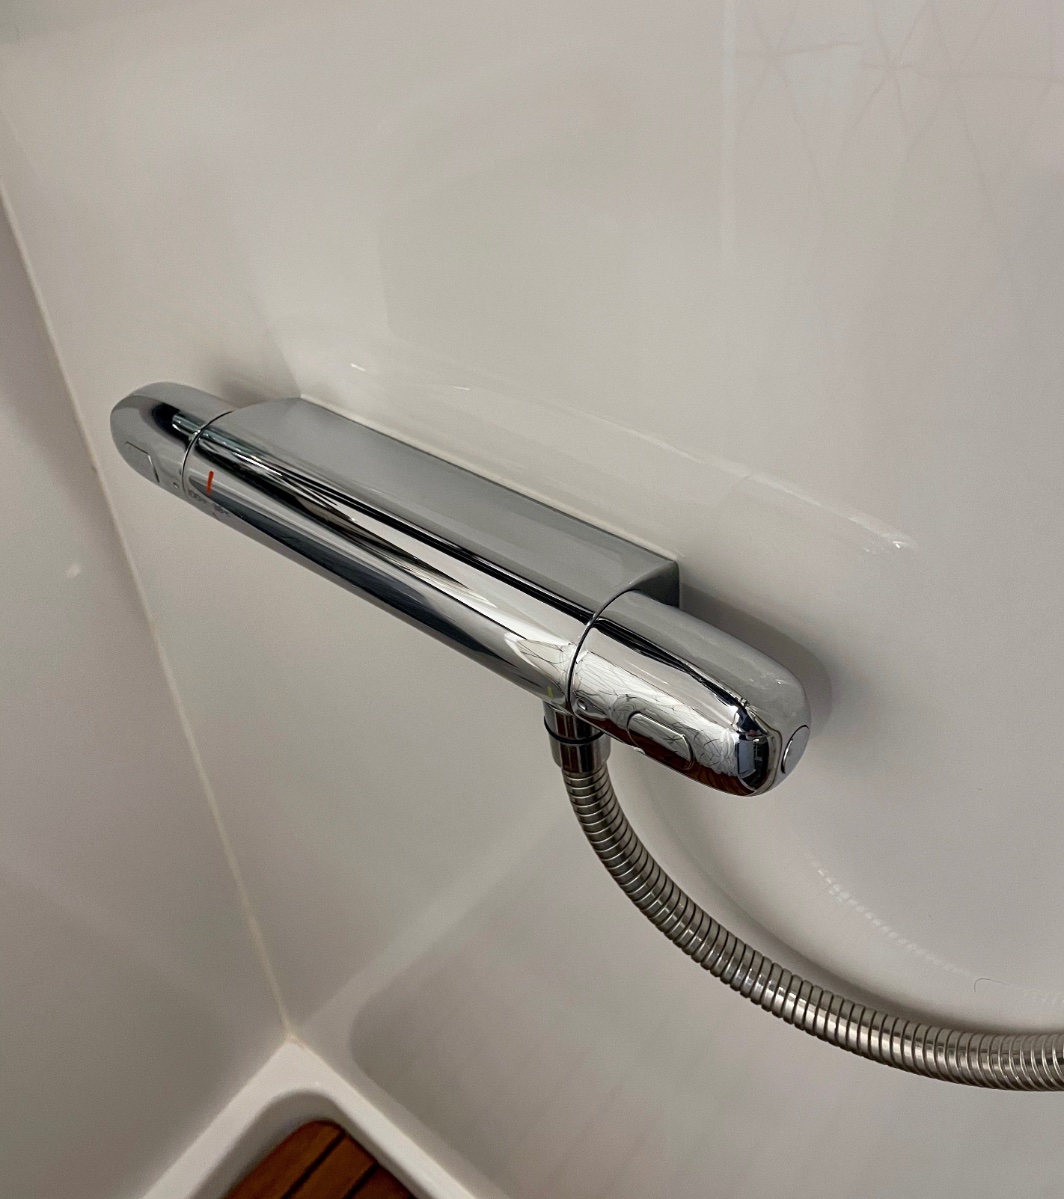
Many of you know that this has been a long, drawn out project. I think I started talking about it to a few people at the 2019 rally - so it's been well over a year in the making, almost two. Not that it was particularly difficult (though certainly a more major mod), but because of laziness and indecision on all the components it ended up being a start and stop project, with months sometimes between fits of activity. And then it snowballed into a complete plumbing overhaul, which was unnecessary - but then that's how the trailer got its name, after all. I'll post about all the plumbing stuff later, but since there have been a few recent posts about shower and bath mods, I figured I'd go ahead and toss this one into the mix. This project started for a few reasons. One, I've always found the bath sink to be mostly useless. It's fine for washing hands, but for most anything else, you've got to crane your neck around with the front wall curving in to hit your head. And trying to use a tiny little sink for washing your face just leaves water everywhere. So we found that were using the kitchen sink almost exclusively. That was fine - no big deal - but with the bigger sink, I was getting tired of wasting water cleaning toothpaste residue out of the sink, and it seemed silly to have a bath sink that got little to no use. The second reason for the upgrade is that after we redid the kitchen sink, the bath sink just looked sad. In addition to functionality, the bath needed some sexy. So the obvious solution was a vessel sink of some sort. Since a vessel sink sits on top of the counter, I'd have much more leeway in size and placement. I could pull it forward as much as I wanted, plus it had the added benefit of raising the sink to a more comfortable height for us. Some experimentation with kitchen bowls of different sized showed that I could get a fairly generous sink that didn't take up too much shower space. I settled on something in the 11" to 12" range; which proved to be a little difficult to source, especially after deciding on the material. I had bookmarks for dozens of sinks of different materials, but I couldn't find one that I really liked. I almost picked a glass one off Amazon, but in the end I thought that was going to be too heavy. What I really wanted - since I had already swapped out almost all of the brushed chrome fixtures in the bath for polished - was a simple polished stainless sink. There were a few out there, but nothing in the right size, nor at a reasonable price. So the project bogged down a bit at that point; but I was confident that I'd find something eventually, and so I went ahead and ordered a new vanity top from Oliver, without any cutouts for the sink or faucet. I’m glad I did, since Oliver has apparently now stopped offering our countertop color And sure enough, a few months later I came across a discontinued sink on Overstock.com that was exactly right. 11.25", polished inside and out. It's the Acquaio sink from WS Bath, if you can find one. I know that other sizes are still available. It was still pricy even on discount, but by that point I didn't care. To make up for the splurge, I got a faucet from Ikea, which is actually pretty nice. The colors from chrome to stainless don't exactly match, but they're close enough and it doesn't bother me. Since I was swapping out the faucet, I needed to find a separate shower valve, which was another lengthy quest. I thought at first that I'd put one to the right of the bath caddy, like @mountainoliver has in his trailer. But most everything I found was just a bit too big to fit (I didn't know about mountainoliver's mod and the mixer valve he used until later). Then I found the Grohe Grohtherm valve, which was interesting in a couple of respects - it didn't recess into the vanity at all (which eliminated a potential issue with the plumbing), it matched the Grohe faucet that I had already installed in the kitchen, and since it was linear, I thought that it might actually fit in the space above the caddy, between it and the vanity top. And it did fit, but looked squished in place, plus I didn't think until trying to place both it and the sink that the the sink drain and trap was going to be difficult to work the plumbing around. Plus putting it there meant that the shower hose was going to be strung across the vanity and generally look bad and be in the way. The problem with this realization was that I'd ordered the valve and the sink before one of my 3-month breaks in the project and now neither was returnable - so I had to make it work. This meant that the shower valve was going on the closet wall. I also realized during the test fitting that when I pulled the sink forward, the drain trap was going to hit the top of the bath caddy, meaning that I couldn't get it far enough forward to work. Small disaster. But I realized though that the bath caddy wasn't symmetrical, and if I turned it upside down, everything fit. I'd lose the flat shelf on the bottom, but we only use the caddy to hold the bath mat, so not a problem. Small problem with the water pump switch placement, though, since it would be on the bottom - but a quick email to Oliver had a new caddy that hadn’t been drilled for the switch on the way. At that point, all the pieces were here, all the logistics worked out, and I was ready to go. Time for another couple months off while I built up the courage to drill through the closet wall. Then finally... First step was to remove the existing vanity top, which is possibly one of the most firmly attached things in the trailer. It's glued in place, so the only way I could find to get it off without completely destroying the vanity was to cut through the joint with an oscillating saw. That's a slow, tiring, dusty endeavor; and it generates a great deal of heat, so you've got to work in spurts to keep the fiberglass resin from burning - which is fine really, since working through the caddy access, your shoulders will welcome the rest. I had to do a tiny bit of trimming on the new top to get it to fit as snuggly as the old one; and once in place, I sealed it with silicone like the original. Top off, new drain lines in place, and I decided to attach the new top with industrial velcro to make it easier to remove in the future (works well). Next, shower lines teed off the existing plumbing, line to the nonexistent toilet removed, and some insulation added to both the plumbing lines and the outside wall behind the vanity. (I have a circulating pump on the hot water, hence the extra line.) I also glued a small PVC block to the back side of the vanity wall to tie down the water lines and prevent them from vibrating too much. And as always, cleaned out as much fiberglass dust as possible, cleaned up and wrapped wiring, etc. The access port on the closet side is something that Oliver gave me in the original build. The sink valves and drain trap are accessible from that port, and since I used velcro for the top, I have the option now of cutting the silicone on the top and pulling that off for access, in addition to taking out the caddy. New plumbing in the closet for the shower. I drilled out a short piece of aluminum as a backing plate for the shower valve. The plumbing is protected somewhat in the closet by the ABS vent, and we really don't keep much in there that could bump around and damage the plumbing. But a few layers of aluminum tape should help protect the insulation from getting beat up and gives a bit of a spaceship vibe. The valve is supposed to stand out from the wall about an inch or so, but I decided to recess it so that it attaches flush and as out of the way as possible. I caulked around the valve and it ended up making a nice little shelf for a razor, and I placed it low enough that my wife can use it to prop a foot while shaving her legs. You can also hang a bar of soap on one of the handles to drip dry. The faucet has a neat feature with stops on both valves, which can be custom set to whatever temperature and flow you prefer. The little buttons on the handles allow you to go past the stops when you want. And that's really it. Installing the sink and faucet is just drilling two holes and following the directions. The only change I made is that the sink came with a short stainless ring to mount between the sink and counter, but I didn't like the look and so just used one of the black rubber gaskets that was inside the ring. That way the sink looks like it’s sitting right on the counter instead of a pedestal. We tested everything out on our last trip and functionally, it all works as expected. The sink isn't in the way at all while showering, and really is so much more usable. Plus I think it looks great. The shower functions just as nicely, with the valve not being obtrusive. I added a second holder for the shower head up high, which works better for me, though my wife prefers the original one. I still need to swap that one out, since I think it's the only bit of brushed chrome left in the trailer. I added the same backsplash material that a few other owners have recommended. I wanted to order a new, wider mirror; but the original one is glued on and so I didn’t want to go through the trouble of trying to get it off. I suppose I could just place one on top of the other, so maybe that’ll be a future project. Glamor shots -
1 point
-
We just put our deposit down for a LEII and its expected in Feb. We are super excited to get our Ollie and we look forward to meeting those in this family!! I've owned a couple trailers since 2000 so I'm not new to camping but my Mrs. on the other hand.......... 🙂 We are down sizing from a Grand Design Imagine 30' TT which was a great trailer and company. We are looking to do more boondocking and the over build quality of the Ollies is undeniable and was one of the main things that attracted us. We went a couple weeks ago to see an Ollie in person and we were both very surprised (in a good way), loved the layout and that was pretty much all we needed to call Phil and place our deposit. Cheers, JJ1 point
-
I just want to throw this out for your consideration. A long day trip, ten hours with the engjne running. A Redarc charger will give you around 110 amp hours, day or night. Your standard solar may give you double that.... unless it’s overcast or night time. Working together in full sun they will give you up to 300 AH..... I think the DC to DC charger is a must have for anybody with lithiums, simply because it provides a decent amount of reliable power, regardless of weather conditions that will disable any solar device. And I am not saying that because I just installed one😬 OTH the regular 12 volt power wire from many TVs (but not a Land Cruiser!) will sort-of charge them, say to 70%. Better than nothing IMHO, especially if you have rooftop solar to assist. John Davies Spokane WA1 point
-
Need is a word that gets thrown around a lot right after someone does that mod on their own trailer, lol. I don't think it applies here, because, you know, generators. But definitely some thought needs to go into both power sources and storage. Like SeaDawg said, expect your electric bill to go up by anywhere from 50 to 75 amp hours. So, you can plan to recover that each day by some means, and/or, up your storage to get you from charge to charge. We use roughly 70 Ah non-fridge, and 60 fridge - so, 130 Ah total to try to recover. To get that from solar exclusively, that would equate to 650 watts (rule of thumb = 20 Ah per 100 watts of solar). So, that's not gonna happen without serious modifications. You'd also in addition want 3 days of battery storage to get you through cloudy weeks, or 400 Ah - an easy but expensive upgrade. You said you had LFP batteries, but not how much. 400 would be the minimum in my opinion, but SeaDawg is reading that and laughing. But, you might not be able to hear her over her generator 😜. If you got the 600 Ah option (platinum, natch) then you've got the extra amps in the bank to get you from charge to charge. 4 or 5 days, easy, more with good sun. So unless you're a dedicated boondocker, I'd say try it and see. Or get that generator. Or get a new truck. Those F150 hybrids with the built in generator are pretty sweet. I do however agree 100% that you should put some thought into a truck fridge. We've got a DC fridge in both truck and trailer and I wouldn't give up my truck fridge for anything, except perhaps for a larger one. In fact it's become permanent. It's very convenient for grocery runs, when you don't want to head straight home to put everything up. But just as importantly, we can stuff 3 weeks worth of food in there.1 point
-
We have been running a Dometic CFX-35 in the bed of our tow vehicle now for a year and find it to be an excellent addition to the fridge in our current SOB trailer. Plan is to keep this compressor fridge in the TV after getting the Ollie in September. The setup we have to run the chest compressor fridge in the bed of the truck is a 100W solar panel mounted on the roof rack on the truck shell run to a MPPT controller which then feeds two 12v AGM batteries mounted to the front of the truck bed. Never had any issues with being able to run the dometic either in fridge or freezer mode 24/7 and then fully recharging the batteries the next day. This system is NOT tied into the TV electrical, rather a stand-alone system. Planning to use it after getting the Ollie to charge Ollie batteries when Ollie is parked in the shade by parking TV is full sun and running wires from battery bank in truck bed to Zamp port on Ollie instead of hauling around a ground mount, portable panel. The Dometic sips amps and is useful for either overload food or to freeze a lot of water bottles/freezer packs for use in a cooler when away from the trailer.1 point
-
Mike, Yes. Shane is really busy and I'm supplying him with the hitches that go on almost all of them. Every time we go to Utah, we stop at his place for a visit, or to drop off hitches. Hope to see you one of these days. Any fun trips planned? John1 point
-
Hey John, glad to see you pop in and update us. I also see you over on Fiberglass RV forums. Glad you’re still enjoying your HQ19, I bet Shane is selling a bunch of them. Hope to see you out on the road again. Mike1 point
-
Several of us have done this. I'll look up some threads for you. I think the Novakool probably offers the biggest capacity for the existing cavity, but there are a lot if choices. In our smaller Elite, we installed the very reasonably priced Truckfrudge tf130 over three years ago, as it (barely) fit through our narrower opening between shower door and microwave cabinet. That opening is larger in the II, so you have more choices . I'd loved to have installed freezer and fridge drawers, but felt it was too pricey. The swap was pretty simple. (Our Dometic three-way no longer worked, and required replacement. ) I gained about. 5 cubic ft. Of refrigerator space, and a drawer beneath the fridge. With the Novakool, you'd gain over 1 cubic ft., as I recall. All the choices that I know of use the same Danfoss/Secop compressor. Since you have lithium, you shouldn't have any trouble running on battery. It's much more of a challenge for us, with only two 105 ah agm batteries, but we manage. Edited to add links.1 point
-
Looks like a decent mod 🙂1 point
-
Hello everyone! We did it! Just put our deposit down on an Elite ll. We'll pick it up in Feb. We will be stopping to tour the facility the first week in May on our way to the Red river gorge. After spending 5 months traveling in our class A 30 ft we decided to go smaller. We will be towing it with our 2018 nv 3500 4x4. Has the pop top so still room for when the grandkids come along. Really excited about this forum and hoping to learn alot here. Looking forward to a western states rally in the future! We are a bit new to the forum and social media thing.... hope the picture is allowed.
1 point
-
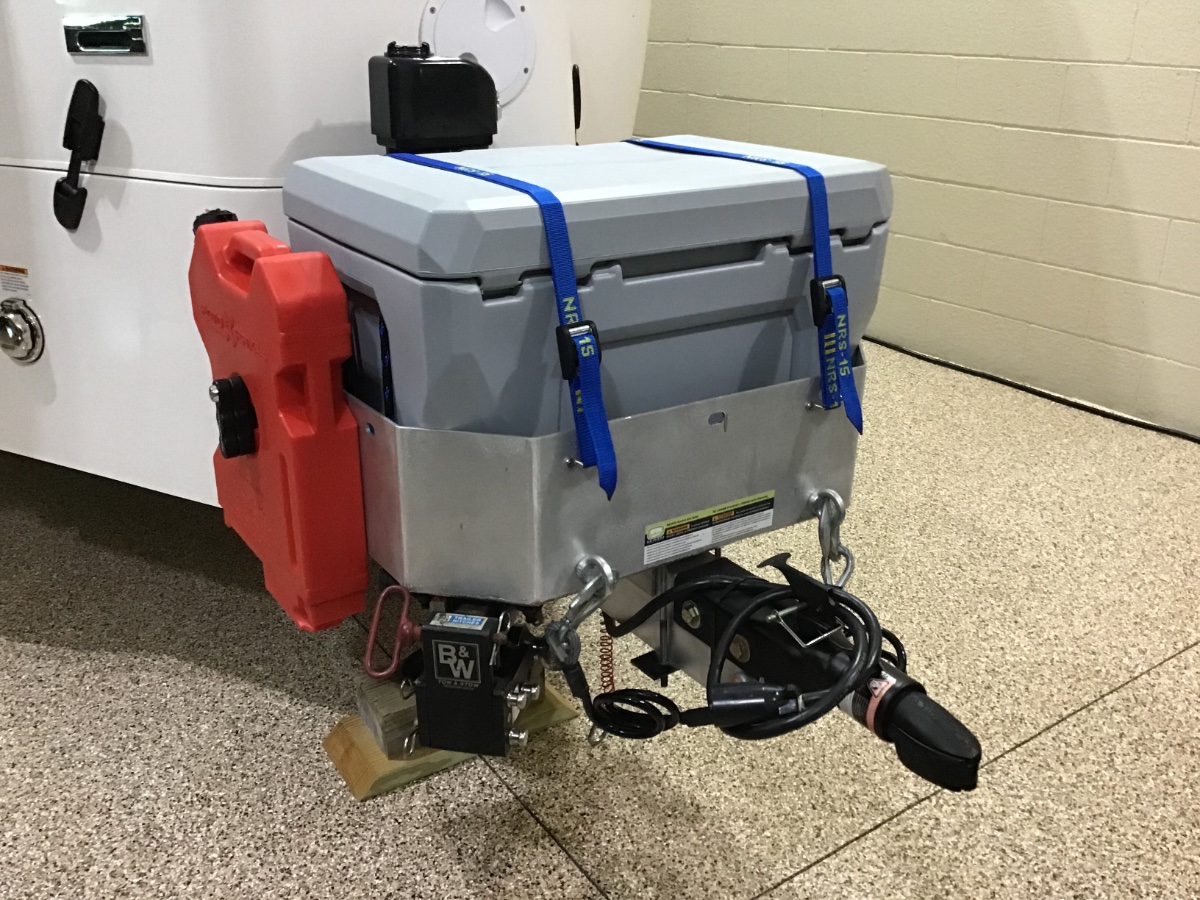
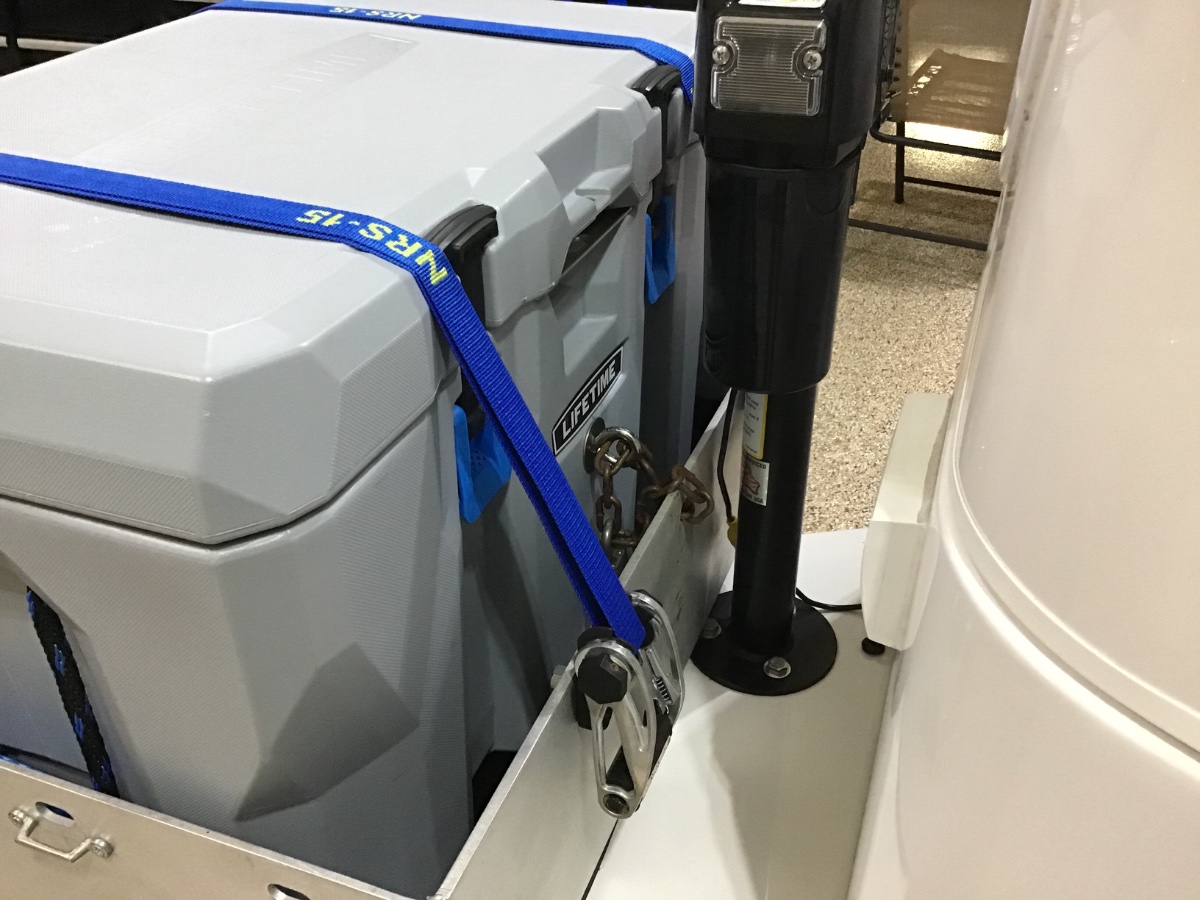
Here is one more option to consider. It works very well for us. Lifetime cooler from Walmart it serves multi purposes, takes up all the space in the basket just enough room on the back side to store two 2x6 wood blocks water tight, can be used for extra dry food or put food on ice which lasts about 4 days or just use as a anything storage. I also added a theft deterrent chain and lock on the back side. i also plan on getting another fuel pack for the other side of the basket. 4gals of fuel plus all the onboard propane I’m set for hurricane season.💨💦⚡️
1 point
-
GJ - I know that Patriot is presently a bit "busy", so, it might take him a few days to get back to you on this. Bill1 point
-
Thanks JD, eager to hear the long term evaluation. RB1 point
-
Lol, I wish I had a picture of our dining room while we were waiting for our Ollie. It looked like a camping world annex.1 point
-
Just why do you humans always blame it on the Dog?1 point


-
Recent Achievements
-


")


")


