Leaderboard


Popular Content
Showing content with the highest reputation on 05/01/2021 in all areas
-
Update to include a parts list and to provide some comic relief to anyone wondering how much money I spent on this modification. Mossey Victron Venus on Raspberry Pi for the dog house $11.99 RS Raspberry Pi 7-Inch LCD Touch Screen Case, Black touch screen and Pi housing $20.81 Raspberry Pi For Dummies (For Dummies (Computers)) education purposes $11.98 Distributed By MCM Official Raspberry Pi Foundation 5V 2.5A Power Supply Black Pi power supply $7.98 SanDisk Ultra 32GB microSDHC UHS-I Card with Adapter, Silver, Standard Packaging (SDSQUNC-032G-GN6MA) for Pi OS $7.85 30 PCS Raspberry Pi 4 Heatsink Kit with Thermal Conductive Adhesive Tape, Aluminum Heat Sink Cooler and Copper Heatsink for Raspberry Pi B B+ 2/3/4 probablly not required, but I used the anyway $41.79 Raspberry Pi 3 Model B+ Board (3B+) the actual Pi computer $69.99 Raspberry Pi Official 7 Inch Touch Screen for Raspberry Pi 4 / pi 3/pi 2 Model B touch screen $6.99 Pastall Raspberry Pi Camera Cable, 6pack 15 Pin (15cm×2pcs/30cm×2pcs/50cm×2pcs) FFC Ribbon Flexible Flat Cable for Raspberry Pi Module Camera the display came with cables, but I wanted longer ones for mounting options $8.23 Blue Sea Systems 1014 Socket 12VDC MOUNTING Bracket, Beige I glued a piece of PVC material inside the stereo cubby hole and used this to mounted the USB socket $38.55 Blue Sea Systems Fast Charge 4.8A Dual USB Charger Socket Mount, 12V/24V 4.8v output for 2 ports, suppling 2.4v for each $28.05 Victron Energy VE.Direct to USB Interface BVM connection to the Pi $28.05 Victron Energy VE.Direct to USB Interface MPPT CC connection to the Pi $28.21 GlobalSat BU-353-S4 USB GPS Receiver (Black) for locational data and geofencing $9.99 ELUTENG USB 3.0 90 Degree, (6Packs) Right Angle USB Extender Adapter Male to Female USB 3.0 Super Speed Connector UP Down/Left Right USB Extender Coupler Vertical L Shape for USB Devices normal straight USB connections would not work due to the stereo cubby hole wall thickness $51.02 StarTech.com 4-Port Industrial USB 2.0 Hub with ESD Protection - Mountable - Multiport Hub (ST4200USBM),Black powered USB hub to power the USB cable from the street side area below the bed to the Pi in the stereo cubby hole for data transfer. $5.99 StarTech.com 15 ft USB 2.0 A to B Cable - M/M - USB 2.0 Cable - Black - USB Type A (M) to USB Type B (M) (USB2HAB15) 15 ' USB data cable $6.35 SanDisk Ultra SDSQUNS-016G-GN3MN 16GB 80MB/s UHS-I Class 10 microSDHC Card tesing this MicroSD card for data storage while without WiFi coverage $11.99 SanDisk - SDDR-B531-GN6NN MobileMate USB 3.0 microSD Card Reader - SDDR-B531-GN6NN Black USB card reader for microSD, allowing it to plug into the USB hub 395.81 it wasn't cheap, but I had fun and learned a little about Raspberry Pi and I kept the Amazon team in business5 points
-
Last year we had a short discussion about what time of the year do the fireflies come out in the mountains of western North Carolina. Well, within the next three weeks or so some 20 varieties of fireflies will begin to do their annual ritual and this includes the "blue" fireflies that are only know to exist in very limited ranges and the synchronous fireflies that are "famous" in the Great Smokey Mountain National Park (June 1-8 and it takes a lottery ticket to get to see these which are available at Recreation.gov from today through May 3rd). Good luck on getting a ticket! Bill2 points
-
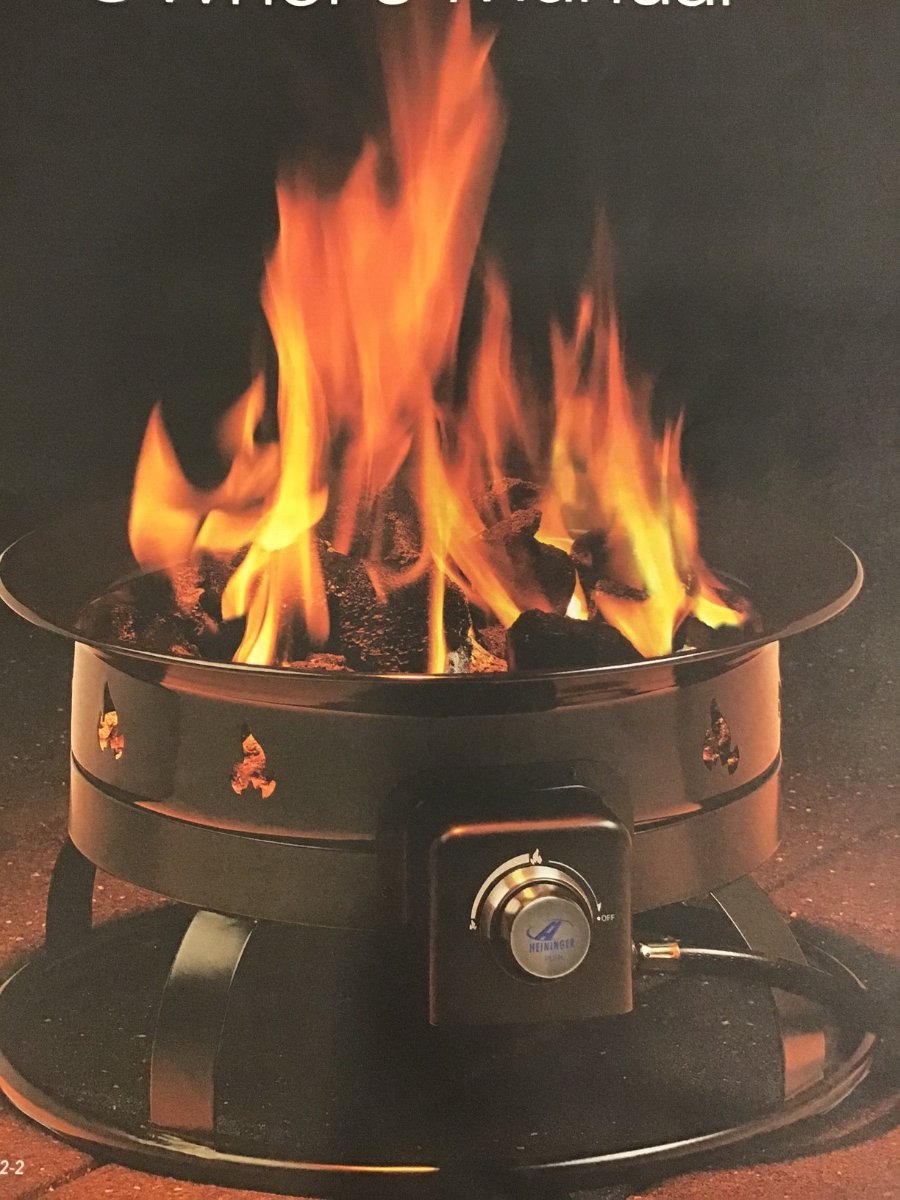
I’m not sure if this was ever discussed before. While scrolling through the YouTube channel i came across a video of the staff at Oliver Travel Trailers reviewing Destination gear propane Fire pit by Heininger. At the end of the video They said to call service they had them in stock. So I called service two days ago, they said yes it is a stock item for them. You can get the basic setup with hose and regulator. Or they also have the setup for the quick connection on the Ollie. I had them send me the basic fire pit set up and also purchased the carrying bag for it. I’ll leave it up to everyone to call for pricing. I will say they are a little higher price than Amazon plus shipping. I’m a shop small person when i can I didn’t mined the higher price. I was surprised two days later UPS was at my door with it. 👍🏼👍🏼 from me. Looks like a well made unit. I hope Oliver starts more of these Options.
 2 points
 -
I have found the God send of all greese guns. Dewalt 18v cordless greese gun. I hated all greese guns, clumsy need three hands hold the gun, pump it and try to hold the end on the fitting. The cordless is great chuck snaps on pull the trigger Done. Shocking price for one, but what isn’t these days. Well worth the price after one use.2 points
-
Carl - We had several objectives. See the actual color options. Computer displays are not always very accurate. They had a great set up in the new sales office/show room to mix and match all the color and fabric options. Spend a bit of time actually sitting in the trailer. I am not a small person, and just wanted to see how it felt after some time. It was very comfortable, even for me. Better understand some of the options and in talking with our sales person, additional questions came to mind that are in the process of being researched, I respected that our sales person would tell us when he wasn't sure about something, but would look into it and let me know. I don't like sales folks who blow smoke. There was no smoke here! See the build quality that you can't see on the outside...like how are wiring harnesses affixed to the inner hulls so they don't come off and rattle, etc. While I've watched just about every YouTube vid out there, I was able to see lots of little details and was very impressed. (and no, I have not partaken of the Oliver Kool-Aid). See the actual production process. Being an industrial engineer, I took in a lot of observations on actual production workers work methods and their attention to detail. Out of everything I saw, I was most impressed with this aspect of Oliver. I watched a worker in the final area working on a small imperfection - he had not seen us, and the level of effort to address this little flaw was very impressive. There were multiple examples of this in addition to a really good "feel" on the floor. Can't really describe this, but after dozens of years in manufacturing, you get a sense of the feel of a place. (While I was getting close to taking a sip of the Kool-Aid, I had not yet ingested any at this point). Taste the Kool-Aid - after the tour, I think I drank some of their Kool-Aid! For us, it was much better to see it in person. It is a huge investment for us, and we wanted to see things up close and personal. I agree completely with topgun2 that a factory tour is very beneficial if you are close.2 points
-
Look at Jay’s listing of his LE2 for sale and do the same. Best listing I’ve ever seen. Clearly showed standard vs optional items, tons of good photos of uncluttered interior, and the original invoice. FWIW, I bought it.2 points
-
I do the fresh tank fill and city water ports. The boondocking port will drain on its own since there’s no check valve, so I just uncap that while I’m doing everything else to make sure nothings in there. If I’m putting up the trailer for the full winter then I’ll sanitize the fresh and grey tanks first. If you aren’t doing that, then start by draining all of your lines. You can do that by running your pump with a faucet open, or if you’ve got a Truma water heater, open its drain valve and you can pump the water out through there pretty quickly. Then blow out the fresh tank fill with your compressor using an attachment like either this or this. I think I use 80 psi, which I think should be fine for everything. Then open a faucet and do the city water port. I don’t move any of the plumbing valves from normal. Do each faucet separately - kitchen, bath, and outside shower - and be sure to do them with the valves turned to both hot and cold. You’ll get a fine mist of water for a while. I’ll repeat that two or three times for each faucet until they all seem clear. Before the last time I’ll run the pump for a bit to make sure it’s clear (take off the filter so that you know you aren’t pulling any new water in from the tank.) I’ll also open the truma drain while I do that just to make sure no water has settled in there. I don’t have a flush toilet so I’ve never looked up how that’s done. If you want to blow out the sink traps, you can by adding an air valve to a small plunger. I think it’s the same little adapter I linked to above, just screw it into the plunger where the handle would go. Just be sure that the hole goes all the way through, and cut one if not. It works really well, but if you do it that way, make sure you plug your drains or in the spring your trailer will smell like grey tank. I leave all the faucet valves open through the winter. If I’m on the road and it’s going to freeze, I’ll just blow out both ports quickly to get water out of the check valves. I think that’s it. I’m having to run through it in my head so I may have missed something.2 points
-
I have just noticed some suspension creaking noise. My last suspension was at Oliver last September and have certainly traveled over 3000 miles since then so it is time to buy a grease gun and figure out what to do. You Tube to the rescue.1 point
-
Hi everyone, Mr.J here and happy to be so! I'm one of the few, the proud, the future Oliver owners. It's probably a bit early to do an introduction, but better now since I'm starting to be active searching through the forums and following interesting (to me) folks and conversations. My family is probably a little younger than most, we're in our low thirties, but I've been drawn to RV adventures for a long time. Growing up in urban California, having an RV was not something that was possible, and I was never exposed to it. Let's just say that watching several of my Utah neighbors over the last years pull up their travel trailers load up from their house, and take off for fun and adventures really cemented my journey, which should begin here (anticipated delivery January 2022) in a few months. I spent a year searching and browsing, looking for the right choice for us, but learned along the way of the generally horrible build quality and resale value. I noticed that several popular RV enthusiasts were swapping trailers/rvs every 3/2 and sometimes every year. They would say new features enticed them, new layouts seemed better, but putting it all together, I saw a confirmation that most were good for 3 years max before needing major repair/investment. So a few years ago, my search stopped. Fast forward, and now we have on the market several African/Australian style options, and a huge surge in popularity of teardrop/overland style trailers and travel. Add the Wuhan flu. Then add, traveling out to explore in 1/2 day trips around Utah and in the middle of the disastrous pandemic I saw hundreds of families out and about, living their best possible life, living a normal kind of life. Camping, biking, exploring, and all with their own little piece of privacy and convenience. Expedition style trailers seemed to make the same kind of compromises on quality (at least the American market options) and for the price of a nice teardrop, I don't see the added value of the small usable space, I don't own a rock crawler. And they are pricey too! I don't know how exactly I found Oliver, it wasn't that long ago, but it was definitely around 2 AM on the internet, so safe to say it was a blur. I'm hopeful that all will be well, that my small family, mom/dad/baby will enjoy our new travel home, and that it will enhance our lives to the fullest, and provide us with some amazing opportunities. We have on order an Elite 2, standard floor plan. Planning on sharing the king(-ish) bed with the little one, which is perfectly fine for us, and one day maybe adding a nice 4 season tent to our arsenal for when the extra sleeping space becomes important. I am working on a design for a custom dinette table that will simplify the process of transforming from bed to dinette, and some strategies and custom work to simplify making up the bed in the morning. If I stumble across anything great, I'll be happy to share along the way. Special thanks to Jason (at) Oliver and @DavidSfor doing a walk through with us. David, you'll know us from our matching tow vehicles! Best to all! Mr.J1 point
-
Thank you for your insight! It really helps.1 point
-
It helped us to ask some additional questions to ensure we understood. Could have likely don't this part verbally, but for me was comforting to see some of the options.1 point
-
Saw that. Looks like the Outland Firebowl sold under another name. I'm curious what Oliver sells them for - the Outland is occasionally on sale at Amazon under $100. We've had ours for quite some time and it's held up very well. It's a bit clunky to carry with us, but 100% worth the trouble.1 point
-
As I'm guessing that Ken has found out by now - this is not a "hard" job as long as you have the right tools. Zerks (the things that you attach the grease gun hose to) can get plugged making it all but impossible to get any grease flowing. The grease gun can be difficult to attach and remove from those zerks. The entire job can be a bit messy given that you are dealing with grease and crawling around under the Ollie. But, the job doesn't really take that long to do and it creates a good number of points for your "man" card. Bill 👷♀️1 point
-
My game developer son loves the Raspberry Pi’s, he made me a Pi Hole ad blocker for my home network. It works very well, when we travel we both notice how many more ads appear, even with device ad blocker apps installed. Those Victron Energy cables are crazy expensive, aren’t they? 😬I do mods all the time and it is insane how much you can spend, especially when you have to buy hardware or other parts online in bulk quantities. I needed just two 2” white plastic hole plugs, but I had to buy 25 ... anybody need some? Thanks very much for your posts. I do suggest that you start a new one each time with the subject in the title; that would help other members to find the information..... not everybody reads every single post, like some of us with too much spare time. John Davies Spokane WA1 point
-
Besides the classified on the forum, there are a couple of on line classified sites specific to molded fiberglass trailers. They cater to people selling and looking for Scamps, Casita's, Escapes, and the occasional Oliver. This way you are hitting a more targeted audience who are looking for the same sized and style of your trailer. .1 point
-
Alot of first time buyers....during This Pandemic buying Frenzy....most have not seen a Oliver due to how scarce they are....its alot of money to part with.....especially on impulse....just remember to accept that 90% of the people will not show....go about your day as usual......have them call a couple hours out so you know they are really on their way. If they keep changing the day and time....tell them you are no longer interested in selling. I have driven thousand of miles total looking at trailers and rvs....but first I do my research..get plenty of photos top to bottom, inside doors, especially maint records....detailed....in your case its new....most do very little research or make an effort to find one and go in it to see if it works for them. Just taping off the size on the floor with blue tape will give you an idea if its too small....I am one person and can make just about any small camper work for me....my issue is I look and see all the wasted space with the extra bed, extra dinette seat and wish someone would build a solo unit in fiberglass.....good luck and sometime it takes time to sell such a new unit...even at a discount.1 point
-
We had planned to spend the Memorial Day weekend in New Orleans with family and decided to fly into Nashville a few days early, take a factory tour, and head to New Orleans taking a section of the Natchez Trace Parkway on our way south. Wish we had planned to spend a day or two in Nashville but maybe when we pick up our Ollie. Looking forward to seeing the actual build and trying to make final decisions on options. Taking photos/videos during the tour sounds like a great idea. A February pick up seems so far away...1 point
-
I will paraphrase a statement from an old pilot friend of mine. "The only time you have too much fuel (battery power) is if everything is on fire." I just replaced the four original AGM's that were delivered in our 2014 trailer with three Battle Borns. They're only a total of 300 aH. Get the most you can afford. You'll probably end up boondocking more that you think.1 point
-
@topgun2 I don’t think you have to worry about elk eating your wiring but a female moose will nest in the engine bay if you leave the hood open and young grizzlies will just steal your truck outright and head straight to town, so lock it up.1 point
-
We will be taking the tour the second Monday in May. We already had a trip planned to the red river gorge in Kentucky in the works when we put our deposit down on our ollie. (We pick it up Feb 2022) We just adjusted our reservations a bit. Now it seems the kayaking in the cave, red river gorge zip line and possible via ferrata as well as some hikes are taking second place to the ollie tour - it's all we talk about! Really looking forward to it! Once we do the tour , Red river gorge here we come!!1 point
-
Not unless you ask for one. While I strongly encourage a factory tour I would hesitate to recommend anyone spend the time and effort just to take a factory tour when coming from Oregon. Adding it on to your delivery schedule would be a good idea though in that you can take pictures and generally become acquainted with how your Oliver was put together. If I were doing this, I'd plan on doing the tour one day and then taking delivery the next day. Trying to do both in one day is asking a bunch. Bill1 point
-
While I believe that the guys working for Oliver are a great bunch, I really don't think that there is anyone there that cares where the donuts come from.😃 Bill1 point
-
Have you really stressed the trucklet yet? High altitudes, steep climbs, high temperatures, strong headwinds? If yours is the V6 then it will produce about 175 ft lbs torque at 10,000 feet.... No offense intended, I am sure it did OK getting from Tennessee to Texas, but towing conditions through the South are low and flat, and that does not stress anything. John Davies Spokane WA
1 point
-
Guess I’ll have to break the news to Jason shortly, but I jumped at the opportunity to acquire Jay’s immaculate 2020 Hull 645 listed in the Classifieds, originally delivered last May, right before the factory shut down for Covid. Mike and Carol allowed us to check out their 2017, so while I would have loved my 2022 on order, getting this now got me an additional season of usage, which at my age is worth a bit. 😉 As his listing noted, it was truly turnkey and virtually new. First night is boondocking at a Cracker Barrel on the 1000 mile trip back to San Antonio. Colorado in July. Ralph @ San Antonio1 point
-
Sheri, My suggestion would be to put it on the FB group "Oliver Travel Trailers for Sale" (FREE!) and post as many photos as you can. When we sold our 5th Wheel I listed it on FB Marketplace (FREE!) and Craig's List ($5) with plenty of photos. It sold quickly. The Olivers that have been listed on the FB group above have all sold quickly as well. I know you find it annoying to have to provide pictures, but think of it from the other persons point of view... if you were looking to purchase a nearly new RV and being asked to make a deposit sight unseen you would want to see pictures from every point of view, every nook and cranny, underneath, closets, close-ups, etc. I probably posted 50+ photos when we were selling ours and provided any photo requested that I might not have thought to take. Include photo of your bill of sale showing all the options. Others with photos have sold within days to a week or so. I think you are doing yourself a disservice by not posting actual photos of your trailer or emailing photos when requested. If nothing else, create a shareable photo album in the cloud and reply with a link to it so that they can look through all the pictures. Tell people in your add why you are selling after just purchasing. The more information you are willing to spell out, post pictures of and talk up the RV the better your chances will be to sell it quickly. Those are my ideas... hope they help. Cindy1 point
-
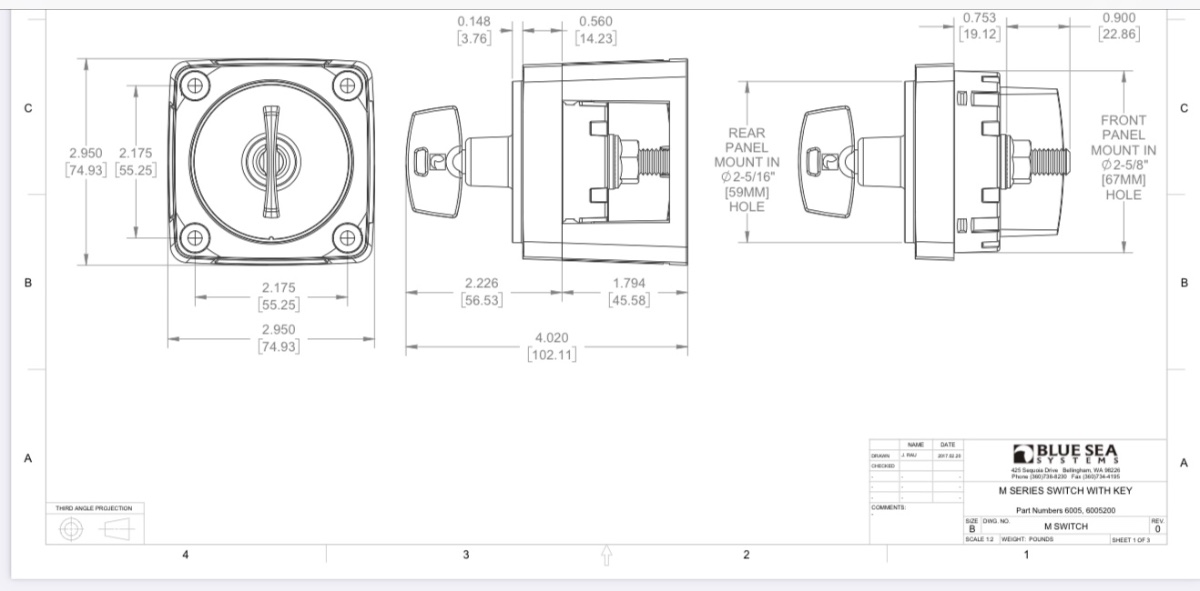
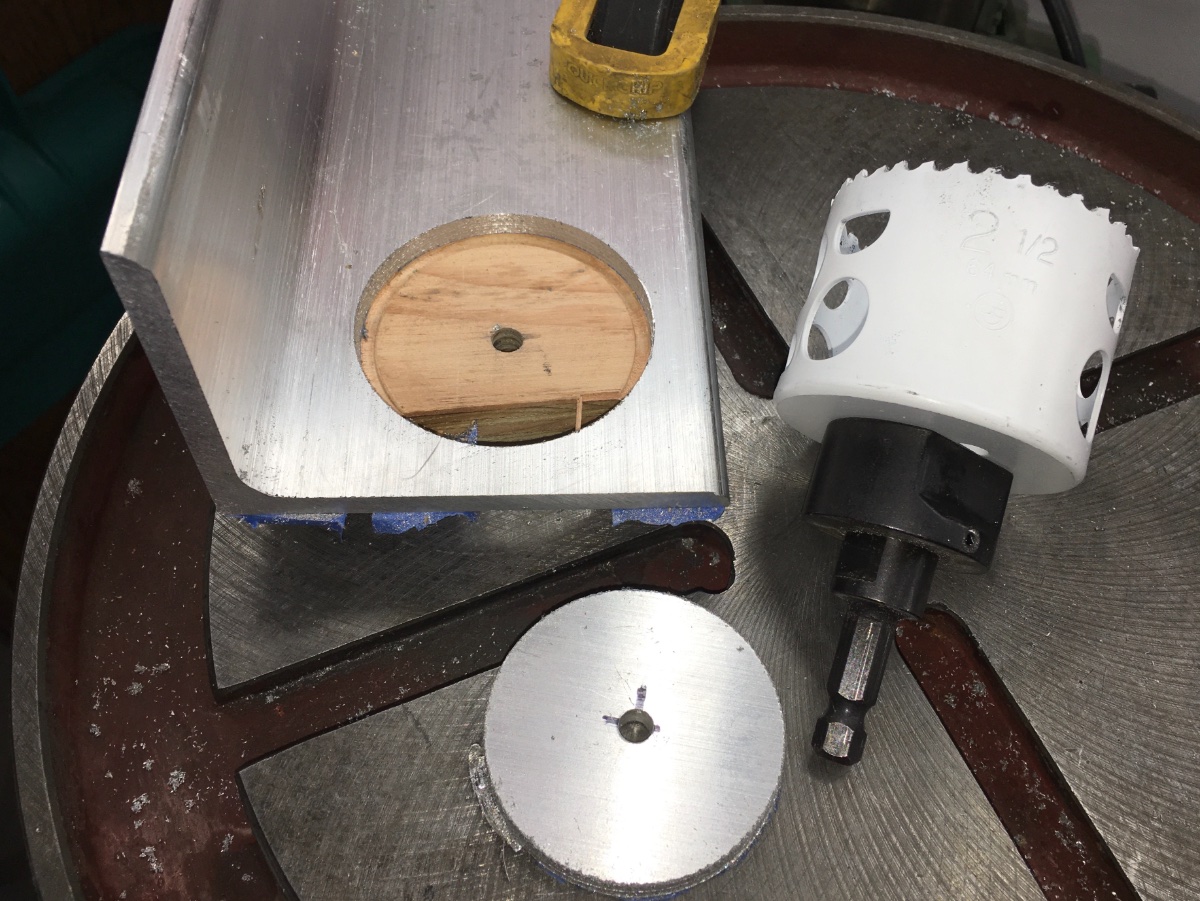
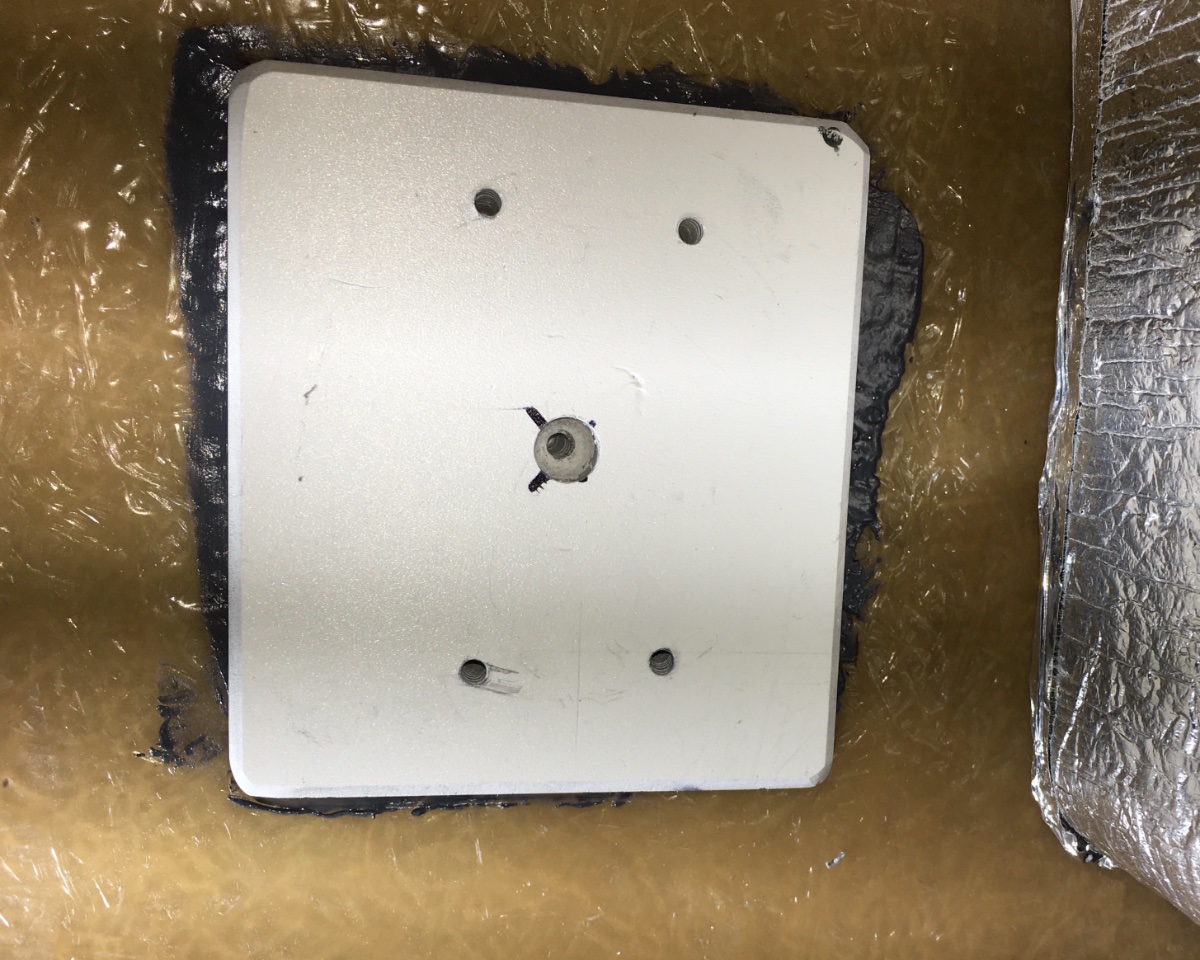
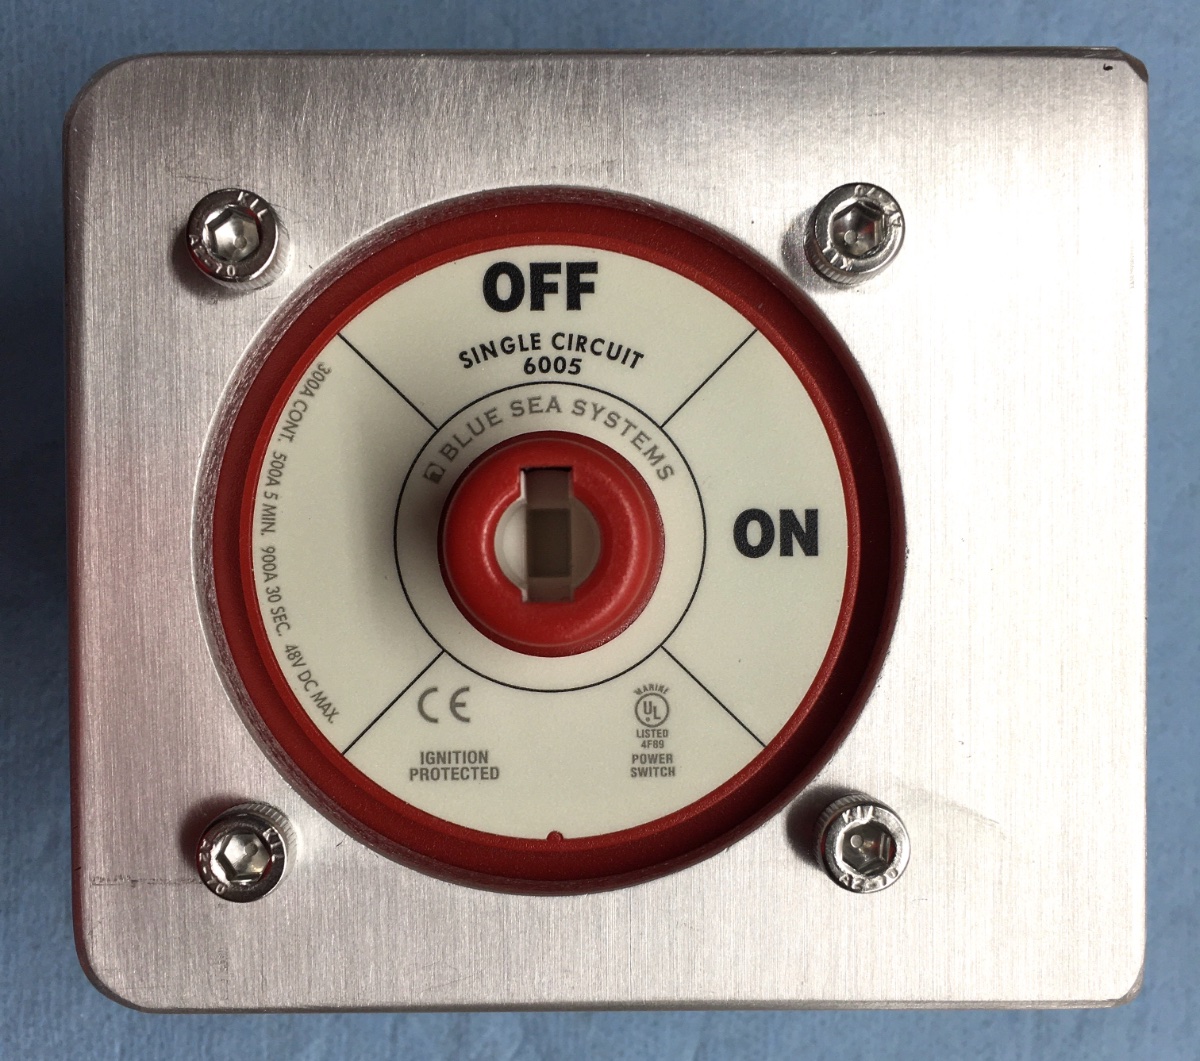
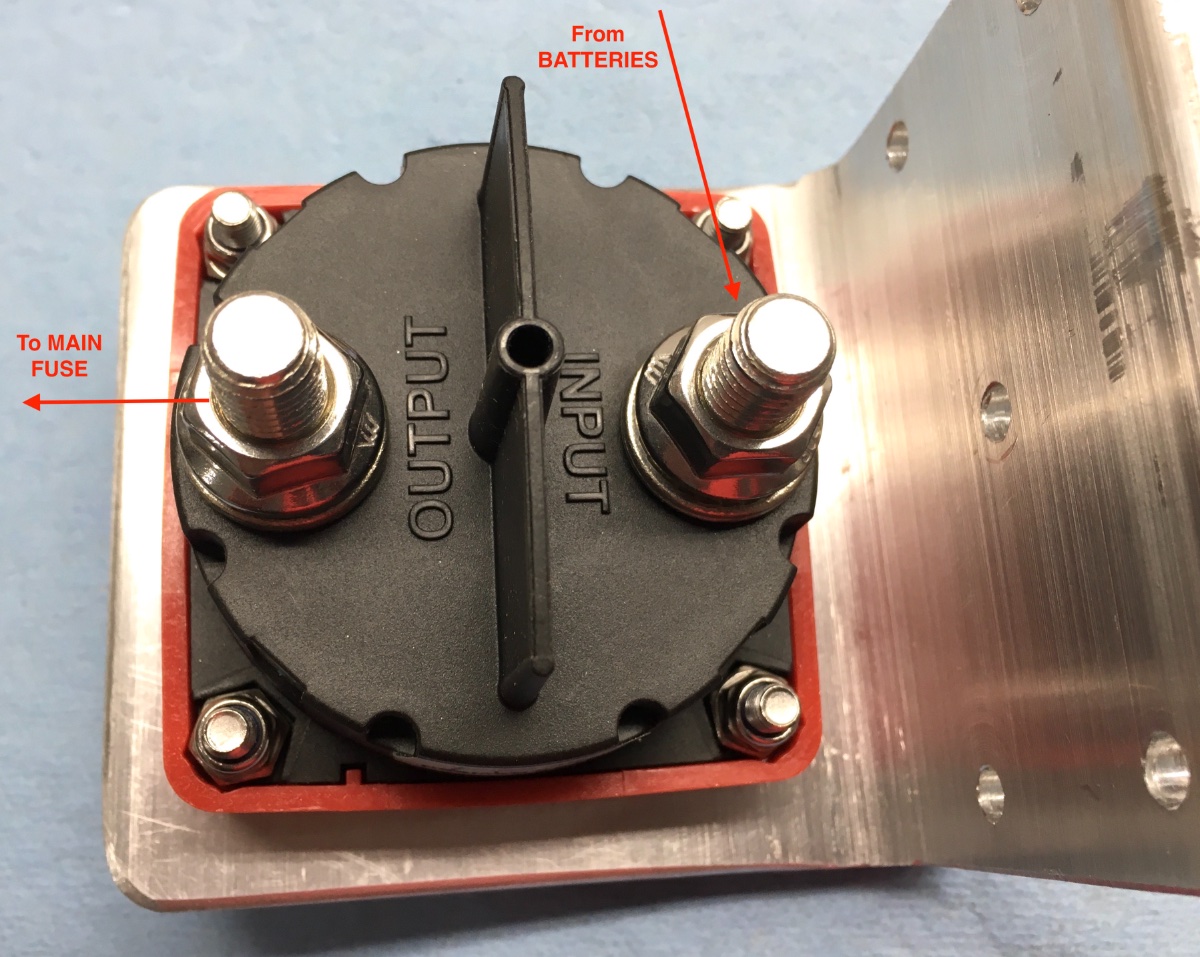
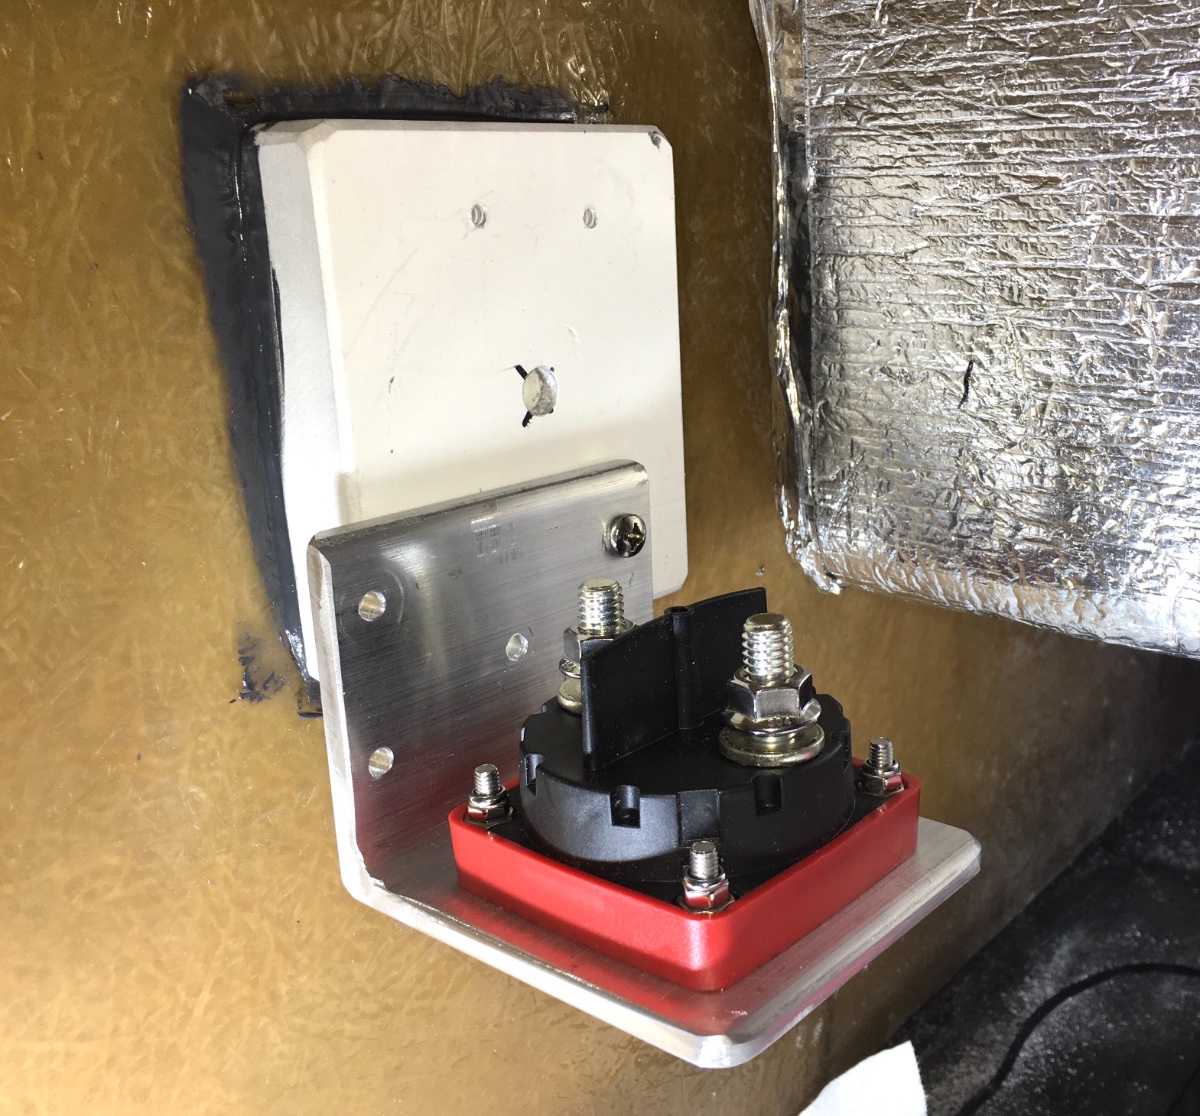
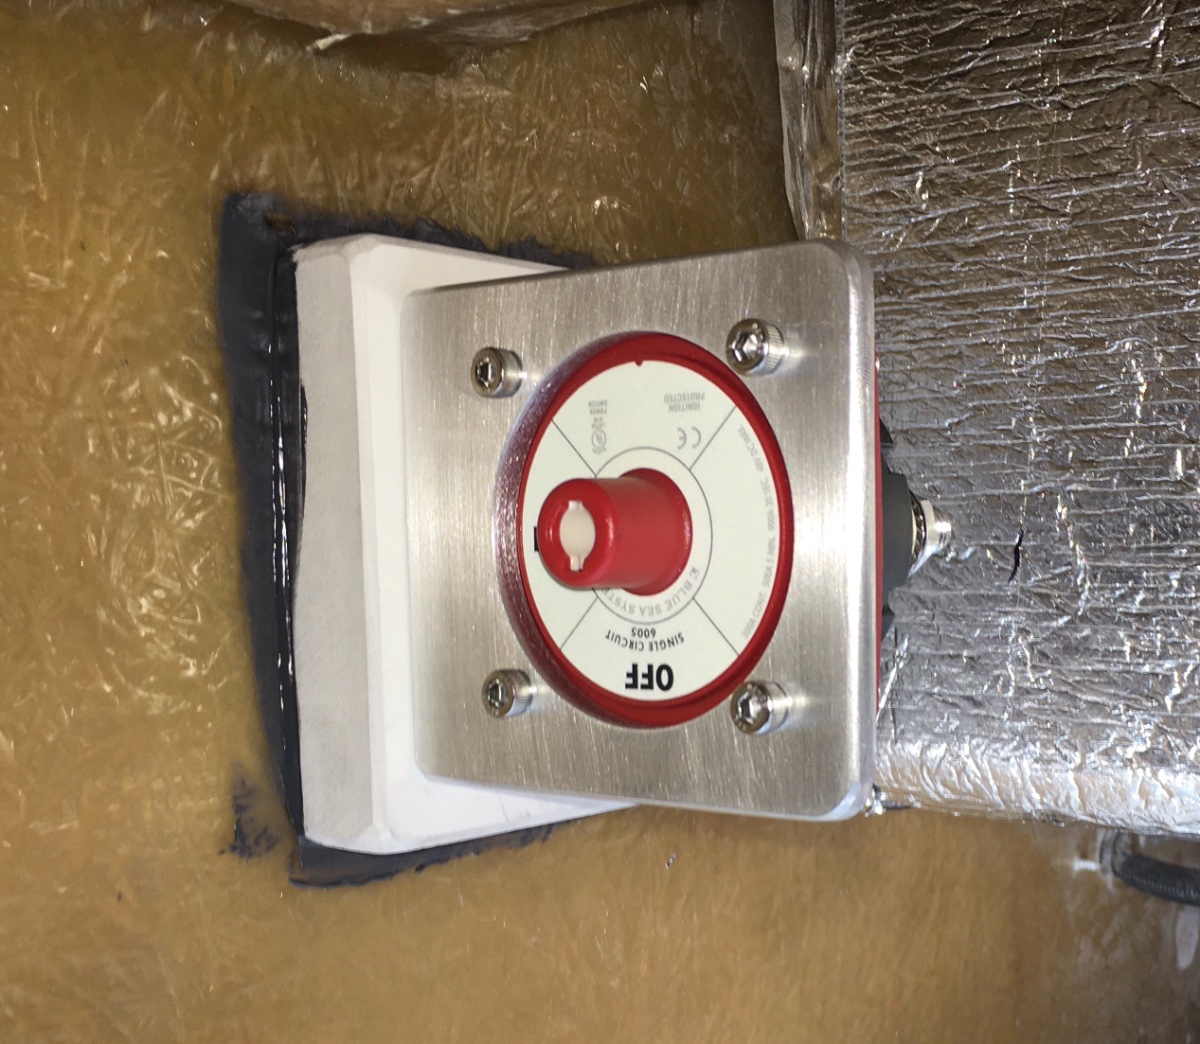
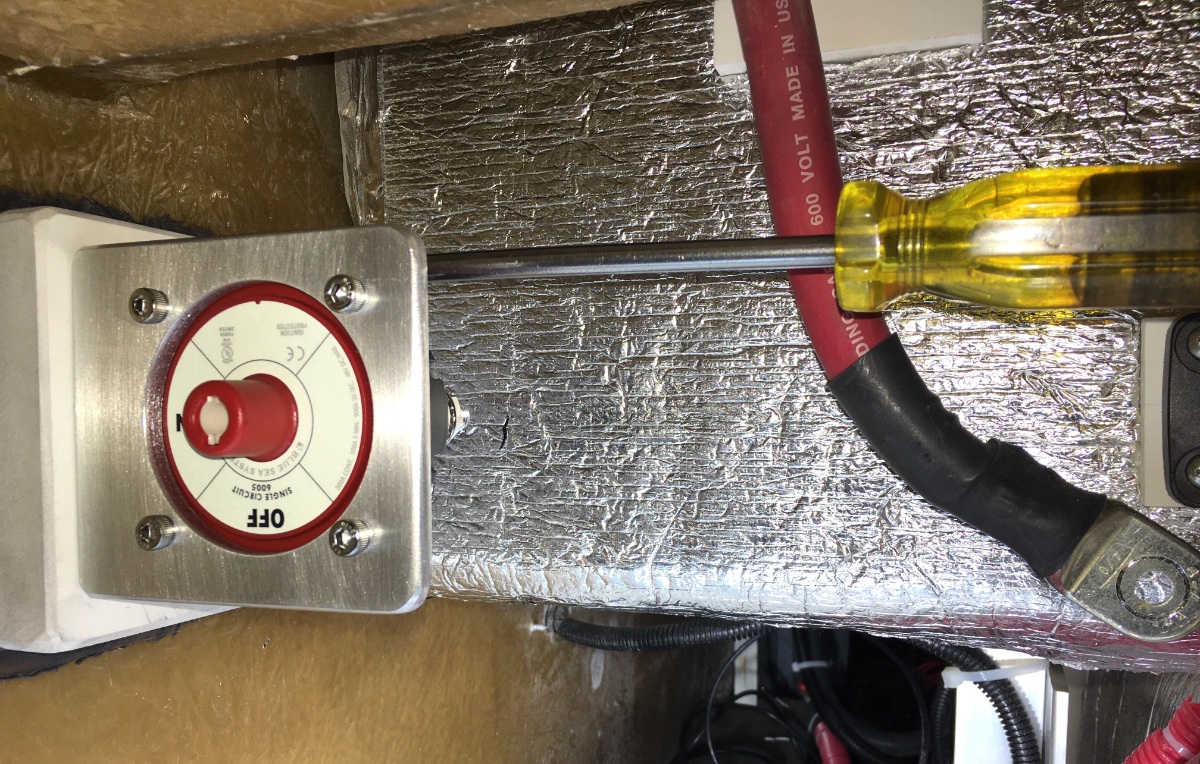
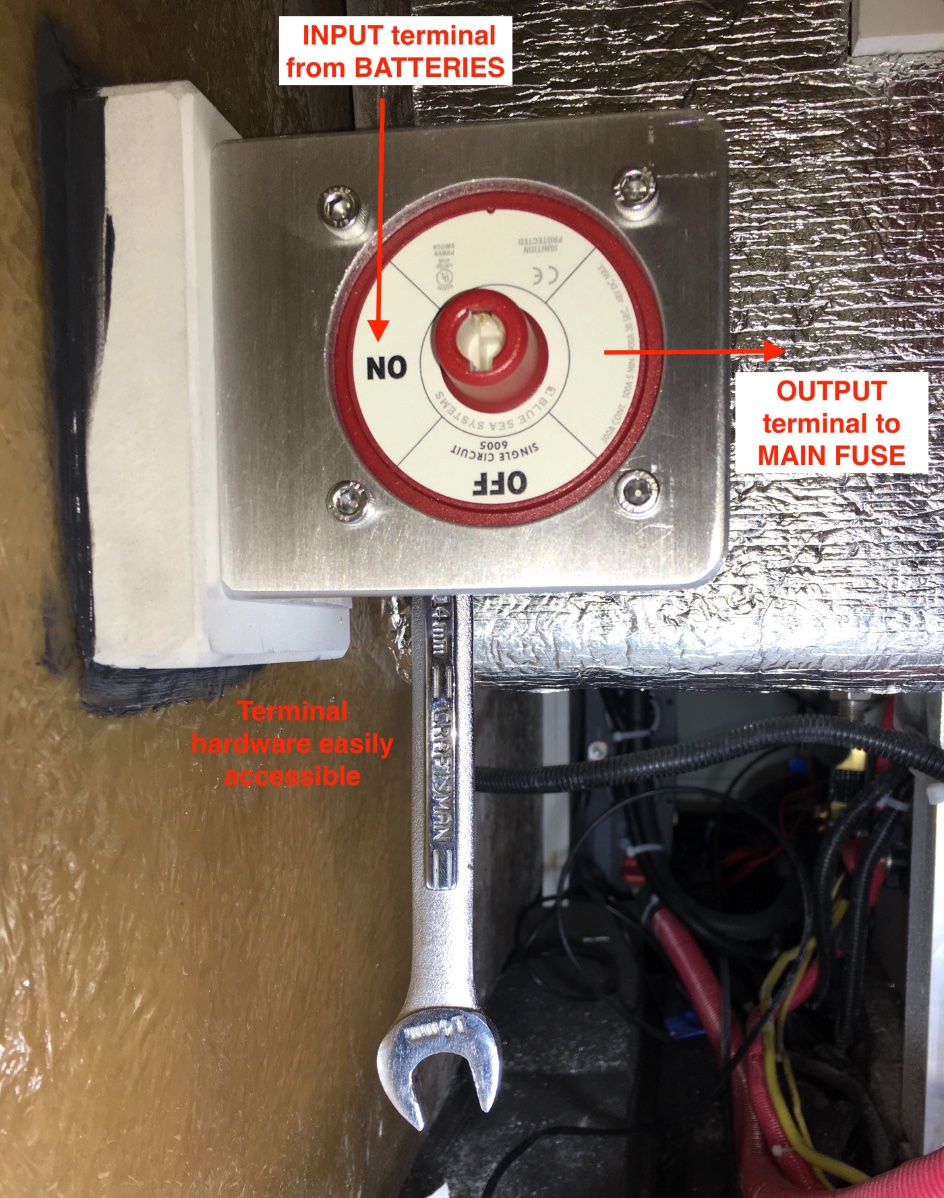
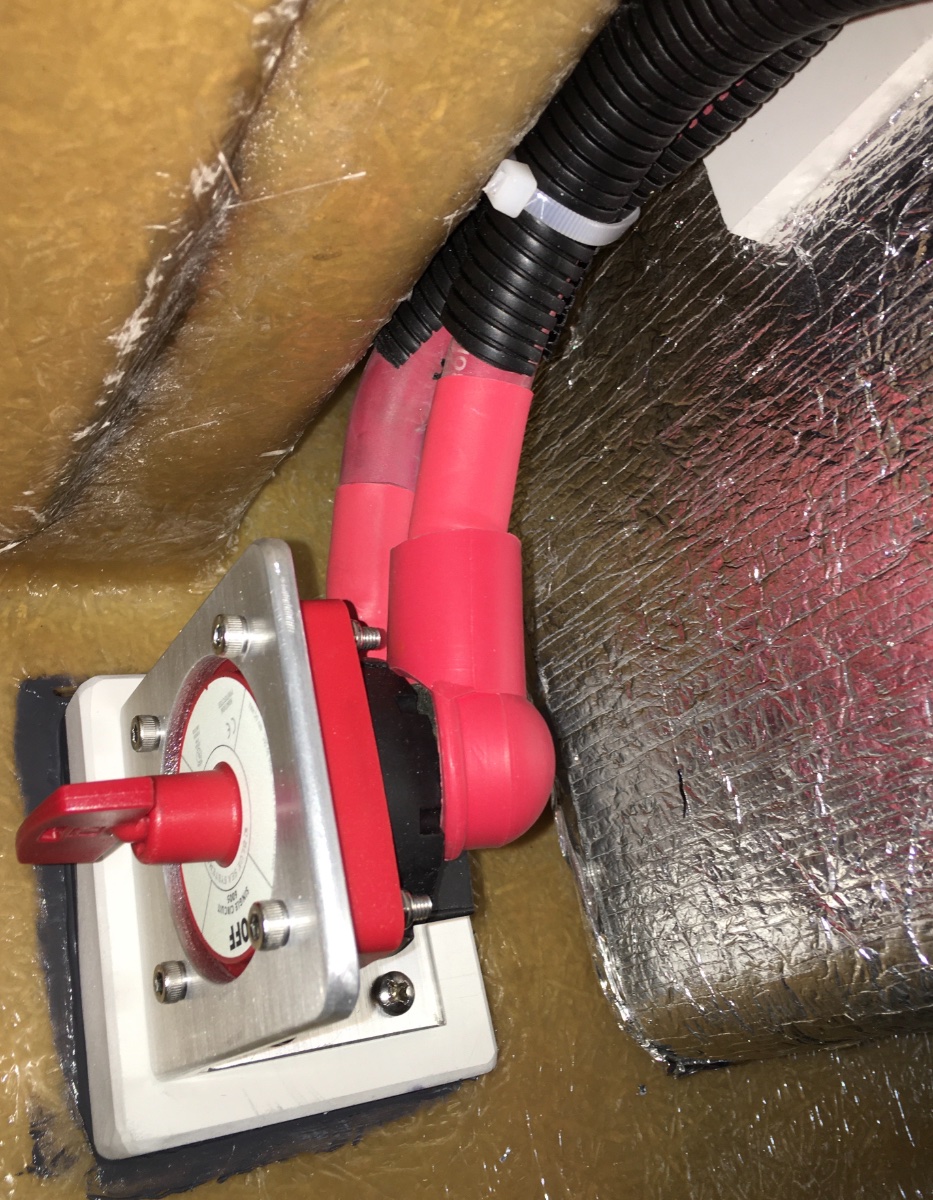
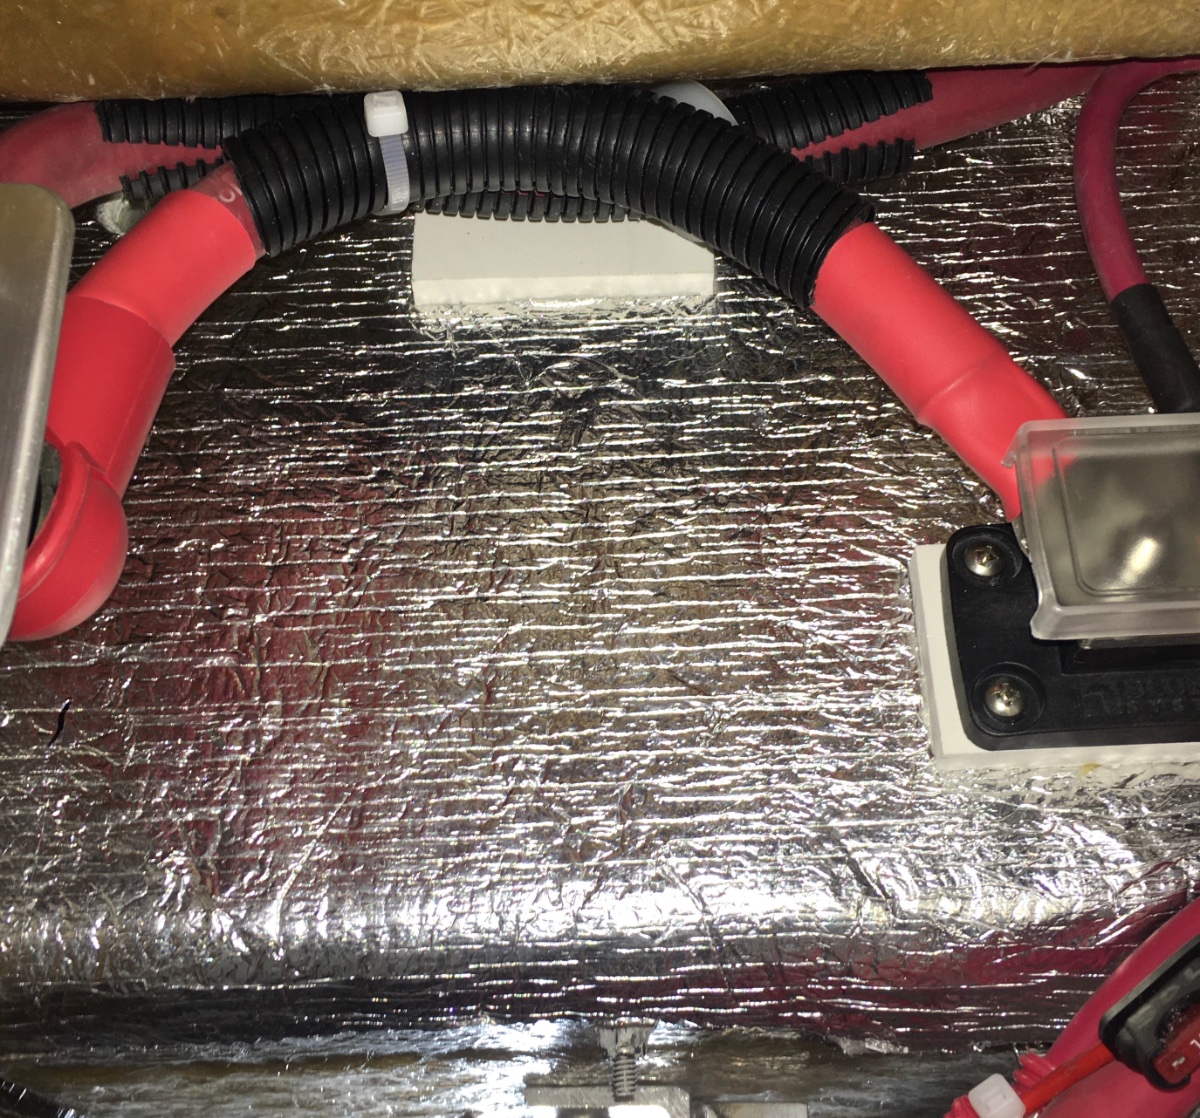
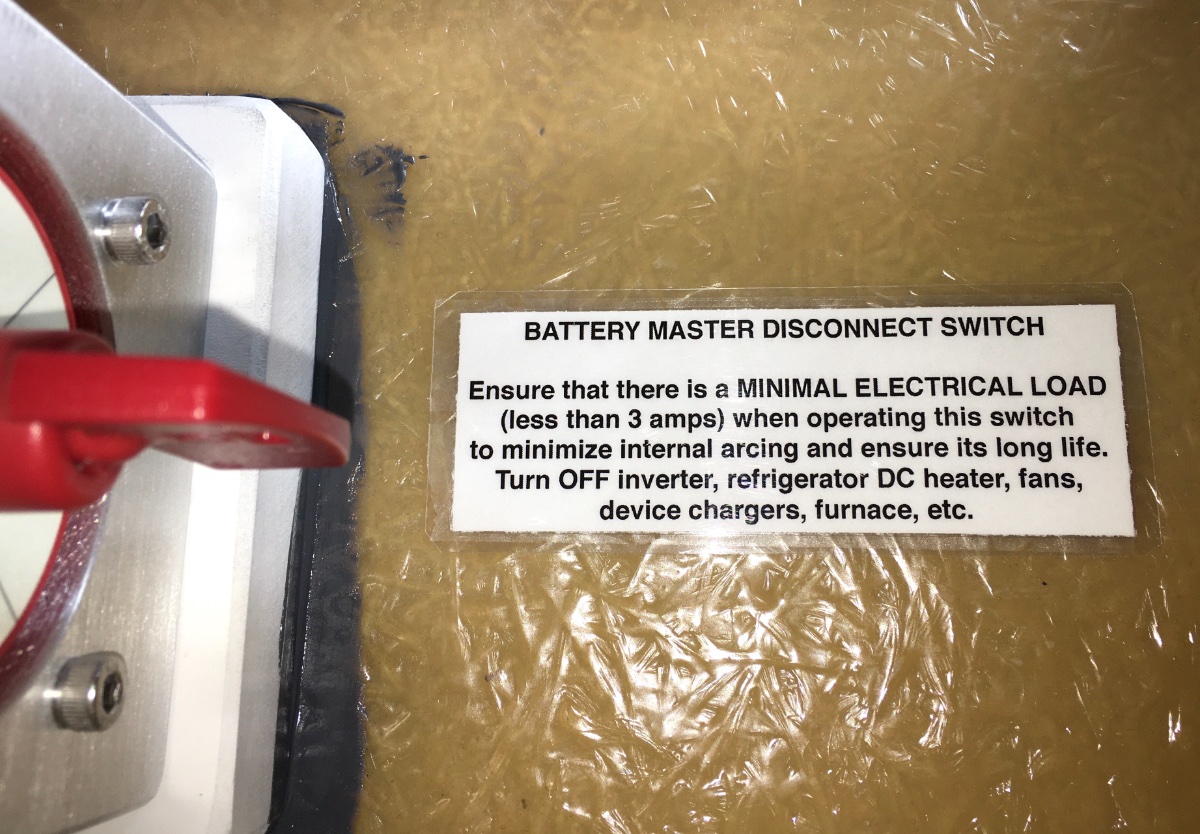
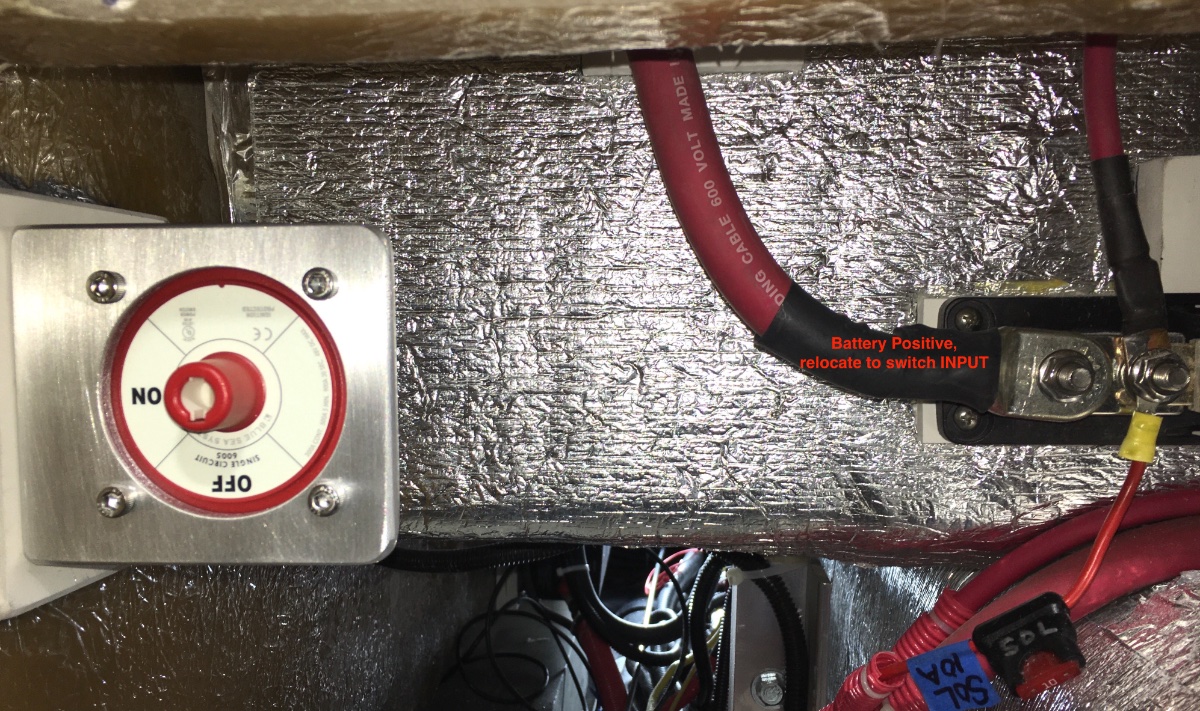
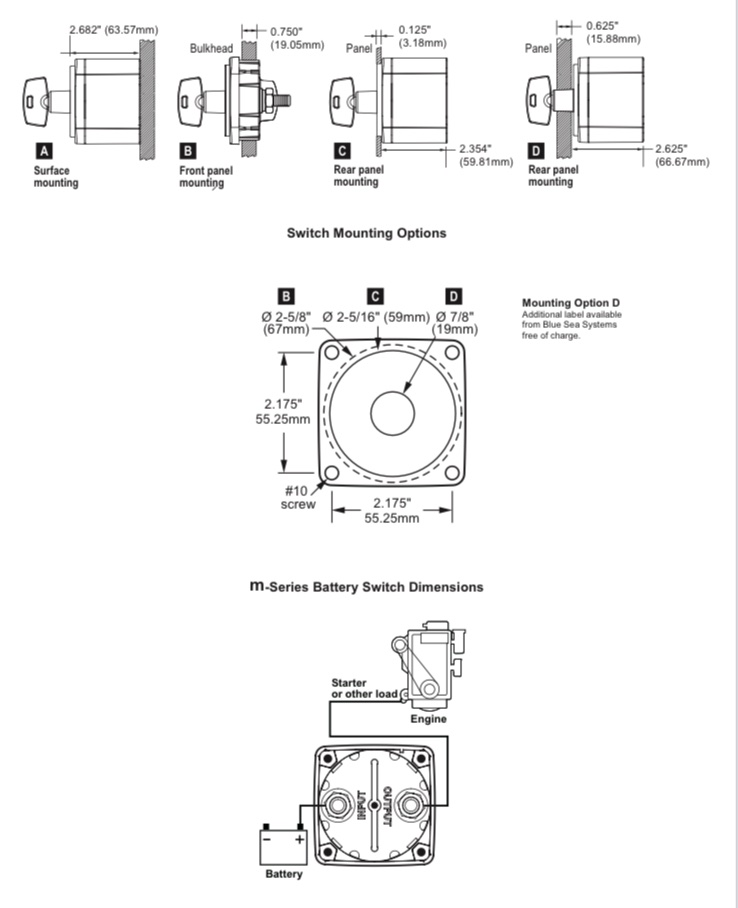
This shows the installation of a Blue Sea 6005 mini battery switch with removable key, it fits neatly into a piece of 3" x 4" aluminum angle, 6061-T6. It can be mounted in a variety of ways, using 5 mm screws and self locking nuts. This mod requires metal working tools and skill, and the ability to fabricate good quality cables. As always, measure twice, cut once, and disconnect the batteries before starting! I chose method C. If you plan to use D, you can purchase a new round label to apply, since the existing one will be covered. I bought a 12” scrap, leave it LONG until the big hole is cut! Brace that end against the drill press post so it cannot spin and take off your fingers! Bond a HDPE mounting block to the inside cabinet wall, I like JB Weld. Let it cure overnight. I used a 1" thick piece, thinner would be OK but not as sturdy. Mount the angle bracket with stainless sheet metal screws, the center hole is not used (that was used as a center for drilling the four outer ones, and also to hold a fixture to clamp it in place). The switch should be mounted upside down, so the label is easily readable when you put your head down in the hole. All four screw holes are located so that they are accessible with the switch in place: Access is reasonably good, there is plenty of room to reach around and get a box end wrench on each one, from below. Remove the battery Positive cable (this one is 4/0 gauge because there is a 2000 watt inverter installed) and relocate it to the INPUT of the master switch (shorten if necessary and install a new 5/16" terminal end.) Fabricate a short jumper cable to go from the OUTPUT terminal of the switch and back to the big fuse block that the old cable attached to. Add a red cable boot on that one, the connection is more exposed than the inner one. Add split loom and secure with cable ties. FYI, I reworked my positive cable by adding a terminal feed through post, so mine comes in from closer to the side of the trailer. A standard installation will have it come down from the existing plastic grommet up high in the back of the box. Fabricate a placard and mount it upside down near the switch. The red key is removable when in the OFF position, for security. It cannot be removed in the ON position. I do not plan to remove it. If you do, please buy a second key and put it in your spares kit! Here it is flipped over so you don't have to stand on your head: John Davies Spokane WA
1 point
-
As much as I have toyed with this idea of a true off road Oliver - Overland really captures the best reasons for not going that route. I have seriously thought about the true off road truck mounted RV - Earth rover type - and keep coming back to the benefits of the base camp concept. I'm still trying to figure out how to carry additional "stuff" mainly larger heavier - like a multipurpose motorcycle, a boat, or perhaps a true off road Jeep or side by side. But my wife brings me back to earth - ride the MTB, walk, and bring a Canoe if you must...... I can always rent when in Moab, much cheaper in the long run. RB1 point
-
"Offroad" is a relative term and most people think of it as just off pavement. Gravel roads and such. From the factory, an Oliver should be able to handle maintained, moderately smooth gravel roads. Even so, lots of washboard, potholes, etc. would run the possibility of small damage, like to a water line, electrical connection, components like the water heater, etc. To me, vibration is the biggest enemy of the trailer. If you've been to Chaco, think of the entry road there, and that's about what I think the limit of the trailer is - for 95% + of owners that's surely a perfectly acceptable level of durability. And with some small modifications, like securing water and electrical lines, you can go a long way to improving durability in those situations. I would hesitate to lift the trailer much, even though relative to true offroad trailers, one of the biggest limitations of the Ollie is a poor amount of suspension travel. Many early Elite I trailers have the axle flipped and so have about 3"-4" more clearance, but the Elite II gets a little ungainly when you try that. The factory actually mounted our suspension like that for us, but weren't comfortable with the possibility of decreased stability. Plus it looked dumb, and we switched it back. But there are some suspension options that will give you more like 1"-2", plus a little more cushioning. I'm trying out one of those on our upcoming trip (Lippert Centerpoint) and will report back. It was a dead simple install so I'm hopeful that it will show some benefit. There are clearance and perhaps durability tradeoffs with that type of solution, so you have to be OK with the compromises. The main advantage of a camper van would be maneuverability, and the main drawback would be that you can't leave it behind. We've been very happy with using our camper as a basecamp and venturing out for one or two nights in a tent. Last year, we did the white rim trail in Canyonlands that way and we felt that it was ideal. True "overlanding" really isn't a thing in the US, unless you go out of your way to travel like that. There are a few multi day overland routes here and there, but IMO, not enough to justify an Aussie or South African style setup. Most places in the US aren't seen best by going from point A to B to C each day. Instead, you go to point A for three or four nights, see what's around to see, then go to point B, etc. And if you travel like that, keeping your home on your back every hour of every day will get old. Better to set up your basecamp then go adventure.1 point
-
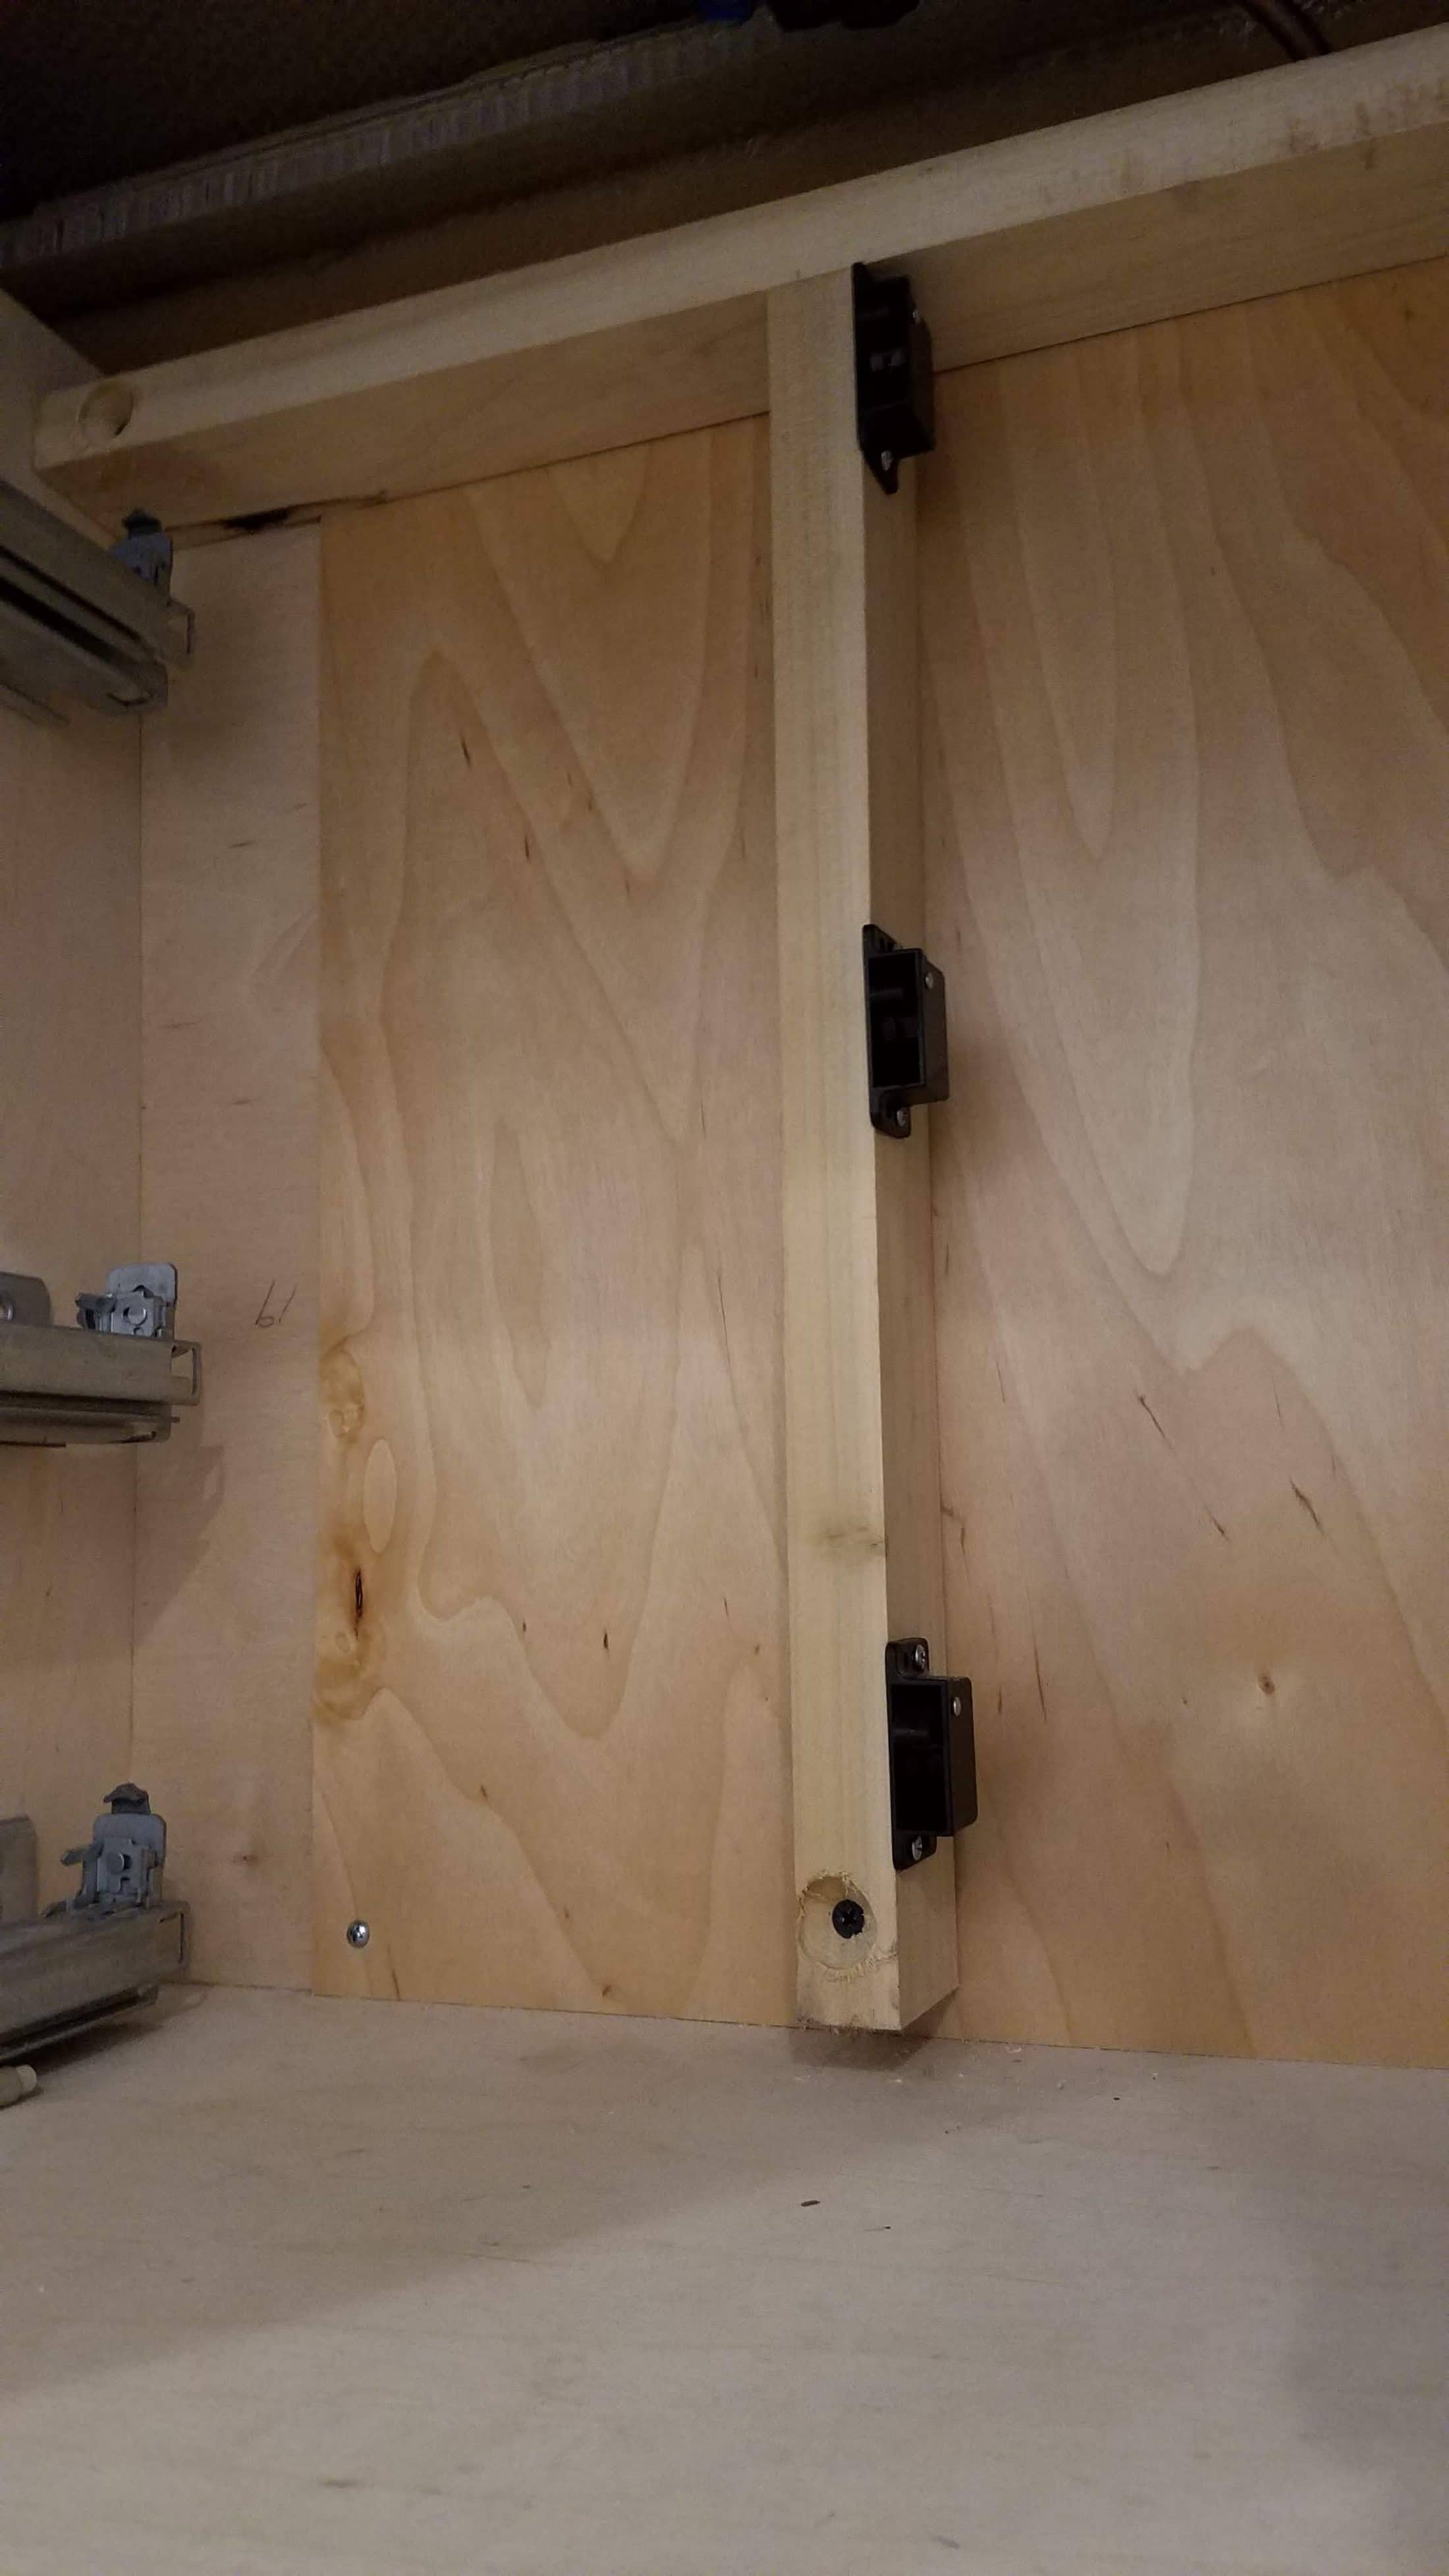
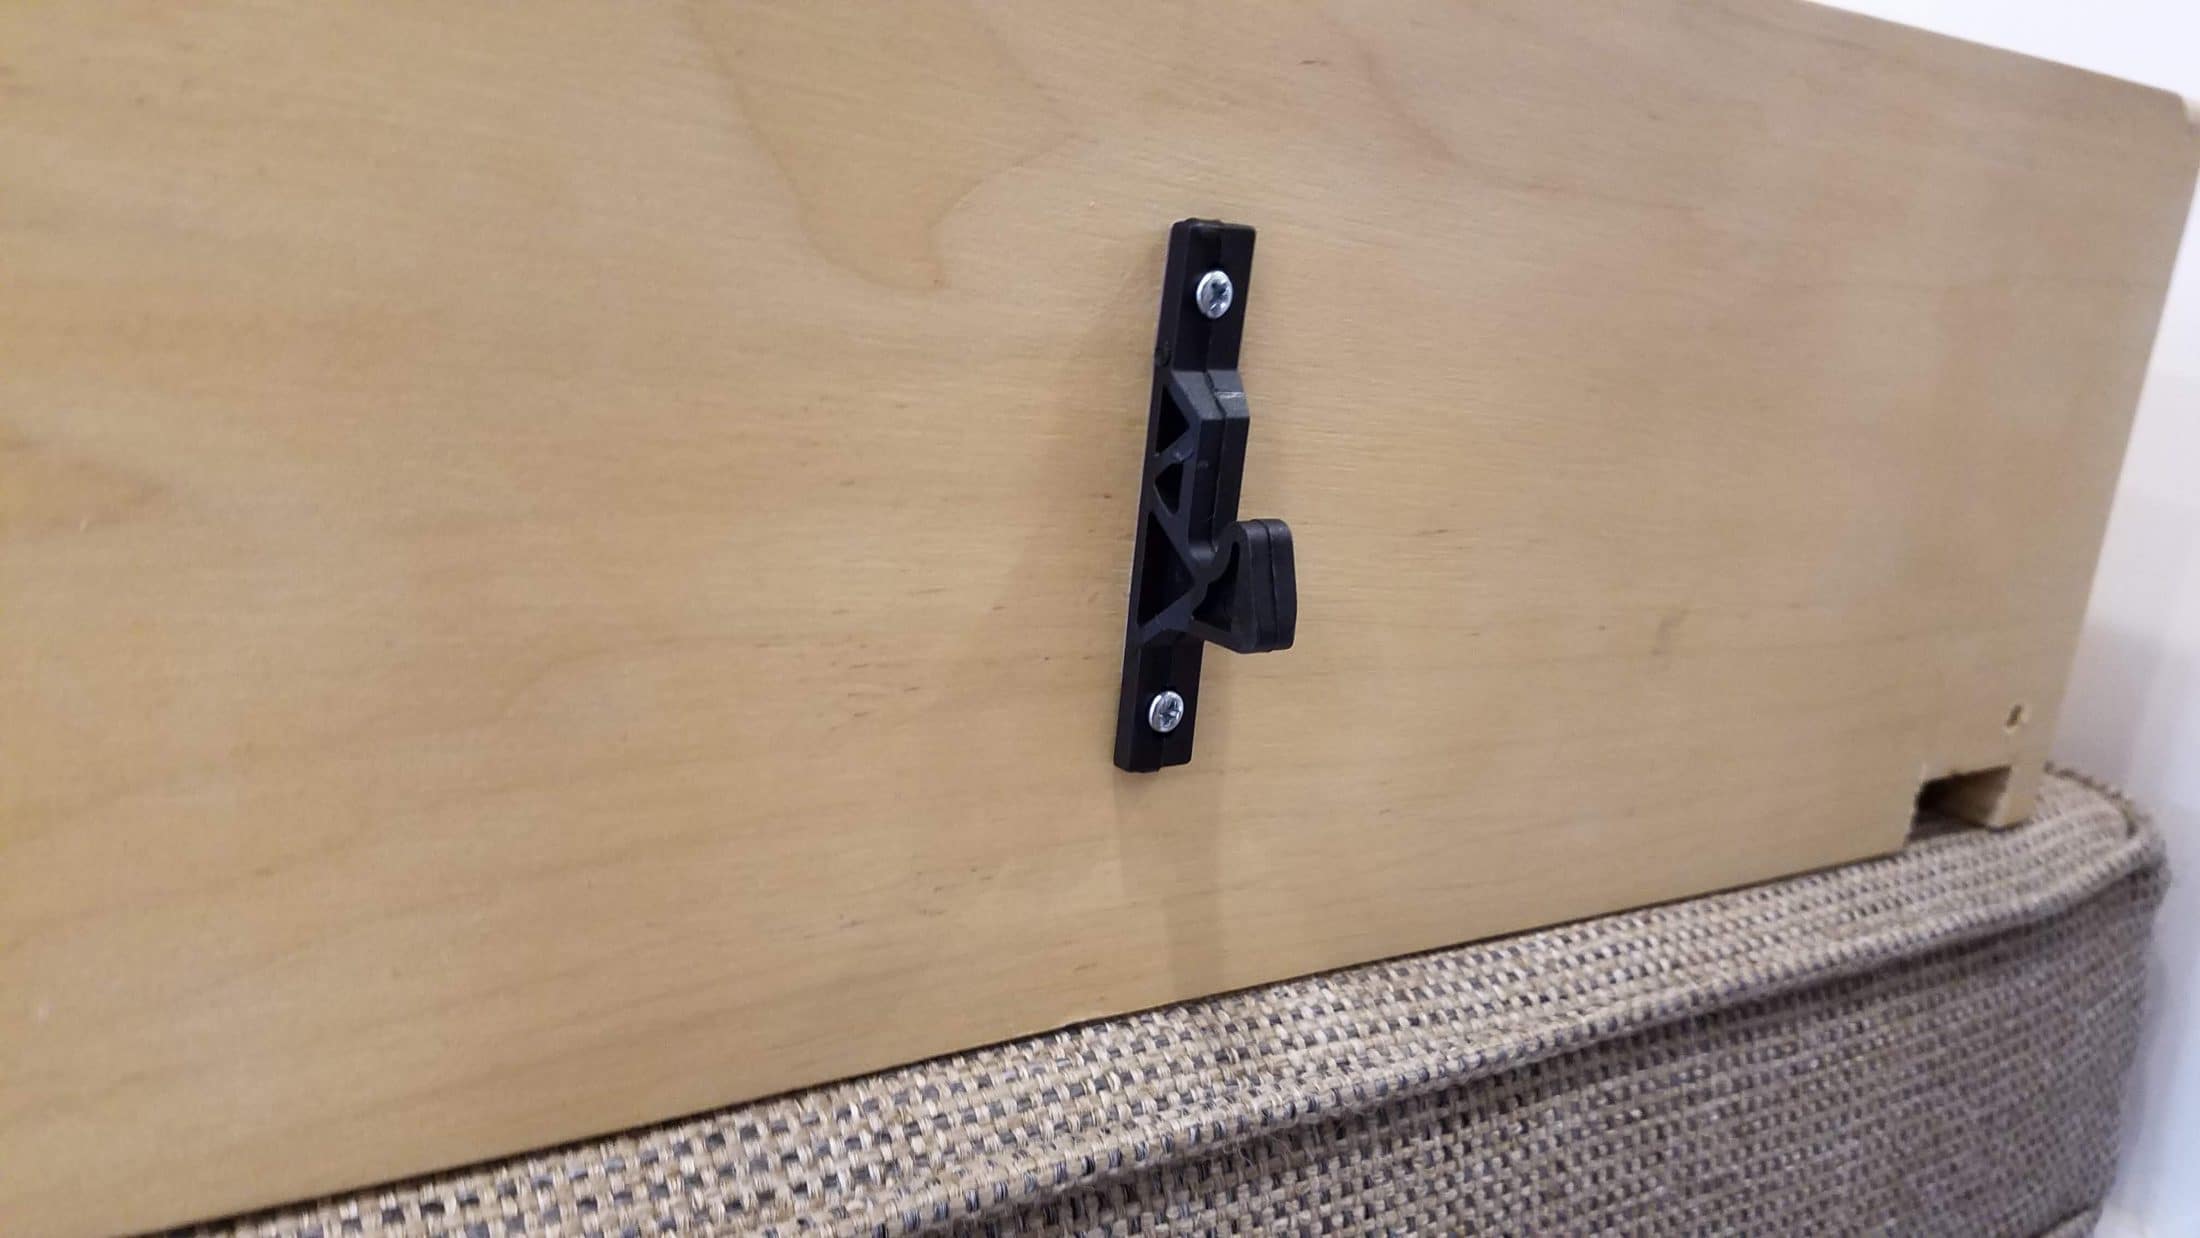
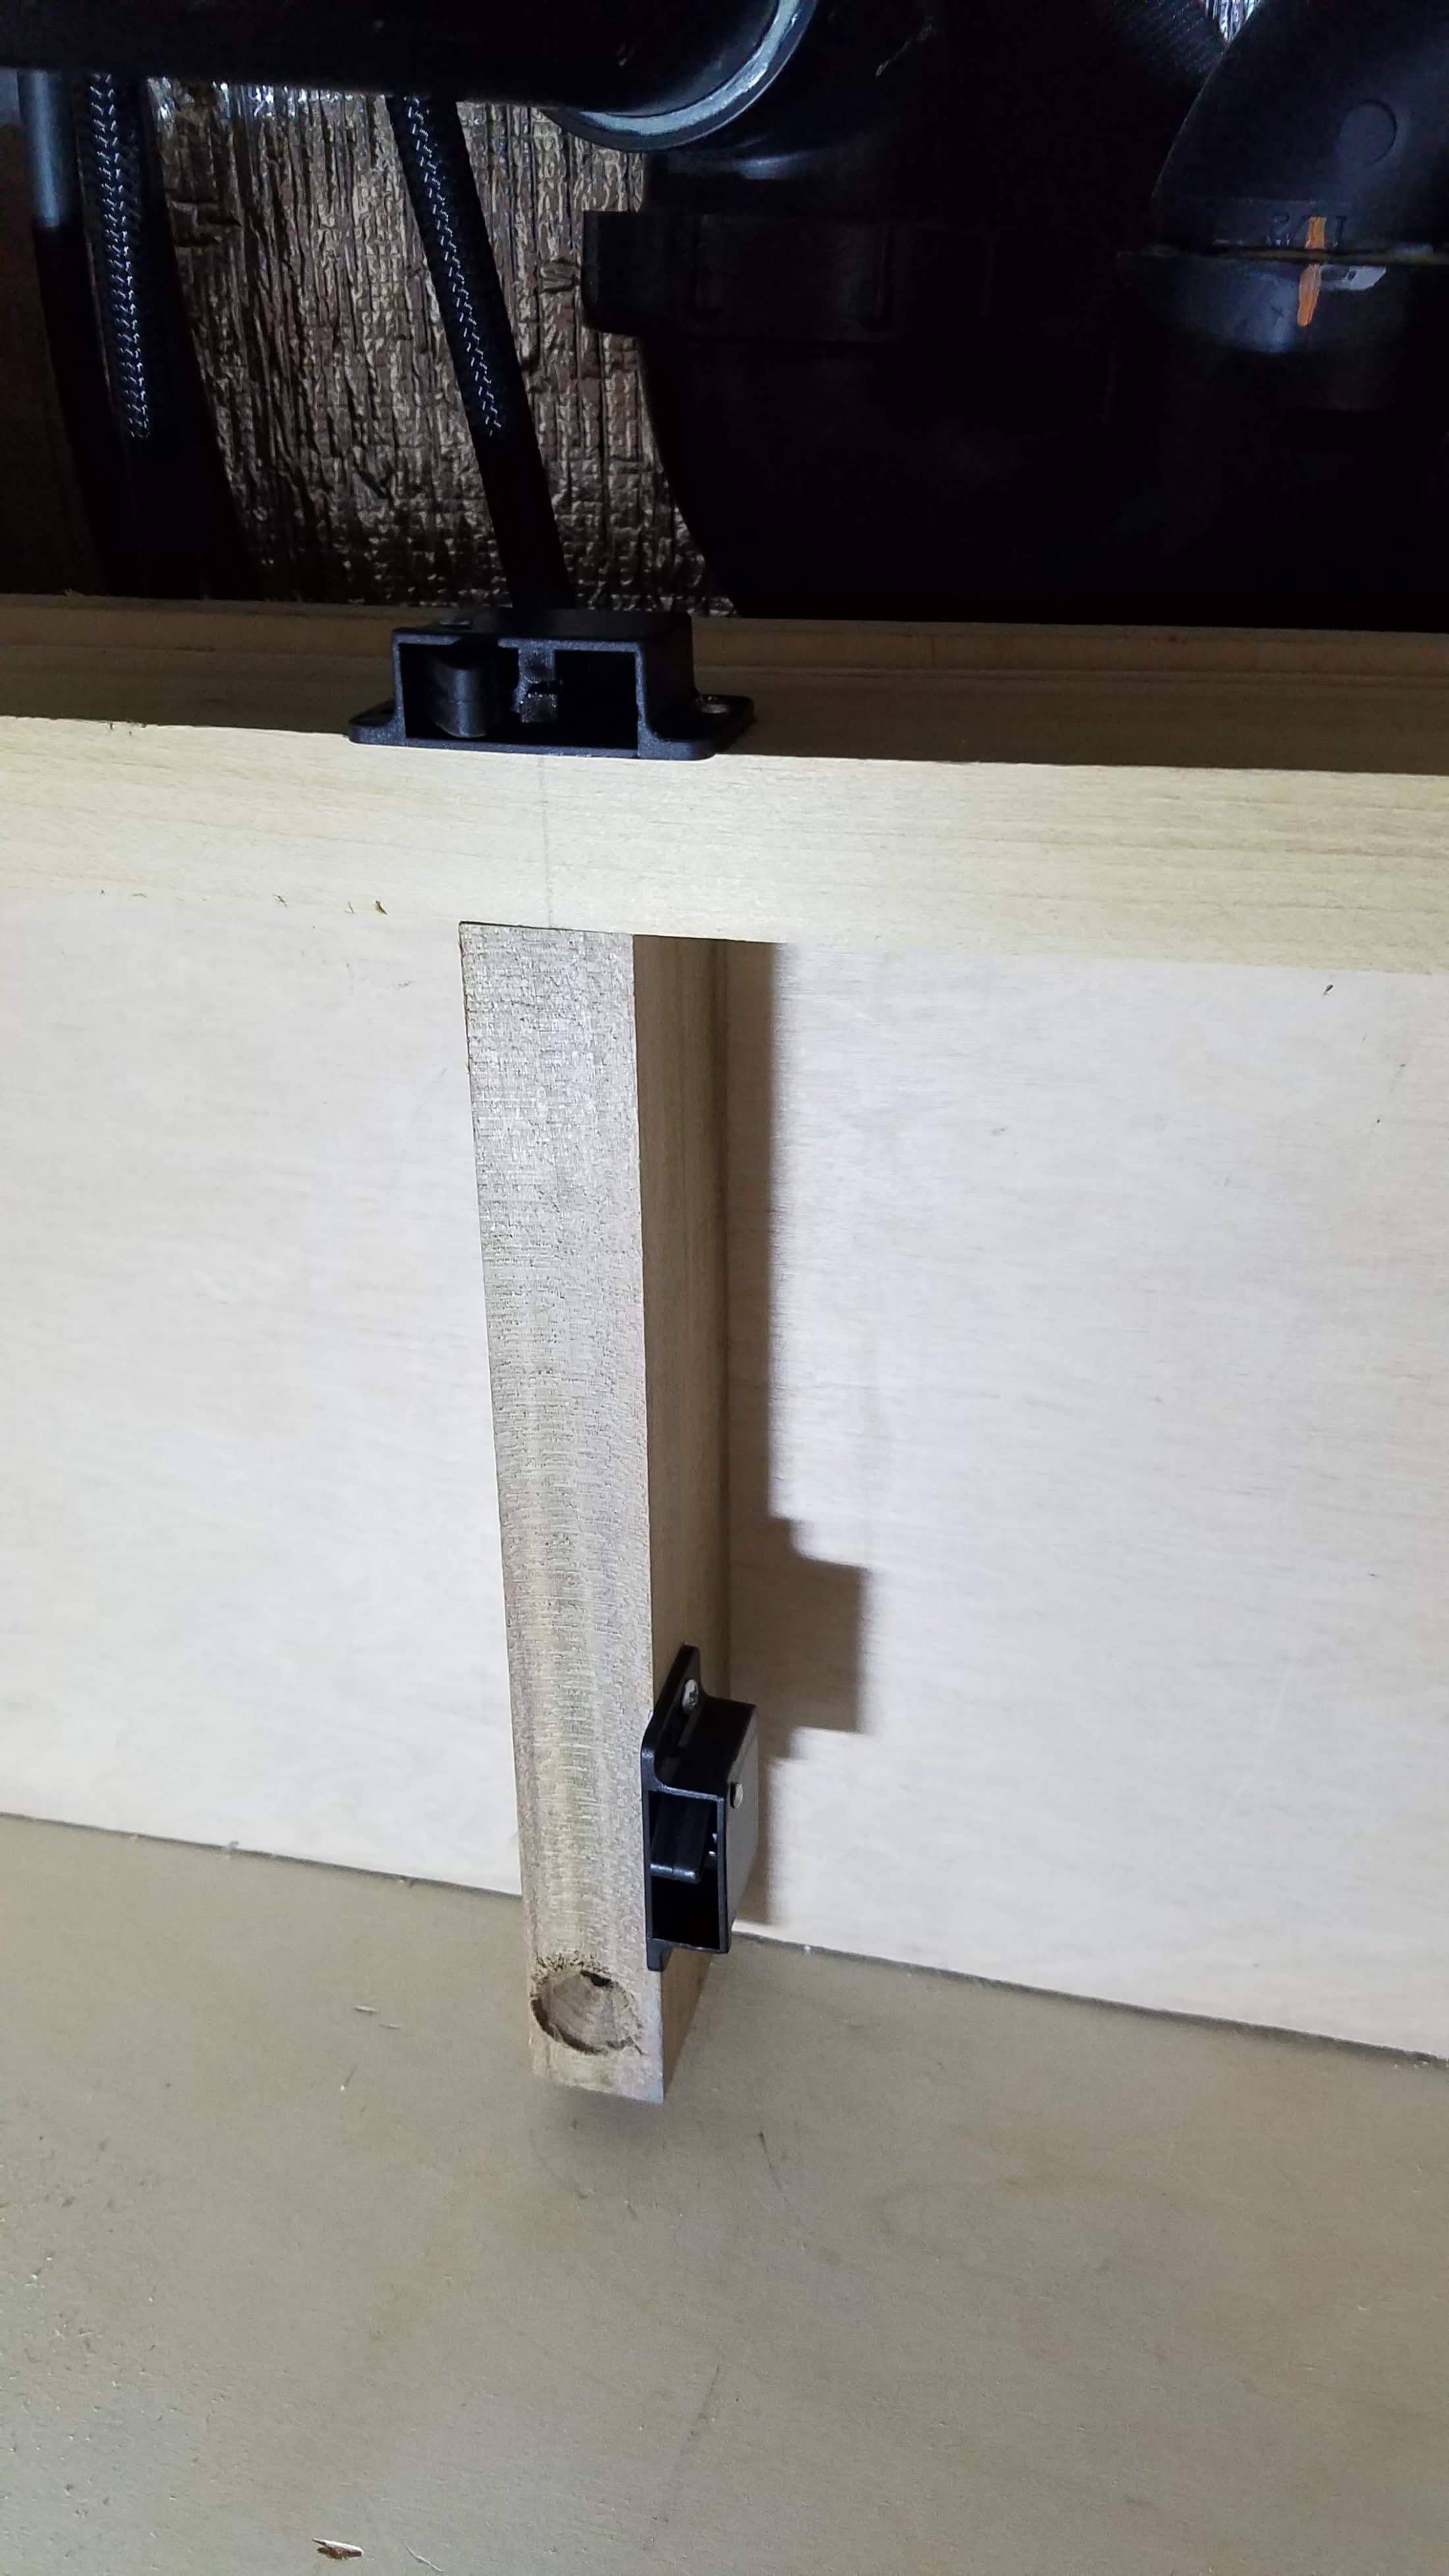
Drawer Locks There have been quite a few postings about galley drawers opening during travel. I am constantly amazed at the ingenuity and craftsmanship of my fellow forum members. My first drawer management version consisted of small Harbor Freight suction cups and 1/2” PVC pipe. It was a simple fix and worked well, but then I followed topgun2's recommendation to clean the inside of the dog house with the Norton's Duragloss recipe. The inside was clean, shiny and so slick, I couldn’t get the suction cups to stay in place any longer. So we once again had the unexpected open drawer experience during our rally trip this year and the hunt was on for a new solution. This was the product I chose and we will test it on our next trip with fingers crossed. And this is how I mounted them to the cabinet supports and drawers. Edit: The drawer locks worked very well on our last 2900 mile trip. Edit: The link above to Amazon actually takes you to the 8 lb. version of the latch. I used the 5 lb. version and corrected the Amazon link. Mike
1 point


-
Recent Achievements
-


")


")


