Leaderboard


Popular Content
Showing content with the highest reputation on 07/01/2021 in all areas
-
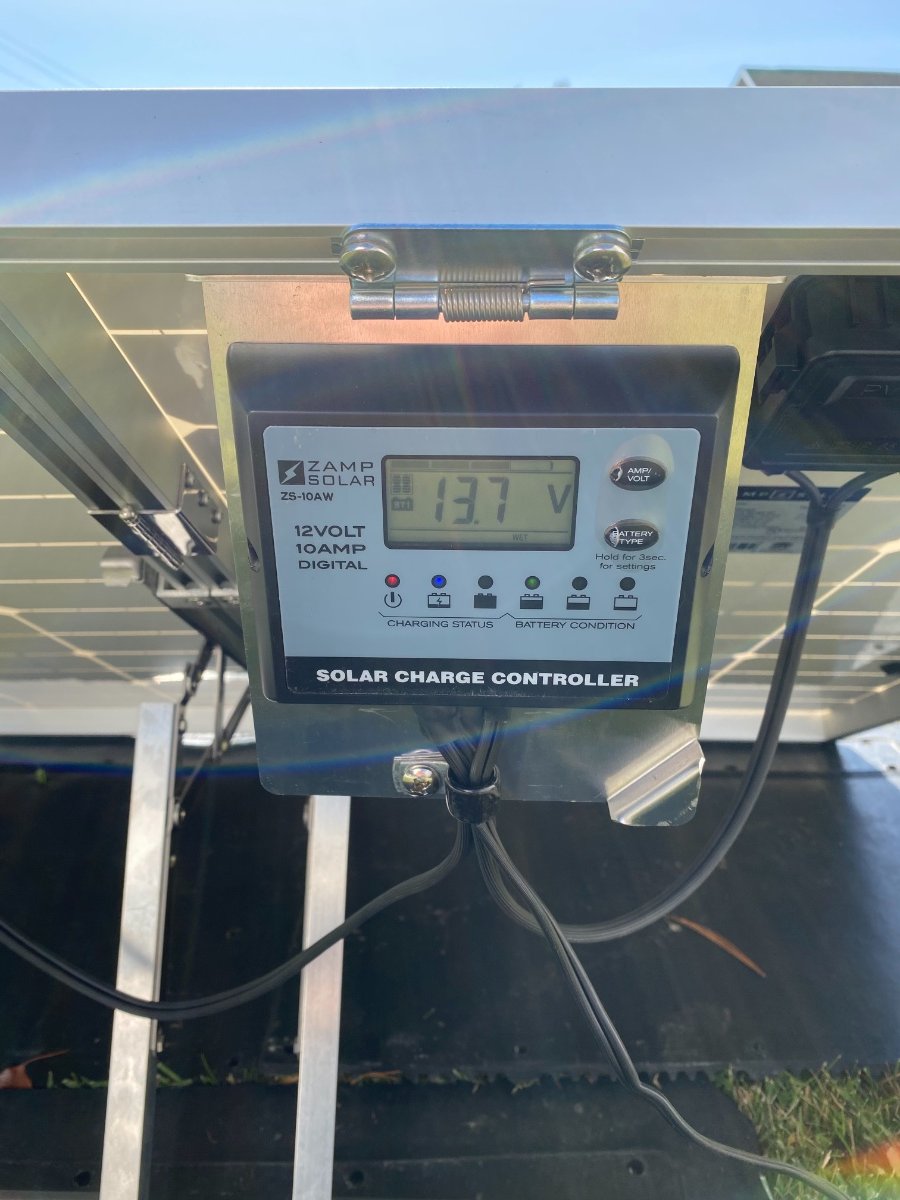
I should add that I have the 4x12volt lead acid wet cell battery configuration as a big reason why my portable solar panel setup works well vs. John’s concerns. Nominal full charge voltage for lead acid wet cell is approximately 12.7 volts. So my setup through the 7 pin connector can tolerate a few tenths of a volt drop through the wiring length. The controller on the Zamp portable panel has selection options for battery type. For AGM batteries, nominal full charge voltage is 13.0 volts. Not sure about lithium nominal full charge voltage but I believe it’s even higher than the AGMs. I know the lead acid wet cells get a bad reputation as needing a lot of maintenance but mine have been almost zero maintenance into our third year of camping. I check the water level regularly and they have only needed very small amounts of water once. When they do eventually needs replaced I’m still on the fence about which option to go with then.4 points
-
When we purchased our 2015 LE2 used during 2016 it had two group 27 12V lead acid batteries without factory solar. The following information & installation has happened over a few years. Initially we purchased a Renogy 100W suitcase solar panel and used it charging the batteries through the trailer's 7 pin connector. Wanted to have a more efficient way to charge batteries. Installed a Furrion Solar port and mounted Renogy Waterproof solar charger in the battery compartment. Use about 36' of 10/2 cable with 12' sections from solar panel to Ollie's Furrion Port. Had to drill holes in Ollie's pretty finish for the Furrion Solar port next to battery compartment. Furrion inlet under port bed: Renogy Solar 20A Waterproof Charge Controller mounted on plastic kitchen cutting board in battery compartment: When Ollie is in the shade it's nice to be able to reach out up to 36' placing panel in the sun, panel in lower LH corner of photo. Highest charge amperage seen using 36' of panel cable is 6 amps and highest charge amperage seen is 7.1 amps using one 12' section of solar cable. We purchased a Honda EU2000i to charge batteries on poor solar days. Installed a EZ start on the 13.5K Dometic AC so the Honda gen-set can also run the AC unit, or microwave, or hot water heater. Been actively reducing Ollie's weight when possible, currently Ollie's ready to camp weight is around 4950 pounds with full 6 gallon hot water tank and all other water tanks empty as per CAT scales. Replaced two group 27 12V (125 pounds) batteries with one BattleBorn 100AH Lithium (35 pounds) battery for loss of weight and Lithium battery performance benefits. Also installed the Progressive Dynamics Lithium charging section in our Progressive Dynamics convertor that BattleBorn said would work fine with their battery. Using the Honda gen-set connected to Ollie's 30 amp connection, the Progressive charger slowly drops charge amperage then cycles charge rate between .25 amps to .4 amps at full charge. BattleBorn told me not to worry about TV alternator damage when connected to TV with 7 pin plug with our particular system. They said because of charge cable's small diameter and distance from TV to battery, would not see very high amperage charge with TV connected. So far with BattleBorn battery at 75% charge while connected to TV with engine idling have not seen more than 3.5 amps of charge. Our current TV has 180 amp alternator and with ignition turned off, the 12V power supply to Ollie is also switched off. Initially installed a Victron BlueTooth shunt to monitor the battery, but my Android 5 was not supported by the Victron system. Believe Victron unit is the way to go, but at the time my Android was not compatible so purchased an inexpensive shunt & monitor from Amazon to monitor the battery. Found a automotive 2" instrument mount on Ebay to mount the monitor: https://www.amazon.com/dp/B07FGFFHC6?psc=1&ref=ppx_yo2_dt_b_product_details The battery monitor is not waterproof, use a 1 1/8" hole saw to cut out 1" OD plastic cutting board plugs to fill the existing ventilation holes in the battery compartment door. Did not want to mount these plugs permanently, sealed with clear RTV silicone for easy removal: The benefits of the Lithium battery is much faster charging with gen-set or solar panel with plenty of battery capacity for our style of camping. Will be doing more camping without electricity and water connections with this system, too.3 points
-
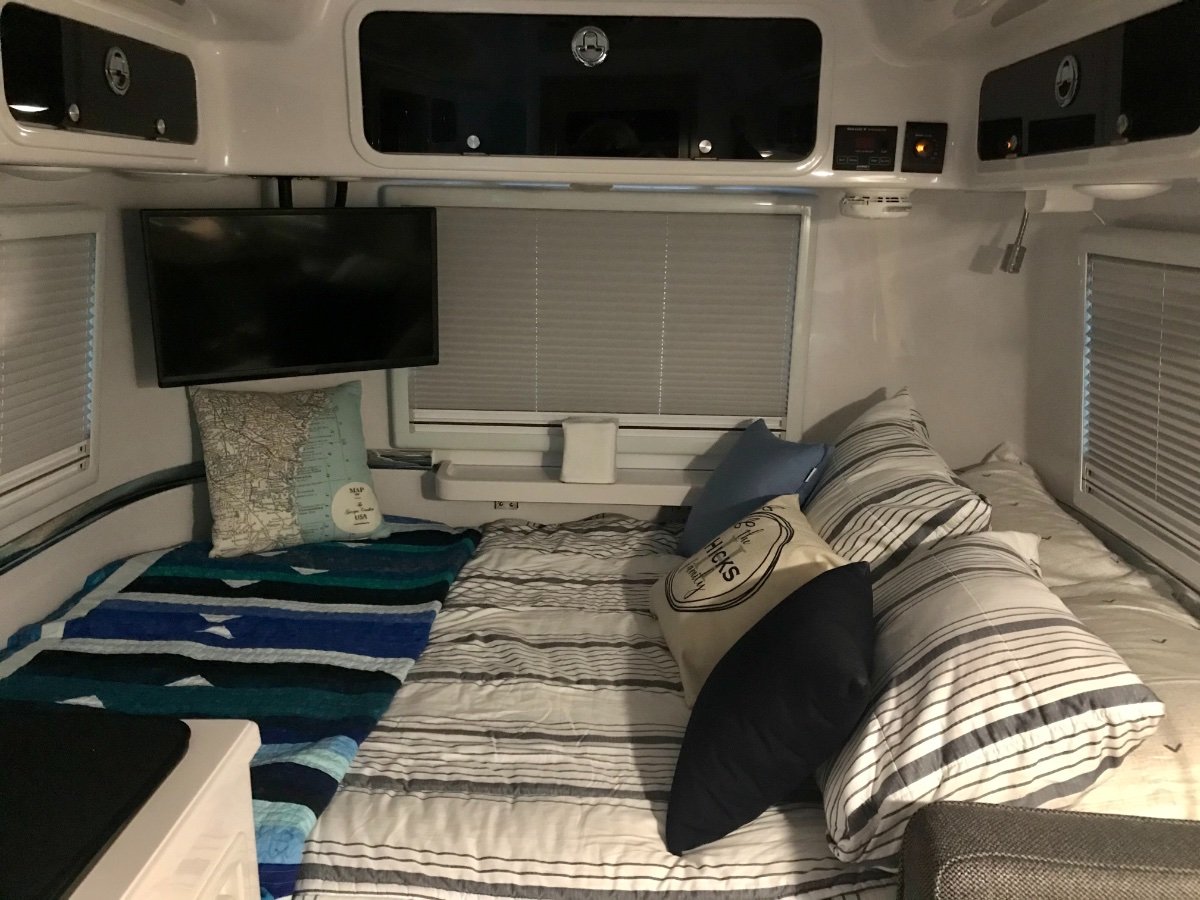
Thanks Andria. Looks like the change in the belly band was made to accommodate the window that they used on our units. I don't like it and at some point I will come up with a means of making it look better. When I do, I will post what I come up with. Your bedding looks terrific! If my wife sees it I am in for it. I picked out ours and it is just a couple of down filled backpacking quilts and two small pillows.2 points
-
I tried to search this with no luck so forgive me if these questions have already been asked. 1. Do crosswinds vibrations during travel or anything else have any negative affect on these mount points of the factory solar panels? 2. Have any of you had issues with the factory solar panels relative to how they are attached to the roof of the Oliver? If so in what way? 3. Have any of you upgraded, added more panels or simply deleted these factory panels? if so how has that worked out relative to the original mounting holes? waterproofing? I ask because I am soon going to have to commit to my build sheet and these questions came to me when I first saw the panels mounted on the roof sideways, it is a fair question given the way the panels edges hang out in the wind so to speak, however I have not been able to find an answer to this on my own..... maybe that is my answer but I leave it to you all now to give me the goods. FYI I am already set on AGM Batteries to start out, regardless of what decision I make about panels, so no point in opening that can of worms in this post. My goal here is to decide if I am going to add panels now or wait until I decide exactly what I want to do relative to a full on boondocking solar solution in a year or so. I am fine with the cost of the panels, I know some will think it is overkill for me to purchase them if I am not boondocking that is my prerogative so hold those comments please, thanks. I am simply concerned about how their attachment affects the roof/gelcoat of the RV and since I do not plan to do any hardcore boondocking the first year I am leaning towards no panels at all because we all know that 12-18 months from now there will likely be better panels that may or may not mount the same way leaving holes/patches in my roof that I am not crazy about thus the question because the oliver being 100% gelcoat is brand new to me and you can all see by now I am going around in circles about something that probably should not be so complicated 😉 so I look forward to your educated input on the subject. Thanks Dan1 point
-
You've done a great job to customize your Ollie, your way! Congratulations.1 point
-
fairmontrvpark Answers to your questions: 1 - no 2 - no 3 - Similar to Maverick I got the 4 trojan 6 volt wet cell batteries at delivery and they are still going strong. However, unlike Maverick I did get the rooftop solar panels which have had absolutely zero issues since new. And, like FrankC I have added a small portable panel - 25 watts with controller connected via the pigtail - for use when I have my CalMark cover on during storage (i.e. the rooftop panels really don't do much when they are covered). These Oliver panels are really about as bullet proof as it comes and the way they are attached through the roof is stellar. I strongly suggest that you take a factory tour where you can see this sort of stuff for yourself. Bill1 point
-
FrankC: we also have the 4 six volt Torjan wet cell batteries, they have provided excellent service for almost six years of Oliver II ownership. I check the batteries on a regular schedule and most of the time no water is necessary. The most water I have ever added is between 0.5 to 1.0 oz of water. If you take care of them they will out last any AGM battery. We did not purchase or regret purchasing the solar package; we stay about 75% of the time in campgrounds with hookups. We have stayed in National Park Campgrounds up to two weeks without any problems. Sometimes we will carry a 2000i Honda generator; but not all the time. My tow vehicles has no problem in charging the Oliver's 4 six volt Torjan wet cell batteries; after I corrected Oliver's wiring problem. When my current Torjan batteries require replacement it will be the same battery. With NO solar or No inverter there are fewer problems to deal with, I have no issues in my ability to handle any electrical issue with the Oliver Travel Trailer.1 point
-
Sorry Neuman, I can see how that sounded, the 100% was meant in comparison to my previous RV's that had PVC Roofs, Wood Substrate, Fiberglass Coated Wood Siding etc. The Oliver is nothing like them and is new to me.1 point
-
On the 7 pin connector for portable- it's probably a decent solution for small panels with a controller. Oliver can also install a Zamp port, which provides a shorter fused path to the batteries, and there are various conversion bits available for other types of connectors to Zamp, so you can use the more reasonably priced renogy or other brand portable panels. Zamp is usa made, great quality, but pricey, and kind of heavy, imo.1 point
-
No big deal. I read it as 100 per cent fiberglass, versus composite. Gelcoat is basically fiberglass, minus the fiber. It's more brittle than full on fiberglass, but shiny and nice! Oliver uses a great marine grade gel coat, that keeps that shine, if you keep up with the waxing. Holes can be filled pretty easily, with marine epoxy, or a gelcoat repair kit. MarineTex epoxy is fairly close in color, and if it's on the roof, you and a police helicopter pilot are likely to be the only ones to see it, anyway . The mounting brackets that Oliver uses are really nice, and beefy. We were able to upgrade from 2 x 100 to 2 x 200 watt panels pretty easily, with a bit of additional aluminum bar stock as spacers for the slightly longer panels, and new panel clips from am solar. Ours are custom (by Oliver in fall, 2008) saddle bracket sidemount, and have been in place for 13 years, with good backing plates. We examined them, and felt very comfortable reusing them, hopefully for at least another decade. That said, a couple people fashioned their own sidemounts, after seeing ours, in 08 or 09. So, after market install is entirely possible. I think the tough part would be pulling the heavy guage wire through the double hull. Our smaller Elites have a smaller rooftop area available for panels, as you've seen. We like the sidemount solution Paul drew up in 2008, but I suspect the current twin panel flat would be fine, too. Good luck with your decision process. It's not an easy one, to be sure.1 point
-
Hi to the Olliver owners I saw heading north on Route 1 in Waldoboro, Maine just south of Moody's Diner around 12:50 today. Hope you have a great time in Maine.1 point
-
Dan, we have the factory panels installed on our 2016. We’ve never had an issue with crosswinds or vibrations. We’ve driven through some pretty fierce winds in west Texas that prompted a lot of 18 wheelers to pull over. No vibrations either. We’ve also camped in some pretty strong winds, gusts up to 60 mph one night in southern AZ. No panel issues. I wash the panels and roof after every trip so I’m up there a lot and haven’t seen any mounting issues. I do check the T knobs while I’m up there and they’ve always been tight. Mike1 point
-
Hello John, A 2013 Land Cruiser 200 is not an Ideal TV, but it gets the job done for you right? I am quite sure 99% of my choices relative to my Oliver will not be up to your standards so that is established now. As I stated in my Original Post I am NOT using Lithium and would like to avoid this post going down that rabbit hole so it can stay on topic. I absolutely love the 7 PIN solar solution in my case it is an ideal option, and I am grateful for it. Dan1 point
-
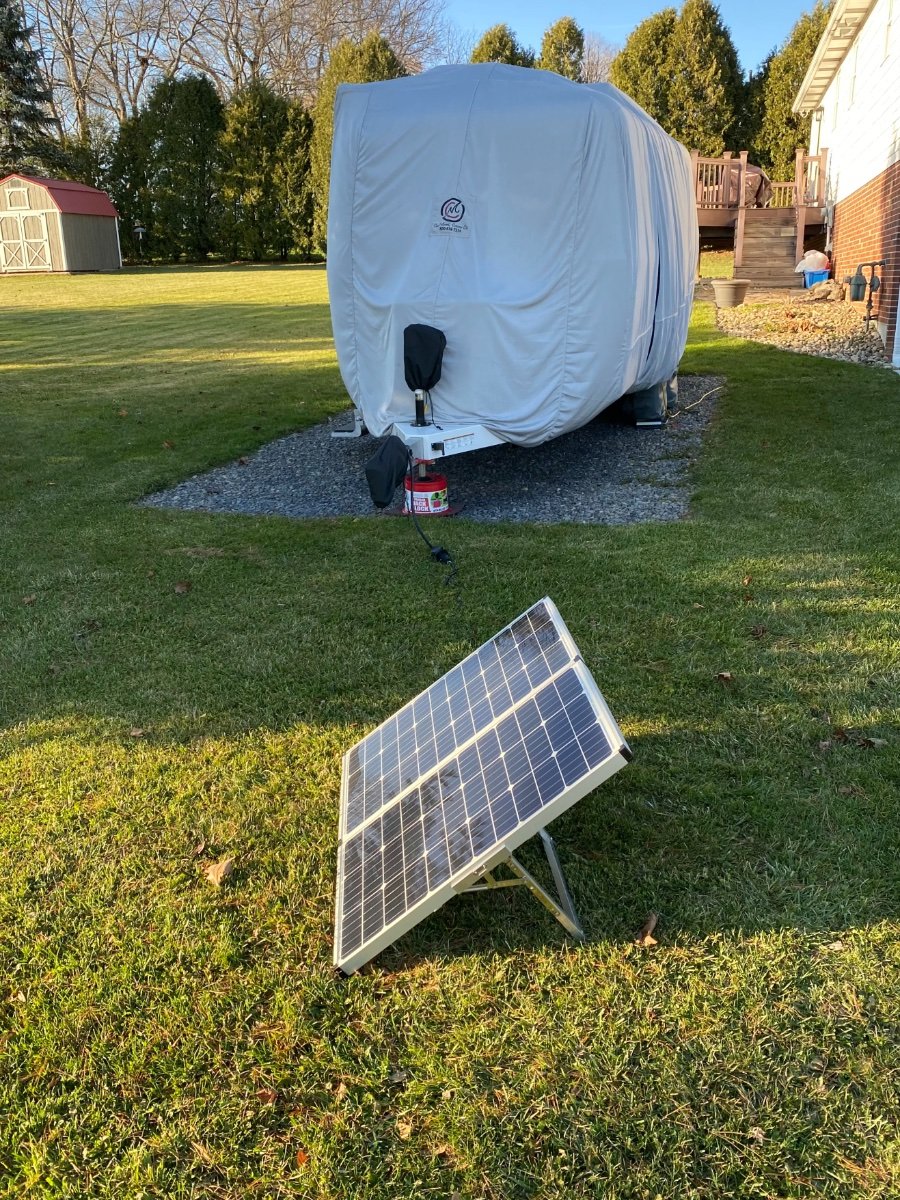
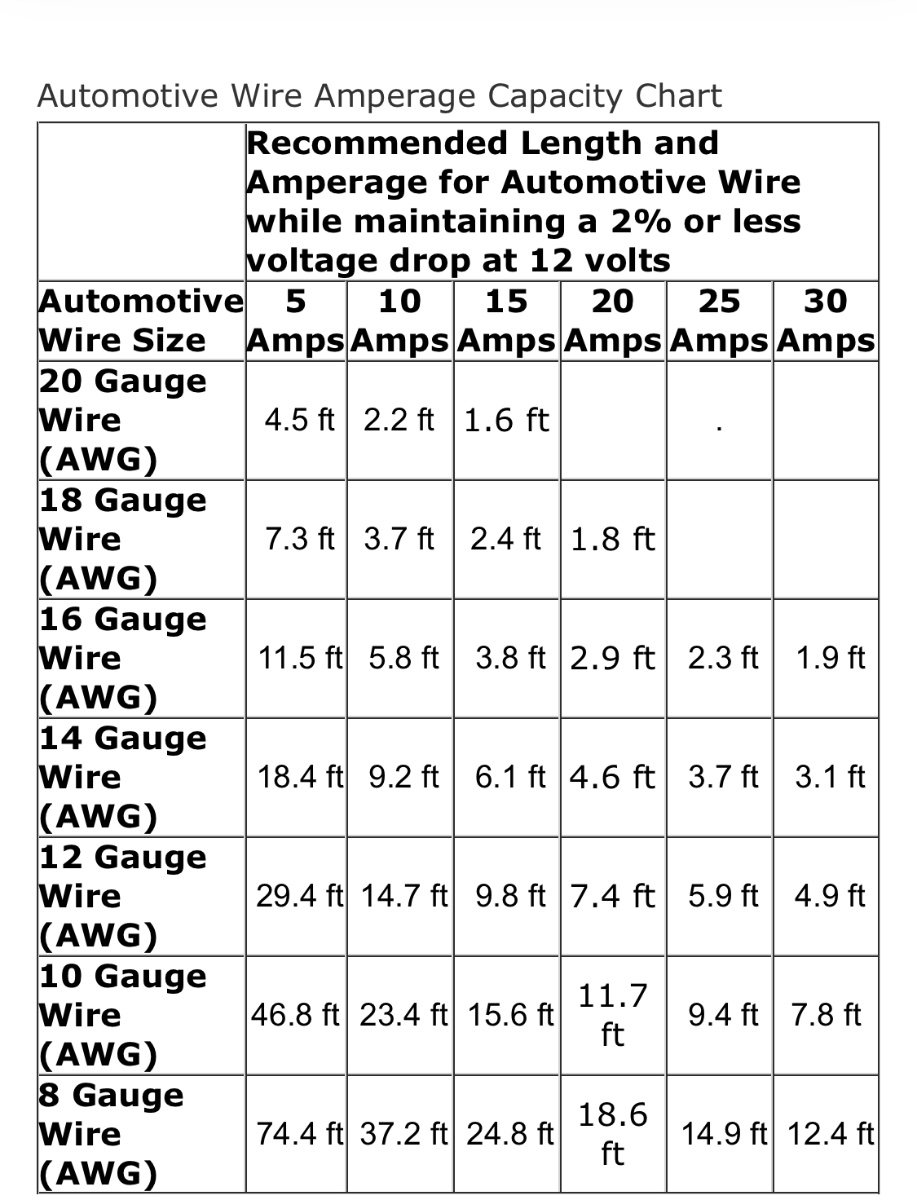
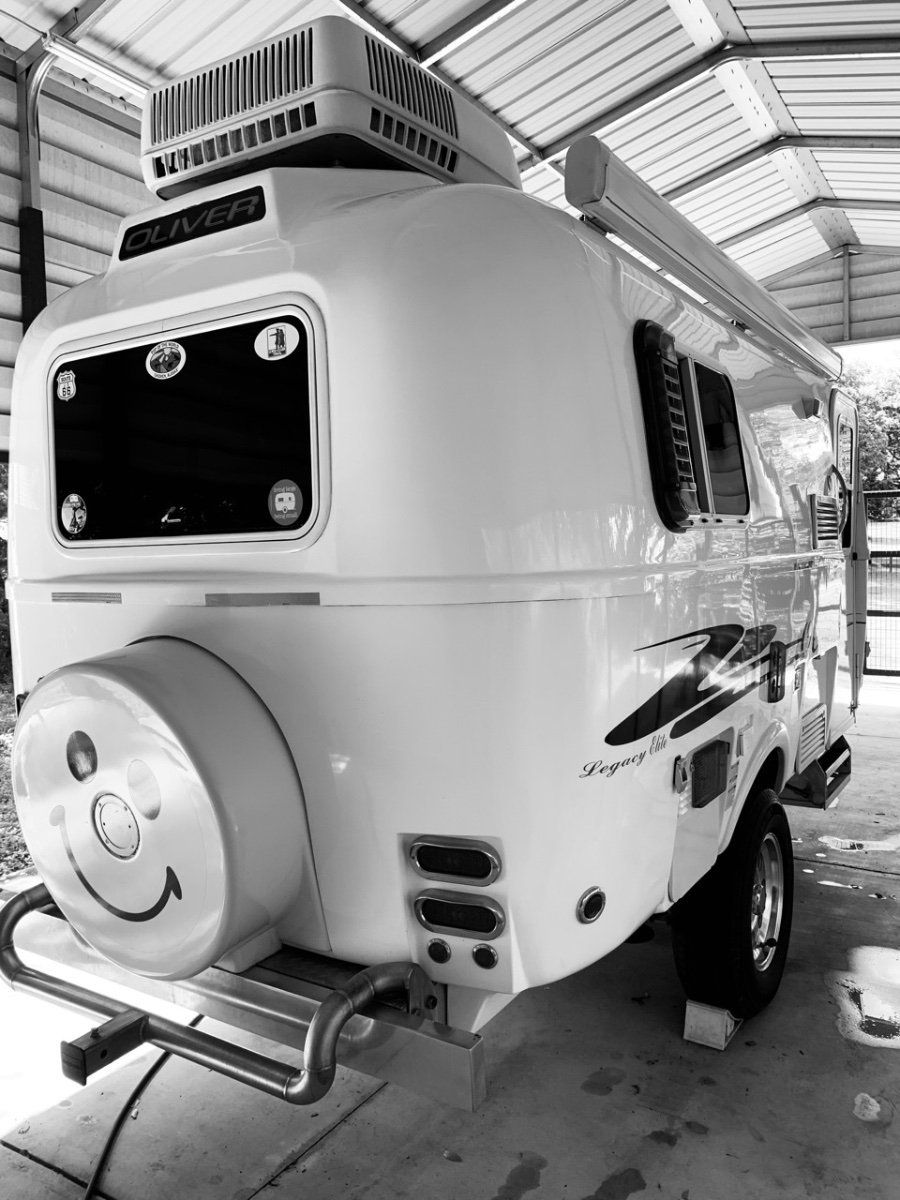
It can be used but you have to make sure the panel has a charge controller. Here’s what the setup looks like. As John said, it’s not the optimal setup but it works and it was a heck of a lot cheaper. About $1,000 for the panel with controller plus the 7 pin adapter I had to wire up. Plus as portable panels improve I can upgrade easily. As far as the distance issue it’s not much different than the tow vehicle alternator to trailer distance, and my batteries fully charge just fine from both my tow vehicle when driving and when using the solar panel at Harvest Host stops. As John described, wire gauge vs current capacity is heavily dependent on wire length, whether the wire is in open air or buried in a bundle, continuous or intermittent current, ambient temperature, etc. Chart below. My panel is only 140 watts so call it 12 amps max. (And I rarely see above 10 amps). John is correct though that for a very high wattage panel like the Oliver factory setup, larger gauge and shorter wiring is required.
 1 point
 -
I’m also planning on no solar if I can find one. Most likely we’re going to utilize a renogy 40 amp dc to dc charger for both the trailer and a battery bank in the truck to run a additional freezer/fridge. We have a lot of cloudy days in the Midwest and as a family like to stay on the move. As GG mentioned above the reinforcements are already installed on all trailers and for that reason I’d probably have them install the mounts down the road. The solar panels might be considerably more efficient in 10 years so waiting, if they’re not currently needed, might be a good idea.1 point
-
We've had ours for 2 year and many miles and never any issue. I make sure to check the fasteners each time I was the roof, and tighten the quick connectors that can be loosened to remove or tilt the panels as well. (A tilt kit is available in the aftermarket.) You may want to check with your Oliver Salesperson, but I believe there are metal reinforcement points on the inside of the roof for the solar mounts and they may be able to be installed later easily if you know where the mounting points are. One thing to be aware of is the very long backlog presently with any solar installations through after-market installers. **** As to SOLAR benefits you might have overlooked: One thing to be aware of is the Battery Re-Charge current you'll get while driving. One of the more important benefits of SOLAR is that as you drive, solar does a great job of recharging your AGM batteries. Hope that helps. Craig The 7 pin connector on the Oliver has a +12V line (10 AWG) that runs through a breaker to the AGM's. This will help recharge batteries while you drive. The amount of current that flows on this line is only 7-10 amps simply because the wires are pretty small on most trucks. That amount of current isn't enough to fully recharge your batteries quickly while you drive. If you drive with your fridge on DC, (or on AC with the inverter on) then SOLAR becomes a more important feature. Without the boost from Solar on board, you'll deplete your batteries as you drive instead of recharging. Some folks feel safe driving with Propane On for the Fridge, but many local regulations make that somewhat iffy.1 point
-
We didn’t order the factory solar panel option on our 2019 Elite II, so there are no holes or brackets on the roof. We typically stay at full hookup campgrounds. I do have a portable 140 watt solar panel with integrated charge controller that I use for brief stays at Harvest Host locations, connected through the 7 pin trailer wiring harness plug.1 point
-
Welcome Fred! I too am from Baton Rouge - Geaux Tigers! (LSU and Tara grad LOL). We started our journey looking into Oliver early this year...Had a great factory tour in April - and bit the bullet. Now waiting for an October delivery. Safe travels and enjoy your trip - it's a beautiful part of the country! This forum is great - so much experience and ready to share and help. Laissez le bon temps rouler in an Oliver LOL!1 point
-
I'm going to get the WS-10 with three sensors and add how ever many more we need. With this display, I can always see the fridge/freezer/indoor temps without scrolling, then scroll for other zones as needed. I be able to use our Accurite 3 sensor unit at home and not need to swap it out for the trailer when we camp. Thanks for your recommendation.1 point
-
We ordered our 2022 in May 2021 for a March 2022 delivery. We were told at the time of our tour and order that the main reason for the price increase was due to the increased cost of fiberglass in 2022. And yes, the standard equipment list now includes several items that were previously options.1 point
-
I think two big changes to base is they made fancy awning standard. That was 700 upgrade on my 2021. They also made fiber granite standard. That was 1800 upgrade if I recall correctly. I am glad I was able to get my 2021 with the white counters. I don’t like the fiber granite and already upgraded dinette to top made by Foy with plans to do nightstand top as well. If price is 65k that is 5k cost increase after you account for 2.5k above added to base unit.1 point
-
I got this base station plus two fridge/freezer sensors and 4 temperature/humidity sensors. It will support up to 8 sensors. https://www.amazon.com/Ambient-Weather-WS-08-8-Channel-Thermo-Hygrometer/dp/B00EW369VK1 point
-
I am not sure if I agree with everything in Andersen's Statement! Example, from what I understand and have seen demonstrated in Videos, the Auto Sway Control System applies the Trailer's Brakes, not the TV's Brakes to counter act the Sway. As far as these systems miss-reading the inputs, because the TV is equipped with a WDH, this doesn't make any sense. We all know that most WDHs, that also have an Anti Sway Feature, are very affective at reducing Sway, Therefore, it stands to reason that the Forces are also reduced! The reduction in these Forces are read by the Auto Sway System which then sends the adjusted signals. Note, the "After Market" has two difference Auto Sway Systems, that I aware of that are available now, for around $500-$600.00. As I mentioned in an earlier Post, about 90% of newer TV with these systems cannot be turned off, and those are can be turned off, are not off 100%, but are just Detuned. I've check with two WDH manufactures, (Andersen hasn't replied yet) and they both have no such recommendation. Additionally, "Can Am Airstream," which by all accounts is the leading authority on RV Towing, says that a WDH and an Auto Sway System complement each other! I would recommend you follow the TV's recommendations!1 point
-
We have a 2021 Elite. Yes, ours is like yours as well. Andria 2021 Elite #750 “Orchid” 2020 Toyota Limited Tundra “Tank”
1 point
-
I did make him aware of this forum Mike and I have a feeling others will as well. Like the rest of us he has his own agenda and schedule so I did not press it.1 point
-
Yes, Oliver did a mid year price increase. When I asked for brochures to use when customers visit our unit, Anita also sent me updated price sheets and asked that I remove the older ones from the earlier folders they sent. There could be some older price sheets still floating about and that could explain the different numbers you may have heard. The current build sheets that I have in my handouts are attached. Oliver made several changes in the last two years and have consolidated items that once were options now as standard gear. (example: remote & electric awning instead of manual) and reduce down the number of choices that customers had to make. (Example: fewer color combinations on interior and less exterior graphics colors etc.) They have also done away with many other items that they once offered...like NO Microwave and having a cabinet opening instead. Growth has it's pro's and con's. I'm still really happy with our unit. 2022-Elite-Build-Sheet.pdf 2022-Elite-Build-Sheet.pdf 2022-Elite2-Build-Sheet-1.pdf
1 point
-
Neat. And it uses batteries, so doesn't require a wire run to the lock, like some of them. If the proximity thing doesn't work properly inside the trailer, you could always turn off Bluetooth. Or the app . We have a wifi app for our garage door. It has saved me countless trips back to the house to see if I remembered to close the big garage door. And, love my keyless entry doors at home, too. Even though they require punching a code.1 point
-
Pretty darned neat.1 point
-
Yeah, good tip. I decided to just pay for the convenience to reduce the number of things I would be doing myself to get the trailer tuned for our first camping outings. I also priced getting good quality custom fit latex mattresses from a reputable local mattress place and found that the Oliver option was actually way less $$ believe it or not.1 point
-
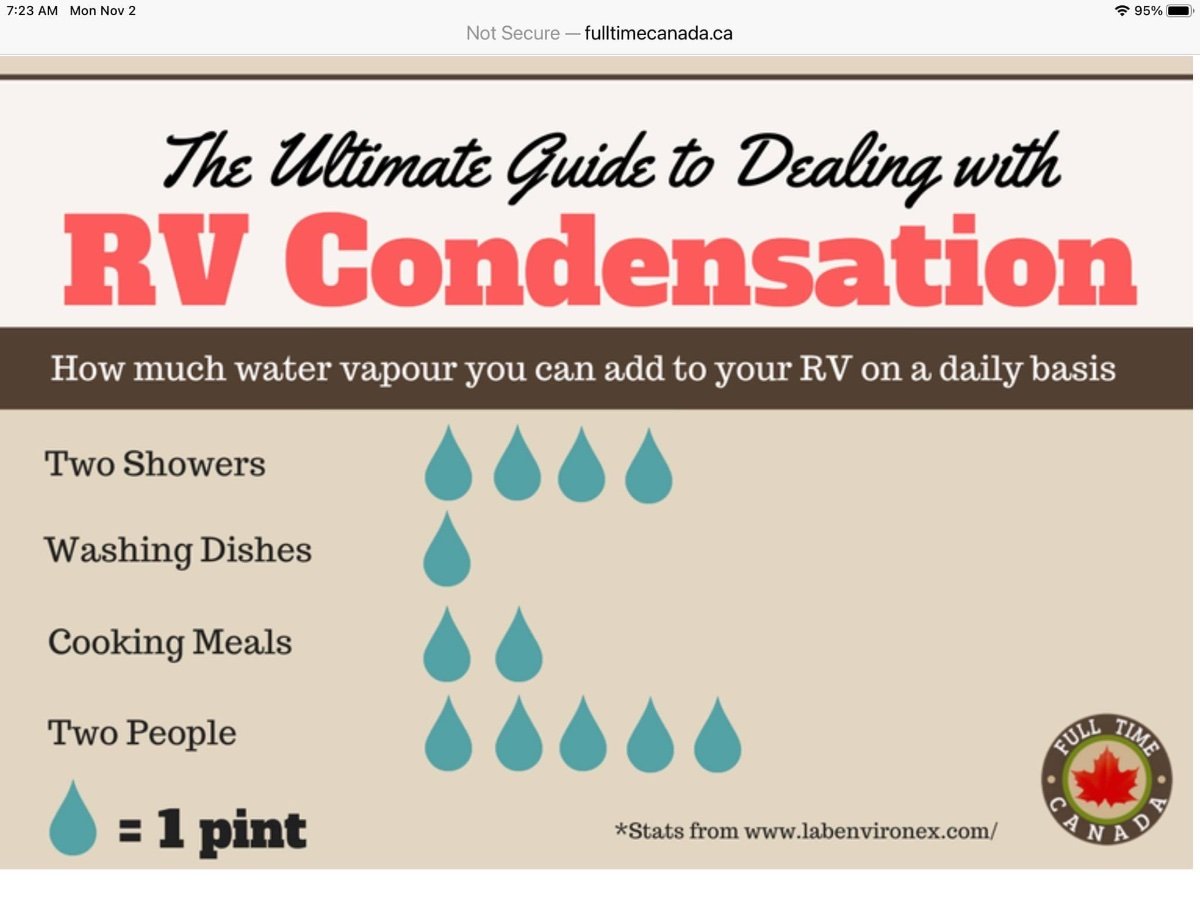
Another PNW resident and camper here. I agree with comments above that ALL RVs have potential for condensation problems - the nice thing with the Oliver is that the extent of the problems can be more quickly noticed. That said, thus far even camping during cool wet weather out at the Pacific coast in the rainforest, the most we've seen has been some fogging of the windows overnight. We have the KTT latex matress option plus the hypervent pads and while yes they're slightly more of a hassle than a heavy mattress alone I haven't found them to be that troubling - the thick heavy mattress is the main thing making it a chore for me to get in those compartments but so worth it for the comfort (I'm quite certain we would not like sleeping on the base/stock cushions given the feel of the dinette cushions which are on my "to do list" to replace with something more beefy btw as I don't love them even for sitting on). Anyway, we've not seen any condensation beneath the mattresses and the bit of fogging of the windows in the early morning has gone away quickly during the day. And we've only noticed the window fogging on particularly wet and/or cold nights - less than we've typically seen in our Class B camper van with its fuzzy walls and ceiling fwiw. We do keep a few windows and a roof vent cracked while sleeping (and turn on the fan to 10-30% if it's feeling warm inside) and turn the fan to whatever level is required to keep the bathroom door mirror from fogging while boiling water or otherwise cooking inside (most of our actual cooking we do outside but have liked heating coffee water on the Oliver's stove in the AM). We run the bathroom vent fan and if needed the MaxxAir fan during and for a little bit after showers and I squeegee and wipe the wet bath's surfaces after showers to move that water down the drain. We've also slept in single wall tents which are way worse for condensation issues and from that you will necessarily learn a few things including that wet gear makes it worse as does "sleeping hot" - if you can comfortably tolerate less covers over you you will perspire less overnight and thus put off less water vapor into the cabin. In any RV it pays to think about how to mitigate the amount of moisture you send into the cabin air and what level of ventilation you need for the significant moisture you'll put in there despite reasonable mitigation efforts. To repeat - the design of the Oliver simply makes it more likely you'll notice if you could be striking a better balance there.1 point
-
Base price on my 2017 E2 was 49,900.00. But at that time, you could very easily get your trailer into the $60k range with options. I believe that 2018 was the first substantial jump in base price, which reflected an equally substantial increase in demand the previous year (though there also seems to be a big jump between Steve's 38k in '14 and TopGun's 48.5k in '16). But like Mike said above, they also began to offer a good many options as standard that year, and they've increased the number of standard items most every year since. So for the E2 it looks like we just need 2015's price to own the whole set... 2014 - 38.0 2015 - ? 2016 - 48.5 2017 - 49.9 2018 - 53.9 2019 - 53.9 2020 - 55.9 2021 - 57.5 2022 - 62.5 (65.0?)1 point
-
This issue depends a WHOLE lot on where you live and camp. Around the arid parts of the West it simply isn’t a worry because the humidity is so low outside. However, you should never button everything up tight.There are a dozen 1/2” moisture drain holes in the belly of an LE2 which are always seeping in some fresh air. But even on super cold or super hot days you should have some sort of forced or convective ventilation operating to extract moisture. Cracking a roof vent and a side window is enough. If you live where it rains often, or camp in the dead of winter, this is a lot harder to do. For sure, if you are showering or boiling a pot of water, there should be a fan running. And stop breathing, that will eliminate a lot of moisture……😬 John Davies Spokane WA1 point
-
The Oliver is pretty airtight because of the double hull construction and insulation, and the fiberglass interior surfaces don’t absorb moisture like carpeting or wood products do in other trailers, so with the windows and doors closed, managing interior moisture from showers, cooking and breathing is something that most Oliver owners have methods to deal with it. Condensation on the interior walls can occur with big temperature changes unless you use some easy solutions. Not severe condensation (we’ve never had it “dripping from the walls”), it’s more just that muggy uncomfortable high humidity feeling. But condensation can happen under certain conditions. Using the air conditioner or furnace can help depending on ambient outside conditions. Some use small dehumidifiers, others (including me) use DampRid, and some will run the MaxAir fan frequently, even with the furnace or AC running, just to get more air exchange. Always use the exhaust fans when using the shower or cooking. And someone posted this graphic to illustrate where the moisture typically comes from. As the old expression goes “we have met the enemy, and he is us”. And we have the hypervent matting and it’s worked great so far. No problems with moisture under the mattresses.
1 point
-
The cost may be significant, however, when you consider the years of pleasure you will experience, it doesn't seem that significant at all . . . Here's how my Elite I looks after 13 years.
1 point
-
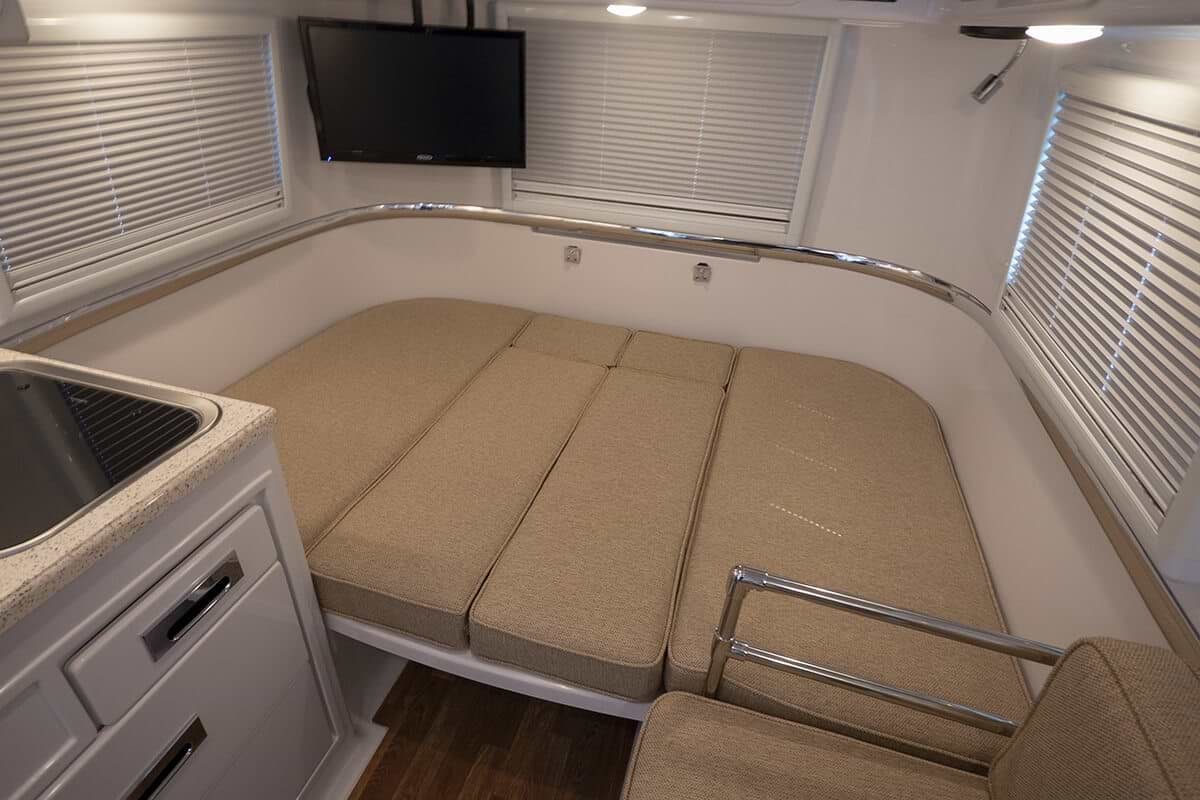
I picked up my Elite (I) March 17, 2021, hull #758. It does not have a continuouse chrome strip above the rear dinette. There is a tray/shelf that fits in that place, that is above the table, so the chrome strip is not there if you got the dinette option. I was told that if you got the permanent bed option, the chrome band would be continuous, and the brackets/thumb screws would not be there. I decided to get the dinette option, as I wanted the flexibility of using the dinette or the bed. I plan to leave the bed permanently made up for my upcoming, first, trip. I did remove the thumb screws. John1 point
-
I could live with John Davies' idea of ripped/notched band better than the "missing chunk" you have now. Move the whole band up a tiny bit. Notch the retaining lip of the shelf a bit to clear the chrome trim. It would at least give the illusion of a full continuous band, with the shelf in place. I'd be disappointed, too, if I were you. I understand that the slider requires a bigger space for egress, but I don't think this was well thought out, personally. I'd ask Oliver for a bit of a redo, possibly as described above. We ripped the inner part of the shelf (the part that sits in the slot) and the lip, making our wooden shelf a few inches less deep. Still room for glasses, a small clock, my phone, and a paperback book. But, I've not seen the new style in person. Might be more shallow than our original, as it is. Mine is now just deep enough for a paperback. I've even given fleeting thought to removing the table clips, and filling the holes, as we haven't used the table in over 10 years. I just throw a pillow over them...1 point
-
Here's a pic right off Oliver's website of a 2022 model Elite. So I don't know what is going on with your trailer Longstride. It does look like the window in the pic was placed higher however. Note no sticker and the shade frame pretty much touches the upper cabinet. That would give just enough room for a continuous belly band. Dave
1 point
-
I moved all my stickers to the trash can, which is where they look the best. I agree with the others about the trim and window - whatever it is that Oliver is trying to do there needs to be rethought.1 point
-
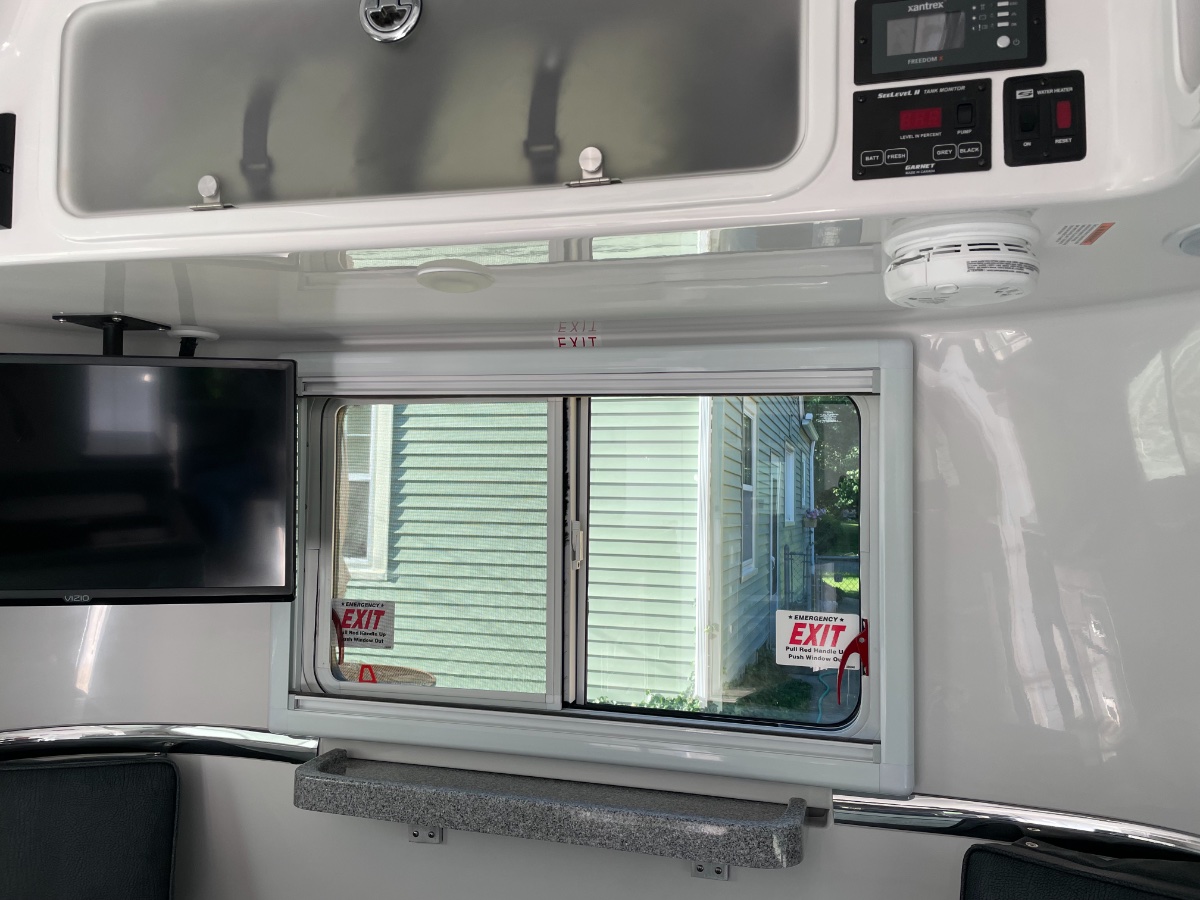
Well, that certainly looks like an engineering decision to me, tho the execution could be a lot better IMHO. It is sure unsightly. If you can get Oliver to send you a length of the chrome trim, you could carefully notch out the bottom edge to clear the shelf. It would look odd when the shelf was removed, but no odder than a completely missing piece. And it would look terrific when the shelf was installed. My guess is that the missing piece is a cost saving measure. I removed my two peeling stickers and mounted a single one in their place outside the frame, the view out the back window is much improved. The stickers are a visual distraction, they force your eyes to focus on them rather than the scenery beyond. On your setup, I would install a new one to the right of the street side red handle. And the EXIT sticker at the top should go a few inches forward, on the ceiling, so you can see it when lying down. I am not sure it even meets code where it is now, half hidden by the blinds frame….. . I guess that all the sticker locations are by code, but as an owner you do not have to leave them there. John Davies Spokane WA1 point
-
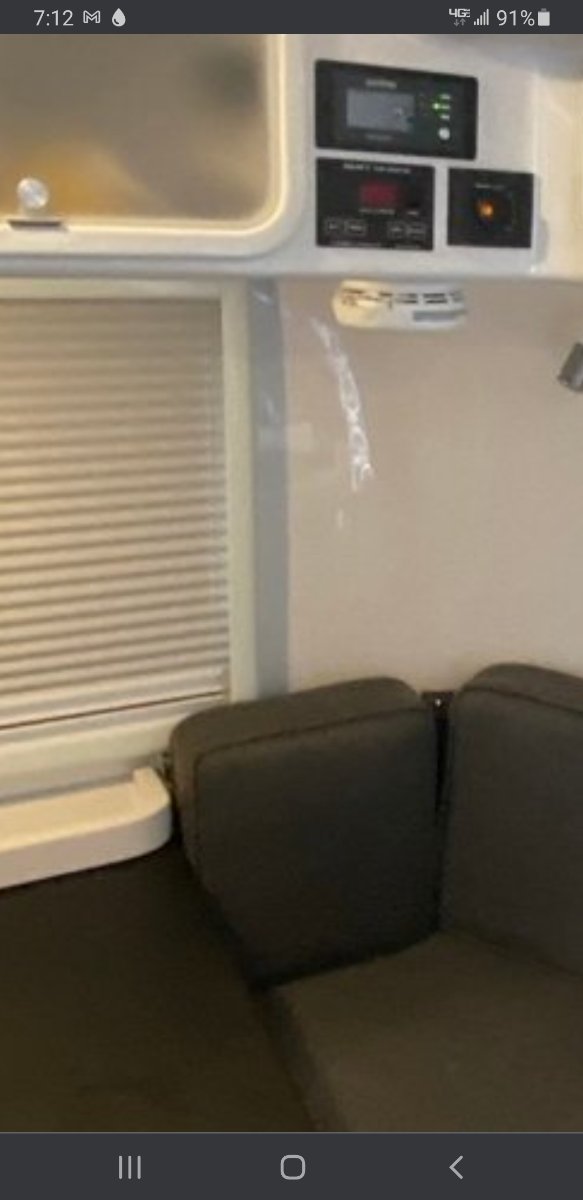
Thanks for the photos from the classifieds. Sure looks like the belly band is cut out at the tray slot on that Elite also. I have no problem with it as long as it is a manufacturing change and not a goof! It appears as if they had to make the change to accommodate the larger egress window. Not much available room between the top of the frame and the attic (see pic below). Like you, we intend to leave the back set up as a bed. The tray is a nice place to set your glasses, flashlight, and a water bottle. A mini nightstand if you will. Perfect for us.
1 point
-
Since no one with a 2021 model has posted, I went back to the classified listing for the one that sold a month or so ago. I can see why you would not have noticed at pickup, as the dinette was probably set up as a dinette. Difficult to see in these photos, with cushions and shelf, but pretty sure the belly trim is positioned, and gapped,ike yours, @LongStride. I wonder if RVIA requires the sticker to be visible with shade closed? If so, wondering if a sticker could be applied to shade frame instead of wall? There's still a sticker on the window. Even with that, there appears to be very little room between shade frame and attic in these photos.
1 point
-
Hi Dave. The “exit” sticker on mine is on top of the window. The frame that holds the shades/blinds is not centered on the rear window. Looks like they dropped it down a bit to clear the exit sticker above the window then struggled for room to install the chrome band. The band(s) slopes down a bit toward the slot on both the curb side and street side. I don’t believe this ever should have passed QC.1 point


.thumb.JPG.dd838cdb3df463dab6a16861fa23a319.JPG)


-
Recent Achievements
-


")


")


