Leaderboard


Popular Content
Showing content with the highest reputation on 03/30/2022 in all areas
-
We took delivery of our Elite II on March 4. Visited the Oliver facility and met with some great people who helped us with documentation and with the delivery tour. Tour and explanations of how things work were pretty straight forward with no major hiccups. Stayed at Olivers campsite for two nights so we were hands on. Left the facility on Sunday for Nashville for 2 nights. After this we were pretty confident that we could be on our own. Called tech support once, confused for the orientation of the valves - normal, boondocking. The technician was great explaining the difference between the two. Our route took us to 6 HH locations (by the way best investment we ever made )met with some great hosts from wineries, distilleries, organic farms. Great people to meet and talk to. All HH sites ( with the exception of one ) offered no electricity or water which was no issue for us. Used the central heat for 9 days and consumed the first propane tank which is not bad at all. On March 11 and 12 while in NC, we experienced a snow blizzard with temperatures down to 7 degrees. Our truck and the Ollie were covered with snow and ice, however we were very comfortable inside and nothing froze. I was concerned about the outside shower but luckily I did not flush the antifreeze on delivery date. After this we headed south GA, AL, FL , MS , LA and returned back home late last week. Had many curious visitors inquiring about the trailer, most unaware of the name, some pretty disgusted with their own complaining about the particle board roof and tarp, floors and overall the low quality craftsmanship of the rigs that they currently own. I saw some folks bring their own level to make sure their rig was level. Towing the trailer was a dream and especially easy on road construction sites. Overall we averaged 13.3 MPG taking in consideration the NC steep grades - some 4 degrees up and down and driving against strong head winds for 4 days. Solar option works really great - did not choose the Lithium battery option - but sufficient for lights, microwave, instapot, radio, etc.Just 4-5 hours of sunlight was enough to fully charge the batteries and I think that we can stretch the battery reserve for 2-3 days with no sun. The convection oven was a no no with solar. Only complaint we have is the roof AC, very noisy, uncomfortable. Another great feature is the black tank flush port. Before we arrived home we stayed in a RV park, drained both tanks and flushed black with fresh water. Overall it was a great first trip and already started planning the second and third.10 points
-
We now have a hull number, and a name. Hull #1150 shall be called... Eggcelsior. (With a tip of the hat to our neighbors in NY!) 😃7 points
-
When I took my first camping trip with the new to me Oliver I was thrilled with the experience it gave me, and as I added more trips I started a mental list of things that I could tweak or add to the Oliver that would make that experience even greater. Today's post is addressing one of the items on that list concerning the windows and how they are limited to only being able to be open in fair weather conditions. Because they lean inward at the top of the window they can create problems in rainy conditions whether the window is opened or closed. When closed they have to deal with all the water that runs down from the roof and sidewalls, this can overload the drainage holes in the window frames which can result in getting the bedding wet. Many Oliver owners have installed rain gutters to help alleviate that problem, but there's still the problem of having the windows open while it's raining to mitigate high humidity or that closed in feeling. What I came up with for a solution I'm calling window eyebrows. I created a list of design parameters or considerations that I wanted to hit for this project. The first one was I did not want to alter the Oliver in anyway, that included the drilling of hole to mount the eyebrow to the windows, this really slowed my project down. I'm the type of guy that builds it in my mind before the prototype is built, I went through many different design ideas before I settled on this one. I designed a mount that clamps into the window frame and to spread the load out over a larger area I utilize three of these mount per window. The mounts are inserted into the window frame and the screw on the bottom is tighten which draws down the 5/16" diameter rod in the tapered slot which then spreads the mount to engage the ribs that are formed into the window frame that hold the rubber molding in place. I inserted a still picture in the following video showing that process. To remove the mount you have to take that screw out with the 5/16" rod and there is a hole on the bottom where that same screw is inserted and when tighten it releases the mount. The eyebrow itself is made of 3/16" thick x 5" wide x 29" long aluminum which has 3/4" of the outer edge turn down. I used a neoprene edging trim bought from McMaster-Carr along the length that mated with the Oliver, my hope was that it could be pushed tight enough to seal the water from coming between the eyebrow and the side of the Oliver making for a easy instillation. When I tested this in the rain it looked like it was going to work but after about ten minutes I noticed each window developed a drop of water by one of the mounts and it would fall and hit against the screen about every couple of minutes. So plan B I was forced to use a 1/4" wide weather strip tape between the neoprene edging and the fiberglass wall of the Oliver. There was one more problem, I had to incorporate a drip edge to the eyebrow to keep the water from following around the edge and falling towards the window. This eyebrow is fastened with two stainless steel 1/4-20 button head hex drive screws to each of the three mounts. This makes for a quick install or removal of the eyebrow, Here in Minnesota we had a warm up and it rained one day so that is all the testing I have been able to do, so time will tell if all is well with the design. As far as the rigidity of the eyebrow I'm extremely pleased you can literally grab onto them and push and pull with no flex of the eyebrow. EYEBROW.mp45 points
-
Hello All... Don't have it yet...but it,s coming (June 15th) ! Love to hook up with all the great people who have Olivers! We are from the Pacific Northwest (Bellingham) Just us and "Emma"...(sweetest Black Lab you will ever meet!) Look forward to the adventure.3 points
-
Eggcellent name!3 points
-
All this makes it rather embarrassing to know what we paid for the first Elite II to come off the line after the hiatus of 2009-2013. The Outlaw Oliver, Hull #050. We just had it ceramic coated by CGI out of Murfreesboro, TN. Come see it at the rally in May, it looks better than brand new.3 points
-
Eggcited for you!2 points
-
Nice number and interesting name! It won't be long now. Bill2 points
-
The issue may have been that there were no double-pane swing out RV windows at first. Now they are available and and are in use by some of the other fiberglass RV manufacturers. Maybe they'll be included in the re-design of the Elite...? I was trying to figure out some sort of homemade shield to temporarily protect the screens from rain but @Minnesota Oli far outclassed anything I could have come up with. I'd be willing to pay a pretty penny for something like that.2 points
-
Great modification! After buying Ollie, we missed our previous (SOB) camper's Dometic Seitz type hinged windows that could be open while raining. Always wished Oliver would use this style of window. Keeping the windows open during the rain is a great benefit. Nice Job!2 points
-
Nice trip with a fair number of miles and stops. Glad all went well. If you were using that little bubble level that is in the front jack to level the camper, note that it requires readjustment from time to time. This is done by getting the camper level (using another leveling device) and then turning the three screws on top of the front jack in order to get the bubble in the exact center. Bill2 points
-
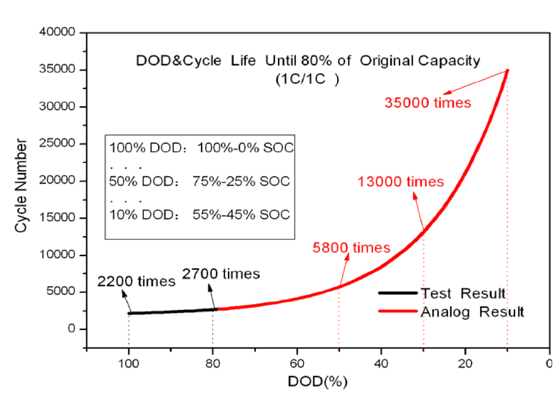
There have been numerous posts in this forum about Oliver’s lithium battery systems—about their usefulness, limitations, and value with respect to cost. Despite reasonable arguments against it, a number of us have purchased the lithium package. Reasons for purchasing the option have included the ability to run the air conditioner (A/C) for short durations (like at highway rest stops), greater usable energy (more boondocking in cloudy weather without needing a generator), faster charging, and longer battery life. This post summarizes things I’ve learned over the last 6 months about the Xantrex/Lithium/Zamp system. This post might also be titled “Things I Wish I’d Known from the Start.” This summary is a work in progress. Hopefully, with your corrections and additions, this thread will be of use to others that have purchased the Lithionics option or are considering doing so. At the time of this writing, manuals and other information for the Lithionics batteries are in the Service Center Knowledge Base — see links at the end of this post. I assume at some point Lithionics information will be compiled with all of the other trailer manuals in Oliver University. Battery State of Charge A key component of the Lithionics system is the app that lets users monitor State of Charge (SOC) and voltage (see links below). The reliability of the SOC values (which describes the amount of energy remaining in the battery) depends on (1) maintaining SOC calibration and having (2) up-to-date Lithionics firmware. The SOC should be near 100% at 13.6 volts, and about 50% (+/- about 10%) at 13.2 volts. If this is not what you’re seeing on the Zamp controller, Xantrex remote, or Lithionics battery app, then something’s wrong. By way of example, a couple times we’ve experienced the SOC readings of 60% when the batteries were dead -- not good. Note that the voltage reading on the app while there is a load on the system (e.g., electric heater) is different than when there is no load; the “resting” voltage may be higher. SOC Calibration The SOC requires periodic calibration. According to the manual for the 130 Ah batteries, the SOC can be calibrated simply by charging the batteries to 14.4 volts. The manual also states that fully charging the batteries to 14.4 volts should be done at least once every two weeks for battery life. Get the 130-Ah battery manual from Lithionics using the links below; at the time of this writing, Oliver has the incorrect manual posted in the Knowledge Base). When charging with shore power, it is not always apparent that the batteries have reached 14.4 volts, because when charging, the batteries only stay at ~14.4 volts for a short while before dropping back to about 13.6 volts. You can verify that batteries have reached 14.4 volts by monitoring battery voltage using the Lithionics app during a charging event. If you are unsure that the batteries are reaching 14.4 volts, you can at least confirm that the Xantrex charger/inverter is set to charge to at least 14.4 volts in the Xantrex app (https://support.olivertraveltrailers.com/portal/en/kb/articles/xantrex-remote-bluetooth-pair-operation) and, under Settings, check the custom absorption voltage. Ours came from the factory set at 14.6 volts, which is sufficiently high to get the batteries to 14.4 volts. Lithionics Firmware At least some of us that picked up our trailers in spring or early summer have batteries with outdated firmware. As I understand from Lithionics, more recent firmware versions have an improved SOC algorithm (our initial SOC readings were unreliable). You can check firmware version with the Lithionics app by clicking on a battery, then clicking on the settings “sprocket” in the upper right side, and then clicking on firmware. Our battery came with firmware version 1.0.05; I’ve recently updated to 1.0.07 by clicking on flash firmware. This has to be done with your phone in close proximity to the battery, and has to be done separately for each battery. Updating firmware comes with a “…this is a critical operation…” warning; you might want to check with Oliver or Lithionics if you have any questions about doing this. Has updating firmware improved our SOC readings? I’m not sure yet, but I think so. So far, the readings seem more reliable, but I’m still testing. SOC Calibration by Cycling A Lithionics rep told me that the SOC can be calibrated by “cycling” the batteries, and that this should be done every two months. Cycling consists of discharging the batteries to reserve voltage (e.g., ~12.1 volts) and then charging to 14.4 volts. However, the rep could not point to written documentation supporting this form of calibration. As the batteries support more partial cycles than full cycles (see graph below), calibrating by simply charging to 14.4 volts (assuming this effectively calibrates the SOC) seems better for battery life. Lithionics batteries will not charge from tow vehicle The standard 7-pin connection from tow vehicle to trailer cannot be used for charging the Lithionics batteries. Charging the batteries from the TV requires a DC to DC charger, which is an aftermarket installation. For more discussion on this, search for John Davies’ Redarc DC-to-DC charger installation description. Batteries Turn Off Twice now one or two of the three 130-Ah batteries have turned off when reaching low voltage (which happened because we were relying on incorrect SOC values). The SOC readings themselves looked OK, but the voltage did not correspond with SOC. The battery State in the Lithionics app reads “Off” for each battery when it is off. There is no flag on the Zamp or Xantrex control panel that alert the user to one or two batteries being off. The lesson (at least for me): monitor all three batteries, not just one, and note the Current, Power, State, and Status Code settings. If one or more batteries are off, turn the battery(ies) back on, and fully charge to 14.4 volts. Inverter Noise The Xantrex charger/inverter can be noisy charging the batteries with shore power (I’ve measured 60-64 decibels in the cabin when batteries are charging, and about 72 decibels adjacent to the inverter). The noise comes from (1) the charger/inverter fan and (2) the way in which the inverter is mounted (the fiberglass wall to which the inverter is mounted propagates noise into the cabin). The noise can be masked by turning on the A/C. Alternatively, the noise level can be reduced somewhat by lowering the charger current. In the Xantrex app, go to settings, and change the Charger Current from, for example, 100 amps to 30 amps. This will reduce fan noise. It will obviously take longer to charge the batteries with lower current. If you would like to be connected to shore power (to run an electric heater or the A/C, for example), but not charge the batteries (to avoid keeping them fully charged for long periods of time, or to reduce inverter noise) you can set the charger ignition control in the Xantrex app settings to “auto-on” (thanks to NCEagle for figuring this one out). In this mode shore power energizes the 110 outlets, the A/C, and the fridge, but does not charge the batteries. Turn the charger ignition control “off” to resume charging batteries with shore power. There are likely ways of re-mounting the inverter so that noise does not propagate into the cabin, with either a different mounting location or perhaps mounts using rubber bushings. Has anyone tried this yet? Xantrex Communication Errors Too often, I’ve gotten “Code 20” communication errors on the Xantrex remote panel. This can be resolved by pushing the red button on the 300A breaker under the streetside bed, waiting for at least 30 minutes, and then pressing in the little red flag on the breaker. Yes, this is a pain (I wish this breaker were more accessible), but it usually resolves the issue. Leaving the Xantrex inverter on battery mode for 25 hours or more will result in the Code 20 communication error. The time limit can be changed in the Xantrex app, but cannot be lengthened to more than 25 hours. As long as the inverter has not timed out, turning the inverter off and then on again at the remote panel resets the 25-hour time-limit clock. Battery Storage Lithionics provides guidance for storing the lithium batteries (see link below). Long term storage can include lowering the SOC to about 50%. Discharging to the appropriate SOC can be accomplished by turning on an electrical load (e.g., A/C or space heater) while in battery mode and monitoring frequently. Theoretically one could set the inverter cutoff voltage (in the inverter app, under settings), to something like 13.2 volts, but the highest cutoff-voltage option is 12.8 volts. Lithionics recommends keeping a log of SOC and voltage readings prior to and after storage for warranty purposes. ------------------------ Hope this helps. Again, please correct any errors that you see, and please add your observations and tips. Fritz ------------------------------------------ Relevant Links Lithionics battery app: https://support.olivertraveltrailers.com/portal/api/kbArticles/386680000012415191/locale/en/attachments/lpqvx861bbc9c842d48f7995281b07d0a193d/content?portalId=edbsnfe5dceb1ade7571879ff200cb63e14a94b62f48e3338c31a6401acd00130b0bc&inline=true). Lithionics battery manual: At the time of this writing, the Oliver Knowledge Base has links to Lithionics manuals for 125 Ah and 320 Ah batteries. However, our LE2 has three 130 Ah batteries as part of the 390-Ah package, and the manuals for the 125-AH batteries and the 130-Ah batteries are not the same. A manual for the 130 Ah battery can be found on the Lithionics website: https://lithionicsbattery.com/wp-content/uploads/2018/12/12V130-G31LRBM8-Battery-User-Guide-R1.pdf. Lithionics Storage Procedure https://support.olivertraveltrailers.com/portal/api/kbArticles/386680000012415191/locale/en/attachments/lrotz3ebee5a7020f42a58eb0d4db18a41356/content?portalId=edbsnfe5dceb1ade7571879ff200cb63e14a94b62f48e3338c31a6401acd00130b0bc&inline=true Lithionics FAQs https://support.olivertraveltrailers.com/portal/api/kbArticles/386680000012415191/locale/en/attachments/lrotz0edc34bc92ef4dce941bbb7f3f2d89db/content?portalId=edbsnfe5dceb1ade7571879ff200cb63e14a94b62f48e3338c31a6401acd00130b0bc&inline=true Xantrex Remote Bluetooth Pairing and Operation https://support.olivertraveltrailers.com/portal/en/kb/articles/xantrex-remote-bluetooth-pair-operation
 1 point
 -
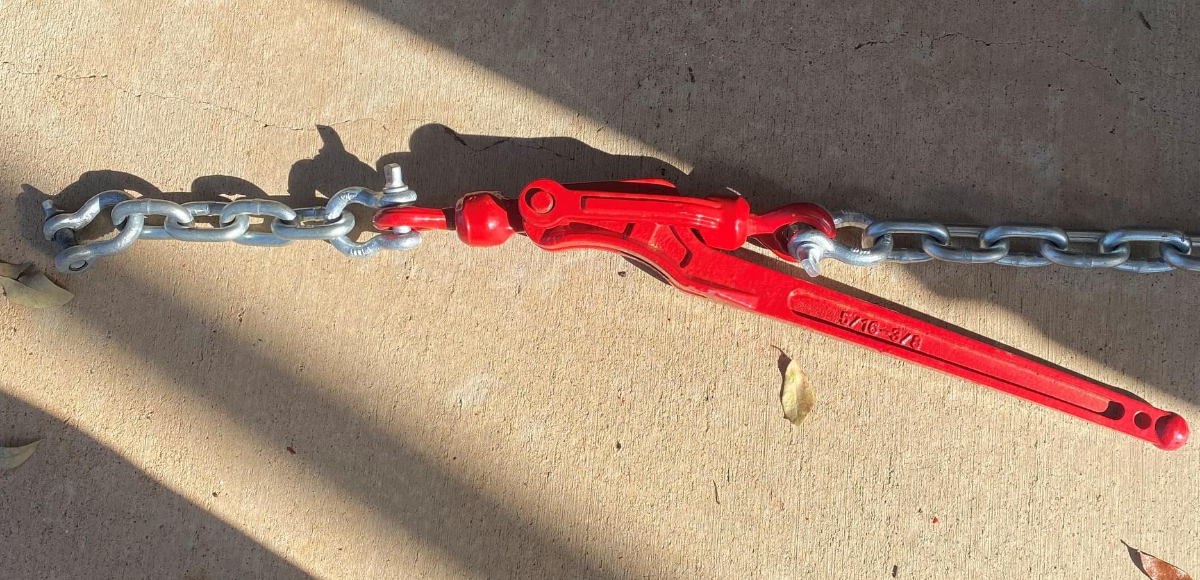
A while back, I had an idea for a hack to my Andersen Hitch to simplify hookup. The modification involves putting a chain binder in the two chains which adds slack in the chain when doing the hookup. If you're interested in it's operation, I attached a brief video explaining.
1 point
-
Eggceptional!1 point
-
I would start by charging the batteries until they go into float. While charging you will see voltage go up to around 14.5 then start to drop back down to round 13.5. Once you are in float mode I would give the cells a chance to balance. You will see a status code on the Lithionics app if the battery cells are balancing. Then apply a load to the system like a small space heater. Allow this to run while periodic checking the SOC for each battery. They should be relatively close. You can allow the batteries to drop down to their Low voltage cutoff which is controlled by the BMS. You might have to check the inverter settings before doing this since the inverter also has a setting that will stop discharging the batteries at a preset voltage. If I remember correctly mine was set higher than the BMS setting. Also be aware that the batteries will not all shut off at once so you have to make sure the load you are using doesn’t stress the system when you get down to one battery. John1 point
-
Yep, hope it's a consideration in the re-design efforts. Minnesota Oli did a fine modification, and if made available I would want a set, too.1 point
-
Very nice, are they permanently installed? How much do they weigh? 🙂 (edit: guess I should have read the intro, I see they can be removed. I jumped right to the video after seeing the picture and didn't even read the description lol. Very tasteful and attractive.) John1 point
-
Hello, We have a 2022 Oliver Elite II that is scheduled for delivery in mid-august. Oliver gave us a military discount of $1,000. To get the discount all I had to do was to email them a copy of my DD-214. Hope this helps answer that question.1 point
-
Count us in as an interested party if you decide to sell these. We've been looking for something like this. Brilliant!1 point
-
Very nice! I’ve been considering something similar. Boats often have rain guards above porthole windows but I haven’t found any long enough for the Ollie windows except for the Ollie bathroom window. So now I’m looking at re-purposing automotive sunroof wind deflectors to use as window rain guards on the Ollie, if I can find ones long enough for the Ollie windows.
1 point
-
Very impressive piece of engineering to address a complex problem. Do you have plans to produce these for sale to other OTT LEII owners? I am interested.1 point
-
"But I still do the math and wonder how far I can travel by other means on $150+k (tow vehicle + Oliver). Not to mentioned the fuel, insurance, maintenance costs (+$10/yr?)." I wrestled with that also. I did order an Oliver for November delivery as the places that appeal to me don't have hotels near them. RV parks don't appeal to me. Established campgrounds also aren't appealing. This trailer will be best suited to BLM land, COE camping areas, forest service spots. Basically I can go where most can't. I totally understand your reasoning too.1 point
-
Oliver’s are now out of our price range too… so I’m thinking I’ll keep #135 as old as it is. It still feels new. Oliver won’t have any problem selling all the trailers they can make. Mike1 point
-
My comment about the Zamp controller in the original post in this thread is incorrect. The Zamp controller does charge the batteries up 14.4 volts. Moderators: I tried to modify the original November 4 post, but could not find the "edit" option. Could one of you please show me how to correct the error in the original post?1 point
-
I received this question as a private message (PM), but am posting it here as others may benefit from the discussion, or wish to weigh in... "Does the inverter automatically shut off when the batteries reach their full charge state? If so how would I know this? Is there any setting that would tell me this? Since our fan keeps running I am thinking in my head that the inverter is still trying to charge the batteries... I am thinking that the inverter is still drawing some power from our batteries when we are disconnected from shore power if that is at all possible. Maybe that is why our batteries are draining so fast with nothing on in the RV?" My understanding (which is very far from complete, and may in fact be flat-out wrong) is that the Xantrex unit really has two components: (1) a charging function and (2) an inverting function. When connected to shore power, the Xantrex unit is on, but its sole function is charging the batteries. The Xantrex unit is not inverting (changing 12V current to 110 volts) because it doesn't need to; the 110V outlets (and A/C, microwave, etc) are powered with shore power. The uppermost "esc" light on the remote panel is lit when the trailer is plugged into shore power and the Xantrex unit is set up to charge. The only way that I know to really "turn off" the Xantrex entirely is to trip the 300A breaker under the streetside bed. When in charge mode (i.e., plugged in to shore power) the Xantrex fan is running while charging. When the batteries are full the fan kicks on for about a minute every 15 minutes or so. When the batteries are full (or as full as you want them to be), you can set the charger ignition control in the Xantrex app to "auto-on" (again, thanks to NCEagle for this tip). In this mode the 110 outlets, the A/C, and the fridge get electricity from shore power, but the Xantrex unit is not charging the batteries. The inverter portion of the Xantrex unit is (or should be) active only when the trailer is not connected to shore power and the inverter is turned on (i.e., the button on the remote inverter panel is pressed in). The "bat" light on the remote panel is lit when the inverter is on. The Xantrex fan may run briefly when the inverter is first turned on (I suppose the fan could also run if the inverter is inverting to meet a large load). If the batteries are draining overnight there is likely another problem. Here are some ideas for troubleshooting the problem: Update the battery firmware to version 1.0.07 if you have not yet done so. In my experience, the SOC is completely unreliable if this is not done. Unreliable SOC might lead you to think there is a drain when there really is not. If updating the firmware, be sure to fully charge the batteries to 14.4 volts afterward to calibrate the SOC. When disconnected from shore power, turn off the solar (by turning off the the knob at the front of the streetside bed upper cabinet), turn off all lights, fans (including the toilet fan), etc., and check to see if there is a load on the batteries by checking the Lithionics app (2 upper right boxes below the SOC). The current and power should both be zero. Then... With updated firmware (and solar off, and no obvious load on the batteries), record the SOC and battery voltage on the Lithionics app. Let the trailer sit overnight and check again. The batteries should have a SOC and voltage very close to where you left it. If not, then... Turn off the inverter by tripping the 300 amp breaker under the streetside bed and letting the trailer sit overnight again. The SOC and battery voltage after a day or so should be the same as when you started the test. If this is the case, then there may be something in the inverter. If this is not the case, then there may be some other phantom load that is drawing down the batteries. (smoke, propane, etc detectors will draw down the batteries some, but it should not be very much over 24 hours). Record the SOC and battery voltage. Turn off each of the 3 batteries (button on top of the battery) and let them sit for a day or so. The SOC and battery voltages should be the same as when you started the test. This should confirm that the problem is not in the batteries. Next, .... Call Oliver. Any suggestions of mine are those of a well-meaning amateur, not to be confused with those of a real professional. They really should be able to help with this stuff; hopefully the results from some of the above-described steps will help them. Good luck!1 point
-
Thank you, John. You and others have set a very high standard!1 point
-
John Davies Wrote: " Use Redline CV2 and repack every 12K to 15K miles. There is NO need to repack more often if you keep an eye on bearing temperatures. .... Use high quality parts, and a high quality lubricant, no worries. .... You do need to recheck your hub bearing play after say 1000 miles, ,,,,,,,you may need to tighten one more slot on the adjuster nut. ." I have run 21,560 Ollie miles in the past four seasons. As a Professional Mechanical Engineer and amateur wrench turner, here is what I have found to work well ... I.E. zero issues on the road during the past four seasons with my 2018 OE2 bearings: I use Redline CV2. However Mobile 1 synthetic is likely just as good, and some may say better. All I know that after four cross USA trips in the last four years, the JD recommended CV2 works just fine for me. My Chinese Dexter bearings "bothered" me as it does many new owners. I over-serviced mine annually (new grease and seals). The Dexter bearings and National seals ran 16,000 miles with no issues. But this was my personal limit of comfort for them. When I changed them at the beginning of my fourth (May 2021) season , I had a full set of Timken bearings and two sets of National ready for use depending on what I found upon disassembly. I was rewarded in doing so as they were ready to be replaced. My recommendation is to keep track of your trailer miles, service the Dexter's annually or every 5,000 miles, and be ready to replace them with better bearings and seals based upon what you see. But have the Timken's and National's in hand by 10,000 miles for sure. Buy real Timken and National seals, a bearing punch, and extra CV2 or Mobile 1 synthetic grease. When you get in the 10 to 15K zone, replace the bearings with Timken's. You will travel confident knowing you will likely not have to do a bearing/seal job on the side of the road. SAVE the best two old bearings, clean them up well, grease them well, and put them into a plastic jar. Wrap them in Sarane Wrap if you like, but keep two just in case. Have your grease and gun with you at all times. Basically free insurance. I recommend that once you upgrade t the Temkin's and Seals, you can stretch out the service interval to 10,000 miles or so. Just always have four spare seals available. I recommend replacing the Timken's every 50,000 miles just for grins. Get a digital IR hand held temperature meter. Just easy to stop and zap the temperature of your hubs. Cheap insurance for bearings or brake issues. The ONE item that I have a recommendation that is contrary with John's is rechecking the bearing "play". I recommend stopping after just 100 miles and rechecking your bearing play. I found three of my four too loose after only 200 miles. Grease the EZ Flex zerks every 5,000 miles or annually! Guys, this is about the 4th time in four years that this subject has been asked and answered. Maybe if a moderator has some spare time this winter, all these threads can be consolidated and we can put this subject to bed.....at least until the next crop of owners joins our family. 🙂 For the new owners, here is a nice hand-out to have when you are working your wheel bearings. Geronimo John +++++++++++++++++++++++++++++++++++++++++++++++++++++++++++++++++++++++++++++++
1 point
-
What do you mean by comparable? Phil Wood waterproof grease has been around for decades, the recipe is secret but it is petroleum based. It is used on bicycle ball and roller bearings mostly, where it excels at staying put in extreme conditions (doesn’t wash out). CV-2 is a full synthetic, I think it is better but the main reason I would choose it over PW is you can’t buy that grease in containers larger than 3 ounces. Plus the price per ounce of of PW is way way higher. BTW I carry my hitch spares and tools in a steel ammo can, there is a 3 ounce tube of Phil Wood grease at the very top, I put a smear on the ball every other time I connect. I do like it. I also carry a can of brake cleaner to remove it from the ball and my finger…. John Davies Spokane WA1 point
-
If anyone wants to make the block I made, here's the list of pieces you'd need to order: #3075 Extrusion, 24" #4303 Bracket, 4 pieces #4302 Bracket, 2 pieces #3320 Bolt Assembly, 14 pieces You'll also need some stainless ¼" or 5/16" bolts to fix the block to the hull. I think most can be 1" or 1.25" long but you'll need two 3" bolts for the two vertical ones that go through the bed extension. I used lock nuts and large fender washers to spread the load against the fiberglass. I also cut off all the bolt ends around the bed side with a dremel and cutoff disk and filed them smooth so not to damage the mattress or cushions.1 point
-
My sentiments exactly! We bought our 2019 Elite II in fall 2020 and just calculated ours as well. We would be spending a little over $26,000 more if we ordered what we have as a 2023 model. SO glad we were able to find ours and purchase it when we did. As an added bonus, it came with some things I like that are no longer available!0 points
-
I bought my (nearly new with only 6000 miles on it) 2018 Elite II in 2020. I think I paid about what he paid for the trailer new. Believe it or not, the 2023 Elite II with similar extra's would cost me $24,375. more ( I double checked my numbers a second time) then what I paid. Glad I bought when I did, that I bought a slightly used Ollie and that I found a great trailer at a nice price.0 points
-
Here is the 2023 Elite 2 Build Sheet. I have a very well equipped 2021 Elite 2. I ran the numbers and the cost difference between my 2021 Elite 2vs a similarly equipped 2023 Elite 2 (after allowing for the items that are now standard on the 2023 vs my 2021) is approx. $15,500. 2023-Elite2-Build-Sheet.pdf0 points


-
Recent Achievements
-


")
")

")


