Leaderboard


Popular Content
Showing content with the highest reputation on 04/05/2022 in all areas
-
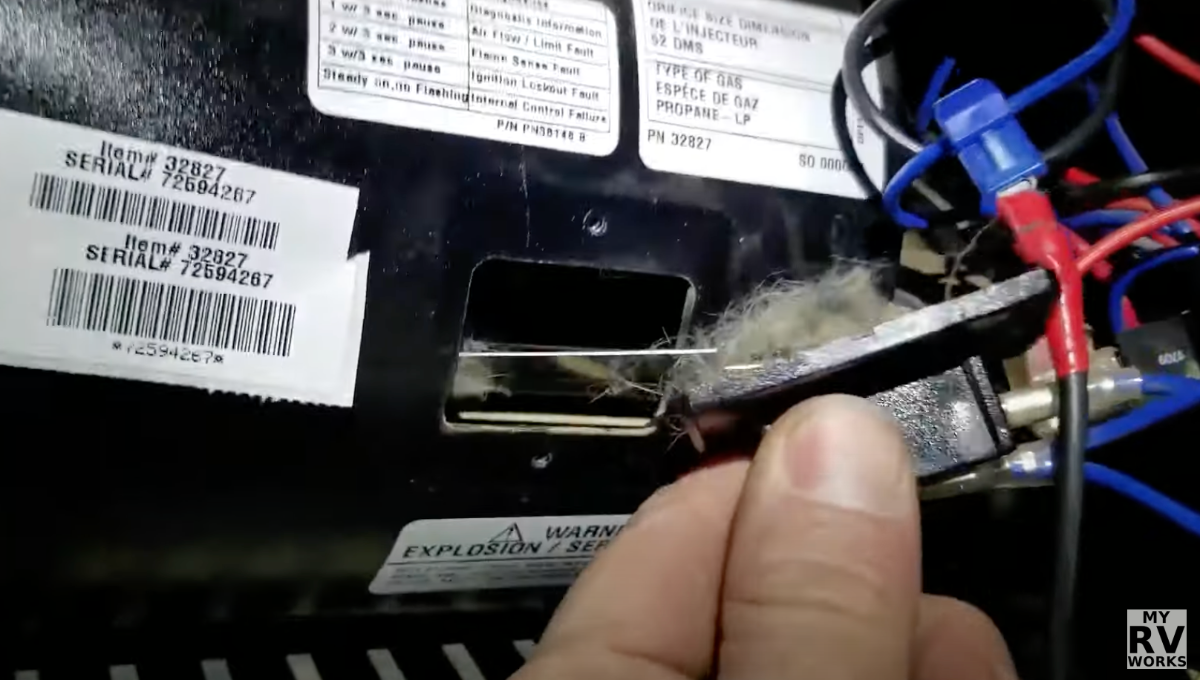
Here's how to check your sail switch....the outside panel of the furnace comes off with a few screws....the video shows what's inside (rotated 90 from how ours are mounted.) Sail Switch with pet hair shown below...but could be just dirty. The video :
 5 points
 -
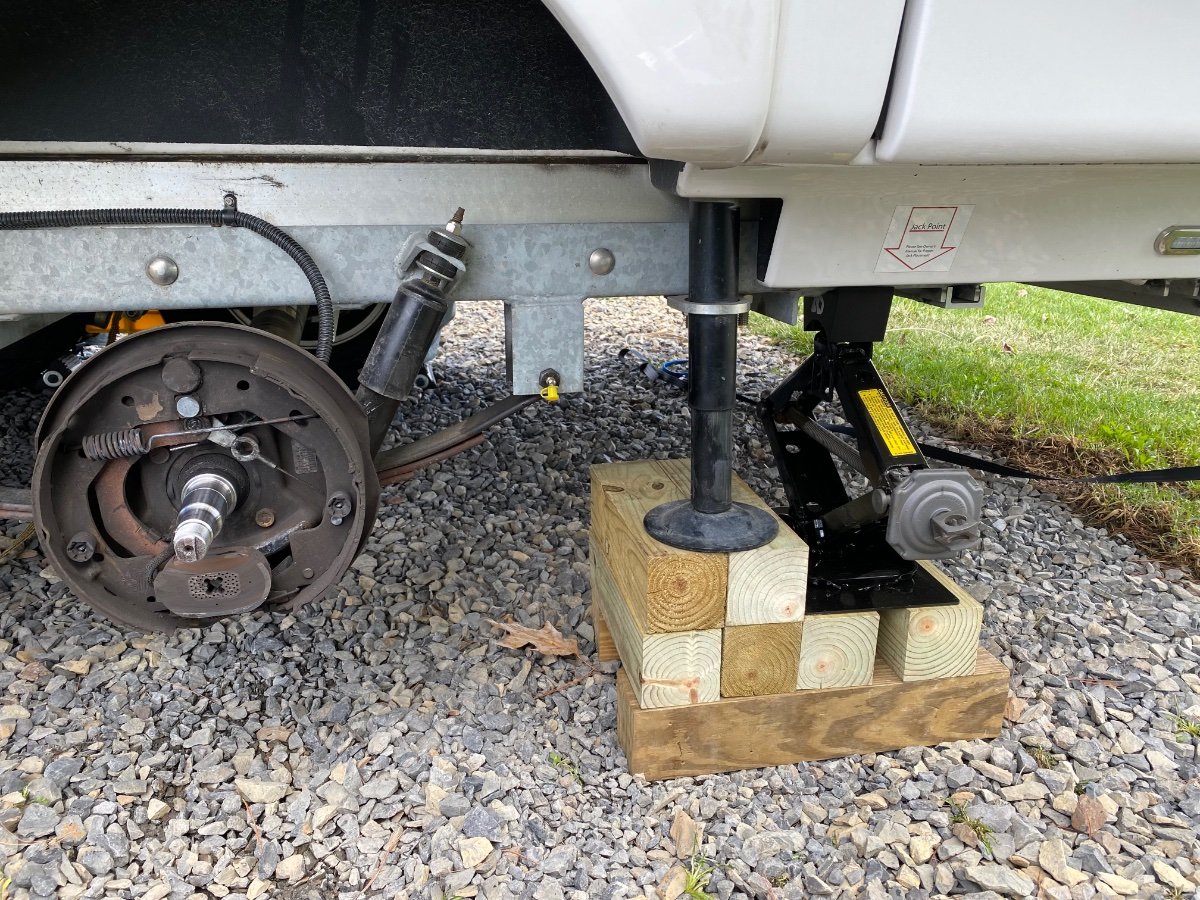
I just use a good heavy duty scissor jack on some 4”x4” cribbing to lift the trailer (but mine does have the marked jack points on the steel subframe) and then after raising the trailer I put the stabilizer down just as a backup. Chocks under the tires on the opposite side of course. Doing my wheel bearing re-packing now.
5 points
-
It's OK. They collect them when they fall out of the trees on cold days in Florida.5 points
-
We purchased Ollie used and initially had two leaks, one coming in at the top of the dinette window from the exterior light above the window and one coming in from the rear Oliver sign lens leaking on the starboard bed from the rear window. Removed the exterior light fixture over the dinette window, then resealed leaving a drain in the bottom of the "old style" light fixture and have not had leaks there for years. Had to remove the rear Oliver sign lens and reseal stopping that leak for years, too. In both cases the water traveled down from exterior leak between inner & outer hulls coming out at the windows. Hope this helps!4 points
-
John, Useful advice on dealing with the drawer releases. However, I suggest NOT glueing the bottoms of the drawers to the sides. The drawer bottoms typically rest in a groove in the drawer frame and are purposely NOT glued to permit movement of the wood as temperature and more importantly, humidity vary.4 points
-
We had leaks appearing at the bed window frames (sides). Turned out to be the lights on the outside. The light housing had an outer seal, but the small hole for the wires was not caulked, nor were the screws holding the housing to the trailer. The trailer wall tips back just enough to let water flow back into the screw holes and then inside, down the wall and out the window frame. Enough to soak the bedding, surprisingly. Once the screw holes were sealed, no more leaks.3 points
-
The first step is to make sure it is actually the windows. A roof leak can let water run down inside the air gap between inner and outer hulls and appear as a window leak. John Davies Spokane WA3 points
-
My God! How many Lizards would it take to insulate an Oliver LE2?3 points
-
The trim lock or ez rv gutters is most helpful to keep weepholes from being "overpowered" in heavy rain. They don't replace proper installation and caulking, but they do "help" to direct rain away from the windows and weepholes. I'm surprised both sides' windows show "leaks." Over the years,for us, it's usually been only one side that has an issue. I usually look to the Oliver third tail light as first culprit, but not sure in your case. That typically appears as a "leak" in the rear window, and some moisturein the attic. Much depends on how you are set up, side to side, front to back levels. A tiny bubble/gap in caulk can create a significant leak in a downpour. The fiberglass hull flexes as it goes down the road, and can stretch or break caulk. Since you say you have leaks on both sides, I'd probably be looking at rooftop, personally. Possibly ac. Are the bolts to the ac torqued properly? If you typically camp nose high, a bit, as we do, could be fan, as well. I like to use duct tape to figure out where a leak has originated. Any penetration, window or roof, can be the culprit. Our habit is to seal a suspected tiny leak with a strip of tape, and see if it helps in the next storm. If it does not, move on to the next likely culprit penetration. And, here's another. If you lift the leveling jacks higher on one side, does the leak disappear on that side, and only show on the low side? If so, it's probably a roof penetration, not a window. Double hull can make it more difficult to "think like a raindrop, " as a roofer friend told me years ago. Water travels hidden, but always find the lower spot. I suspect you opened a service ticket before, but please do so, again, anyway. It only helps Oliver get better, even if you find the cause yourself.2 points
-
My first thought is a bad sail switch. Air from the fan blows on the sail switch, which tells the controller that air is moving. That in turn tells it that it's OK to start the ignitor to light the flame. After the fan starts can you hear the ignitor clicking? Fan running but no ignitor makes me suspect the sail switch. OTOH, if you hear the ignitor clicking but no flame kick in, I'd suspect a propane problem.2 points
-
Hi Charlie, Sorry to hear! Is your camper new? We first stopped at a location where a cold front was moving through. It rained and then snowed like no tomorrow and then temps plummeted that night. A day later when things started thawing out we experienced a leak on the side window by the galley. This was a brand new unit so I knew the window tracks were clean but I checked them anyway. Nothing there. I suspect the water from the rain froze in the tracks and blocked the weep holes and then came the leak. After all was thawed and the weeps holes were clear, the leak stopped and has not returned since.... 2 1/2 months now. Best of luck 🙂 John2 points
-
Yeah, the Andersen rapid jack or EZ leveler will work for changing a flat tire, but only on older Oliver Elite IIs without the Dexter E-Z flex cushioned dual axle system. On later Olivers with the Dexter E-Z flex dual axle, there is so much articulation in the suspension linkage that if you drive one wheel up on the rapid jack, the other wheel on that same side will stay on the ground. There have been a few posts about this on the Oliver Facebook page. https://www.facebook.com/groups/OllieOwners/permalink/540818246323301/ And what is it with all these companies that use EZ in their product names!2 points
-
I did receive a timely response from Jason Essary: "The preferred method for a dual axle camper is to use an EZ Jack tire chock. If you do not have an EZ jack chock then locate the closest frame point, to the wheel that will be removed, and place cribbing between the frame & jack so that the pressure is spread across the cribbing" I do in fact have the Andersen Rapid Jack from my Casita days in addition to the smaller Andersen leveler which I use for the front tire for side to side leveling on the ILOVHER. I guess I was NOT thinking! Makes perfect sense for roadside flats or bearing failures (which I hope doesn't ever happen to me)..DUH!2 points
-
My personal opinion: The fridge outlet is put in place when the lower half of the outer hull is wired (in compliance with the RV code) to make it very fast and easy for the tech to connect the fridge when that is installed later. It would take much longer to connect a hard wired junction box and install its cover, perhaps another ten to fifteen minutes. That adds up in production costs. This is the same reason they use regular solid core “house wire” and outlets with “back stab” connections which are flaky and unreliable even in the stationary walls of your home…. . Those make it fast and simple for relatively untrained people to install electrical components, compared to the much higher quality (and much more expensive) marine grade multi-strand wire ….https://www.amazon.com/10-AWG-Triplex-Marine-Wire/dp/B06X6L6W2C ….. and crimped end terminals, which IMHO “should” be used in Ollies. These are used in those high end expedition vehicle$; no way would Earth Roamer select house wire…. Oliver would either need to just absorb that extra production cost or bump up the price again to compensate. Improvements like this j-box change are “death by a thousand cuts” to a company’s profits. They have to weigh that against customer satisfaction, future warranty costs, and the very remote likelihood of a lawsuit from somebody who has a lethal accident fumbling around back there with wet hands…. I think they are much more likely to switch to a GFCI outlet there instead of a waterproof solution like mine. That would probably cost less in the long run than the increased installation labor needed to hardwire a j-box. It is also a much easier solution for retrofitting earlier hulls if they ever decide to issue a Technical Bulletin. My OPINION. 😀 John Davies Spokane WA2 points
-
I asked for $500 when I sold my 2017 Dometic AC unit, settled for offer of $450. Note that RecPro warned that warranty would be voided if easy start was installed. I took the chance.2 points
-
No impact to travel. Potential increase in Ramen purchases. 🤣2 points
-
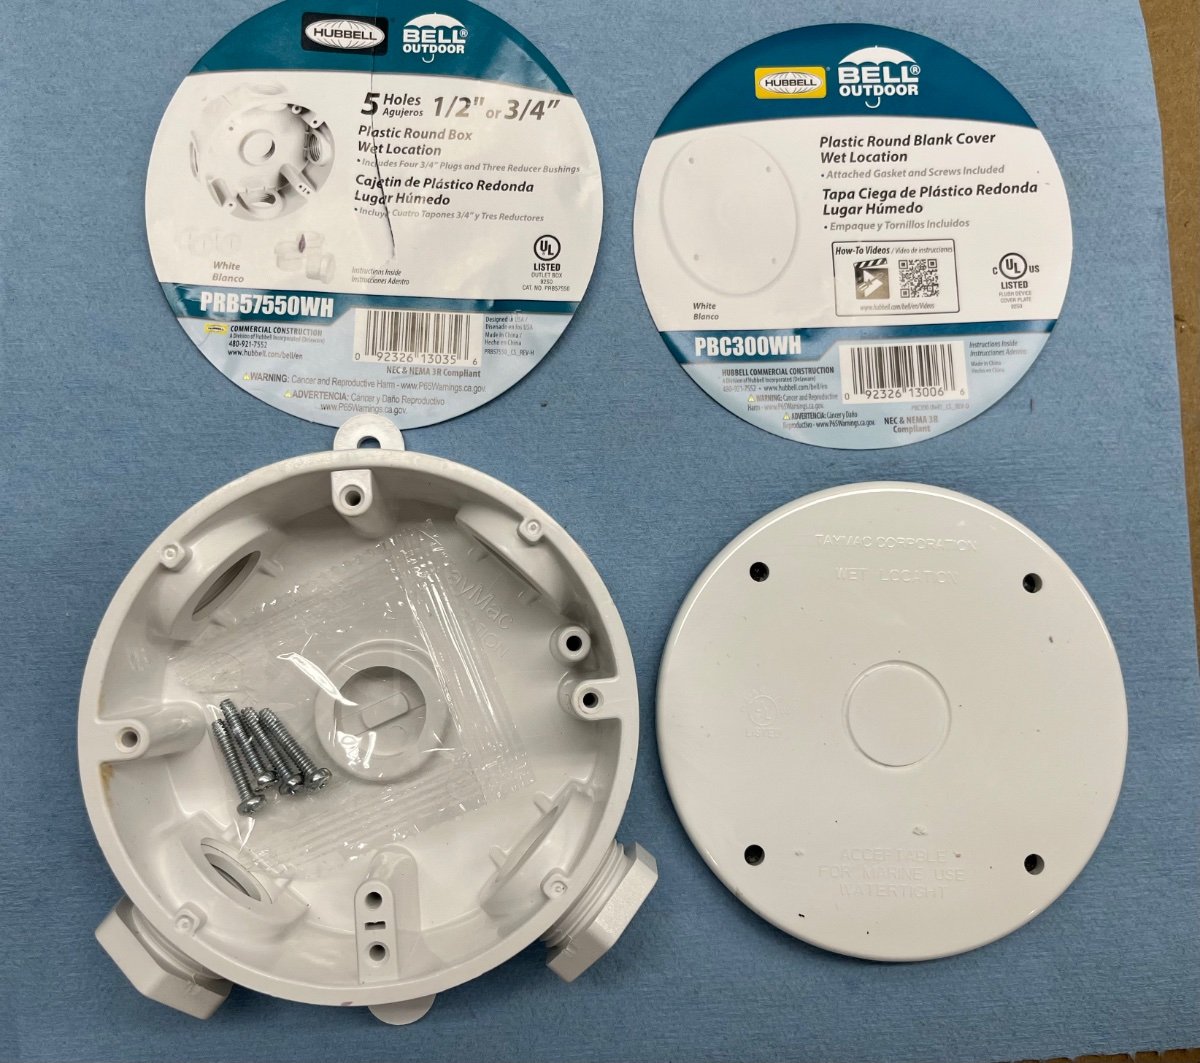
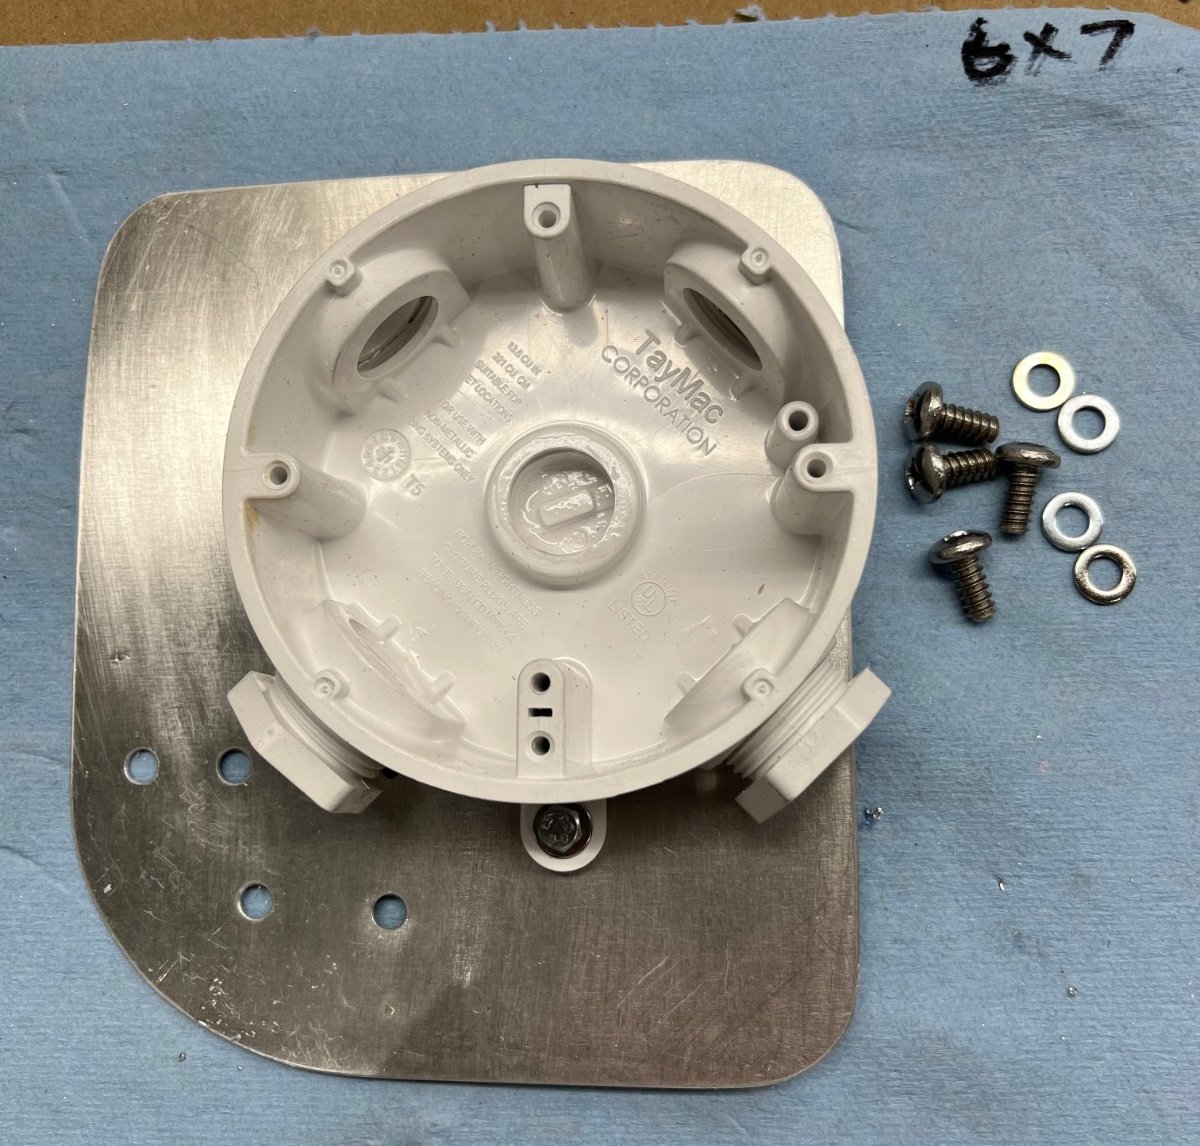
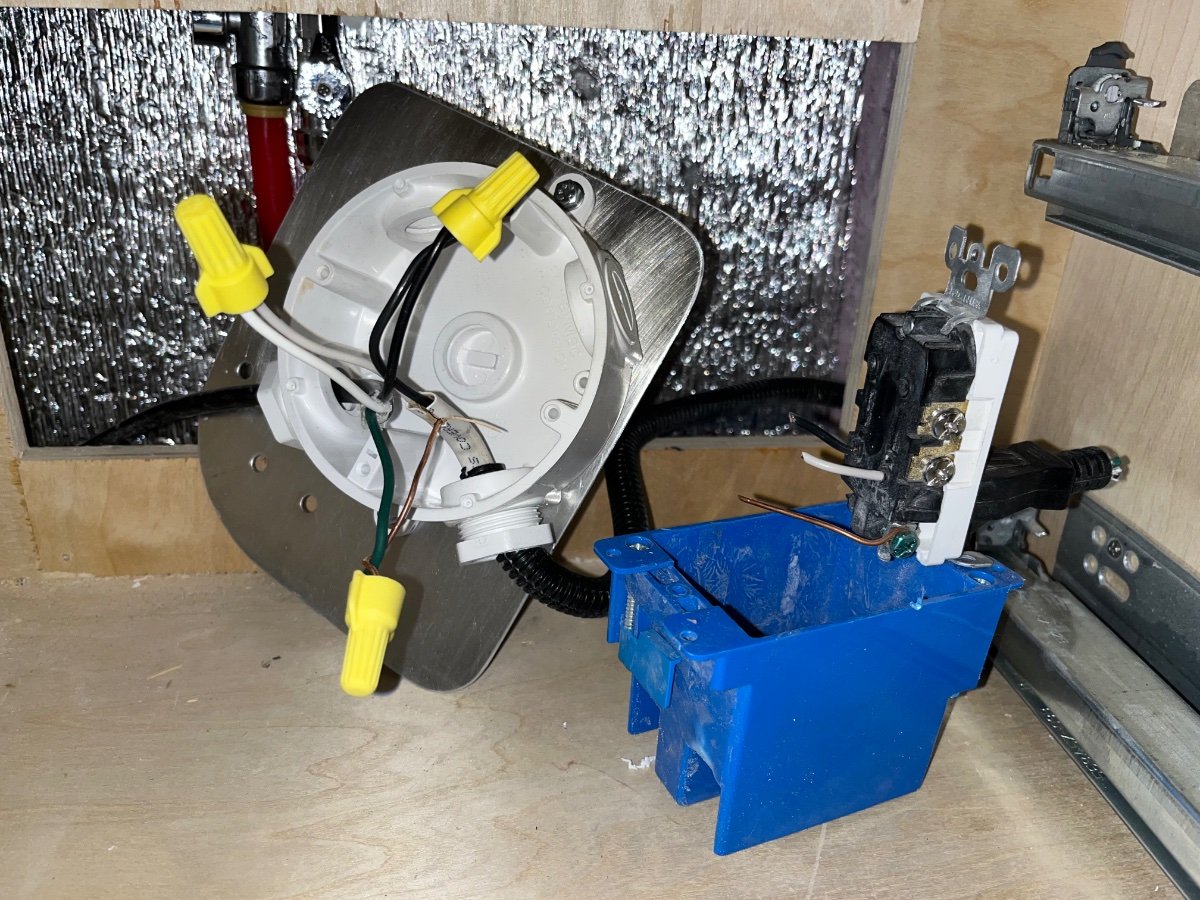
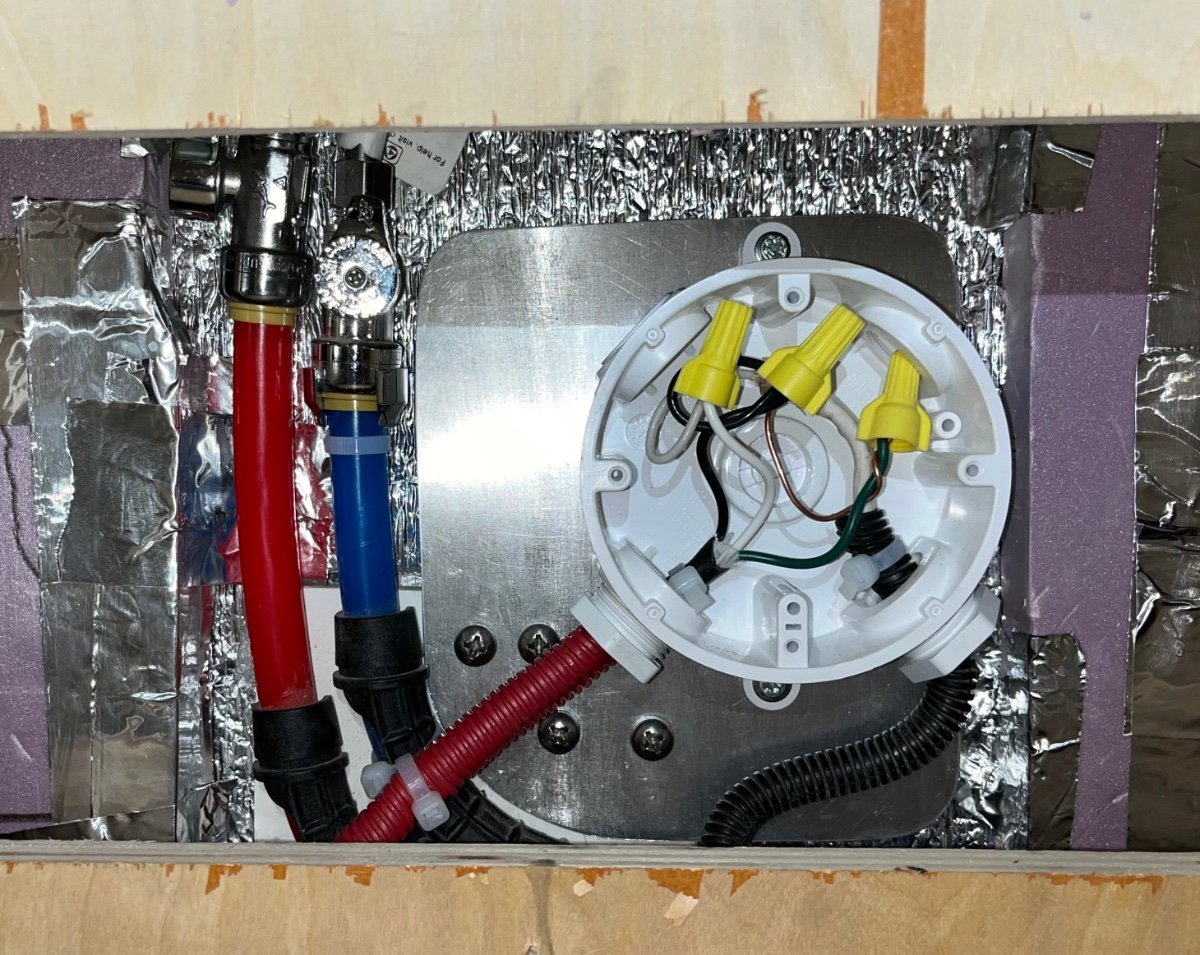
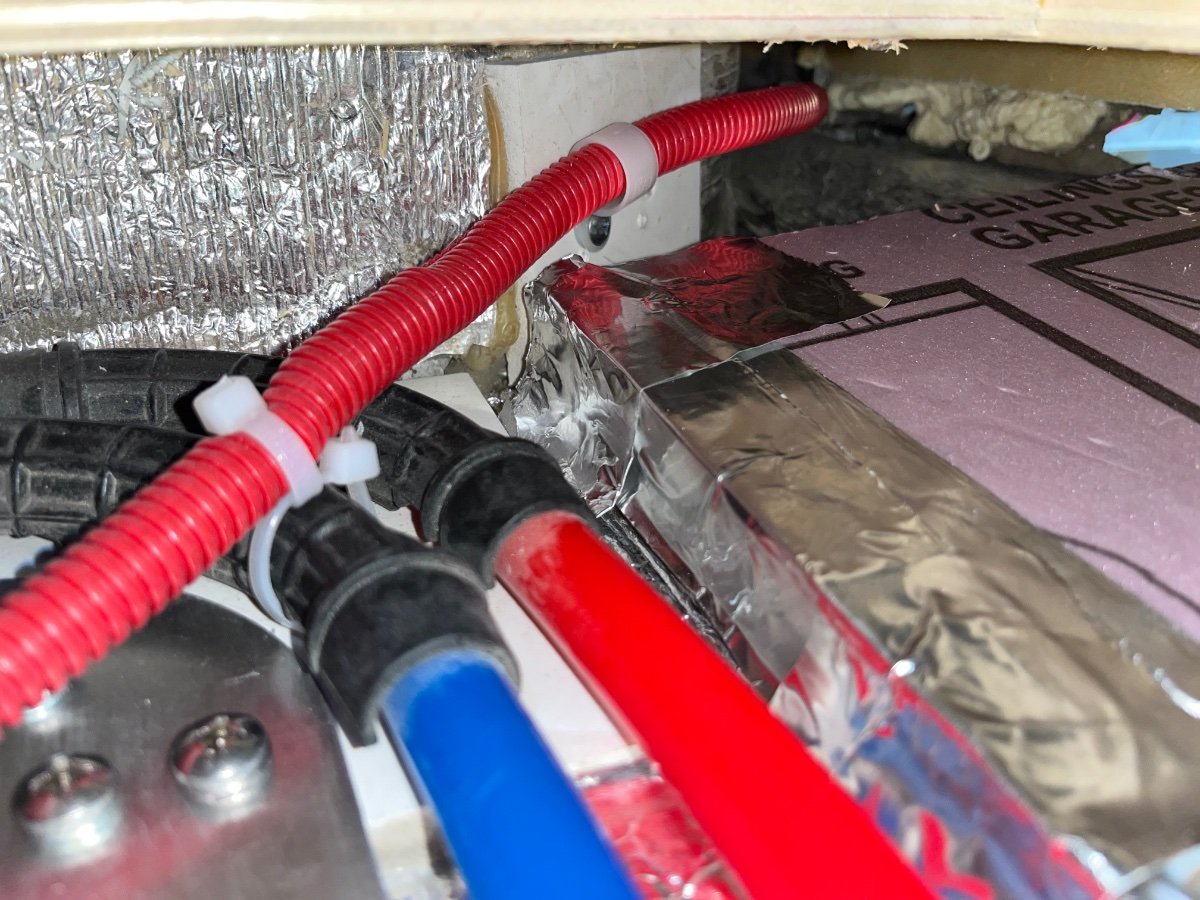
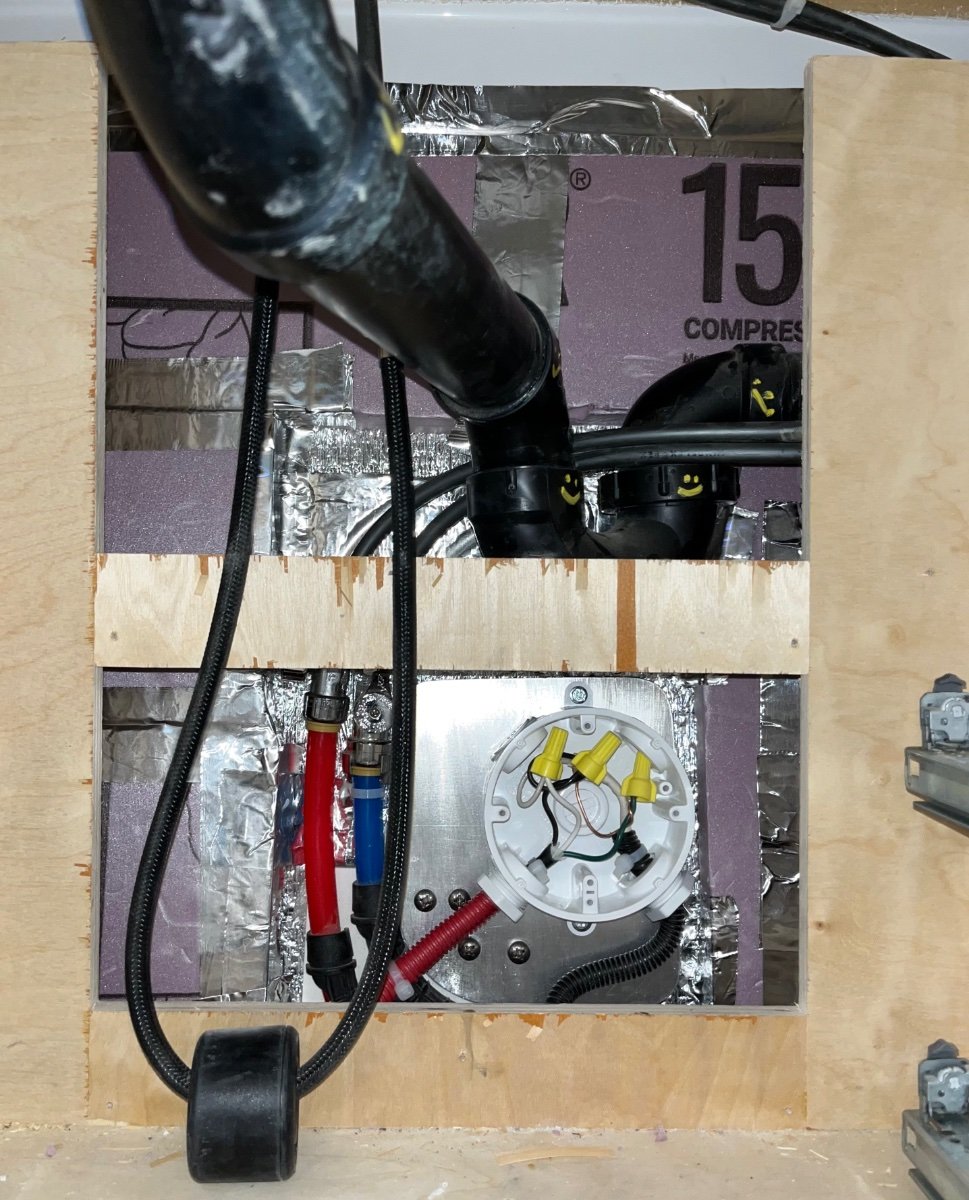
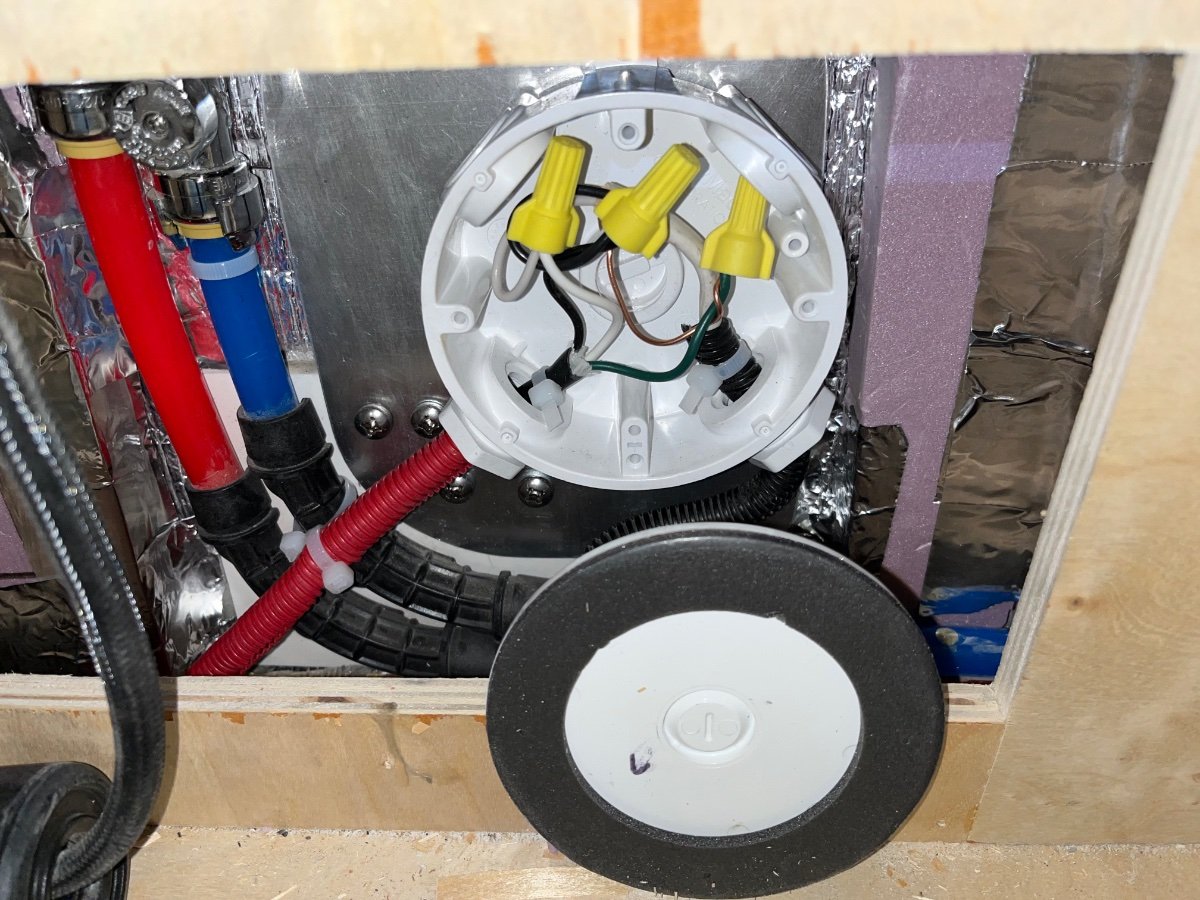
re t Fabricate a bracket from 0.050" aluminum sheet, that will allow you to attach the box to the existing hose support. After installing the blank plugs and two threaded ports, seal them from the inside with PVC cement. Remove the outlet cover, outlet and the blue box. (The lower outlet screw hole was stripped, so the screw just spun. I bent up the outlet, cut the wires and removed the two screws holding the box to its support block.) Reroute the original wires to the new box after cutting and stripping the ends. This shows the new j box next to the old parts. Afer CAREFULLY joining the wires, install the box plate onto the water hose mount. Secure the inside of the each of the two harnesses with a nylon tie. Leave the two bottom holes unsealed, water cannot get in that way. Install split loom and secure the fridge power wire to an existing hole in the original outlet mount. This pic is rotated! The finished j box. Note that this shows the additional 1 inch R5 insulation I also added to this area and under the range top. Black to black, white to white, green to bare ground. Label the cover before installing it! I think this should be done at the factory, they could simply install a larger HDPE block and attach the box directly to that. EDIT: I submitted a Service Ticket with this request. I will update this thread with any new info. John Davies Spokane WA
2 points
-
Wish I owned one of those Atwoods, unfortunately the Suburbans are a major PITA to work on. The entire thing has to be removed from the camper to get to anything but the ignitor. I've done this before, its an all day affair due to the limited working space. Even the compartment dividers to the storage area in the rear have to be removed. Anyway was hoping all indicators would not point to the sail switch for this reason. Regardless thanks for linking the video, it was helpful even though it is for an Atwood.1 point
-
Thanks for that info.1 point
-
I suspected sail switch, also, but surprised when furnace worked above 50. Maybe some Utah dust finally blown away after many attempts,? I doubt it's a low voltage issue, as I'm pretty sure @routlaw has lithium? Not sure. Cold temps affect la battery output more than lithium batteries. I will say, my old suburban on agm has never had these issues. But I've seen others with control board issues, as well, in newer trailers. I "think" the newer suburban furnaces have a two or three year warranty. I'd be checking in with suburban, especially since routlaw says the fridge still runs on gas. That's usually much more sensitive to propane issues than the furnace. Very helpful troubleshooting, @Steph and Dud B. Thanks.1 point
-
I'm fairly certain that under the right circumstances condensation between the hulls can do the same thing. I had an occasional small drip coming from 2 of my windows until I started making an effort to keep the humidity down inside. Once I did, the dripping ceased.1 point
-
Well I ordered a 13.5 BTU Houghton today. I am planning on installing the easy start that came with the trailer. So I might have some questions on that in the future. I’ll post my experience when I get it and get it installed. Anyone sold their used Dometic unit? What did you get for it? Mine is only 7 months old with very little use. I guess I’ll start trolling Craigslist and eBay. John1 point
-
John Davies, your tutorial is excellent, as usual. As one with an Elite II on order, I asked my Oliver sales rep about the non-GFCI refrigerator receptacle. I was advised that it meets "RVIA standards," but was also told that Oliver engineering would take another look at the issue. I expect those RVIA standards are the minimums, such as for run-of-the-mill "stick and staple" trailers. IMHO, premium-priced trailers like the Oliver should do more than the minimum, particularly when it comes to safety. I note that a GFCI refrigerator receptacle could be problematic. It would be a PITA to pull the drawers and remove the access panel every time there is a nuisance trip. John Davies' hard-wired, waterproof j-box avoids this issue. If our Elite II comes with the same non-GFCI receptacle with standard plug that has been used for years, I have a different solution in mind: replace the breaker for that circuit with a GFCI breaker. More expensive than John Davies' solution, but much less work to implement. As an alternative, BillATX could replace his loose receptacle with one of the newer tamper-resistant ones, which I find hold plugs almost too well, then also replace the breaker with a GFCI breaker. I expect that would entail less work reaching through between the drawer supports, which sound terribly uncomfortable to my bad back.....1 point
-
Things can be fixed/replaced. You kept your family safe, that’s what matters. And after time has passed you’ll eventually reach the phase of joking about “Hey, remember that time we drive off with the hose still connected?”1 point
-
It concerns me... but I'm at least blessed enough financially to be able to afford to travel despite the increased fuel charges. So I'm just ball parking some numbers here, but if I get about 14MPG and use somewhere in the neighborhood of 165 gallons on that 2300 mile trip it means that it's going to cost me another $165 each way (round trip it's $330) MORE than fuel was just a year ago. The last time we traveled extensively it was spring of 2022... we were in a tear-drop camper and because of it... we tended to almost exclusively go to KOA's for the shower/bath house facilities... and pay anywhere from $45 ~70 per night depending on the locale. Why? We needed those nicer facilities because we didn't have them in our little tear-drop. Now when we get in our Ollie... we expect to be staying in state parks, Core of Engineers, maybe a even a few Harvest Hosts or even the occasional Cracker-docking (love that word!). We even expect to stay at least a few times on BLM. All told, even considering the higher cost of fuel (say $500 more).... we will easily save that now that we can choose places that I might not have wanted to stay in before. All that and we are going to be obscenely comfortable in our new Ollie! And let's not even talk about all the great campsites that will be opened up to us going forward. The other off-set is that our house is going to be virtually shut off while we are gone. Typically our travels have taken us out for 6 weeks or so at a time but when we leave this time... there is no telling when we are going to make it home again! 🙂 So we are going to enjoy life while we can and be grateful to God for every day we get! And no looking back! I'm also reminded of how fortunate we are in this country to only have to worry a bit about the current cost of fuel.1 point
-
Fuel prices stink but won’t deter our summer plans. We’ll be in Colorado in June and July, partly for family events. We may not do an extended trip around the rally, just head to Alabama then come home. Mike1 point
-
Current prices for fuel certainly cut down on "fun" money but will not stop me from any of my planned summer trips - to include the annual Owner's Rally in May. Bill1 point
-
I believe you may have better success with jacking the frame up behind the wheels rather than in front. My experience with using the front position is that it also lifts the front jack off the ground, particularly if you're trying to lift only the rear tire. This could turn into a disaster if the trailer decided to pivot on the opposite side tires. "But they're chocked", you say. Still taking a chance in my opinion. "Keep it hooked to the tow", now you're trying to lift the truck too.1 point
-
I'm baffled! It seems that my Oliver does not like to be rained on!! For the second time, I have had leaks on both side windows, at one time or another. I checked the tracks, removed the white strip gaskets, and there is apparently no reason for a leak there. The second time, it soaked the mattress! We are not happy. Just bought silicone caulk to seal the windows, if needed. Why, in a camper that is otherwise so well made, that we pay a premium price for, do we have this problem? It beats me. Does anyone have the same problem, and if so...have you solved it? Charlie0 points


.thumb.jpg.e34bf01ef7f7d5e99ad31856d45afbeb.jpg)


-
Recent Achievements
-


")


")


