Leaderboard


Popular Content
Showing content with the highest reputation on 04/22/2022 in Posts
-
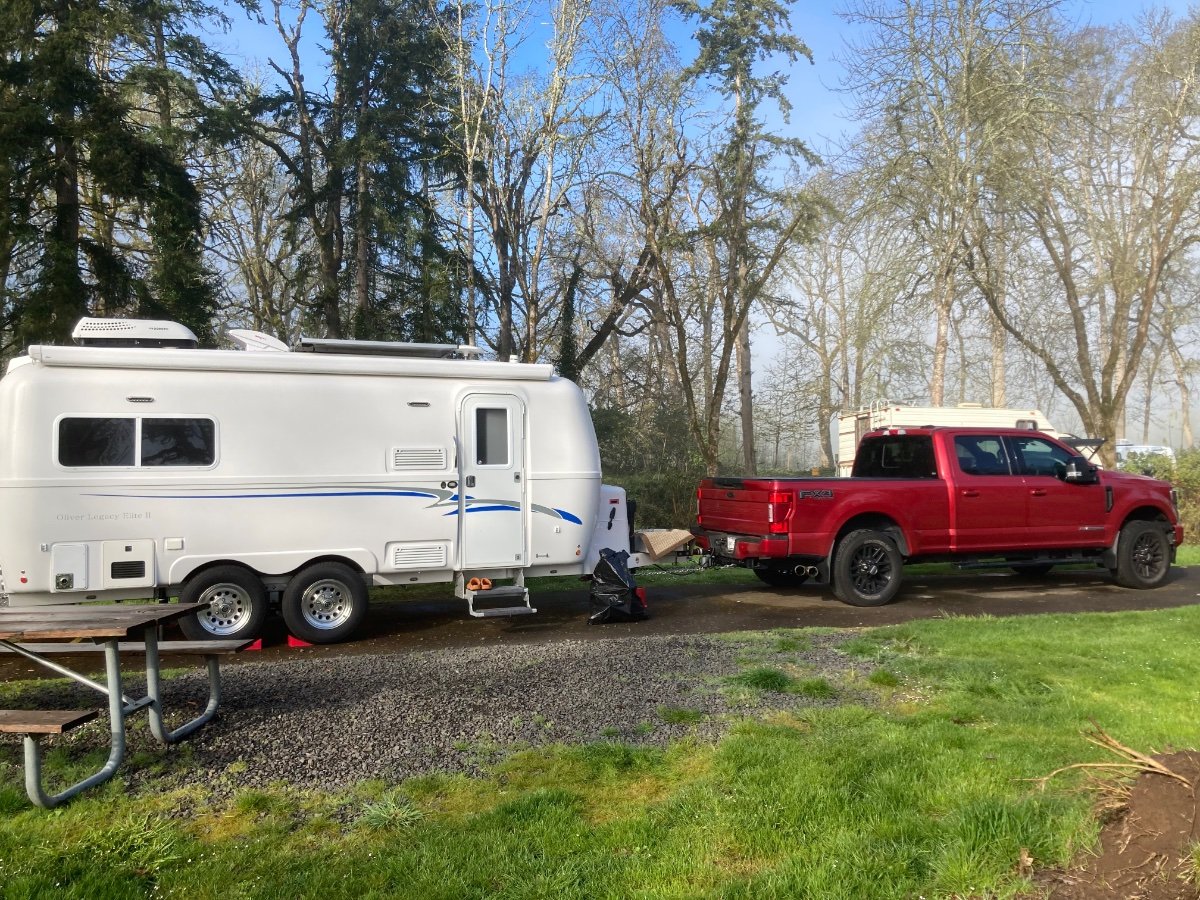
Just a quick follow up to let everyone know both Cyndi and I continue to do well with no hidden injuries from our rollover accident. In addition, we were successful in finding and purchasing a 2017 Oliver Legacy Elite II this past week and have just now returned to our home location after successfully making some of our originally planned stops from our interrupted vacation on Apr 2nd. It is truly amazing we were uninjured in the accident and able to get back on our feet with truck and trailer within the remaining two weeks of our scheduled vacation. Thanks again for all the support the Oliver community has given us these past few weeks. This alone should convince anyone on the fence about purchasing the best built travel trailer on the market. Mark and Cyndi
 14 points
 -
Shame. A good boat or fiberglass place should be able to perform the repair without too much trouble. However, in order to get the repair to disappear you will need to know the exact color of gelcoat that was used and be able to get a very small quantity of it. If this were my Ollie, I'd make sure that once I found the repair place, they were placed into contact with the folks in Oliver Service. There is a good chance that not only will the Service people tell the repair outfit what and how things need to be done in that area, but, they will also be able to sell them a small quantity of the proper color gelcoat. Good luck! Bill4 points
-
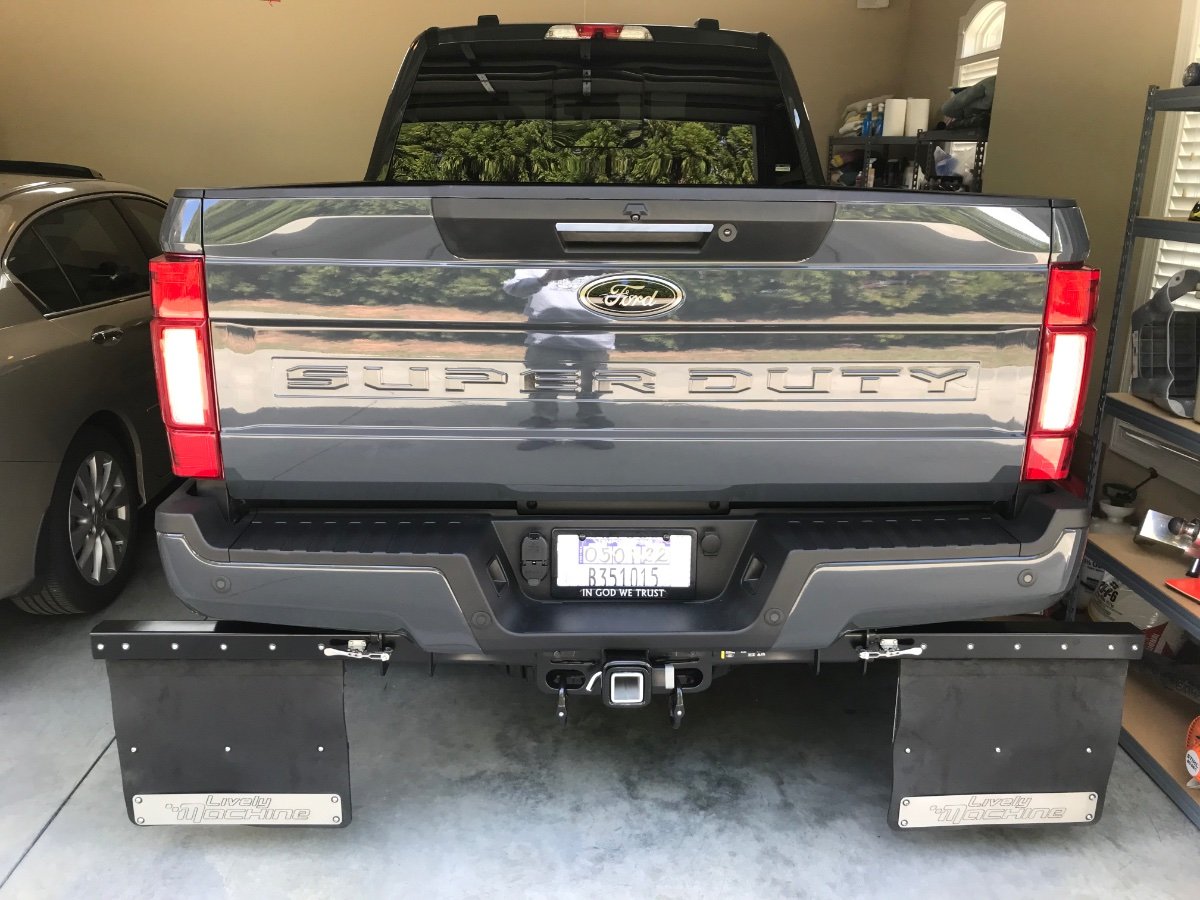
Bill, I am very happy with these “Rock Stoppers” they are made by Livelymachine.com and are designed Super Duty specific. I don’t know if they fabricate Rock Stoppers for other trucks. I can report they work excellent and protect the front of our Ollie and keep it clean. If anyone has questions PM me.
4 points
-
And double check that your outside hot water shower wand had the valves turned OFF. Once I had winterized and forgot to turn those outside shower controls back to off. With the wand head shut off, I was inadvertently cycling the hot and cold water through the system and it never got really hot. So...just for grins make sure the outside shower controls are truly OFF. CS3 points
-
Hi Mike, likely me and my oak pollen decorated Oliver. Eating at Compadres before heading out to the Casita Bluebonnet rally in Bandera. Basically a dry run before start of Yellowstone trip in mid-May. Back Friday to prep for covering the Airshow this coming weekend at Randolph AFB. Long weekend and even longer editing hours, but should be fun. https://greattexasairshow.com3 points
-
I saw the same Oliver again in Boerne today. Ralph, I hope it was you because I was the guy waving like a lunatic as we passed in front of Home Depot this morning! Mike2 points
-
John, Took a few additional photos and measurements this morning of Oliver's extendable hitch. I do not know what kind of aluminum they used, but I'm sure it has a pedigree. Steve (ScubaRX) probably knows. There are 3 different sizes of square aluminum tube used, outer sizes shown. Everything is 1/4" wall, the very short sleeve welded on close to the hitch is 4" square outer measurement, slipped on and welded in place over the 3 1/2" outer tube with the 3" inner telescoping square tube. The bolt through the short 4" tube is 3/4" Grade 8. The 3 1/2" tube welds to a cross member in the main aluminum frame, about 4' behind the LP tanks. Looks like a major conversion if someone tried to attempt this modification. I can gather additional information, if needed. Already see the next thing I need to do to Ollie, belly wash!2 points
-
GJ - I don't know the brand but I do know that Patriot bought something other than the Rock Tamers and has been very happy with them. Perhaps a PM to him might get you some details. Bill Also - I assume that you have previewed a number of posts here on the Forum concerning ways to protect the front of the Ollie during an Alaska trip. One that I liked had to do with using semi-permanent tape to hold on rubber padding. It seemed to do the job while at the same time it was relatively inexpensive and was easily removable.2 points
-
Lithionics Technical Service Bulletin Note: This only applies to campers that have a 3000w inverter AND the 130ah batteries. Information was released recently regarding potential for internal battery BMS damage. This is a rare case as certain things would have to fall in place in order for the situation to have an opportunity to potentially occur. Lithionics has found that under certain conditions if your 3000w inverter is left on, which many people do, and your batteries are turned off, by you or the BMS, and you were not connected to shore power, and you turn a single battery on by itself; the entire load from the inverter for in-rush capacitance would hit the single battery which was not designed to handle that much load. So to help ensure that you do not accidentally damage one of your Lithionics batteries we have released a technical bulletin for a restart/reboot process to eliminate this small potential for error. For more information regarding the proper Restart/Reboot sequence, please see the attached technical service bulletin. Q&A Do I have to do this every time I use my camper? - No, this is only done if the batteries have been turned off. Do I have to follow the restart process if I am aware of the situation and plan to turn on all the batteries at once? - Yes, Lithionics recommends following this procedure to ensure that the batteries are brought back online safely. Why do I have to do all the steps with the inverter? - If the inverter loses 12v power as it does when you trip the inverter breaker then it must be powered on properly to load the communication software to the remote display. Failure to do this will cause an Error 20 condition and the remote display will not function. Additional Notes: I recommend that the inverter is NEVER left on. Make sure that you understand that the Xantrex Freedom 3000 is an Inverter and a charger all-in-one. When you connect to shore power it will automatically power up as the incoming 120v power runs through it to power your microwave, receptacles and A/C. Since the power automatically runs through it there is no need to turn it on or off. However when you are not connected to shore power aka a 120v power source, then you must manually turn the inverter side on and/or off as needed. On the Xantrex Remote display there is a round button with the power symbol next to it. This button is to power the inverter side only. The only time I recommend having this power button ON is when you are NOT connected to shore power and you want to utilize the microwave, receptacles and/or A/C. The reason for this is that if it is left powered on and you are connected to shore power but the onboard surge protector sees an issue with the incoming shore power, it will shut it off. When this happens the inverter can pick up the load within seconds and you may never know that you have lost incoming shore power. This may sound great and you may think why wouldn't I want it to pick it up and keep supplying the power to my microwave, receptacles and A/C. Well, if you are unaware of this power changeover to the inverter you may keep letting the A/C run and keep working on a laptop that is plugged into the receptacle for power and a few hours later ,unbeknownst to you, your batteries shut off because they have become depleted. If on the other hand you lost the incoming shore power and were aware of the situation then you have the decision to inspect and determine the reason for the failure and/or make an informed decision to switch to inverter/battery power and manage how much you use to ensure you do not deplete your batteries. lithionics-proper-boot-sequence.pdf2 points
-
Well, that's a bummer. I'd use white or clear duct tape for a temporary fix. Like many others, we carry rolls with us. Butyl tape is a sealant, not really a "tape." The door itself is damaged, right, not, the trailer hull? That is probably a Lippert made item. Your insurance may cover a new door. I'd open a ticket, and ask for Jason's advice.1 point
-
I think any reputable place that does fiberglass work should be able to do a proper repair on your door. As far as stoping leaks, if it isn’t going to be very long some kind of tape should work. I carry a roll of white duct tape and a roll of white gaffers tape (leaves no residue). Butyl tape will also work. I just bought a roll of 3M 4412N Sealant Tape that I read about on the Airstream forum. Folks over there are using it to seal around roof appliances on their trailers. I haven’t tried it yet, but it gets good reviews. Mike1 point
-
Oliver service will make that look as good as new. Just had my door latch repaired Wednesday. When they riveted it in during construction they missed the metal plate inside the hull behind the latch. The pressure from the rubber grommet was enough to pull the rivet through the fiberglass. They went in by cutting a hole in the closet and adding the metal support brackets. I thought they would put an access port there to cover the hole. To my surprise they re-fiber glassed everything. You cant tell anything was done. As far as keeping the rain out. Butyl tape will leave you a mess but will work. If it were me, I would just put a piece of the air-conditioning foil tape over it until I could get it fixed. Think it will come off easier than the the butyl tape.1 point
-
So happy to see you back on the road! What a great looking rig!1 point
-
Try this link. Mossey1 point
-
JD would an extension off the back of your TV hitch be just as applicable ? They make different lengths. Tongue and cargo weight may come into play. Eventually you have to say to yourself how much is too much. 🥴1 point
-
Thanks for all the helpful reply’s its dark here now and will resume the troubleshooting tomorrow. Marc1 point
-
OH COME ON JD... Surely you would find additional projects/mods to utilize the remaining 8'... My guess is I was probably not the only one with this thought when we read your comments. Respectfully, Bryan1 point
-
You can do a vinegar soak for a few hours, 50/50 with water. Followed by a flush. If it hasn’t been done in a couple of years, it is due. John Davies Spokane WA1 point
-
Happy to hear you have another Ollie and are already enjoying it!1 point
-
Are you sure the outside AC switch is positioned correctly? It is confusing because on mine it is upside down, it is marked properly but you move it down for ON. Also, has your circuit breaker inside the trailer tripped or did you leave it open? Both of these electrical components can fail, and they are cheap to replace. https://olivertraveltrailers.com/forums/topic/3243-how-to-service-and-inspect-your-suburban-hot-water-heater-gas-system/ John Davies Spokane WA1 point
-
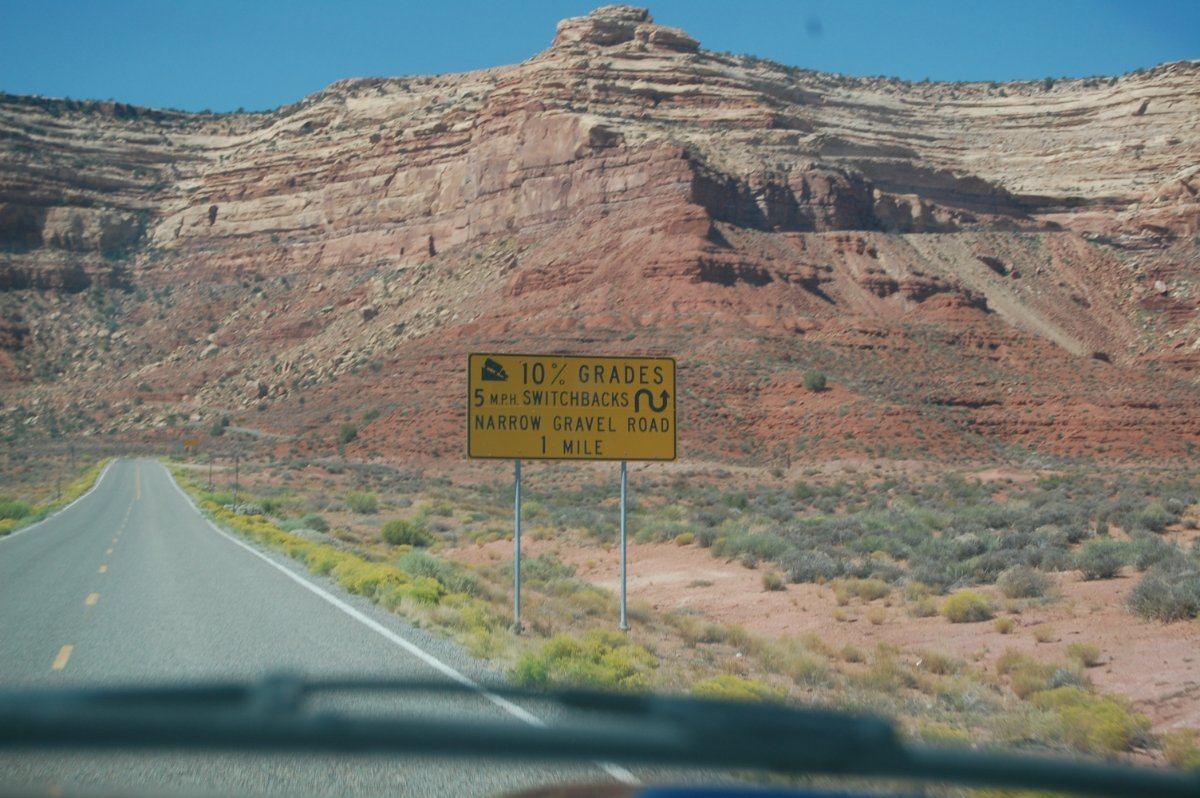
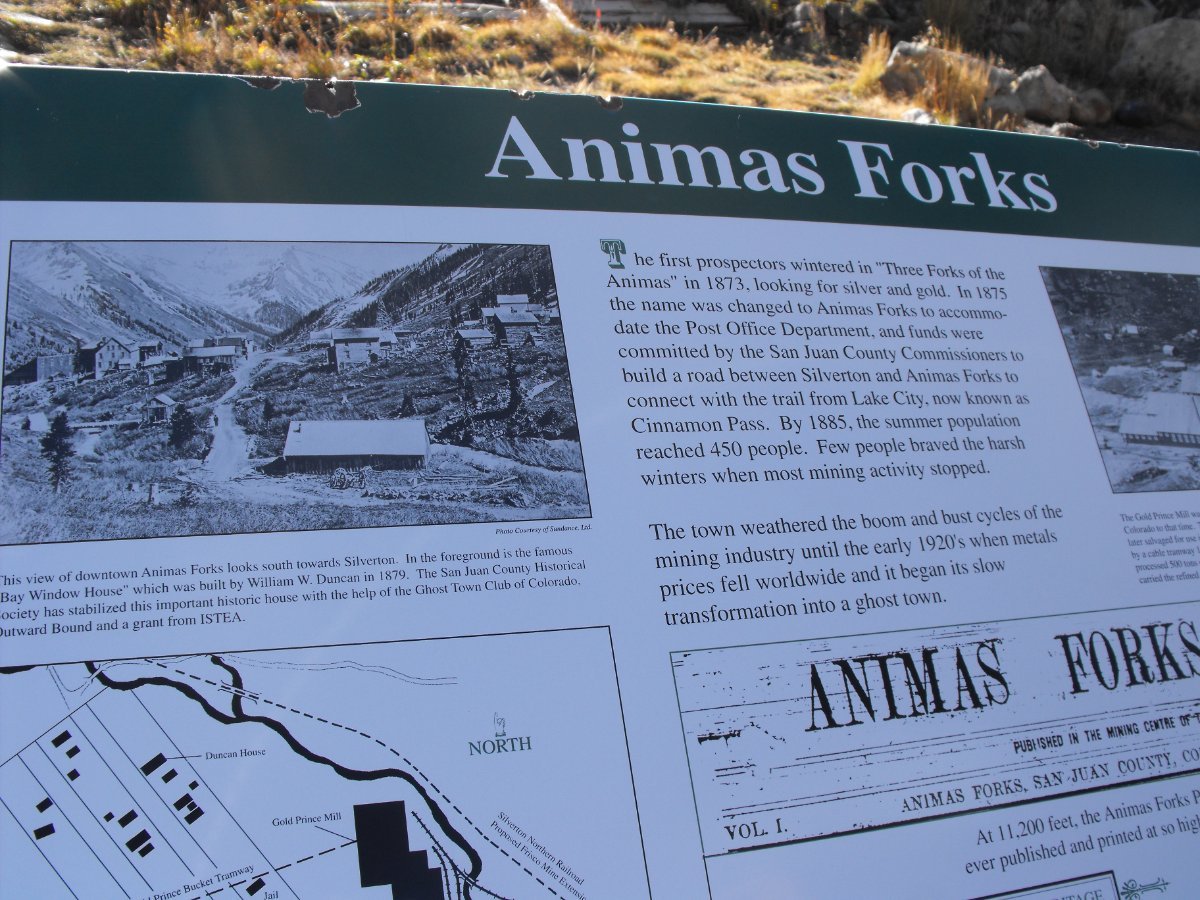
Traveling North on UT 261 approaching the Moki Dugway The Ghost Town Animas Forks, CO Jackson, MS, one of the deadliest cities in America Finally, the way it should be... Old Drilling Rig stuck in the Bentonite in the Backcountry near Capitol Reef NP
1 point
-
6 Olivers a week ago in Catalina State Park just north of Tucson. Met some new Oliver friends!1 point
-
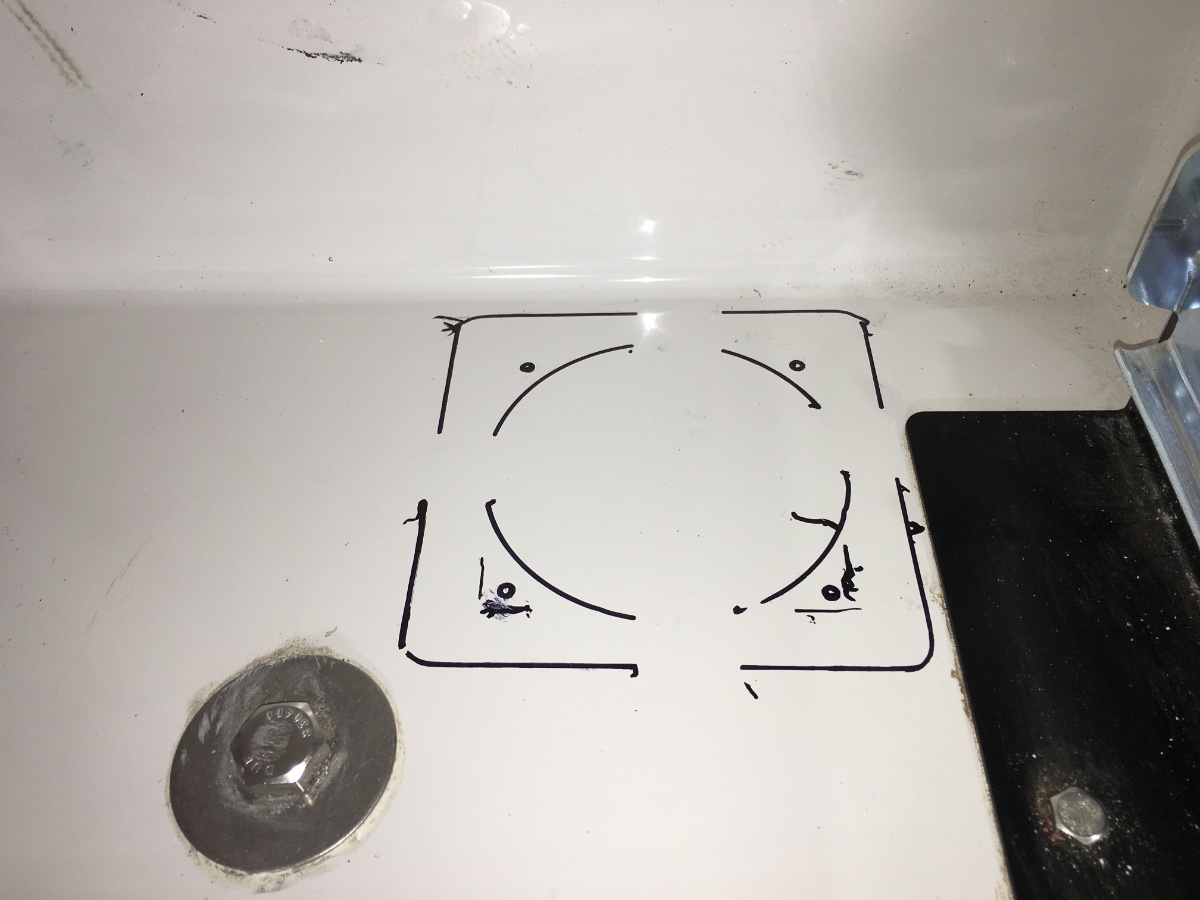
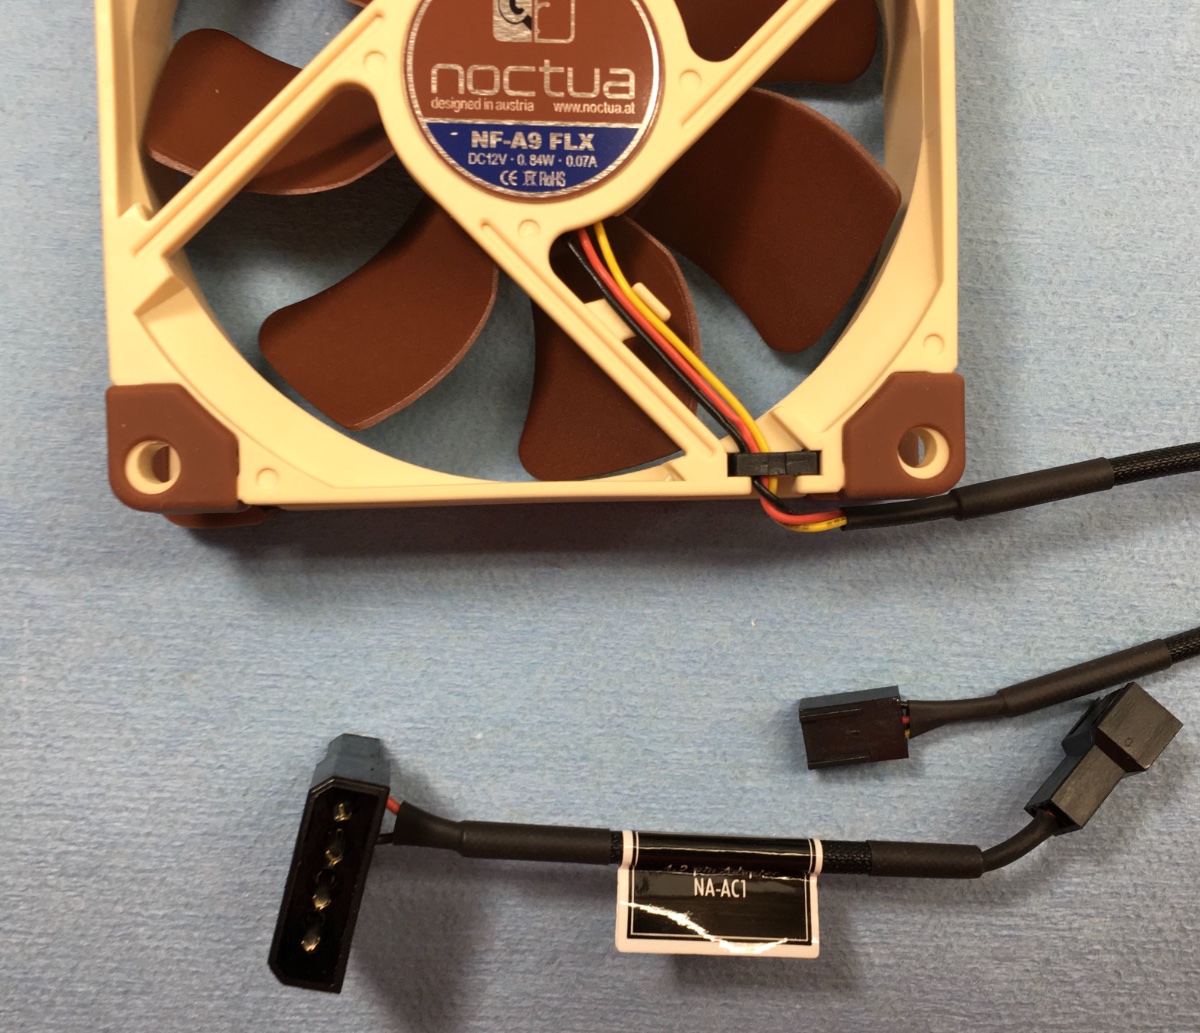
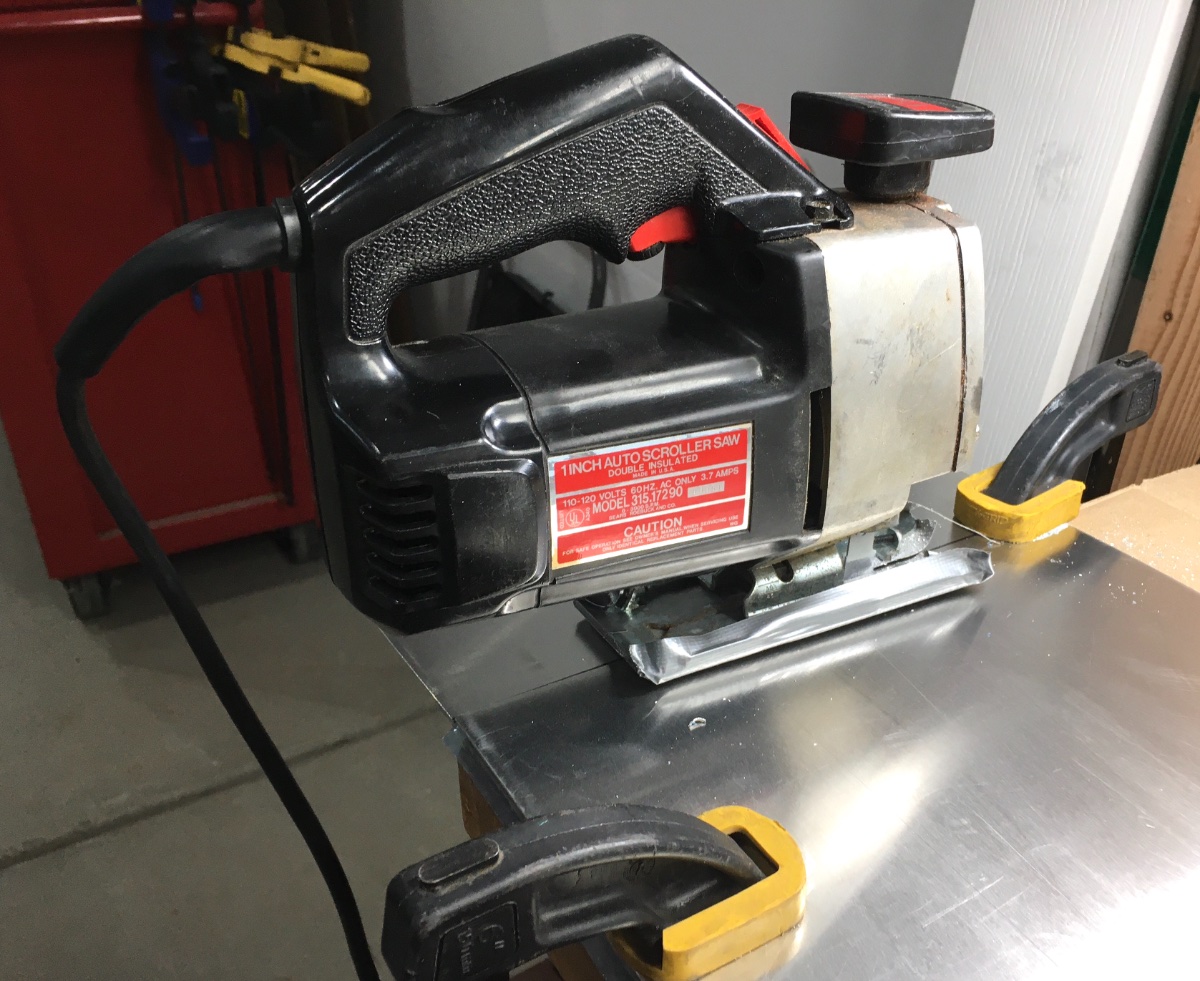
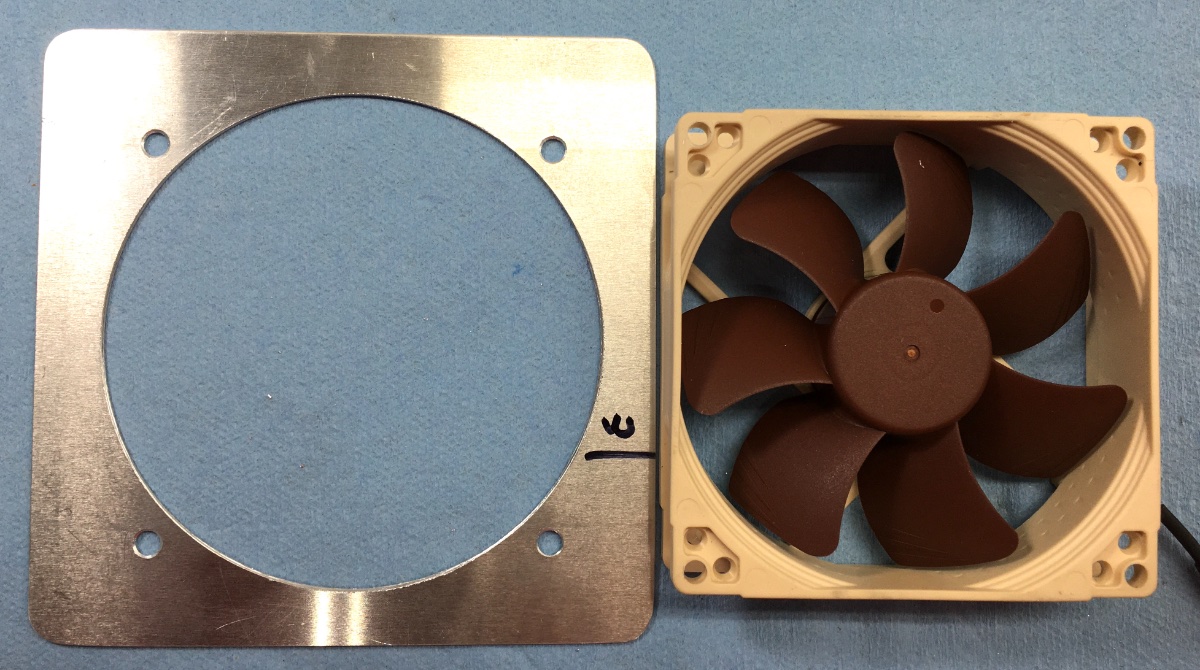
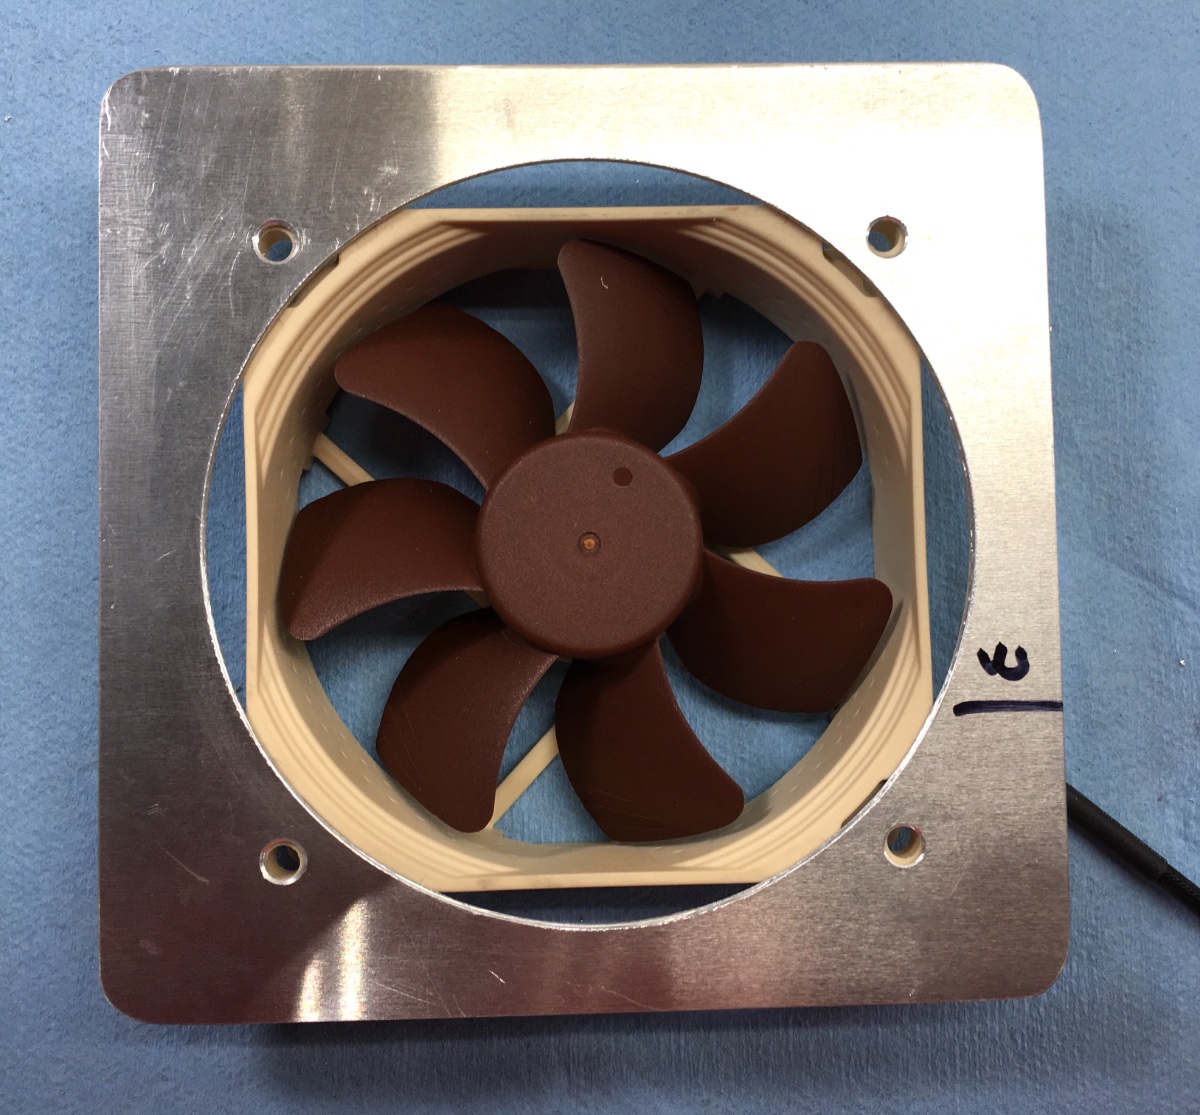
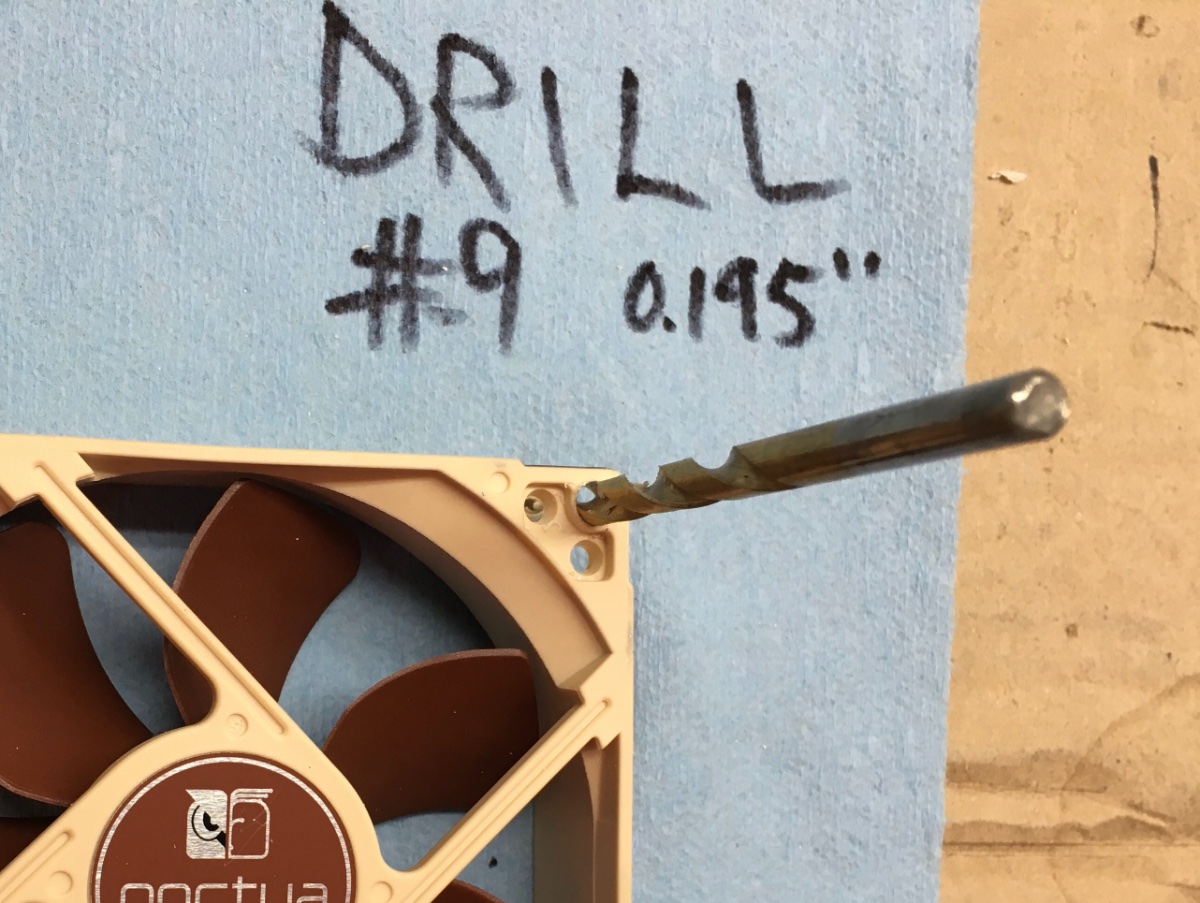
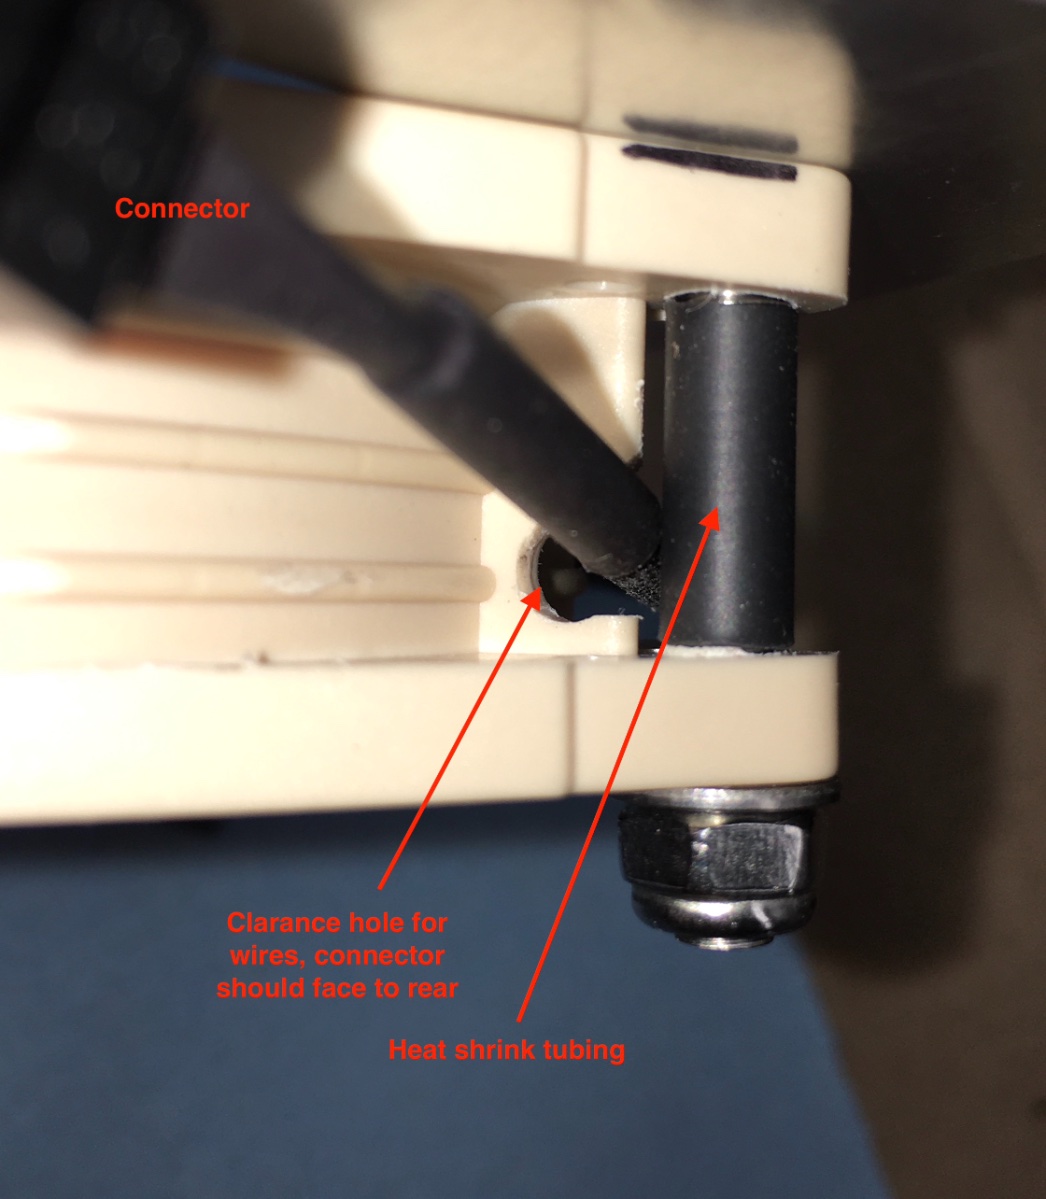
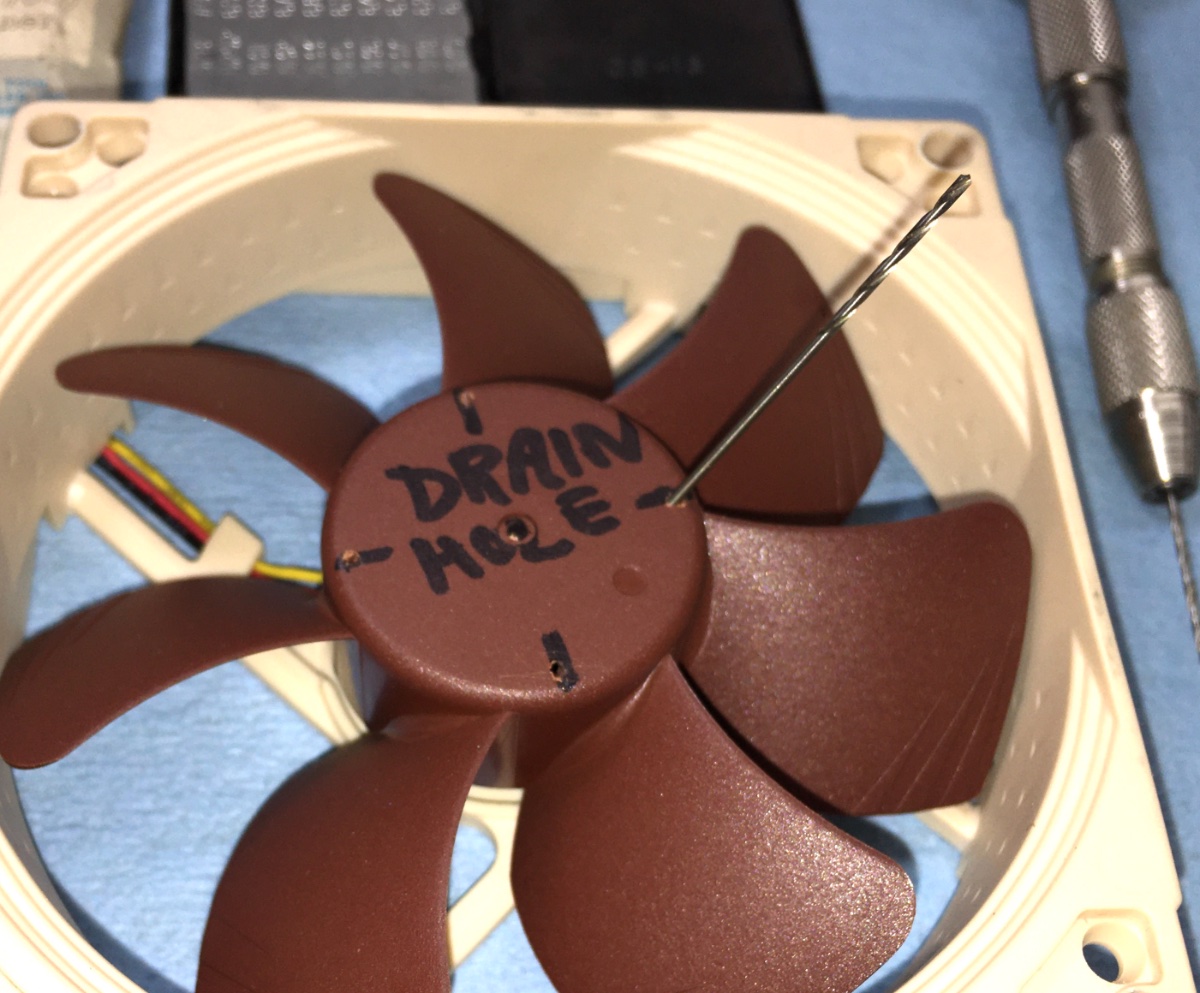
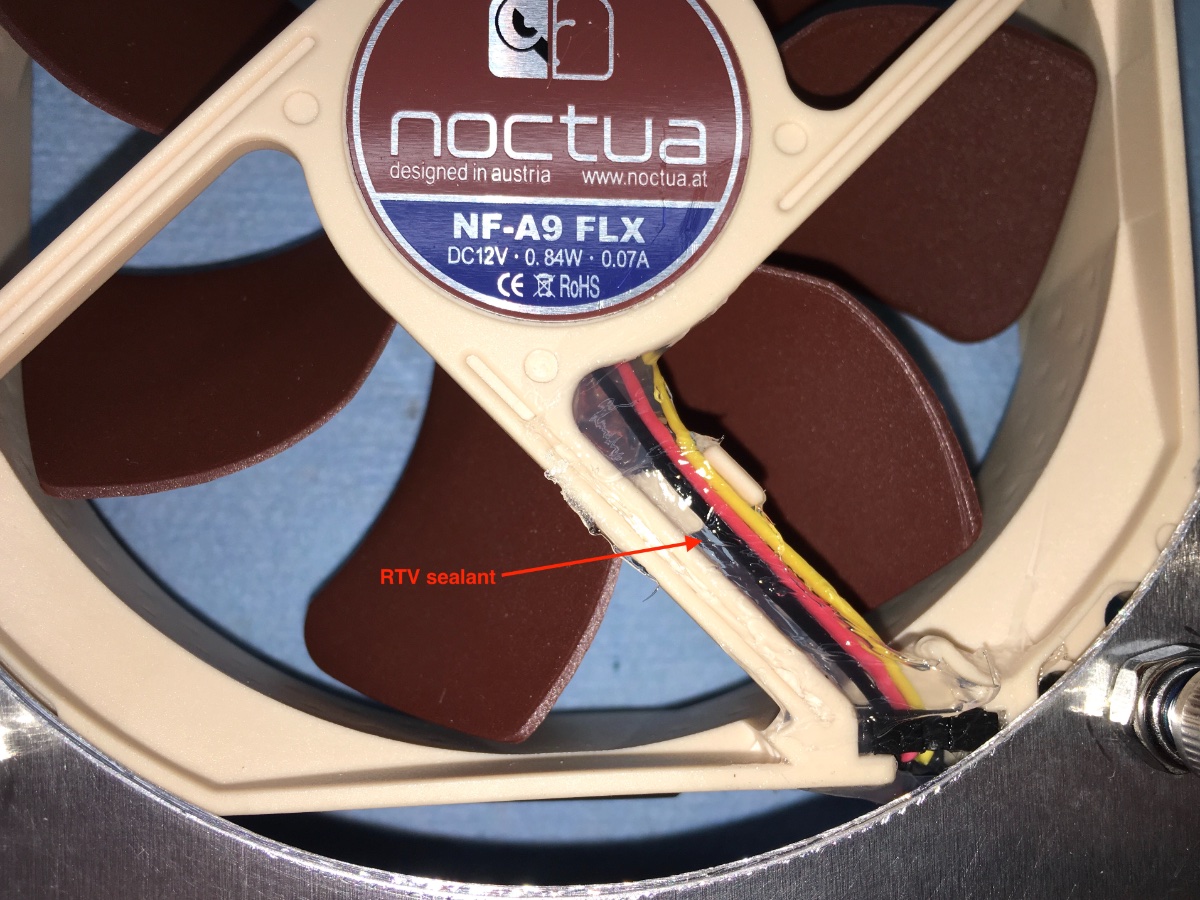
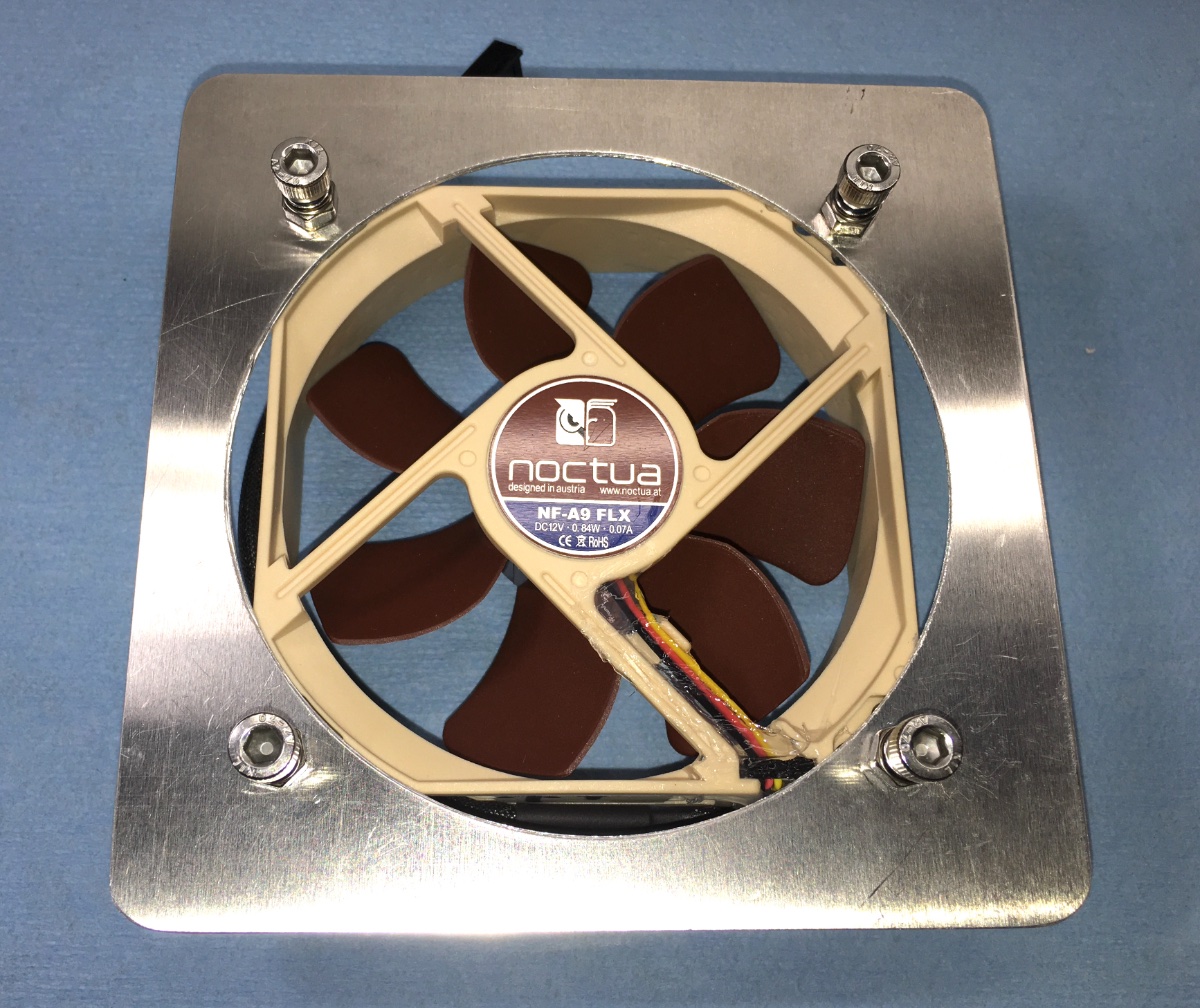
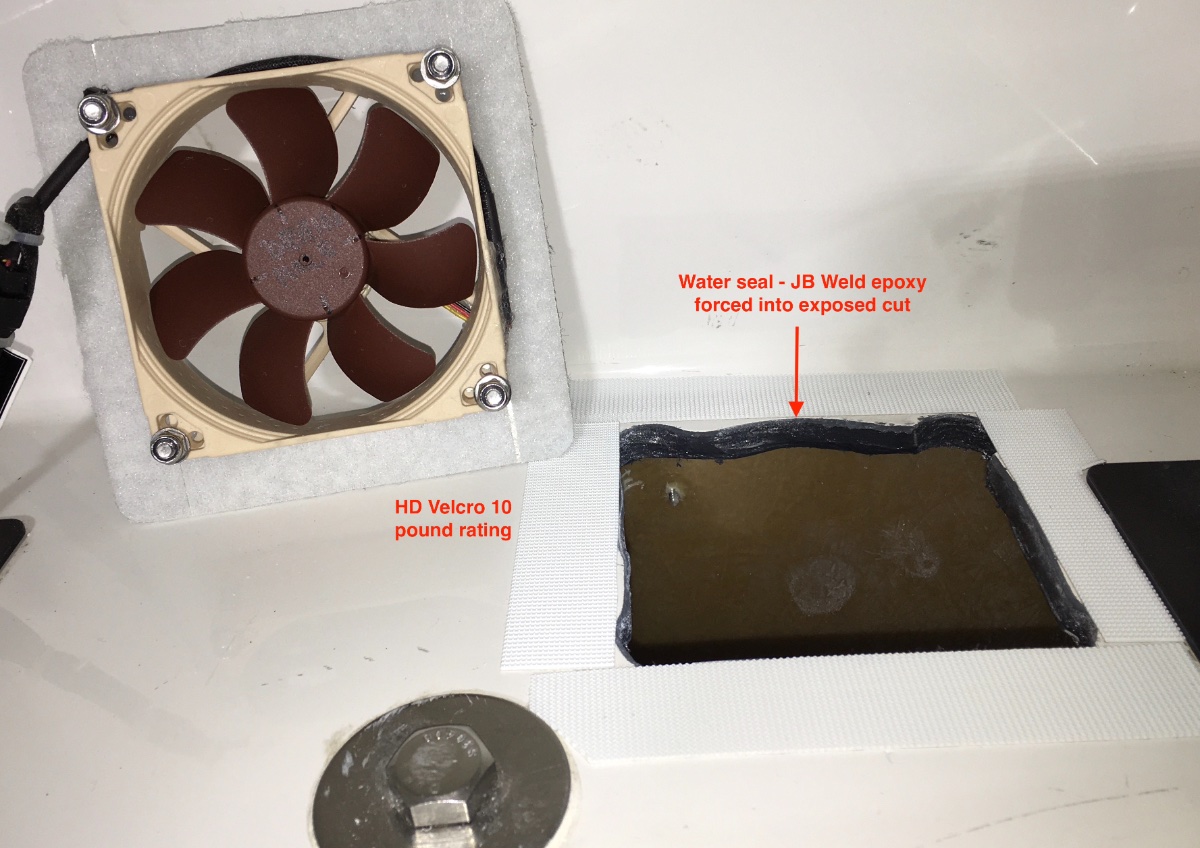
Battery box cooling fan. This one is high quality and well regarded. It has sealed ball bearings and uses just 70 milliamps (0.07 amps), so it can run as long as needed. Flow rate is 38 cfm on high, they supply two dropping resistor harnesses if you want to slow it down to reduce the sound level. It is pretty quiet, though a light sleeper on that side of the trailer might want to turn it off at night. But it is “white noise” which sometimes you do want..... Noctua Fan I really wanted the fan to go in the bottom at the rear wall, so it was centered between the two electronics compartments. The problem is that the floor of the box is not fiberglass honeycomb as I thought, rather it has a hard (6061?) 1/8" aluminum diamond plate bonded in the center! So cutting a large opening was a challenge. If you have access to a scroll saw (pivoting head) it is easy enough. Otherwise, choose to locate the fan at the bottom edge of the rear wall instead! That is thin (1/'8") fiberglass. Screws are 5mm, and are double nutted so that the heads will stick up enough to use as "grab handles", for servicing: John Davies Spokane WA
1 point


-
Recent Achievements
-


")


")


