Leaderboard


Popular Content
Showing content with the highest reputation on 05/16/2022 in all areas
-
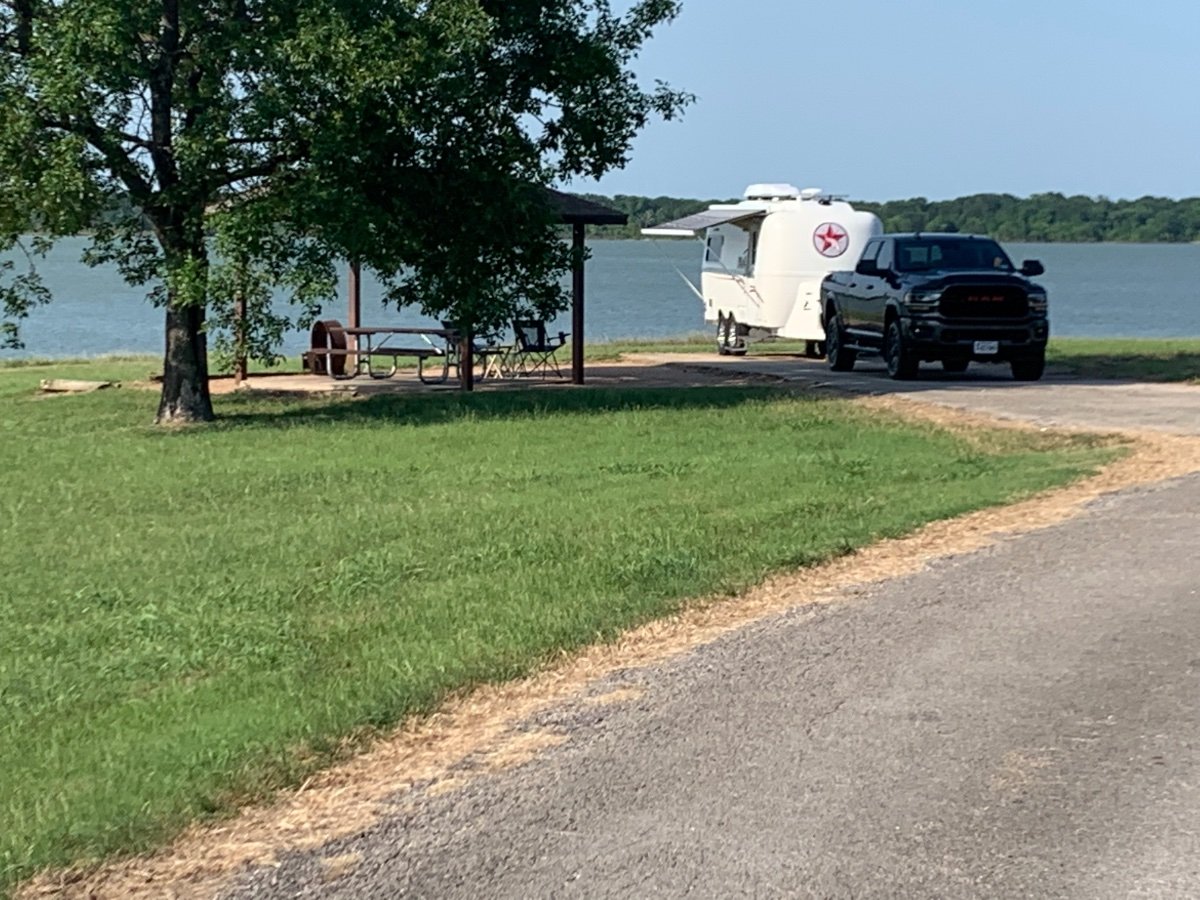
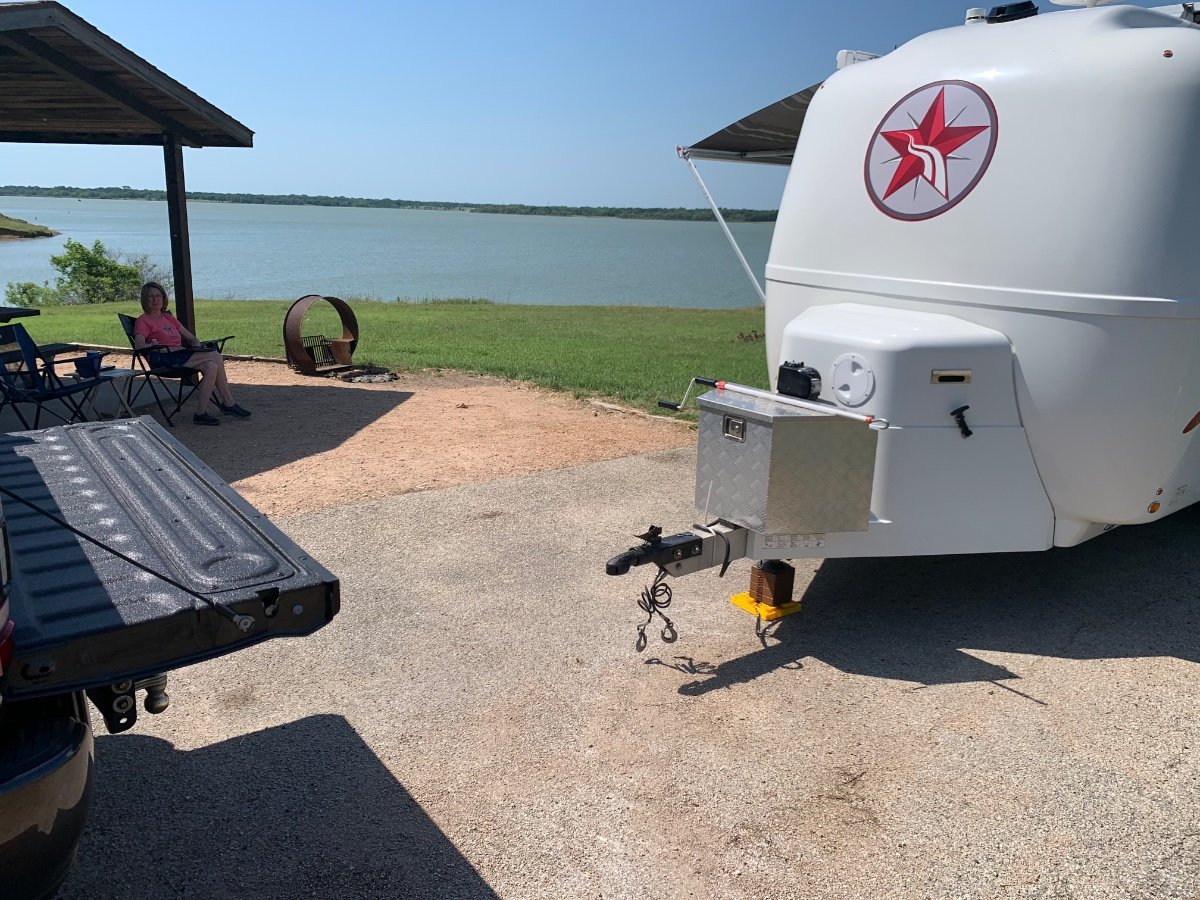
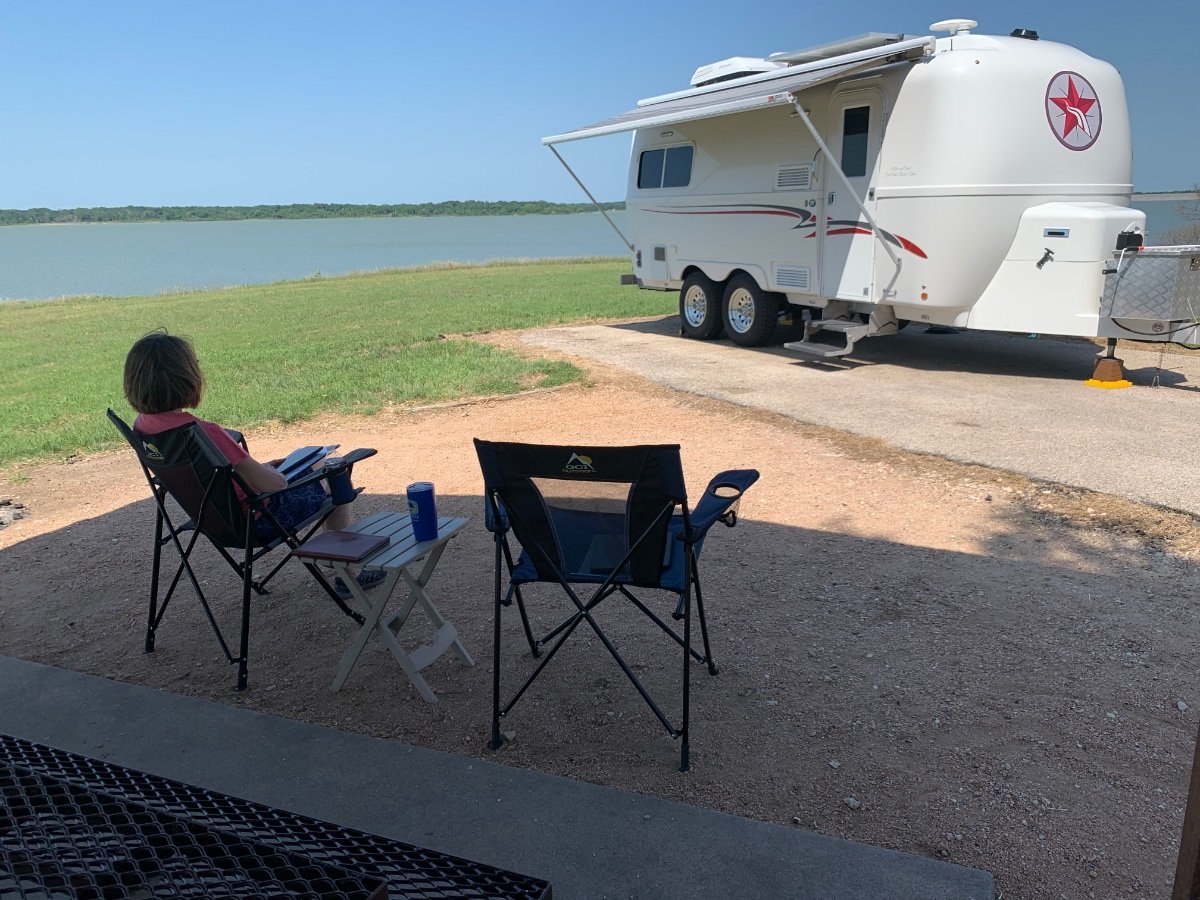
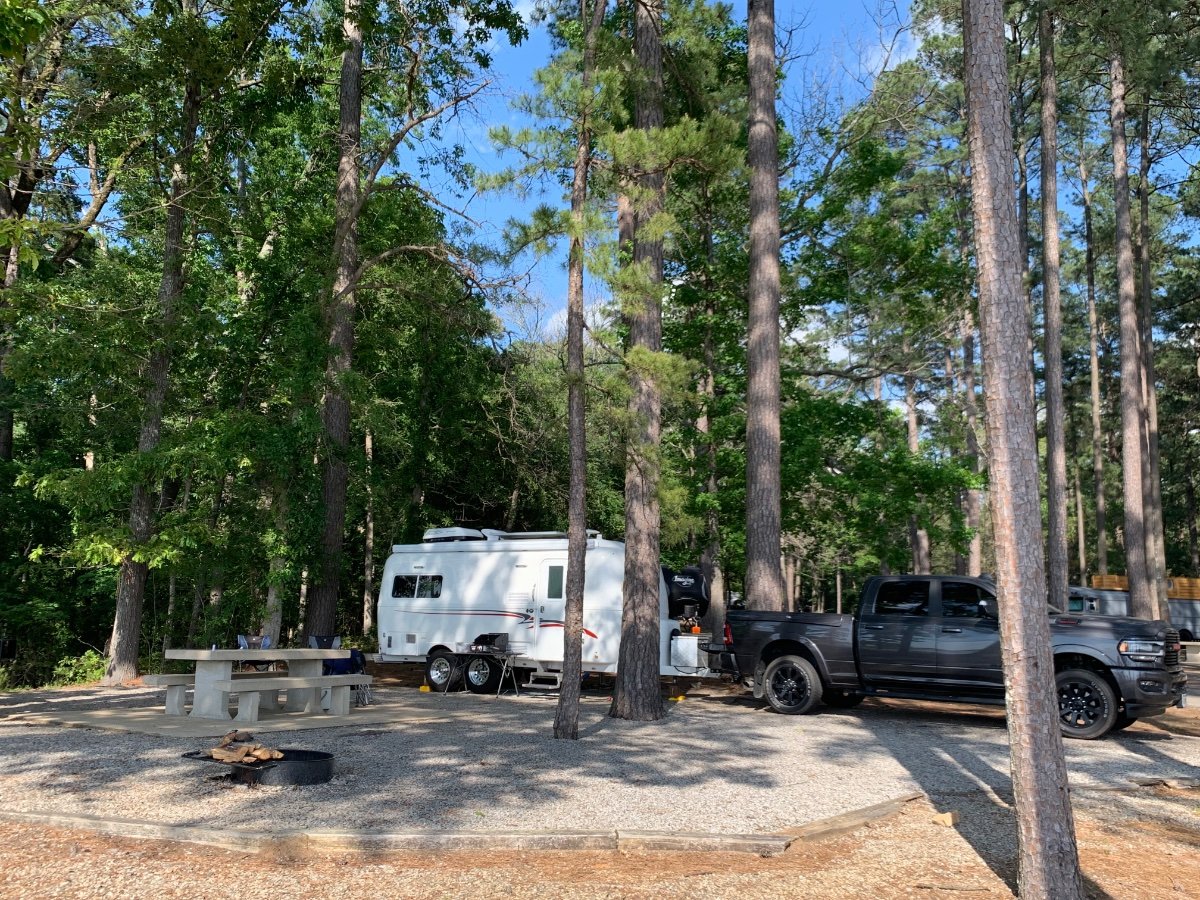
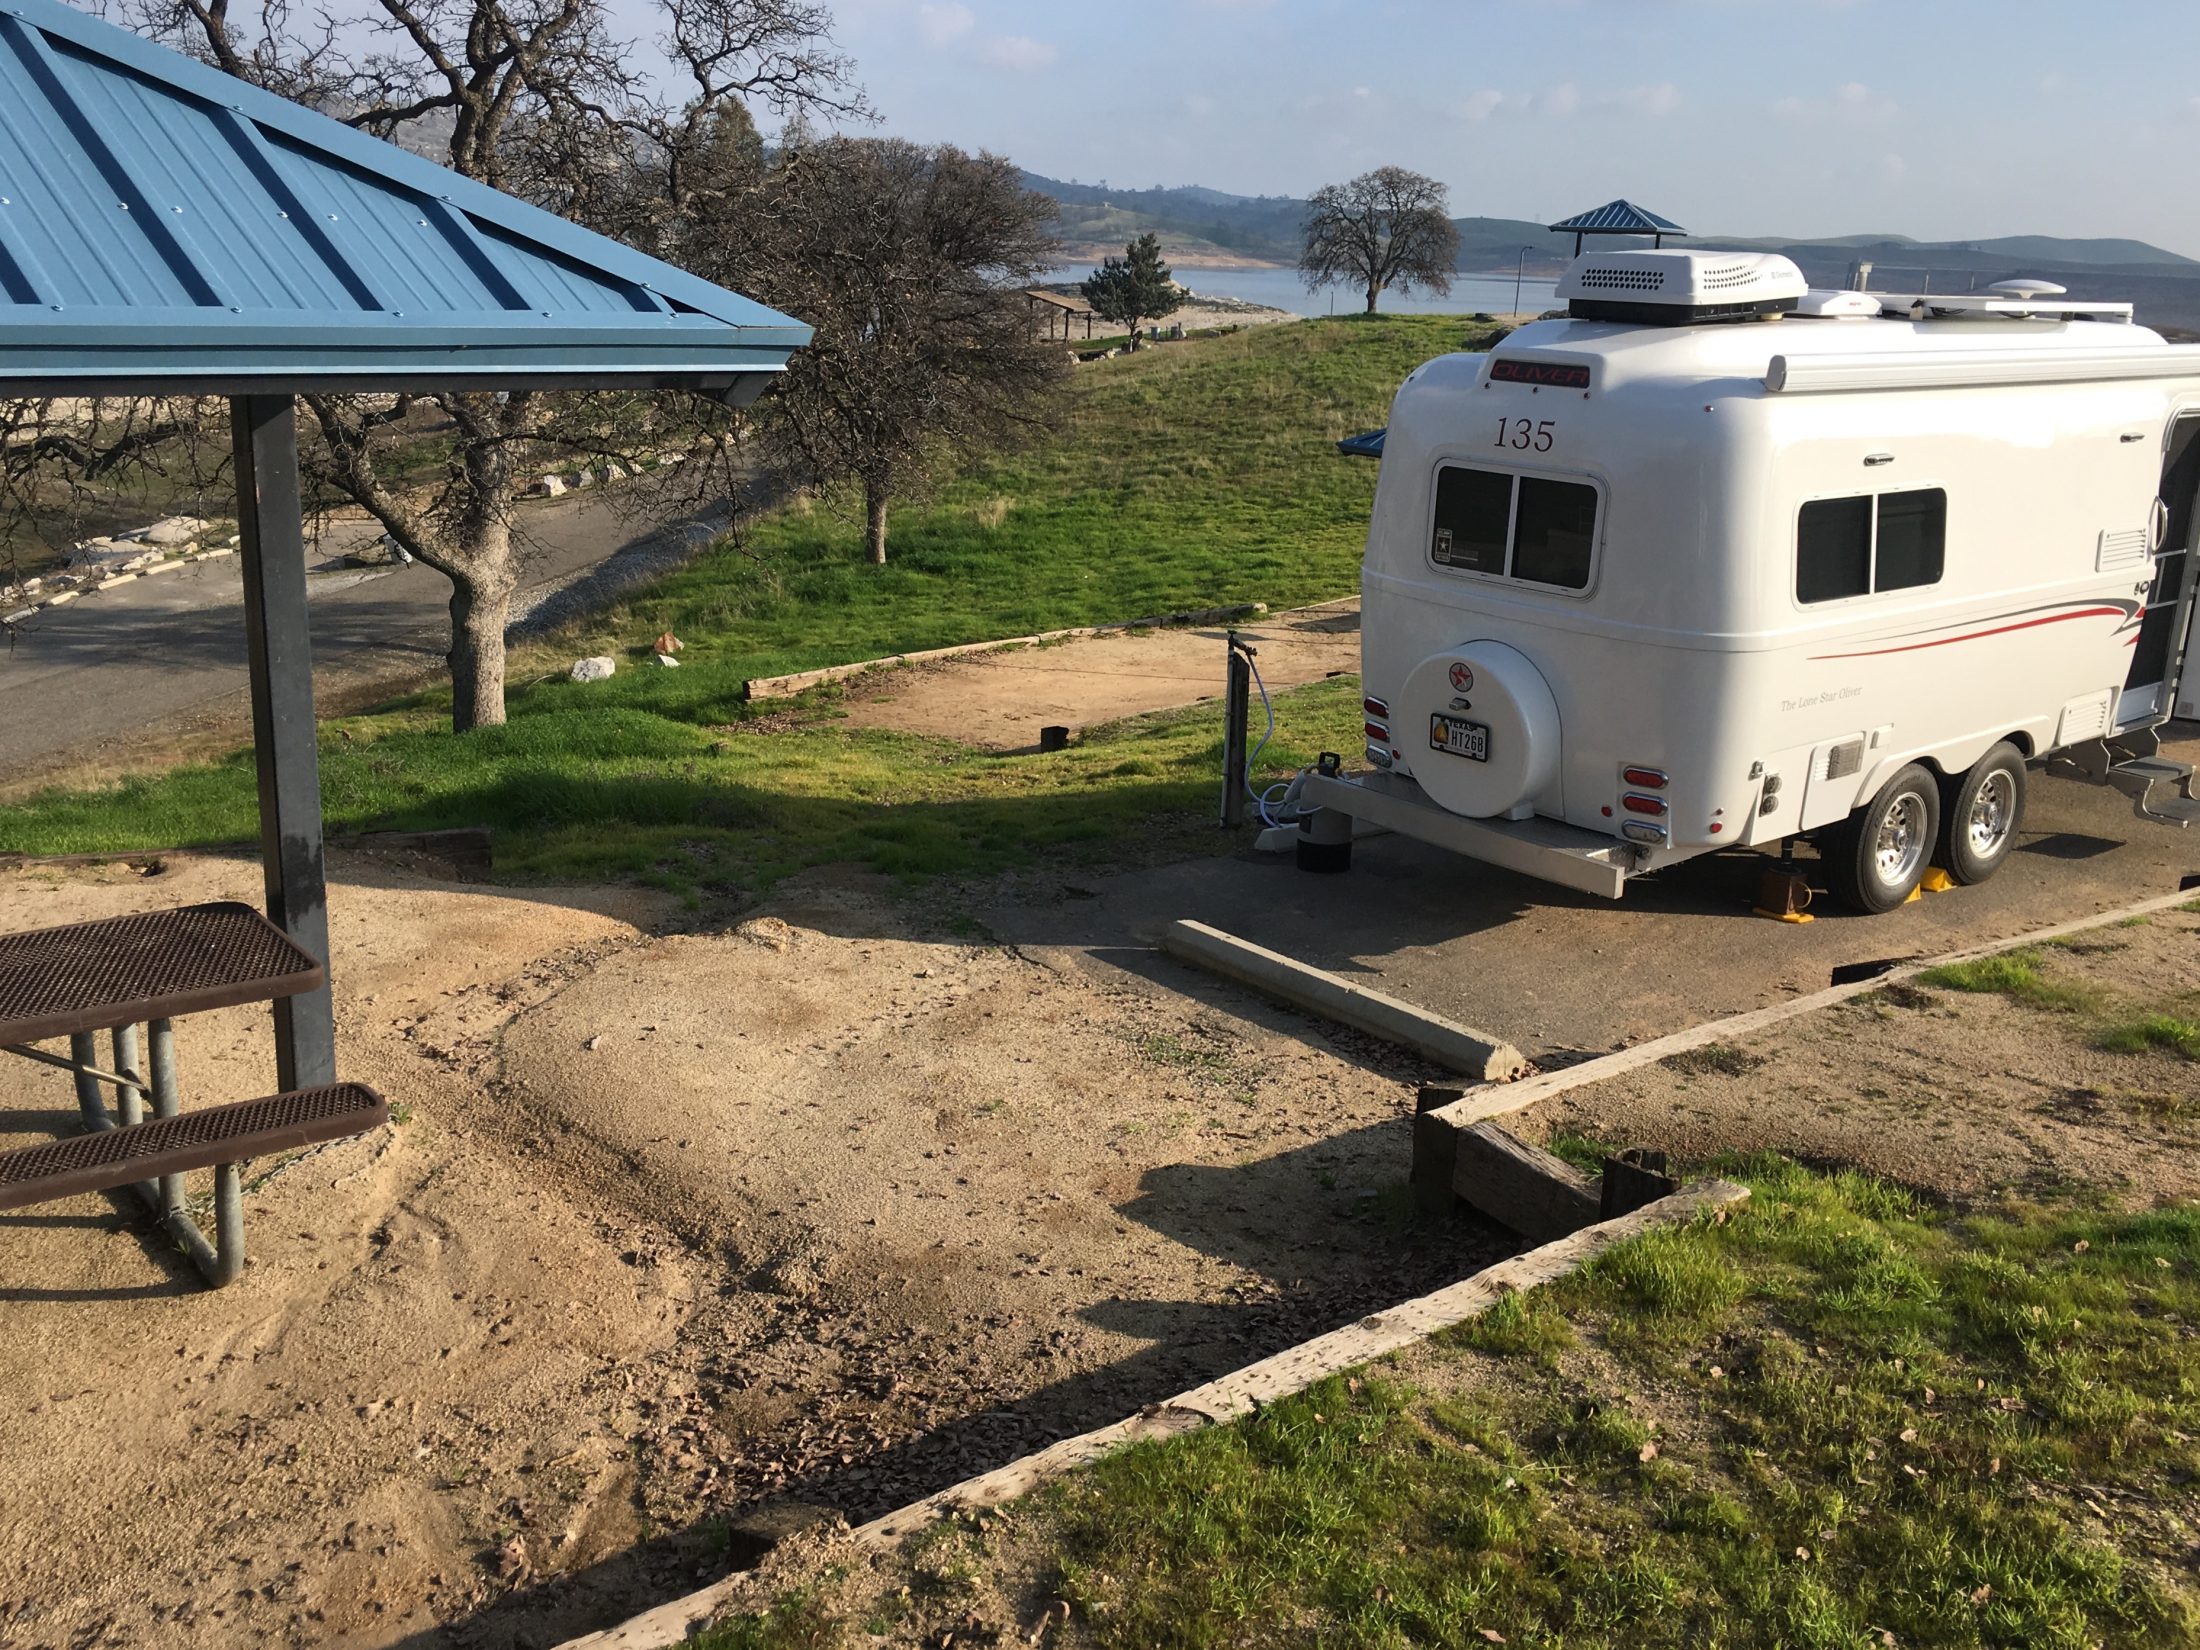
We are meandering our way across Texas on the way to Alabama and the rally. We stopped this afternoon at Liberty Hill COE campground on Navarro Lake in between Waco and Corsicana. It looks like an older park, with some nice sites by the lake and some average looking sites in a couple of loops away from the lake. There are three other COE campgrounds on the lake, we can see all three across the lake from our site. I might try another one of the campgrounds if we come back through this way.
 8 points
 -
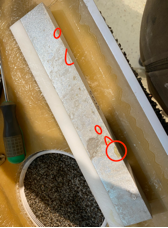
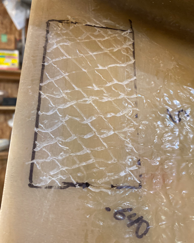
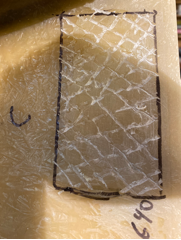
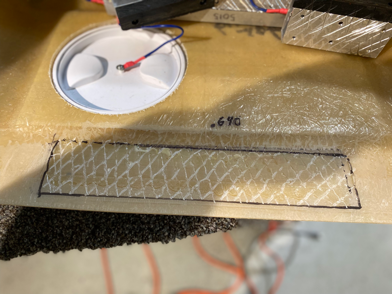
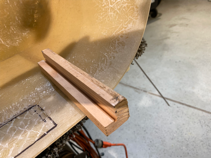
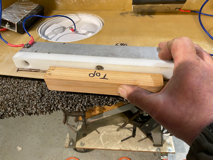
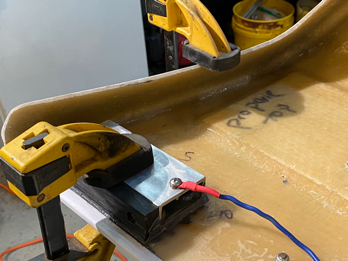
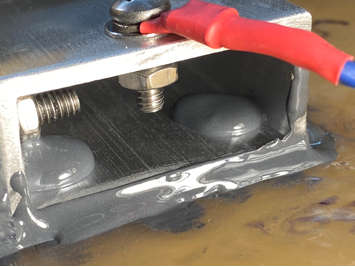
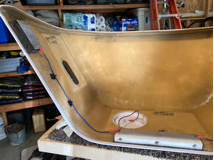
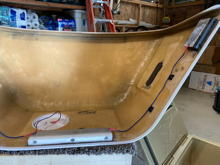
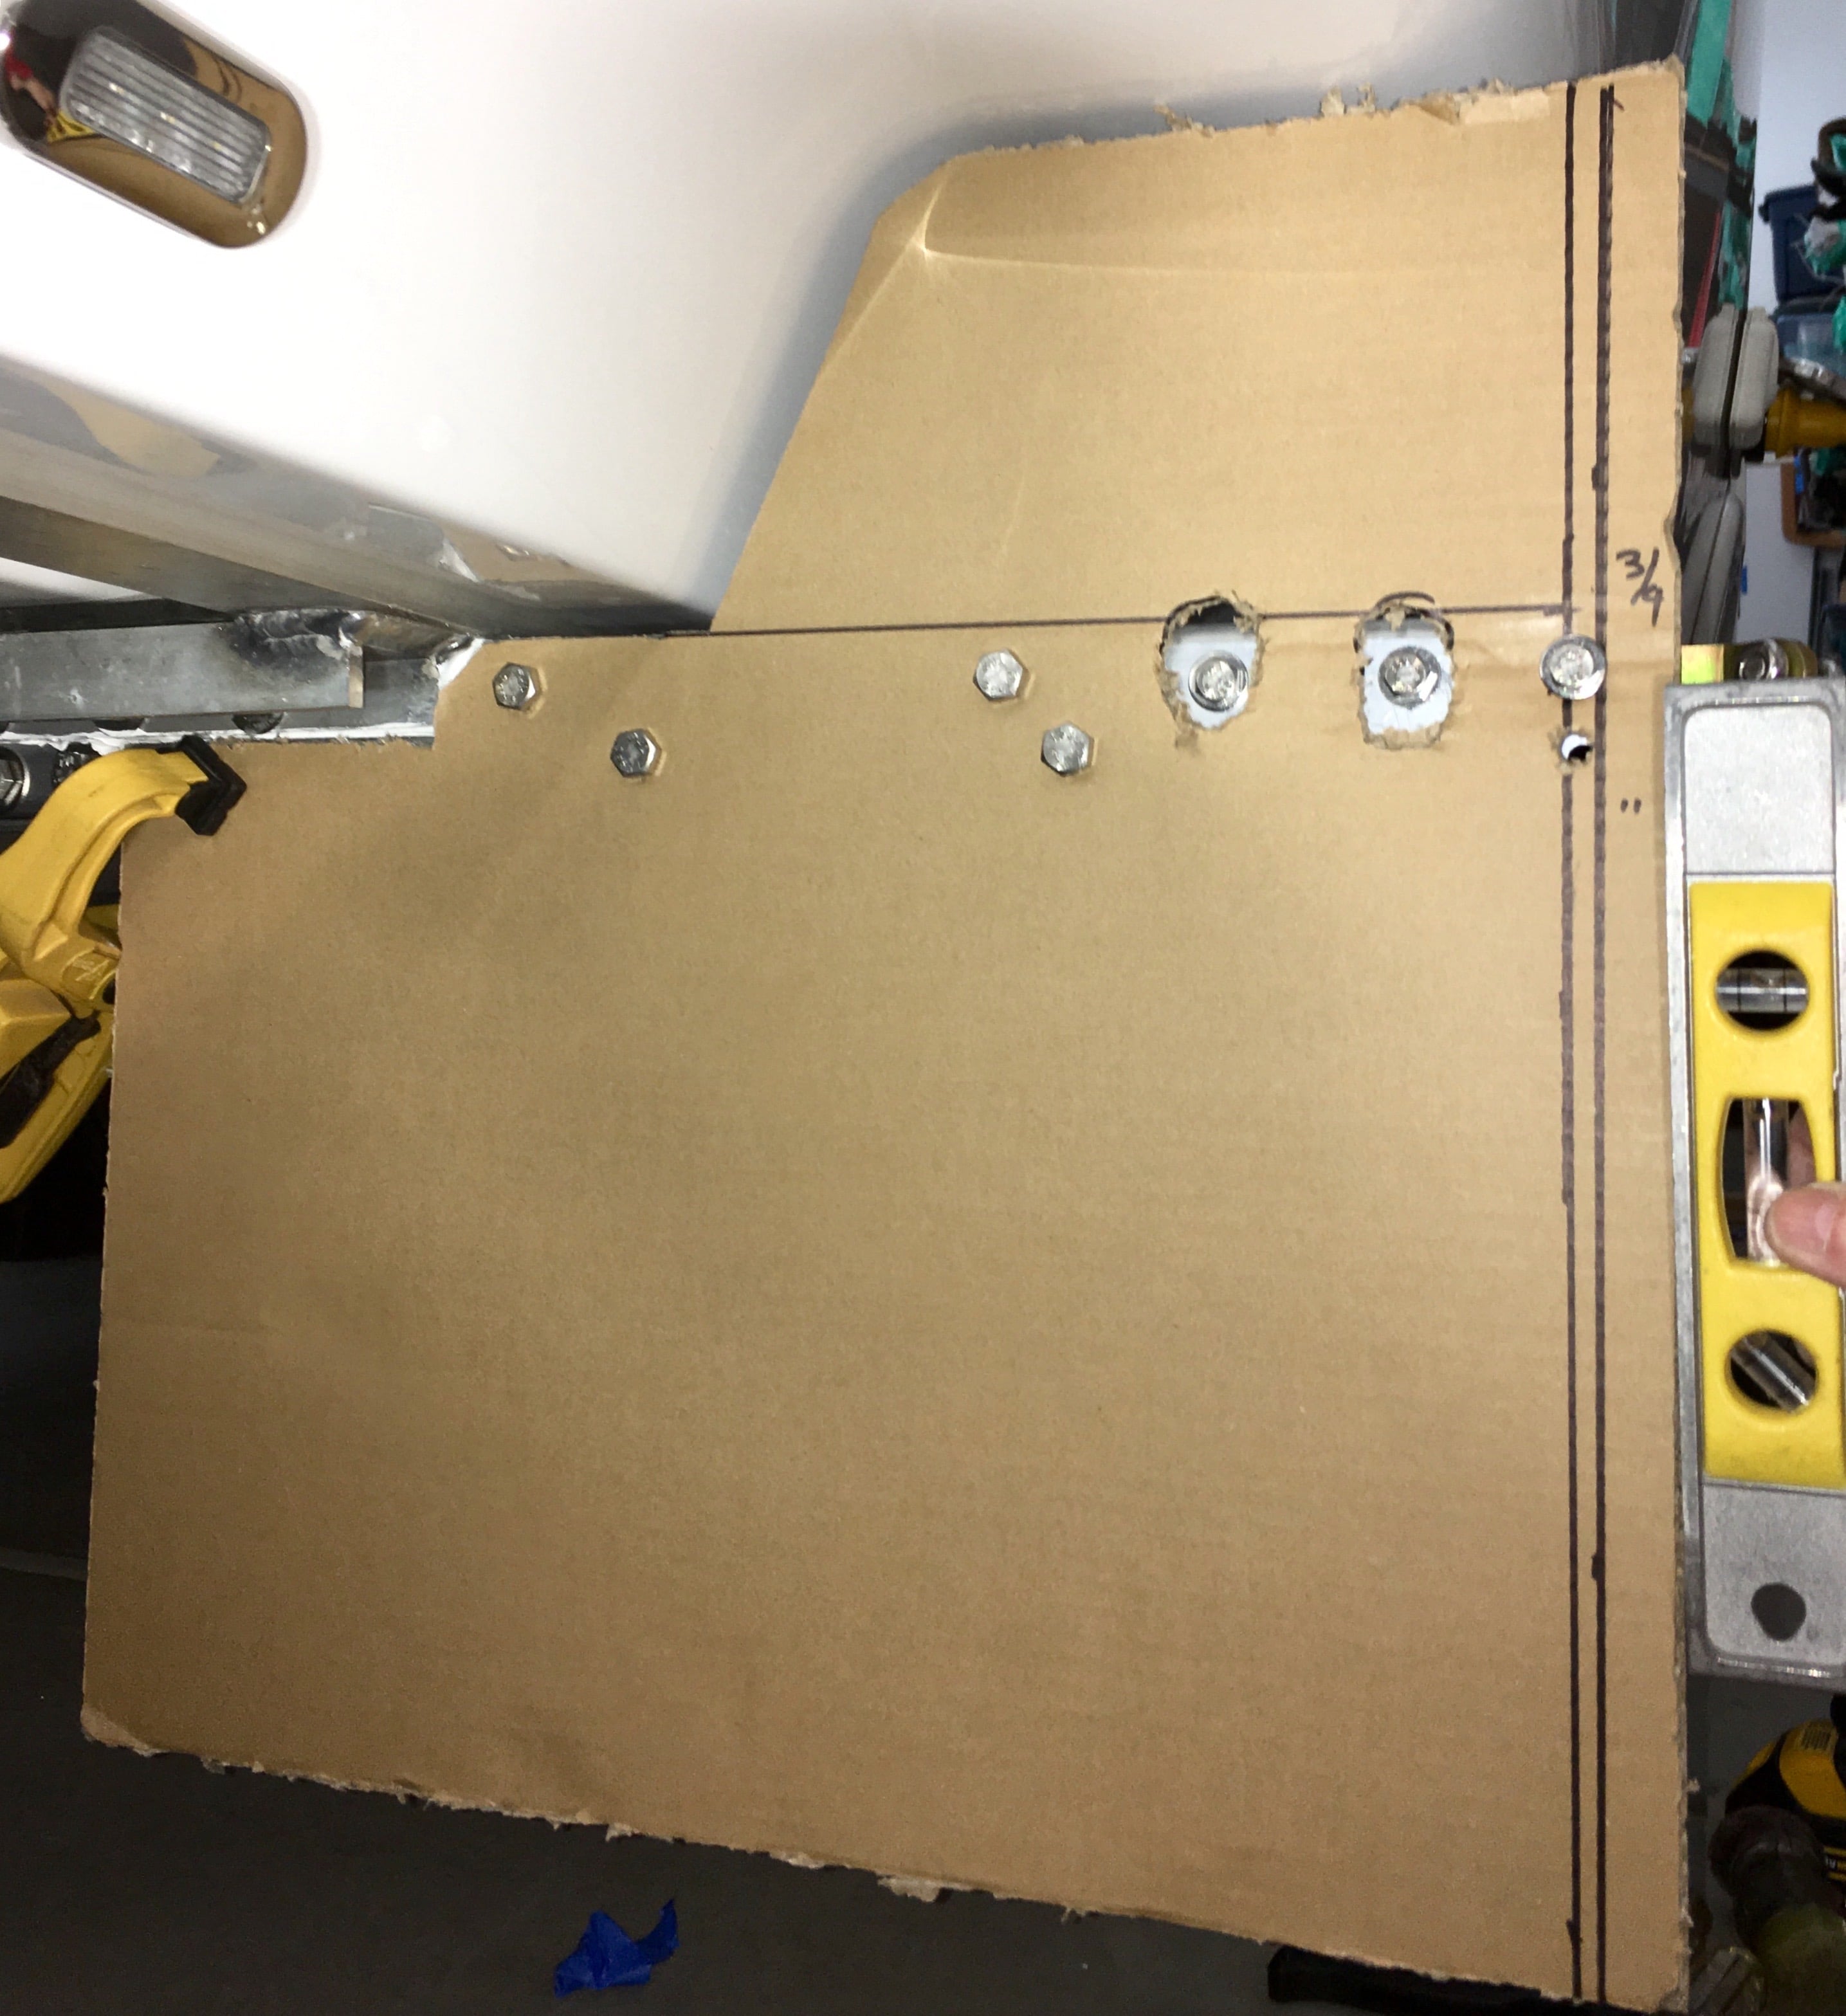
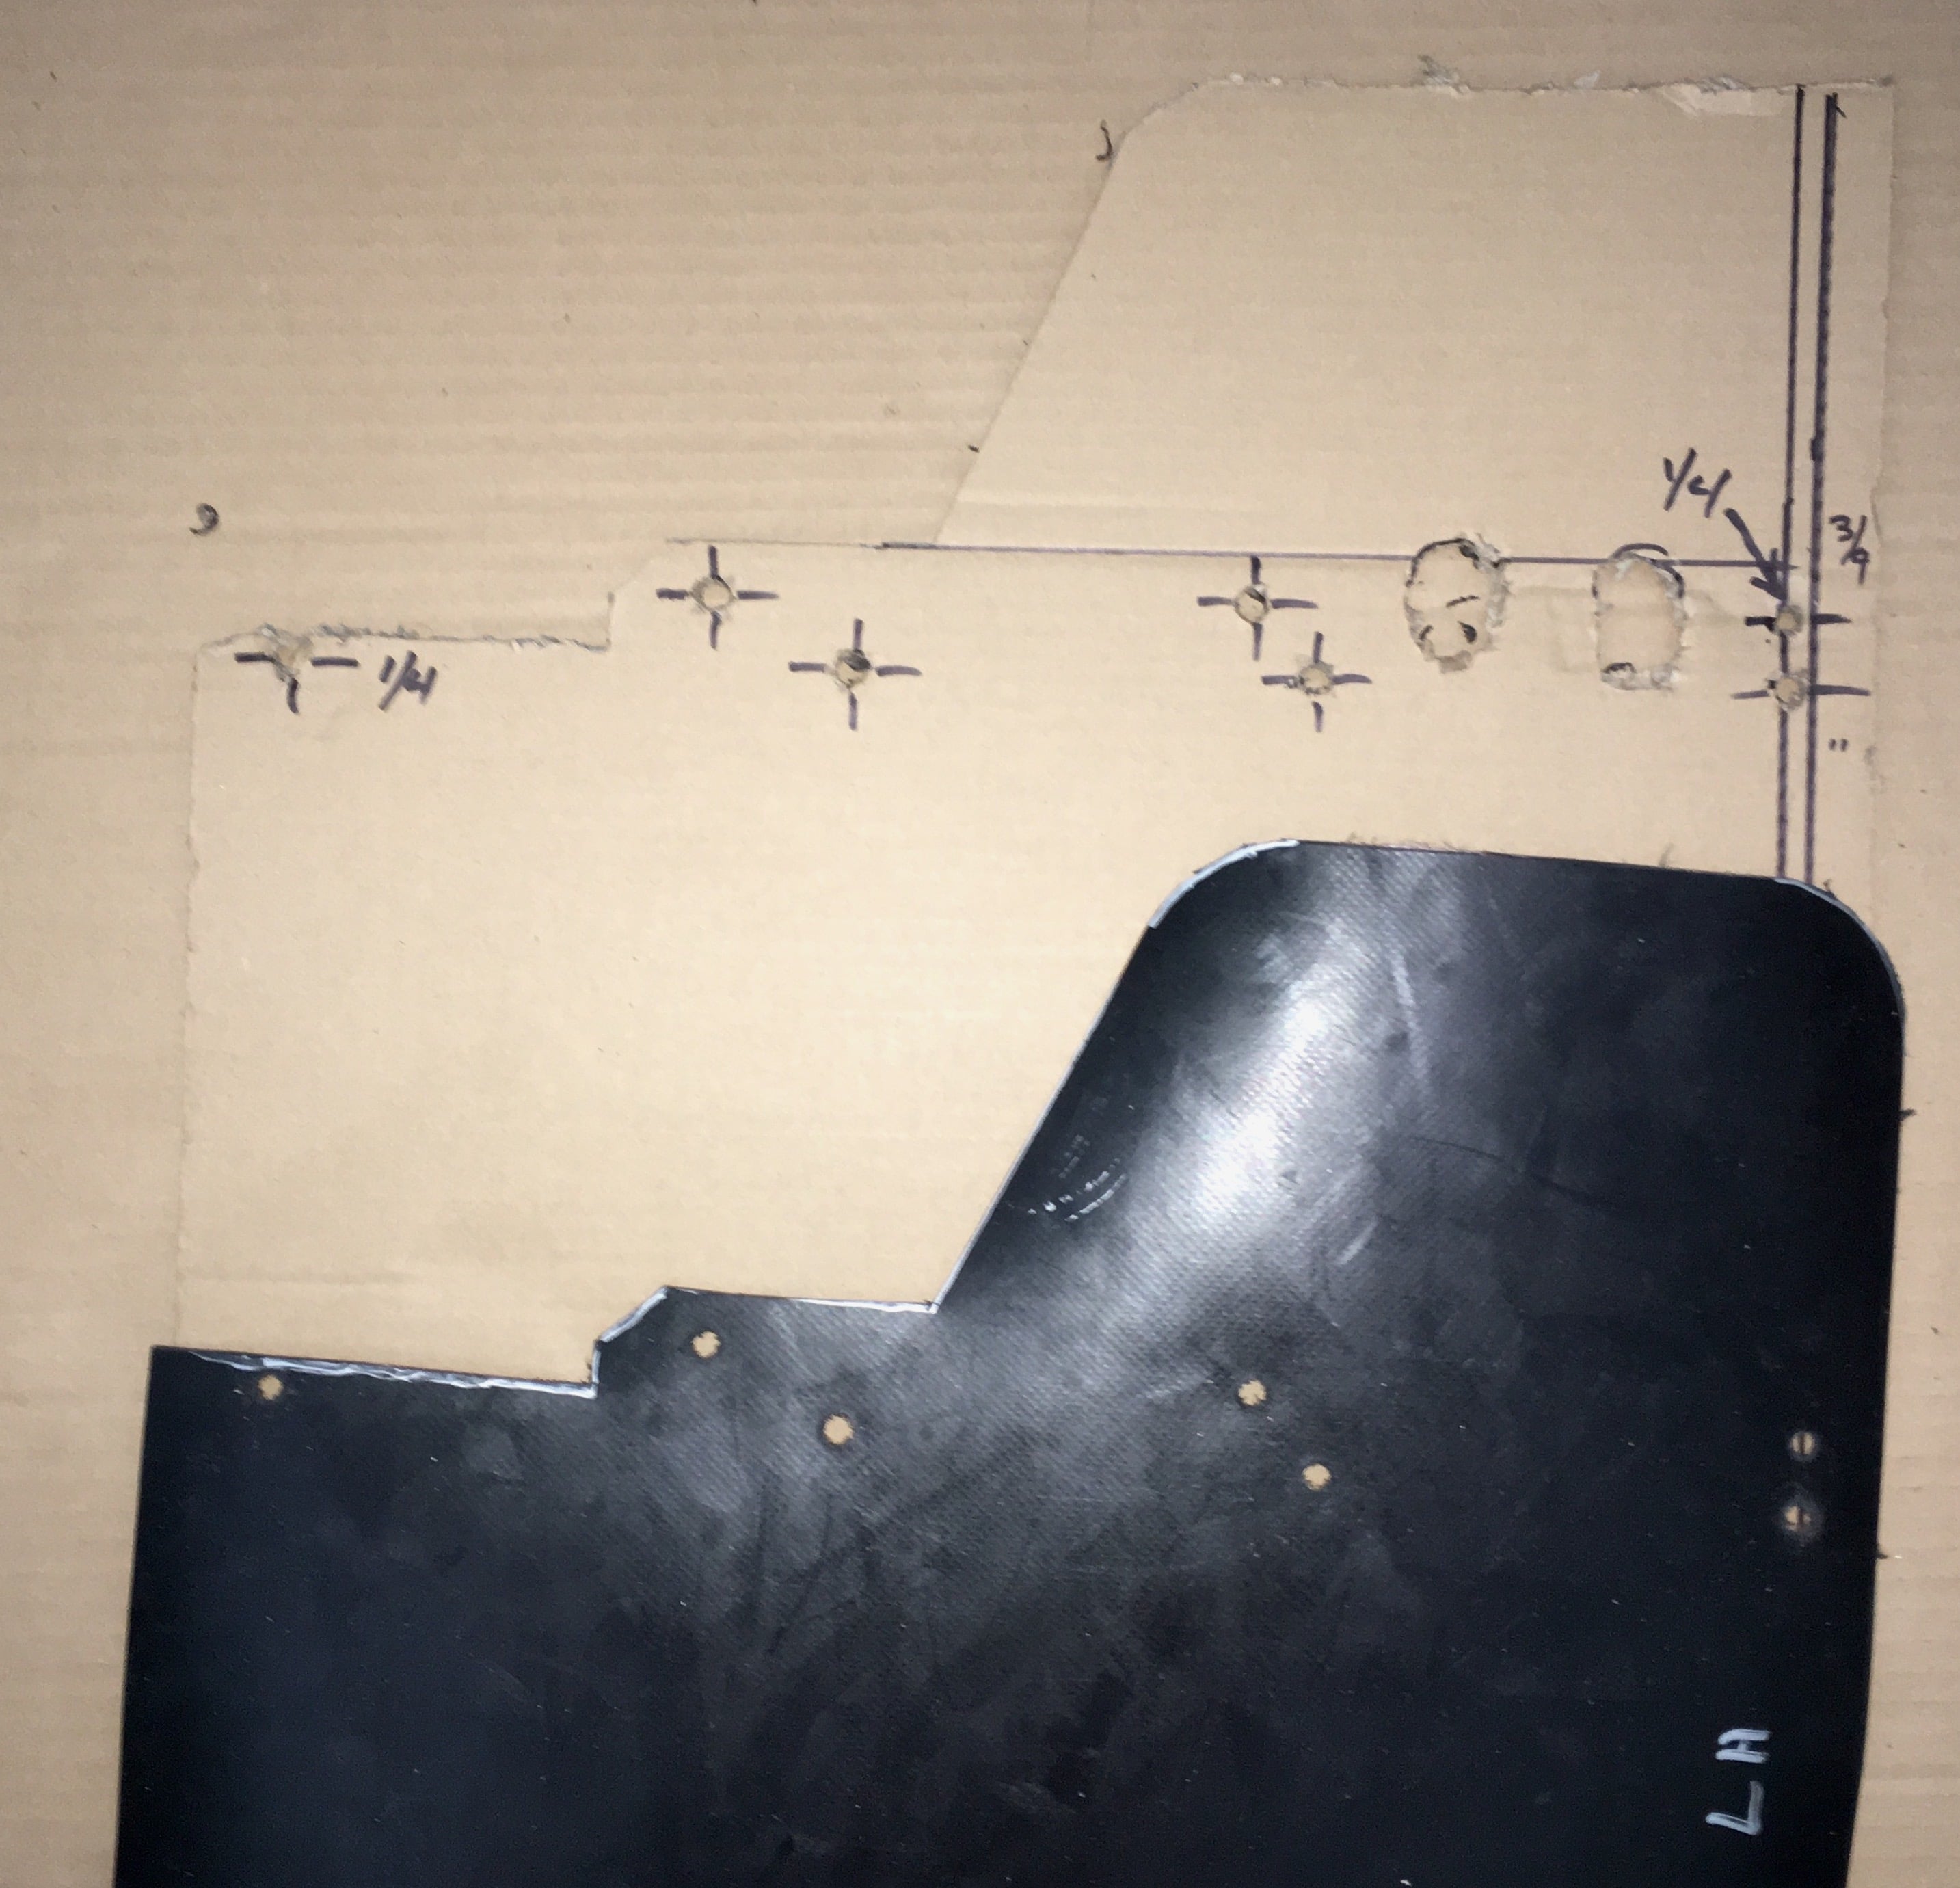
I bought my Oli used at 10 months old (2020 hull# 648). When I got my Oli one of the small Aluminum support bars was missing in the dog house lid. One my first voyage, We lost the other one within the first 40 miles. I noticed I had a bad habit of lying down the access port cover, so I fixed up a 18g wire and hooked to the large support bar and to the back of the access port cover. Just one year as the owner on one of our 5 day outings, I got to the camp site and went to open the access port to turn on the propane; The large bar had fallen off, and was hanging by the wire. I was going to call Oliver to order 2 more small bars, but since I am out in the cold when it comes to Olivers Warranty I decided to make Aluminum Support bars. I had left over 1”x2” Aluminum rectangle left over from mud flap installation (Original rectangle material was 1”x1.5”), and I had a few small pieces of Black 5/8” thick Ultra High Molecular Weight Polyethylene (UHMW) lying around. The large bar that I still had only a few very small areas that had the resin attach to it (marked in Red), and the area where the bars came off where real smooth. The surface of the aluminum had a fair amount of oxidation. I cut a couple pieces of aluminum with a Angle grinder cut-off wheel, and the UHMW was cut to size on a table saw. I counter sinked the UHMW with a 3/8 spade drill and drilled out for a 10-24 SS screw. I also tapped the aluminum with a 10-24 tap for attaching the UHMW. I got a little carried away when I attached the UHMW to the aluminum, I used blue lock tight and lock wash and nut on the back side. I was paranoid of the aluminum support bars falling off again, so I go a little carried away with the mating surfaces to be attached. I used a 1/16 angle grinder cut-off wheel and cross hatched the aluminum, I then drilled and tapped 1/4-20 threads into the aluminum. The 1/4-20 holes are NOT for bolts but something extra for what ever I used to adhere to the Aluminum. I also sanded the aluminum by hand with 40 grit sandpaper for metal. For the Fiberglass I sanded down the original area with the 60grit sanding pad on a angle grinder. I left one small portion of an edge for locating the bars side to side. I used a Dremel tool with a carbide bit to cross hatch the fiberglass. Finally I did a final hand sanding with 40grit sandpaper. I made a tool for locating the aluminum support bars from the edge of the of the fiberglass. I took measurement from the impressions in the fiberglass from the resin, and the one Aluminum bar that I had. I calculated the offset of the bar .640” from the edge. This measurement was including the white trim piece. I didn’t realize that the trim would just come right off. If I had to do it over again, I think I would done the measurement without the trim piece. Note the picture shows me holding it without the trim on the shell, but I did not use it that way. Note the wires in the second picture. Before I mounted the bars I made a couple of security straps. I figured that by some chance one of the bars would come off I Attached 16g wire with heavy duty eyelets to each bar. That way I will not loose any more support bar if they cam unglued. The next question was how to adhere the support bars to the fiberglass. I felt that my 2 low tech options were JB weld or Gorilla glue. I research both, and both seemed to be a reasonable option for adhering aluminum to fiberglass. I have used Gorilla glue a few times and never had any problems with it besides the bottle has a short life span in Oregons high humidity after it is opened. The JB Weld had a fractionally higher shear factor than the Gorilla glue did, and I have use JB weld in so many applications and it has never failed. I flipped a coin and JB Weld won, although it might have been a 2 headed coin. I ended up using 1 package of the Professional size JB Weld, and one of the regular size. to do the job. I used a Bondo plastic putty tool to spread the JB weld. I put a small amount on the fiberglass just enough to fill the cross hatching squeegeed across the fiberglass. Then I put a large amount on the Aluminum cross hatching. Put the Aluminum bar in placed and then clamped. Note the trim piece in place. Below is of one of the bar ends. The puddle of JB Weld on the inside of the bar is what pushed up through the 1/4-20 holes. Here are the tools I used for the JB weld. The 3M adhesive remover worked great for cleaning up the JB Weld (sometimes I can make a mess). The final Product. I secured the wires with GB 1” square adhesive back wire tie downs to keep the wires out of the way.
7 points
-
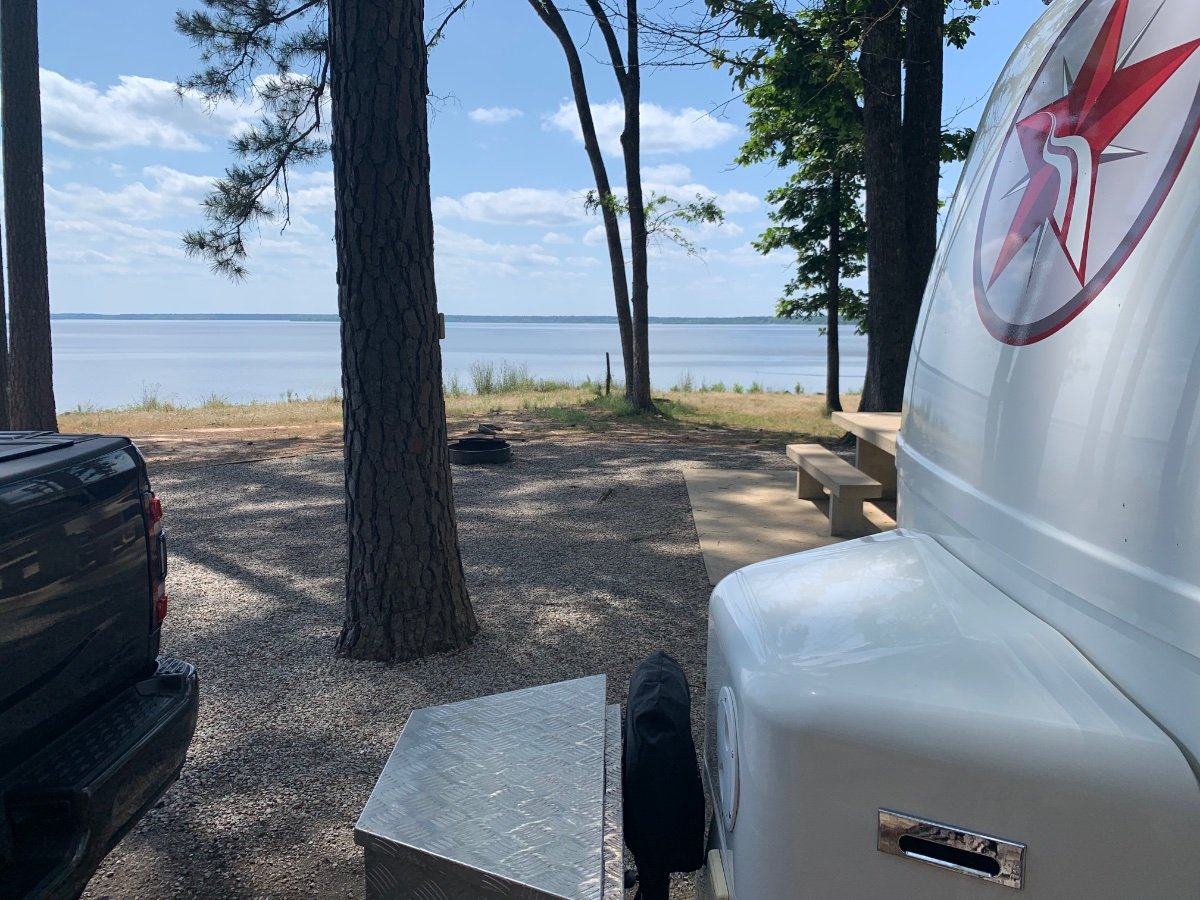
We continued our meander across Texas today for another one night stand just outside of Texarkana. We’re at Piney Point COE campground on Wright Patman lake. We’ve camped at this lake several times before at Clear Springs COE campground not too far from here (see page 9 of this thread). I’d say Clear Springs COE is a bit nicer and is much larger. It has a lot FHU sites if that’s what you need. This campground is smaller. Lots of tall pine trees, not like Texas Hill Country at all.
7 points
-
UPDATE: I performed an LP Drop test on the gas line this week, after tightening up the suspected connection at the furnace, and we have no more leaks. For those wondering, the best place to do the drop test for us turned out to be the outdoor propane quick-connect. My local hardware store had a quick connect fitting with a hose barb on the other end that fit our manometer tube perfectly. SO happy that we can head out for our 10 day boondocking trip and not worry about the propane. (After we install the replacement propane/CO detector Oliver sent under warranty, of course.)5 points
-
My wife and I pickup up our LEII, Hull 990 on 2/17/22. We spent the nearly a week at or near Oliver's operations in Hohenwald shaking down the systems before returning to our home in Dallas. Our Truma water heater worked as expected and we marveled at how it was "just like out tankless water heater at home". I winterized the trailer upon our return home, including installing the antifreeze option for the Truma water heater. Our LEII spent the next 6-7 weeks in our driveway while I made additions to it. On April 23, I moved the trailer to an enclosed storage facility approximately 30 miles north. We have three Lithionics batteries, for which I followed the recommendation to turn OFF the batteries during storage for 30 days or less. On approximatly May 8, I retrieved the trailer from the storage facility to prepare for departure on May 11 to South Carolina. Everything appeared to be in order prior to our departure, although I did NOT test the Truma water heater. After a full day of travel, late on the night of May 11 I discovered the Truma water heater would not operate. We had two full 20 lb. propane tanks, the stove easily lighted verifying the flow of propane. I verified the power switch on the Truma unit was ON, however, the interior control located to the right of the pantry did NOT display an amber light. No hot water. I contacted OTT Service the next day and was advised to check the fuse, which proved to be OK. I was also advised to check for 12 volts DC at the rear of the Truma remote control. Today I removed the access portal from the forward interior wall of the pantry to discover the Truma remote is apparently epoxied to the hull. A black cable with an RJ11 type telephone connector plugs into the rear of the Truma remote, making testing for 12 VDC difficult. I again called OTT Service, and after four hours have still not received a call back. I searched Google for "Truma service near me" (now Paris Mountain State Park, near Greenville, SC) and found the Truma Dealer Partner Locator on Truma.net. The first listing was for Retromodern Campers, in Pickens, SC. I phone them and spoke with Scott Whitmire, who indicate his company had recently become an authorized servicer for Truma and he had been installing Truma units in refurbished trailers, many from the 1940s and 1950s. After describing the symptoms of our Truma unit, Scott indicated he had encountered the same symptoms twice, once as recently as two weeks ago. He said he would call Truma for guidance. In about 10 minutes I received a return call from Scott, saying he had spoken with Truma and received the following directions: Power ON the Truma unit at the main power switch. On the interior mounted remote control, turn the dial to OFF Wait a few seconds, then turn the power to ON at the remote control The remote control unit should now display the amber light on the dial. I was pleasantly surprised the amber light came on. I went outside to the external shower (not wanting to fill the gray tank) and ran the water for less than a minute, when hot water began to flow. I then verified hot water was available at both the bathroom and kitchen faucets. Scott said as long as the power is not shutoff to the Truma unit, it should work just fine on the next trip. I point out that I expect it to be common practice for Oliver owners, many of whose whose trailers are equipped with lithium batteries, to power the batteries OFF between trips. This will necessitate performing the Truma re-boot process described above after each storage period in which the lithium batteries are turned OFF. I can find no reference to this re-boot process In the Truma section of the 2022 Oliver Optional Features Component Manual. I hope others with lithium batteries and Truma water heaters will recall call this procedure after they have turned OFF their lithium batteries during storage.4 points
-
And, that is the way it should be. Glad that it worked out for ya.🙂 Bill4 points
-
Well, hooked up to my tv and a proper platform sure made my life easier.4 points
-
All, thank you so much for the heads up so I guess I will need a jack and a bottle of "Jack" to complete the job>4 points
-
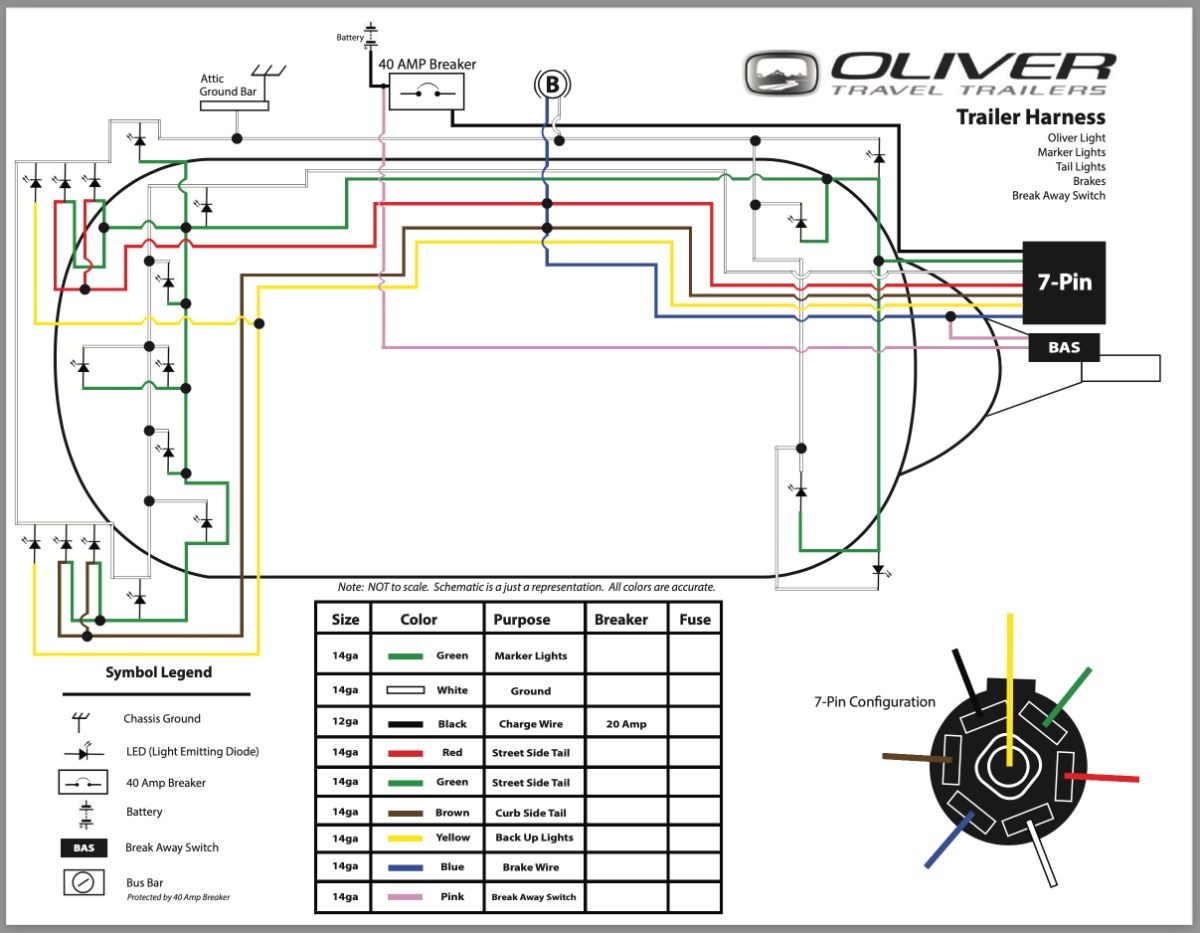
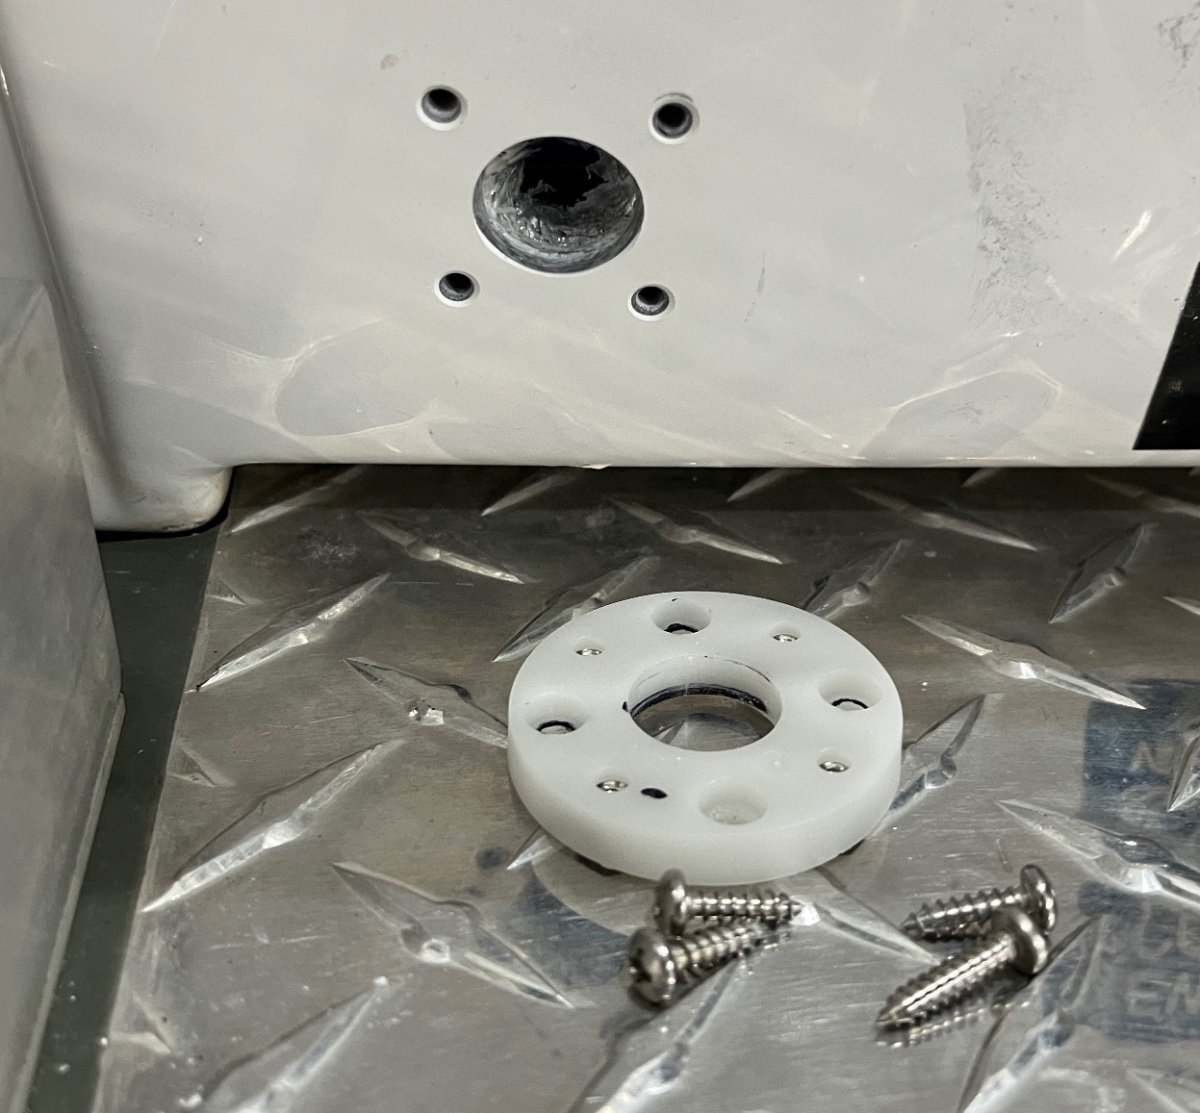
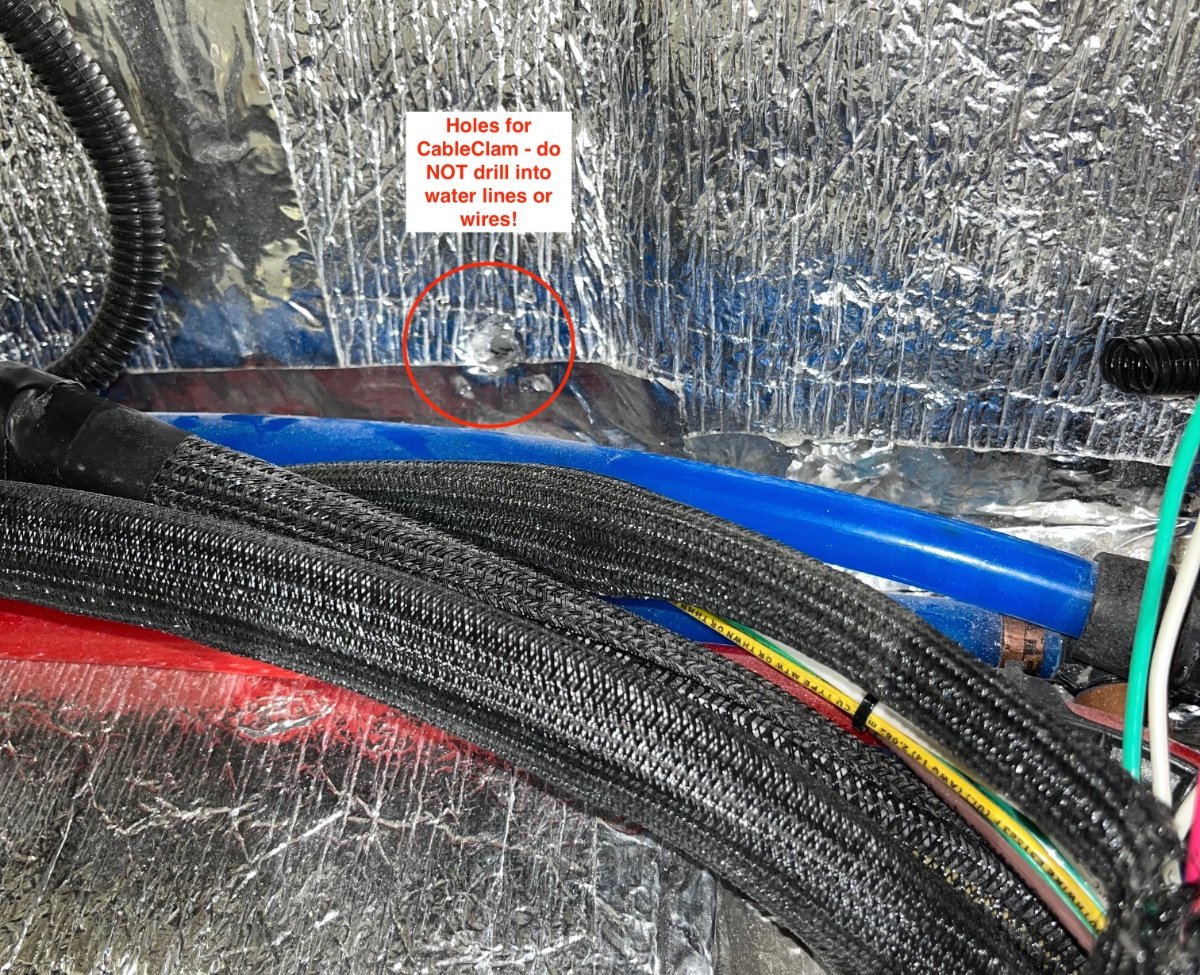
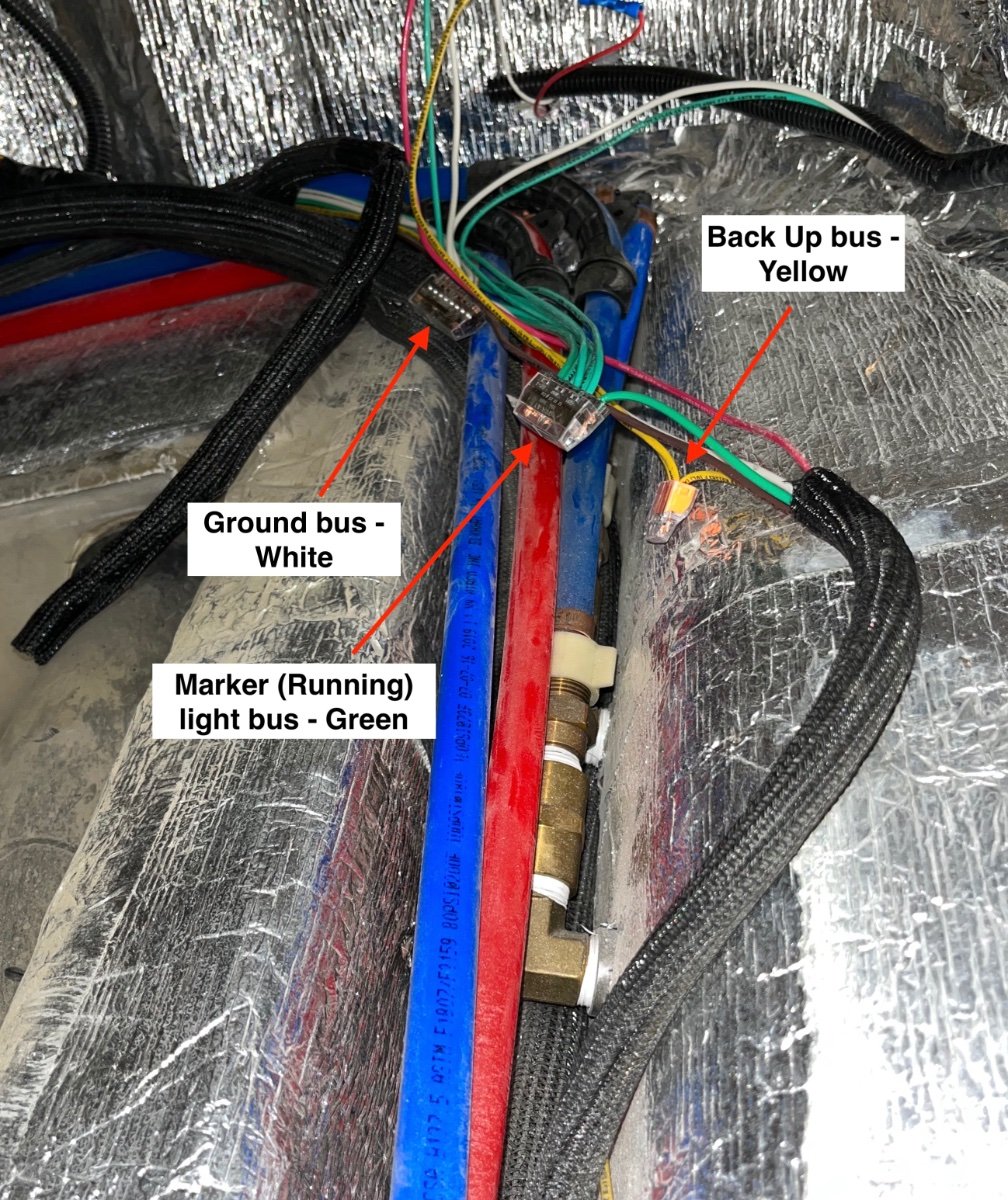
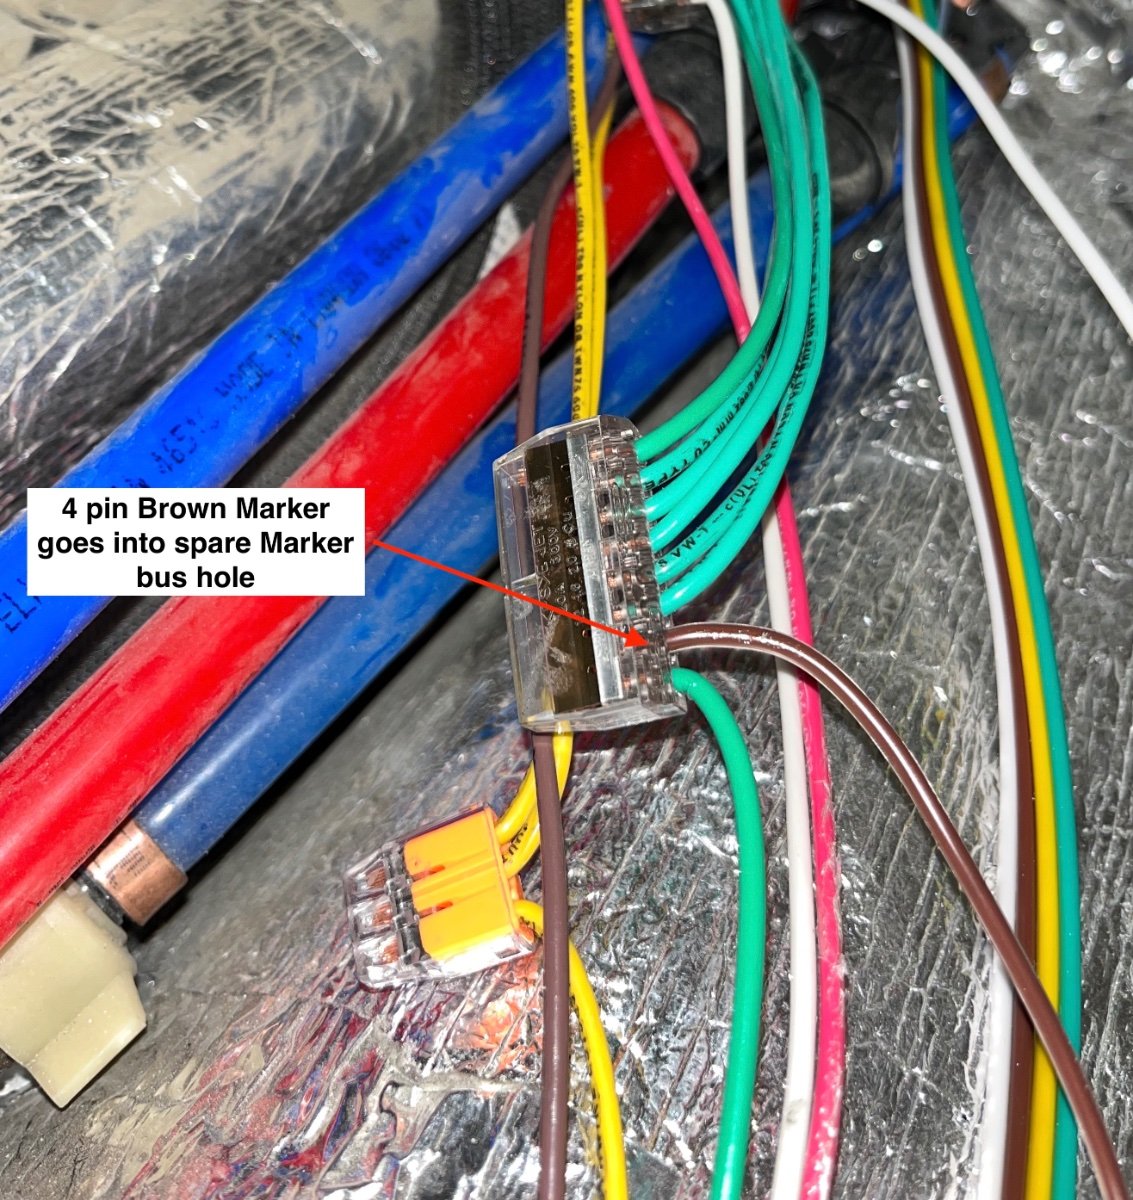
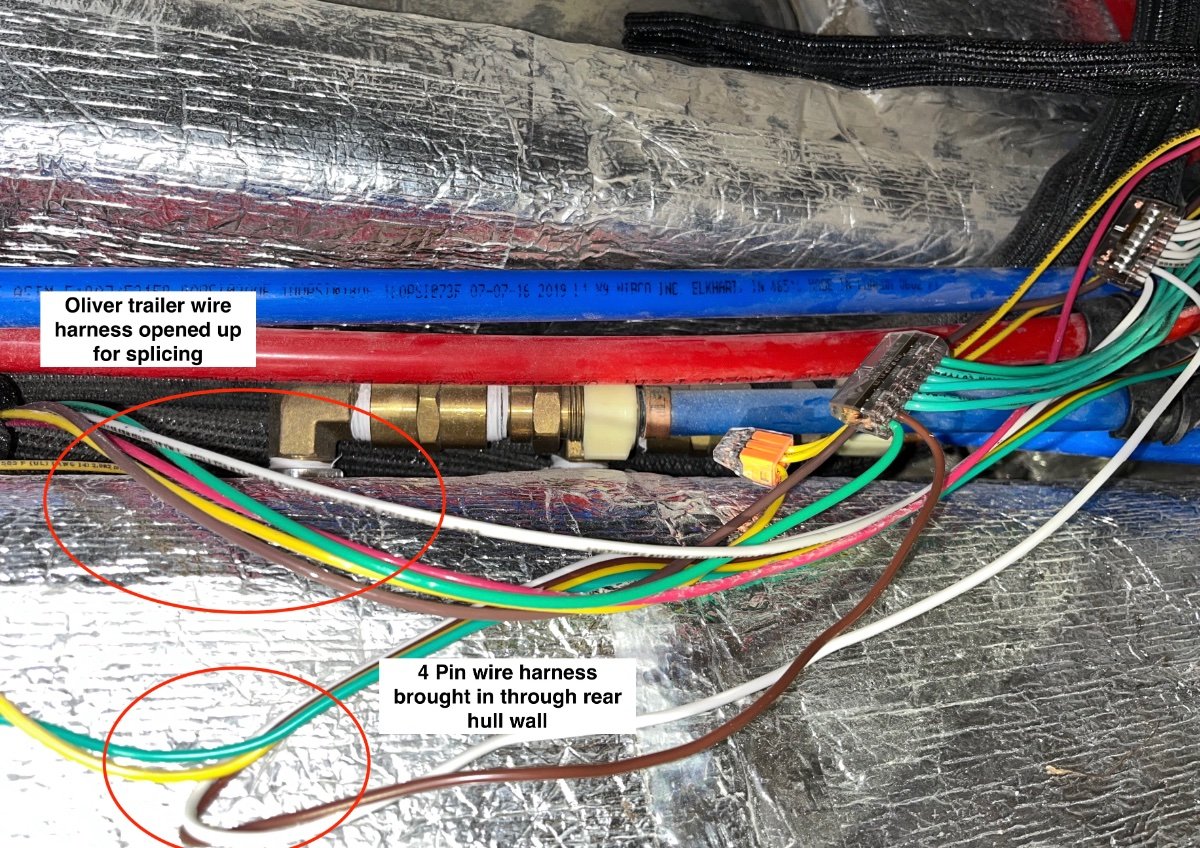
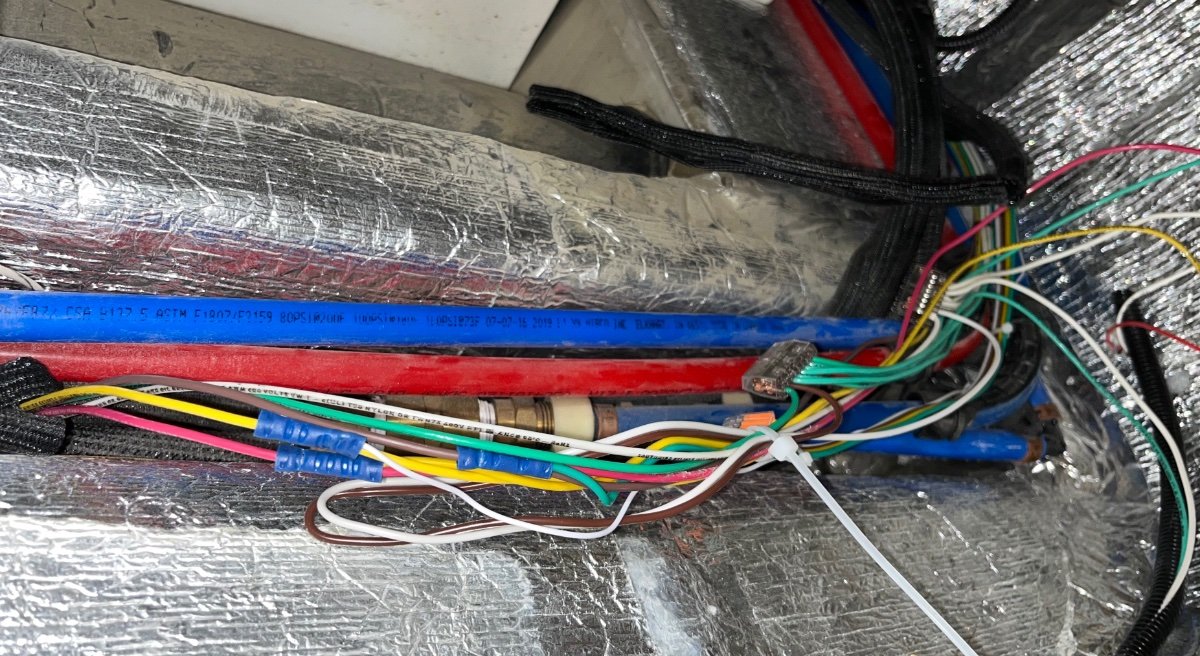
If you have blocked your tail and brake lights for some reason, with a big cargo box for example, you need to add aux lighting to be safe and legal. I added an LED light bar here: ... https://olivertraveltrailers.com/forums/topic/6848-how-to-add-a-full-width-led-light-bar-to-your-bike-rack-when-your-bike-blocks-the-trailer-lights/ The factory wires are easy enough to access underneath the rear cargo floor, near the side door, but the colors do NOT match "industry standard" color coding. Not even close. This is based on my 2017 LE2, yours may differ. Oliver stopped providing wiring diagrams a few years ago, please complain to Sales! I made this chart showing the differences. Why they did this is beyond comprehension. This is from the lightbar thread, it shows the CableClam in the exact location of the left round red reflector. Be VERY careful drilling holes here ... ... because directly on the other side there are water lines and electrical cables: To access the wires, remove the rubber floor sheet and the several tiny screws holding down the floor panel. Remove any cable ties, black electrical tape and peel away the protective split loom material. You will see some wire buses and also the two water ports and check valves. My two larger buses each had a free spot, so I could just strip the appropriate wire and push it into place. The other three wires had to be spliced directly into the Oliver wires. A little confusion here, the separate LED light bar Back Up wire was white, so it is important to keep track of the wire's purpose - function supersedes the actual color at all times! AFTER testing to make sure all your lights work .... OLIVER Bike Rack LED Light Bar Initial Test .... reinstall the split loom and secure everything well with nylon wire ties. Don't forget the big bundles that run along the back wall, mine were completely loose. Double check your lights to make sure they still work. Put the floor and rubber sheet back in. Go have a beer. I hope this helps. It is infuriating when colors do not match industry standards. ESPECIALLY IF YOUR TRAILER MANUAL HAS NO WIRING DIAGRAMS!!! John Davies Spokane WA
3 points
-
Mike, Beautiful site! We love COE campgrounds!!!!!!!!!!!!!3 points
-
I’ll never think of a bottle jack the same way after this thread!3 points
-
Fellow Oliver Travel Trailer Owners and friends’ Earlier I posted that I and my two business partners of Happy Camper Solar would be at the Oliver Rally to demonstrate and provide information on our Solar MaXX products. Our plans were to show the Mobile Tracker and the rooftop tracker for the Oliver Elite and Elite II. Unfortunately, a family member of our business tested positive for COVID. As we discussed attending the rally, we quickly decided to do the right thing and not expose anyone to the possibility of being infected. This will be my first time ever to miss an Oliver Travel Trailer Rally. I was looking forward to again leading the Rally and being the MC for the Wednesday night Opening Ceremonies. My conversations today with Oliver Staff and sharing the itinerary and program notes should result in everyone having a great rally. I also posted earlier on Oliver Trailer Owners Facebook page and Oliver Forum that we would be offering a 3-year free electronics warranty if you contacted us during the rally regarding the purchase of one of our products. Since we are unable to attend the rally, if you contact us via the e-mail below, we will put your contact information on our waiting list for a no obligation purchase. Due to supply chain issues and manufacturing backlog, we are unable to provide a product availability date. However, if you provide us with your contact information we will put your name on our list, notify you when we have completed manufacturing the products, provide you with technical data and a price as well as honoring the 3-year free electronics warranty from the date of purchase. If you e-mail us with your contact information no later than June 17, 2022, we will honor the offer of a 3-year electronics warranty. We were looking forward to spending time with each of you at the rally. However, we felt ethically obligated to cancel our attendance for fear of a possibility of exposure to COVID. I look forward to next year’s rally and seeing each of you. Coy Gayle hcsolar3@gmail.com2 points
-
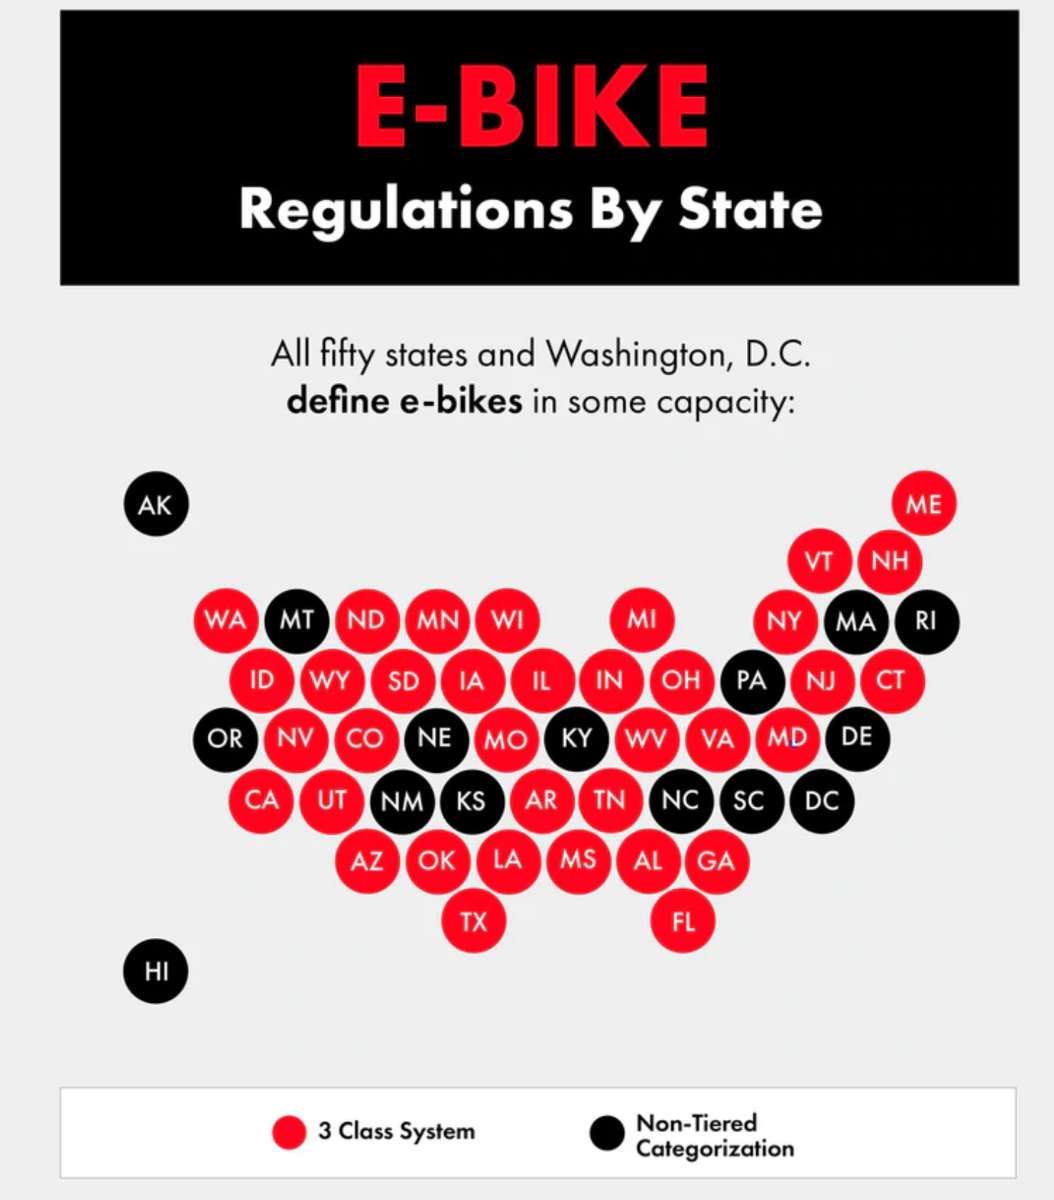
Be VERY sure you understand the classification system for ebikes and where you can legally ride yours. Most states categorize them and many limit their use, it would be a shame to buy an ebike and then find out that you can't ride it on those bike paths or rail trails. Generally speaking, if it can move without your "pedal assist" it is going to be very restricted. My wife just bought a fast and powerful Class 3 (28 mph) Gazelle Ultimate C380+commuter ebike. Because it has no hand throttle it is legal for many trails that the more basic ones can go. She just has to be careful about keeping the speed down 😉 https://www.juicedbikes.com/blogs/news/e-bike-regulations-by-state Some rail trails like the wonderful Route of the Hiawatha in Idaho do not permit Class 3 bikes, but in reality there is no way for an inspector to tell a Class 3 from a Class 1.... as long as you don't speed. It isn't stamped or placarded in any way. And that trail does allow Class 2 bikes by special permit, which would be a hassle and there would be no guarantee of being approved. The main intent of limiting power is to reduce damage to soft surfaced paths. I'm not sure about mobility scooters, I suspect that if YOU are truly ADA handicapped, you could ride it on most paved bike paths. But I would not bet on that. And it would certainly be a whole lot harder to transport when camping. John Davies Spokane WA
2 points
-
Edit, added a warning picture about the CableClam holes: John Davies Spokane WA
2 points
-
Thank you all, really good advice here - I will replace the dura faucet shower head, flush the water system with White vinegar ( by pass water heater of course) and invest in a quality water filter.2 points
-
Even the least effective camco cuts out a lot of solids. Not all, of course, but it definitely helps. Good question, Mike. @Imelda, I'll look for instructions in another post, but basically, you'll want to pull a strong vinegar solution in like you are winterizing. do not draw it in to the water heater. Pull water through the lines by opening one faucet at a time, just like you do when winterizing, but you won't see pink, you'll smell vinegar. Don't forget the showers, and the toilet. The acid in vinegar can mess with valves and seals,, so let it sit for twenty or thirty minutes,, and flush very thoroughly with plain water, everywhere, every faucet. (That's my opinion. Others may think otherwise. )2 points
-
Geo, in your photo, it looks like you might be using stacked patio blocks/pavers to support your jacks? I'd be extremely uncomfortable with that, as well. I had a bad experience once with a concrete block shattering under the weight of a jack. Never again. We always use wood. Sometimes, you can't see the hairline cracks, or internal cracking, in those formed concrete blocks.2 points
-
You could do a close sniff test at the quick connect and a sniff test at the furnace an hot water vents. I’d also check my propane tank area. Mike2 points
-
It would be nice if Oliver service department would make a video showing the right process of lifting up the Oliver for maint.2 points
-
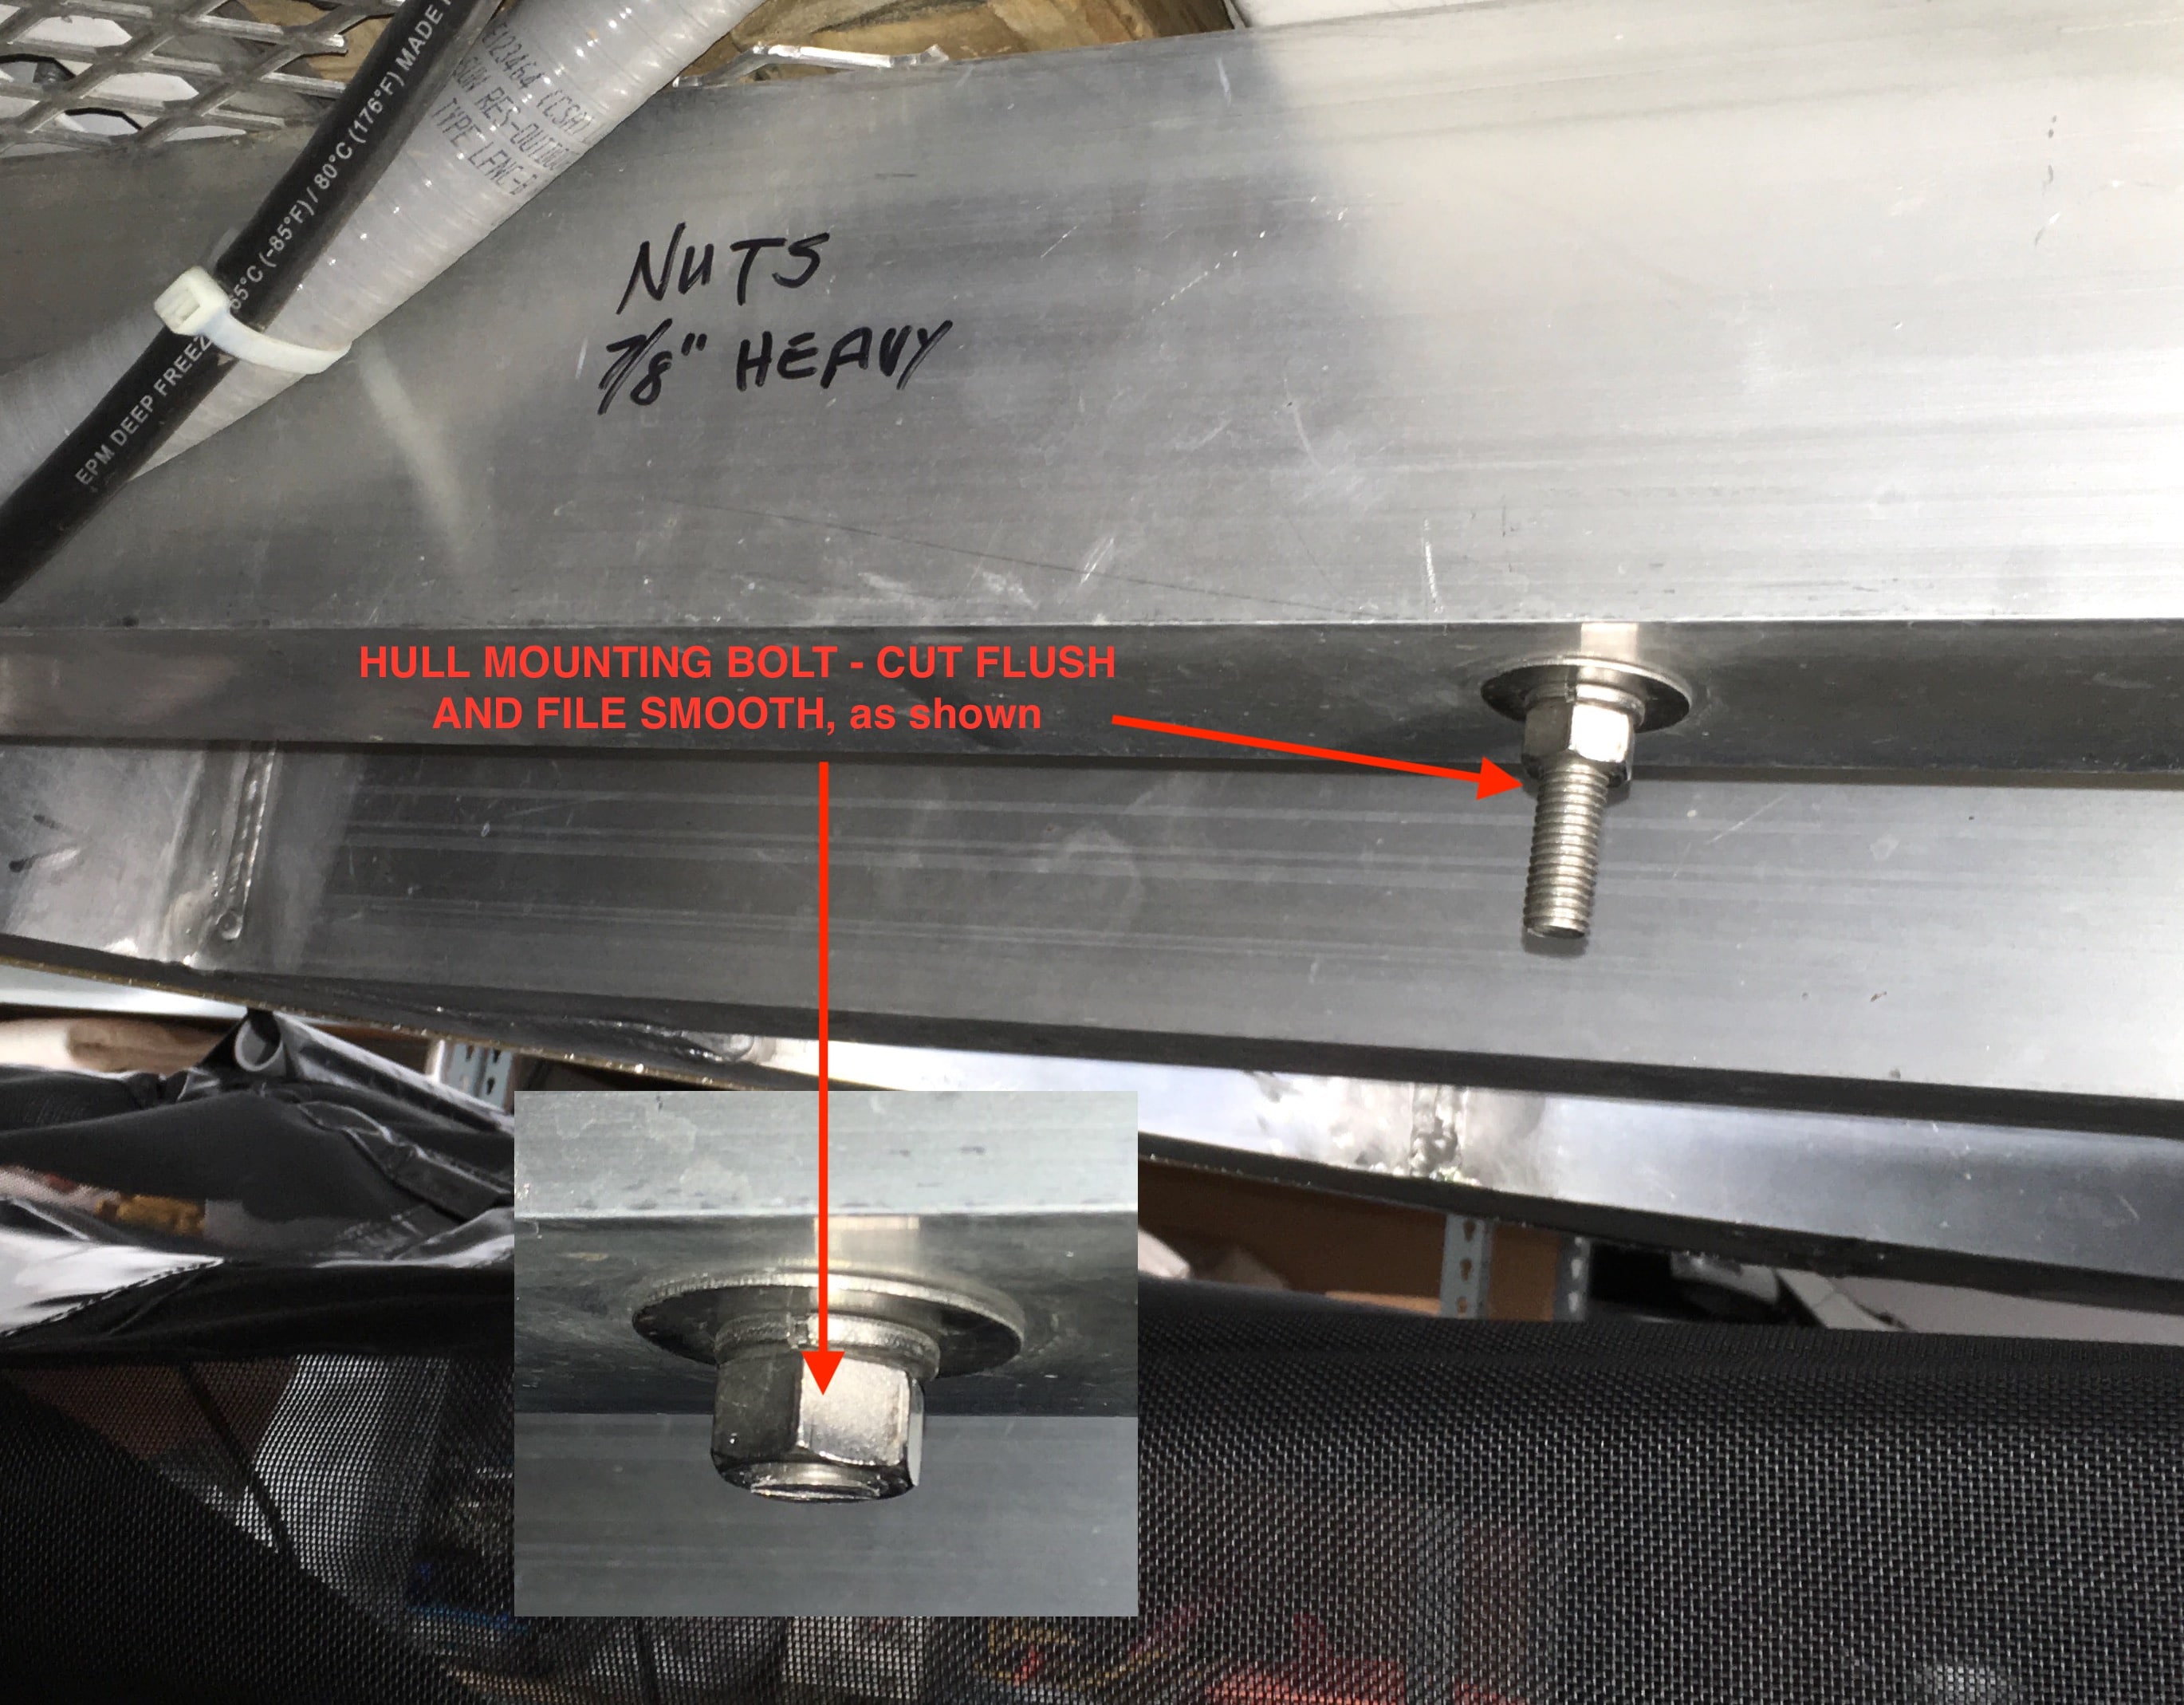
Oliver no longer recommends using the electric jacks to lift the trailer for tire changes or wheel bearing service, only for stabilizing the trailer to prevent rocking. Oliver doesn’t even call them “jacks”. They are a “three point power stabilizer system”. I use some pieces of 4”x4” lumber and a heavy duty scissor jack (3.5 ton rating) to lift one side of the trailer at the marked lift points on the suspension subframe (Note: not all Olivers have the lift points marked like this in the photo). And once I have the trailer lifted I put the electric stabilizer down just as a safety backup. Used this setup for my wheel bearing repacking, and I carry the wood and the scissor jack on the road as well in the bed of the truck for changing a flat tire if needed. If you use a hydraulic floor jack or a hydraulic bottle jack, you still need some type of safety backup like jack stands or using the Ollie stabilizers. Hydraulic jacks can leak and collapse.
2 points
-
Imelda, this has been discussed many times on the forum. Initially Oliver recommended this, then changed their mind due to the manufacturers (Barker) rnot recommending doing this. To make a long story short from what I can determine many Oliver owners use the built in jacks without the blessing of Oliver while others use a mobile hydraulic jack. If your Oliver is a newer one with enhanced steel plates on the frame, use a mobile jack, if older without the steel plates there seems to be no real consensus as to the best or safest method. I would encourage you to do a thorough search of the forum to learn more.2 points
-
Thanks guys! I'm 5 hours into my trip and lug nuts are staying tight at 90# Checked at 50 miles and 100.1 point
-
Hi, New here too. Just picked up Hull #1081, an E2. Ran furnace a few nights when we first got home. The following afternoon I was outside near the back of the tailer and my nose detected a whiff of propane. It was there and then gone, but then I noted same thing a few days later. I sniffed around, opened the furnace area, and did not notice a thing. I do have a rear quick connect and from posts above I wonder now if that might have been the source. I have not noted any propane the last few days...... maybe I should check the levels in my bottles...... a sniffer is a good idea too. Thanks1 point
-
What Mike D. said, can't use them with the E-Z Flex suspension.1 point
-
Hi Raspy, sorry, I am not attending. I normally try to stay on the west side of the Great Plains…. but I will be in central Texas in 2024 for the total solar eclipse, we could meet then. 😬 I would appreciate seeing lots of pics of your baby, maybe you could start a detailed thread? I don’t recall, don’t you live in Nevada? In a week we are headed to south Idaho and then Great Basin NP (tho it is too early so we probably won’t be able to get high up there), then west and back through Steens Mountain area. Maybe we will run into each other… John1 point
-
Interesting video, and also because he used an hydraulic jack right under the axle, oh well.1 point
-
Yeah in that first video where they show prying out the bearing.... it last all of 2 and a half seconds and that if you slow it down to 25%. It's almost as if they want it to be a big secret. Thanks for posting it though Jim. Scotty1 point
-
In a recent review of wheel bearing grease - the Redline CV-2 beat out even the Timkens own brand. Bill p.s. HERE'S that review1 point
-
This has been discussed many times. Short answer: Redline CV-2 John Davies Spokane WA1 point
-
I've finally got all my parts and getting ready for the task. I found this video very helpful!1 point
-
Update. I did get 3 100 AH BBs and had them installed. I've just returned from the auto parts store where I had the AGMs load tested and one of four tested "bad" and the second of four tested "nearing end of life", the other two were still good. I'll keep the two good ones and use them in another application I have in mind. I watched the entire installation and I have to say, thank you to all who tried to help me understand how to do the swap myself. However, from what I saw, I would NOT have had the hand strength to manipulate those cables ( @Terry McCaffertyI was able to re use the existing cables and my tie-down now looks kind of like yours only black ) AND hold them onto the bolt while tightening the nuts. I most DEFINITELY would not have been able to lift the AGMS out of that tray. The entire process of discovery and completion has been very educational. Having read the Solacity piece among volumes of other material, I now feel that I need to re learn how to read the Solar Controller panel and use the information there differently. I *think* I understand that I need to know much more about the batteries' state of charge but I don't really know how to monitor/track that. More research! Thanks again to all of you1 point
-
Agree with @Trainman. Most American RVs, and virtually all of their appliances/components, are built to last barely longer than their warranty period. Yes, they do get bounced around a lot, but my truck doesn't need a new radio or navi system every 18 months because it goes down the road. The real problem is us. As long as Americans will keep paying top dollar for a rolling do-it-yourself project, they'll keep making them. I am hoping the Oliver design and construction holds up to our expectations. Bad enough when the gadgets break, much worse when you're dealing with roof leaks, broken spring hangers, and cracked frames.1 point
-
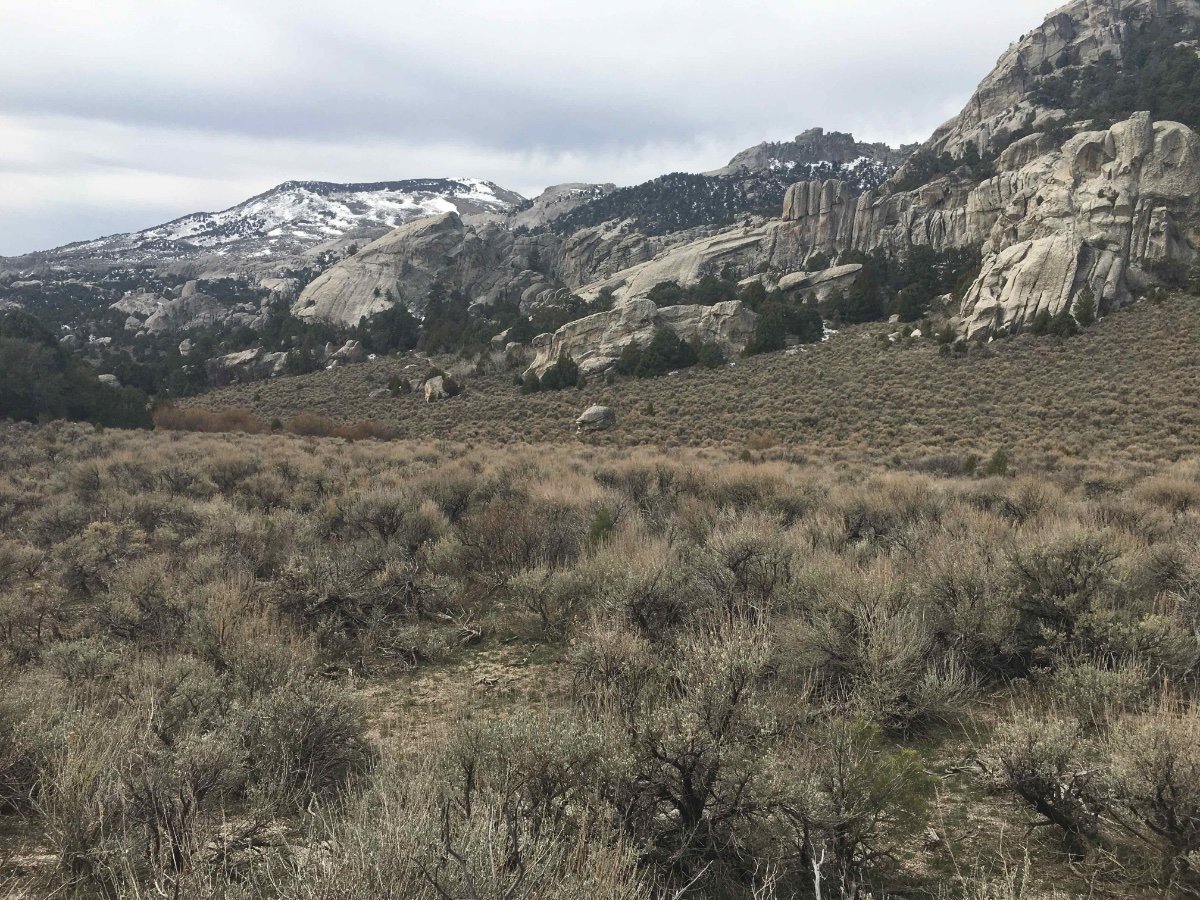
Early season at the City of Rocks, Idaho, elev. ~6,200 feet. Superb hiking.
1 point
-
Well then! Back to the drawing board as I DO have the Dexter E-Z flex Suspension! Now I'm completely confused! My goodness..does it have to be this hard??1 point
-
I'm getting ready to do the same thing and was just wondering that a few days ago.1 point
-
Yeah, you're right! My Dad simply left me out of the mechanical stuff and reserved his knowledge for my brothers. He died when I was 21 so I never got to ask him these things now that they are important. The brothers..well, they live in other states.1 point
-
What's that got to do with it?😇 Seriously - any human that I know of isn't going to lift one of these campers all by themselves. Knowing what works and especially knowing the right way to do it pertains to all of us. Besides usually being safer, the right way is also usually the most efficient and easiest way to get a job done correctly too. Bill p.s. besides - these kinds of topics are good to revisit from time to time particularly with more and more people obtaining previously owners Ollies.1 point
-
That's what I understand to be the "correct" way to jack up the trailer. The problem on a pre-2017-18 trailer is that the subframe is very short. Trying to find a place to get a jack in there amongst the axles etc. is not an easy thing to do. I have used the onboard stabilizers as well and not had any problems. It's my understanding that this issue ..... along with some folks damaging the axle by jacking under them... was what drove Oliver to the decision to extend the steel subframe.1 point
-
OR - try this. Note that the jack points indicated in the video are NOT NECESSARILY applicable to all Elite II's. Early models had a different sub-frame. Bill1 point
-
Yes, no tools needed.1 point
-
I had the same problem with poor flow. Additionally, I had a constant weeping of water from under the handle. I tried the process where you run vinegar through the lines and let it soak. No improvement. I purchased a new cartridge and attempted to change out the old one thinking a bit of debris was the problem. I couldn't find any instructions on the web of how to disassemple this type of faucet. For the life of me, I couldn't get the old cartridge out even with the correct faucet socket. (I think someone over tightened the cartridge retension ring in an attempt to stop the weeping) I eventually removed and replaced the entire faucet assemply which fixed both problems. Hopefully you're not faced with replacement. If you are, there are some things to note. The shower head hose which Oliver provides is clad in chromed metal and is much nicer. The replacement faucet, I ordered off the web, came with a vinyl hose. The Oliver hose is also shorter. This is presumably because there are two long bolts down in the cavity under the sink. A longer hose could easily get caught on these bolts and therefore not deploy long enough to be used as a shower. My (not so elegant) solution was to place zip ties across the end of the bolts to keep the hose from getting between the bolts. In hindsight, I should have contacted Oliver to see if I could order the faucet from them but I defaulted to Amazon and had the new faucet in two days. But, I now have a full flowing shower.1 point
-
I’ve had the same problem with mine but it seems related to the use of either vinegar for sanitizing or the winterizing solution. I think some of the rubber seals in the faucet head are affected/swell up from exposure to the chemicals, reducing the flow. I just replaced the sprayer head and problem solved. Cheap and easy fix. Dura Faucet RV Kitchen Faucet Designer Toggling Pull-Out Sprayer Replacement - for Dura Faucet Faucets Only (Brushed Satin Nickel) https://www.amazon.com/dp/B009Y06H3Q/ref=cm_sw_r_cp_api_glt_fabc_5WEG1XNWRCRX50546YVP?_encoding=UTF8&psc=11 point
-
We had the same issue a few years ago. Check for plastic bits or hard water debri in the faucet filter and in the line behind the toilet. Mike1 point
-
GJ - From your question to FrankC I'm guessing that you do not have the Rock Tamers (yet). If that is the case you will note when you get them that you can cut them down to size via "guide" marks that are already in them. However, Be a bit careful to not cut them too short the first time - you can always go back and trim another inch or so off if you find them to be too long. This is what I did for my F-150. Bill1 point
-
I have to agree with Steve on not using the front jack points. If you were to lift with those, and the front jack also lifted, then the trailer could easily twist off the jack even if the other wheels chocked. While it's always possible that Oliver didn't think it through when they marked the forward points, my suspicion is that those are valid, but only to be used when the trailer is to be lifted with a 4-point lift in a garage or placed on jack stands. Perhaps Oliver makes that distinction in the newer manuals? Seems like they should. I'd think that a better label for those front points would be "Secondary Lift Point" or something similar.1 point
-
We didn’t go back to Quartzsite for the rally. We’re at a COE campground between Fresno and Yosemite. We’ve been working our way up CA, head to Napa tomorrow. We had a great visit to Death Valley NP and also Yosemite NP. Yosemite was a ghost town yesterday, hardly anyone there. Great weather but 5 feet of snow forecasted for today and tomorrow. Hidden Lake COE campground.... Yosemite yesterday....
1 point
-
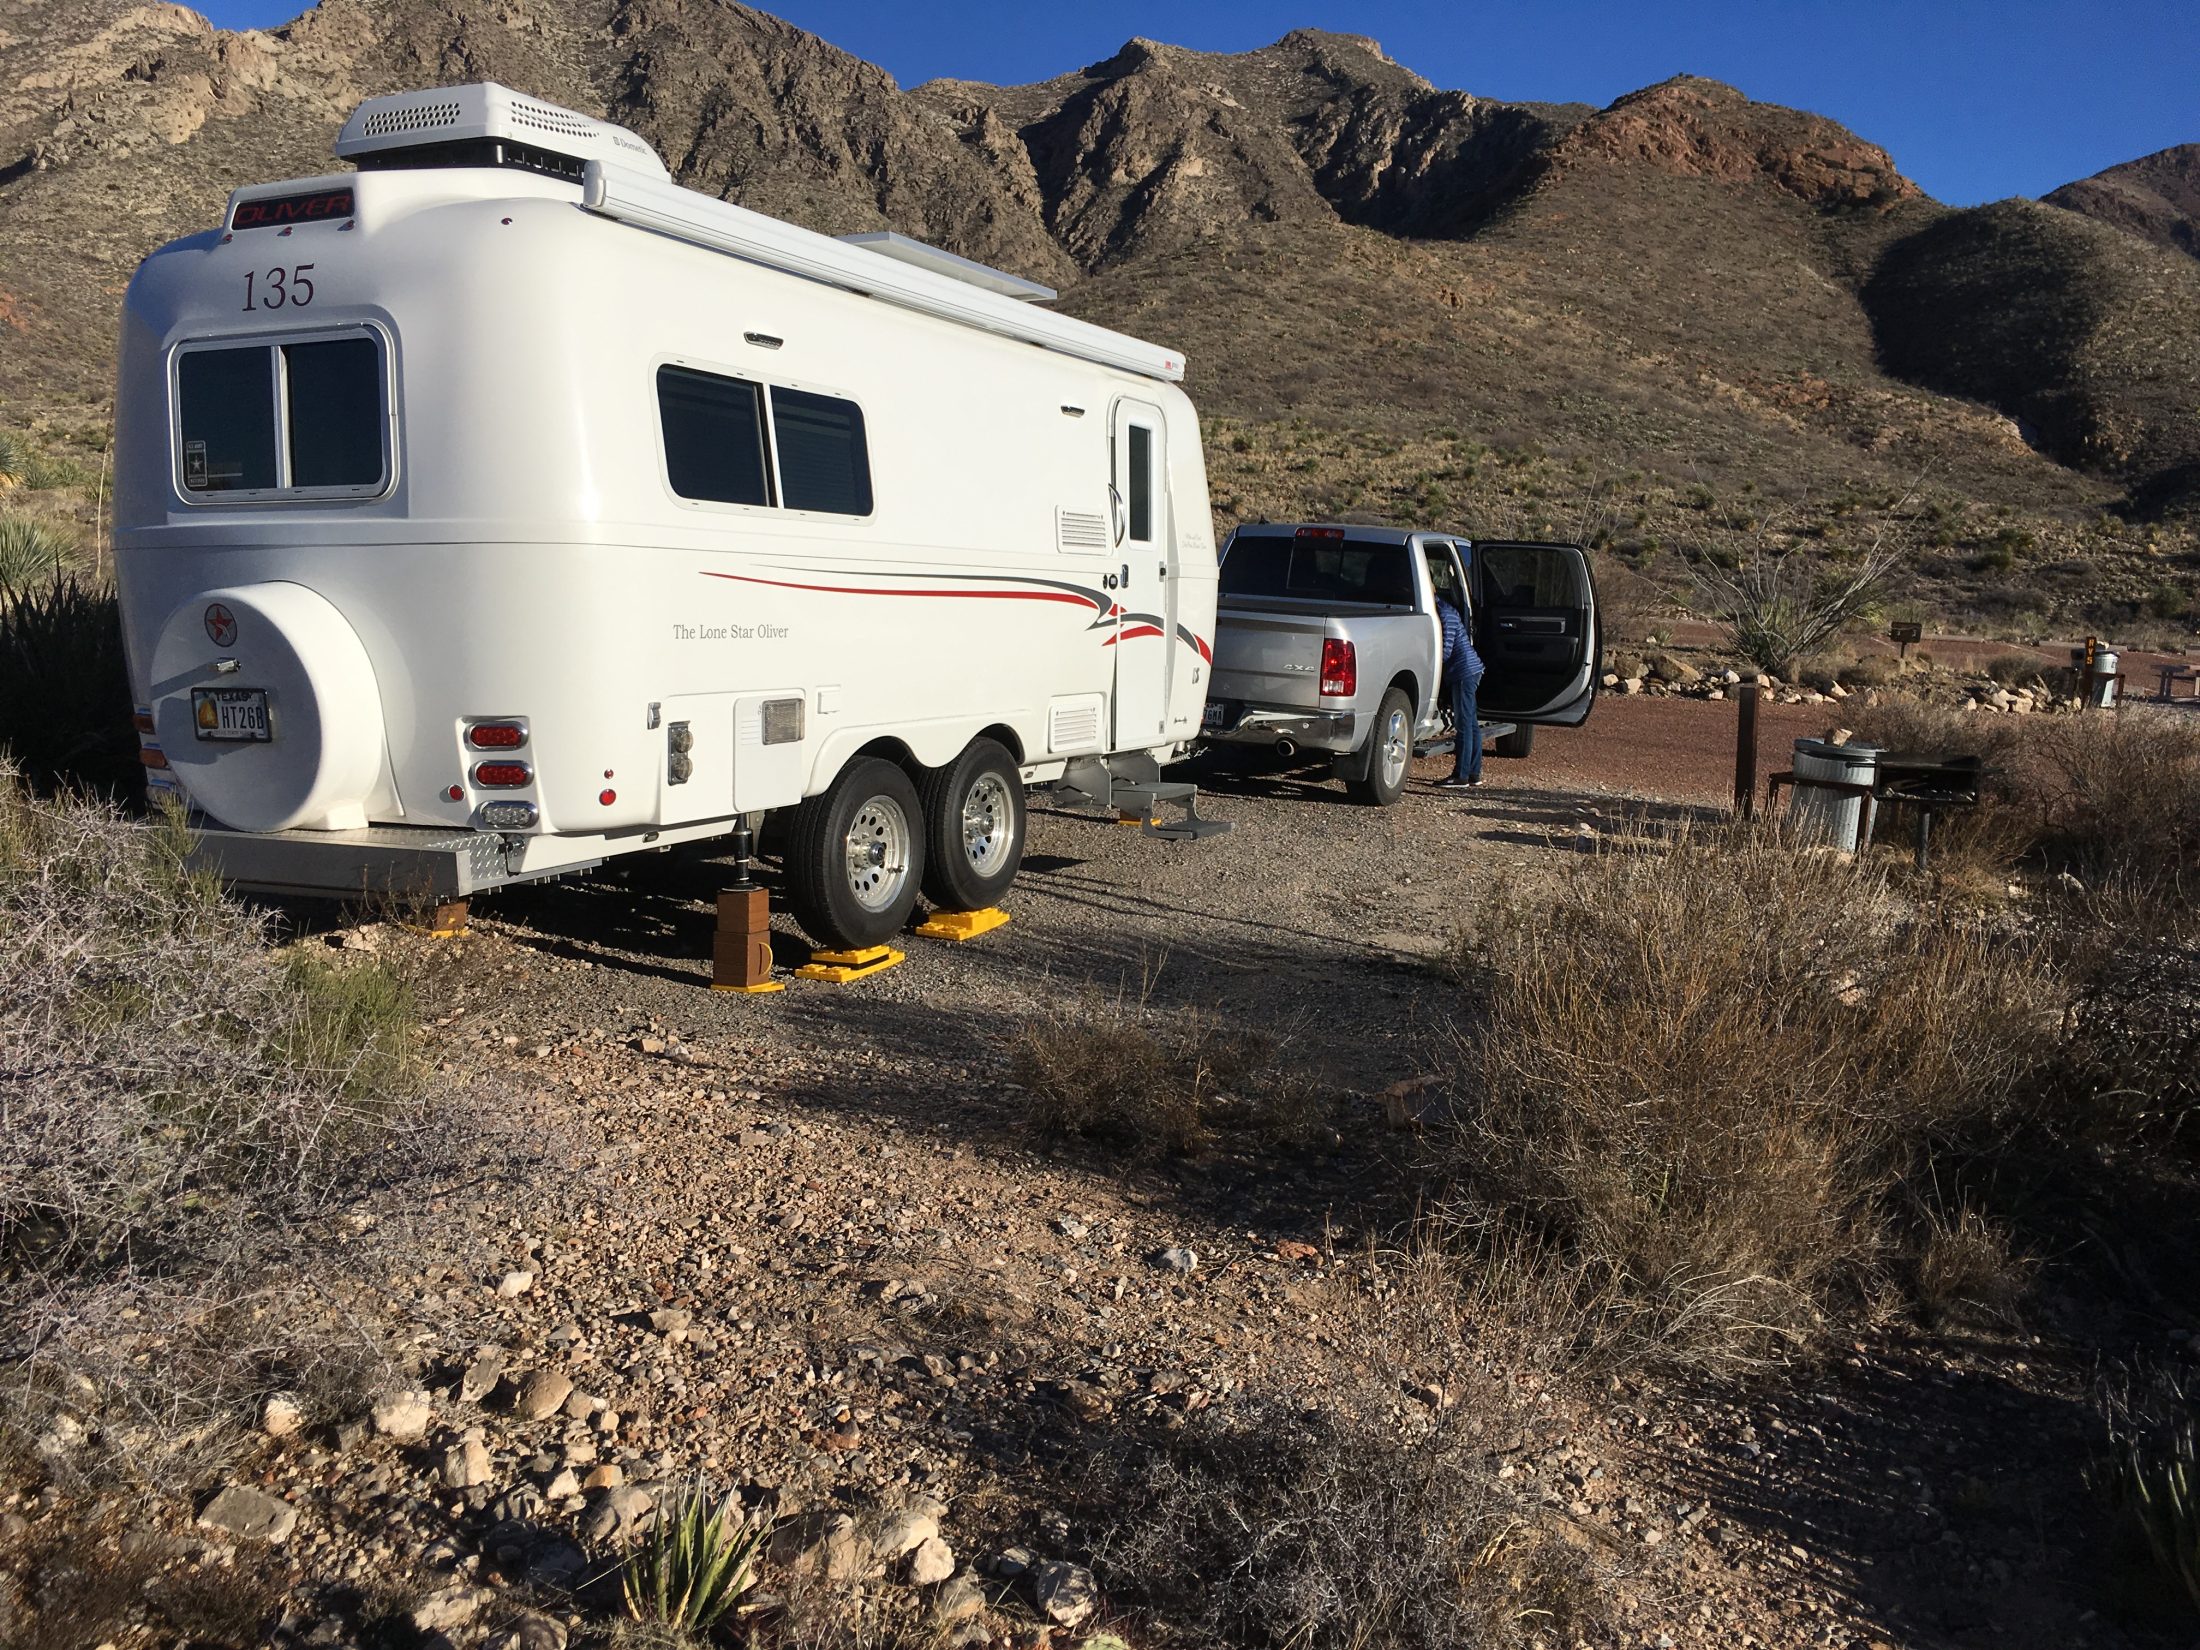
Franklin Mountain State Park only has 5 RV sites. No hookups and no dump station. $7/night. It’s basically a small loop with three sites on the outside and 2 on the inside. Sites 1 and 2 are not very level. Site 3 (our site) was better. 4 and 5 on the inside are pretty level. We didn’t venture into the brush, it was just an overnight stop on the way to Quartzsite. We walked the road down to the tent sites.
1 point
-
1 point


.jpeg.2a0a3861d22e1d8df1b57d8ccb72faaa.jpeg)
.jpeg.b4547f2812a1c2c9090f7bc81c109ea5.jpeg)


-
Recent Achievements
-


")


")


