Leaderboard


Popular Content
Showing content with the highest reputation on 05/23/2022 in all areas
-
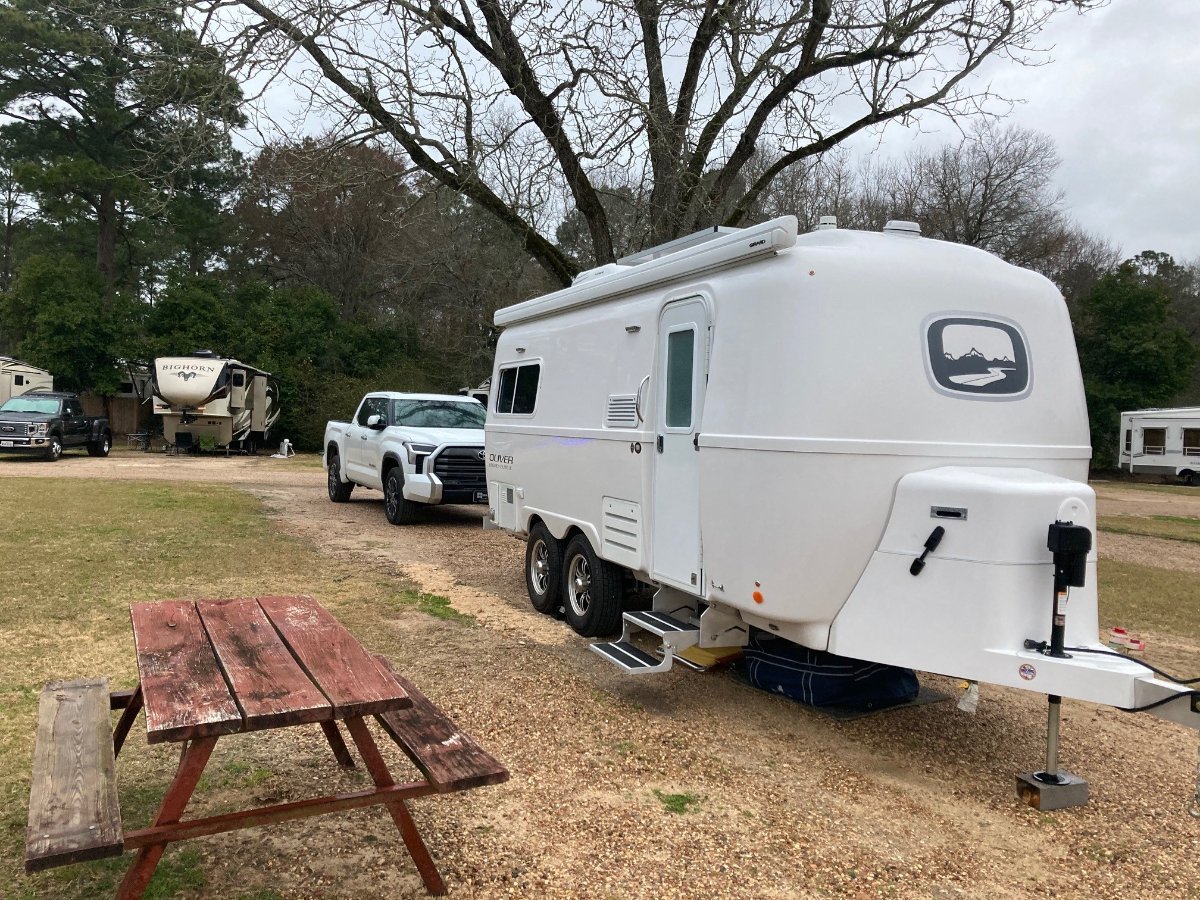
We did it! We thought we'd keep the factory company while the rest of you were at the rally and we picked up our Oliver on Friday, May 20th. Her name is Luna, and she's gorgeous.
 6 points
 -
We have found the coolest new tow vehicle. A restored 1968 Oliver 1250 tractor. We can also use it to clear an area to camp in.
6 points
-
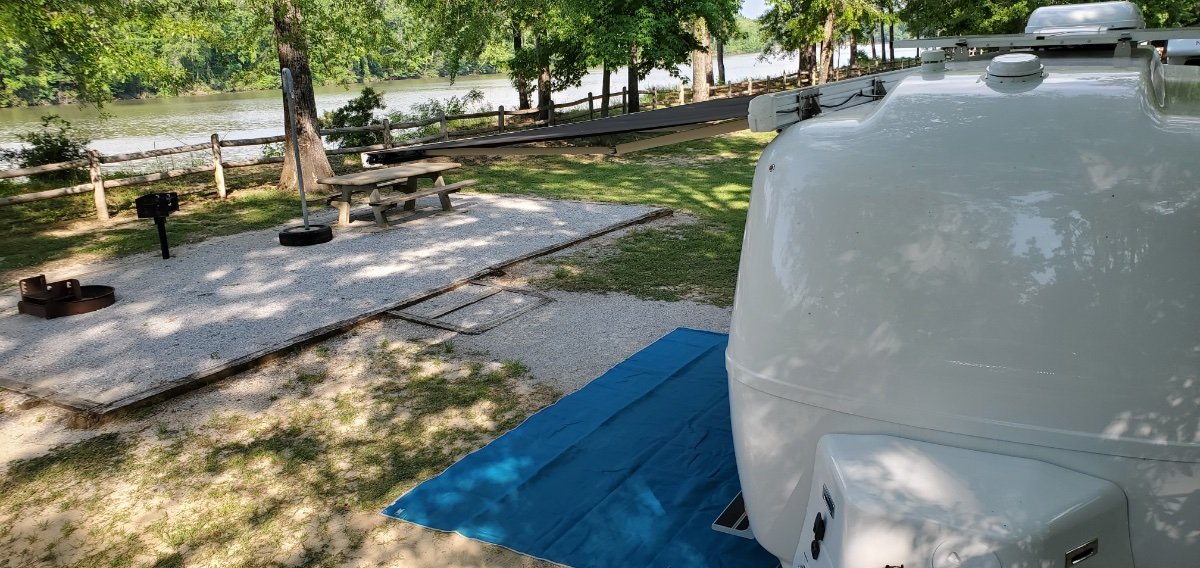
Service Park COE campground on the Tombigbee river in AL. Nice COE campground but pretty remote.
4 points
-
2003 2.4L Tacoma. Full disclosure, no sag with 30PSI in the air bags and it's a confidence builder for the Tacoma moving Ollie around the house!4 points
-
LRN, We pull our LE2 with a '21 F150 Hybrid and are happy with the rig. We returned yesterday evening from a 6 week tour from here in Tx out to the West coast. 6000+ miles, averaged 13.0 MPG overall, start to finish, including towing miles plus the unhooked sight seeing. We get 25-26 around town, 24-25 at highway speeds and 11.5-12 pulling the Ollie. While we loved the ride and handling of the F150 we did spend 3 unscheduled days in Newport Oregon at the excellent Ford dealer there diagnosing a misfiring problem which turned out to be a spark plug/coil failure. Who'da thunk a spark plug and a coil have to be overnighted to a Ford dealer. It's interesting times we live in. BTW, Newport was an excellent tourist town to be stuck in. Also we had 3 instances of what I decided was erroneous error messages where we would see "Hot engine coolant" but after checking the fluids, smell checking under the hood etc we would restart and not get the message for a long time as in 1000+ miles. None of these events happened during our 108F crossing of the Mojave Desert but temps in the 60's. Now that we are back home I'll take it back to my local dealer and get them to check it over. Also we used the generator function on the truck to power the truck a couple of times. Big plus there. This was our first extended trip with the Ollie; it is now a full fledged member of the family.3 points
-
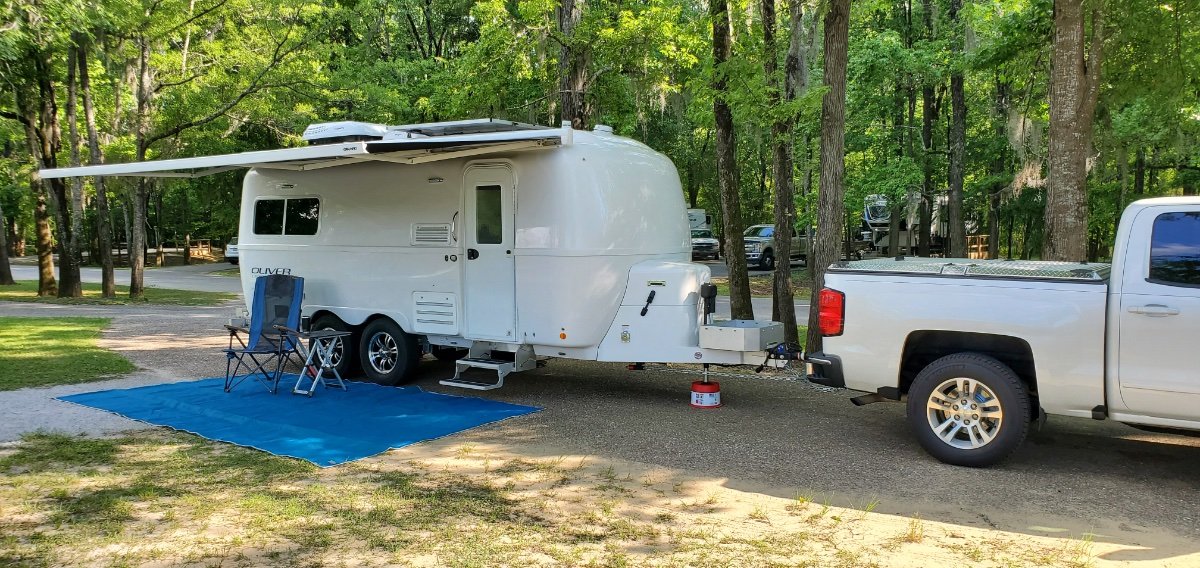
Beautiful Ollie and great looking campsite! We Love COE campgrounds!3 points
-
Has anyone towed their Elite II with a Mitsubishi Mighty Max? Thinking it might get some high m.p.g. going downhill (so long as I can keep the rig straight). For uphills I am hoping for a miracle. 🤪
2 points
-
We are in Duncanville near Dallas and would be 100% interested in attending an Austin, Hill Country, or San Antonio area rally!2 points
-
Congradulations. You will have lots of fun with Luna. Where are you taking Luna after leaving the factory?2 points
-
Yay! Congratulations. Hope to see you next year at the rally 🙂 Wendy and John2 points
-
I’ll bet that tractor will hustle down the freeway!2 points
-
Hello LRN, We have a 2022 Ford F150 Powerboost Hybrid Lariat package, and we picked up our Elite II just two days ago from Hohenwald. Yay! (I'll post in the Delivery day sub-forum soon) MPG without the trailer, from Denver to Hohenwald, was 20 MPG overall, doing posted speed limits or +5 over. Usually 80mph in Kansas. Missouri and Tennessee speed limits are lower and we maxed at 70mph, but we also took an alternate path where the speed limits were 50/55/60/65, and we kept at the max speed limits along the route. MPG with the trailer, from Hohenwald to Atlanta, GA was 12.5 MPG while traveling at posted speed limits, and even as much as 70 mph. We used the Tow/Haul mode, which is a different engine/transmission profile; holding gears a little longer on acceleration, brake usage prompts the transmission to gear down on declines, no electric motor usage. The Truck handled very well with the trailer attached and it almost seemed like it wasn't there. No porpoising at all with the Andersen WDH. The other reasons why we got the F150 Powerboost hybrid are because I use it to commute to work a few days a week, can fit it in the home garage and the parking garage at work. Plus.. we live at 6200ft elevation, camp even higher, and the turbos make that a breeze. Hope this helps!2 points
-
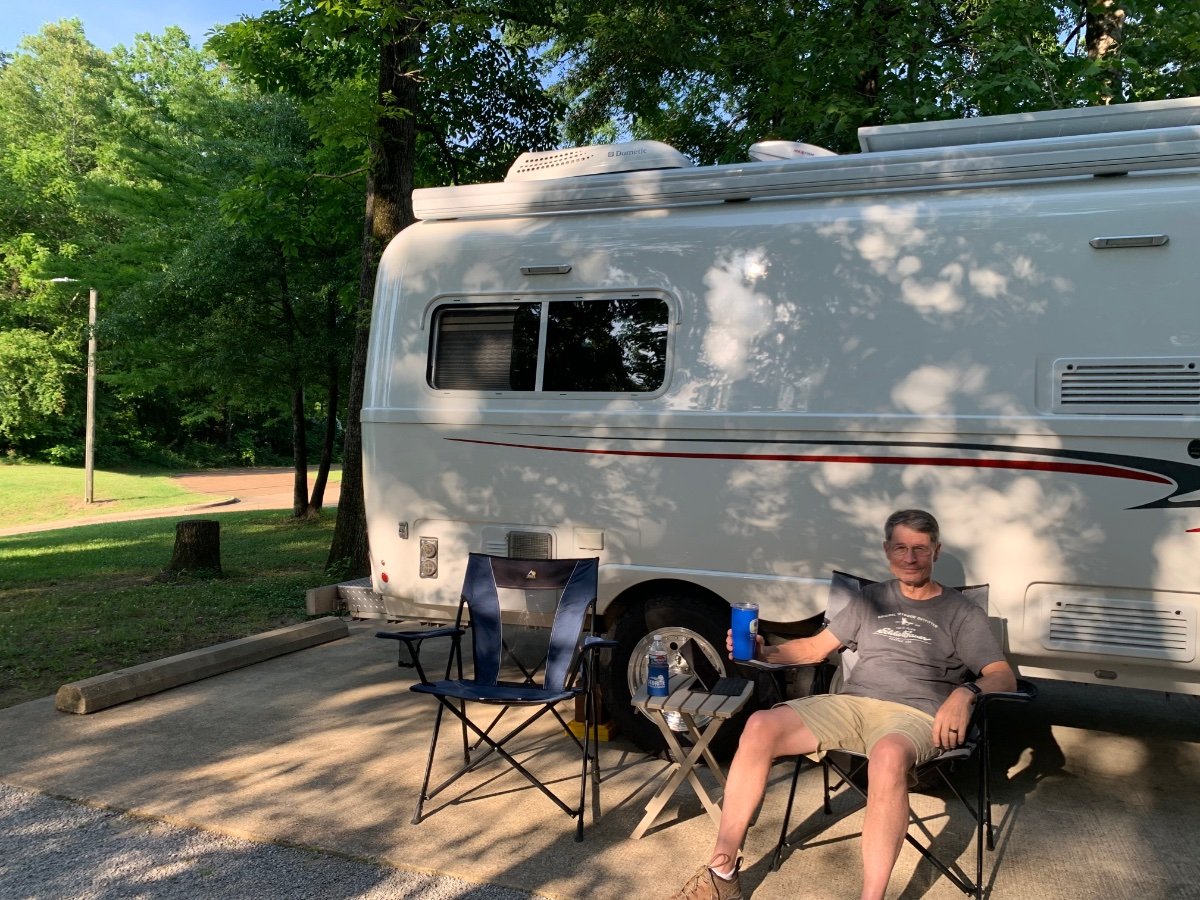
Last week before we picked up it was suggested that a "Where's Ollie" thread might be good for folks to post pictures of where they've been, maybe with a few comments about the location. I'll get it going.... This is Hillman Ferry State Park in KY at Land Between the Lakes. Nice campground, with lots of lake water activities. You can get a site right on the lake to fish from!
1 point
-
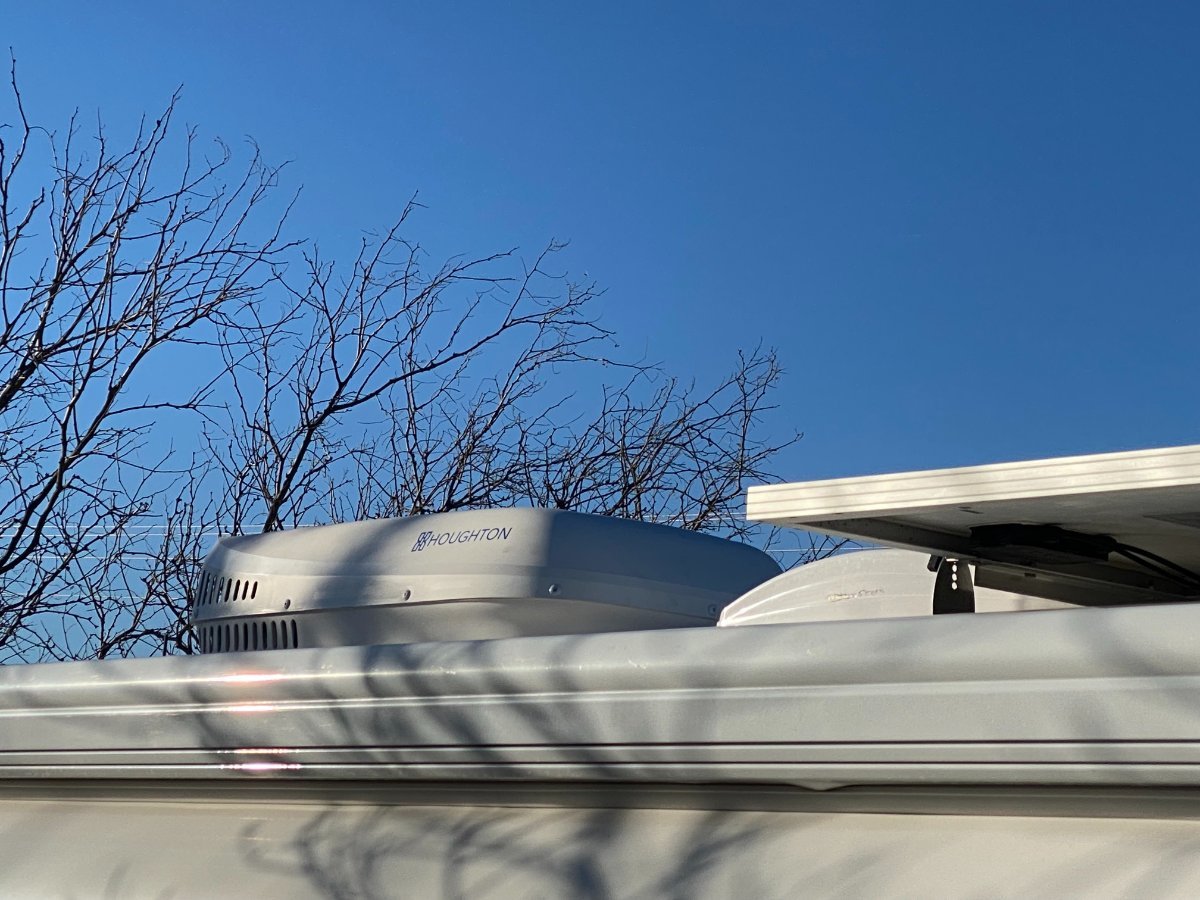
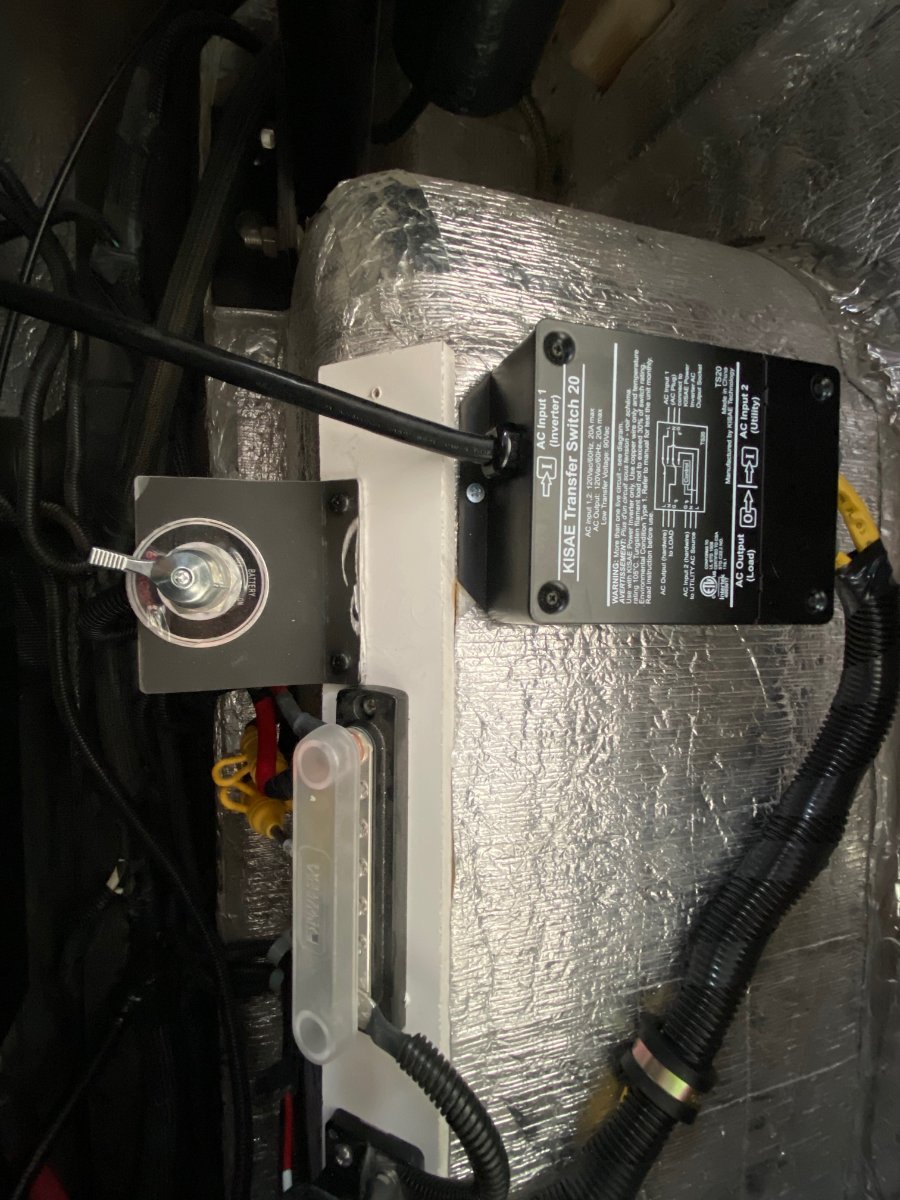
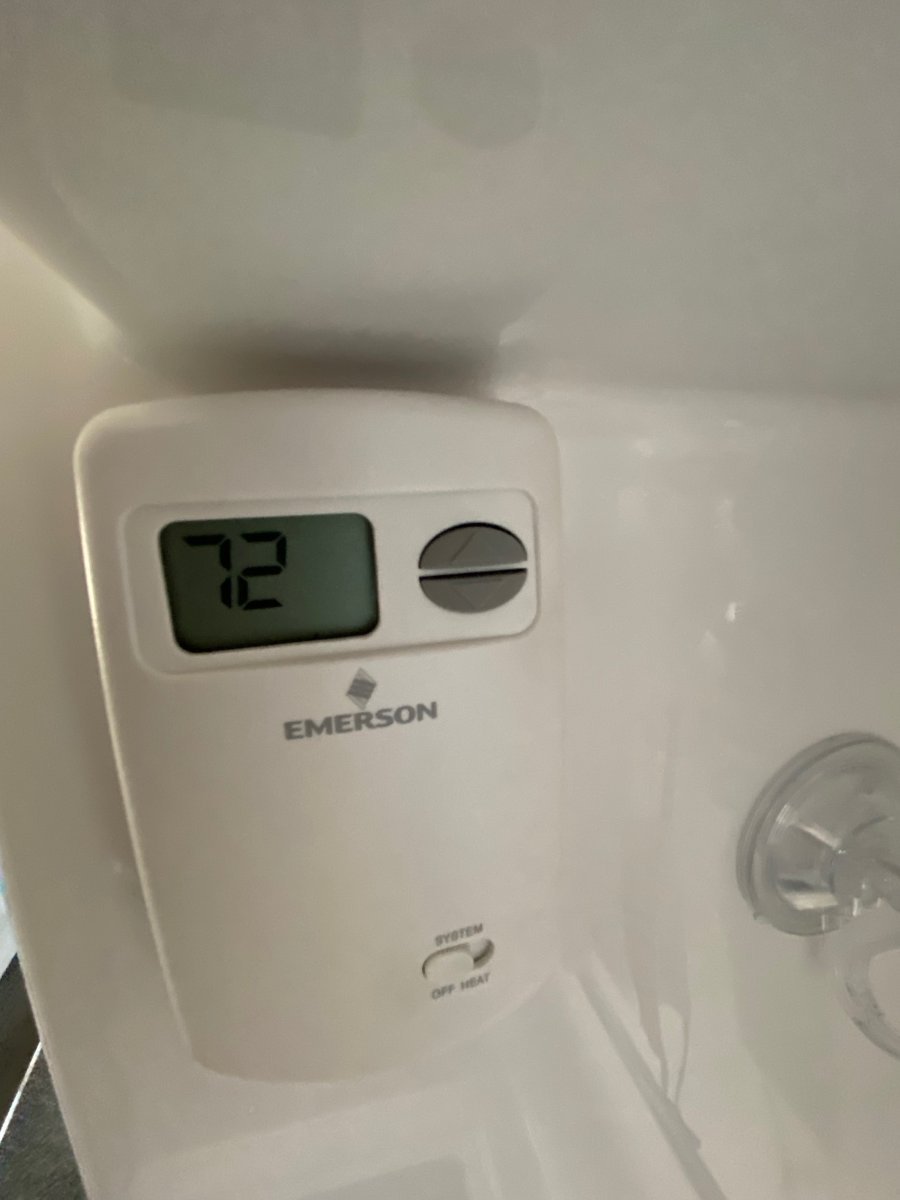
With the help of a number of good folks on this forum and my great RV Tech, Mathew Gonzales, who has worked on my 2017 Elite II since I brought in home to SE AZ, I finally achieved my goal of being able to run my AC off of my 2000-watt inverter and my new battery bank: 4 100ah Battle Born lithium batteries. After asking for, and getting, advice from folks on the forum about a number of issues that Mat and I ran encountered when attempting this upgrade, I made these decisions and Mat did this work: I first made the decision to purchase the Houghton 9.5K Low Profile Air Conditioner from RecPro--due mainly to how much quieter it runs compared to the Dometic Penguin that came with my Ollie, and to its lower amp draw (10 vs. the 16 for the Dometic). I learned that the Houghton could be run off of the 2000-watt inverter that came with my Ollie, using a transfer switch plugged into it running to the AC. I asked Mat to move the Micro-Air soft start previously installed in the Dometic to the Houghton. We discovered that he needed to reprogram the soft start to coordinate with the new AC. Since, unlike the Dometic set-up that came with my 2017 Ollie, the Houghton did not have a way to control the furnace, Mat installed and wired an Emerson non-programable thermostat--once again using information gleaned from folks on this forum--to control the furnace. I figured it was a good idea to supplement the 320-watt solar panels that came with my Ollie with a 180-watt Zamp solar panel kit. I also purchased a Zamp solar port that Mat installed near the shore power input. When my AGM batteries overheated last fall, I found I had no way to easily disconnect the battery bank. (This, I suspect, is something that is an original defect in the electrical system of my Oliver. Is it for all Olivers still?) So, while Mat was doing all of the other work, I had him install a battery disconnect switch near the inverter. I don't want this to appear as a straightforward process. It took a lot of back and forth between Mat and me trying to come up with solutions to problems encountered along the way. This back-and-forth involved a lot of advice from folks on this forum, some of whom I have not thanked by name. I would like to give special mention and thanks, however, to CnC and Minnesota Oli, who spent a good deal of time with me exchanging private messages. Man, were they patient with this technical novice! The outcome is that I now have a much quieter AC that runs off of my solar, batteries, and 2000-watt inverter. One can read elsewhere about the advantages of the Houghton. Mat told me, before I took my camper home, that he ran the Houghton for about four hours, supplementing the roof-top solar with the Zamp portable kit, and the voltage never dropped below 13 volts. I ran it when I brought the camper home, and verified that the system seemed to run the AC flawlessly AND much more quietly than before. I am delighted, as I have been wanting for a long time to be able to boondock in climes needing cooling of the cabin without having to resort to the hassle and noise of a generator. I will follow up with another post if I run into any issues. Disclaimer: I still have very little technical understanding about how this system functions and how the components and wiring fit together, so I will not be the one to answer many, if any, technical questions, but I know that on this forum, if you ask, you receive. There are some good posts on this forum involving the Houghton AC and related issues, so take a look around, and don't hesitate to submit your questions on this forum. Doing so paid off big time for me! Here is the interior view of my newly installed Houghton 9.5K Low Profile Air Conditioner: Here is an exterior view (birds won't be able to nest in this one!): Here is a photo of how Mat secured and wired the transfer switch and battery disconnect switch: Here is a photo of the Emerson non-programable thermostat to control the furnace (thanks go to John Davies who suggested the purchase): Here is a photo of the Zamp solar port with cord leading to the Zamp 180-watt portable solar panel kit: Here is a photo of the charge controller on my Zamp 180-watt portable solar panel kit, showing the voltage just after I plugged it in. (In less than 10 minutes, this controller and the interior Zamp showed the voltage up to 14.6 before dropping back into the floating voltage range.):
1 point
-
We are about 70 mi from Natural Tunnel SP and go there about twice a season. I recommend you also visit Big Stone Gap, Norton VA ( WoodBugger check it out and you'll understand), and the small towns around area while you're there. Lot's of beautiful country to see and history.1 point
-
The setting on the Truma is “Eco”. The setting will not allow the water to drop below 42 degrees. Andrew1 point
-
Consider having it installed on the battery connection side of the controller where it'll be more useful. Under the bunk near the circuit breaker is the most logical location. Instead of a switch though, I just replaced the original 40 amp Shortstop with a switchable breaker like the 60 amp one used for the main DC disconnect.1 point
-
Congratulations, Spike. 😀 Charlie1 point
-
Just a quick note for those interested in the lithium platinum package, which we have on our 2022 Ollie. We took our maiden voyage in VellOllie this week, about 4.5-5 hours from home. Because I knew we would have an electrical hookup at our campsite, I decided to run the regrigerator on DC for the entire trip down. We started at 100% battery, according to the Lithionics app, and ended at.....99% battery on one, 100% on the other. It was sunny the entire trip, which helps of course. On the return, we ended at 99% and 98%, and were in cloudy conditions for the entire drive. I'd say that's pretty good performance, and have confidence in running the fridge on DC while traveling, even when I know we won't have electrical hookups at our final destination. Pretty cool...and part of why we went with the biggest solar/battery package we could get.1 point
-
2021 Ram eHemi & E2 - We just completed a three week 4500 mile trip from Arizona to Michigan and back... Had wind everyday! We got as high as 16.5 one day with tailwinds and as low 11.5 with headwinds - averaged 12.6 overall running mostly 65 mph (some 70 toward the end of the trip as I could tell the barn door was open.) FYI, we were loaded - took waaaay too much stuff with us. My bad habit! Charlie.1 point
-
Sounds like you had a private rally at the factory! Congratulations!! Mike1 point
-
Purchased last week a 2500 w Champion dual fuel generator . It runs our AC ( with soft start ) with no issues. I am only using it propane right now. Manual says 1X25 # propane cylinder will last for 30 hours, doubt it will do this under load. I will find out more in the next 45 days when we travel in Central and West Texas1 point
-
I have a 2016 F150 5.0 liter V8 pulling my Elite II with an Anderson sway & equalizer hitch to level out the truck. Just took a trip to NP's in Utah from Spokane WA and averaged 13.5 mpg which included some unhitched mileage. The Anderson hitch also helped with driving in some high winds. The V8 rev's to 3000 to 4000 rpm and pulls hills with no problem. I try to keep my speed at 65 mph or less and I get passed a lot.1 point
-
I looked at the F-150 V6 3.5 and the Ram 5.7 V8 Hemi, it was a tossup for me, but went with the Ram in 2019 as it was a totally new vehicle in 2019. The Ram get 13.5 mpg pulling the Elite II so I think I made the correct decision. I personally would not rather get into eco-Boost/hybrid, etc., I feel the cost of repairs/maintaince on down the road will be more expensive. My 1/2 ton Ram with 4X4 does not propose with the Anderson, plus I do not have airbags on the Ram. trainman1 point
-
I looked at this when I bought our 2021 F150. Came to the conclusion that, given the very small battery storage of the hybrid, you would probably not see much highway MPG help from the electric motor. I have not read any reports from actual users as to whether or not my concern is valid. The hybrid would give you more horsepower but that is kind of unnecessary as the standard 3.5 Ecoburst has more than enough power to handle the Legacy II. For what it is worth, I get about 11 to 11.5 MPG on average in the mountainous west where I live. The big tank is a plus and, at the time I was researching this issue, the hybrid had a somewhat smaller tank than my standard FX4 max tow package. A GREAT truck. Have been very pleased. The only downside is that the softer suspension, as compared to 3/4 tons, results in a bit of squat in the stern and some porposing. A set of air bags cured that issue.1 point
-
The Obey and Obed are two separate rivers. The Obey river where rideandfly stayed is on the Dale Hollow Lake near the KY and TN state line. The Obed River is a NPS Wild and Scenic River located a little further south in Morgan and Cumberland counties of TN.1 point
-
Thanks to all for the great insights, Yes my trailer connector was corroded i cleaned and sprayed electic contact cleaner on and the taillight problem resolved. Thank you Dewdev & John loved the pictures i am a visual learner. I am sure i will have many more questions as i continue to go over this beatiful little camper. What a great community of Oliver owners just confirms my choice to buy one. The 110 power issue was my stupidity i tripped a circuit breaker on my house and did not realize. I have so much to learn about this Ollie but I am so impressed with how everything is so well made. Cant wait to take her on her first voyage.1 point
-
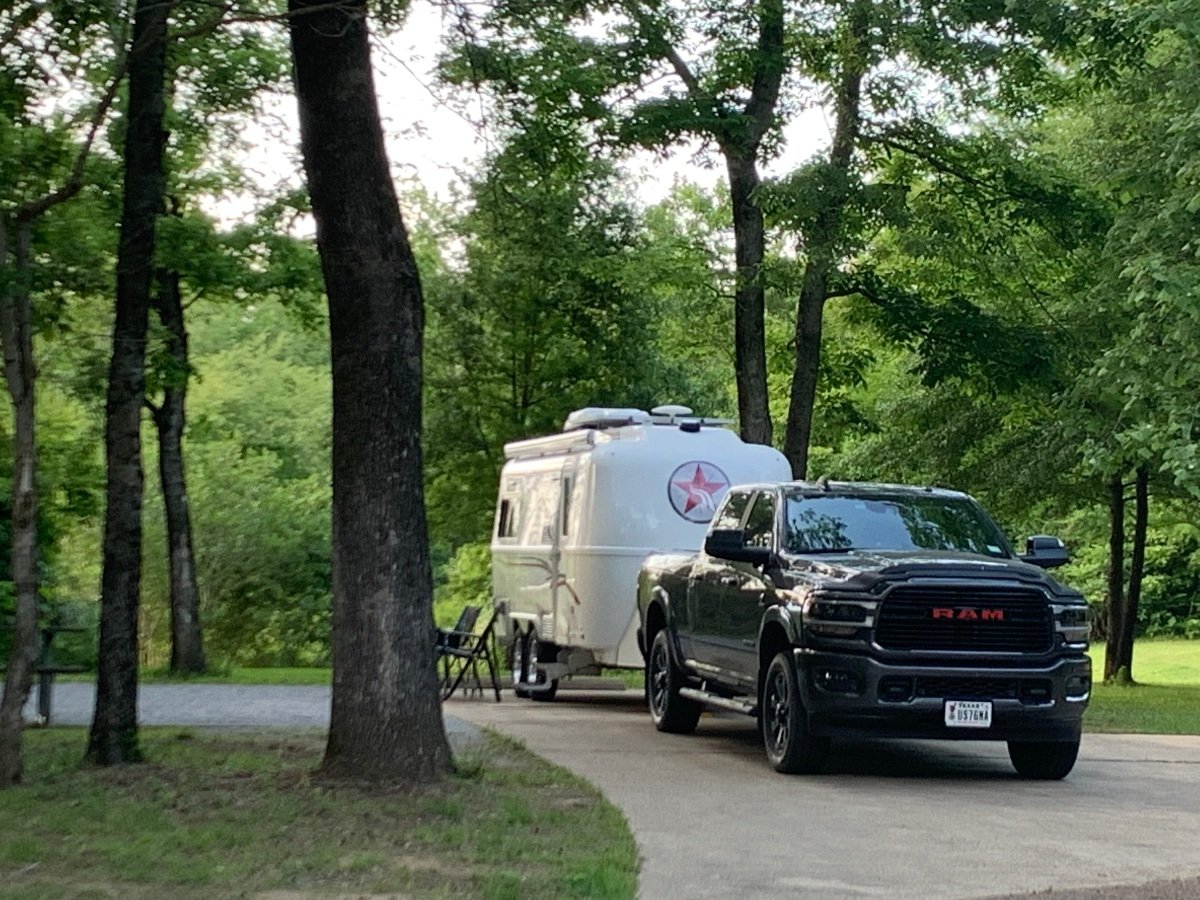
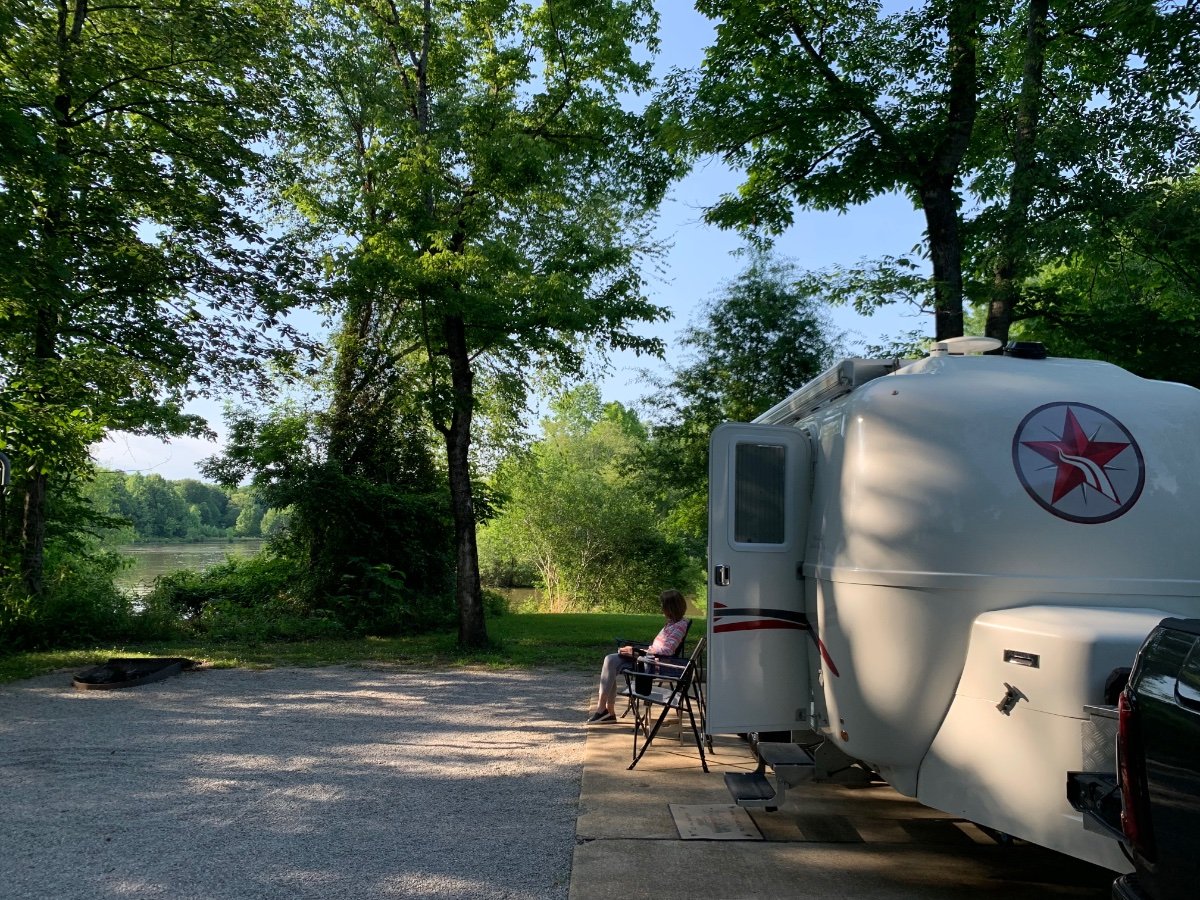
Tonight we’re at another COE campground in Mississippi near Starkville, just outside of Columbus AFB. We picked it at random due to location but are pleasantly surprised. It’s a very nice campground and we have FHU (not that we need that for one night). We’re only about 170 miles from Lake Guntersville and the rally, so we will have a short drive tomorrow. Nostalgia - 60 years ago we lived here in Starkville where I went to 2nd and 3rd grade while my dad went to Mississippi State University.
1 point
-
These questions about what charges/discharges during various conditions can be answered by simply installing a smart shunt. Then you can "see" the changes when things turn on/off - start/stop - connect/disconnect. It's the best money you'll ever spend on your electrical system. I use the Victron Smart Shunt with the bluetooth app to monitor ALL energy flows via the negative buss. Charlie.1 point
-
We installed the GasStop emergency propane valves at the tanks so that we could tow with propane. But....since we suspected a propane leak right before this trip, propane wasn't an option. I'm pleased that this worked out - I will likely always throw the fridge on DC before trips where I'm headed to an electrical hookup, but will still use propane when I'm going to be boondocking.1 point
-
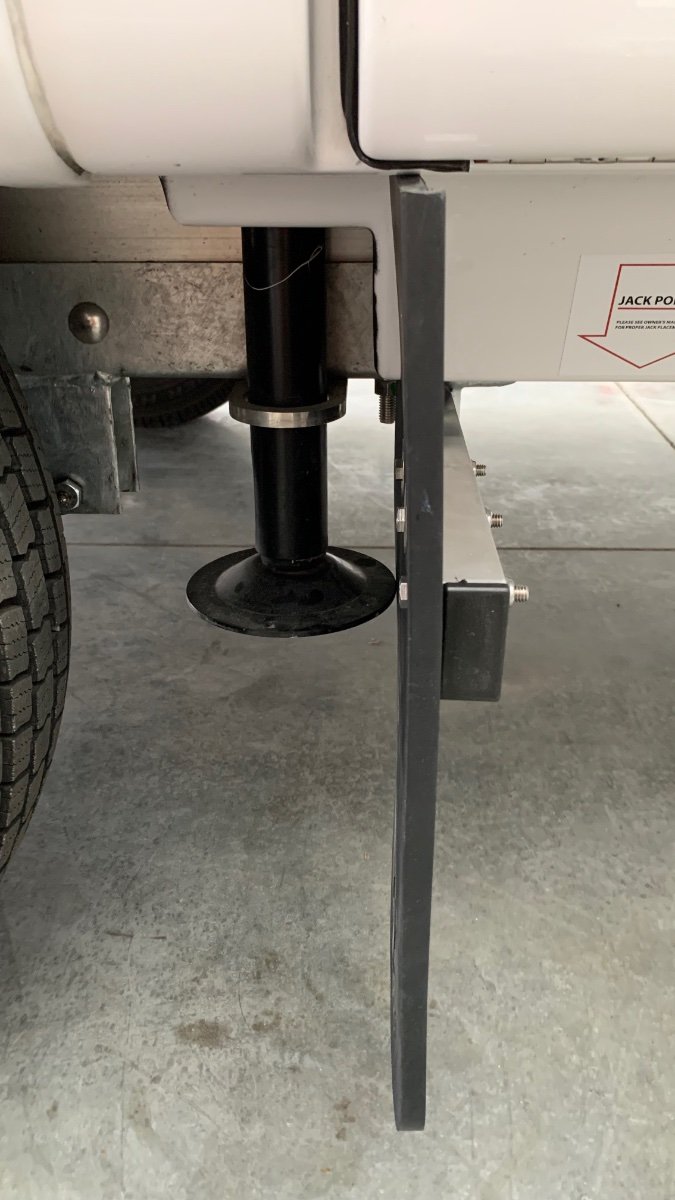
Hi John. I did not drill drain holes in the bottom of the support bars. The plugs are only in the outer exposed ends, so any water that gets into the bars should drain or evaporate from the open inner ends under the trailer. Thanks again for the inspiration to make this modification.1 point
-
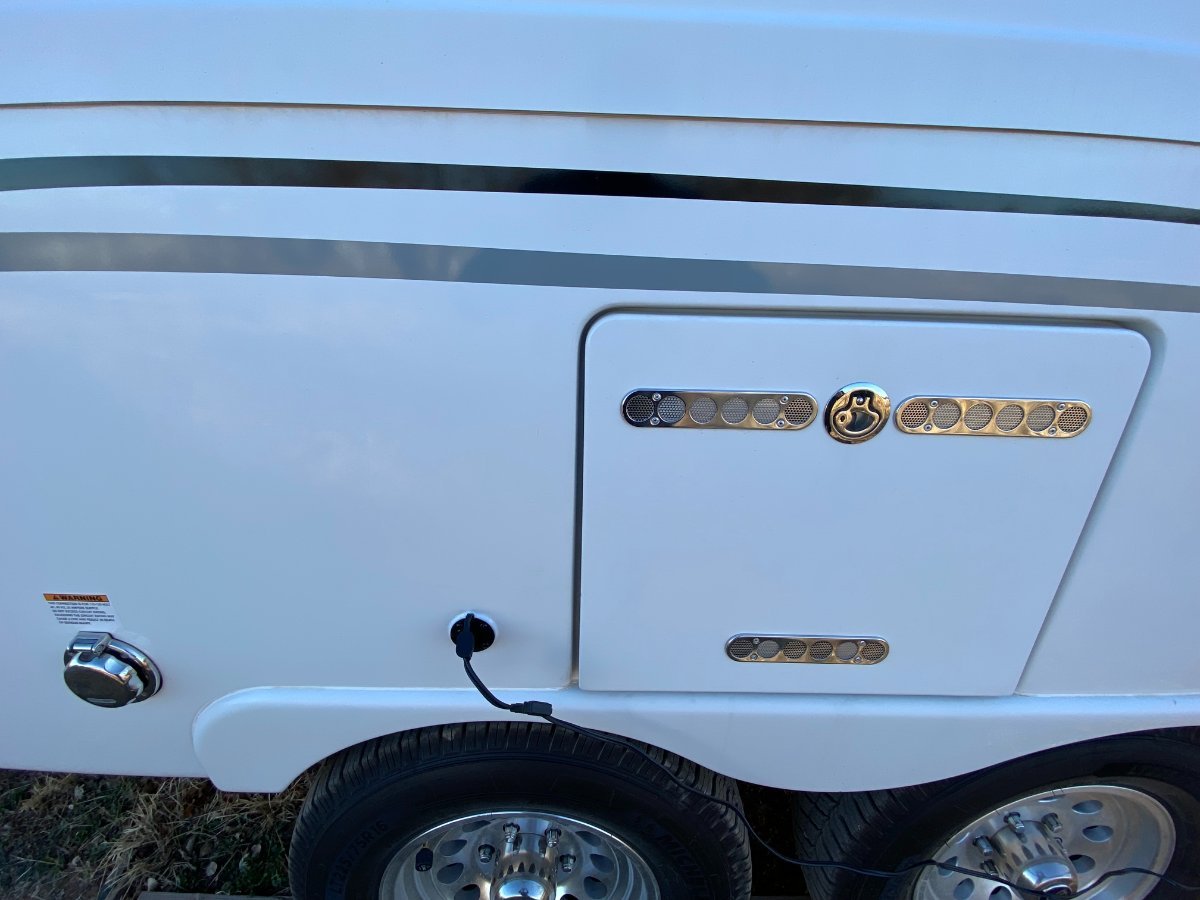
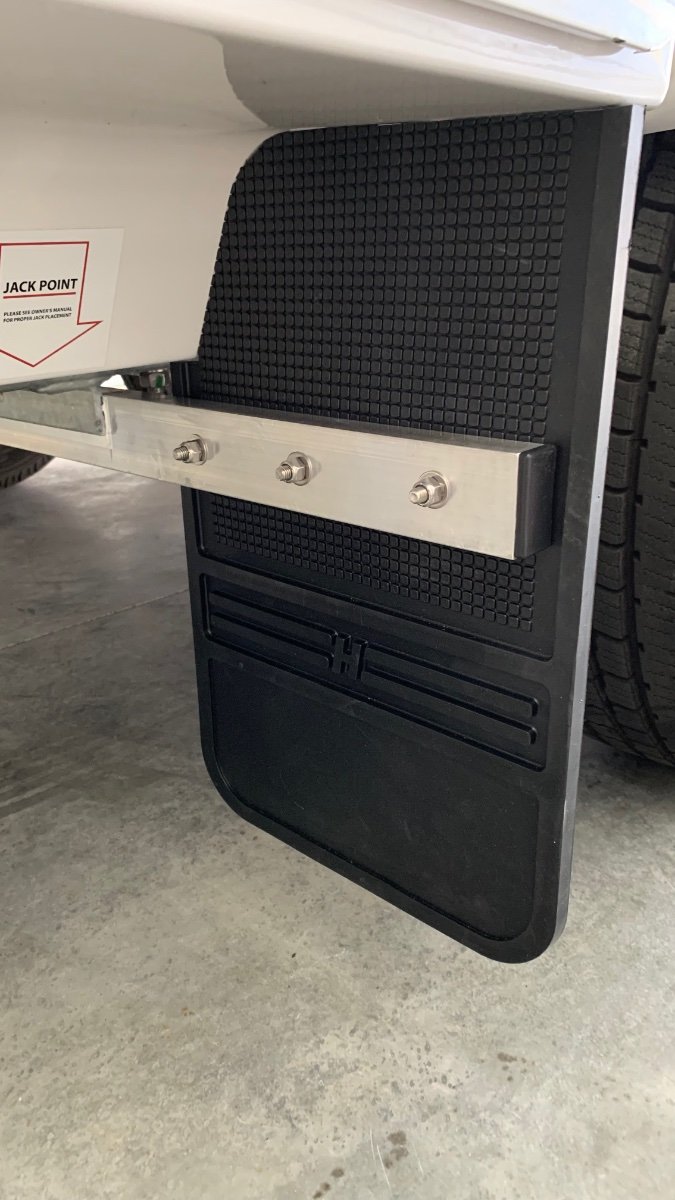
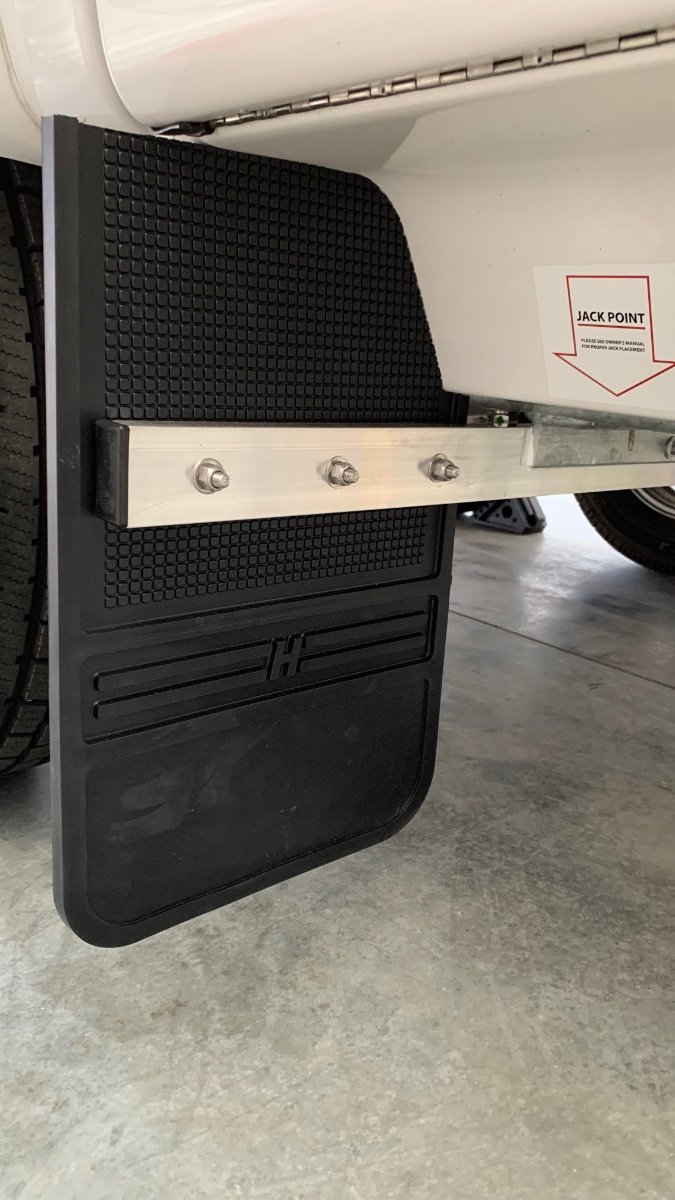
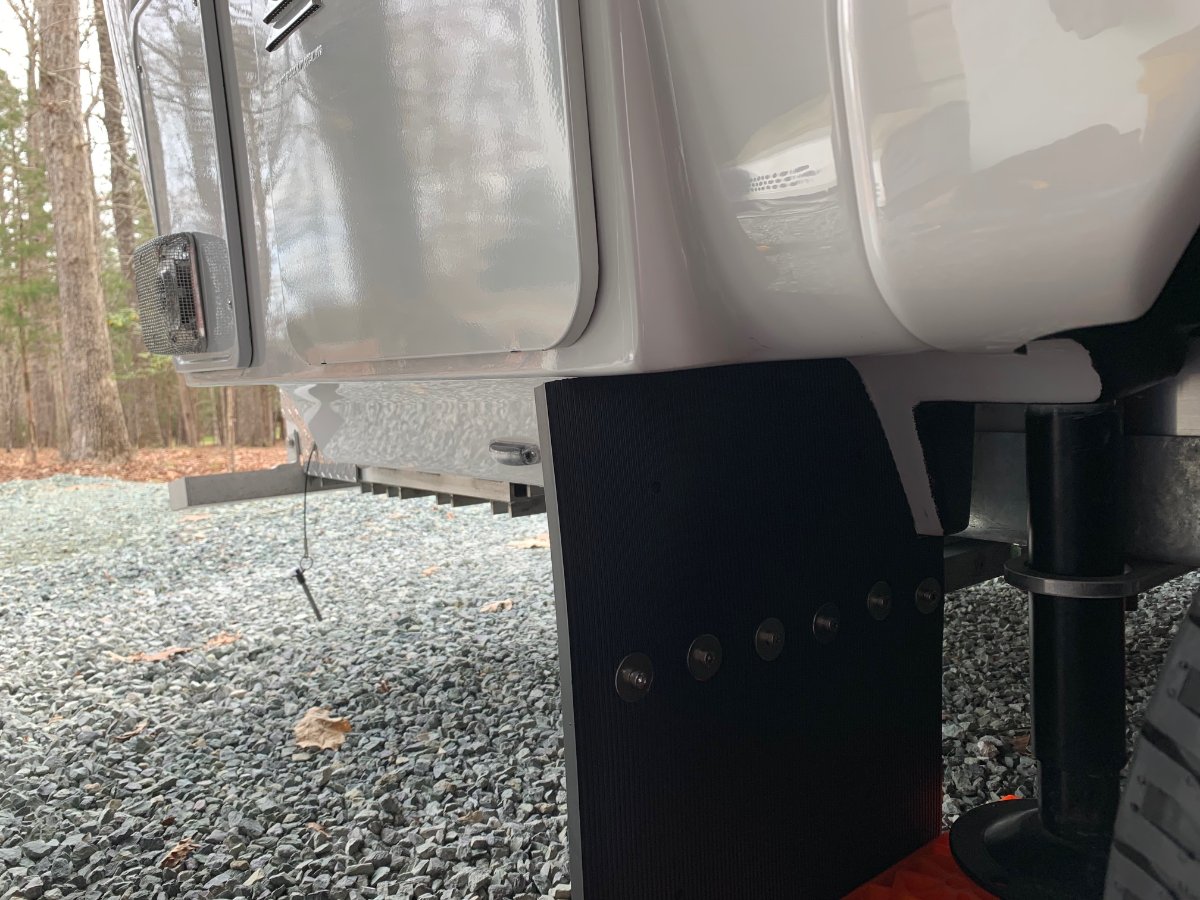
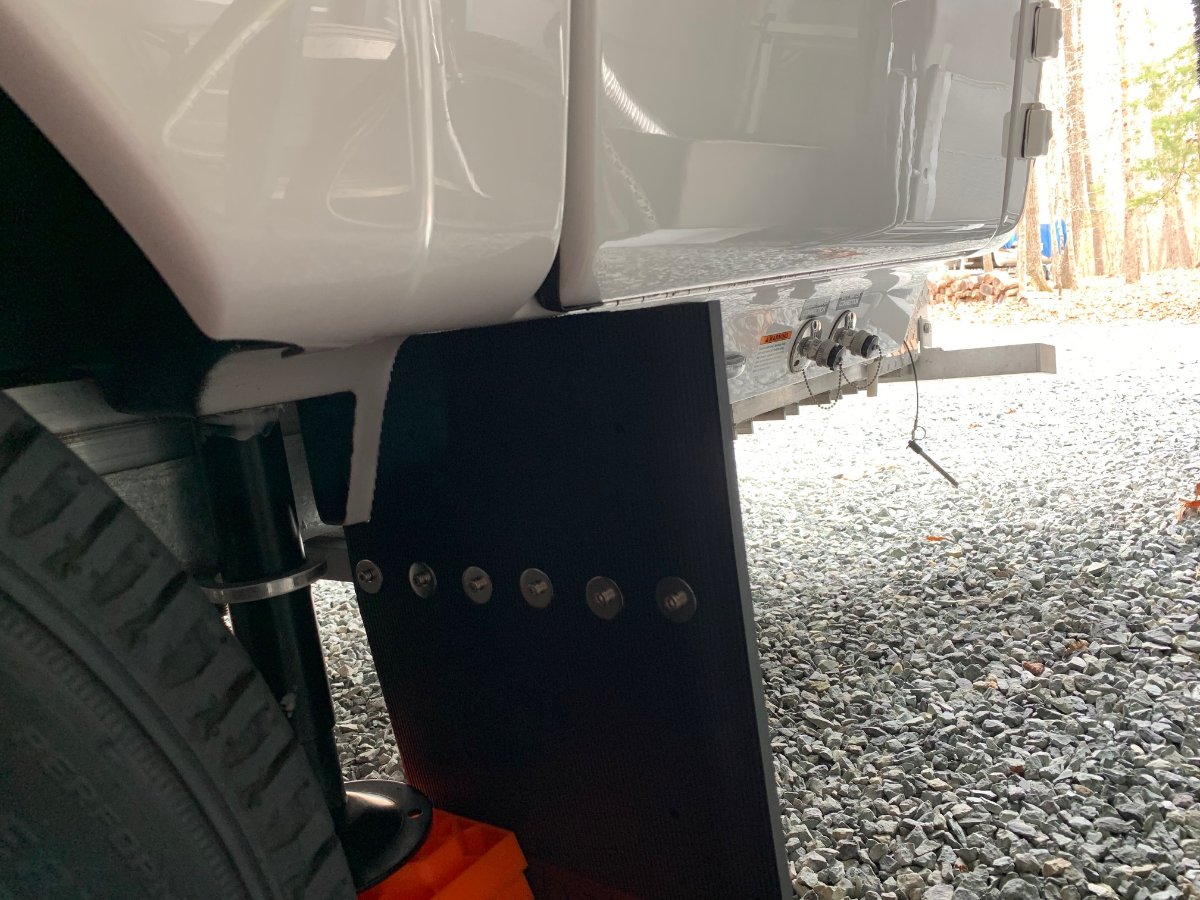
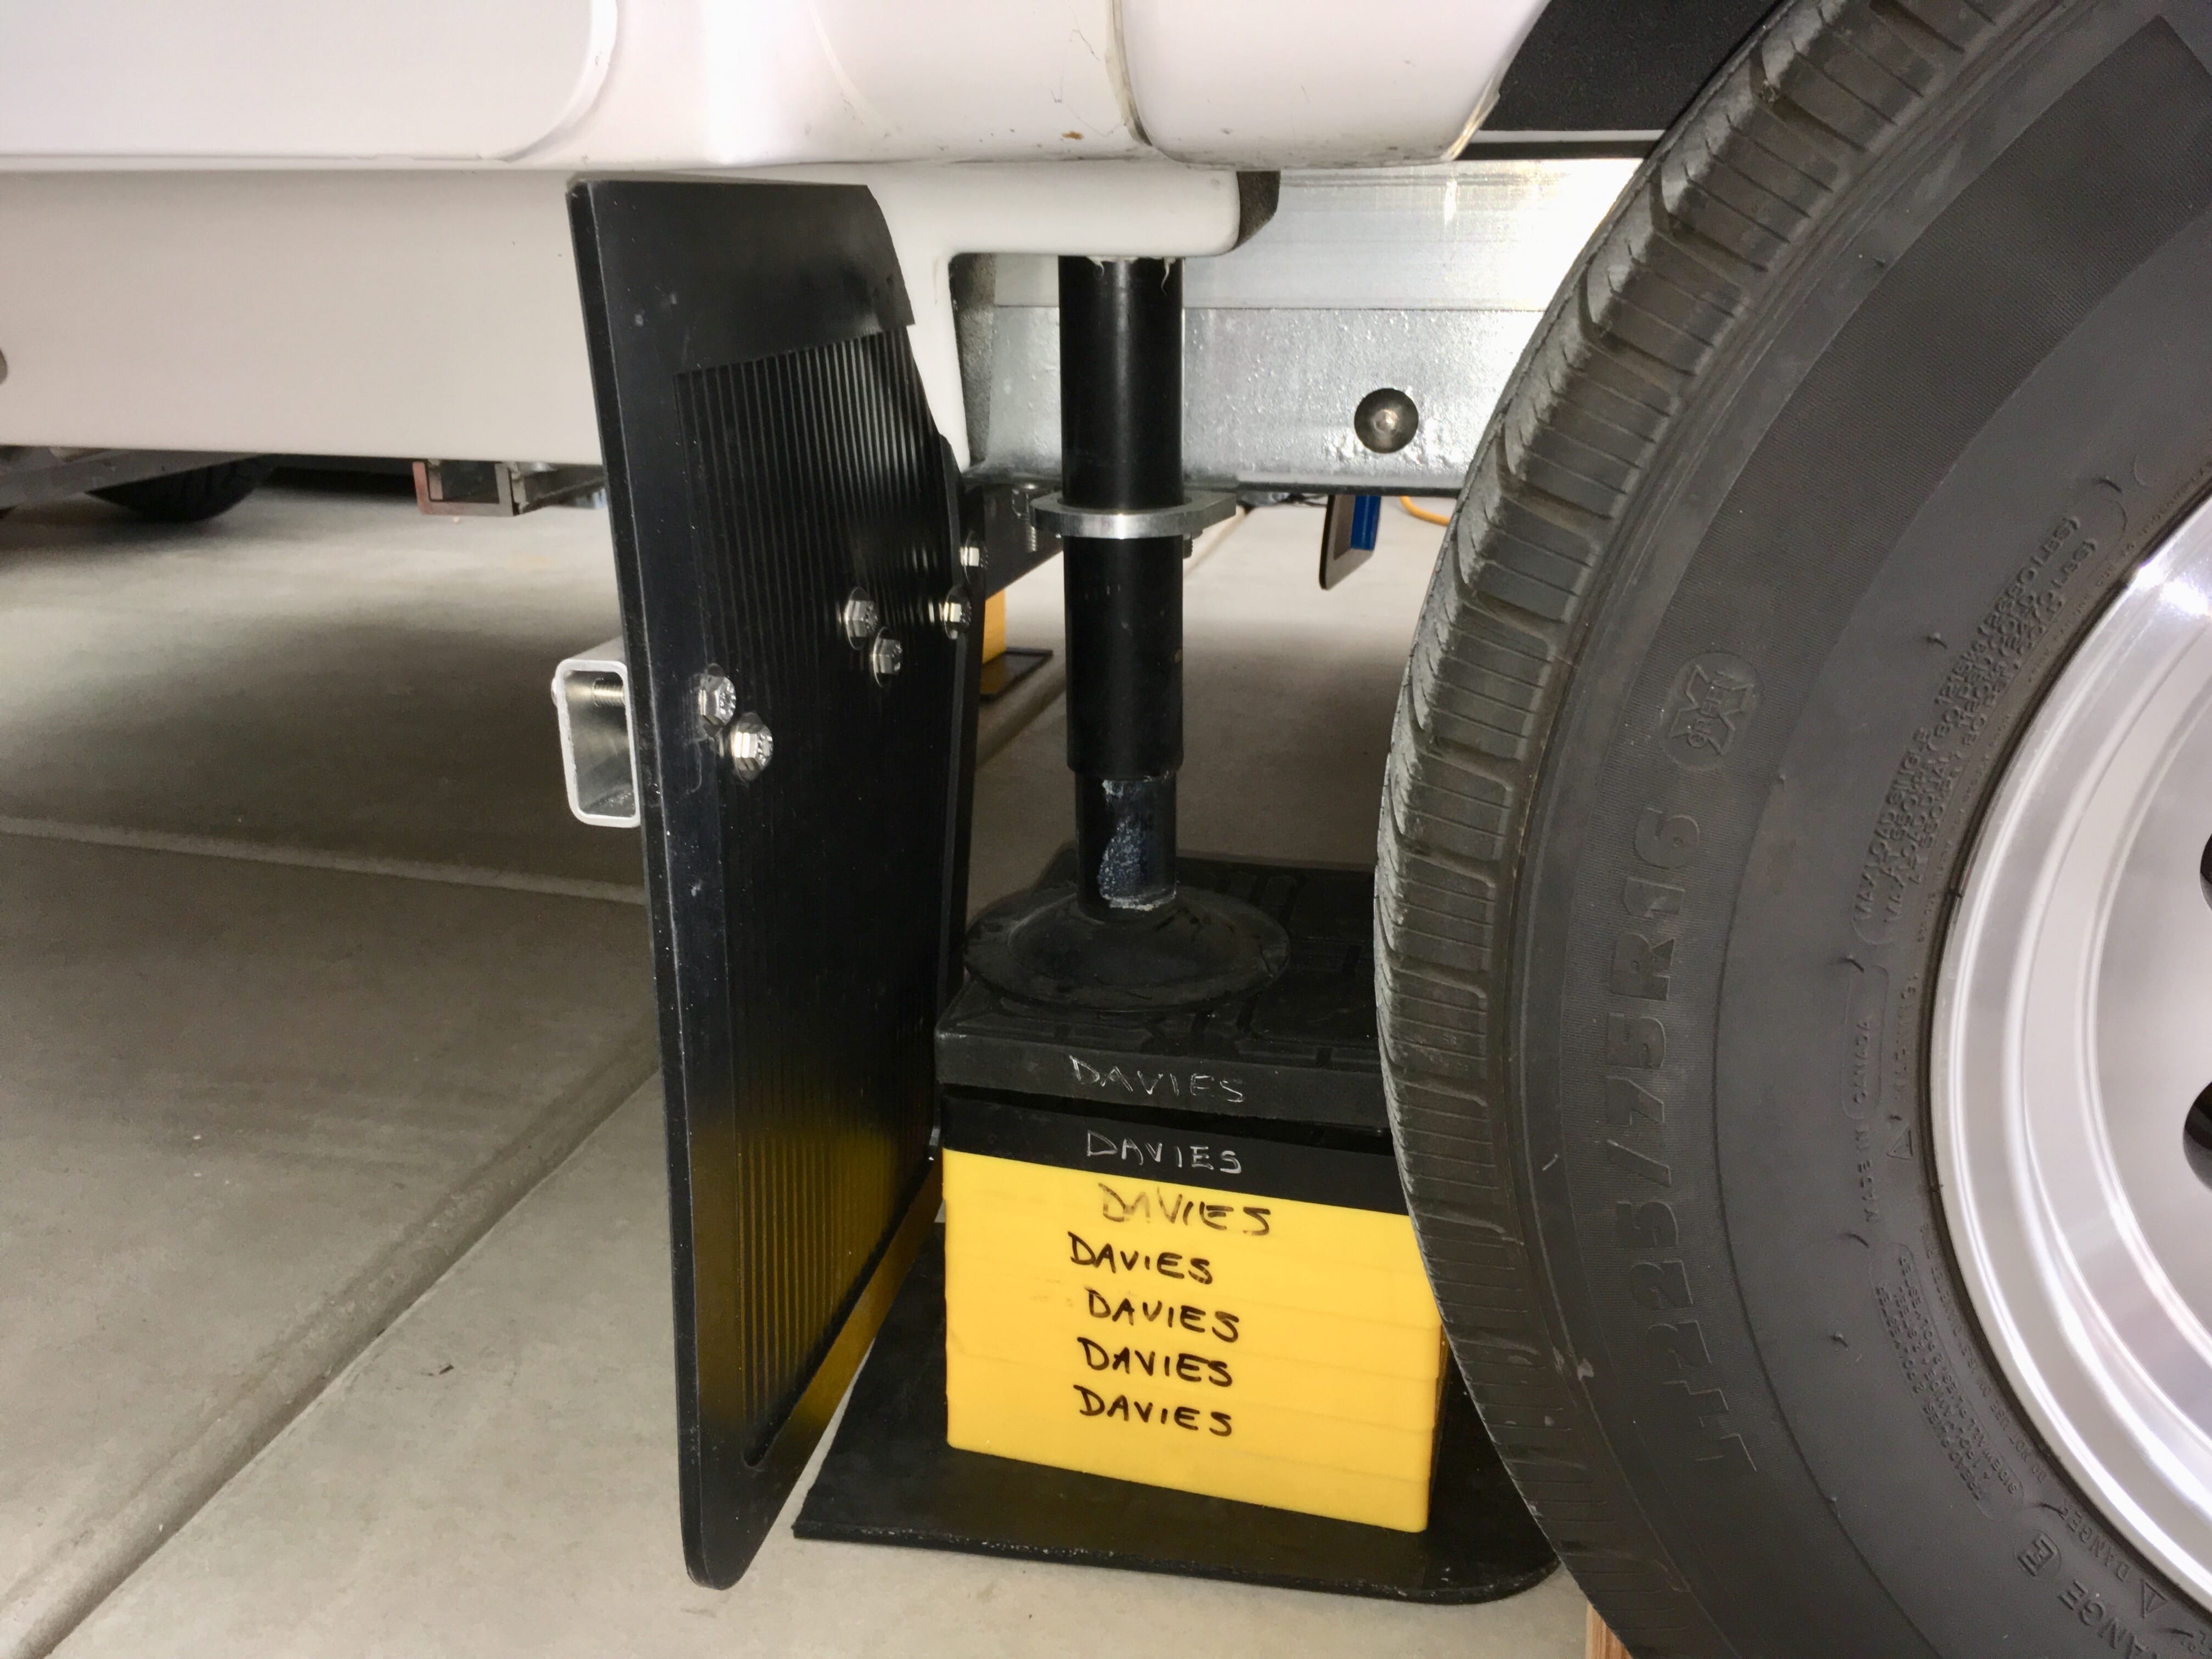
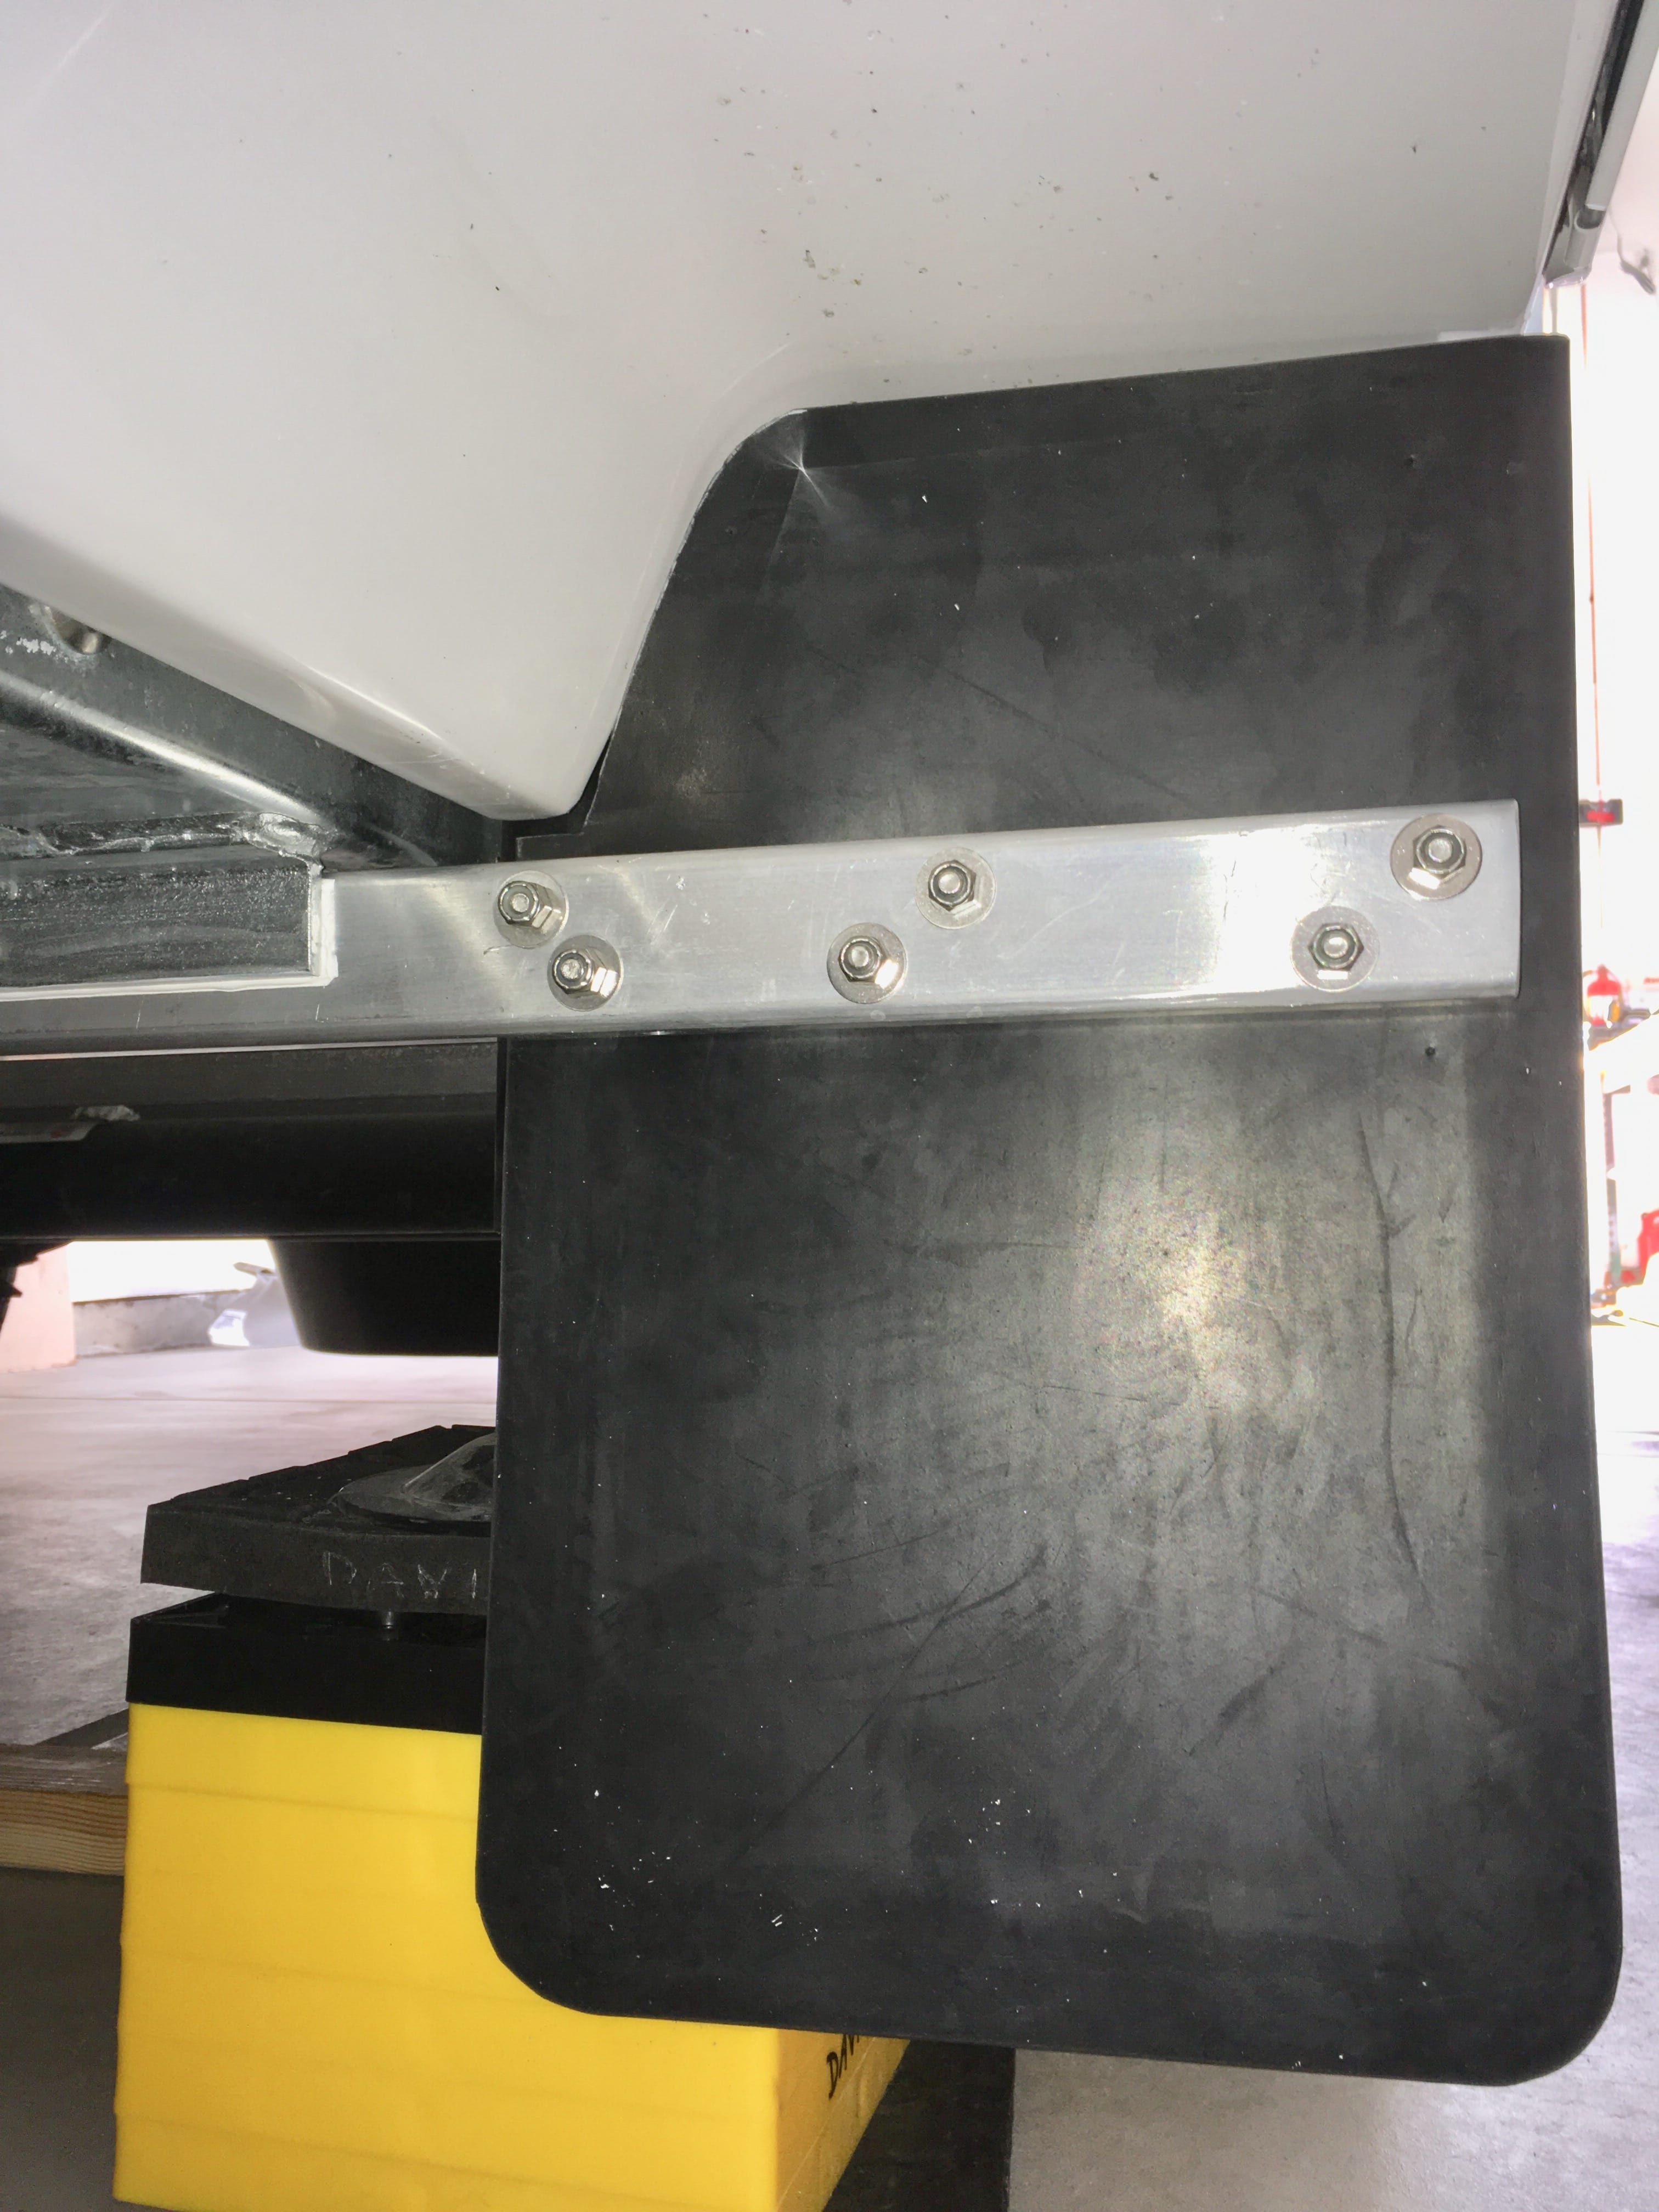
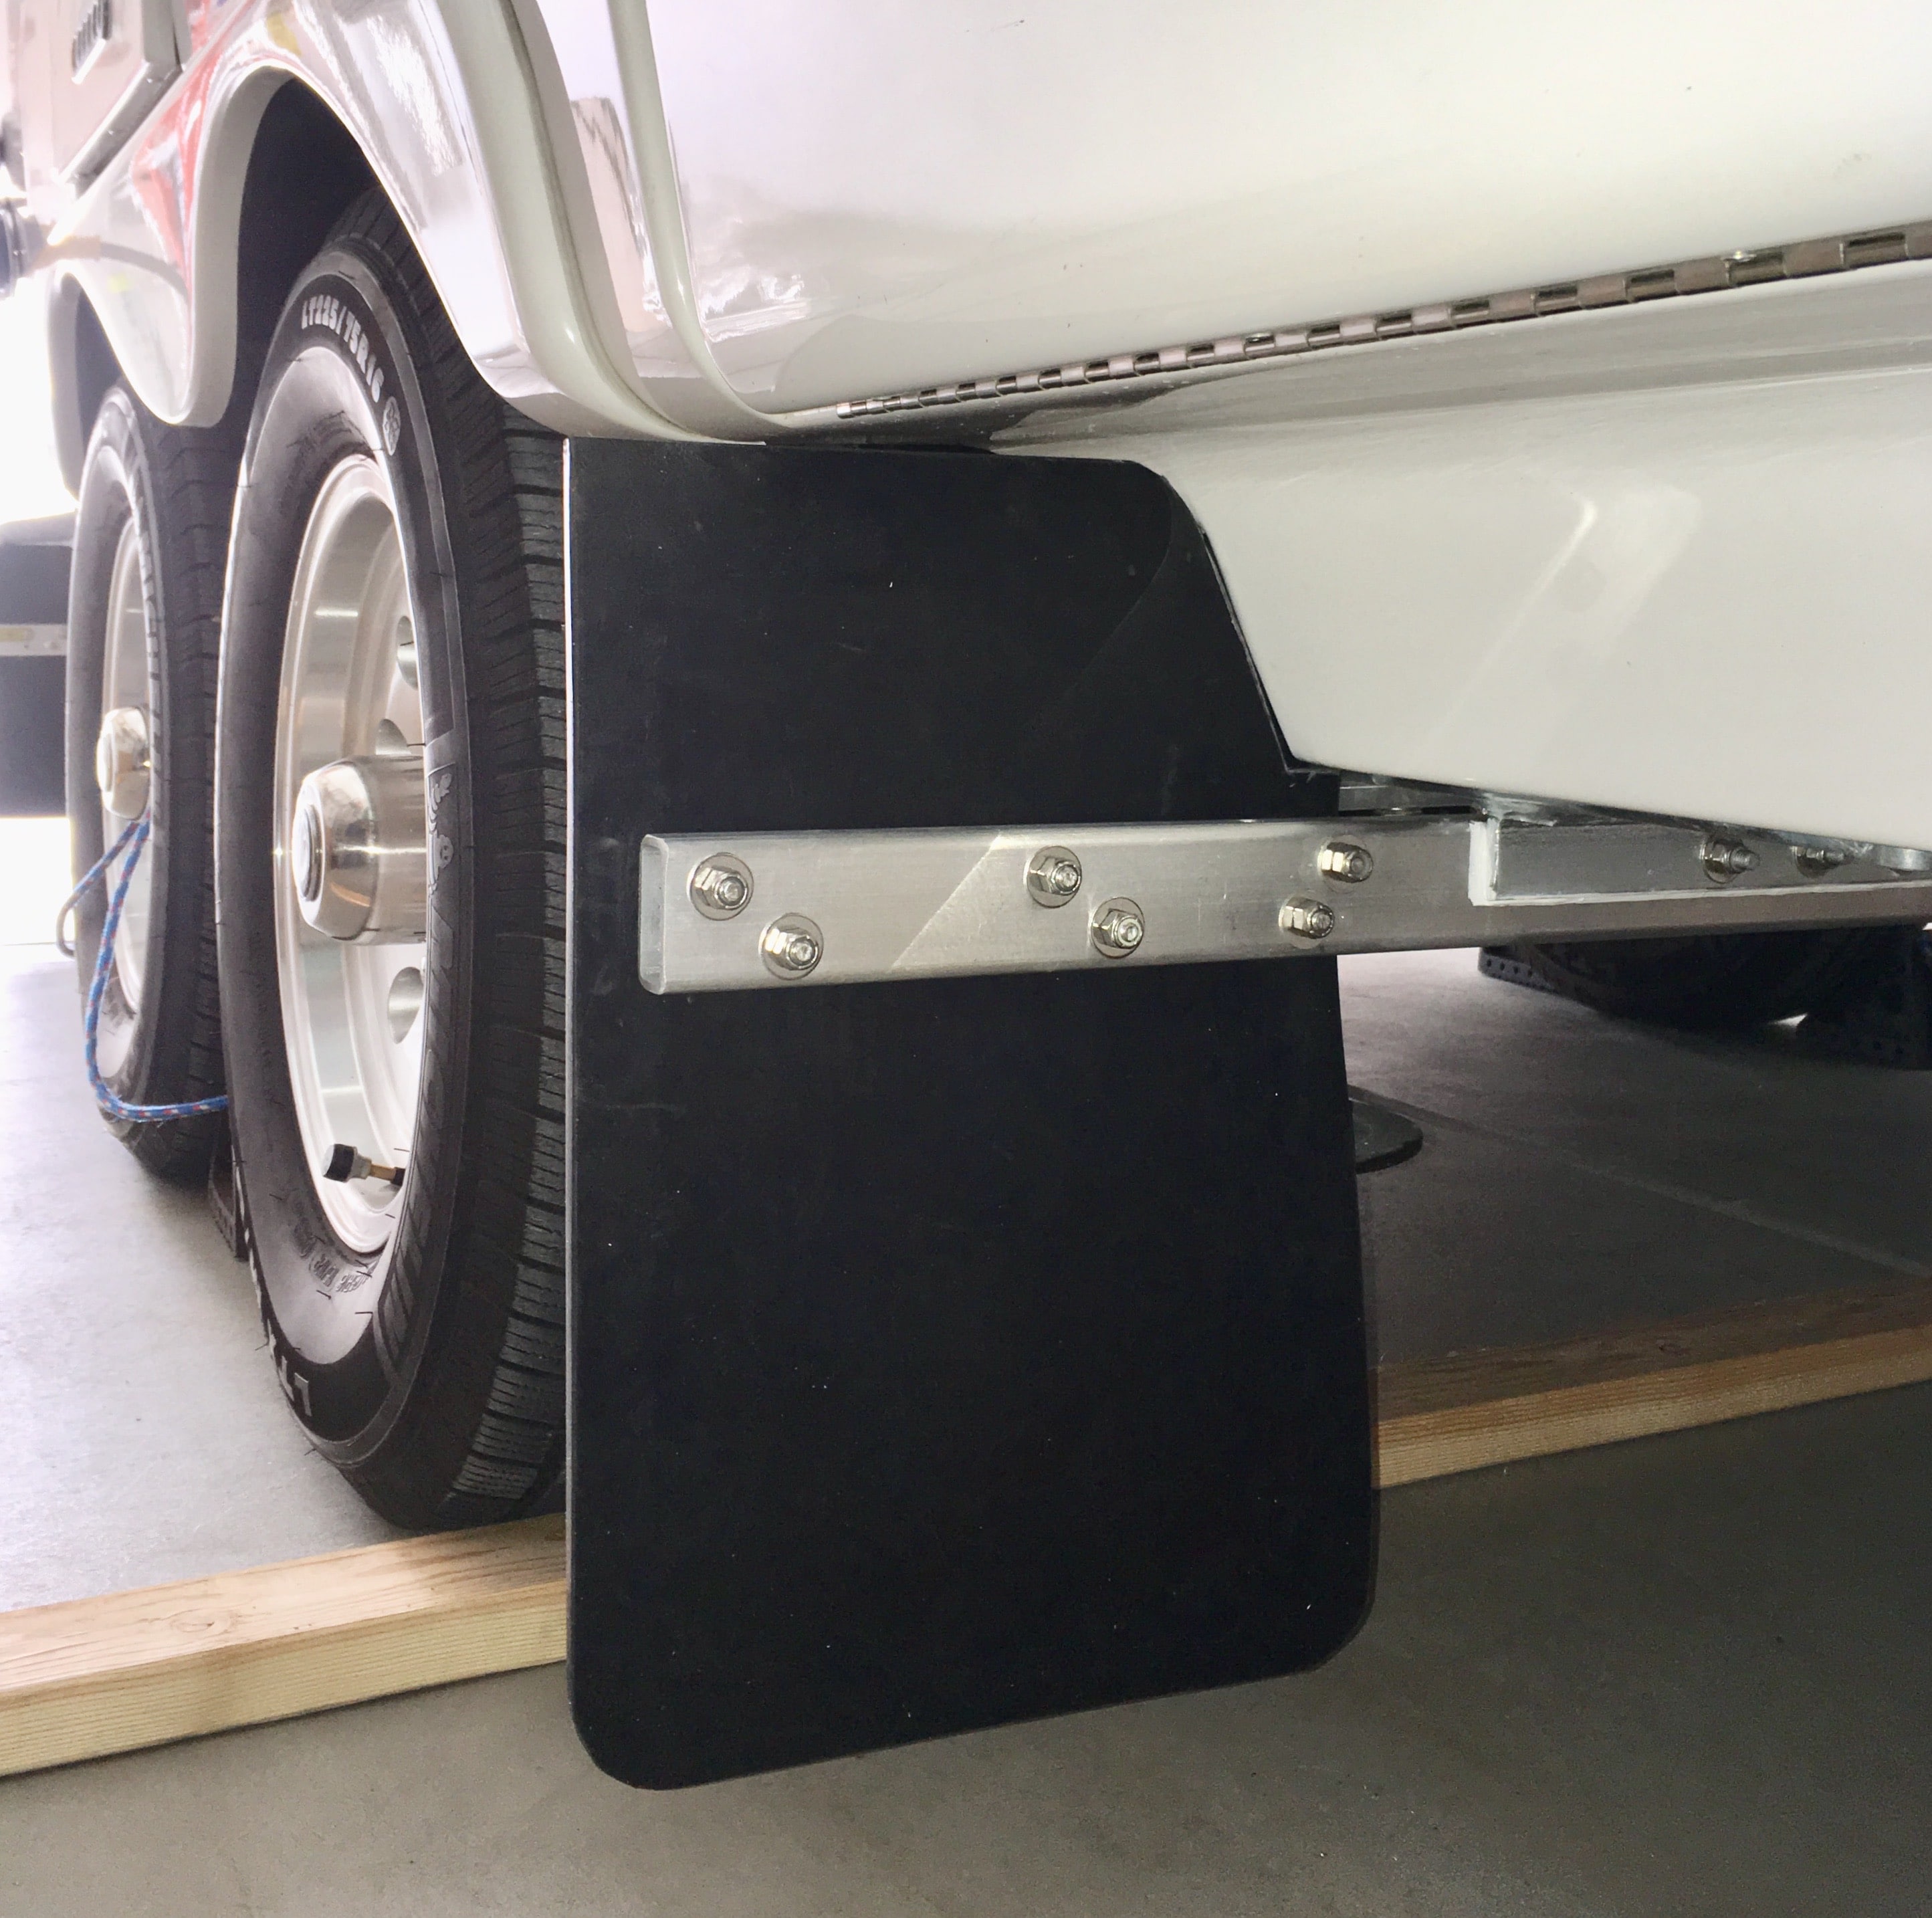
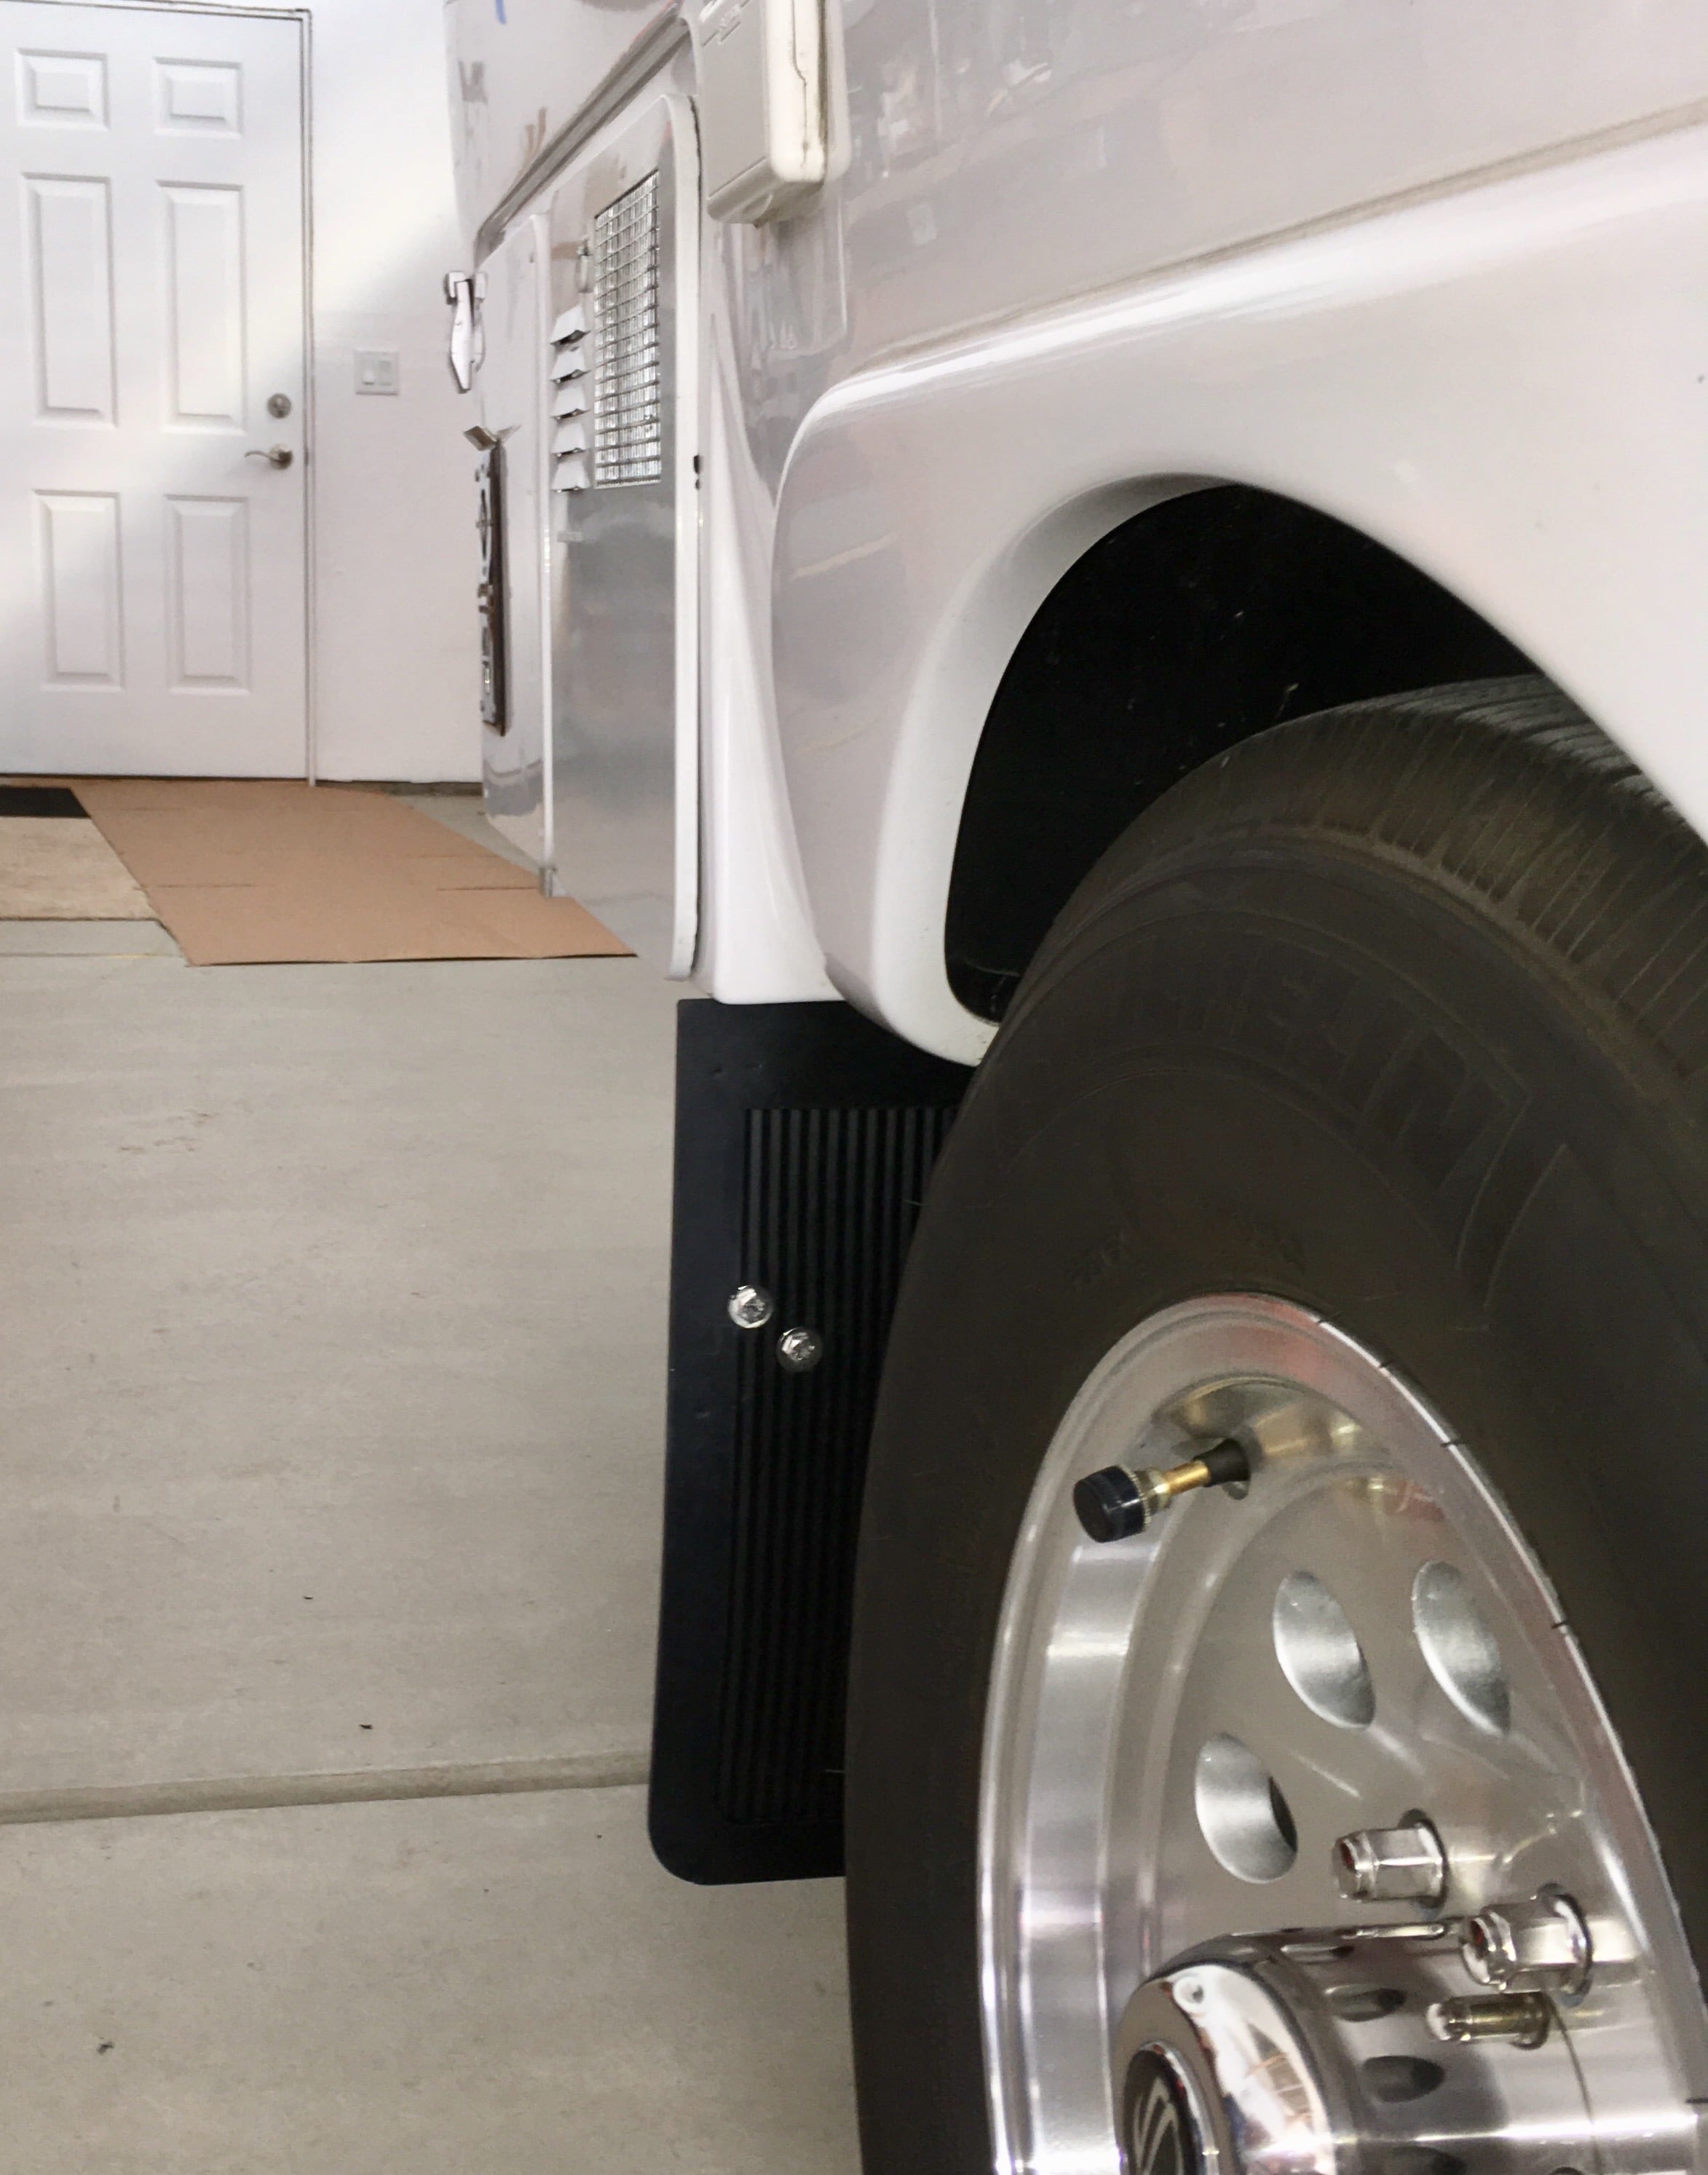
I finished installing mud flaps on our 2021 LE2 today. The street side mud flap does not clear the basement door, as on JED's trailer, but the door does open fully when the upper part of the flap is bent forward a bit. That's not a big deal, but I do wonder what the difference is between our trailers. The 1"x2" aluminum tubing I used is attached to the forward part of the lateral angle that is part of the sub-frame, and the flap is attached to the front of the aluminum support as in the photos of other installations. I suspect that the lateral angle piece is welded to the sub-frame further to the rear of the trailer, rather than there being a difference in the size of the basement door opening. I added plugs to the exposed ends of the aluminum supports to give a more finished appearance. I bought them on Amazon (where else?). https://www.amazon.com/gp/product/B07CNCCR7S/ref=ppx_yo_dt_b_asin_title_o01_s00?ie=UTF8&psc=1
1 point
-
made it to livingston tx...heading to the hill country next.! 10-q dan
1 point
-
Second year here. Last trailer was shorter so more spots from which to choose but still worth the risk of the long twisty drive in to see if a spot is available.1 point
-
Yes, it was Terry and Laura. We had a hiker stop us and ask if there was an Oliver Meet there as they thought they had seen at least 4. I think they counted Terry and Laura twice as they had moved to a different space that became available. 🤗 Charlie.1 point
-
I too showed up at Oliver in my home built overlanding trailer to see the Elite II in person. Rodney Lomax was who showed the Olivers to me and spend over two hours answering questions without any pressure. While My overlanding rig was quite capable it was also very “Fringe” but I was treated the same as I expect had I rolled in with a Class A or Airstream. The Oliver team has class.1 point
-
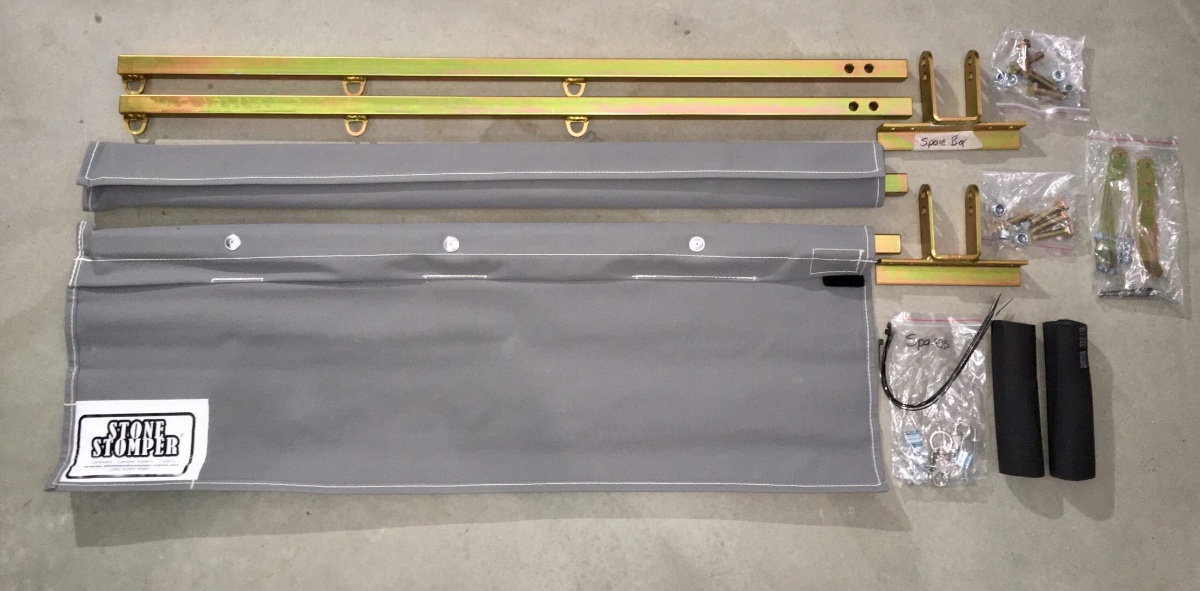
I did end up using the 1"x1" steel since it's galvanized, I plan on towing in winter / salt, and needed to find something useful for it. I "galvanized" it again after cutting and drilling. I'm going to keep a close eye on it and if it starts to rust, I'll take it off and replace it with aluminum. I used M5-0.8 Socket Head Cap Screws for everything. I did not use washers on the 2 bolts / screws that attach the bar to the frame. The screw / bolt head diameters are not much larger than the threaded portion of the bolt so l "hope" that's my "fuse" to protect the frame if there's a solid strike on the bar. I sure wish OTT had mud flaps standard or as an option. I already had a few "dings" in the gelcoat from driving it home after delivery that could/would have been prevented with flaps. 😞 Numerous owners have done this mod, so I'm not adding anything innovative or new here, but I know pictures are worth thousands of words and maybe will help someone thinking of doing this mod, so here they are:
1 point
-
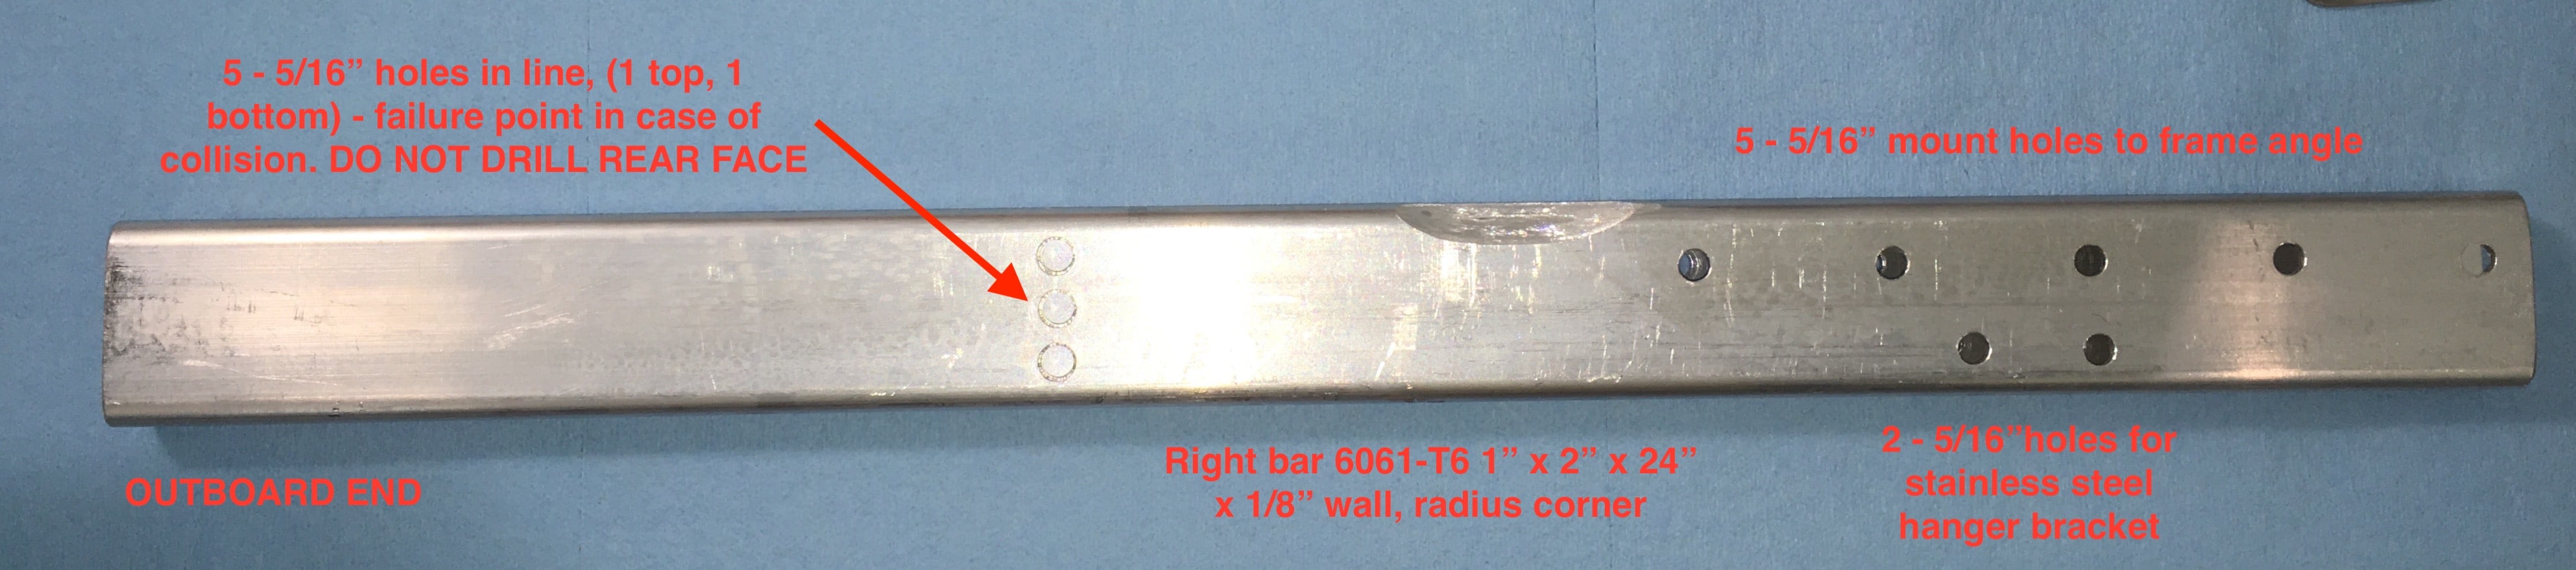
Feasible, but undesirable IMHO. Rust, mainly. It will be very hard to keep looking nice. You could get the parts plated after drilling and cutting. I strongly recommend 6061-T6 aluminum. It is very easy to work with and will always look great unless you tow in winter (salt/ mag chloride). Plus it matches the main frame material perfectly. If you don’t have a nearby non-ferrous metals supplier you can order online, for example: https://alcobrametals.com/aluminum/tube-rectangular/6061-t6-rectangular-tube Thanks for the kind words, they are greatly appreciated. Post some pics when you are done. FYI, Stone Stomper uses square steel for their front skirt arms, those and the hardware are yellow cad plated, it seems to be quite durable and looks fine. No signs of rust after four years. I ordered extra parts in case the got pranged up or started looking bad, but so far they have not been needed. John Davies Spokane WA
1 point
-
After getting the materials to do this job more than a year ago, I finally finished it this past month. Thanks John.1 point
-
If your bar material is aircraft grade, then I fear it is too strong. What are the outside dimensions and alloy type? You really need to design the support arms so that they are weaker than the subframe they are bolted to. The angle is steel, but it is a mild alloy and not THAT strong. If there is a big hit on the arm due to road debris like a 2x4 or a blown tire carcass, the arm should fold back gracefully, not bend your sub-frame attach point. That might cost some $$$ to repair. Replacing just a damaged flap arm would be relatively minor. The material I used is 1 x 2 x 1/8” wall. It is pretty darned rigid due to its shape and the tempered 6061-T6 material, so I added a line of weakening holes so it will bend when hit hard. The following pic is from my Stone Stomper thread. I TRIED to add it to the first post of this mudflap thread but I am unable to edit that post. The line of holes does not show in the other pics because they are drilled on the top, bottom and front face only. This leaves a “hinge” in the back to allow the metal to fold. The material will tear apart at the holes. I suggest that you drill some small holes in the arm inboard of the flap to remove enough metal to make a failure point. Seriously. Please do it. Be safe. John Davies Spokane WA
1 point
-
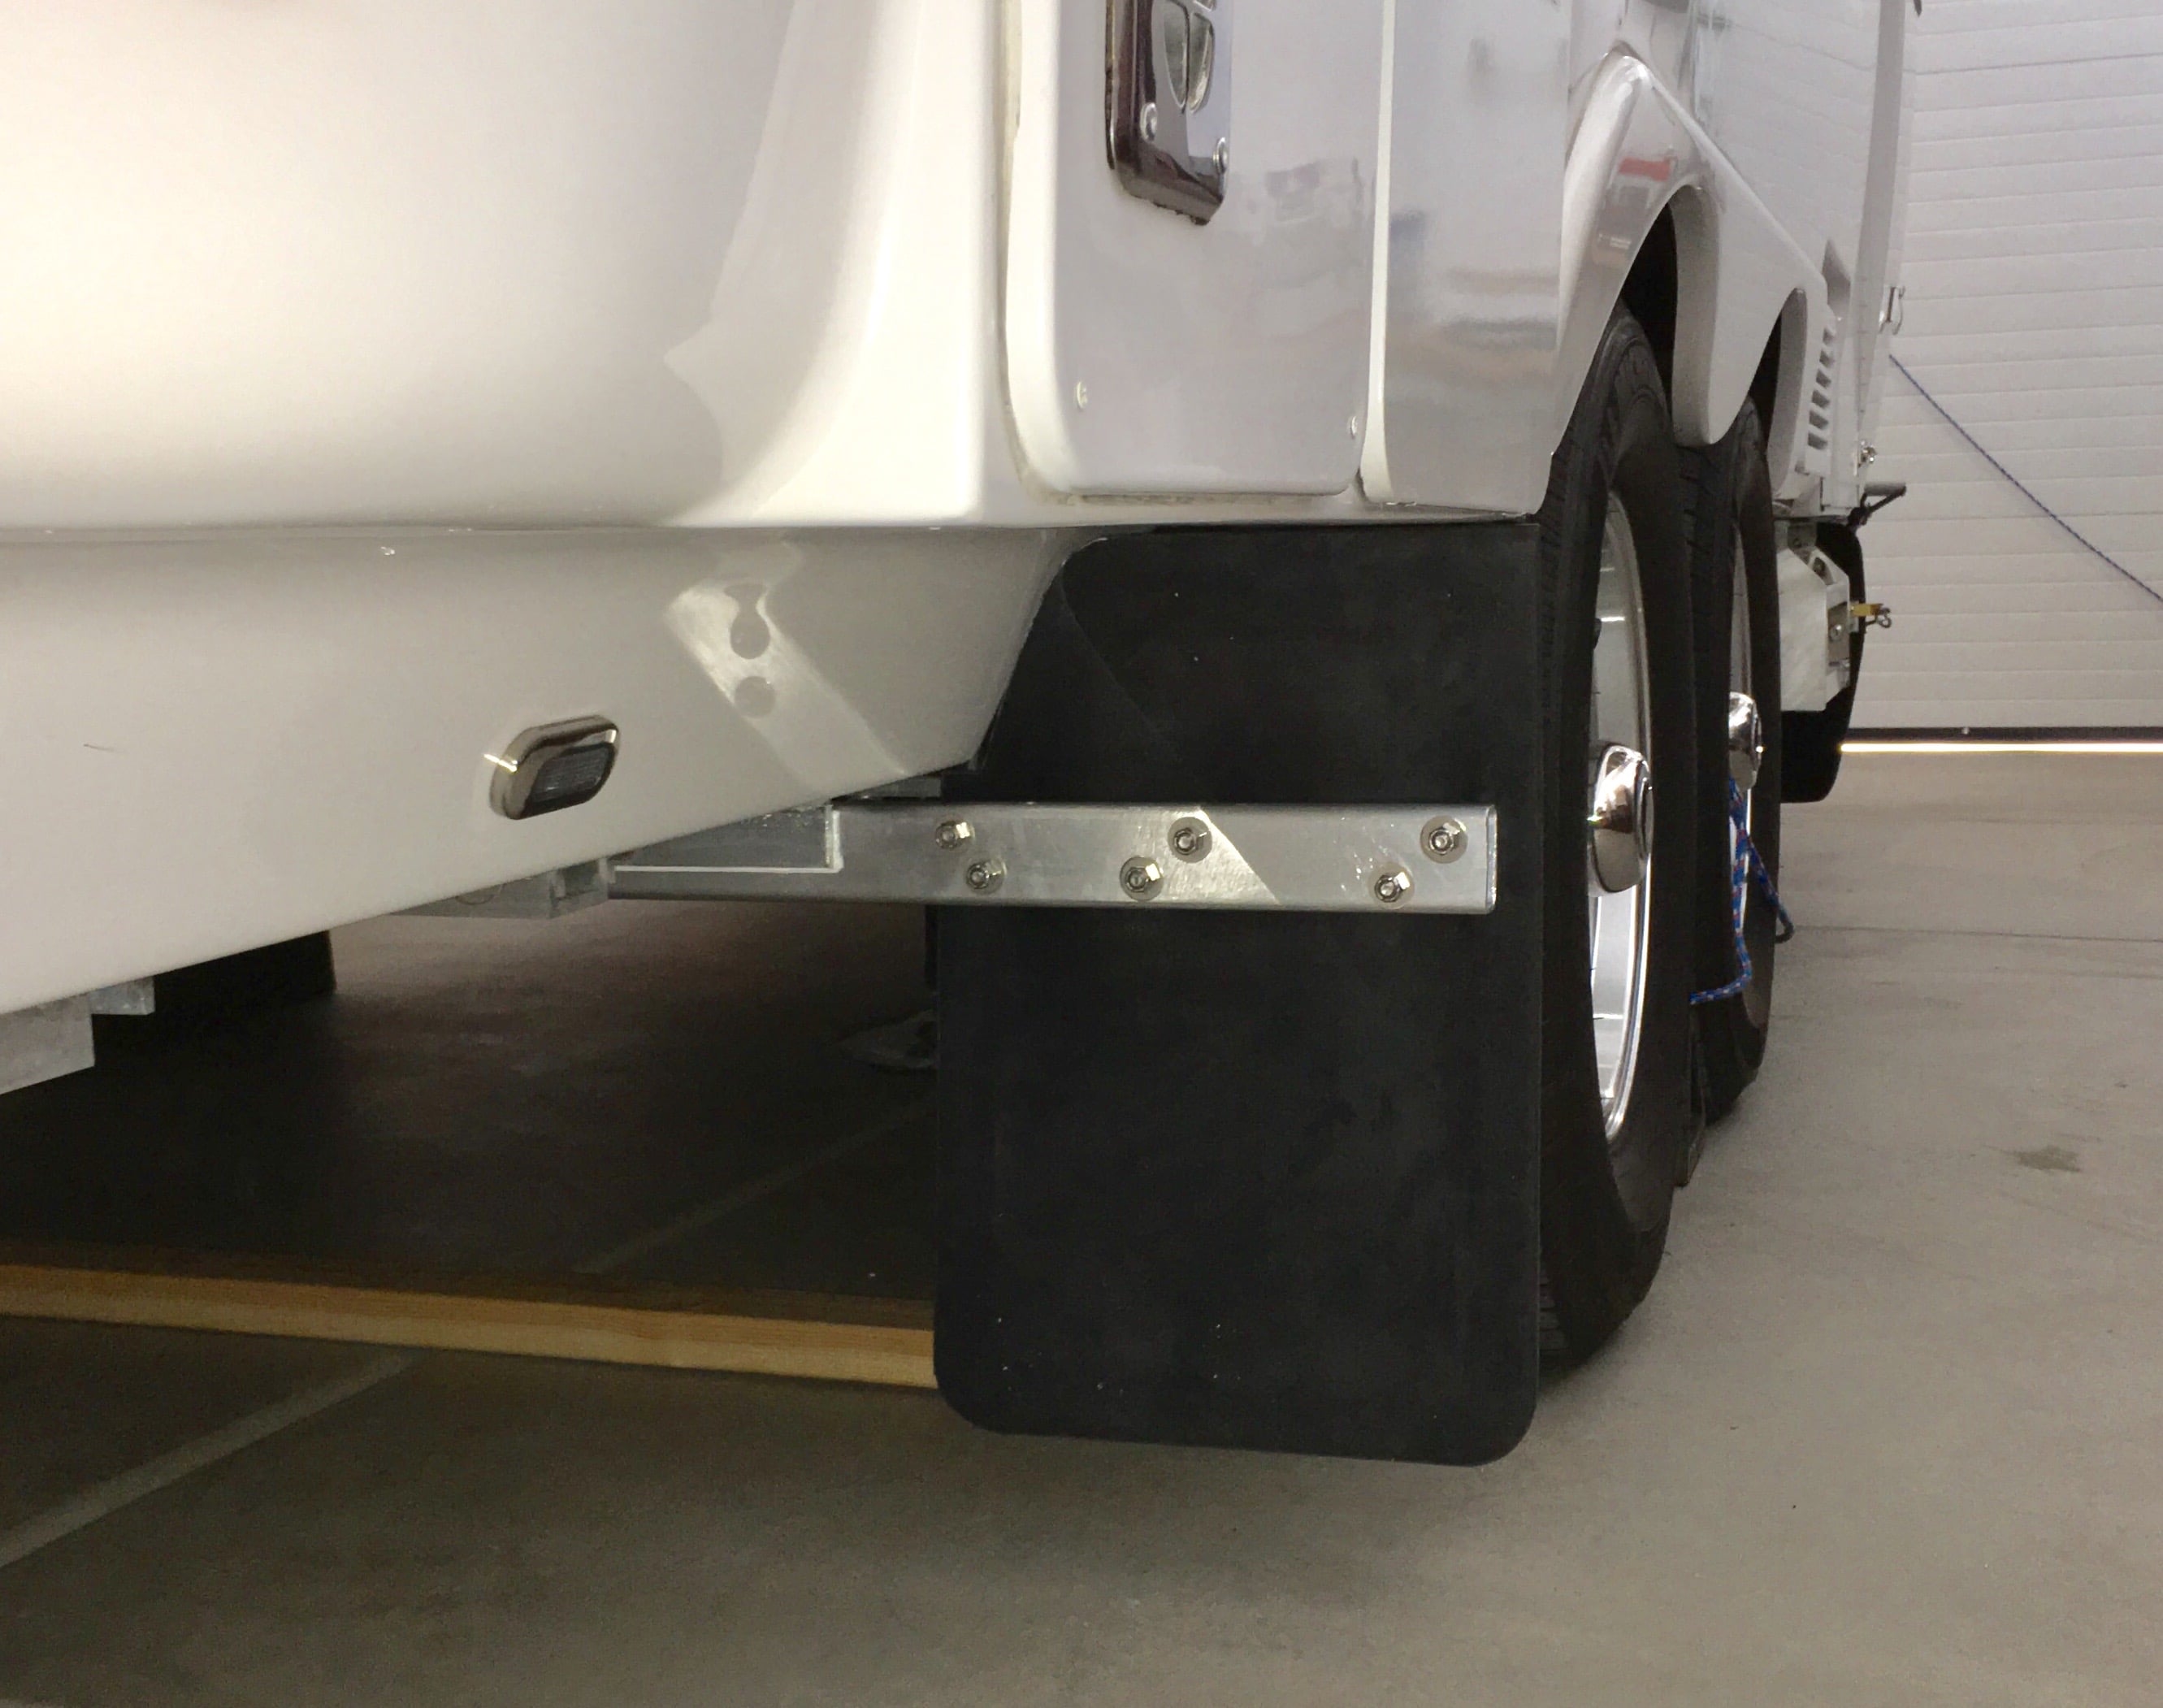
Thanks to JD's well documented post's I finished my mud flap install. I used similar sized aluminum square support, however, I used solid, rather than "tubing", mainly because my local supplier had a highly discounted 10' piece in the remnant pile. In addition to the lock washers I also used red lock tight on the nuts. (couldn't find any nylock nuts, when I do, I'll replace.) Similar SS nuts, bolts, washers, little different install overall. The cost of material was less than $60, and took about 3 hours total to fab and install. A drill press would have made the process a little quicker. I also reversed the flap, just personal preference [attachment file=152850] I have yet to figure out how to keep the pic orientation correct, or how to fix it in the posts.
1 point
-
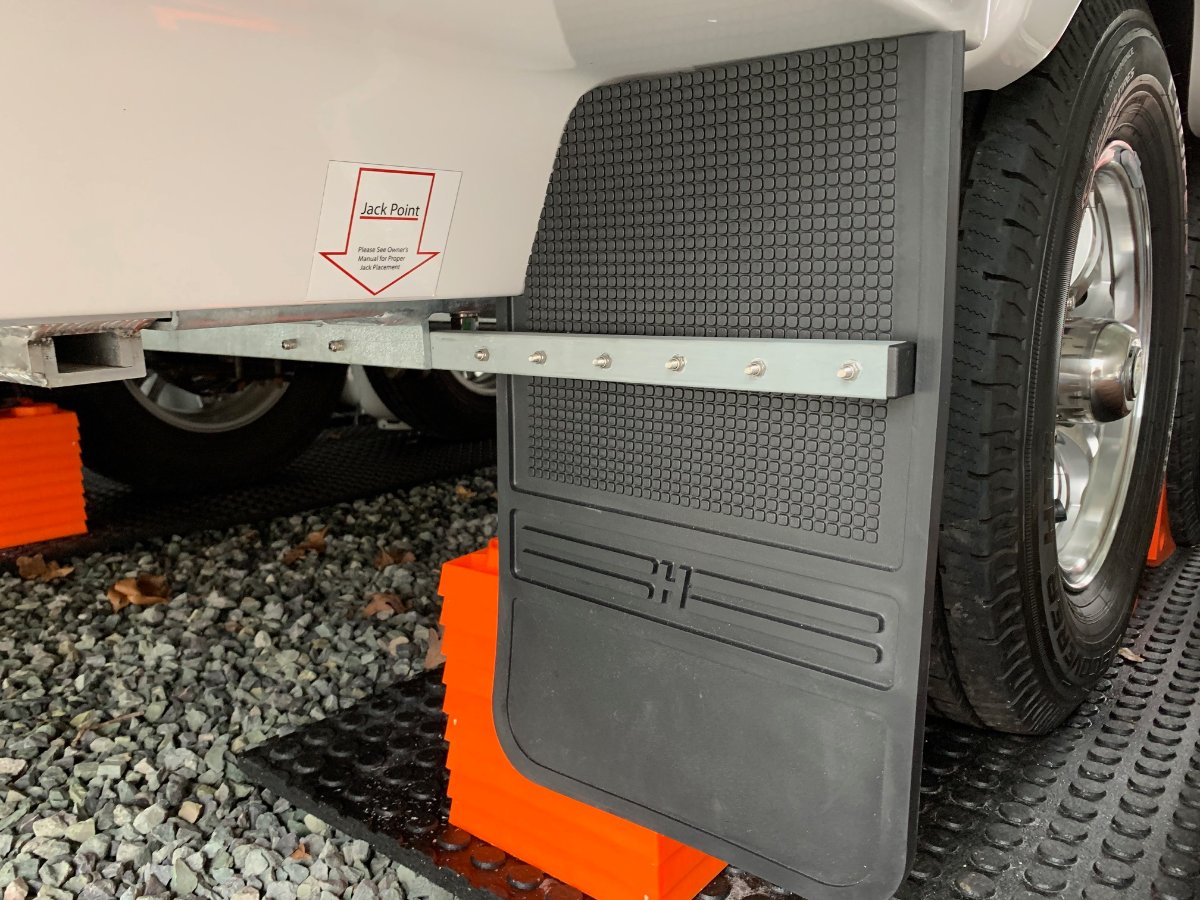
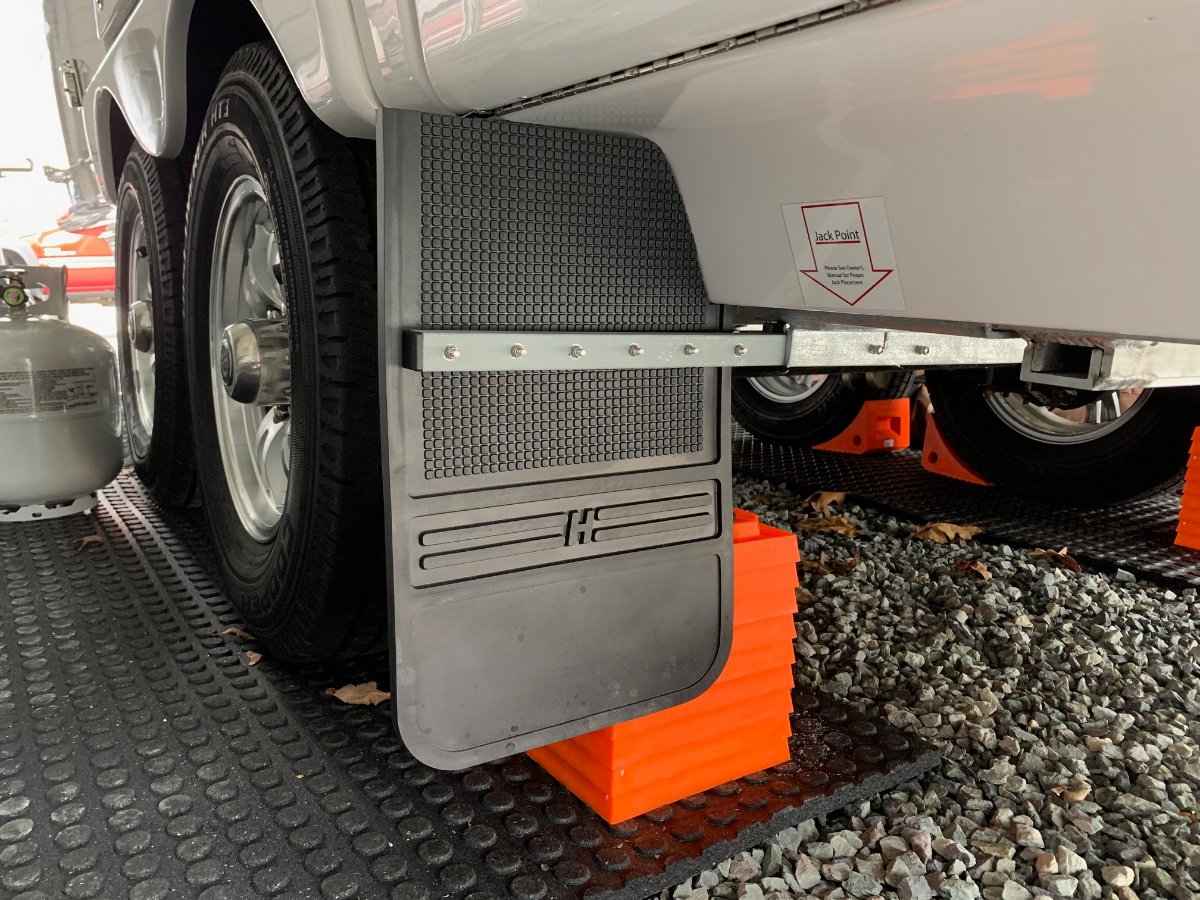
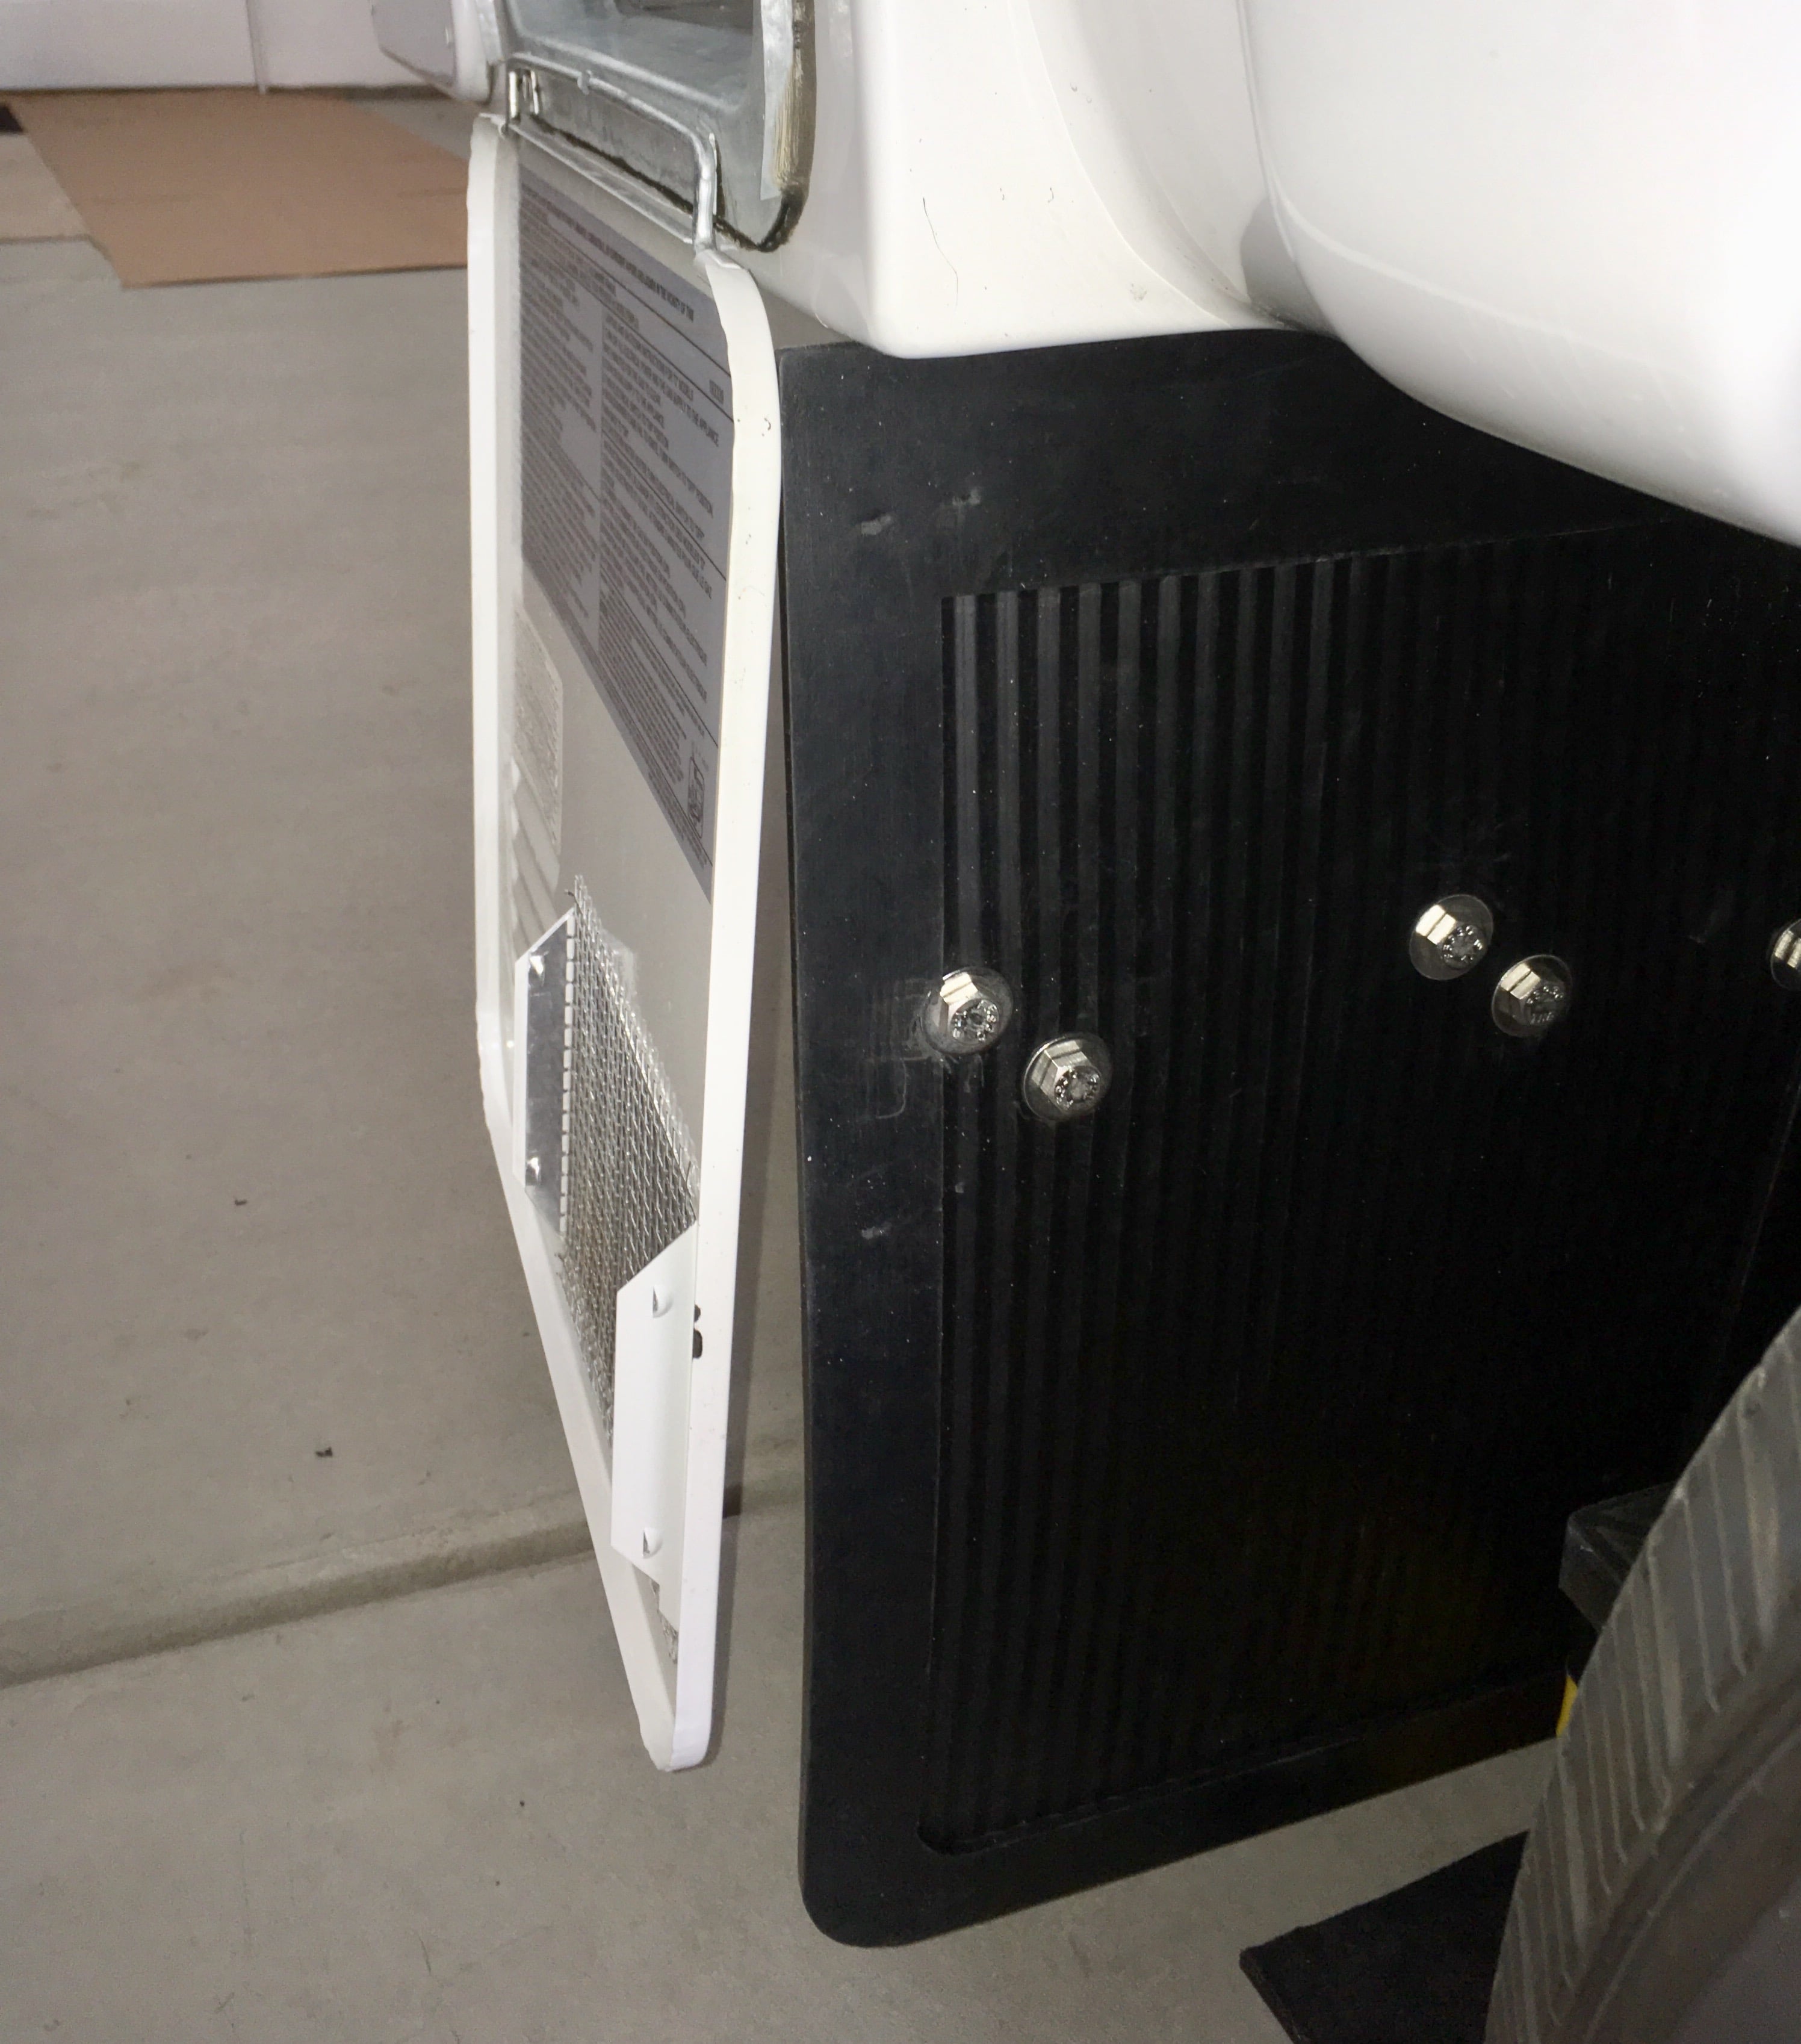
It would not hurt to cover the entire area that would get blasted by road spray and hard debris, and the front facing surface of the rear bumper too. All surfaces in line with the tire tread need to be protected, so coat pretty much the entire underneath curved part of the hull, plus the exposed gelcoat around the back of the wheel wells. (That area does not get protected by flaps, but it is not highly visible so I can live with damage until it gets bad enough to cover with bedliner spray). If you plan on driving on unsurfaced roads, you won't be able to match the protection you get with flaps. They stop the debris from hitting in the first place. Plus they protect the city and tank fill water fittings and stop big stones from ricocheting off the back bumper and into the rear lights and gelcoat. I have found jagged basalt stones the size of my thumb lying on top of the rear platform before, and nothing but dust after installing flaps. They are really very effective. Plus they protect cars following you from stuff thrown by your tires.,. that is a bonus. John Davies Spokane WA1 point
-
As far as I know, they will not, though I have heard that in the past they have installed them on Canada-bound unit(s) due to the laws requiring them on trailers there. I have suggested that they develop a kit that can be installed either by a skilled owner, or prior to delivery by the Oliver shop. Ideally, they would make changes in the mold to allow better/ easier attachment to the fiberglass - the shape is a little awkward at the very back - so you don't need to add heavy support bars to the frame. Whatever we end up with, it needs to be robust, but also failsafe, so if you run over a big object or have tire tread separation, it will not do too much damage to the hull. It needs to be designed with a break-away or fold-away feature for a big impact. Jason said they would look into it. It never hurts to ask them, the more people who express interest, the more likely things like this are to happen. This is how we got EZ-Flex suspension, extra access panels, solar, etc. Ask (enough) and ye shall receive. John Davies Spokane WA1 point
-
NICE! I always wondered why all the flaps I've ever seen have been mounted with the patterned side away from the wheel. Perhaps your own logic and thinking about will change this. Bill1 point
-
I mounted them smooth side to the rear EXACTLY because that is the easier side to clean. That is the part that shows the most, I do not care if the front face collects stuff. I just pressure wash that off anyway, or it falls off in the rain. Secondly, if I have to trim the bottom for clearance, I will round the corners and the back side will look unchanged. The front has a thicker lip all the way around the perimeter that would look weird if cut away and facing the back. If you want to install a set with the textured side, or a naked lady, facing the rear, go for it. I won't hold it against you. ;) I usually do stuff for a valid reason. It may not match your own logic, but I did think about it, and there was a reason for doing it the way I did.... John Davies Spokane WA1 point
-
Thanks again John. Your explanation and pictures should make this a straight forward project for anyone interested.1 point
-
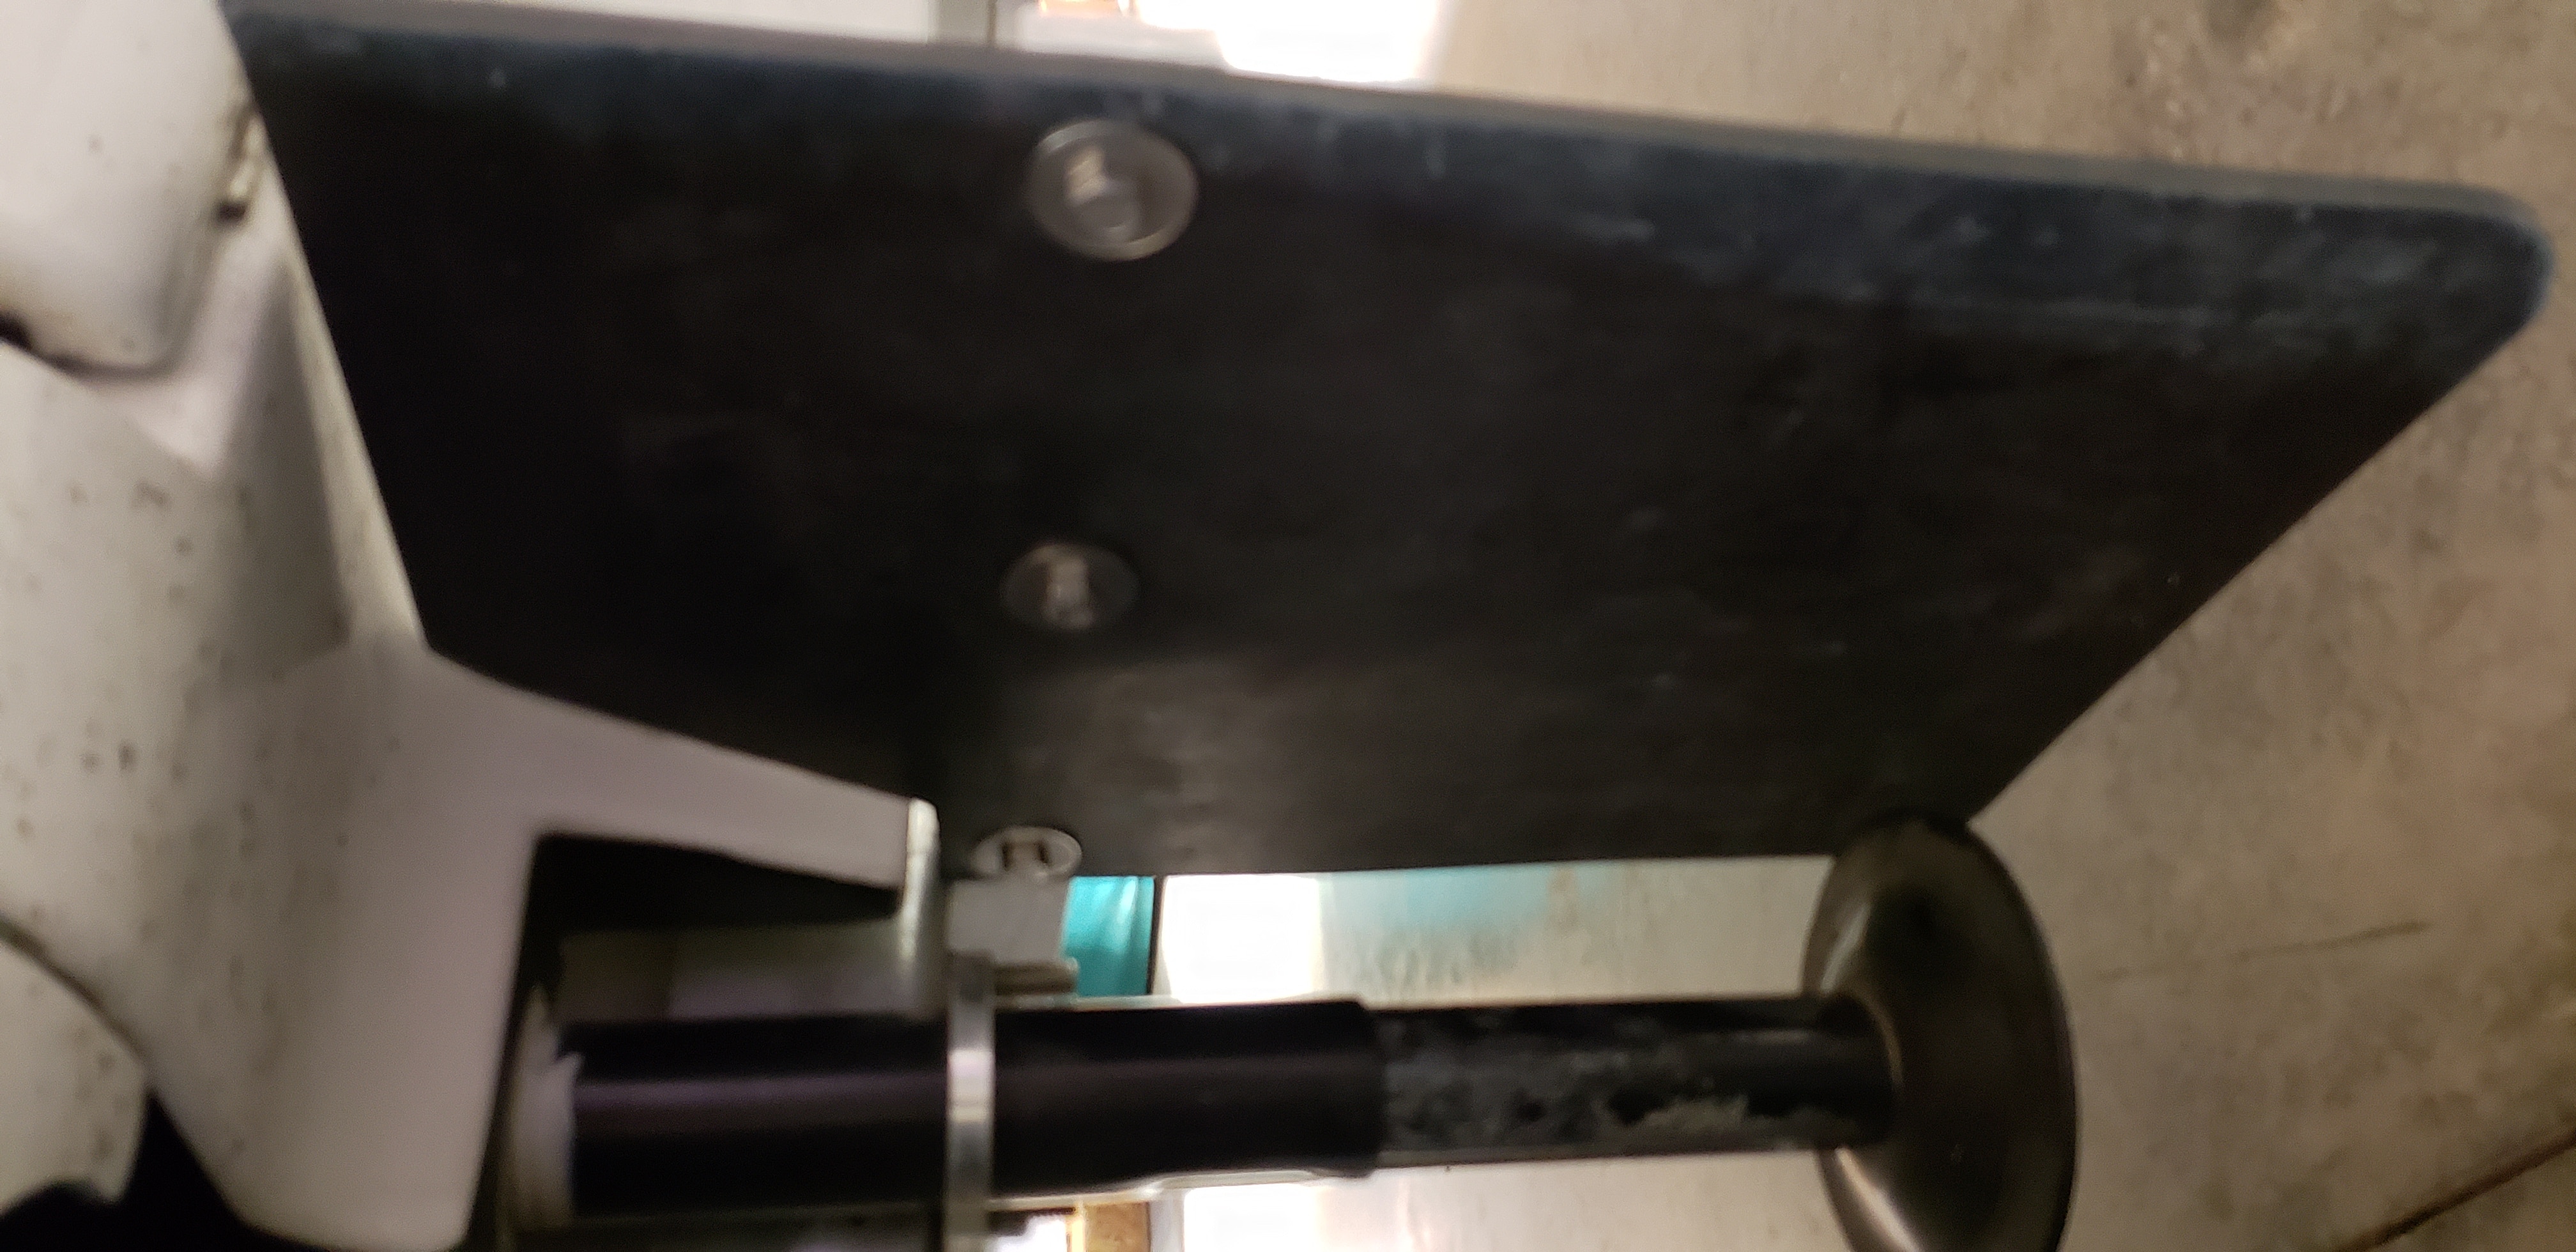
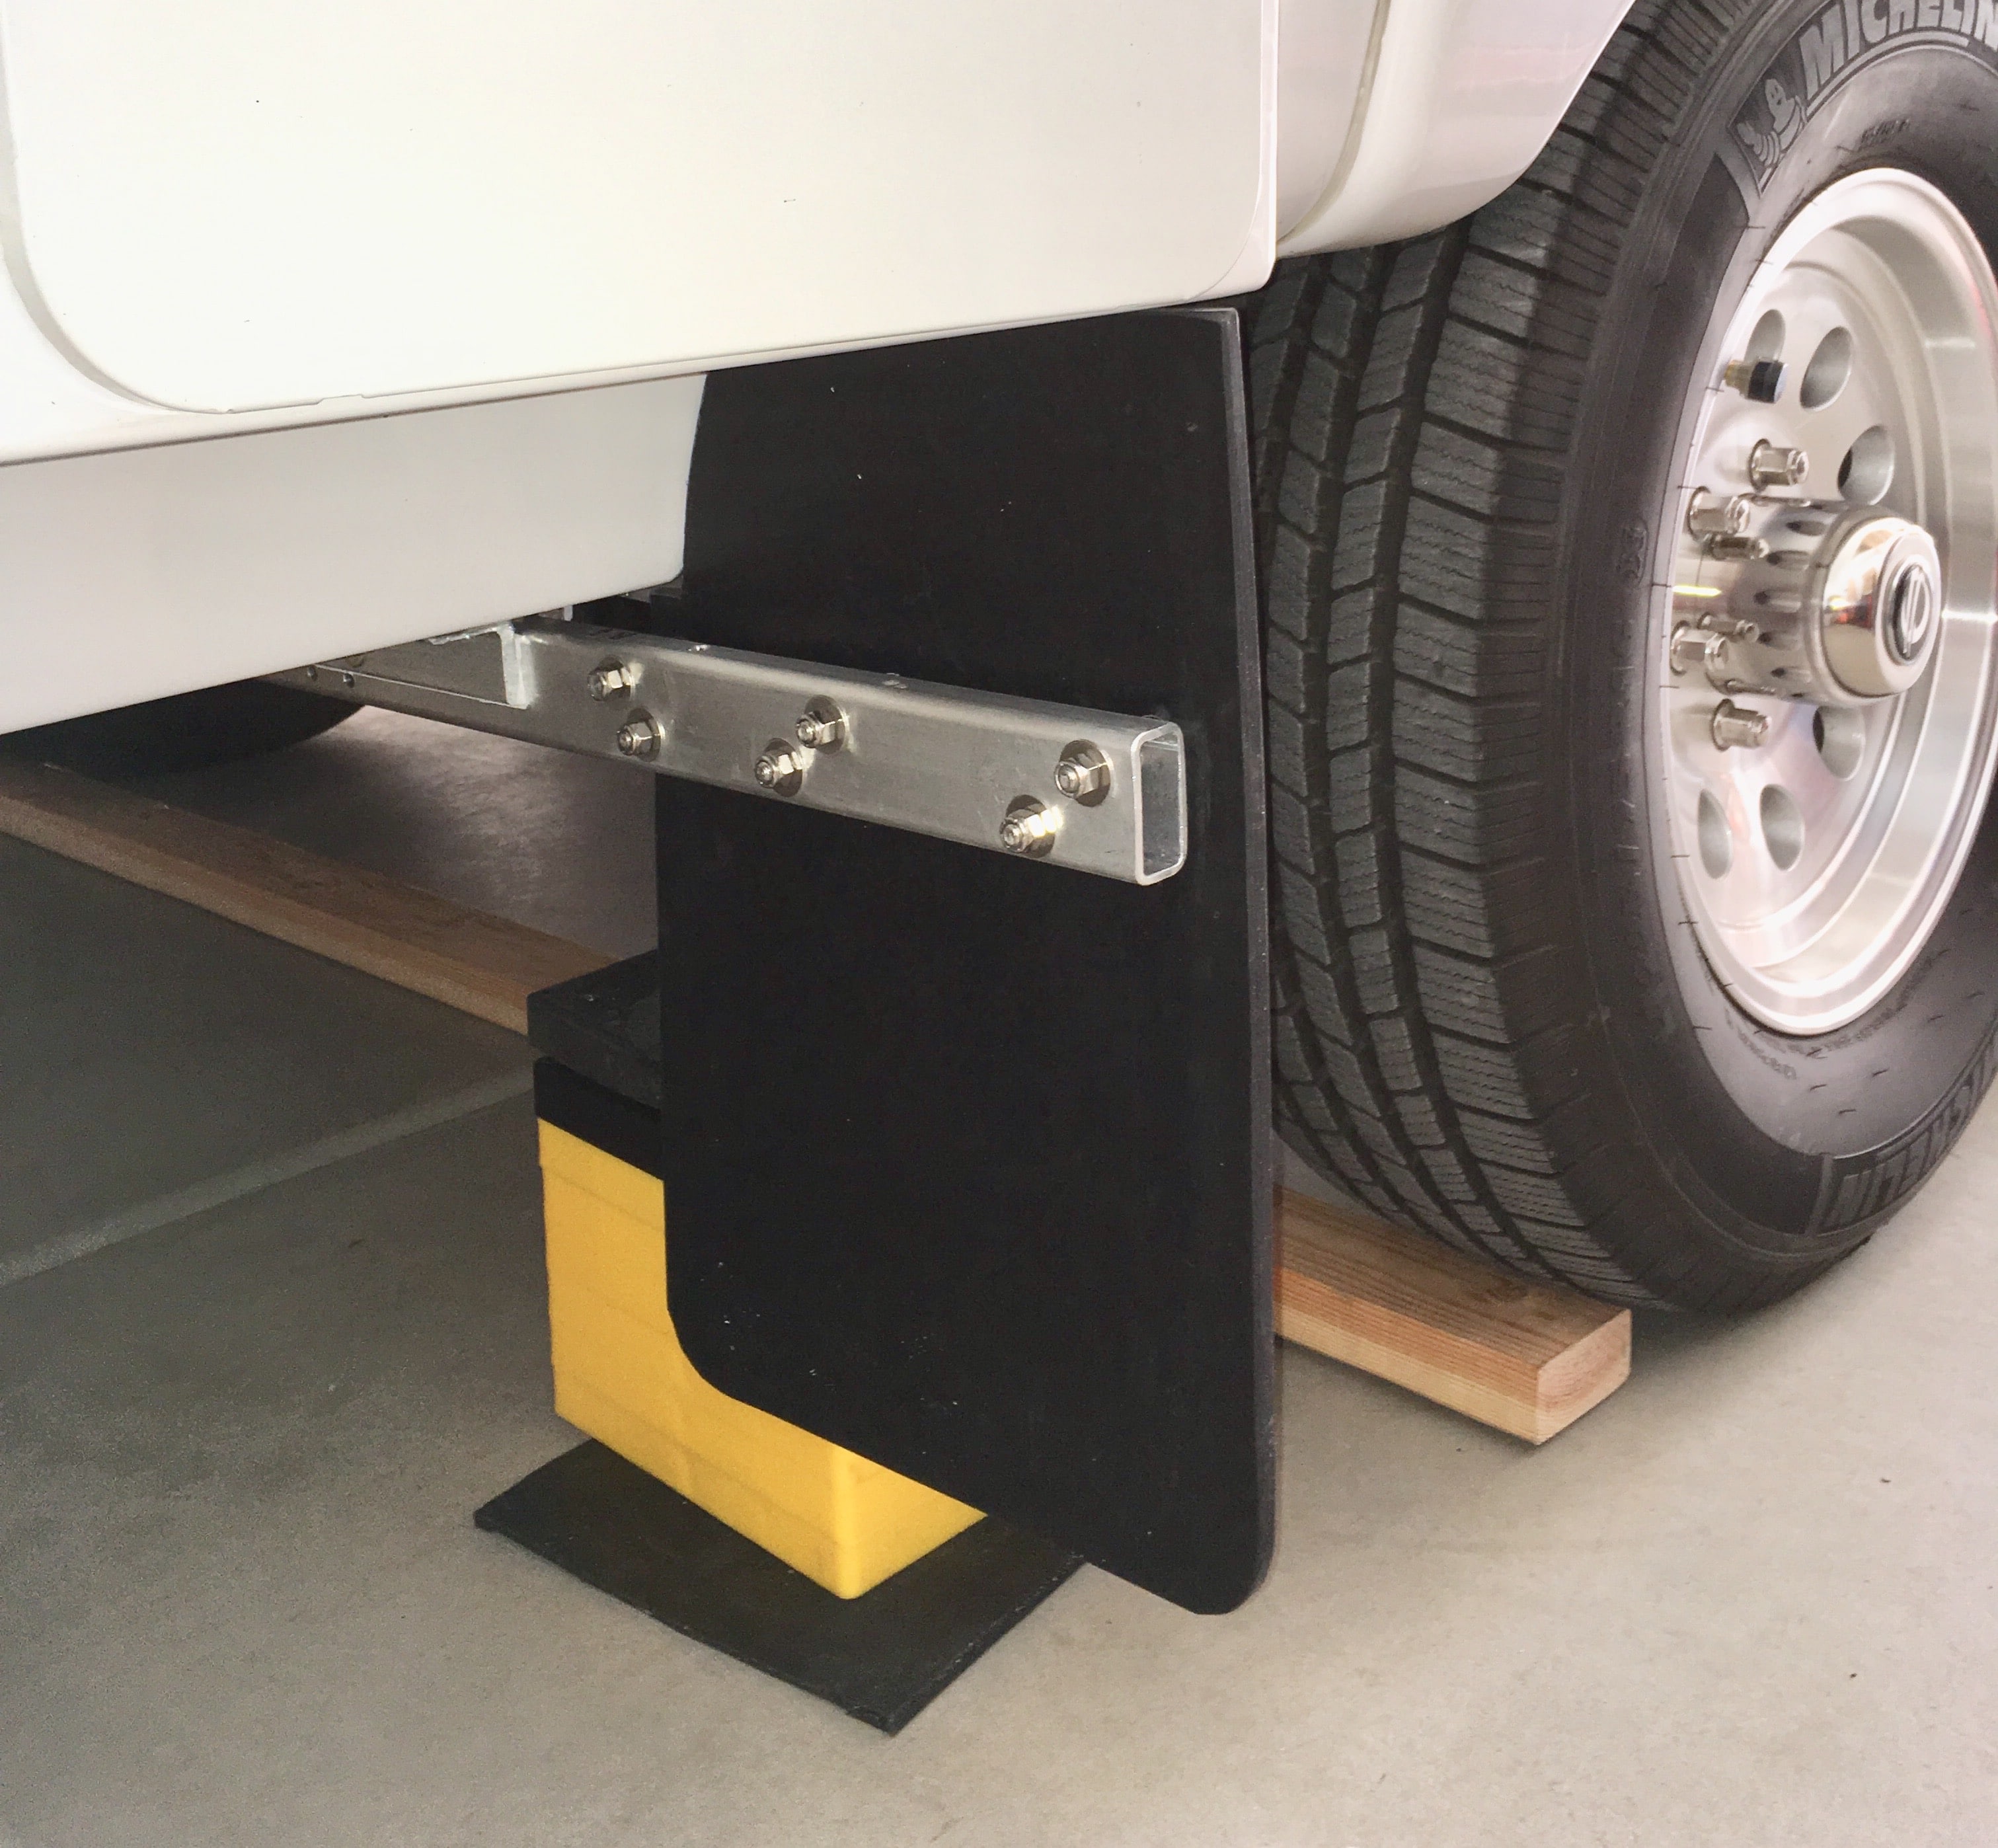
The flaps are easy to cut with a new razor knife blade. Level the trailer side to side! Once clamped into position, check that the flap is vertical along the outside edge using a bubble level, drill the holes 5/16". Remove and enlarge slightly oversize; this gives you a little wiggle room for final adjustment. Install the flaps with hardware specified in the other thread. Both flaps clear the jack, and also any blocks under it. The flap can easily be pushed back for extra room. The left flap: Clearance with the jack was tighter on this side. The jack was mounted about 1 inch further back on the frame rail. It still clears. And the flap also clears the cargo door when fully open. The bar has about 2 inches clearance with the door itself. The right flap again: The hot water heater door lies against the rubber when fully open. The bottom edge is 3.5 inches off the ground. I will see how this does, and if it seems to be dragging excessively, I can easily trim off a couple of inches. ***** I don't THINK that it would be possible to pinch a flap between a curb (or rock) and the tire when backing up! I will check to be certain, and if needed I may have to remove a little from the bottom. ***** EDIT 05/20/18: No worries about dragging, I have backed over a standard street curb and the flap folds forwards but does not get pinched. The flaps are very effective on gravel roads, but there are still rock strikes on the gelcoat above the front of the flaps, there is no way of stopping that. But behind them, the bottom of the hull stays much cleaner and relatively undamaged. I'll post a few pics outside when I next tow Mouse. This was a fun project. Fabricating the bars, drilling the subframe and installing them was time consuming and a little finicky. Actually fitting and attaching the flaps was quick and easy. I like how they look, and they should provide significant protection for the curved part of the hull, the puddle lights, water fittings, rear bumper and back of the trailer (from rocks pinging off the front face of the bumper). John Davies Spokane WA
1 point
-
I camped near the giant General Sherman tree, at Lodgepole campground. The picture was taken during my descent to the southern exit. It is very very very winding road with many miles of hairpin curves. You folks in the Ollie II should call ahead to make sure they'll allow you on that route. Here is a comment from the park's information: Generals Highway The section of the Generals Highway leading from the Sequoia park entrance to the Giant Forest sequoia grove was built in the early 1920s and connot accommodate longer vehicles. Vehicles longer than 22 feet (6.7 m) are not advised between Potwisha Campground and the Giant Forest Museum in Sequoia National Park. Good luck . . . (sometimes being short comes in handy)1 point


-
Recent Achievements
-


")
")

")


