Leaderboard


Popular Content
Showing content with the highest reputation on 06/21/2022 in all areas
-
I very rarely, if ever offer anyone advice about spending their money, but I will offer myself as an example. I bought my used Toyota SUV in 2016, knowing that I was going to buy an Oliver LEII, which I did in 2018. The reason for choosing a Toyota was based upon past experience and I like dependable products and it has a towing capacity of 8100 lbs and a cargo capacity of 1295 lbs. That’s not a lot of capacity in the grand scheme of travel trailer towing, but we make it work. What I didn’t know was that I would need a weight distribution hitch. But my Toyota owners manual states that it is required if it used to tow any trailer weighing more that 5000 lbs. I trust Toyota’s engineering, so a WDH is part of my towing equipment. I compare the Andersen WDH to shoes. I love wearing flip flops, but when I’m cutting the grass, I’ve got my boots on. So if my tow vehicle requires a WDH, it’s incumbent upon me to learn how to use it. So please do not let anyone scare you away from using the Andersen WDH if your tow vehicle requires it. And please verify the towing, cargo and tongue weight capacities of any vehicle you are thinking about purchasing. Do not trust someone else’s assurances that a given vehicle will be just fine towing a travel trailer. The capacity information is posted on each vehicle, usually on the drivers door jamb. Happy hunting, Mossey8 points
-
https://www.thehulltruth.com/boating-forum/477198-3m-4000-vs-4200-a.html 5200 is forever, with a very tenacious grip and quite difficult to remove. Think joining the deck of a boat to the hull. Or the top half of an Ollie to the bottom. (I don’t know what they use but this would be a great choice.) 4200 is similar, but with less grip and easier to remove, not UV (sunlight) resistant. Good for below the waterline hardware in a boat. Fast Cure 4000 UV is my go to sealant for exterior parts like windows or roof vents, where the 4200 would not be appropriate. It holds up well in sunlight and does not yellow. https://www.amazon.com/3M-Marine-Adhesive-Sealant-4000UV/dp/B0000AY0ND/ref=asc_df_B0000AY0ND/?tag=hyprod-20&linkCode=df0&hvadid=193131231816&hvpos=&hvnetw=g&hvrand=10666757639209084638&hvpone=&hvptwo=&hvqmt=&hvdev=m&hvdvcmdl=&hvlocint=&hvlocphy=9033787&hvtargid=pla-340533059924&psc=1 All have adhesive properties but IMHO they should always be used along with mechanical fasteners or tape. 3M VHB is used when there are no screws or rivets, for example you want to attach something inside the cabin where you don’t want to drill holes. When used outside it should always have sealant applied around the joint to prevent water intrusion, and for better appearance. Even if there are no penetrating holes, you want to keep all water out so it can’t freeze and harm the bond. IMHO! In reality any good quality (name brand) white marine grade silicone sealant is OK for outside stuff. FYI all have expiration dates, you can sometimes cheat on that, but don’t be shocked if your recently opened tube of 4200 is rock hard the next time you use it. Write down when you bought or opened the product ON the product. Read and follow the instructions! Some solvents can’t be used because they might affect the cure. I have some long expired VHB tape that I will continue to use, but I always test a small piece before committing to using the rest. If I had a really critical application for the tape, I would use brand new product, just to be safe. Look at this thread for how to use VHB tape and sealant for a professional looking result. https://olivertraveltrailers.com/forums/topic/2082-how-to-install-a-big-bubble-level-no-drilling/ Does this help? John Davies Spokane WA4 points
-
Sorry, I missed this, there isn't a thread about it, as far as I know. It is just common sense that any "dead end" part that can potentially collect water, should have at least a couple of weep holes underneath to allow it to escape, one at each end of the bumper, for example. For the bike rack mount, the big cross beam has through holes in it, to attach the square receiver, and just like for the bumper, Oliver added pretty decorative end caps to the beam. The big mount holes will allow a little moisture to trickle out around the washers and nuts, but eventually those gaps will fill with dirt and corrosion. Did they add dedicated drain holes in the bottom? I dunno. Freezing is a concern, as is long term corrosion. If you see standing water on any part of your Ollie, you should take steps to stop it. Both of the entry steps, for example, hold water on top when stowed; you can drill some 1/8" holes in the low spots to eliminate that. The first Ollie awning support bracket was a simple L shape, that was fine though maybe prone to developing cracks at the bend. The first redesign of the bracket had a welded triangular gusset. It would stop any cracks but trapped water, and it is up on the roof where an owner couldn't see it. A second redesign had the triangle tip cut off, providing a channel for the water to go away on its own. I don't know if that part has further changed 😉 It is a sign that Oliver continually updates and refines stuff, based on owner experiences and feedback. It would be really nice if there were a webpage dedicated to keeping track of the evolutionary changes to various parts, to educate and to alert owners that they might have a problematic part. The Ollie Service Department knows all this, and can advise, but the information isn't available to owners, as far as I know... John Davies Spokane WA3 points
-
Unfortunately, no, there is not, to my knowledge, a thread on drain/weep holes. @John E Davies may be able to offer more details, especially given his experience dealing with structural elements on aircraft. My understanding is that any buildup of water within a structural element is a a potential source for failure of the structural element in the event the water freezes. Such failure is most likely to occur when the trailer is subjected to sustained sub-freezing weather. For the rear bumper and the extended support arms under my cargo carrier, I plan to drill ¼” weep holes to allow any trapped moisture to escape. Since I live in Dallas, TX,I believe the prospect of freeze damage to be relatively low. However, in February, 2021, we experienced the “Texas deep freeze”, with temperatures at or below 0 degrees Fahrenheit for a week. The cost or prevention is low. I will drill the weep holes, but probably not until mid-September, when the daily high temperatures are no longer near 100 deg. F. I see no downside to having the weep holes to allow the moisture to escape.3 points
-
We use a small refrigerator fan. Keeps the Air circulating in the frig....NO ISSUES!3 points
-
Thank you Frank and SeaDawg, I will be coming up on the one-year anniversay of his passing, and I appreciate the kind thoughts. We knew this would be my next step long before he passed. He worked on the house to do whatever he could (which was a lot) before he couldn't. Yes, an unbelievably difficult time. In addition to my work with farmers, I am an estate planner (retiring from that this fall) and so I knew all the things to do, but the heart has its own time. I work with a number of widows who lost spouses recently, so I know personally their challenges. I am relishing every step of downsizing, but I am not sure I'll have it whittled down by December. I will have a small storage unit in N. CA where most of my work is, but I am looking forward to relinquishing an acre of house and land in the high desert. It is a good time to sell and then I can buy something smaller later whereever I decide to settle. I spent a long time looking at trailers, too. The Oliver's insulation, user group support and stamina finally won me over. I don't know about the warranty. I'll have to talk to Anita. I'm test driving some Fords tomorrow, but don't see any 4x4s on the lot. As you noted, I don't have to do this immediately. I just liked my carmax offer and got the itch. Also, I think end of the fiscal year (June) for some might be a good time. Thank you again!3 points
-
As per your comments on the f250, in Florida, it's not classified as a commercial vehicle, to my knowledge. We've not owned anything above a 1500. I'll ask my nephew.he has one. It's a workhorse. If you are planning to fulltime, check south Dakota regulations. Many full time folks find that to be the best state for full timers After that, Texas3 points
-
@Roadlotus, I would like to add my condolences, that I should have included in my first post. I am very sorry for your loss, and hope that you take your time before making really big decisions. My mom has had three homes since my dad died nine years ago. The first was the best, but too soon, to adjust, if you understand, and I suspect you do. She sold it, too early. But, if you've been camping a lot, in your lifetime, you may very well know what's best for you. We spend about half our year in our Elite, and we've been very happy for 15 years. I personally wouldn't be happy without a home base . Others are. You'll find several full time women in the Oliver group on Facebook. I truly wish you all the best. (I also wouldn't count on the rivian at projected date, and I'd buy a truck as new and low mileage as possible, were it me. ) My bff and cousin lost her husband a month ago. We talk every two nights or so. I know that this is not an easy time for you, and I wish you every comfort friends and family can provide, even your new "virtual friends" here. You can pm me any time. I personally would not want to buy a 30k truck, in today's market. Most are older, sometimes not necessarily well maintained, or high mileage work trucks. Doesn't mean you have to buy new, but a lot of people who bought trucks as urban daily drivers are giving up that idea, as gas is $5 a gallon, near us. I think, on the next few months, prices may not go down, but they at least won't go crazy up.(but then, I'm not an economist, either.)3 points
-
We also keep a fridge fan going at all times. It keeps the air circulating, and helps prevent the ice buid-up on the fins that John mentioned. https://smile.amazon.com/dp/B09GCH9ZZZ?psc=1&ref_=cm_sw_r_cp_ud_dp_NMXVJ1GY0BWWK66MGVEW3 points
-
We have a Land Cruiser. I am presently trying to talk myself out of the new Tundra. The cargo capacity numbers are a little hard to come by, mostly because I am really interested in the hybrid. As they become more common, there will be more information available. All the dealers want to talk about is how expensive they are going to be. So we are biding our time or I should say that I am, she doesn’t really care.2 points
-
Thanks for the reply, it looks like I'll be drilling some weep holes in my bumper too. 👍2 points
-
PS, since I'll be full-time, one important consideration is that this is my everyday vehicle in addition to TV. So I want to be comfortable in it. My farmers will appreciate me even more in a truck over my Subi.:)2 points
-
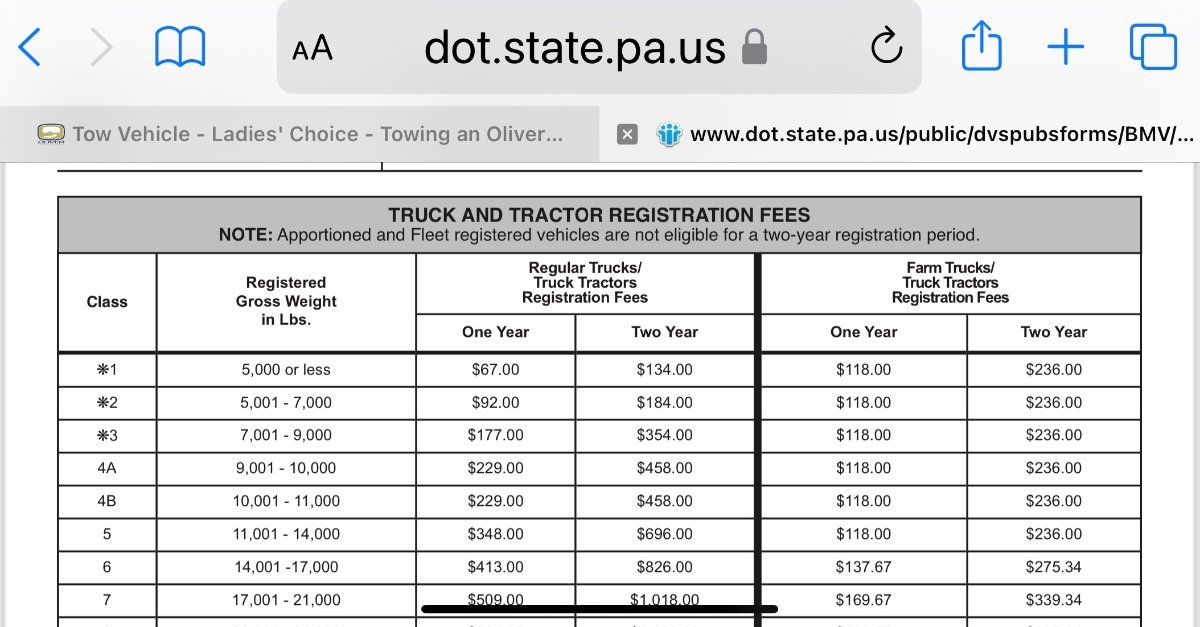
I have an F-250. No issue with my insurance here in Pennsylvania because it’s not registered as a commercial vehicle. My insurance is actually really inexpensive because of low total annual mileage since I really only use the truck for towing the Oliver on road trips. There is a difference in annual registration fees though here in Pennsylvania depending on GVWR and whether it’s registered as a farm truck.
 2 points
 -
And, just in case, open a service ticket, with lots of detail.2 points
-
Great comments and thank you for the welcome! I think I can make the payload, but maybe I'm being short-sighted not trying a 250. I agree regarding the garage comments, and I already have a buyer for my house so we are skipping the realtor and reducing the price. My assistant loves my house and adored my late hubby, so it would mean a lot to me for her and her family to be here. My family is on the east coast and my job (working with farmers) means I am usually working somewhere away from home, so I know selling is the right decision regardless. But not until the end of the year. I am hoping to get used to the truck before I hitch a trailer. My husband was 6'3" did construction and LOVED big trucks. Not that same for me. But he is smiling reading the recommendations on the posts:) Isn't there an insurance issue with larger trucks, since they are deemed commercial? I was trying to avoid that as well. I could take out a loan and go newer, but I'll be in the Rivian in a year or so, and would want to get back my investment on the resale of the prior TV. I appreciate the sentiment SeaDawg - I once could double clutch and so funny new rigs are all automatic. It's a lost art.... And yes, CNC, I'm good with gas over diesel right now. I'll check out the Ram. sigh...just a lot to think about! And thank you John - is the Anderson hitch really that much of a pain? It sounds like it. PS. No dogs, likely 2 cats but one has kidney disease and I'm not sure of her timeline.2 points
-
Camping in the 100 degree weather is tough on you, and the fridge, and the ac. Does your manual show you how to adjust the thermistor?, (that thingy that slides on a fin, and tells the fridge how cold it is, and when to turn on?) in our old 2008 norcold, we could slide it up or down to adjust the sensing. I don't know about the new ones. It's also possible that the thermistor is bad (though unlikely, in such a new trailer.) I'd add a clip on fan to the outside vent, set up to exhaust, and see if I could increase the exhaust flow. A small battery operated fan inside the fridge could move cold air around better, as well. Are you running the fridge on gas, or electric? Gas is most efficient, as @dewdev noted. I know it seems counter intuitive, but the flame works way better at "absorbing" heat than 120 electric. 12v is dismal.2 points
-
Welcome to the forum, @Roadlotus. My sister-in-law is about your size. She is perfectly comfortable driving my brother's F150, towing a cargo trailer. There's not much difference between a f250 and f150, sizewise, and I'd encourage you to try to test drive both. The f250 would allow you to delete the Anderson requirement. As @John E Davies said, I wouldn't buy a truck to fit a garage that you won't own, soon. Instead, I'd put the house on the market now, and use some of the equity to buy the newer version of the truck you like. In today's housing market, you may be able to find a buyer willing to let you lease back your house til your departure date in October. Or, line up a short term rental studio, in the meantime. Everything in my neighborhood sells within days, so be very sure that's what you want to do before you put your home on the market. An alternative is taking out a small equity loan to purchase a better, newer truck, learning if you actually like the lifestyle, and selling after. In real estate, my experience is always to get the best price while the market is hot, as it still is now, at least here in Florida. If this is your plan, start interviewing agents who have been successful in your neighborhood, recently. Get their advice. (I'm not a realtor.) I'm shorter, as well, and I'll say that I hate driving my husband's 2008 Ram, but I love my driving my older 2005 Silverado 1500, regular cab, stepside. Unfortunately, my truck (or my husband's) would not be suitable for towing a II, without the Anderson. I understand that bit of trepidation based on what you "used to drive." I drove very large trucks cross country when I was young, and even shorter, with my dad, and I sometimes had to stand up to shift gears in those old trucks. I wouldn't want to do that now, for heavens sakes. But, that was 50 years ago. Do you have a dog that will be traveling with you?2 points
-
We had the same problem - a crew cab truck would not fit in our garage. We ended up with a 2021 Ram 1500 eHemi DUAL cab - same as other's extended cab. The pedals are adjustable. The gas V8 Hemi engine is plenty powerful. We average about 14 mpg. We use the factory tow/haul option and we have pulled our E2 more than 5000 miles without an Anderson hitch. We had no sway problems - BUT we just added the pesking hitch (as John calls it) because of porpoising on overpasses, etc. Charlie2 points
-
I did notice on our last trip (boondocked...propane only) that I needed to adjust the temperature setting throughout the day, depending on ambient temp. I have a SensorPush as well, so I could tell whether I needed to make it colder or warmer. It was annoying, but I never had to push it above setting 6, except when my husband put a bottle of white wine in to "chill". SMH. Temps were in the high 80s or low 90s for a few days, and the camper was in direct sun. I would call Oliver and see what they have to say.2 points
-
Although I do not have a Norcold, with my refig it cools down faster when running on propane.2 points
-
Don, I don’t have a rear cargo carrier, but if I were to consider one, your design looks great. Well done sir! -David2 points
-
What a great write-up! Thanks for sharing this - we've been contemplating a rear carrier since we picked up Hull 953 and I sure do like how robust this is. mb2 points
-
Wow. Your cargo carrier looks terrific and your write up is even better. Thank you for posting this. Pat2 points
-
@John E Davies, Thanks, John, for kind words. Thanks also for reviewing and commenting on my design approach. In answer to your questions: Yes, I did write the dimensions on the wooden mockup pieces. As I mentioned in my writeup, I also took one of the original support arms to the machine shop and explained the most critical dimensions are for the horizontal holes through which the clevis pins pass to secure the arms to the receivers and the vertical slot. I had initially assumed I would need to provide dimensional drawings to the machine shop. However, when I asked if they needed drawings, they said no, the dimensions on the wooden mockups and having the original support arm were sufficient. Thanks for reminding me to drill drain holes! I had planned to do so, largely from reading some of your write-ups. I agree with the need for them. This is relatively easy to do with the support structure in place. I composed the article initially using the Safari browser interface for Gmail on my MacBook Pro M1 laptop (MBP). I used Gmail because I am very familiar with its behavior, particularly the autosave function. I had to break the article into two draft emails when I reached the 25 MB limit of Gmail, after which it loads images to Google Drive. I wanted the images kept in place in the text flow. Once I completed composition and proofreading I copied the contents of both draft emails into a new topic page in the owners forum. Not having previously composed a long article directly in the new topic page, I was concerned about possible loss of content before completion. All of the photos were taken with my iPhone 13 Pro Max, which automatically stores the images in Apple's Photos/iCloud. I created a smart collection in the Photos using keywords, to make it easier to see all of the related photos together. I selected photos for inclusion in the article and exported them as JPEGs to the Downloads folder on my MBP. I used Apple's Preview app on my MBP to do some minor cropping of the photos and used the annotation features to add arrows, circles and text. I got lazy and used a grey filled rectangle to mask the license plate in a few photos, rather than take the photos into Photoshop for a more elegant edit. The Preview app is surprisingly robust. I do not know of any comparable utility in the Windows or Android worlds. I have previously used Window PCs extensively, but the Android world is foreign to me. I suspect you use a similar annotation process, having seen many of your annotated photos. Finally, yes, posting informative articles is time consuming. I spent most of the day yesterday drafting and editing. I also found I needed to take a few more photos yesterday, in addition to those taken during work on the project. I also had to confirm some measurements and materials details. I have benefitted significantly from reading your well crafted articles and those of many other contributors to the forum. I feel an obligation to contribute. Regards, Don2 points
-
Don - Nicely done with a great description. Thanks for posting it! Bill2 points
-
Bravo, very nice, and what a great description. I have a couple of comments, since I can’t seem to leave the back end of “Mouse” alone. Using wood for mocking up is a neat idea. Did you write the actual dimensions on the pieces before dropping them off at the machine shop? The shop needs quite precise measurements. Relying on your holes in wood might not be precise enough. Drain holes? This can be a super wet part of the trailer, each part needs two openings, at a minimum, for water to escape. (I leave my parts wide open and simply blast them with water when washing the trailer.) A little moisture will naturally escape from the bolt holes, even with the hardware in place, but those will eventually plug up with debris and corrosion. A hole at each end of each cross beam allows water to egress regardless of the angle of the trailer. And do not forget to add some to the Ollie bumper, the factory does not drill any! Be prepared for water to flow out onto your drill, so drop the bumper down first. I really like your annotated images. That is very easy to do with an iMac or iPhone, I don’t have a clue how you would do it with a PC or SOB phone. What did you use? Thanks for posting such an informative thread. I think members should be aware of how much work is involved in doing an article like this. John Davies Spokane WA2 points
-
@dhaig Your cargo carrier and mounting solution looks very robust, well planned and based on your 2000 mile test run, very functional. Thank you for the detailed write up which even I could follow and other OTTO’s can use to their advantage and solve their own cargo carrying limitations. Mossey2 points
-
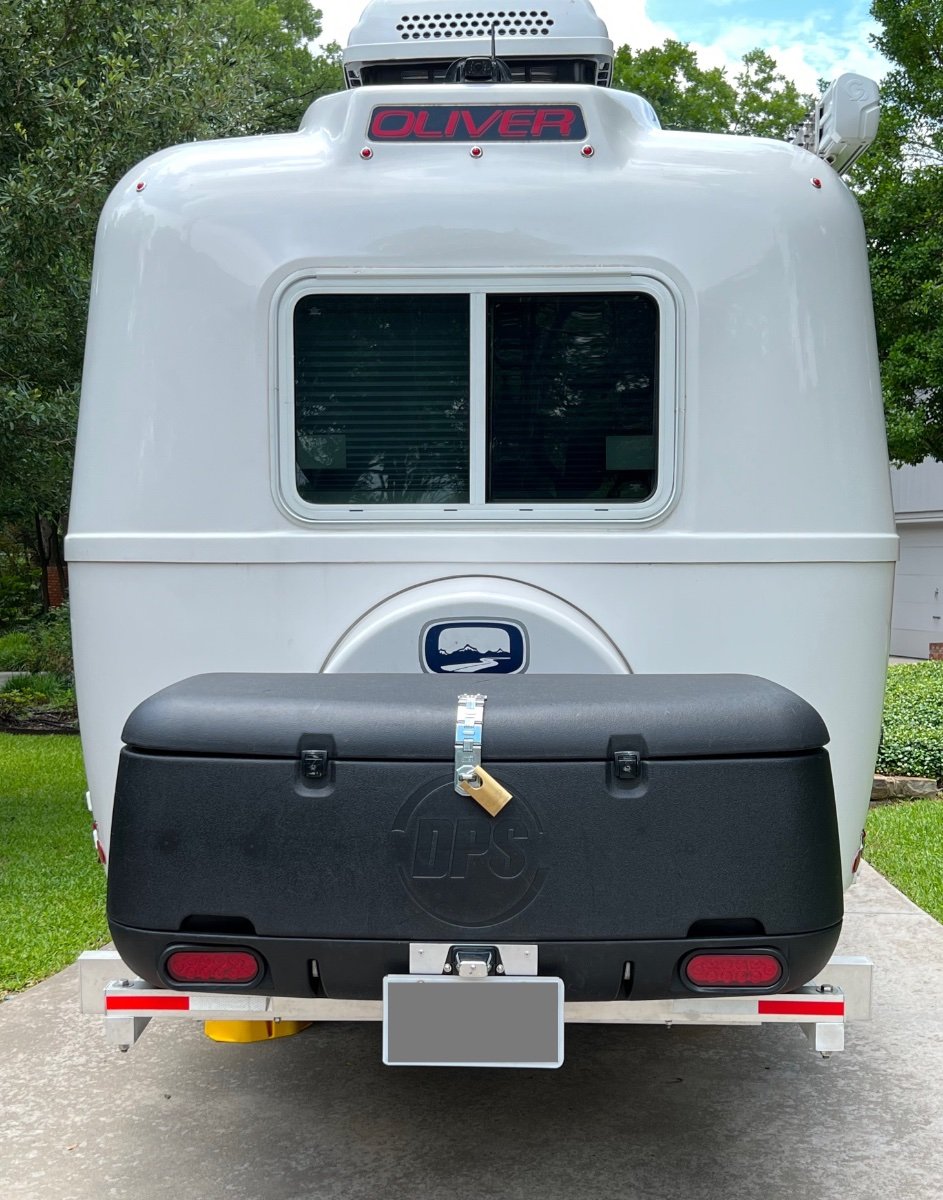
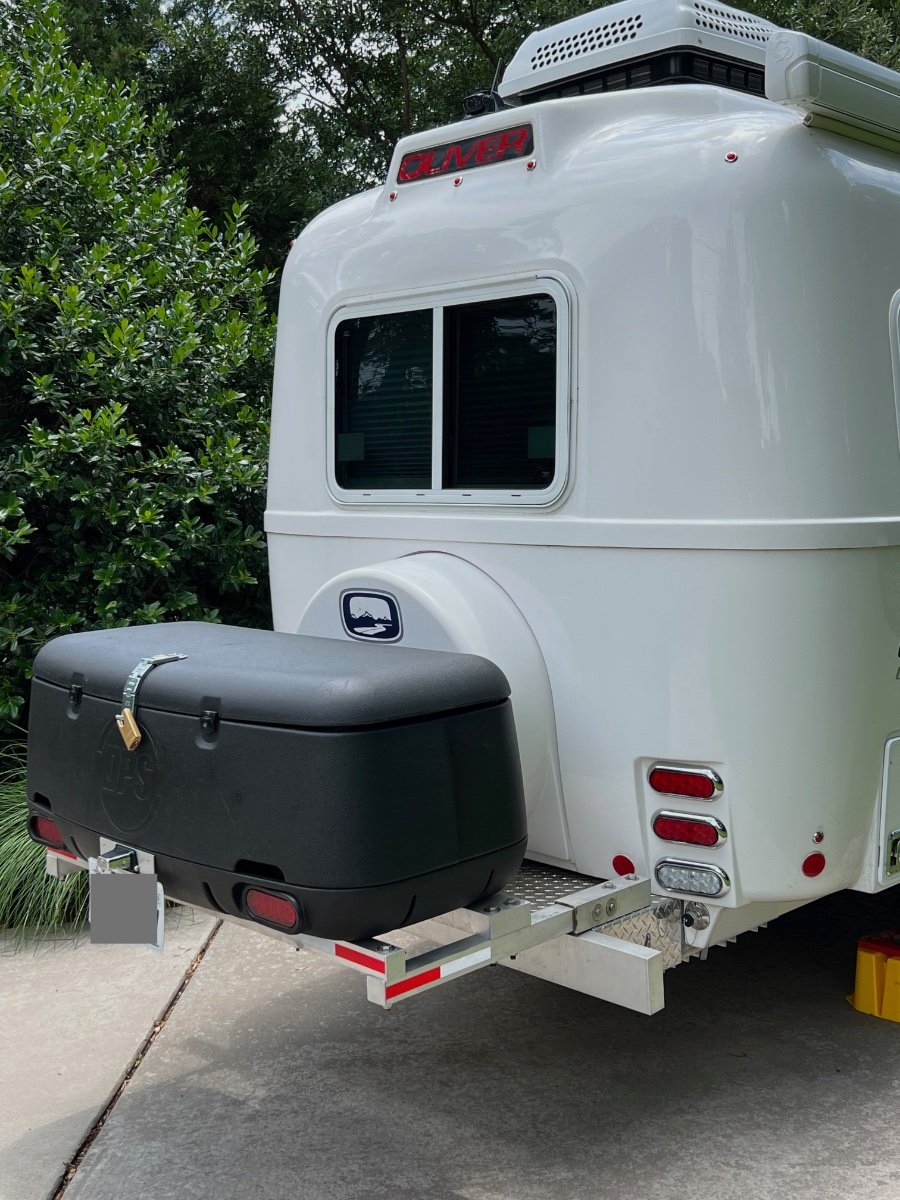
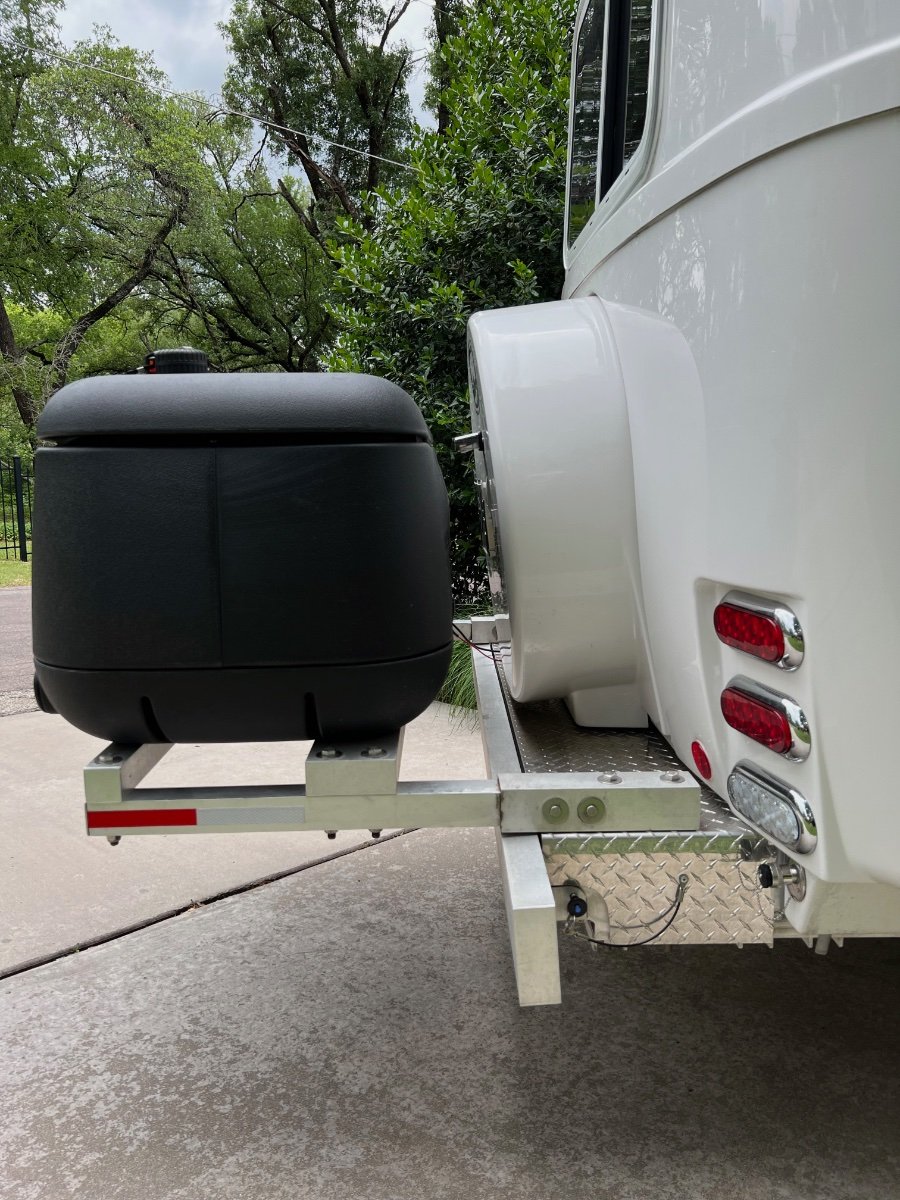
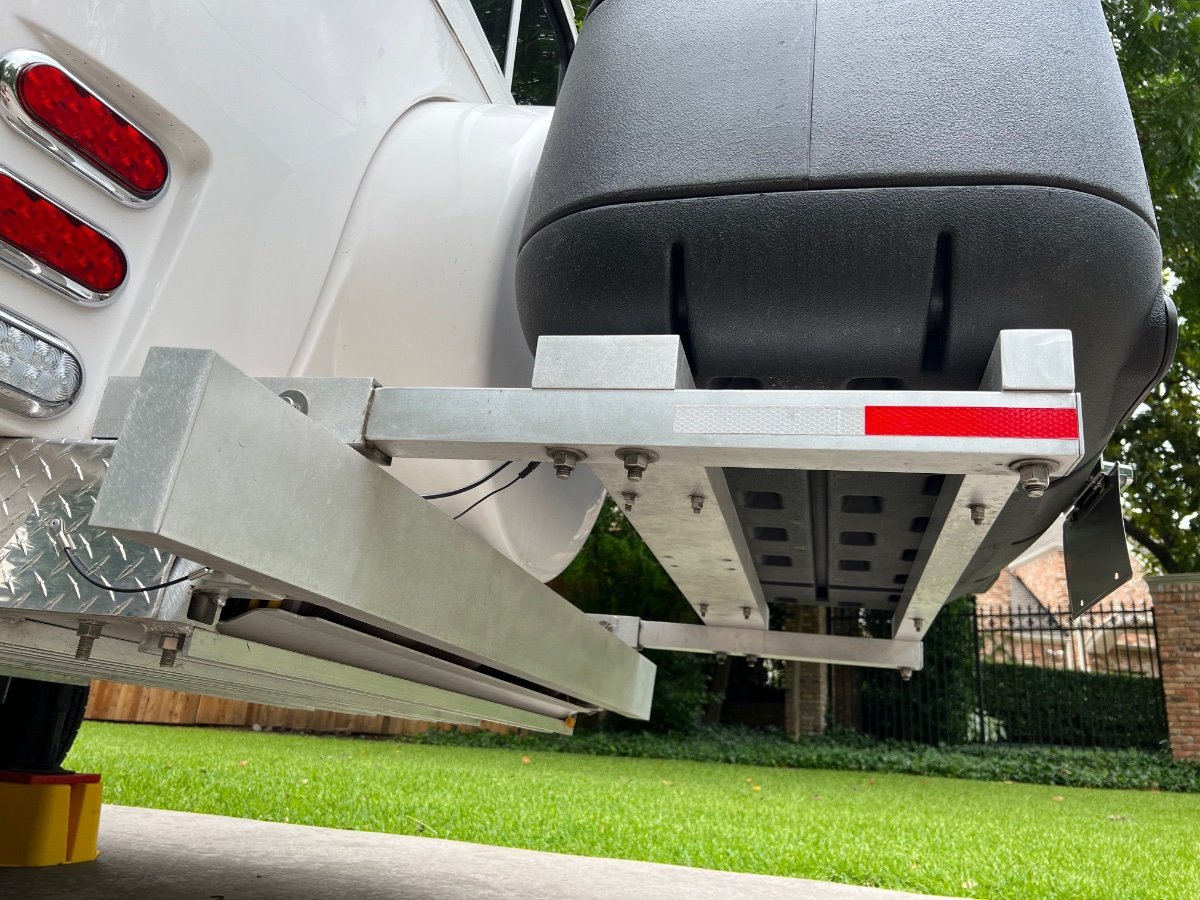
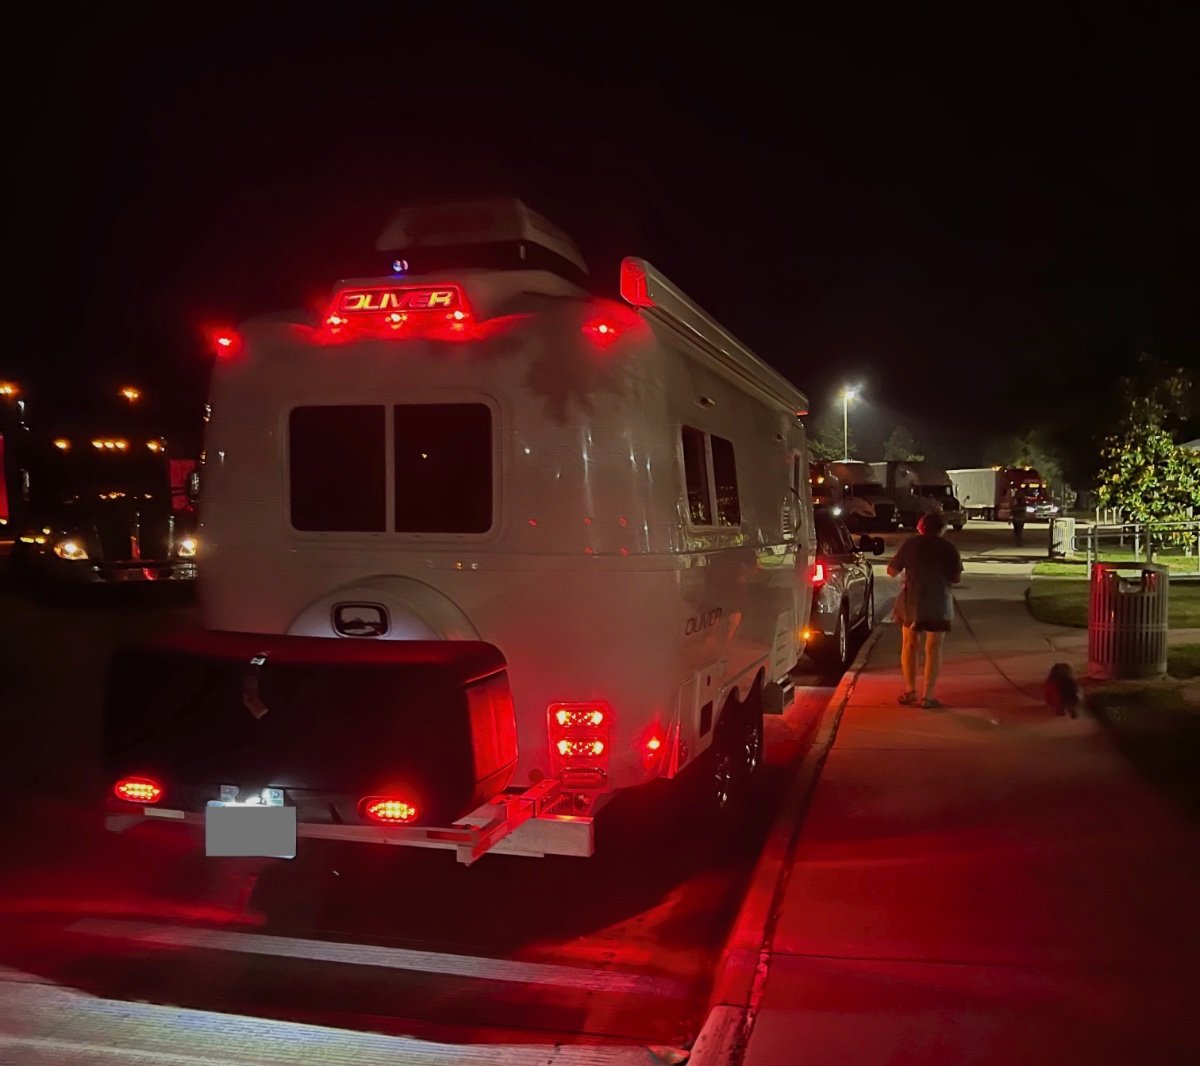
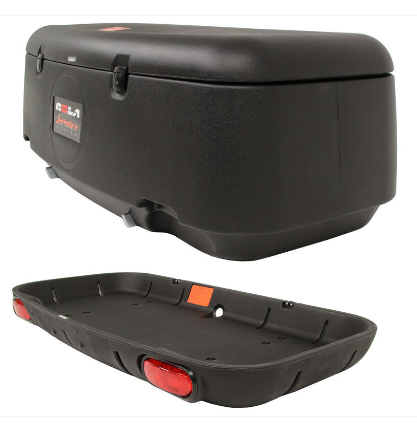
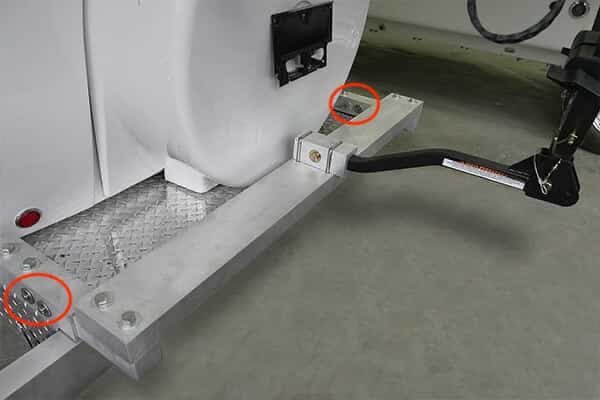
Summary I have installed a rear mounted cargo carrier, with lights, to our 2022 Oliver Legacy Elite II (LEII) travel trailer. We recently completed a two week, ~2000 mile trip, using the cargo carrier, which performed flawlessly. Below are photos of the installed cargo carrier, which are followed by a detailed description of its installation. Storage Constraints Prior to ordering our Oliver Legacy Elite II (LEII) travel trailer I knew we would need additional storage space on the trailer. We are using a 2014 BMW X5 35d (diesel) as our tow vehicle, rather than a pickup truck. Thus, we could not plan to use the pickup bed for supplemental storage. We also needed to stay within the tow vehicle's cargo capacity of 1100 lbs and maximum tongue weight of 600 lbs.. Expecting a tongue weight of approximately 500 lbs. plus two occupants at approximately 300 lbs, we could only accommodate a maximum of 300 lbs. of other cargo. The available payload will be partially used by our camera gear, which must be protected from exposure to moisture. A tongue mounted cargo carrier was not viable, given the tongue weight limit for the tow vehicle. Storage Requirements I anticipated needing additional storage space for the following items: Champion Dual Fuel Generator- 2500 watt (~45 lbs.) (too large for basement storage) Napoleon TravelQ™ 285 Portable Propane Gas Grill and hose (~35 lbs.) (too large for basement storage) Anderson Ultimate Leveling kit (~25 lbs) Harbor Freight rubber chocks (4) (~20 lbs.) Camco Stabilizer Jack Supports (3) (~10 lbs.) Miscellaneous accessories All of these items can tolerate some exposure to moisture, which is likely when stored in any external cargo carrier. A closed and reasonably secure cargo carrier was needed. Searching the owners' forum, I found examples of rear cargo carriers/bike racks and found several examples, including: Oliver's original bike rack design using twin receivers and extending approximately 3 feet beyond the rear bumper; Various rear mounted metal cargo boxes, including custom designs; Rear mounting of an Oliver tongue cargo box by John E. Davies. I also looked extensively at aluminum cargo boxes from various manufacturers, trying to find options which could accommodate the cargo items listed above. I already owned a cargo carrier which we had used on the BMW X5 tow vehicle. This carrier has a heavy steel swing-away frame which mounts to a standard 2" receiver. Mounted on the steel frame are a polypropylene tray and an enclosed container with 13.5 cubic foot capacity. The tray and enclosed container interlock. This cargo carrier also is equipped with fully functional lights (running, brake, turn, flasher). Interlocking pins on the enclosed container mate with the tray. Locking latches secure the container to the tray. Solution Approach I decided to re-use the polypropylene tray and enclosed cargo container, but not the heavy steel frame. Instead, I would use a design similar to the original Oliver bike rack. I ordered the current optional Oliver bike rack when we placed our LEII order, planning to utilize some, but not all, of its components. The current Oliver rear hitch (photo below) utilizes twin receivers that are 11" long, constructed to receive 2" x 2" X 0.25" (wall thickness) T6061 aluminum square tube support arms, which are 17 inches long. The receivers are each mounted to the LEII frame by two long 0.5" diameter stainless steel bolts and nuts. The other components of the rack are a 2" x 5" x 0.25" T6061 aluminum cross-member, 51-1/8" long (with end caps), and a 1-1/4" receiver for connecting a bike rack. I planned to use the twin receivers, and the cross-member, but not the support arms, nor the 1-1/4" receiver. Instead, I would replace the 17" long original support arms with longer equivalents, whose length was to be determined. I would utilize the original 2" x 5" x 0.25" T6061 aluminum cross-member and add another cross member, this one 2" x 2" x 0.25" T6061 aluminum, also 51-1/8" inches long with end caps. The cross members would be bolted to the support arms, in the same manner as on the Oliver rear hitch. The tray and enclosed container from my existing cargo carrier would be mounted to the cross-members. Note the clevis pins circled in the photo below, there are two 0.50" diameter horizontal clevis pins securing the support arms in their receivers. Each clevis pin has a washer on either side of the receiver. Removing the clevis pins permits the support arms to be pulled to the rear, enabling removal of the spare tire cover and spare tire without dismount the support arms. Solution Model A critical dimension to be determined was the length of the 2" x 2" x 0.25" support arms. The new support arms need to be long enough to: Support the polypropylene tray and enclosed cargo box and attach using the molded mounting holes in the tray; Allow the lid of the enclosed cargo box to open without striking the spare tire cover; Permit removal of the spare tire cover and spare tire without removing the cargo carrier and support frame; Permit access to waste water hoses stored behind the bumper; Minimize the additional length of the cargo carrier and support frame to the LEII's length. I fabricated 2" x 2" wooden support arms, approximately 40" long. Using woodworking equipment, I cut slots into one end of each support arm to fit around the bolts holding the twin receivers to the frame. I also drilled horizontal holes for the clevis pins which retain the support arms in the receivers. Positioning the Cargo Carrier on the Cross-members The wooden support arms were inserted into the twin receivers and secured with the clevis pins. Then the 2" x 5" x 51.125" T6061 cross-member was placed across the support arms near the bumper. The additional 2" x 2" x 51.125" wooden cross-member, was also placed across the support arms, but further from the bumper. Clamps were used to hold the cross-members in place on the support arms. The polypropylene tray and enclosed container, latched together, were positioned on the cross-members, centering both to the trailer's width. I opened the lid of the enclosed container and adjusted the spacing (fore and aft) between the lid and the spare tire cover to ensure they did not contact each other. Once I had located the joined tray and enclosed container in what appeared to be a desirable position, I adjusted the positions of the cross-members fore and aft to establish alignment with the mounting holes in the tray. The 2" x 5" cross-member engages two mounting holes on each side of the tray. The 2" x 2" cross- member engages only one mounting hole on each side of the base of the tray. Six 5/16" carriage bolts will fasten the tray to the cross-members. Only four carriage bolts attached the tray to its original steel support frame. I used a mason's string stretched across the width of the tray with weights on either end to aid in aligning the mounting holes in the tray with the positions of the cross-members. I also used carpenter's squares to verify the cross-members were perpendicular to the support arms. Another check of squareness was made by measuring the distance from the trailer bumper to the cross-members. Once I was satisfied with the position of the tray and enclosed container on the support structure, I marked the locations for the holes to be drilled for the six mounting bolts to secure the tray to the cross-members. The tray overhangs the rear cross-member at the rear. With the cargo carrier tray and enclosed container in place on the clamped cross-members, I wanted to determine if the spare tire cover could be removed without removing the entire cargo carrier and support assembly. I found I could remove the clevis pins and pull the support arms aft approximately 7 inches out of the twin receivers and enable removal of the spare tire cover. With the tray and enclosed container positioned on the cross-members, I could now determine the required length of the support arms, which is 33.75 inches. The location of the rear cross-member determines the length of the support arms. After locating the mounting position of the tray and enclosed container I marked all key positions and hole locations on the wooden support arms and wooden rear cross-member. I cut the wooden support arms to the desired final length. Material Sourcing and Machining The required T6061 aluminum components required are: 2" x 2" x 0.25" x 33.75", square tube, quantity 2 (support arms), cost= $110.18 2" x 2" x 0.25" x 51.125", square tube, quantity 1 (cross-member), cost= to $99.08 2" x 12" x 0.125", flat bar, quantity 1 (to be cut into 2" squares for end caps on the support arms and rear cross-member), cost= $6.86 Sales tax= $17.83 No shipping charge. I picked up the materials at the local Metal Supermarkets warehouse Total cost= a $233.95 The above T6061 aluminum components, cut to specified length, were obtained from: Stainless steel bolts and nyloc nuts were obtained from: I was referred by Metal Supermarkets to a local machine shop: When I received the materials I took them and my wooden mockups of the support arms and cross-member to Air & Earth. I also took one of the original support arms. I discussed the machining needed: to cut the slots in one end of the support arms and to drill the needed 0.50 diameter holes for the clevis pins and mounting bolts. I also asked them to cut the 2" x 0.125" flat bar into 2" x 2" squares. I did not ask them to drill the smaller holes for mounting the cargo tray to the cross-members. I was quoted $220 and turnaround of the job within a week. They did an excellent job within the promised timeframe. Finishing and Assembly of the Support Structure After Air & Earth completed the requested machining, I performed the following finishing steps, which included: Rounding the edges of the 2" x 2" square tubing on the slotted end to be inserted into the receivers. I used a 3" wide belt sander with 100 grit sanding belts to round the corners of approximately 12" of the tube which would be inserted into the receivers . The original Oliver support arms also had the corners rounded to more easily slide within the receivers. Several trial fittings were required to verify smooth insertion and removal to/from the receivers. The support arms and the rear cross-member were sanded with an orbital sander using 200 grit disks. This sanding removed markings on the tubes and made the surface textured, similar to the Oliver rear hitch components. The support arms were inserted into their receivers and fastened with the clevis pins. The cross members were aligned with the mounting holes on the support arms and bolted into place. The cargo tray was positioned on the 2" x 5" cross-member at the previously determined mounting position and holes drilled to mount the cargo tray. Holes were then drilled in the 2" x 2" rear cross-member. Carriage bolts, flat washers and double jamb nuts were used to secure the cargo tray to the cross-members. Once all test fittings of the support assembly were completed, lithium grease was applied to the ends of the support arms which are inserted into the receivers. 2" x 2" x 0.125" caps were attached to the open ends of the support arms and the rear cross-member, similar to the end caps used by Oliver. These were attached to the square tubing using JB Weld epoxy. Cargo Carrier Lighting The cargo carrier partially blocks visibility to the taillights of the trailer, which is most noticeable when viewed from close behind the trailer. At a distance the taillights are largely visible. The cargo tray is fitted with two LED light fixtures and a wiring harness with a 4-pin flat connector. A corresponding 4-pin flat connector was installed on the LEII to integrate the lighting on the cargo carrier with the trailer lighting. Details of the installation of the 4-pin connector in the trailer are covered in a separate article. The lights on the cargo carrier ensure the trailer is quite visible from behind. A license plate mount was added to the cargo carrier tray, since the license plate mount on the spare tire cover is blocked by the cargo carrier. Lighting for the license plate mount is provided by adding a Y connector to the license plate light cable under the spare tire cover and adding an extension cable routed to the cargo tray mounted license plate mount. I also added reflective tape to the support frame members. I used the following reflective tape: https://www.amazon.com/gp/your-account/order-history/ref=ppx_yo2ov_dt_b_search?opt=ab&search=reflective Conclusion This addition to our trailer provides significant benefits, with no significant disadvantages. It does add approximately two feet to the length of the trailer. Besides the additional storage space, the cargo carrier and its load slightly reduces the tongue weight. I measured the tongue weight, using a Sherline scale, at 450 lbs., with no water onboard. Tongue weight seems sufficient, as no swaying or other handling issues have been observed. This project had a successful outcome due largely to the information I was able to glean from the Oliver Owners Forum. I hope this information is useful to others on the forum. Comments and suggestions welcome. Regards, Don
1 point
-
Hi Everyone, I will pick up my Elite II in late October. I am downsizing my life to a TT after losing my husband to cancer last August. I am waiting for the Rivian with the 400 mile range and am waitlisted for it to arrive in late 2023. Meanwhile, I need a TV and am trading in my Subaru Outback for it. I have gone through the forums and done research. I test drove a 2017 Titan (not XD) yesterday and while it is an awesome truck, it is a lot for my 5'3" , 120lb personage. But it did have all the features I want. I did drive tomato trucks in the Central Valley of CA some 30 years ago, and could handle a full rig with double trailers, but that was A LONG time ago. Any suggestions on a TV for someone who is short and a little nervous about a ginormous vehicle? Since I will be solo, I think it best to have 4x4 for safety. I'd like as decent as mileage as possible and to keep the vehicle length less than 228, which would barely fit my garage while I still have a garage (I am selling my house after I get situated with the trailer). I will test drive some 150s today and have yet to try a Silverado. I am only looking at used vehicles and will get $31k for my trade in per Carmax. So I'm looking at prices in the 30k range. Thank you!!!1 point
-
The only part of my drawers that has any kind of coating is the upper sidet of the plywood bottom. If you want to take steps to preserve the wood, you should coat all the parts, including the insides of the cabinet itself. That way if you get an unexpected gusher from a failed sink connection, it will not soak in. Though a long slow drip is much more likely to cause rot and failure, because you might not notice it for many months or years. John Davies Spokane WA1 point
-
Thank you Cameron and Dewdev. I have some test driving to do! Fortunately I have some time so I think SeaDawg may be right about people turning in their trucks with these gas prices, so I feel a bit less pushed about deciding. And I'm waiting for the Rivian that has the 400 mile range - I waitlisted a while ago, and agree AGAIN with SeaDawg not to count on a timeline and to settle in with a good TV now. Thank you Cameron - I have a colleague who owns a farm in N.CA. (Guinda) where I can always park. And I used to backpack lots in the Sierras way back. Such a great place to hike and camp! My brother-in-law has a house in SF and is thinking of selling, I think. I so appreciate the feedback because I am really green on all this, but looking forward to this next phase:)1 point
-
Hi Roadlotus, Welcome to the forum and the Oliver family. It seems like getting an Oliver is a major life milestone for many of us. You've gone through a lot in the past year and I hope that the adventure of buying and traveling in an Oliver will help you transition. Regarding the tow vehicle, I have a GMC Sierra 1500 4x4 and no weight distributing hitch on the Oliver Elite II. I've got about 3000 miles on the trailer so far and haven't noticed a problem. Before I decided to buy a trailer I rented three and pulled them with my old pickup, a 2014 GMC Sierra 1500 2wd, short bed. It only had a 6 cylinder engine and had to work too hard getting over some steep passes, but overall it was fine. One one of our rentals we had the weight distributing hitch. On the other two, no. Never had a problem even with the old, less powerful pickup. I'm definitely a newbie here compared some of our colleagues, but so far so good with a half-ton pickup and no WDH. I'm in San Francisco and often travel up to the Sierras so if there's anything I can do to help, let me know. P.S. I'm seeing some of the Rivian's on the streets here in SF, they're sharp!1 point
-
Hi Steve and Cindy, A couple of things I've noticed on our Norcold, when it starts struggling I check to see if there is any ice build on the fins below the freezer. If so, you'll need to defrost. Another thing that helps us is to remove the top outside vent grill to help exhaust the heat. Our fan runs a lot of the time but when you get in the mid to upper 90's it can get overwhelmed with the heat build up on the top of the fridge, so removing the grill for a while helps us out. We have the same problem when it gets to 100...the fridge will be in the very low 40's range. Good luck John1 point
-
Welcome to the forum. How exactly will you use the Ollie, do you in fact plan to Full Time? That can really affect your TV choice, because the more “stuff” you want to bring, the more likely you will run into that nasty payload limitation that all half ton (1500 class) and big SUVs have. For a pickup, you have to include the weight of any accessories you add such as a bed liner, canopy or hard tonneau cover. It can add up to 250 pounds…. If you won’t have a travel partner, it makes it easier to deal with. More people equals more stuff….. One factor is the Andersen hitch, which is 100% required for the bigger trailer with the light duty trucks. It works quite well but it adds a whole lot of complexity to hitching and unhitching, and sometimes it will make you swear and kick dirt if the parts are not aligned perfectly. A heavy duty truck solves a lot of problems, including that sometimes pesky Andersen, because you simply don’t need it. And your payload is so much greater, you don’t have to fret about every little thing adding up. The Ram 2500s are very nice, they drive well and the interiors are very car-like. They do indeed sit high, but running boards or an electric stowaway side step will deal with that. I can’t help with pricing, the used vehicle market is insane and unpredictable. At the very least, consider a HD truck, maybe drive a RAM 2500 to see if it suits. Your choice of power depends on how many miles you plan to tow. A lot of members have and love their diesel trucks, but out of warranty they can be a financial heartache. I personally would suggest a powerful gas engine. If you haven’t spent time in the Towing forum, do some reading there. Look for a complete tow package, and as many “driver aids” as you can, they all help to make towing easier. Edit, did you mean 228”, because that is only 19 feet and there are a whole lot of good choices that are longer. It is going to seriously limit your search! I would not buy a truck just so it can fit in the garage, if the house is going to be sold! Just park it outside. John Davies Spokane WA1 point
-
We had a 3500 MB Airstream Sprinter - we never towed with it - it had a 5k tow rating. My concern would not be the power of the sprinter - but its wind issues are a problem without towing. If you select the shorter E towed by a 2500 - I'd think there may be little problem if using an Anderson hitch. If you select the longer E2, I'd give some serious thought about wind issues. Charlie1 point
-
In John D. Original post he mentioned the upper sides of the drawer panels were already clear-coated, hence my suggestion the bottom could be done likewise to seal & stabilize. It was just a thought, I may do nothing to my drawers until it’s necessary.1 point
-
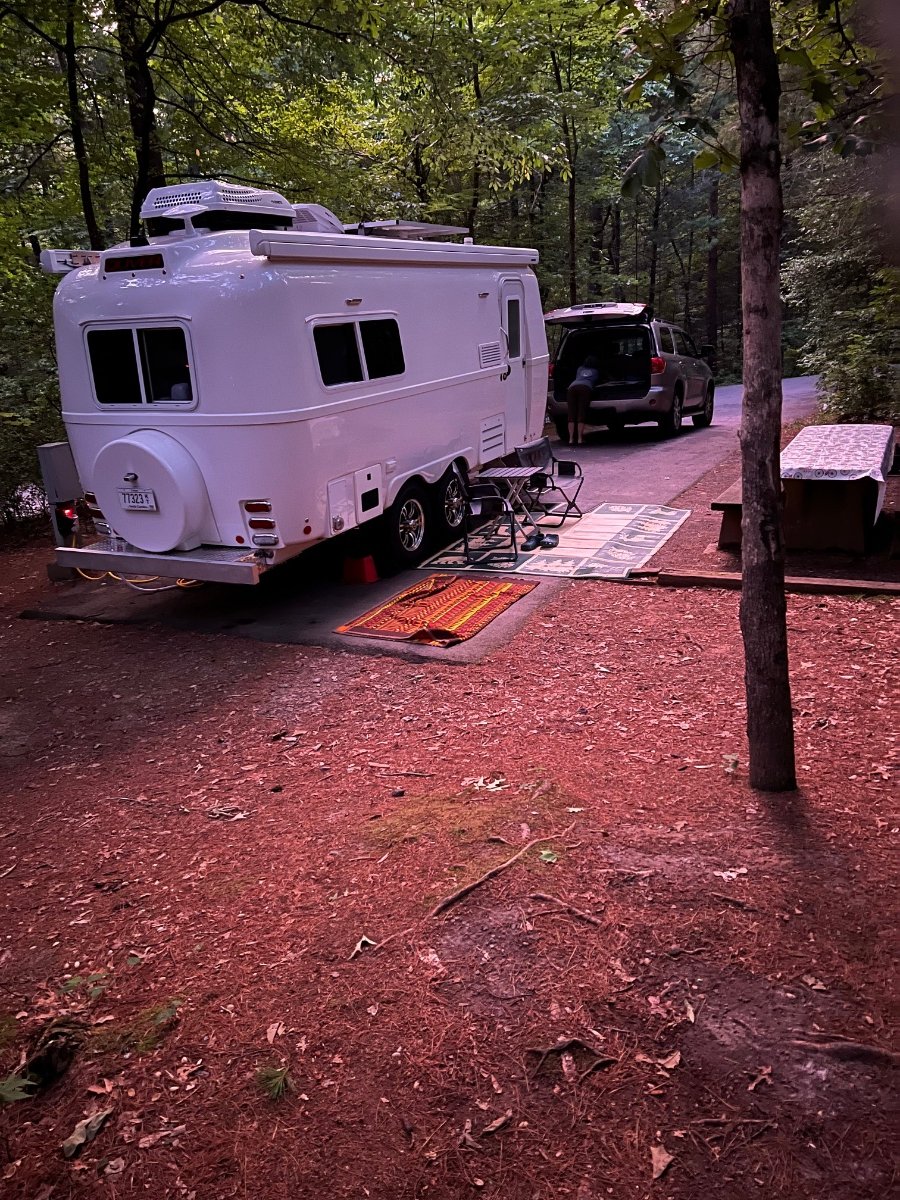
I have no cell service at the campground. A huge change in the weather occurred Friday night, and this weekend is one for the records, under 40% humidity, upper 70’s, bluebird skies! Lake Powhatan site 51 is tough to back into! We found ourselves at The Moose restaurant by recommendation of a new friend at Powhatan….fantastic heart-attack-on-a-plate dining. Just say “YES” to gravy on everything! We didn’t bring bikes, just ourselves and our 14+year-old mutt….we’re all good with relaxing….Oh, and eating….I almost forgot, drinking, too(lol)! We’re heading home on Sunday, but will be back in the area at Mt. Pisgah campground from 7/1-7-9….loop A. Plan on the Farmers Market, and a bunch of other fun when we’re back in 2 weeks!
1 point
-
Re John's comment to drill drain holes in the bumper, do you have a thread on that recommendation?1 point
-
TFL just released an IKE towing test for the F-150 Hybrid powerboost and the F-150 Lighting. That Lighting is very impressive towing. Range is still a major concern but that downhill and acceleration is really impressive. Downhill on the hybrid is not great but this is also at max tow capacity which the Ollie would not be.1 point
-
My water heater quit working on gas a couple of days after delivery. I did some basic troubleshooting and determined after ten minutes that the ignitor was not firing. The system would cycle on and off three times, then lock out with a solid red light. The overtemp switches were not tripped, and there was gas, which I proved by carefully sticking a long camp stove lighter in the burner hole. I clicked the lighter and the flame POPPED and whooshed out and burned all the hair off the back of my hand. Check, there is gas! Note to self: do not do this again... I called Jason at Oliver Service and asked if he could send me a replacement board so I could install it myself. He told me that they do not warranty the appliances and I would have to take it to an RV dealer for repair. Fine.... I found a new OEM module on Amazon for $79, and also a much better aftermarket one for about the same price, but it would require a new plastic cover. https://smile.amazon.com/dp/B0002MG2IK/_encoding=UTF8?coliid=IY2Y0Y0X7RVZF&colid=1X5H11EH41351 https://smile.amazon.com/dp/B007HRVXY6/_encoding=UTF8?coliid=I3LZPCEN833TPC&colid=1X5H11EH41351 Since it was going to be a warranty repair, and I am a confirmed cheapskate, I scheduled an appointment at a local shop in Spokane. They told me it would be three weeks before they could see me, and that they stocked a lot of boards for the Suburban heaters, so most likely they could fix it while I waited. I told them that I would be surprised if the job took more than fifteen minutes, and access to it was great. Three weeks later I showed up, checked in, watched with concern as they took Mouse away, and then I waited. Half an hour later I was called into the office. "The board is bad." ME: "Right, I knew that and I told your tech." "In order to do this under warranty we have to order a replacement board from Suburban, and it will take two to six weeks to get here, do you need the water heater to work before then?" ME: silence, counting to ten very slowly. "Sir?" ME: "I do need it to work on propane. Is there an alternative?" "We can install an aftermarket Dinosaur Electronics board, it is a much better part and has a five year warranty, and we have plenty of those in stock since the Suburban boards fail so often." ME: Sinking heart. "How much would that cost?" "The board is $129 and the cover is $10, and it will be $279 total with labor." ME: "I wish this was mentioned when I talked three weeks ago. Just put it back together and I'll order the part from Amazon and fix the heater in two days." "OK, fine, that will be $50 plus tax for the diagnosis." As I left, the tech who did the work told me quietly, "I left your old board on the floor at the entry, and I also left a used one that was in our junk box. We strip stuff like that off old water heaters when we scrap them. It will probably work fine for years. They sure did build your trailer nice!" I was floored and relieved, and my faith in mankind got a very small boost. I thanked him and left with Mouse, feeling a lot better. I got home, plugged in the board and the heater fired right up. Woohoo! My old (brand new) board that failed (water pump is to the left): The underside, showing the bottom of the fried resistor. The white foam strip goes on the PC board and keeps it off the mounting surface (the water pump and manifold assembly plate). If I had the notion, I could have replaced that resistor for less than a buck.... I don't know how I should feel about the dealer, their parts prices are _over_ MSRP and they sure try to screw you, but then the tech went way out of his way to make things right. He could have got into trouble with his boss, too. Moral of story: unless it is an expensive repair or you can live without a part for a long time, just fix it yourself or have a buddy do it for you. I hope to never go back to a dealer, ever. There is no way I was going to leave Mouse there, and then have everybody start crawling around inside, looking. John Davies Spokane WA
1 point


-
Recent Achievements
-


")
")

")


