

Going
-
Posts
72 -
Joined
-
Last visited
Posts posted by Going
-
-
On 12/30/2020 at 8:14 AM, NCeagle said:
And now with the same shower mixer as Mountainoliver...

Mountainoliver, the check's in the mail! But... I don't know how to get anything delivered by the post office these days. 😉
So glad I didn't have to rip the caddy out again - sure made this addition easy!
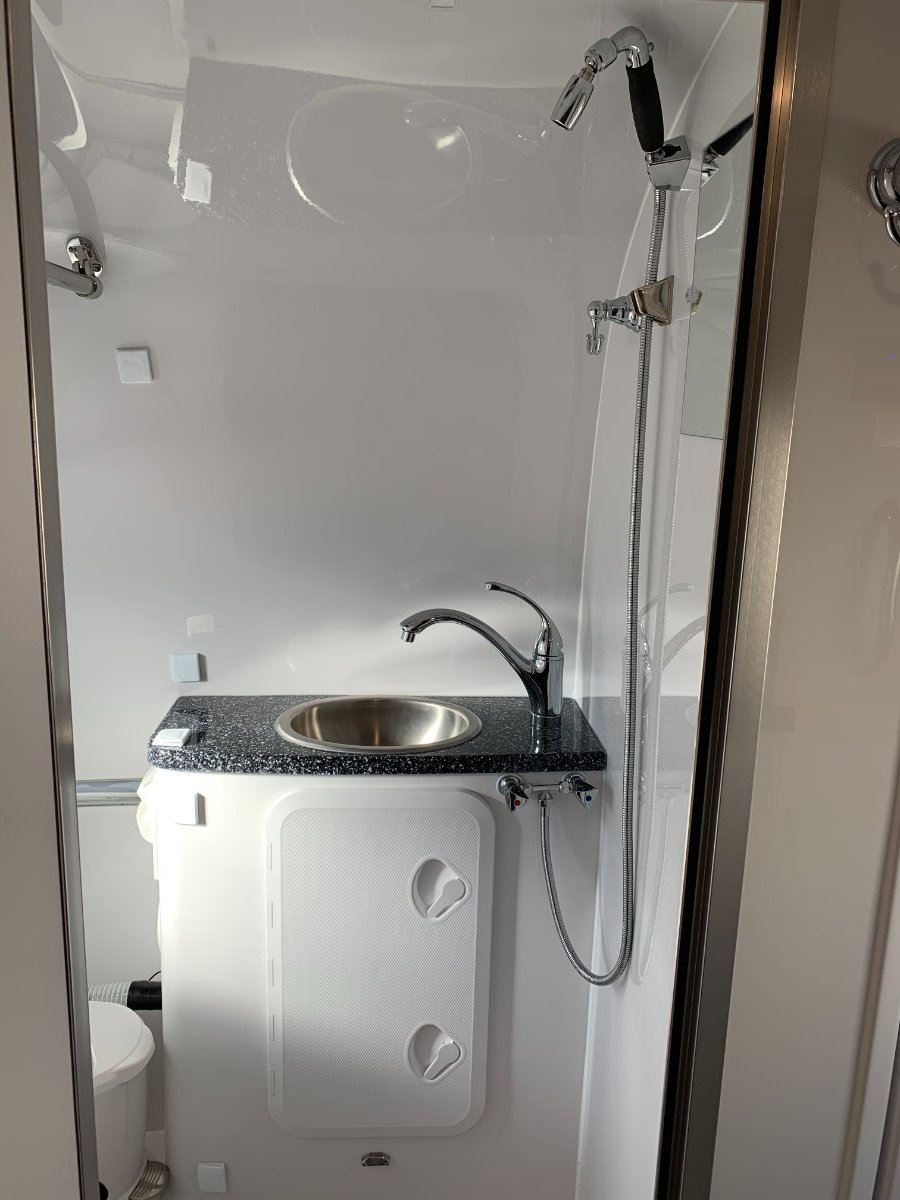
Seadawg and Mountainoliver, I am following after your footsteps here first in installing the Marine hatch and second in replacing the shower system. I really like the design. But I can not see the diverter in these pictures. I only see the hot and cold valves where the shower hose connects. W/hat am I missing? Besides glasses.
-
8 hours ago, MAX Burner said:
Let me know if you need a pic of the tie-downs...
Sure, a pic would be goo. I am not following "between" the BBs. Are you talking front to back or side to side.
-
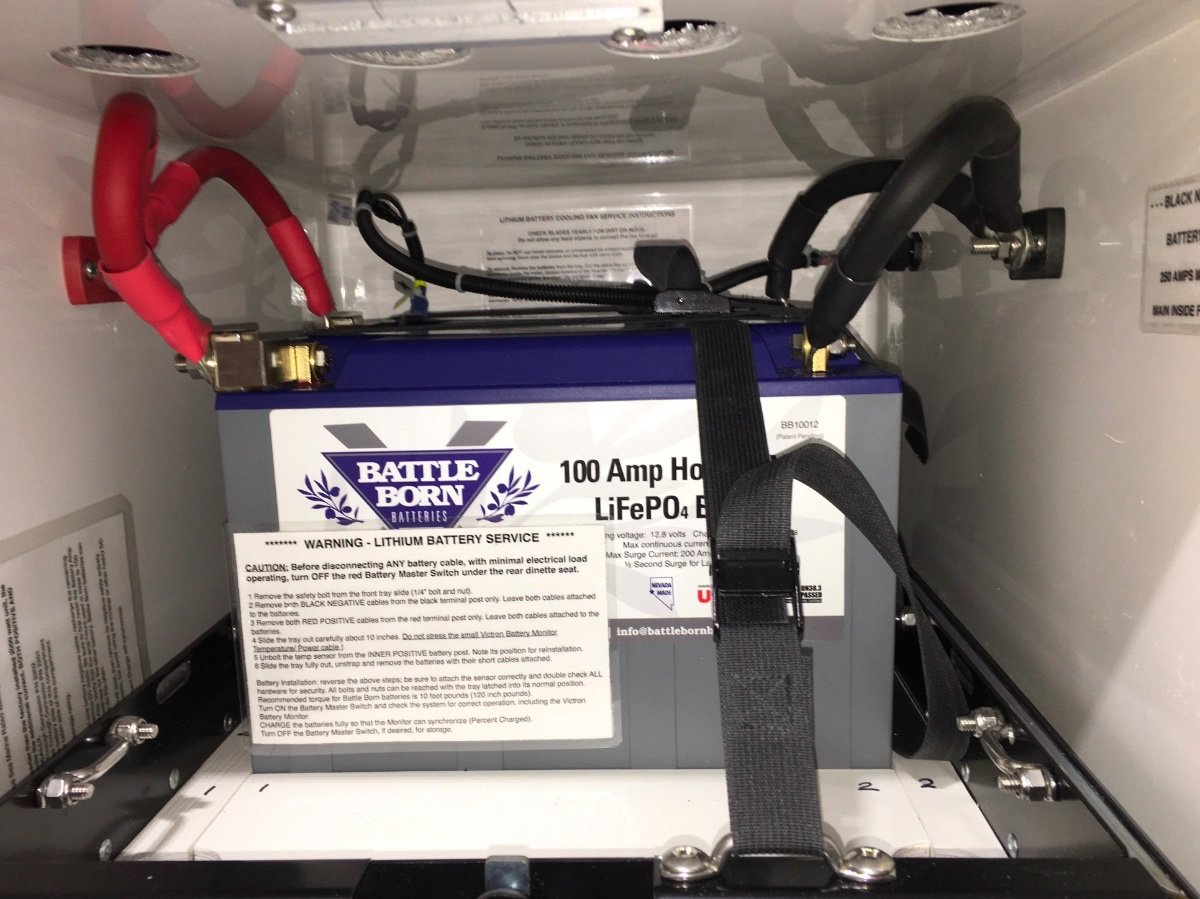
Nice. This is exactly what I needed. Earlier this year I had 3 LifePros installed in your final configuration but they did not install an on/off switch. I supplied all the parts (except an on/off switch) after consulting with BB so I did provide the replacement board with lithium option. I have been trying to figure out how to mount the switch inside the box. And Wa La, here it is! They did thankfully route all the neg connections through the SS so it would work properly. Couple of questions; 1) Is a 250A bus bar with 3/8" connectors what you used? 2. Did you use a tie down strap on the batteries? My 3 fit snuggly in the box using an aluminum flat bar on one side on the bottom of the tray to hold them against the other side so they don't move but seems there should be a strap too in case of a bounce. However, there is no slot on the back of the tray for a strap to hold onto.
-
 1
1
-
-
18 hours ago, MAX Burner said:
We've mounted a small mountain bike hand pump on the underside of the forward curbside hatch cover for easier accumulator bladder air adjustments. We've played with air pressure settings between 20 and 40psi; settled on 30. With this pressure, water seems to flow longer from the kitchen sink before the pump starts.
FWIW: It does seem to run a bit quieter, according to D. However, I can barely hear it at all...
Cheers!
A & D
Good idea on the bike pump.
-
1
-
 1
1
-
-
On 5/15/2022 at 11:18 PM, John E Davies said:
If you have blocked your tail and brake lights for some reason, with a big cargo box for example, you need to add aux lighting to be safe and legal. I added an LED light bar here: ... https://olivertraveltrailers.com/forums/topic/6848-how-to-add-a-full-width-led-light-bar-to-your-bike-rack-when-your-bike-blocks-the-trailer-lights/
The factory wires are easy enough to access underneath the rear cargo floor, near the side door, but the colors do NOT match "industry standard" color coding. Not even close. This is based on my 2017 LE2, yours may differ. Oliver stopped providing wiring diagrams a few years ago, please complain to Sales!
I made this chart showing the differences. Why they did this is beyond comprehension.
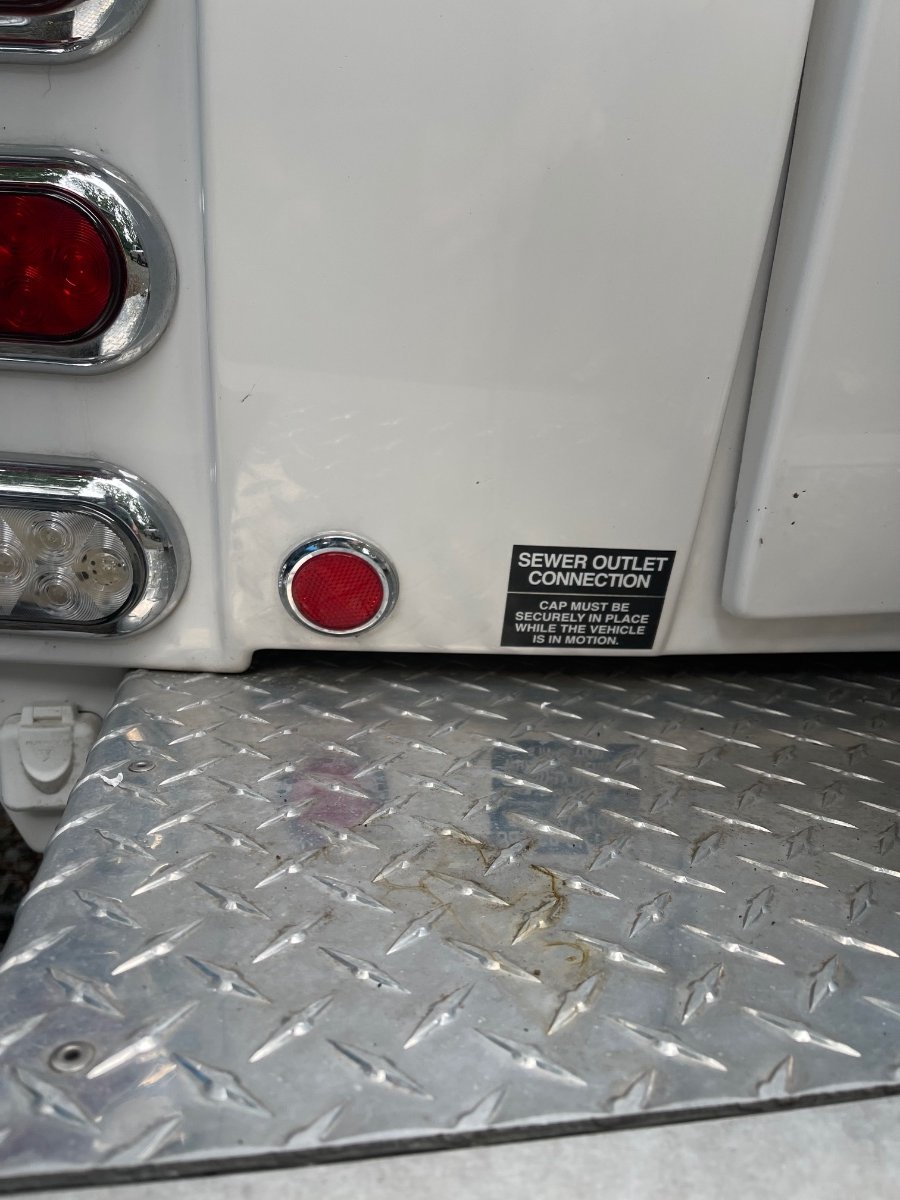
This is from the lightbar thread, it shows the CableClam in the exact location of the left round red reflector. Be VERY careful drilling holes here ...
... because directly on the other side there are water lines and electrical cables:
John, I googled how to drill in fiberglass gel coat but what type hole saw did you use for the larger hole? Also curious since you had to make the hole behind the stick on reflector, why not just put it anywhere you want?
-
On 7/9/2022 at 12:21 AM, John E Davies said:
Another option for access is to remove either of the two round red reflectors that are just above the ends of the sewer compartment. They aren't very visible anyway. I ran wires for my rear bike rack aux lighting that way. Some of the factory wiring is a little unsightly, isn’t it?😢
John Davies
Spokane WA
I
Was there a hole behind the reflector plate or did you cut one? My reflector plate appears to just be stuck on the outside with no hole behind it. My coax cable port is located much lower in a hard to get to place behind a piece of white pvc tubing. Is that the AC drain line? Anyway looking for another location but if I have to cut a hole might as well be a new one. Your picture above is different then mine.

-
On 7/6/2022 at 3:47 PM, Sak said:
This project is to create an inlet port for Starlink cable into the attic where I put the Starlink router. I decided to repurpose one of those TV/Sat ports.
Below are the pictures of the Furrion coax inlets. The left picture is the original and the right one is modified by drilling a big hole using hole saw.
This is the waterproof RJ45 inlet port I got from Amazon.
Then plug it in at the RJ45 female at the inside of the inlet. The cable end from the dish will be on the outside.
Plug the router in and enjoy fast Internet!
I, - ~
Curious, what is plugged into the 12 volt outlet?
-
On 7/25/2022 at 12:52 PM, John E Davies said:
The Ollie bracket is structural aluminum, probably 6061T6 or similar, the same stuff used in the frame and steps. You can tell by how very thick the plates are and by the welds, they are big and sloppy looking compared to steel welds. Those particular welds are a little nasty, but they are fine in terms of strength.
John Davies
Spokane WA
I believe your bracket is like mine in that it is L shaped and does not have the added structural brace welded in the middle. I am hull 246, 2017. I am wondering if that matters. I know Oliver strengthened the brackets and I think the mounts in the fiberglass to handle the self supporting awning. Mine is the Girard with the fold out supports that connect to the lower trailer. If the dish is supported equally from the center of gravity, then it would be fine which I think it is. I just received mine a few days ago and it weighs 9.2 lbs. I do not see any cantilever issues but would like a second opinion. Wouldn't want it pulling away from the trailer over time. Thanks.
-
1
-
-
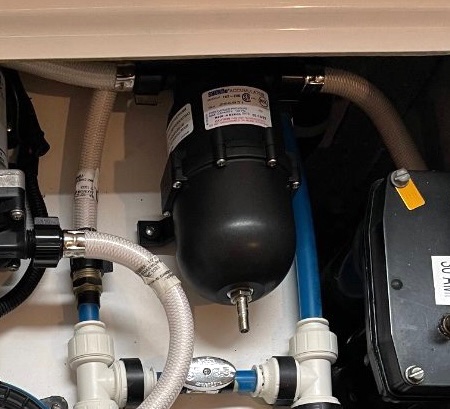
5 hours ago, John E Davies said:
Vertical is a little better, if you do not winterize with antifreeze, there will always be a some water trapped in the cylinder. If it is mounted with the valve up, then gravity will assist in draining that out when you empty the system, or blow it with regulated compressed air. Also FYI, follow the directions for pressurizing, I haven’t used one of these before, but accumulators “usually” are charged with air when the system is completely inert (zero line pressure).
What does the accumulator instructions say about this?
Also FYI, keep a Schrader valve cap on it always, it keeps dust and grit out of the opening, which might cause air leaks. So which of these is better?
John Davies Spokane WA
To you first point yes, if you winterize in a cold climate. The Piedmont region in NC where I live sees mild winters so given the limited space I chose the horizontal position. I haven’t seen where Oliver installs them but I think vertical. To you second point yes, when charging, the pump must be off and one water fixture open thus inert. I started with 25psi. Per the instructions it should match the pump psi but not exceed it. Instructions also say the pressure should be released when not in use. The braided hose is better per the instructions to further minimize vibration/noise. However, though someone else said the shorter the distance between the pump and the accumulator the better, the instructions say it doesn’t matter and the accumulator can be placed anywhere in line on the pressurized side. Bill used the provided coupler but also had to raise the accumulator to be inline with the pump. Though I suppose without the extra hose there is less vibration. I wanted the valve on the easy to access side. I am just happy I installed one and will not hear my water lines chatter anymore! Hopefully.
-
2
-
-
I searched the forum and could not find anything on this. I am hull 246, 2017 and just now getting around to cleaning the excess glue around the edge of my floor. Doing complete maintenance as getting ready to go out west next year. Did any others have this issue. Not sure why it exist from factory but see the picture. What are suggestions to clean it with so not to damage the vinyl floor?
-
11 hours ago, topgun2 said:
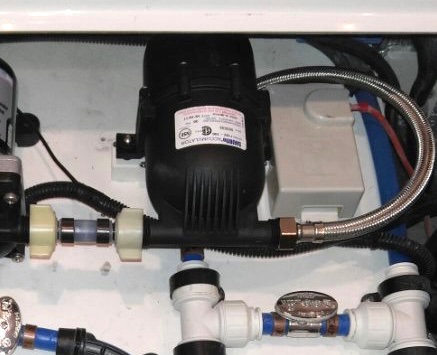
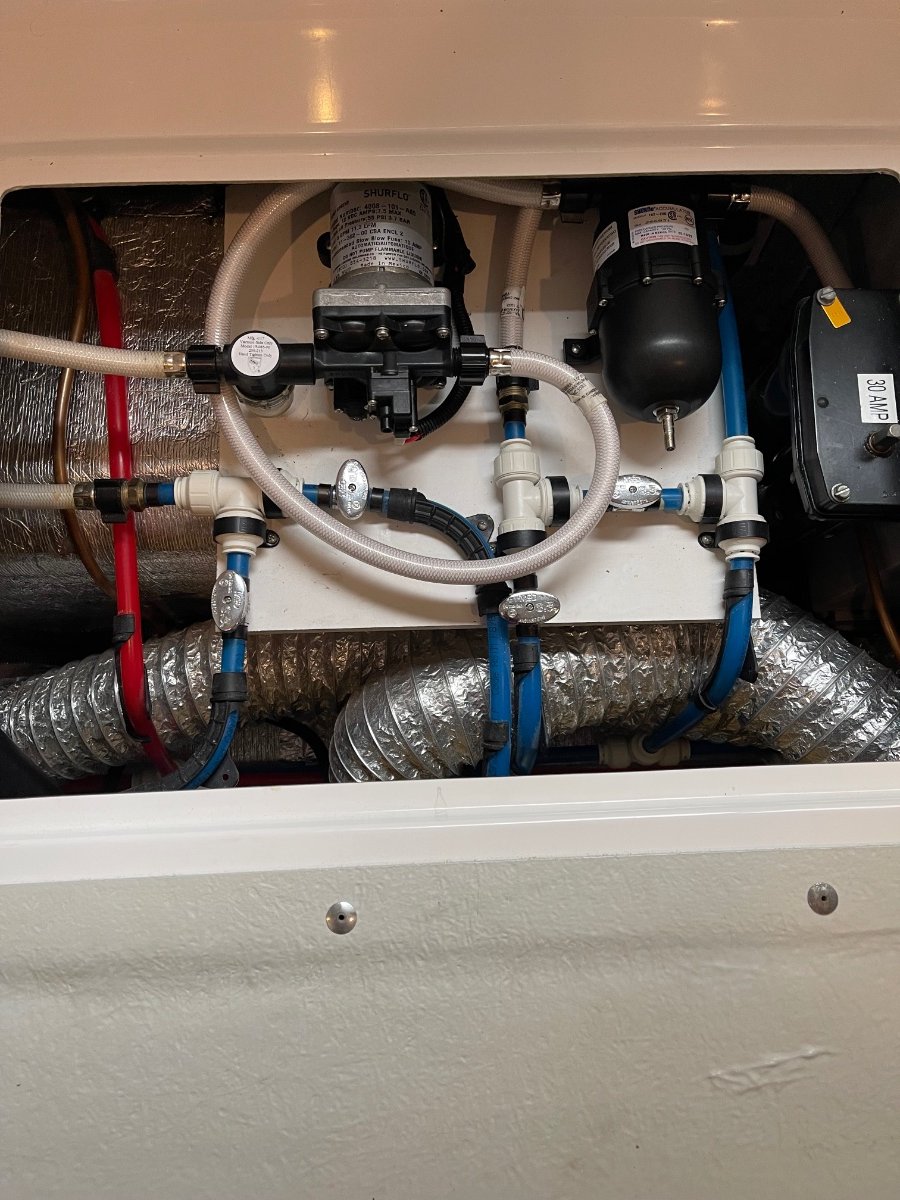
OK - you've got the hard part done (and it really wasn't very hard - was it?).
Now, replace the white hoses coming off the water pump with braided lines and place pipe insulation on anything you can . These measures will help quiet that pump even further.
After you are done with that - you can place sound deadening material on the underside of the two hatches (or all six hatches if you really want to do it right). And place another layer of reflextix anywhere you can.
Bill
Hi Bill. Nope it wasn't hard at all. When you say braided lines, you mean steel braided? And by pipe insulation you mean like a foam sleeve?
-
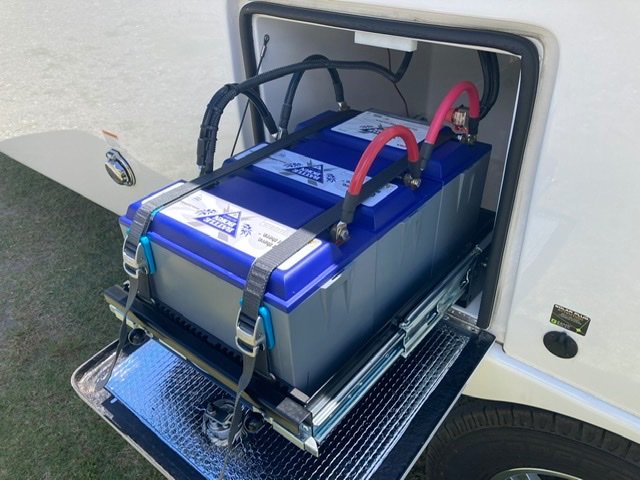
I just did this mod. I used the silence hose kit too. As you can see in my picture I put the accumulator to the far right and chose not to move my pump. Tested it today and seems to be working, although won’t know until I turn the water on/off a few times. I set the pressure at 25 based on input here because I think the pump is 30psi.. Thanks for the instructions.
-
3
-
-
On 5/2/2023 at 8:19 AM, Wayfinder said:
I was even considering my left-over gutter guard in lieu of the bulb seal. That way heavy water, and wind, could still pass thru under the awning mount, yet light to moderate rain could be channeled via the gutter guard? I'll do some critical thinking on that one.
I am in the process of re thinking all this as well. Going to take my bulb seal off too. I believe in some cases like mine Oliver installed it tight against the awning and in others like mine left a small gap. (bad installation) Debris definitely get stuck in there. I like your idea of installing gutter guard below say about 2 or 3 inches. You could even have a high point in the middle gradually sloping down to front and back. Nothing would get caught up top in a hard to reach area either. The other thought I had was installing a new bulb or the gutter guard (or something similar) up top in the valley between the top and the awning cutting sections to fit in between the mounting brackets so it would be flush with them for a smooth path. Also on the brackets, mine are just L brackets with no middle piece to drill a hole through so that is not a problem.
-
1
-
-
On 10/16/2022 at 11:03 PM, John E Davies said:
Four 6 volt AGMs are certainly the most painless and cost effective option. But they are not especially long lived, anything longer than three years is uncommon. Mine were fried at the beginning of season four. The advantage is that they are completely plug and play, you don’t have to mess around with different charger settings or making new cables.
Lithiums are the way to go if you are at all handy and willing to learn how they work. They require a clear understanding of their differences and care. The weight savings is stunning! They do require a new charging board for your converter, with a “lithium switch”, and a simple change of settings in your solar controller. Your truck will no longer charge them properly, you should either disconnect that charge wire or install a smart DC to DC charger that will properly manage that current. If the brand has its own Bluetooth app, you do not need to do anything else special, but Battle Borns require a separate battery monitor, to keep track of the state of charge. (You can no longer use the system voltage since it doesn’t steadily decline like a lead acid battery.)
I suggest that you educate yourself about RV lithium batteries, and then make an informed decision. I switched to two Battle Born 100 amp hour ones and I find that amount to be plenty, except when I am running a compressor fridge in the truck, that uses up to 50 AH per day and then I start to worry. I do have room for a third battery, but so far I do not think I will need to add it…
These ship free and have a super warranty and reputation:
https://battlebornbatteries.com/product/12v-lifepo4-deep-cycle-battery/
This is excellent:
Other FYI:
If you must get running again ASAP, buy a $100 12 volt Walmart Deep Cycle battery (not AGM) and use that until you get the situation under control. Later you can sell it on Craigslist and recoup some of its cost.
John Davies
Spokane WA
John, this post has been very helpful in my search to transition to BB Lithium, especially the step by step installing the PD4045. I was going to have a professional install but now I am going to do it myself. Do you also have threads on installing the BAM030712000 Victron BMV-712 Battery Monitor and the. SCC110030210 SmartSolar MPPT 100/30 Charge Controller with Bluetooth? If I remember, the Monitor just replaces the Zantrax and I just have to make a plate to mount it too and cover the larger hole left by the Zantrax. Just wondering if anything specific about the wires to wires on either of these change?
Also, I posted on another thread yesterday that the BB 270 amp Gamechangers will not fit unless you relocate the wiring in the battery box. After that I decided to just stick with the 3, 100 amps. But then reviewing this post again, I see you did relocate the wiring. Was that difficult because you have limited space on either side of the battery box at the top? Does the wiring come out simply by unscrewing the plastic "nuts" around the wire inside the battery box? And I assume you drilled new holes from inside out? I am asking because and depending on your answers, I think with your wire re configuration, you could get 2 of the 270s in there which takes it to a whole new level of DC power. How much, I don’t know except you can run anything in the Oliver and if you don’t run the AC or microwave does that give you 5 days of power vs 2 ? The price is significantly more because you then have to replace the inverter for another $1300 plus the extra cost of the batteries. I am trying to figure out the cost/value proposition. One benefit is theoretically, I would not have to run my generator to charge or run accessories. One thought is I plan to use my Oliver to go off road at certain hunting sites and running a generator would be a noise I would not want. Any insight you can provide would be helpful.
-
On 9/11/2022 at 10:23 AM, Hokieman said:
If I were to do it over again, I’d probably go with the 270 Gamechanger. That would be more than enough power for us, maybe ~5 days with no sun.
I am still going through the process of changing so I measured the compartment again. While the battery storage opening appears larger enough for the 270s, with the power cables in the back, it is not. The actual battery box depth is a little over 23 inches but after taking the cables into consideration (you can only sit up against them) the depth reduction goes to 21.25 inches. The 270s are just under 23 inches. So I am going with the three 100s as you have pictured here. Are the SCC110030210 SmartSolar MPPT 100/30 Charge Controller with Bluetooth AND the PD4045CSV Progressive Dynamics Replacements 4000 Series 45 Amp Lithium Converter just simple swap outs?
-
On 10/31/2022 at 11:32 PM, Liana said:
Ours is under the street side Bed
I have been wondering the same same thing. You are asking about the Xantrex 3000 correct which is fairly sizable?
-
On 10/24/2022 at 10:50 AM, Hokieman said:
Regarding the 270A BB battery, according to Frank C. it won’t fit in the battery tray (see post link below). You might want to measure your tray to see if it’s the same. This post also gives opinions on capacitiy recommendations. It seems many folks, including me, have found that 2 BB GC3 100’s is plenty. I now have 3, which in our case, is overkill. But, we don’t have an inverter, microwave, toaster oven, hair dryer, etc, and have not used more than 50A/day. We have the standard 340W Zamp panels and the standard Zamp 30A controller, all works fine. Your power requirements requirements may be significantly different. The advantage of starting off with one or two GC3’s, is that you can easily add a 3rd if needed, unless of course you want to operate your AC off battery power. There are many posts on that topic also.
Replacing the Powertron Lead Acid Wet Cell Batteries
Thanks for the info. The thread from Frank C was very helpful and yes after further study, I do not believe the BB 270Ah batteries will fit even if you do remove the battery tray. So going with the 100s. I will add another post and list of upgrades once complete.
-
2
-
-
On 10/23/2022 at 7:59 PM, Going said:
The Xantrex 3000 watt inverter/charger is necessary to have in order to be able to run the air conditioner off the batteries. It also is able to recharge the lithium batteries at up to 150 amps per hour, 3x that of the PD4045.
I think I have decided to add the inverter instead of the PD4045 for this reason. Of course it adds $1500 to the total costs but my BB contact said if I did not mind spending the extra money he definitely would recommend it. Thanks for originally clarifying this for me. Does anyone happen to know where Oliver installed the inverter?
-
On 10/22/2022 at 11:55 AM, ScubaRx said:
You didn’t mention in the Oliver vs BB comparison the Oliver has ditched the inadequate Zamp equipment for Victron. It won’t make up for the $$ difference but it is light years better in capability.
I swapped my Trojan AGM’s for three BB’s a couple of years ago. We rarely use more than 12% during the dark hours and we are back to 100% by noon with good sun and we only have 300 watts of solar. We were not hobbled with the Zamp stuff as our Hull #050 (and the next 150 trailers) was outfitted with Blue Sky equipment.
A 100 watt panel can only put out about 8 amps so you can calculate how long it would take to replace amps used with whatever number of watts of solar you have. With either the Blue Sky or Victron equipment, you’ll get a few extra amps because their controllers are MPPT vs PWM on the Zamp.
Older trailers will also need to replace the PD4045 charger with a lithium compatible model ($200+).
I have the PD replacement included and am adding the Victron back in. Had it in then took it our to simplify and because I wasn’t sure if it would fit in the Zamp space. I currently have the Zamp. The Victron is two piece to get the wall display too, from what I am seeing. Did you just mount the non display piece in the space behind the Zamp display?
-
On 10/22/2022 at 5:16 PM, ScubaRx said:
The Xantrex 3000 watt inverter/charger is necessary to have in order to be able to run the air conditioner off the batteries. It also is able to recharge the lithium batteries at up to 150 amps per hour, 3x that of the PD4045.
Good to know. I will ask BB about including it, primarily because of the faster charge and I assume since Oliver does not replace the solar panels with there system the Xantrex will do the same thing with BB. I can’t remember, but doesn’t the soft start lower the watt requirement to 1000 from 1200 with out it? I have the soft start.
-
1 hour ago, Liana said:
We did this swap in the spring. 3 BB 100ah. What a weight savings! To your Question about Whether 4 can fit, yes. Someone on here did it. However, in our experience, 3 has been more than Enough. Only one time did we go over 100ah (we don't use The air conditioner) of use in one day. We have the lithium jumper and the Zamp controller so the swap was very straightforward. OTOH I Had a shop install the New BBs and I would not have had the hand strength to Wrestle those cables into place.
With your solar, can you even generate enough to Charge 540ah?
Good question. Not entirely with 2 GC3s. But there are 3 options as I understand; 1. Use my Honda generator to supplement. 2. Purchase a suitcase panel from BB that I could plug into the batteries. (Would have to make a connection in the battery box to make the plug up easy). 3. Perhaps the best option is install the DC to DC charger on my tow vehicle that John Davies recommended. I don’t think anyone has installed the GC3s yet that I know of. One thing I am trying to figure out to make sure I am not missing anything is why is Oliver so expensive for their Platinum package at 15k vs this scenario. Even if I install 2 of the GC3s at 540Ah, I would still be spending only $5500 plus 4 or 5 hours labor for the battery install. Oliver has 31 hours labor included. One thing is the batteries they use are $4500 each and 315Ah each, so 630 total but everyone on the forum has been happy with either 2 or 3 of the BB 100Ah. They swap out a few more things but main one I see that is not on my BB quote is INVERTER, XANTREX FREEDOM XC 3000 Pro at about $1500. I need to understand why or what that does because it is on their quote for the 390Ah and the 630Ah package.
Questions for you. Did the installer have to run new cables to the battery area or just inside the battery area? And if 4 will fit in there, would that leave enough room to work with the cables? Also, did you remove your factory battery sliding tray or leave it in?
-
1 hour ago, ScubaRx said:
How much solar does your trailer currently have? Do you have the Zamp controller?
I have the 320 Watt package with the T105 Trojons from Oliver when I bought my trailer in the fall of 2017. And yes I have the Zamp controller. Just got off the phone with BB again and since the Zamp controller will work I may wait on replacing that unless there is some good reason to replace it. At this point, I am thinking of one GC3 BB; https://battlebornbatteries.com/product/270ah-12v-lifepo4-deep-cycle-gc3-battery/ to convert instead of 3, 100Ah's https://battlebornbatteries.com/product/12v-lifepo4-deep-cycle-battery/. The reason is because I can easily add a second GC3 if I want and have 540Ah to run more things or longer time. The max size fit for the 100Ah is 3 vs 2 of the GC3's and you can not mix and match. One of the GC3s is less than 3 of the 100Ah's for only 30Ah less in power.
-
So replying to everyone here since I have talked to BB and I know David may be soon doing the same thing. First, John it looks like from your picture that you took out the factory battery sliding tray. Just curious was that just for more room? It appears the BBs will fit in the existing but would like to hear your thought. I gave some thought to try and fit 4 of the 100Ah 12V LiFePO4 Deep Cycle Batteries from BB in there but I think 3 is the max. Other components being provided by BB are:
SHU050150050 SmartShunt 500A/50mV x 1. This is the BlueTooth battery monitor although I am not yet sure (waiting on reply from BB) if this will work as the solution that John references or I need the actual one in the link he provided. (waiting on a reply email from BB). Costs $124
SCC110030210 SmartSolar MPPT 100/30 Charge Controller with Bluetooth x 1. I believe this is the Victron to replace the Zamp. It is not required but since John recommended and it is only $214 and offers more capacity and better readings I think it is worth it.
100Ah 12V LiFePO4 Deep Cycle Batteries x 3. Costs approximately $850 each.
PD4045LICSV Progressive Dynamics Replacements 4000 Series 45 Amp Lithium Converter x 1. My PD Charger does not have the Lithium switch. Costs $212.
It seems that this is a fairly simple change out to do my self. John, you did mention the external smart battery monitoring device being done by a professional. Is there a particular reason for that? I have a found an RV dealer that can do the whole swap out but if I must have any one part done by professional, I would do it all with them and me buying the parts.
One last thought is BB makes the 270Ah 12V LiFePO4 Deep Cycle 8D Battery and it costs $2279 and it appears two of these would also fit giving me 540Ah. That is $4600 vs $1750 for the batteries but still a far cry from 15k the Oliver factory install would costs. Plus it is close to the Ah their solution provides. BB did mention the option of an external suitcase Solar panel that could could be plugged into the battery array to provide more solar charging capability.
Please let me know any thoughts or if anyone thinks I am missing something. Hopefully this will help David as well.
Phil Drye
-
3 hours ago, Mike and Carol said:
I agree with Steve here and with JD’s advice. Our AGMs lasted almost 5 years. We’re almost at 2 years with our 3 Battle Borns. If your trailer is a 2017 I assume you have the Blue Sky controller. The base 100aH BB lithiums were about $800 each. The updated PD 4045 was a little over $100, also from BB. There is some reprogramming of the Blue Sky but BB provides the parameters and it is not difficult. The PD (Progressive Dynamics) 4045 is what charges your batteries when on shore power. The old model did not support lithium, the new one does. It is part of your fuse box under the dinette seat. Check to see if yours has a little lithium toggle on the front. Not difficult to swap out. The folks at Battle Born are very helpful answering questions and giving guidance. Mike
Thanks Mike. I will check on your suggestions and place a call to BB. As long as I have a technical person helping me along the way, I am good if it is not too difficult and from your post, it doesn’t sound as if it is.
-
1
-


Starlink mast holder/base
in Ollie Modifications
Posted
Nice for being able to move from each stabilizer depending on sky. How tall does the pole extend above the trailer? Does it extend easily with the dish attached?