

Townesw
-
Posts
471 -
Joined
-
Last visited
-
Days Won
18
Posts posted by Townesw
-
-
@Geronimo John look inside the rear bumper. There is a rubber seal around the sewer pipe where it goes into the lower left rear of the trailer that will become dislocated and permit dust intrusion. Reposition the seal and place a clamp around the sewer pipe to keep the seal from slipping back out of the hole. I used a Stainless steel Banjo TC-331 just snug. Not tight.

-
 3
3
-
 6
6
-
-
- Popular Post
Summary: Check under your kitchen sink
I walked up to an Oliver at a campground one time to introduce myself. I noticed water running down the curb side rear stabilizer. After exchanging greetings I brought the leak to the attention of the owner. After looking under the curb side bunk and finding nothing I suggested that he look under the kitchen sink for the source of the leak. Upon removal of the drawers he found water soaked plywood caused by a loose coupling on the kitchen sink drain trap. Since then I have tried to check mine occasionally to ensure that it is tight and to look around for any other problems. Today I found that the quarter turn stop on the hot water was not completely open. It had probably been like that since we took delivery. Anyway, I opened it and improved the hot water flow at the sink.
Occasionally remove your (kitchen) drawers and check on stuff down there
-tightness of the drain coupling
-quarter turn stops fully open
-refrigerator plug plugged in
-hose weight located between back of drawers and rear of cabinet carcass
-hose not twisted
-any sign of moisture
-anything rubbing against something
-and especially that blue clip on the faucet hose assembly. There was an owner that heard water running underneath her sink when she turned the faucet on. Turns out that blue clip was missing and the hose had completely separated.
We have a 2018 OEII, hull 313. Some of this stuff has probably changed. The round port was added after production to access a loose clamp on the exit end of the fresh tank overflow hose. It sure is useful for checking below the cabinets.
There is a plumbing vent under the back right corner of the range. It is supposed to let air in and not let grey tank smells out. If you are smelling something foul (grey tank odors, not black tank odors) and you can’t locate a leak you might have a bad plumbing vent.
-
13
-
6
-
2 hours ago, Geronimo John said:
I momentarily thought I saw a model number for this faucet. Have reread the thread, but apparently my eyes are fooling me again.
I would appreciate knowing the faucet model number. And golden bonus info would be the repair cartridge you used.
thank you
GJ
Here is the response I received from Jason in July 2019 regarding faucet model number used in Hull 313.
Here’s the cartridge I used. Get a couple of spares. I ordered one from Amazon and Dura sent me one under warranty. I need to replace mine again.
https://www.amazon.com/Dura-Faucet-DF-RK601-Cartridge-Replacement/dp/B072BVH7KB
Don’t forget the socket wrench. Mine came from a set that I bought at a Menards in Marquette MI. It’ll make the job real easy. You may have to clock the faucet base if it has been twisted out of position. See my write up in this thread.
-
2
-
2
-
-
I asked service what was being used and the response was ASI 335.
-
6
-
-
Read my posts in this thread for installation of a replacement without drilling holes. The LP/CO detector shown in the thread is what the service department was recommending at the time.
-
2
-
-
I realize this post has nothing to do with the direction this thread has taken, but I think this part is what was originally used for the bathroom sink drain. I submitted a service request asking for the correct part but the factory was unable to provide that information. You won’t find this in most hardware stores.
https://www.lasallebristol.com/product/metal-c-o-plug-without-overflow/
-
4
-
-
@jd1923 That same regulator package, F3004 from RV Water Filter Store, was $138, shipped, in July 2019. I don’t know where it was made.
Google “Camco water pressure regulator vs. diaphragm water pressure regulator” and read some of the discussions that pop up.
This is one that I found:
https://www.irv2.com/forums/f54/water-pressure-regulators-255560.html
We primarily use full hookups, so this isn’t going to help if you’re using the pump.
-
1
-
2
-
-
28 minutes ago, Geronimo John said:
The flow reduction may be caused by the pressure in the accumulator depleting down to the pressure of the activated pump.
Worth a consideration.
GJ
@Geronimo JohnThat water is not pumped water. Those videos are with trailer hooked to city water through a hose bib on the house. One video with water flowing through a brass Camco “pressure regulator”, which I call a flow restrictior, and the other video with water flowing through a Watts pressure regulator.
-
3
-
-
Are they still using ASI 335?
This stuff works well for removing old caulk
-
2
-
1
-
-
@Lisa Rae @jd1923 I have hull 313. I have 2 check valves under the basement floor just under the door. This is a picture that I made in September 2019 of mine when a few Olivers were having problems with split check valves.
I’ve not found any of the brass Camco “pressure regulators” down there. The plumbing diagram shows the check valves but doesn’t show any “pressure regulators”.
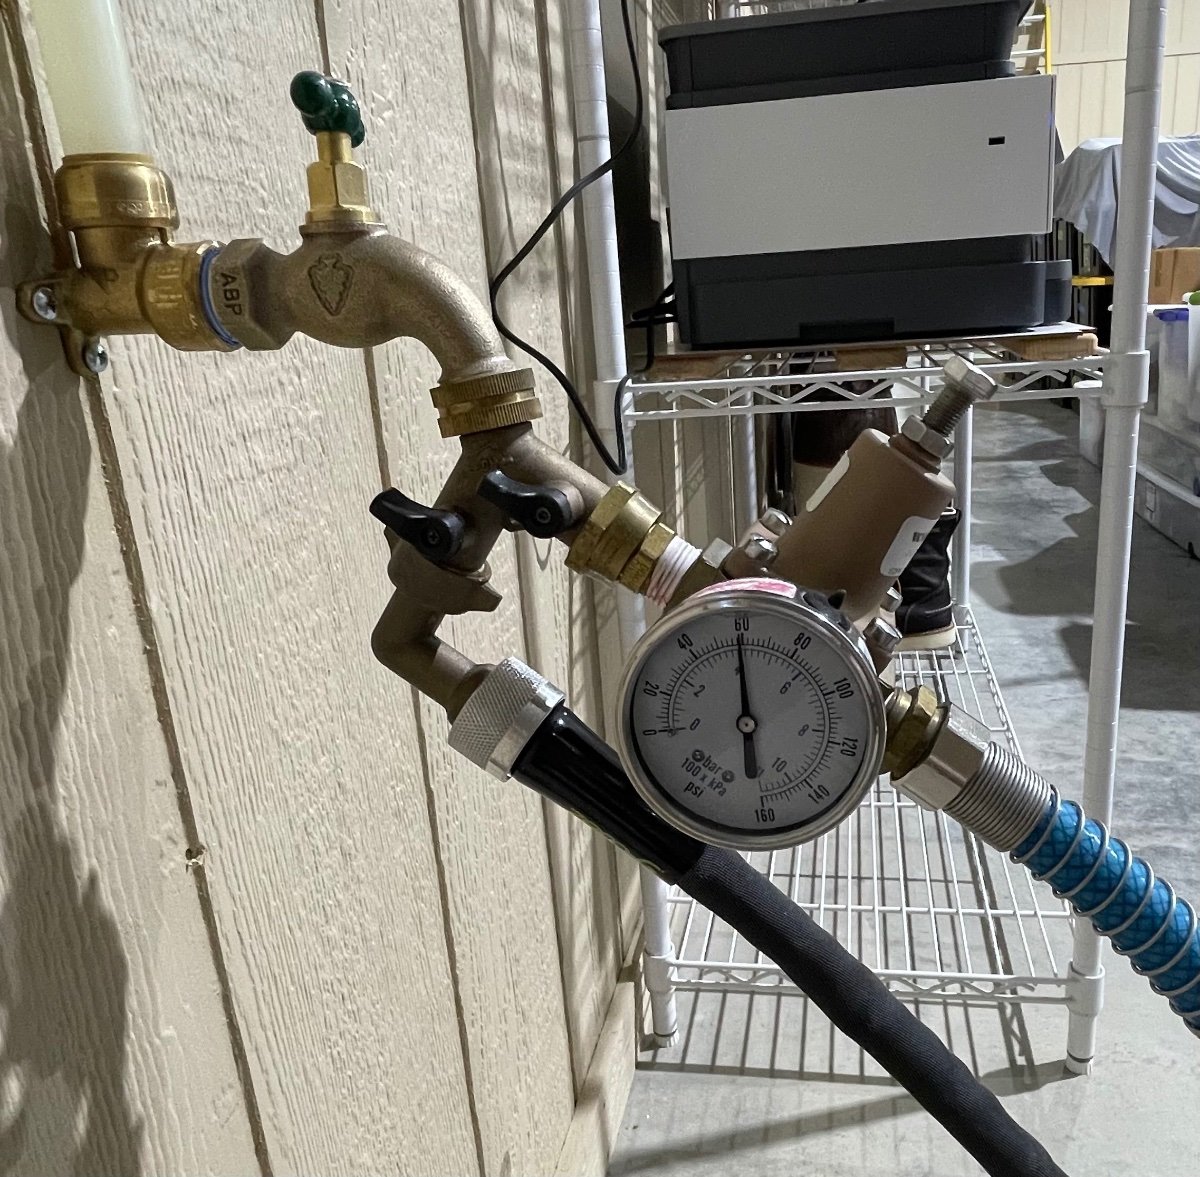
Oliver provided a brass Camco “pressure regulator” (or flow restrictor) for use externally to limit the incoming water pressure and I used it when our trailer was new. We noticed that when we turned on any water that the flow would be strong and then it would quickly slow. I did some reading on the internet that lead me to replace the “pressure regulator” with a diaphragm type pressure regulator.
Video from July 2019, flow with Camco pressure regulator in place at the city water faucet (hose bib).
Video from July 2019, Watts diaphragm type pressure regulator in place at the city water faucet (hose bib).I am the kind of person that likes to know how things work and I have thought about cutting the flow restrictor (Camco “pressure regulator”) open to see how it works but, it is my backup in case my Watts regulator fails. (Boy Scout motto: Be Prepared). All of my information and suggestions come with the added warning that what worked in my case may not work for you.
-
5
-
-
I got better flow everywhere in the Oliver when I switched from this
to this
https://www.rvwaterfilterstore.com/products/263a-lf-regulator-stainless?_pos=1&_sid=7382cb9a5&_ss=r
-
3
-
 1
1
-
-
Thanks @mossemi I did see that thread but I’m on my second caddy from the factory and both appear to have been hand trimmed when manufactured. The edge that meets the front of the vanity is so wavy that I doubt that I could get a seal on the edge to seal well against the vanity.
What did you use to enlarge the hole for the hatch?-
1
-
-
@rich.dev is this the bathroom heat duct? Is the factory using this now or is this something that you have used to replace what the factory used?
-
There is another thread “Upgraded shower and bathroom access hatch” but I am starting this thread to address the access hatch only. The other thread primarily addresses the shower valve modifications and some questions about the marine hatch modification are going unanswered.
Moderators, remove or add to this thread if you need to or direct me to another thread with more information about this modification.@mossemi @MAX Burner @NCeagle @Going and others that have made the modification:
1. has anyone installed the hatch opening to the right?
2. I see that Mike relocated his water pump switch and light to the upper left front on the vanity. What have others done?
3. Has anyone found a lighted switch to use for the water pump switch?
4. Did you bed the frame with butyl?
5. Can the door be easily removed from the frame?
6. Did anyone use something other than the 23.9x13.9 SEAFLO marine hatch?
7. Mike mentions using a hole saw in reverse to cut the radiused corners (@mossemiis this correct ?) What did you use to cut the straight lines?
-
1
-
-
I forgot to mention that while you have the caddy off take a few seconds and straighten out your faucet head hose.
-
4
-
-
@MAX Burner can that door be removed from the frame?
-
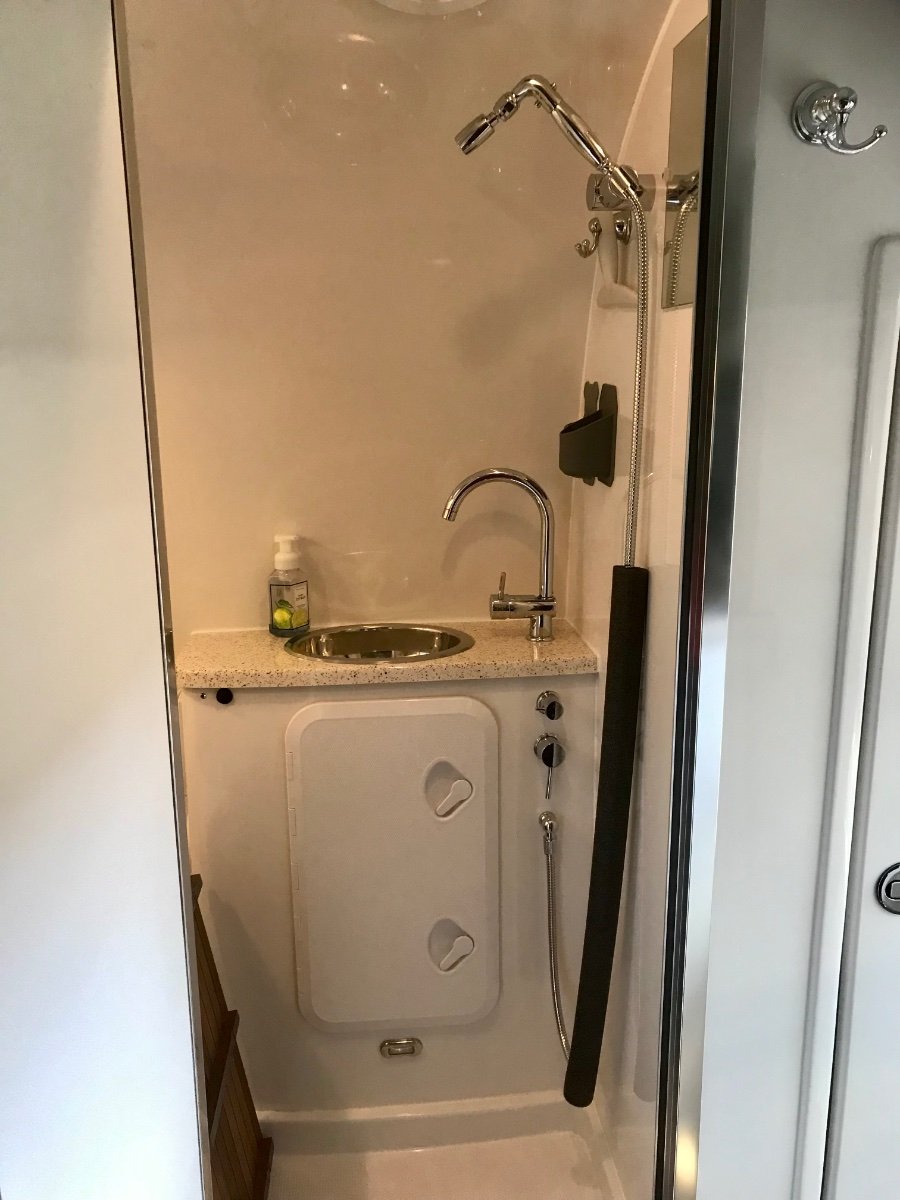
If you see water dripping from this bolt under the front center of your trailer look for a leak under the bathroom sink
In my case it was a split in the sink tailpiece. The split was on the side not visible so I didn’t find it until I removed the tailpiece.
I couldn’t find this style of tailpiece at any of my local hardware places including Lowe’s because most tailpieces are made for sinks with built in overflows. I finally found a tailpiece that would work at a place that had an old supply of mobile home parts. It was plastic instead of metal but it worked great. I will order another tailpiece, either this one or a metal one, to put in my parts box.
Installed pictures. The stopper is better than the rubber plug used before
I cannot understand why the factory puts that fixed caddy under the bathroom sink. Sure, it’s no problem to remove and replace, but the fiberglass won’t stand the removal and reinsertion of the screws many more times. And when you remove, replace, and recaulk the caddy you have to wait until the caulk cures enough before you can use the shower. I will be installing a marine deck hatch in its place.
-
7
-
1
-
-
On 6/28/2022 at 7:49 PM, mossemi said:
@mossemi OR anyone else that has done this modification, do you have the name and model number of the hatch that you used?
-
@rideadeuce Is the “5” in 5000 a raised or a stamped number?
-
@rideadeuce Hull 313 has the gusset
-
1
-
2
-
-
I stand outside beside the trailer while filling the black tank through the flush valve. You can hear the water spraying inside the black tank. When I hear the water level in the black tank rise above the flush valve I leave the water running and just pull the black tank dump valve. I do this 2,3,4 times or as many times as it takes until I see clear water and no floaters in a clear fitting at the terminal end of the sewer hose. Only then do I turn off and disconnect the flush hose. Never had a problem doing it this way.
Sometimes I delay pulling the dump valve a little just to make my wife hollar at me “Ok OK OK DUMP DUMP DUMP!!”
-
2
-
 3
3
-
 1
1
-
-
Read my posts in this thread for a no-drill install of a new CO/Propane detector.
-
1
-
-
21 minutes ago, Tom and Doreen said:
Did you find that the x-chocks were causing problems?
I think they are more of a gimmick than actually a device to chock the trailer. Nothing chocks better than a big chunk of wood or rubber. I don’t think they do much to stabilize the trailer, they are just another step in setting up and taking down, and they are just something else in the way. The simpler you make the process the better.
-
5
-
-
You might consider removing the decorative hub caps altogether. This will allow you to check wheel hub temp using a non contact IR thermometer or by hand. You can also watch for a loose bearing cap. You can also adjust wheel bearing play without having to remove the tire and wheel assembly.
I don’t use the x-chocks anymore either.
-
3
-


MaxxFan 7000K chirp
in Mechanical & Technical Tips
Posted
For years our MaxxFan 7000K has made a high pitched chirping noise at lower speeds. I had been told that it was due to pulse width modulation speed control so I didn’t try to fix it. My wife can’t hear the noise but it really annoys me. I finally googled and found this video. I cleaned the brush dust out of the motor and now the fan is pretty quiet. Be aware that black dust will come out of the motor when it is disassembled so you might have someone hold something under the motor as you pull it apart.