

mjrendon
-
Posts
183 -
Joined
-
Last visited
-
Days Won
1
Posts posted by mjrendon
-
-
I have been towing my OE2 with a 2007 Tundra Unlimited with Sumo springs which were simple to install and do not require air adjustments. I use a locking tonneau cover and I get 11-12 mpg and have had no issues. I also recommend using the Andersen hitch.
-
 1
1
-
-
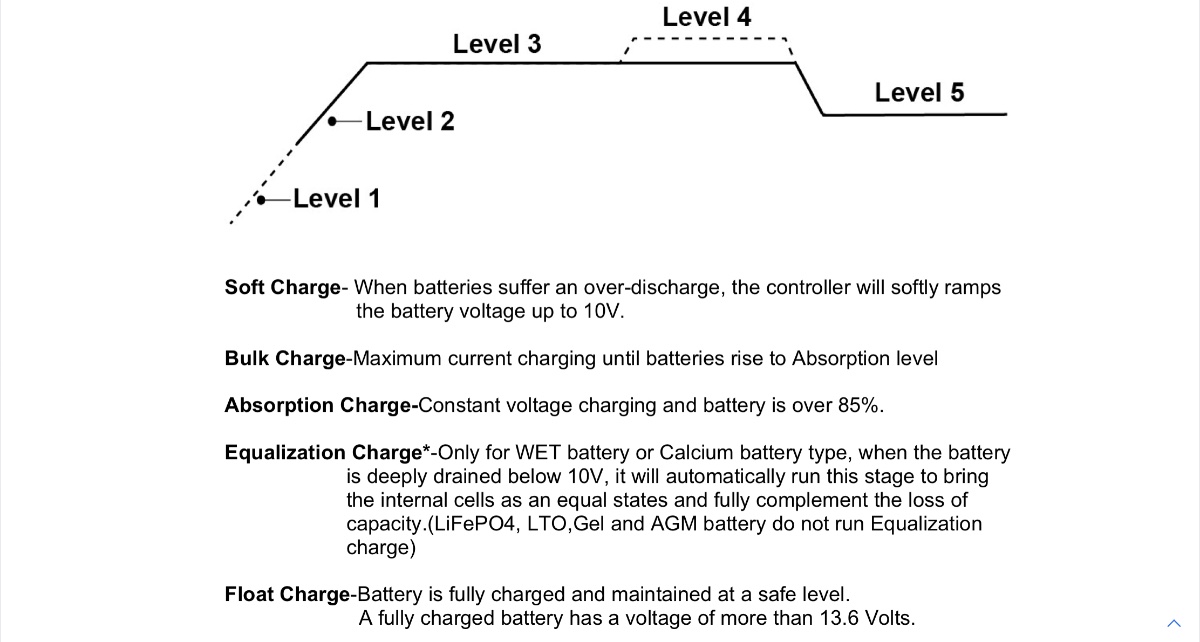
From what I read, the BTV (internal to the Victron battery) controls the cell imbalance. The charge/discharge rate protection offered by the BMS relies on communication to the Victron charge and load controllers. I believe that you are correct in that the PD controller lacks the ability to be controlled by the Victron BMS. However, you might leverage the DC disconnect relay. If I am understanding the Victron setup correctly, a fuse between each battery would be prudent. I am not sure why Victron chose to design their system this way.
The Battleborn BMS is an internal battery device and performs temperature control, balancing and charge/discharge rate protection.

-
1
-
-
It looks like the Victron batteries are monitored internally by the BTV, but the controls to prevent excessive charge/discharge rates is done using an external BMS. Did you or are you installing the external BMS as part of your setup?
from the battery manual on the Victron website
"Our LFP batteries have integrated cell balancing and cell monitoring. Up to 5 batteries can be paralleled and up to four 12V batteries or two 24V batteries can be series connected, so that a 48V battery bank of up to 1500Ah can be assembled. The cell balancing/monitoring cables can be daisy-chained and must be connected to a Battery Management System (BMS).
The BMS will: 1. Generate a pre-alarm whenever the voltage of a battery cell decreases to less than 3,1V (adjustable 2,85-3,15V). 2. Disconnect or shut down the load whenever the voltage of a battery cell decreases to less than 2,8V (adjustable 2,6V-2,8V). 3. Stop the charging process whenever the voltage of a battery cell increases to more than 4,2V. 4. Shut down the system whenever the temperature of a cell exceeds 50°C."
-
I have not had time yet to read your reference material but I believe that Victron recommends a fuse on each battery to prevent an issue with battery imbalance. This can occur when installing batteries with different charge states or if some "event" happens while the batteries are connected in service. If the batteries are not balanced, there can be large current from the higher charge state battery to the lower charge state battery. A BMS board should limit this current, as would a fuse.
From the images posted here I do not believe that Oliver is fusing the two LifeBlue batteries. Someone would need to verify this.
Mike
-
1
-
-
I have not used these before but find them interesting. Do they slip over time?
Below are links to youtube videos explaining how they work and describe the tool and no tool installation process.
-
Great implementation on this improvement. Did you drill the rail out before you placed new tray in the trailer or use a block of wood to prevent hitting the battery compartment wall?
-
9 minutes ago, John E Davies said:
I don’t see that option on my iPad,
Hold down on Posted X hours ago in the original post and the option for download linked file will appear. NOTE: The file is 1.5GB.
-
 1
1
-
-
Nice video, thank you for posting. Excellent quality and very useful.
47 minutes ago, John E Davies said:Thanks for the video! I am having trouble viewing it, it starts and stops. where is it hosted?
John,
I downloaded the file and used Apple's Quicktime for playback.
-
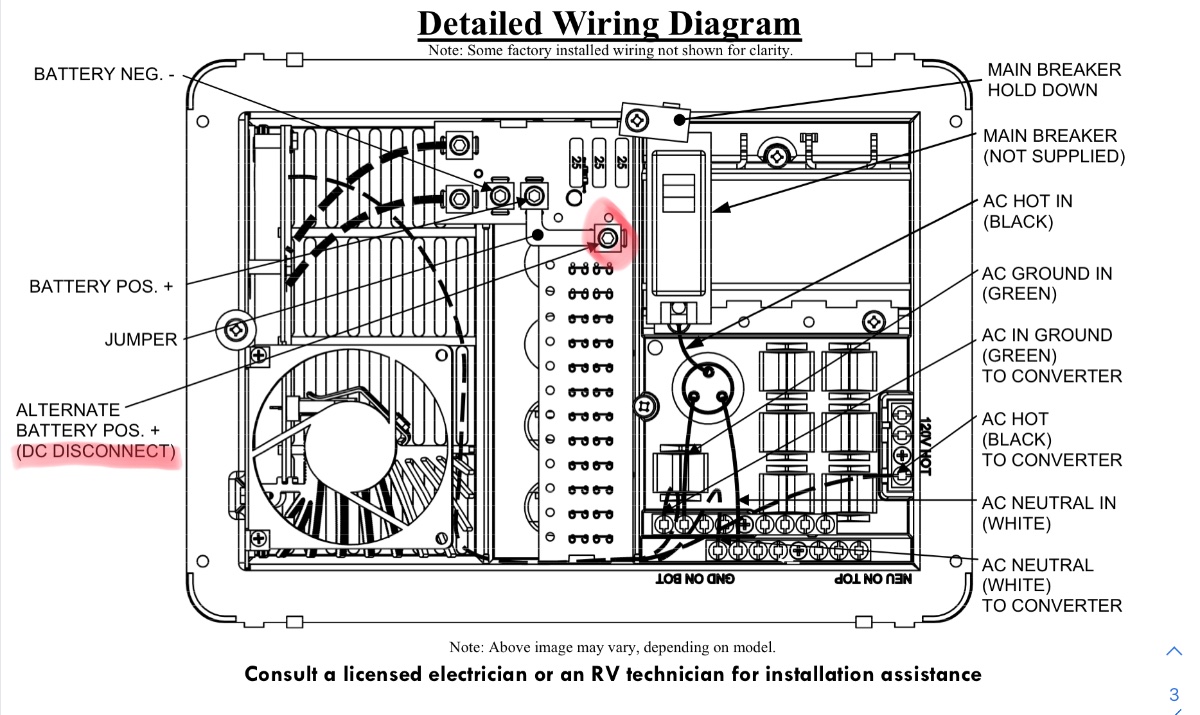
Here are the instructions from PD. It is pretty easy to follow and has nice images too. I received my replacement unit in April 2019 and it was Li capable. My new board showed LI/WIZ instead of LI/LA. NOTE: WIZ is for charge Wizard and is the same as LA for lead acid, while LI is for Lithium
I did have a tough time getting the white wire removed from the lug (step #3). Otherwise it was pretty simple.
-
4
-
1
-
-
6 hours ago, ScubaRx said:
We also removed all the wiring from the battery box and sealed off the outside vents and insulated the door
Removing the wiring from the battery box is where I stopped (paused temporarily). Inside the trailer, mine has positive and negative wires on both sides of the pantry that requires some additional planning...
Your next step might include deciding Lithium or AGM and when. Lithium batteries are more expensive, but lighter, higher current capability and last for up to 10 years. Some have internal heating which is a nice feature. If you choose Lithium, you could install 100ah to 400ah (or slightly more).
You will need to decide if you want to relocate some of those wires or not. If you have any ground wires between the battery and a smart shunt, you will not get a true reading as ScubaRX mentioned. Having a different configuration of batteries in the box could make connecting those 7 wires challenging.
You might check your Progressive Dynamics DC board to see if it supports Lithium. There is an upgrade available for about $150 if it does not have the lithium board in it now.
-
1
-
-
I typically put silver colored duct tape (or other non-conductive tape) over the positive lugs, completely covering them, when I take them off the battery and another color around the negative lugs to help insure things go back together correctly.
-
1
-
-
Capacitors can store and discharge energy very quickly, so they can make-up for very brief, high energy demands that a battery can not keep up with.
-
2
-
-
Had you considered spray or paint on truck bed liner?
Equally as important would be how to best stabilize the batteries from moving...
-
26 minutes ago, Mike and Carol said:
I can try to patch my leaking battery or just go ahead a replace all four with either replacement AGMs or bite the bullet and go lithium
If your 4x AGMs are working now, you might patch the one and use them until either they fail or you replace them. Mine gave me a bit of warning in that the tongue jack started to struggle to lift the trailer, where as before there was no hesitation.
-
Mike,
Can you describe your system?
4AGMs - Y
Solar?
Inverter?
Number of cables into battery compartment?Inside my battery compartment there are seven cables. 1 big red (main line) and 2 small red (solar pos. and 12V appliance pos.) plus 1 big black (main line) and 3 small black (solar neg., appliance neg. and ZAMP the temperature sensor). You can also just count the number of connections to your AGM batteries and subtract the battery to battery connectors rather than tracing the cables.
The inverter has a large capacitor that charges and discharges each time a battery connection is made (note: expect sparking unless you have a cut-off switch).
More details will follow based on your system components.
-
1
-
-
26 minutes ago, Overland said:
I cut off the tabs for the straps on one side so that they’d lie flat. That worked well, but when I install the new ones, I think I’ll follow Bill’s lead with the plastic liner, but with cutouts for the tabs.
Are there liners available for the Battleborn batteries?
-
33 minutes ago, mountainoliver said:
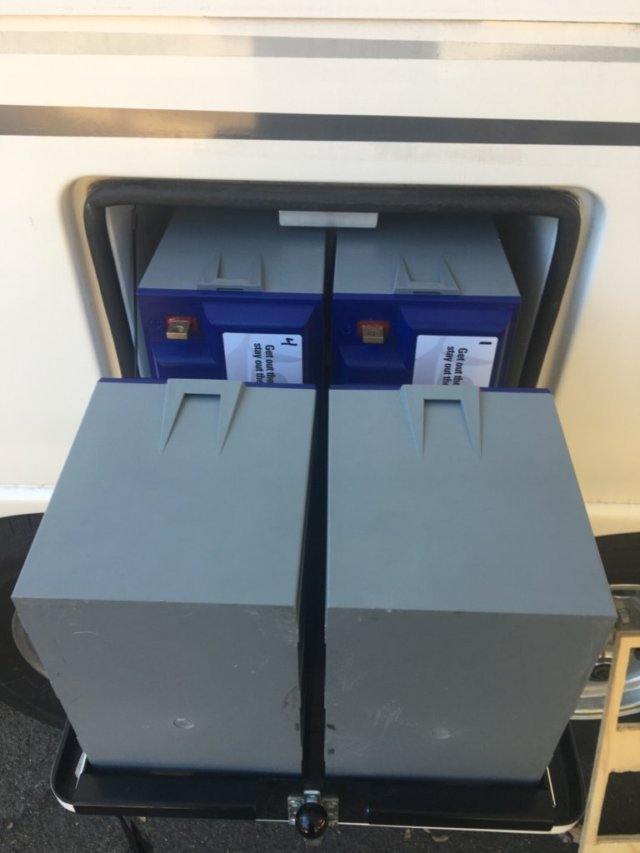
If nothing else, all of the battery photos show that in a mobile application such as in our campers there is almost constant movement between the batteries and the tray. For this reason I don’t think using solid buss bars between batteries is a good thing. I would think that there would be battery lug or internal damage caused. I bring this up because there have been posts about lithium changeover projects lately and this post highlights the need of being somewhat flexible with battery inter connections.
This is a very good point. However, I brought this up to the folks at Battleborn and they said that bus bars should be fine. I will check with them again as I already have the materials for bus bars, but I could easily be convinced to setup using cables instead.
Looking at the image that I have attached, one thing to consider is that the bus bars might make the whole 4x battery setup more stable and therefore less likely for the batteries to move independent of each other. I don't believe that the bus bar alone will be enough to prevent the damage that we are seeing in these pictures or potential lug damage.
When I did my test fit last weekend, I had noticed that the Battleborn batteries are not square (top to bottom) making them more difficult to stabilize when they are on their sides.
This is all new to me so I value your thoughts.
Mike

-
1 hour ago, Overland said:
The first pic is the bottom corner of one, where apparently some rivets in the tray dug into the case. The second is two gouges in the other battery from I don’t know what - I’m guessing a ratchet strap. And the third is the weirdest of all - it looks like the strap itself dug into the case, almost like it melted it.
Thanks for sharing these pictures. I had noticed the rivets in the latch at the bottom of the battery tray as a potential issue and cut some stand-offs to prevent this. The other two I did not anticipate. Improved strapping of the batteries to limit movement may help. How did you strap your batteries down.
-
$20 for 360 watts (after the original MMPT investment of course)
-
1
-
-
That battery is now leaking. So even if you place something to prevent further damage from the clip, the existing leak will continue to cause corrosion of the tray. Have you checked to see if the tray has started to corrode below that battery?
-
John,
Since you are installing an MMPT charge controller, you could disconnect the PVs and plug in the output from a 120V AC to 24V DC converter and have the MMPT controller properly charge your Li batteries. If you are installing dual controllers (one for roof top PVs and one for external PVs) you could easily use the external PV charge controller connector for this too. MMPT controllers can handle 100V DC (some 150V) and 120V AC to 24V DC converters for LED drivers or laptops are inexpensive with 10A, 15A or more current (240 to 360watts).
Mike
-
2
-
-
If there are a significant number of pending changes, the drawings might just be delayed until a final version of changes are accepted/documented. Or did Jason say that they will no longer provide electrical drawings for their trailers? Hopefully not the latter.
-
I do not believe that the ZAMP controller is inappropriate for LifeBlue or Battleborn batteries (as it is spec'ed). Both batteries have BMS to prevent over/under charging and excessive charge/discharge rates. Some BMS also provide cell balancing capabilities.
Advantages of the ZAMP controller is that it is relatively simple to setup and use and it is effective. Its disadvantages are that it is both less efficient and customizable than other options.
-
1
-
-
47 minutes ago, NCeagle said:
According to the LifeBlue data sheet, 13.32 Volts is the full charge resting voltage, so not the same as Battleborn, which according to the chart would only be 92% or so with 13.32 Volts
ZAMP specifies lithium charging absorption at 14.4V and a float of 13.6V.
-
1
-

Ollie 2 with a Tundra / Feedback Requested
in Towing an Oliver
Posted
Sure thing. I bought the SSR-610-47 from here.
They have 20% off until EOY and they offered free shipping and no tax when I purchased mine. These are the medium springs in black.
Mike