

2008RN
-
Posts
165 -
Joined
-
Last visited
Posts posted by 2008RN
-
-
3 hours ago, Rivernerd said:
Perhaps anyone planning to tow their Oliver Elite II to Alaska should invest in a set of ALCAN 5-leaf springs before the trip.
My thoughts exactly!
-
 2
2
-
-
3 hours ago, mossemi said:
I think the material is the same as the trim boards mentioned above which is also available is sheets
Mossey
This is what I used with the DC-DC converter setup. Expanded PVC Foam Board, White, 3/4" (0.75", 19MM) Thick, 12" W x 36" L
https://www.amazon.com/gp/product/B09K2YR21N/ref=ppx_yo_dt_b_asin_title_o02_s00?ie=UTF8&th=1
I used the 3/4" thick instead of 1/2" thick so I could have a few more threads on the screws holding things.
-
 1
1
-
3
-
-
7 hours ago, johnwen said:
I'm looking for something to glue to the inside lower shell of my trailer to mount (screw) my Victron MPPT controller to. Anyone know what Oliver uses? Many items are attached throughout the trailer using that stuff. It's about 1/2 inch thick and painted? white. Any help is much appreciated.
John
I always Assumed that Oliver used epoxy. It matches so well with the existing fiberglass epoxy that they use in the shell. They must use tons of the epoxy. When I installed my DC-DC charger setup. I used JB weld. I sand the fiberglass surface and mating Marine board with 60 grit sandpaper. I then roughly cross hatched both surfaces with either a angle grinder with .060 cutoff wheel, or used a dremel. I just wanted to make sure it was going to get the best possible adherence. Oliver's joints have been known to fail. I have had 2 joints fail of what Oliver did at the factory. I don't know if JB weld it any better than their epoxy, but the failed parts had smooth surfaces. It sure can't hurt to give the surface more to adhere to.
-
1
-
3
-
-
3 hours ago, Geronimo John said:
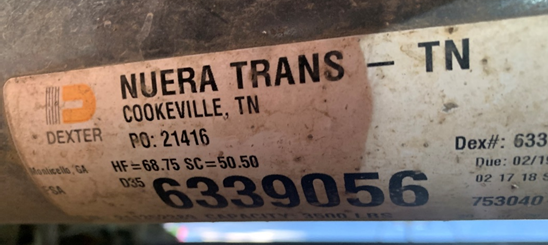
IF your Axle Decal looks like this one, You may want to read the rest of the below.

From what I can figure out, Red Neck Trailers was “Integrated” into Nuera Trans which was “Hoovered Up” into Dexter. The original Red Neck Trailers is still in business as is Nuera Trans. All flying the Dexter flag.
As clearly printed on a Dexter Label, they were made by NUERA TRANS likely in Cookeville Tn. So don’t waste your time calling Dexter for a "Build Sheet". The correct terminology is to request the Configuration Info associated with 6339056. The Dexter Customer Service could not pull up this info. So instead, call this knowledgeable contact that has been in her job with all three name changes::
Christy Gillentine | CSR
Dexter Distribution Group
christy.gillentine@dextergroup.com
direct tel:: (931) 739-4034
An alternate would be Denise Ameling via E-mail: <denise.ameling@dextergroup.com>
Please keep in mind that these contacts are ONLY for NURA TRANS labels axels. If your label is not like the one above, the regular Dexter Customer Service is by far the way to get your axle info.
The Nuera Trans Axles (I.E. Really Red Neck Trailer axles that were sold under the Nuera name) were purchased without springs. The springs were sent to them for assembly. They are the Chinese made PR4B springs. Christi stated that if the springs are flattening out, then they were undersized for the application. After they flatten out, then they generally fail as was originally reported on our thread. She stated that the PR4 springs with their thicker steel (2,400 pound rated) would be a better choice.
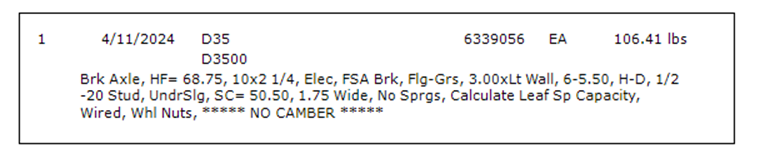
Here is the CONFIG INFO for this Config Number for my rear axle on Hull 342. If you have the same number on yours, here it is:
Note it states “No Springs, Calculate Leaf Spring Capacity”.
GJ
Wow, The plot thickens. I think we could make a Johnny Cash song out of this, trying to figure out what is on our "supposed" Dexter Axles.
-
On 4/10/2024 at 8:52 AM, DaveAndBecky_NorthernMI said:
if you need it right now, you can google "DYI neutral ground plug" or "DYI neutral bond plug" and make one today. All it takes is a screw driver, 120V 15amp plug, and 2" of wire (I used 12ga 20Amp)
-
 1
1
-
-
@John Welte, The humidity content is horrendous here in the winter we had so many days this year with greater than 90% humidity.
We have a 3 sided metal RV port with tarps for the doors, so direct rain/snow is not on the Oli. We also can keep the Oli plugged in full time. The outside of the Oli itself during the winter along with the cement floor and the inside walls of the port would get dripping wet with moisture from the humidity. The first couple of years I opened the bathroom vent, and then turn the Maxair fan on it's lowest setting and l had the blinds completely open leaving the fan run all winter. I learned from winter camping out here if we did have constant air flow the insides of the trailer would be wet.
This last year, I was so busy working on the inside of the trailer, that I left a little electric heater set to around 55 degrees in the Oli and lock the Oli up tight, with all the vents closed. This year worked much better at lowering the humidity level in the trailer, although the electric bills were higher.
-
1
-
 1
1
-
-
21 hours ago, Geronimo John said:
Step 16: "We oriented them so th grease ole on the wet-bolt faced "UP". In the forum "Remove Wet Bolt", GAP replied " After talking to Dexter, my conclusion is that the nut had been installed incorrectly. The little hole that the grease comes out is supposed to be at 3:00 or 9:00 and, turned facing say 6:00 or 12:00, will not dispense grease.
Ya that makes sense, greaseing the wet bolts has been a little bit of a pain on my Oli. I can get most to the wet bolts greased while it is setting on the ground, but a couple of them I had to jack up the trailer to remove pressure in order to get them greased.
-
2
-
-
@MAX Burner Fantastic documentation. I know I will be using it in the future. Thanks for all of the hard work.
-
3
-
-
3 hours ago, mountainoliver said:
Are you sure about the 3 3/8 diameter axle tubes? My 2017 LEII D35 tubes measure exactly 3 inches. The 10 inch brake assembly uses four mounting bolts. If the 2 3/8ths and 3 3/8ths diameter numbers are correct then that would make three different axles used. That doubly reinforces your good suggestion to measure first then order the springs and U bolts.
My 2020 LEII also measure within a couple thousands of 3", and I have the same brake assembly as @mountainoliver.
-
1
-
-
2 hours ago, SeaDawg said:
They don't have to. So, why should they?
I'd say, 2026 or better, before that happens, if ever.
Supply and demand, Honda supplies us with what they want and demand we buy it. Since they are "Honda" people will buy it, just like other big big manufactures like Apple. BTW, I own both Honda and Apple products, and sometime get frustrated with them both. But the quality is there.
-
1
-
-
1 hour ago, Ronbrink said:
To @jd1923’s point, my 2020 OLEll has the 3500 LB axles with the described square pattern 4 bolt axle connection.
D35 axle label confirmation.
I also have the D35 Label. Does that mean that I should not update to the Alcan 2,000# springs. I run between 6,300 and 6,500 on the scales. I would not mind that little extra stiffness. I replaced the original Monroe shocks this winter (3 were shot with 8,000 miles on the Oli) with Bulldog HD shocks. I haven't had a chance to take her out on the rougher windy 2 lane roads yet. Darn, I was really hoping that I was going to have the D52 axles!
-
1
-
-
I like that. After living in CO for 48 years, I have shoveled tons of snow in bright sunshine, and several times in shorts and snow boots. In Oregon we usually get only get 1-3 days of snow a year, and 240+ days of gray skies. I kind of forget what the sun looks like or where it is at. So, I don't have to worry at what angle the sun is to the trailer.
GO Buffs
-
15 hours ago, GAP said:
Guessed that warm, moist air would rise (like in the atmosphere) and that I could vent through Maxair Fan. Even mid winter, we would crack the fan cover, not turning on the fan itself unless cooking and it did wonders to cut back on condensation.
We have a pretty big problem with winter condensation with humidity often in the high 80s and 90s. We usually do not get below freezing much (except for last week). We crack the bathroom fan open, and turn on the Maxair to it's lowest setting. We also keep the heater around 68 during the day and 60 at night. We do end up wiping the inside window a couple of times a day.
-
3
-
-
15 hours ago, MAX Burner said:
Concur 100%. That's why we did it ourselves - it took less than a half-day to configure the Tundra with wires, fuse, and Anderson plug/mount from engine compartment to hitch area. Took about the same time (maybe a bit less) for the OTT side of the equation. We used clam hull penetration hardware to introduce the cables into the area below the bathroom sink, underneath and in front of the head, under the forward dinette, to the aft dinette area where we mounted the DC/DC charger.
Note: In bulk charge mode this particular charger kicks off some heat. We've been leaving the aft seat hatch off while towing to better circulate air around the cooling fins of the charger. There's a ton of YouTube videos of how some RV fabricators attach cooling fans. As described and photographed earlier, having two of these bad boys in close proximity will create some serious heat and auxiliary fans would definitely be helpful.
As of this post, currently boondocking just south of Elephant Butte Lake SP waiting for the temps to rise above freezing before heading off to "The Q" - planning for a mid-afternoon arrival in the Sonoran Desert where its been above freezing temps for a few weeks now.
FYI: OATs here last night dropped to 20F. Starting a 10pm last night with 96% SOC, ran the furnace and water heater all night and woke up at 5am to a 78% SOC. Not too bad.... I'm expecting to have 100% SOC by the time we hit Benson, AZ, with the DC/DC charger cranking +/-30A/14.4vDC into the BBs.
Cheers!
I never thought about mounting at 90 degrees. The was a great idea for mounting the charger using that little space. I also like hearing about the real world experience. I am hoping that my test for an hour in a closed compartment, will be relevant in the real world. If I do have problems with heat, I could try opening the deck plate to see if I could get little air flow in there.
-
3 hours ago, ScubaRx said:
30 feet of 2awg red + 30 feet of 2AWG black will cost nearly $250. 60 feet of each would be about $470. The wire is not cheap, but I suspect that it is the labor that is tearing you a new one. Is there any reason you wouldn't want to do it yourself. I am about to do the same thing and I was figuring well under $1000 for materials. I can't afford the labor fee I would charge. The job is not technical or particularly difficult, but it is time consuming to do it correctly and there's not a lot of folks I'd trust to do this job like I would want it done.
My project was little more expensive. with Victron dual chargers, wire, alternator, shunt and miscellaneous like Anderson connecters, buss bars, breakers, fuses, wire sheathing, battery shut off, and lugs, heat shrink, crimper... I think my total cost approximated $1900. I pulled the fuel tank to properly run the wire in the frame rail something RV solar installer probably would not have done. I Ran wire sheathing on all cable except the actual board with the chargers. Anything that had any rub potential was covered. I ran a jumper cable between the truck and Oliver so that If I didn't need to charge while traveling I just wouldn't hook it up. Also makes it clean when parking. The Official Anderson connectors are not cheap, (knock offs are available).
My cost would have been a lot less if I knew ahead of time the new Victron 50Amp charger was coming out. I could have lived with the 50Amp efficient DC-DC charger. I planned on a max of 100 amps input from the truck to run the amps, with my testing I maxed out at 88-89 Amps. With the new 50Amp charger I would bet 60Amp max input would be need, and I would wire for 70 Amps. That would have cut down on all cost of virtually every item and probably cut cost by about $500.
Just an FYI I bought 47' (x2) of wire to run from the front of my F250 extended cab with 8' bed to just aft of the of the Oli battery bank. I had about 2' extra of each red, and black wire. Also as a side note, I bought wire from battery cables usa. I got the extreme battery cable. Very fine wire like welding cable. double sheathing (hard intercore and flexible outercore. Also the inside Copper wire OD was larger than spec. I like the extra safety margin with slightly lower Ohms and more carrying capacity. I only thing is that on 1/0 to 4/0 wires it was almost a press fit( it takes force to put the wire in the lug. I just couldn't strip the sheathing back and put the lug on. I had to use a 2 step process.
-
2
-
-
3 hours ago, mossemi said:
I just saw this YouTube video about the new Victron 50A DC-DC charger by Nate and Steph of EXPLORIST life - DIY Campers. It might be worth the wait!
Mossey
Very Cool, Unfortunately I'm a day late and a dollar short. I had everything built a week ago besides the chargers added. I purchased the chargers last Friday, installed them Saturday and tested today. It would have simplified my whole design. Smaller wires, no fans, and simplified and smaller foot print.
Here is what my install looked like. I epoxied a 1/2" marine white board to the wheel well. Attached everything to a piece of 3/4" marine board and then attached the 3/4" board to the 1/2" board. Space was definitely at a premium. My test showed each charger at 38Amps before warm up. After one hour one charger was 34Amps at 96degrees F, and the orther 32.5 amps @ 100degrees F. Victron rates the 12-12/30 at 104 degrees F. Anything over 104F the Amps decrease below 30 F. I have heard as low as 25 degrees F
each pair of fans positive lines are connected to the Optifuse breaker. So I can turn off either of the chargers and associated fans from the other charger.
This is the 1/2 base.
-
2
-
-
11 hours ago, Ronbrink said:
Good call! I bought 50’ R/50’ B 4AWG for my initial single unit DC-DC 20A, subsequent 40A upgrade, install(s). The length was sufficient for my particular TV and unit install under the rear dinette hatch. Definitely 2AWG with two units.
On my Oli I used the top of the wheel well under the street side bed. It was a nice large platform, I had to move the cable for the back dump valve a little. Main I un-taped the cable and pulled it out from the wall. it was a win-win the cable now has a larger arc and pulls/pushes much easier.
6 hours ago, jd1923 said:Nothing crazy here at all. For my part, I was only questioning two 30A chargers, but you've done your research and know what you want. Please post an upgrade thread along your way so we can learn from it.
First time (on this forum) I've read re an alternator upgrade to match, and I commend you for doing this! Even the mighty F250 Super Duty diesel needs an alternator upgrade for two chargers (if not one).
We're only part of this Oliver family for finding an older hull for sale used, in fair condition at a good price. And so far, I've added $5,000 in parts in 7 months, plus 100-200 hours in "sweat equity!"
I was disappointed in the mighty F250 alternator. It is suppose to be a 110A alternator. Max amps I could every reach was 75Amps. That was on a cold morning after the glow plugs had been on for 2 minutes (210 Amp) draw, and a 10 seconds on the starter at 850Amps. I only tested the new alternator once, but on a cold startup it jumped up to around 130 Amps, then dropped down to about 85 Amps for a while then started to slowly drop down.
I found my Oli used, it was 9 months old. The nice thing, was If I was going to order it from the factory, it had almost everything I needed.
13 hours ago, katanapilot said:Not sure about the experience of others with the Brightway (Chinese made) batteries, but if yours are more than a couple years old and you depend on them for boondocking - you might want to think hard about replacing them sooner rather than later. Ours failed in about three years with very little use, as we mostly camp with FHU. I had difficulty removing the batteries recently, as they had swollen up and wedged themselves into the battery box. These batteries were not high quality - a concern I expressed to Anita when Oliver made the change from Trojan (in 2020 as I recall). This was an expensive upgrade, clearly not worth the cost.
We just bought three BattleBorn lithiums and will install them soon. Yes, I know we need to change the converter configuration for the lithium batteries.
Thanks for the heads up, Ours are just over 3 years old. knock on wood, they seem to all be working fine right now and do not seem to have any swelling yet. I have looked at some batteries, but haven't made my mind up yet, I had figured that I still had time. The Lithionics batteries seem really nice, the Cadillac of batteries. Boy are they expensive, As of about 6 months ago, I was reading about failures with battle born.
-
2
-
-
I boon dock, a lot more than I stay in a park with utilities . So being able to charge the batteries when traveling is nice luxury. Once I retire we plan being out for at least a couple of months once or twice a year. It is great staying a 2-3 days in once spot and then move down the road and being able to make a big dent in getting the batteries charged.
I have been planning/researching this upgrade for over a year, and have spent 4 months methodically upgrading the truck and camper. I upgraded my alternator on my F250 Super duty diesel to handle the load. I have updated wiring in the truck; The alternator to one battery with 4/0 wire. The positive wire between batteries was upgraded to 2/0. I also upgrade grounds from battery to engine, frame and body to 2/0 wire. I ran 2/0 wiring to the Oli.
In the Oli, I put in both Positive and negative buss bars and ran 4/0 wires from the batteries to the buss bars cleaning up the battery compartment and getting all connection in the bay. Long term I would like to move to lithium batteries.
It sounds like a few of you think I'm crazy doing this. I could never afford to pay someone to do this type of endeavor. Fortunately some people have done this and were successful. I also have to thank Victron technical support for helping pave the way.
@jd1923: I will try to get a hold of the manufacture for the specs on charging.
-
I am setting up two Victron 12/12-30AMP DC-DC chargers in parallel. I have a 2020 Oli with Zamp solar charger and Brightway AGM 6volt batteries in parallel series from the factory. I have look for specs on the Zamp charger, and the AGM for trying to setting up the the Victrons with the proper charging characteristics.
From Docs on the Zamp I know the following: Absorption: 14.4V for 4 hours. Nothing appears to be to be configurable.
The Victron sets the folowing for AGM batteries. Absorption 14.7V for 6 hours limit. float voltage 13.8. All values appear to be configurable.
I have not been able to find any charging specs on the AGM brightway batteries.
Any input on setting up the charging characteristics on the Victron?
Maybe, I'am over thinking this, but I just want it setup as correctly as possible.
-
We will be staying home also. We have a 20 lbs bird. I will start at 1130PM Wednesday and doing a Citrus Smoked turkey. Happy Thanksgiving and May both your joy and stomach be full!
-
6
-
-
On 11/15/2023 at 4:49 AM, Ronbrink said:
A RotoZip spiral saw, or like product, will make circle and straight cuts much easier, faster and precise.
I was looking on line at the Rotozip spiral saw online. The internet came up with several cut-out tools and Dremel type tools. Are they all the same, or does one have better features that make it more suited to our application?
-
5 hours ago, rich.dev said:
@2008RN I really like this idea, how did you cut the holes for these deck plates?
1. Taped off the whole area with painter's tape.
2. Drew circles with a compass. be very careful where you place the holes so you don't damage any thing behind it.
3. Drilled 4 2" holes at all of the cardinal points along the edge of the diameter.
4. Used a jig saw with a metal cutting blade to cut the diameter of the deck plate holes doing 1/4 circle at a time. Note, I cut the 2 deck plate holes and the Access door to the storage bay. I fried one whole blade, and dulled another.
I wore an N95 mask and googles, and used shop vac to help suck up the fiber glass while cutting.
-
1
-
2
-
-
rich.dev thank you so much for the diagram. Better than the one that is on basement cover.
jd1923, here is a picture of the deck plates on the Curb side. The forward deck plate is a 6" and the aft deck plate is a 8" which replaced a 4" deck plate that I had a hard time getting my arm any farther than my elbow. I bought the deck plates from West Marine. I like the lift handle. You lift the handle and twist the 90 degrees, and the deck plate comes right off. The deck plate are not water proof, but it really doesn't matter inside the the cabin. The only thing I didn't like was the color was off white. They said it was "white", but as you see they are not pure white.
I can reach all 4 configuration valves from the forward deck plate. From the aft deck plate I can reach the hot water shutoff, the fresh water drain, and 2 of the configuration valves. Note that you have to change all of the valves by feel, but I have no problems reaching, finding and turning the valves.
-
3
-
4
-
-
There is a valve configuration sheet attached to the underside of the curb side access panel. I would like to get an electronic copy of this. I added two deck plates to the side of the bed so I can reach all of the valves under the bed without lifting the mattress.
anybody have or know where an electronic copy is?


Made in USA leaf springs
in Mechanical & Technical Tips
Posted
Or possible mis-rated and/or poor quality 3.5K# Dexters spring packs.