

2008RN
-
Posts
165 -
Joined
-
Last visited
Posts posted by 2008RN
-
-
1 hour ago, Kirk Peterson said:
We are getting the composting toilet. For people with a composting toilet, I have read it’s important to keep the water out of the #2 bin and the shower might cause problems if there isn’t a curtain. Is there some truth to this?
We have a composting toilet, and no you don’t really want to get extra water in there especially if there is chlorine in the water. I am a little paranoid about getting water in the fan/ electrical connections also. so we just cover the toilet with a trash bag and then reuse trash bag when it is dry.-
 3
3
-
-
Honda just released a new 3200watt (26.6 ) amp generator. It is in the same format of the EU 2200i. It will fit under a tonneau cover an should also fit in the front basket. I haven’t measure the basket yet thought. 60 pounds, fuel injection, and all of the same features of the EU2200. It is a little expensive at list price $2999, the 2200 main and companion together are about $500 cheaper than the 3200. If I hadn’t just bought the EU2200i main and companion I would really consider this because of the space savings and one less generator to maintain. The 2 Eu2200i are 4400 watts or 36.6 amps vs 26.6 amps of the 3200
-
6
-
-
Hi John,
I don't have the standard mattress, I have the older KTT mattress. It is the most comfortable mattress I have slept on. We have a firm mattress at home and I put a 1" foam egg crate foam under the mattress cover. I love going camping because of the comfort. If you decide to go with the standard mattress and do the wool topper and don't like it, there are a couple of custom mattress shops in Portland that could make something for you. And yes the only complaint about the latex is the it is really heavy. it is like moving a 60 pound wet noodle that is 6ft long.
Do make sure you get the hypervent under the mattresses. In my opinion it is a must in the in the Northwest. I you are a summer camper only it's not really needed. If you go camping in the winter you will need it. We go camping as long as we can safely get to the beach in the winter weather and it is really easy to get the moisture on the walls. We have vents open and pushing a small amount of air through the Oli all winter long to keep the moisture in control. Thought about doing a Dehumidifier next winter.
Thanks,
Bob Sweethome, OR
-
 1
1
-
2
-
-
I would be thrilled for a 4 in front. Kinda sucks being here on the Left coast
-
1
-
 3
3
-
-
1 hour ago, Cameron said:
So, when it's time to fill up you give this program's card as well as your credit card to the cashier, then fill up and get the discount? How much is the discount? Thx
The card is tied to-your bank account and comes out like a debit card. The great thing is that you don’t have to go inside. savings varies depending on trickstop. Please go to the web site, they answer a bunch of questions there.
-
1
-
1
-
-
Getting ready to make a trip to Colorado. Just filled up in Lebanon, Oregon. 57 gallons of diesel @ $5.499/gallon = $313. Ouch. I have auxiliary tank in addition of our main tank.
-
 5
5
-
-
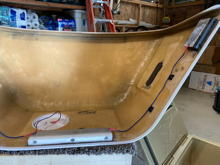
I bought my Oli used at 10 months old (2020 hull# 648). When I got my Oli one of the small Aluminum support bars was missing in the dog house lid. One my first voyage, We lost the other one within the first 40 miles. I noticed I had a bad habit of lying down the access port cover, so I fixed up a 18g wire and hooked to the large support bar and to the back of the access port cover. Just one year as the owner on one of our 5 day outings, I got to the camp site and went to open the access port to turn on the propane; The large bar had fallen off, and was hanging by the wire.
I was going to call Oliver to order 2 more small bars, but since I am out in the cold when it comes to Olivers Warranty I decided to make Aluminum Support bars. I had left over 1”x2” Aluminum rectangle left over from mud flap installation (Original rectangle material was 1”x1.5”), and I had a few small pieces of Black 5/8” thick Ultra High Molecular Weight Polyethylene (UHMW) lying around.
The large bar that I still had only a few very small areas that had the resin attach to it (marked in Red), and the area where the bars came off where real smooth. The surface of the aluminum had a fair amount of oxidation.

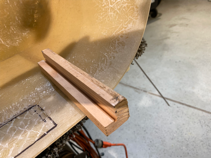
I cut a couple pieces of aluminum with a Angle grinder cut-off wheel, and the UHMW was cut to size on a table saw. I counter sinked the UHMW with a 3/8 spade drill and drilled out for a 10-24 SS screw. I also tapped the aluminum with a 10-24 tap for attaching the UHMW. I got a little carried away when I attached the UHMW to the aluminum, I used blue lock tight and lock wash and nut on the back side.
I was paranoid of the aluminum support bars falling off again, so I go a little carried away with the mating surfaces to be attached. I used a 1/16 angle grinder cut-off wheel and cross hatched the aluminum, I then drilled and tapped 1/4-20 threads into the aluminum. The 1/4-20 holes are NOT for bolts but something extra for what ever I used to adhere to the Aluminum. I also sanded the aluminum by hand with 40 grit sandpaper for metal.
For the Fiberglass I sanded down the original area with the 60grit sanding pad on a angle grinder. I left one small portion of an edge for locating the bars side to side. I used a Dremel tool with a carbide bit to cross hatch the fiberglass. Finally I did a final hand sanding with 40grit sandpaper.
I made a tool for locating the aluminum support bars from the edge of the of the fiberglass. I took measurement from the impressions in the fiberglass from the resin, and the one Aluminum bar that I had. I calculated the offset of the bar .640” from the edge. This measurement was including the white trim piece. I didn’t realize that the trim would just come right off. If I had to do it over again, I think I would done the measurement without the trim piece. Note the picture shows me holding it without the trim on the shell, but I did not use it that way.
Note the wires in the second picture. Before I mounted the bars I made a couple of security straps. I figured that by some chance one of the bars would come off I Attached 16g wire with heavy duty eyelets to each bar. That way I will not loose any more support bar if they cam unglued.
The next question was how to adhere the support bars to the fiberglass. I felt that my 2 low tech options were JB weld or Gorilla glue. I research both, and both seemed to be a reasonable option for adhering aluminum to fiberglass. I have used Gorilla glue a few times and never had any problems with it besides the bottle has a short life span in Oregons high humidity after it is opened. The JB Weld had a fractionally higher shear factor than the Gorilla glue did, and I have use JB weld in so many applications and it has never failed. I flipped a coin and JB Weld won, although it might have been a 2 headed coin. I ended up using 1 package of the Professional size JB Weld, and one of the regular size. to do the job. I used a Bondo plastic putty tool to spread the JB weld. I put a small amount on the fiberglass just enough to fill the cross hatching squeegeed across the fiberglass. Then I put a large amount on the Aluminum cross hatching. Put the Aluminum bar in placed and then clamped. Note the trim piece in place.
Below is of one of the bar ends. The puddle of JB Weld on the inside of the bar is what pushed up through the 1/4-20 holes.
Here are the tools I used for the JB weld. The 3M adhesive remover worked great for cleaning up the JB Weld (sometimes I can make a mess).
The final Product. I secured the wires with GB 1” square adhesive back wire tie downs to keep the wires out of the way.

-
1
-
9
-
-
I was very impressed with Natures Head (NH) service. When I did my NH install I decided I wanted another hose flange to route a hose on the inside of the sink cabinet. I called them up and they shipped the flange the same day, and I had it 2 days later. The original NH was back ordered 3 months, so that took a long time to get, but getting spare parts are quick. Since my NH has only been in service for 9 month, I will probably wait another year before ordering a spare fan.
-
5
-
-
Once you get the metal, I have found that using a palm jitterbug sander works great for putting the same type finish they use at the factory. I use 100 grit sand paper for wood.
-
2
-
-
Mark and Beth,
That has to be tough with a new Oliver. I like Johns idea with a larger thicker aluminum plate and backfilling.
Were the winds in Boulder? Now they get some really strong winds there. I lived in Colorado most of my life. Born in Longmont, In Boy Scouts I ushered at Folsum Stadium, and worked at IBM on the Diagonal. My son still lives and works in Boulder.
Good luck on that repair.
Bob and Dawn
-
1
-
-
When I can get 600 miles a day, without charging, I will think about it.
Right now I get 1200 miles between refills. As long as they keep the 18 wheels let’s going, I hope I will be fine.-
1
-
-
7 hours ago, John E Davies said:
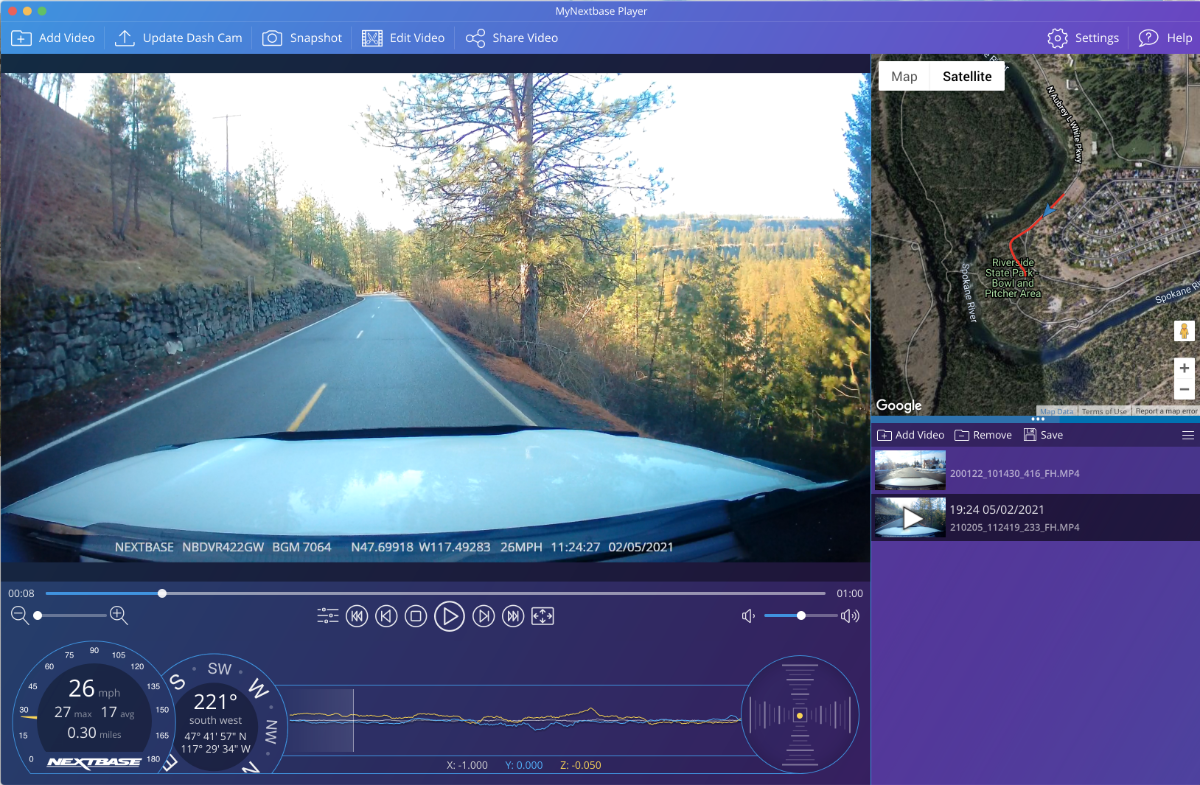
You need to read some dash cam comparison reviews, and decide how much you want to spend and what features you would like. Where and how you park your car is important too! This would be a good choice, I have had one on my TV for three years and just bought a hard wire kit for my wife's new Acura RDX, so I can swap it easily to her car. I will probably buy another cam for that car when they are on sale.
https://www.amazon.com/Nextbase-522GW-Dash-Cam-Kit/dp/B07PV2RX57?th=1
You need enough image quality to read license plates at NIGHT, and a polarizing filter to cut glare in sunlight. Everything else, like rear view cams, are optional features. I really like how this cam captures all the speed, location and G force info, and can overlay it onto a Google map. This is a screen cap of a video using their desktop application.
I have to admit that I feel naked and unprotected driving without one. 😉
John Davies
Spokane WA
John, I need to be able to connect to an iPhone or my MacBook to down load files.
Can you take the SD drive out of these and play the files on a computer or do you need a special app to play them? I have figured out that the phones need a special app to view/ down load. I just do not know how well they work with the iPhone.
The thought about using a 256gb card for storage. So there would be less chance of over writing a file I wanted before I could get it downloaded. I’m assuming I could get 25 to 30 hours of time on a 256gb card with HD.
thanks everyone for the info, keep it coming. I’m sure I’m not the only one that is taking it seriously after the wreck.
Bob and Dawn
-
1
-
-
After Questionmark (Mark and Cyndi’s terrible incident I have been seriously thinking about dash cams. It looked like their dash cam had good resolution. Does any one have preferences on what would be a good dash cam?
-
I am so thank full that you were not hurt. That is truly a blessing from God. I know of a couple that was not so luck on the Colorado mountain roads. It is very sad to see that happen to an Oliver. I know that for most of us we are smitten over our Olivers. I know that there will be an Oliver II out there for you in your future.
-
3
-
-
I just cringe, and hold onto my wallet, and please sir beat me some more. Still doing a 2500 mile trip in June
-
2
-
-
I have never owned a bearing arbor/bearing driver set. I have always used a brass punch to remove and set the cones. and a piece of wood for the Seal. Does any one know of a decent quality driver set?
Thanks
-
2 hours ago, Boudicca908 said:
USB over the kitchen but no USB in the dinette area? I would have expected USB at the dinette for phone/tablet charging.
I agree, I would love both 120v, and USB over the dinette. When I plug in the laptop at the Curbside bed, or at the bottom side of the dinette. It would be much nicer to have those over the dinette.
-
1
-
-
19 hours ago, ScubaRx said:
With the exceptions of A/C and microwave, everything in your camper runs on 12 volts DC. Lights, water pump, fans (including the one in the furnace) radio, television, and controls for the fridge.
You are correct 12volt is used by everything. I am fairly new to the Oli and have only been out on a few 4 day boondocking trips. AGM Battery management has been a big deal especially in cooler weather. I do not have a generator at this time, so I am totally dependent on the Solar. Running the fridge off of 12volts really isn't practical with everything else on 12volts. Man, if I had the 630ah solar package and could actually get them recharged daily with cloudy skies, and trees overhead that would be great. Unfortunately I don't have the $$$$ to upgrade to something like 630ah art this time.
-
1
-
-
On 2/23/2022 at 10:52 AM, Jim_Oker said:
Yes, up here in the PNW we are often camped under tree cover and/or heavy cloud cover and in a decent chunk of the year the sun is also quite low when it is actually visible. We also like to stay put for many days on end for some of our trips - having a compressor fridge would almost certainly mean having to run a generator somewhat regularly for such trips here. I can see that for many folks having a compressor fridge would work just fine but I've been glad not to have that additional draw on our batteries!! Even phantom loads, some lights, and a modest bit of furnace use in the morning and evening will add up over a week+ of camping in the rainforest!!
I totally agree, living in the PNW. Between 8 months of gray skies and our beautiful luscious trees, direct sunlight is a summertime luxury. We rarely ever use 12volts, and only 120v when plugged in. It is pretty cool though camping under the trees canopy.
-
3
-
-
17 hours ago, John Welte said:
I may go with the Lagun table side mount that someone here makes, but it seems most people don't use the table much. Foy makes a nice wooden table top so I may do that in the future.
Ours came with the Laguna table option. We only used it part of the time. Mostly I got tired of setting up the table, and then taking it down multiple times a day (every time I need into get into the nightstand drawer, and every night to go to sleep). I changed the table to side mount style. Now I just rotate the table to the side to get into the drawer, or rotate it over the night stand for sleep. The table never comes down, just raising and lowering the table to where I need it. So we use the table all the time. I may go with a custom table top that will give us a little extra table space.
Now that the table is no longer in the way, I want to add the door added to access the rear bay. I want it use it for a clothes hamper. I use the larger section of the bay for water filter and water hoses. I do not like reaching all the way back into the bay. Pulling out a cloths basket/milk crate should be easier.
-
3
-
-
We also use the compact camping percolator on the gas stove. I am still trying to get the timing down for good consistency. Haven't spent enough time on the road yet. We also pre-grind the coffee before we leave home. We have several different flavors at home to select from. I do notice a difference between my grind technique and my wife and the outcome of the coffee. About 17 years ago I decided that when the cheap $40 grinder dies I would buy a nice gear grinder. Still waiting for the grinder to die. I want to get the full life out of this grinder.
-
2
-
 1
1
-
-
It wasn't me. I was on the Corvallis to Lebanon overpass at 1430 (2:30PM) which is close to the 30 miles north of Eugene on Monday. We just came back from 4 nights on the coast. Great weather.
We are in Sweet Home. Where do you live Fargoman?
Someday we should make our own West Coast/ Northwest Rally with all of the Oliver owner out here on the other side of the world.
-
4
-
-
When I got my Oli, I bought a very low millage 99 F250 SD. Tires had great tread, but were 2010. The full size spare was 1998 that had never touch the ground. Needless to say I spend $1400 for 5 tires on a Thanksgiving deal. I got the tires that I wanted, with the tread pattern and hardness that I wanted.
Same thing with my wife car. Got a very low milage Camry. Drove one year on the previous tires and then replaced with tires that I wanted. We have tons of rain and some snow.
To me all tires are NOT equal. I like to spend time finding the right tire for my driving.
My daily driver 08 Corolla has 290K miles. the current tires will last until 330K. I retire in 2.9years. That puts me out at 340K on the car. My last set of tires will most likely NOT be top of the line tires. Even though the car runs great and uses less than 4oz oil in 4000 miles, I will probably get rid of it.
-
4
-
-
Thanks everyone for the input, Mossemi I'm glad you had been adventurous and found i way to get the wire fished through there. I have a open switch hole in my panel for backup camera. I was going to use that switch for turning both the rear view and side camera at the same time. Though I really don't think I need the Curb side camera while driving while driving. Mossemi, If I get real daring and these cameras work, I Will contact you about accessing the street side.
-
2
-


Haloview Rear view camera install and review
in Mechanical & Technical Tips
Posted
Haloview Rear view camera review.
The following is the installation and review of Haloview camera. About 12 months ago I put feelers out there about rearview cameras other than Furrion. I had read about to many people unhappy with the performance of the Furrion. I had read John Davis’s installation of the Garmin with a remote transmitter and I like the idea. I took a lot of Ideas from John’s writeup and implemented them to fit my wants. Thanks John for your writeup.
I purchased the following directly from Haloview. Note: Haloview does not have any support in the USA. Haloview’s support and products come direct from China. All support is submitting request via the internet.
RD7 monitor and camera with 33ft of cable.
The 33ft cable was overkill. I was uncertain if the Haloview would connect as reliably from the Front bathroom cabinet area like John did (plan A), or if I would have to route it to the front Propane doghouse area (plan B). The Haloview was intended to be installed across the top of the camper with the camera mount on the back and the transmitter to be on the front outside of the camper. I really didn’t want wiring running across the top of the camper.
License plate Camera. CA109
This was for the front license plate. It was not intended replacement for a Dash cam, but to aid in hooking up the trailer to the front end so that I could park the Oli reliably in the 3 sided RV port.
Memory
You have to purchase a memory card in order to record audio/video. I decided to max it out at 128GB, So I could keep more data.
Rearview mirror Monitor adapter:
This adapter plate allows you to mount the monitor over the front of the mirror. I like this because it attaches/de attaches easily. and does not sit on the dash.
DC 5.5mm x 2.5mm Male Plug
The Haloview comes with a long cigarette lighter power cord. I really don’t like a bunch of cords dangling around the cab. I had looked at several different cables on Amazon, I had found another cable that was 9ft long, but messed up and ordered this instead. I will just add the extra wire I need to make the run to hardware it to my truck.
Mounting the Camera
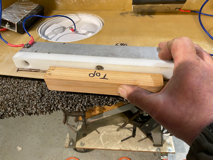
I mounted the rear camera above the Oliver sign on the top of the roof. I like the U channel idea that John Davis installed. The depth of the camera was about 2.3inches. I found a piece of scrap aluminum 3” angle. I cut two 7” lengths and made my own U-channel.
Angle Aluminum is attached with 1/4-20 stainless steel bolts
The camera cable connector is 5/8” diameter and the cable itself is about .220”. I found a shifter bushing at Orielly’s that worked as a grommet. I cut a slot in the bushing so I could get the bushing on the cable. I also had to trim the leading edge of the bushing so I could get it started, It was a tight fit. I also made a 7/8 slot in the aluminum where the bushing resides, instead of just drill a hole in the alumimun. This will hopefully allow keep water from building up around the bushing. Sorry I didn’t take pictures of aluminum before assembly,
Above: Male end of the connector with rubber boot
The Wiring
The wiring came into the upper rear cabinet inside the Oli. When pulled the street side panel off from the inside of the cabinet, I was lucky enough to find a 2 wire bundle with one wire marked “cam”, and the other wire was a ground. The DC power cable that came with the Haloview had 22 gauge wires, and the Oli has 14 gauge wires. So the soldered a small length of 18 gauge DC wire to the 22 gauge and reinforce the smaller wires and connections with a couple layers of heat shrink to reinforce the 22 gauge wires from breaking as easily. I then made a mechanical connection with the 18 gauge wires to the Oli’s 14 gauge.
I purchased a LED switch from Oliver and added it to the Master switch panel. I love it that Oliver already had a slot for the camera. It made it easy to add power and ground to the switch and connect the “cam” wire on the panel side.
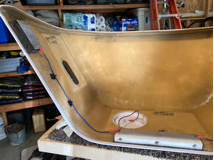
Above: Wires inside the upper cabinet just behind the Oliver sign. Below: Haloview wiring setup.
The 33 ft Cable going to the transmitter was the only big cable run the I had to do. I want to step back a week in time just after I received the Haloview products. I wanted to test the equipment and where I was actually going to place the transmitter. I kludged together some stuff to place the camera just inside the back window. Then connected all of the haloview cables together and powered them up with a battery jumper box. I place the transmitter inside the bathroom cabinet and taped to the front bulkhead. I used painters tape to secure everything in place for a drive. I mounted the monitor in the truck and went for a 40 mile drive on 2 lane roads and a good freeway stretch. I found the the Haloview transmitter communicated well with the monitor in the truck. I will cover my results later in my review.
The 33ft cable run
The 33 ft cable was ran through the street side cabinets. I ran into one snag, I was unable to get a fishtape through the pantry cabinet area. I tried for about 45 minutes and then gave up. OK, time to start plan “B”. I know that getting a wire through the bottom street side waste plumbing areas was doable. So I made sure I could get a fishtape from the bottom storage area to the top rear cabinet, this was no problem at all. The only part of plan “B” that I really didn’t like was getting the bathroom sink cover off, and drilling a hole through the front hull into the doghouse area, and plugging it; yet another point of possible leaks, plus it wouldn’t get finished this week. Then the thought came to mind, if I am willing to cut another hole through the hull, why not just cut 2 holes in the pantry and go back to plan “A”. Time to get the executive committee (Dawn and I ) and make a decision. The committee weighed the facts and unanimously decided on plan “A”. FYI: if you run the wire as I did, Plan “A” Haloview has a 26ft length of wire at will work better, If you do plan “B” and run it below to the Propane doghouse the 33ft length of wire will probably be needed. The Connectors on the rear camera cables are large. They are running power,ground, audio, and video through it. Kind of clunky, but I really do not know any better way.
I cut two 3/4” holes in each side of the pantry cabinet. I went a little oversize since 5/8” hole is a very snug fit with the cable connectors and boot.
upper pantry shelf
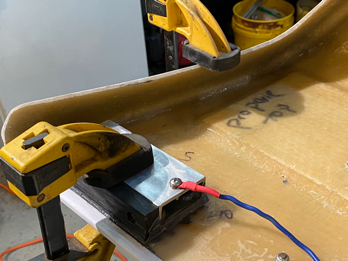
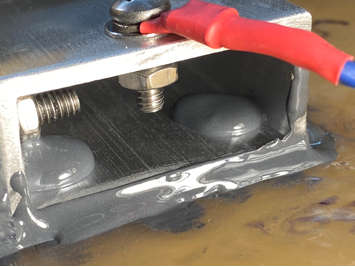
It worked great, running the wire and mounting the transmitter only took another hour. I first tested the setup before attaching the transmitter to the bulk head; every worked great. The transmitter was then attached to the front bulkhead with 3mm double faced tape. I had to use 2 pieces thick to get it to stick because of the slight curve in the hull.
The transmitter fit neatly in the wire trough and takes up very little space. The area around the transmitter only stores wash cloths and hand towels.
Review and Lag Time Results:
Rearview Camera:
The monitor is 720p resolution, and the camera has a 130º view. Furrion is a 480P with 120º. Because of the viewing angle, things appear farther away than they are. The image appears to be clear with good color. A small vehicle can be seen at about 150yards. Semi trucks at about 300yards. This is enough to keep track of vehicles approaching from the rear. According to Haloview viewing distance is only 32ft at night. This does not seem to be very far. I have not had a chance to test it at night. Hopefully this would be enough to see what is close when backing into a site in the late evening. As far as being out on the freeway hopefully you will be able to see car lights further back than 32 feet. I try not to do much traveling in the dark with the camper attached.
Lag time:
Lag time has always been a problem on wireless cameras. I tested the lag time by measuring road imperfections. When the road imperfection was at the front tires of the truck I would start a timer, and would stop the timer when I would see it in the camera in the rear. Rearview lag at 65mph was about 0.7 seconds lag from the front tires of truck until seen in the back of the truck. This distance is approximately 55ft total distance from the front of the truck to when seen in the back camera. At 65mph is equates to 95.3ft/sec. At 0.7 sec @ 65mph this is 66.7ft, So 66.7ft minus 55ft is approximately 12 feet delay. 12ft divided by 95.3ft per second is about 0.126 second delay.
I watch vehicles pulling out in the lane behind me using the rear view camera. When I would see them start to cross the dotted line I would look in the side mirror. During that time the car would be about 2 ft over the line. I also did the reverse watch cars pulling in behind me from the inside lane watching through the side mirror. As the car cross the dotted line, I would look at the rear view monitor and the car would be about 2 ft over the line. I think the 2 ft differences is the amount of time it takes me to turn my head and refocus. So I think that the small delay is imperceptible.
Monitor:
What I did notice is that the monitor does not have a fluid smooth motion. It was more like an old black and white silent movie that that flickered in movements jumped just slightly with the refresh of the screen. At highway speeds this really wasn’t a big deal, because you were just glancing in the rear view monitor then back to the road and then scanning the side mirrors. To many things to watch for at highway speeds than just staring at the monitor. In town when going 25mph you might have a full second or two you could concentrate and see the jumpiness in the refresh of the image. This really does not both me.
The last time I had experience with a backup monitor was when I Installed a Black & white hardwired 9” tube type monitor in a 35” gray hound bus. So my experience is limited.
Audio:
The cameras have audio. I have not really tested it. I had it on for a while when I was driving. It just made road noise. Road noise is not enjoyable to listen to. When I had a chance, I pulled over and muted the sound. Depending on how well it works, it might be nice when I am backing up that I can hear my wife. The negative is that you have to go into the menu to change the sound setting. Would be nice if the monitor had buttons that would changing the volume.
Backup lines:
I was disappointed in the lack of adjustability in the lines. You can in and out and front to back in large steps. Not really super functional. I have 2 different Pioneer stereos with backup lines that each of the 4 points of the lines can be adjusted in both axes.
Setup:
The program works, but is clunky. Sort of old school technology. This unit can handle up to 4 cameras. There is a lot of ways to set the cameras up for viewing.
No wifi/bluetooth to connect to phone
There is no way to transfer data from the monitor to a computer or phone besides taking the memory card, microSD, out and putting it into my MacBook. I then have to convert the AVI file to MP4, so it can be read on any (i)phone/computer. ie: Apple does’t do AVI since it was an early 1990s Microsoft technology and uses a lot of space.
Cables:
Power to monitor takes extra connections. 3 cables totally 9 feet to get to a cigarette lighter adapter. Really! No mater what I do I will still have 5 feet of cable hidden behind the monitor.
Front License Plate Camera.
The front license plate Camera is only to aid in attaching the trailer tongue to the front ball. Due to the Angle of the camera to ball, the camera only works for this purpose. This use is also limited. I can only see the tongue when I am within about 8 feet away. This after practicing one time, I was able to properly get the ball properly positioned under the tongue 3 more times in a row on the first shot. The camera is only turned on when it is needed for hooking up to the trailer. If I pointed the camera up, I would not be able to use it as an aid in hooking up the trailer. Also this technology is not quite suited as a fully functioning Dash Cam.
There is a video delay on front licenses plate camera. The delay was variable from imperceptible to 1.2 seconds. I test it by driving forward in the driveway and then slamming on the brakes and measure the time delay. Fortunately as I got close to the ball the delay seemed to be imperceptible most likely because I was creeping forward, slower than a idle. The camera is mounted on the front of a custom 1/4in thick bumper. The metal may have caused the problems with the reception.
Overview:
Positives:
Haloview had already paired the cameras. I just powered everything up and they worked.
Quality appears to be pretty good.
Everything was packaged nicely and it took 10 days to get here from China. (not bad from China)
I like the rearview mirror mounting adapter. When in use it attaches to my rear view mirror. I do not the rear view mirror when towing, I get tired of just seeing the emblem on the front of the Oli,
This unit can handle up to 4 cameras. There is a lot of ways to set the cameras up for viewing.
Price was reasonable. I spent over $700 for my 1998 wired rear view camera setup. Technology has came a long way since then. Furrion is $200 more for a similar camera.
Records video and audio. Many other setups do not.
Negatives:
Getting the data off of the Monitor. There is no bluetooth/wifi connection. Kind of a PITA.
Since this a totally based Chinese company, I do not know how good there service will be. The Haloview products took about 10 days to arrive from China. Amazon does sell Haloview. I do not know if the support will be any better/different. I did use the online web tool to ask information. In both cases I had a reply in less than 24hours. Finding the communication tool is difficult to find on their website. No phone # to call.
Viewing angle of front bumper camera is poor. This could be as much my problem with the angle of setup.
Lag time on front bumper is as much as 1.2 seconds.
Night time viewing probably poor have not tested. limited to 32ft maximum.
Power to monitor takes extra connections. 3 cables totaling 9 feet.
Monitor function/setup clunky. Looks like 1990s software technology. Looking online other manufactures are just as bad.
This is not a replacement for a real dash cam
Adjusting sound is not as easy as just pushing a button.
Overall I am satisfied with the investment. For a wireless camera it is good. It is usable and does the job I bought it for. I think the only way of getting better video quality at this time is to hardwire from the camera to the monitor. I really did not want something else to connect when hooking up the trailer.