

connor77
-
Posts
201 -
Joined
-
Last visited
-
Days Won
2
Posts posted by connor77
-
-
Jaew and Kevin Henry - Site G39. Really looking forward to seeing our wonderful OTT friends!
-
 3
3
-
 1
1
-
-
I wanted to improve the sound quality in our trailer so I bought a couple of JBL Charge 5 speakers after reading lots of reviews. The speakers are small and both will easily fit in any of the overhead compartments. I bought these so that we could use them while camping but I can also use them while working on projects in my garage and around our home both inside and out.
About 2 minutes to pair them to my phone and they were up and running. We enjoy listening to music considerably more than watching TV while camping...at a reasonable volume level of course 🙂
The sound quality is really quite impressive and the volume at the 50% setting is more than ample. Reasonably priced IMHO to boot.
https://www.crutchfield.com/p_109CHRGE5G/JBL-Charge-5-Grey.html?tp=63331
-
8
-
-
Just fantastic pictures! Thank you for sharing. How long are/were you in Newfoundland if you don't mind me asking? Would a couple of weeks be enough time in your opinion?
-
Just updating this thread....RecPro now offers covers for Houghton AC's. I've ordered one but haven't received it yet so I don't know anything about the quality. Around $30 for the cover that fits the 3400 model that many (not all) have installed. Free shipping too. Free shipping might be Fourth of July related.
Happy Fourth to all!
-
 1
1
-
1
-
-
Does anyone know what is causing all these wildfires in recent years? Is it only drought-like conditions that are triggering these events or could it be something else?
-
Craig - We'd be interested in learning more. We definitely want to spend some time in our Oliver in the Pacific NW and next year would work for us.
-
32 minutes ago, Cameron said:
Picked up my trailer in July 2020. The tap lights were all good. They only came on when I tapped them, whether or not I had flipped the master switch. Then, one day about a year later, they all mysteriously went dim and stayed on. I opened a ticket and service sent me new ones, including a little rivet gun. I removed the old ones and replaced with the new ones. I discovered the new ones always came on whenever I flipped the master switch. Service told me that they'd changed vendors or something and the lights they sent me were different than the ones installed. They also said that they will go on whenever the master switch is flipped, whether or not I've tapped each individual light. That's just the way the new product works. Hope this helps.
This is consistent behavior with my trailer and also what I was told by Service. I did not, however, have all of my lights go dim - just two of them. I actually sort of like that one light on each side of the trailer comes on when I turn the master switch on.
I am keeping my eye out for a better quality light just in case these don't last long.
-
2
-
-
Brian,
I just replaced two touch lights - the one over the cooktop and the one over the street side bed. They would only come on partially (not very bright at all) and weren't helpful. I ordered enough replacements for all of the touch lights. When I placed this order with Oliver, Jason did tell me that whenever I turn the master switch on, any lights that have been replaced will come on automatically which they now do. The others do not come on automatically. This new behavior is not a big deal to me.
Just as a heads up, I think tapping the light "hard" causes them to fail quicker. A very very light touch is the better way to turn these on. As Dave mentions above, there is a small, sensitive spring that activates the light and it doesn't like to be touched too hard.
-
1
-
4
-
-
Hi Rivernerd,
Thank you for creating this thread. I *may* have a similar issue but I'm currently 2 states away from my Oliver. I will check and respond to this thread when I'm home this weekend.
-
2
-
-
John,
I had the same issue with my awning. There is a small allen-head screw that needs a quarter to half turn that will likely fix your awning to close all the way. I believe the screw gets turned clockwise but this detail is in the Girard manual for sure.
I would try this first before adjusting anything else. Mine looked like yours in that it wouldn't close all the way. I made a very small adjustment to that allen-head screw and now my awning retracts completely.
-
6
-
-
Mystery solved. I wasn't thinking that the screws would actually be going through the gelcoat into the aisle but you and Patriot have educated me that this is exactly what is being proposed. Thank you both.
-
2
-
-
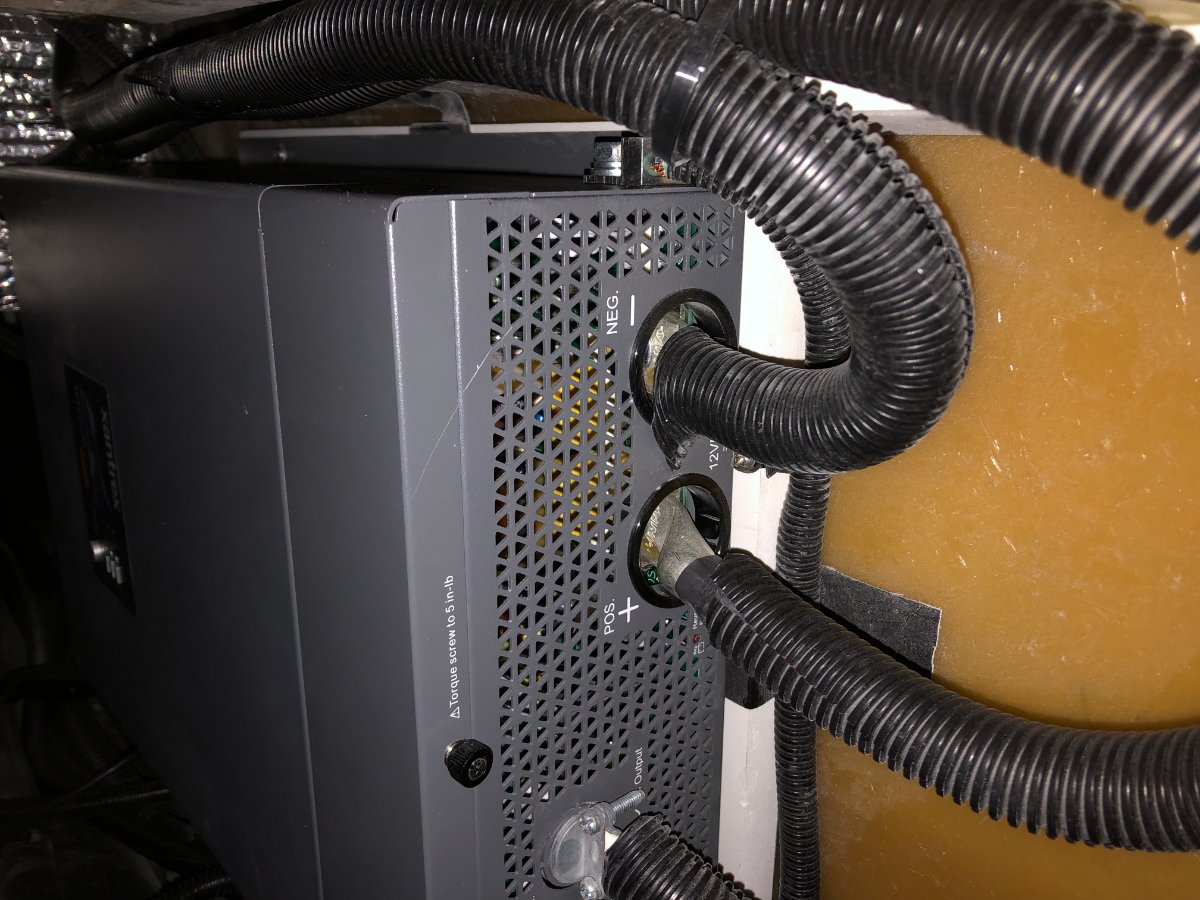
This is a picture from the rear of the trailer facing the inverter. That wall of fiberglass that the PVC board is mounted to has no access on the other side which is obviously where I'd be putting washers and nuts.
I still think my only option is to replace the 4 small screws with longer ones that actually go into the fiberglass. And even this won't be easy because the 2 on the bottom of the inverter are really difficult to get to. I'll need an incredibly long drill bit too.
If you're suggesting that these holes come out through the nice gelcoat under the bed that would be the only way but maybe this is what I've been missing.

-
13 minutes ago, ScubaRx said:
You are on the right track by being proactive. Eventually, those things that are glued to the vertical inside walls are going to fall off, especially the heavy electronics now being used. The way they did theirs is the best way to go. It will require a little swallowing of pride however. Since your unit is still attached, your "fix" should be much more simple.
1 - Remove ONE screw holding the inverter to the PVC backer board. Using that hole as a marker, drill from the inside completely through the fiberglass out into the aisle.
2 - Place your SS bolt into the hole from the outside and put a washer and nylock nut on the inside and tighten it down.
3 - Repeat for the other three screws, one at a time.
Yes, this requires drilling a hole through the fiberglass. There goes some of that pride I spoke of. You'll survive, and I promise it won't fall off the wall now. If you wait, it's gonna be a lot harder and the end result will still be drilling those holes. I really don't understand why they don't do it that way at the factory.
I would love to do exactly what you've suggested Steve but there is no access whatsoever to get behind the wall of fiberglass to put a washer and nut on a machine screw. That is what is confusing to me about what JD and Geronimo John did. There are no port holes and I've tried putting my arm underneath the Xantrex unit to see if there is access that way. There is none. Based on how my Xantrex is mounted, it's not possible for me to through bolt the PVC board to the fiberglass. I *believe* my only option is to install longer screws into the 4 existing holes and have these screws go into the fiberglass through the PVC board. I doubt my installation is unique to me. Meaning I'm sure most or all of the 2021's have inverters installed similarly or identically to our trailer.
-
John D & GJ,
How did you both through bolt your PVC board for your inverters with that wall of fiberglass in the way? What am I missing? I'm having a separate issue with my inverter and stumbled upon this thread. I just looked and confirmed that my inverter is held in place on that white PVC board with the 4 small sheet metal screws and I agree that the unit is too heavy to be held up by just those. But I have no idea how you're able to through bolt that board back on. Where/how are you accessing the washers and nuts? Or are you just through bolting the inverter onto the PVC board and then reattaching the PVC board (with the inverter mounted to it) to the fiberglass wall with longer/better/more screws?
I'd like to be proactive and get something better in place and I'm considering just longer, beefier screws that will go into the fiberglass in the existing 4 holes that the small screws occupy now.
Any chance you took pictures?
-
5
-
-
2 hours ago, ScubaRx said:
Kevin, if you have the equipment and are so inclined, feel free to video our demo and post it. This is something that everyone will encounter during their tenure as an owner and the procedure is pretty straightforward to observe and do but very hard to comprehend from written instructions. I think you’ve got a great idea.
Will do!
-
5
-
-
2 hours ago, mossemi said:
ScubaRx and I did a hands on demonstration and discussion about PEX plumbing at the 2022 OTTO's rally. It seemed to be well received by those that participated. We were talking recently about lubricating the dump valve cables and the valves themselves and thought it might be a subject for discussion at this years rally if there was enough interest. So if anyone has interest in this topic, please PM me directly. And if anyone is having trouble with their dump valves, we might be able to incorporate that into the demonstration/discussion if they are willing to have some “amateur plumbers” in and around their Ollies. We will limit this offer to 2 Ollies if there are any volunteer victims!
Mossey
Mossemi / Scuba, this is a great example of what I think would be helpful in terms of videos to walk people through how to perform these tasks. Doesn't necessarily have to be an Oliver person so long as what is done and video'd is approved by Oliver. The obvious beauty of the videos (both the "full" length ones and the shorts) is that once they're done, they're available to everyone always.
-
7
-
-
If you winterized, you'll need to de-winterize. Video of Jason showing this procedure linked here.
Check your tire pressure (most people like about 60lbs), make sure batteries are fully charged, operate everything you can in/on your trailer before going anywhere, check that you jacks are operational, check your propane level, check your trailer's brakes, grease all zerks on suspension (8 per side), if you have solar, check to make sure the knobs holding the panel are tight, make sure you have fresh, clean water in your hot water heater before turning it on, make sure you have some fresh, clean water
Probably a few more things to check but here are at least a few things to get started on... Edit: Scuba just posted so there may be some additional or overlapping comments between us.
-
6
-
-
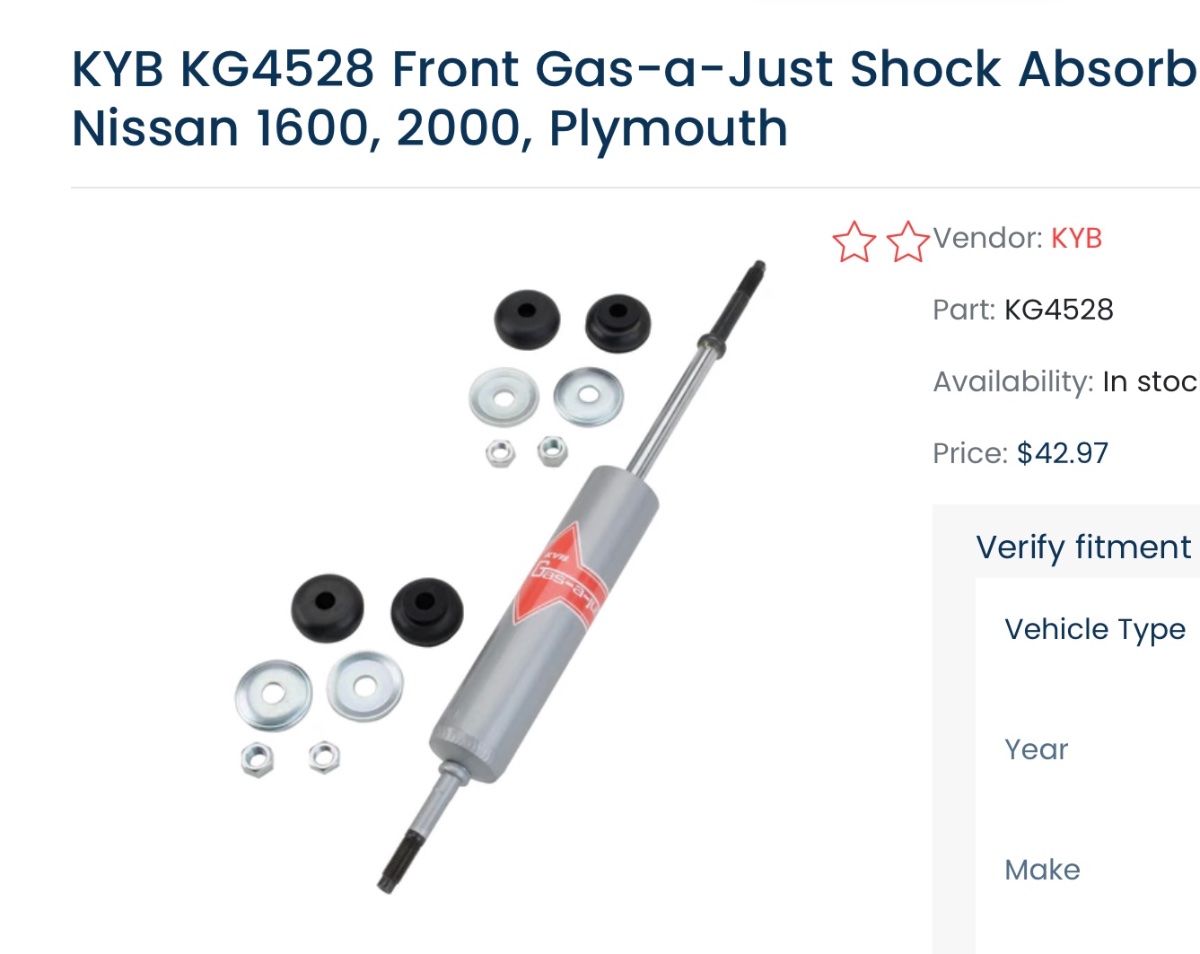
5 hours ago, Geronimo John said:
Could you rob the shield off the Monroe shocks and use it with your KYB's and reuse the old Monroe cupped washers too?
GJ
I might order both shocks and see what kind of a mess I'd get into if I tried to retrofit the shield from the Monroe.
It's unfortunate that there isn't a better option out there. Ultimately, I'm sure I'll end up ordering the Monroe's and keep my fingers crossed that I get 4 decent ones.
Thanks for the clever idea GJ!
-
3
-
-
In my quest to find something better than the Monroe shocks I was given this part from KYB but I've learned that it might not be suitable because of the exposed rod and the beating the underside of our trailers take from rocks, road debris, etc. This shock suggestion came from Shockwarehouse.com
This part could be a consideration if there was some sort of protective sleeve for it but I'm not sure that one exists.
I was not able to find a cross reference to other manufacturers like Bilstein. This shock was all I found that was reasonably compatible with the Monroe specs.
I've read comments from Monroe buyers that some of their shocks never extended properly but there was also feedback from RV owners that used the Monroe's and they had good luck with them.
-
2
-
-
I would like to see an Oliver video of wheel bearing replacement - the complete process from start to finish. I know there is a Dexter video to watch and it's good but I don't think it's complete. I'm also aware that there's a very helpful thread about this that's about 5 or 6 pages long but I still like to see things because I'm a visual learner.
Would also like to learn more about optimal Xantrex inverter settings when not connected to shore power. Specifically, how to adjust the settings to charge (or stop charging) the batteries but also, at the same time, run an AC off of a generator as an example. There are some good threads about this already but a little more depth and detail about how flexible the Xantrex is might be helpful.
Lastly, it would be great if Oliver focused on a few (like 3 to 5) of the most common yearly maintenance tasks that owners can do themselves (low skill level items) and showed videos of these...or one video that captures these 3 to 5 tasks. Because Oliver has done these tasks so many times, maybe they can show us some time saving tricks to make these tasks easier or more effective. I find the Educational Shorts videos helpful. They don't need to be long but they should be very focused.
As a reference to the above, when I've done my winterizing and de-winterizing I bring my laptop outside and watch Jason go through the steps. I can pause the video so that I can "catch up" to what's he's done. Makes the task at hand super easy. Jason speaks in a very clear and deliberate way and, maybe most importantly, he makes no assumptions about people's skill sets. I hope he continues to do more videos.
-
1
-
2
-
-
Jaew and Kevin will be in F48. Looking forward to seeing "old" friends and making new ones!
Safe travels to the Rally everyone!
-
2
-
-
Thanks for the advice.
I can put it in the back seat of my truck - I would just prefer not to because of other "stuff" we usually keep there. Truma makes a nice cover for it and that would protect it from most of the elements and also keep it cooler. I believe it's an insulated cover. Not cheap - around $180. I also thought that it might need to sit on a better platform than what could be supported by a 2" receiver. For clarity, I don't plan to leave it on the back of the trailer all the time. Would go in the garage when we're done camping. The appeal to having it on the back of the trailer is accessibility but I'm obviously not interested in destroying it. I would line the Pakmule with something to soften the roads bumps.
In hindsight, I should have measured the height from my truck bed to the bottom of the tonneau cover. I honestly didn't think I'd have a problem fitting it in there...but it doesn't. It is a large cooler.
If anyone's interested in a brand new C73 from Truma PM me 🙂
-
1
-
-
I need a solution for a recently purchased Truma C73 cooler that is too tall to fit in the bed of my truck with my Diamondback tonneau cover in place. I'd prefer to not put the cooler in the back seat of my truck if possible.
My thoughts....I'm probably going to remove the small receiver and mount a 2" steel receiver as others have done on the back of the Oliver. I have researched a cargo carrier made by Pakmule and I'd like to know if anyone has any first hand experience with this company or their products? I'd like a carrier that is an appropriate width so as to not obscure my lights. I also want something that is aluminum. I do not need a carrier that goes across the entire width of my trailer. The benefit of the Pakmule product is that I can add bikes to it pretty easily if we don't plan to bring our cooler. I'm aware I'll need to lock the cooler down to the cargo carrier / Oliver to reduce the chance of theft.
Does anyone travel with a cooler on the back of their Oliver? Any other cargo carrier ideas aside from Pakmule?
-
Patriot - I'm sure you will like these guys! We've been lucky enough to see them live a few times. They are a bunch of incredible musicians who put their heart and soul into their live performances.
This song was originally written and performed by John Mayer but I like the Stringdusters version of it better.
-
4
-
Wet Bolt Size Help Requested
in Mechanical & Technical Tips
Posted
Just had my leaf springs replaced and my mechanic informed me I have a few wet bolts that are spinning because the splines have worn off. I have searched the internet but would like confirmation from the forum of what wet bolt part # I need. There are multiple part numbers online and some have completely different bolt measurements. Would prefer to only have to order once and get the correct ones.
Also, my mechanic seemed to think that the forward and trailing suspension mounts might have different sized wet bolts than the ones for the equalizer. Can anyone chime in on this and clarify? If they are a different size wet bolt, would appreciate part #'s for these as well. There are 4 of these allegedly smaller ones and 8 of the "regular" size....again, according to my mechanic.