JEssary
-
Posts
61 -
Joined
-
Last visited
-
Days Won
21
Everything posted by JEssary
-
Issue 1: Fan inoperative Issue 2: Fruit Flies or Gnats in toilet Models Impacted: All models delivered before 8/8/2018 Information: Nature's Head recommends using a 2-5 amp fuse for the composting toilet fan. Many models may have been produced with a 1 amp fuse in the converter for the fan and may result in it blowing. Fruit flies and/or Gnats may become a problem in the composting toilet gaining access via the top roof plumbing vent. Resolution 1: Replace the 1 amp fuse with a 5 amp fuse. You can use a 2, 3, or 4 amp fuse as well just as long as it is within Nature's Head recommended size of 2-5amps. Resolution 2: *Place a mesh screen, like the material used in the window screens, over the top plumbing vent pipe. You can also use products such as Diatomaceous Earth or Gnatrol as well. You would need to refer to the Nature's Head Compost Toilet manual for the recommended process for adding these products to your toilet. Please see attached manual. *By placing a mesh screen over the vent pipe you will need to periodically clean this to keep it from becoming clogged and causing a plumbing issue. Natures-Head-Composting-Toilet-Manual.pdf
-
 Please visit Progressive Industries website for the most up-to-date warranty information. The below information has been provided for informational convenience but may not be updated as quickly as the Manufacturer’s website. You can visit the website at: http://www.progressiveindustries.net/warranty Troubleshooting Guide Warranty Claim Form Limited Lifetime Warranty Our Lifetime Warranty covers only Progressive Industries’ workmanship, internal electronics and parts & materials contained within the unit housing. Any and all damage to the outside of the unit is not covered. External damage is typically associated with a poor connection between your RV or our EMS/SSP units and a power cord. The Lifetime Warranty does not cover labor or shipping charges. Our Lifetime Warranty is exclusive to Progressive Industries and is granted in lieu of all other express or implied warranties, obligations or liabilities. PROGRESSIVE INDUSTRIES EXPRESSLY DISCLAIMS THE IMPLIED WARRANTIES OF MERCHANTABILITY AND FITNESS FOR A PARTICULAR PURPOSE. This is a non-transferable Lifetime Warranty. It applies only to the original owner and covers only those products purchased from an authorized dealer, retailer, or seller. This warranty covers manufacturer defects in materials and workmanship. A proof of purchase is required for all warranty claims. The follow are excluded and not covered by the Lifetime Warranty and/or void the Lifetime Warranty: Improper installation of a hard wired unit. We strongly recommend that a competent electrical professional perform the installation of hard wired units. Products installed or used in an application other than an RV Products operated outside systems compatible and compliant with RV surge protectors Products used in a manner inconsistent with the operating instructions Use of replacement parts or accessories that are non-compliant with Progressive Industries specifications Damage to the surge protection unit, such as burnt, charred or melted components resulting from products connected to poorly maintained power sources, power cords or adapters Improper use including, but not limited to failure to disconnect upon departure from power source Failure to ensure electrical plugs and receptacles are clean and all connections maintain a snug fit when plugged in Failure to provide continuous maintenance in accordance with the maintenance instructions provided by Progressive Industries Any unauthorized modifications or repairs Maintenance of hard wired units performed by anyone other than a qualified RV dealer All acts of God and/or natural disasters including, but not limited to lightning damage, hurricanes, floods and earthquakes How to apply for warranty service on hard wired units: Review troubleshooting guidelines located at: www.progressiveindustries.net Complete warranty claim located at: www.progressiveindustries.net. The warranty does not cover labor costs associated with repairs or replacement units. How to apply for warranty service on portable units: Review troubleshooting guidelines located at: www.progressiveindustries.net Complete warranty claim located at: www.progressiveindustries.net Progressive-industries-Warranty-Statement.pdf
 -
Please visit Progressive Dynamics website for the most up-to-date warranty information. The below information has been provided for informational convenience but may not be updated as quickly as the Manufacturer's website. You can visit the website at: https://www.progressivedyn.com/sales/warranty-information/distributor-warranty-on-power-converters/ *Below information was pulled from above website on 8/8/18 Summary of Power Converter Warranty Program for RV/Marine Distributors Progressive Dynamics provides a 2-year “Limited Warranty” for all Inteli-Power Converters sold to distributors. This “Limited Warranty begins on the customer’s date of purchase. The following summary of our warranty program was developed in cooperation with our Distributors and OEM customers. It is designed to meet the needs of the Boat / RV Owner, the Distributor, the OEM Manufacturers and Progressive Dynamics. FIELD FAILURES: 1. We ask that your retail customers contact the PDI Service Department Directly at 269-781-4241 for replacement of defective converters. Customers must have the following information available before contacting PDI. A. Model Number B. Serial Number C. Receipt showing Date of Purchase D. Visa or Master Card number 2. If our service personnel determine that the converter is defective and under warranty, Progressive Dynamics, at it’s discretion will then ship a NEW converter or a Factory Serviced and Warranted replacement converter to the customer via UPS Ground. The cost of the replacement converter will be determined based on the model number. The customer’s credit card number will be recorded however, this charge will not be processed for 30-days. The customer must then return the defective converter to PDI within 30-days or their credit card will be charged for the agreed upon cost of the replacement unit. If the customer requires faster shipment, the additional freight will be calculated depending upon Zip Code and charged to his/her credit card. 3. Once the customer receives the replacement converter, the defective converter should be returned to Progressive Dynamics in the same shipping carton to reduce the possibility of shipping damage. Power converters that fail in the field are to be returned to the PDI Service Department at the following address. Progressive Dynamics Service Department 507 Industrial Road Marshall, Michigan 49068 Telephone 269-781-4241 Fax 269-781-8729 DISTRIBUTOR WARRANTY PROCEDURES 1. We understand that in some instances the distributor must replace a defective converter from his stock. We ask that the distributor service department first test the converter (CLICK ON TROUBLESHOOTING POWER CONVERTERS) before replacing the charger. 2. If these tests indicate the converter failed, the distributor is to replace the failed unit with a NEW converter from stock. The distributor must then contact PDI Service Department (269-781-4241) and obtain an RGA Number to return the defective converter to the PDI Service Department. NOTE: The following data must be included with the defective converter. A. The RGA Number B. A copy of the customer’s receipt showing date of purchase 3. When the defective converter is received at PDI, it will be tested to confirm that the warranty claim is valid. Progressive Dynamics will then issue full credit to the distributor. This credit memo will reference the RGA number assigned. NOTE: The distributor or customer is responsible for shipping costs to return the converter that failed to Progressive Dynamics Service Department within 30 days. Progressive Dynamics is not responsible for Dealer labor or trouble shooting charges! PD4045-TROUBLESHOOTING.pdf
-
The optional 2000 watt onboard inverter is a great option to have if you like to get off-grid or even if you have a lengthy drive to get where you are going. The way the optional on-board inverter works is by taking battery (DC) power and converting it over to (AC) 110 power. It is tied to the campers 110 receptacles and microwave to provide power for use when a shore connection isn’t available. However, the inverter does depend on the battery power and it can only provide up to about 15 – 16 amps of power at a single time. This means that if the battery power is too low then some of the more high power consuming devices/appliances may not work properly or simply overload the inverter and cause it to shut down. There are many different appliances out on the market that range from low power consumption to high power consumption and this is important when purchasing these items for use with the inverter option. Hair dryers are a great example of an appliance that demands a lot of power, but also have a broad range of rating. They typically range from 800-1800 watts. While an 1800 watt hair dryer might be the best choice for your house, it will likely require more power than you might want in your camper, especially when running on the inverter. Another example of high power consumption is the microwave. It uses 12 amps, which is getting close to the 15-16 amp max for the inverter. Just keep this in mind when running the microwave as turning on another appliance at the same time might cause the inverter to shut down. What does the inverter need to work properly? The inverter is 100% dependent on the battery bank power, so be sure that the batteries are always charged up and ready for use if you plan to use the inverter. When purchasing the inverter option it is crucial that you also get the solar package or some form of charging solution so it can keep the batteries charged up and ready to go. The battery bank on the camper also needs to be able to hold enough power to supply the power demand from the inverter and appliances connected. The optional 6V AGM batteries can provide about 200-250 amp hours which is a substantial increase from the standard 12v batteries. The lower the battery voltage, the less likely the inverter will be able to sustain the power needs of the appliances in use. Also keep in mind that over time your batteries age and lose the ability to hold as much power as they did when they were new. This will also start to impact what you can run on the inverter as well as how long it will run on the inverter. The conversion rate from DC power to AC power is also important to know as this will change the rate at which the batteries can provide power to the inverter and the rest of the camper. If the microwave pulls 12 amps of AC power then it will use about 122 amps when using the inverter and battery bank. What this means is that it is draining your 200 useful battery bank amps rather quickly. However, most people don’t run their microwave but for short periods of time so this high power consumption shouldn’t create a problem. What might cause a problem would be running an appliance like a space heater on the inverter as you might leave it running over a longer period of time and it would eventually drain the battery bank down low enough where the inverter would shut down. The inverter is a great option to have if you think you will be camping off-grid with the solar panel package and without shore power or even if you just want to pull over for a quick break to heat up something in the microwave while traveling to your next camping destination!
-
The Dexter EZ Flex system adds another layer of protection to your camper. The EZ Flex equalizer comes with a rubber dampener to lower the impact from cracks, potholes and other imperfections in the roads from causing unwanted stress on the camper shell. This system also replaces the standard bolt & plastic bushings inside each leaf spring eye with wet bolts and bronze bushings allowing you to keep them greased for longevity and less noise from heat and resistance. For this system to operate properly it is recommended that the bushings are greased every 3 months or 3,000 miles with a good high quality Hi-Temp grease. We use Citgo Mystik Hi-Temp at the factory but there are several other approved greases from Dexter. *2018 Elite I models utilize bronze bushings and wet bolts but does not have the equalizer as it is used on the dual axle only. The Dexter Axles used on the Oliver Elite and Elite II models are the 5,000 lb and 3500 lb axles. The Elite models have a single 5,000 lb axle with 12” brakes while the Elite II models have dual 3500 lb. axles with 10” braking. These axles and brakes do have a break-in period as they are Nev-R-Adjust braking and adjust automatically as you brake while pulling forward or backwards. The break-in period may vary slightly but usually adjusts to 100% somewhere between *50 brake applications from the brake controller only or over a period of about 500-700 miles with normal vehicle braking. *Please make sure that you do not overheat your brakes by trying to achieve the break-in too quickly. If you do choose to utilize the brake controller over 50 braking applications it should be done over a 75 mile trip at low speeds allowing the brakes to cool in between and not putting too much stress at high speeds on the trailer brakes to stop the tow vehicle. Both the 3500lb. and 5,000lb axles have serviceable bearings that require maintenance every 12 months or 12,000 miles. The same grease that is used for the EZ Flex will work with the bearings. Both the inner and outer bearings should be cleaned thoroughly and inspected for any imperfections or improper wear. This is also a great time to inspect your trailer brake components as well. These maintenances can be performed by most RV service centers or if you prefer, you can perform your own maintenance. For more information on how to repack your wheel bearings see the Dexter Bearing Maintenance Video.
-
Where do you jack up a Oliver?
JEssary replied to KountryKamper's topic in Mechanical & Technical Tips
Please see post below On-Board Jacks & Jack Points -
Question for the Oliver Travel Trailer Factory???
JEssary replied to Hap's topic in Mechanical & Technical Tips
Please see link below: On-Board Jacks & Jack Points -
The manufacturer of the on-board jacks does NOT recommend using the jacks to lift the weight of the trailer even as a temporary use for changing a tire. New model trailers have an extended steel sub-frame assembly that provides ample room for a jack point either in front or behind the tire that needs to be changed. Older models may not have enough room on the steel sub-frame to use a lifting jack(scissor jack or bottle jack). If this is the case you will simply locate the main frame rail point closest to the tire that needs to be lifted and use a lift pad that will help to distribute the weight. Owner’s manuals may state different things as changes occur every year in the RV industry. There are several reasons why these changes might occur from year to year or even in the middle of a production cycle. Sometimes new industry standards/codes are introduced and changes have to occur to meet these new standards. Sometimes components are discontinued and replaced with a new model that may not work just like the previous model. Sometimes companies simply make a decision change within the company to market their product differently. These are just a few of the reasons that change happens and why your owner’s manuals may be different. Product information is provided by the manufacturer of the component and is available online in the Oliver University section. Oliver strives to provide accurate information to every customer. The product information on components not manufactured by Oliver is dependent on the manufacturer or supplier supplying us with the correct information and as such may not always be 100% accurate.
-
WINTER STORAGE OF CAMPER When storing the camper for the winter you will want to ensure that it is done properly so you don't run into any issues when you get ready to get it out of storage. Winterize: Make sure you properly winterize the camper with an RV Antifreeze. Using air to blow out the lines will NOT remove all of the water in the system. There are valves throughout the camper that can hold the smallest amount of water, freeze and crack causing an unwanted repair. Make sure the filter or anode is removed from the water heater and it is empty. Batteries: The on-board batteries are susceptible to cold weather and can drain even when disconnected from the camper. It is best to leave the camper on a charge keeping the batteries topped off. This will prolong the battery life as well as ensure that the camper has 12v power when it comes out of storage. Tires: The tires on your camper may develop flat spots if left sitting on concrete/asphalt while being stored. This is okay as the flat spots should straighten out as you drive the camper down the road about 10 miles and the tires heat up. Even if the camper is being stored inside a building, if the building temperature is not regulated to stay above freezing and/or the building heat source fails, then you may have something freeze inside the camper causing damage. Winter Usage The camper is designed to be used during the winter months just as you use your stationary house. However, the biggest difference is that with your camper you may turn off the heat source and travel to your next destination. This trip might just be enough for the water left behind in your water lines, water filter, toilet, and or water heater to freeze and cause damage. Recommendations: While traveling in freezing temperature (32 degrees) it is recommended that you drain your water heater, cut off the water to the toilet and flush to remove as much as the water from the toilet as possible. Depending on the outside temperature and how long your drive will be, this may not fully protect against freezing. It is best to use RV Antifreeze to pump through the lines when in extreme temperatures to ensure that nothing freezes. What factors impact how quickly your water will freeze? Water Mass - 6gallons of water will take longer to freeze compared to 1ml of water. The valves inside your camper may have less than 1ml of water resting on them as you travel creating a potential freeze condition. Water Temperature - The starting temperature of the water before it loses its heat source. Water that is in the cold lines may already be at 50 degrees and it only has to drop to 32 degrees for it to freeze. Hot water in the lines requires even less time compared to cold water to freeze. Outside Temperature - If the outside temperature is 0 degrees then the inside temperature will fall faster than when traveling in 32 degree weather. Speed of Travel - When traveling down the roads at 70mph the wind chills across the camper can drop the temperature quicker. *When traveling during the winter months please keep up with each states laws for campers. Many states do not allow the propane system to be on while driving on roadways, bridges, and tunnels. Space heaters may keep the main cabin warm but may not provide a sufficient heat source for the water lines between the shells.
-
Andersen Hitch Inc. has designed a new ball, cone and triangle plate for the weight distribution hitch. This new design was to create a ball that would not lock up inside the collar and/or cause noise when turning. For more information or data on results and testing you would need to speak directly with Andersen. Any customer who has an older Andersen Hitch setup can upgrade to the new design for $100 by contacting Andersen directly and asking about part# 3332 and explaining the issue that you are having with the current ball. The $100 upgrade is a discounted price but it will not last forever. Andersen Hitch Inc. 208-523-6460 800-635-6106
-
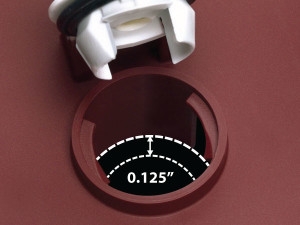
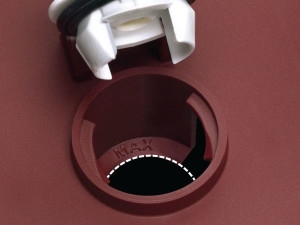
*Please visit Trojan's Battery Maintenance Page for more details at: http://www.trojanbattery.com/tech-support/battery-maintenance/ Watering FLOODED BATTERIES ONLY Flooded batteries need water. More importantly, watering must be done at the right time and in the right amount or the battery’s performance and longevity suffers. Water should always be added after fully charging the battery. Prior to charging, there should be enough water to cover the plates. If the battery has been discharged (partially or fully), the water level should also be above the plates. Keeping the water at the correct level after a full charge will prevent having to worry about the water level at a different state of charge. Depending on the local climate, charging methods, application, etc., Trojan recommends that batteries be checked once a month until you get a feel for how often your batteries are need watering. Important Things to Remember Do not let the plates get exposed to air. This will damage (corrode) the plates. Do not fill the water level in the filling well to the cap. This most likely will cause the battery to overflow acid, consequently losing capacity and causing a corrosive mess. Do not use water with a high mineral content. Use distilled or deionized water only. CAUTION: The electrolyte is a solution of acid and water so skin contact should be avoided. Step-By-Step Watering Procedure Open the vent caps and look inside the fill wells. Check electrolyte level; the minimum level is at the top of the plates. If necessary add just enough water to cover the plates at this time. Put batteries on a complete charge before adding any additional water (refer to the Charging section). Once charging is completed, open the vent caps and look inside the fill wells. Add water until the electrolyte level is 1/8″ below the bottom of the fill well. A piece of rubber can be used safely as a dipstick to help determine this level. Clean, replace, and tighten all vent caps. WARNING: Never add acid to a battery. Watering Diagram Flooded batteries need water. But more importantly, watering must be done at the right time and in the right amount or the battery’s performance and longevity suffers. General Watering Instructions: Add water, never acid, to cells (distilled water recommended) DO NOT OVERWATER For fully charged standard deep-cycle batteries, add water to the level of 1/8 below bottom of vent well (see diagram A below) For fully charged Plus Series batteries, add water to the maximum water level indicator (see diagram B below) If the batteries are discharged, only add water if the plates are exposed. Add just enough water to cover the plates, then charge the batteries. Once fully charged, add water to the proper level indicated above After watering, secure vent caps on batteries Diagram A *Add water to 0.125″ below bottom of the vent well. Diagram B *Add water to the maximum water level indicator. Please visit Trojan's Battery Maintenance Page for more information at: http://www.trojanbattery.com/tech-support/battery-maintenance/

-
Knowledge Base Article for proper Winterization - Depending on your location it may be necessary to properly winterize your unit to ensure that freezing conditions do not damage any part of the on board water systems. First lets discuss what components are susceptible to freeze damage which would result in water leaks and potential costly service repairs. Brass Check Valves - These valves are in-line valves that keep water from spilling back out of the water fill ports. These valves will be located on the Fresh Water Line, City Connection Line and the Black Tank Flush Line. Plastic Check Valve - The Dometic Standard toilet has a plastic check valve located at the rear of the toilet. Water Valves - These valves are used to control the flow of water. You may have 2 or 4 valves located next to the water pump, 1 located on the lower shell floor to drain the fresh tank, and 1 located on the black tank flush port line. P-Traps - These are used in the sink and shower drain plumbing lines. It retains water and traps debris that has drained from the sink and prevents it from forming a clog deep within the plumbing system, and stops sewer gases from passing into the camper. Water Pump & Filter - The water pump filter is used to trap debris and keep it from entering the pump and water line system that is delivered to the faucets. PEX Push Fittings - These fittings are used to connect different runs of pex pipe through out the camper. Pex itself is freeze tolerant but these plastic and/or brass fittings are not. Faucets - The kitchen, bathroom and external shower faucets all maintain water at the faucet when in use and thus present a potential freeze issue if not properly winterized. Water Heaters - All water heaters should be fully drained of all water and the bypass valve must be set to winterization/bypass mode. This allows for RV antifreeze to be utilized in the plumbing system without filling the water heater itself. *Proper winterization method to ensure that all components are protected. Drain all water from the system (All tanks, water heaters) Set bypass valve at water heater for winterization mode. Change valve configuration at water pump for winterization mode. Use water pump to draw RV Antifreeze (potable Safe) into the camper. Turn on the kitchen faucet (Cold Line) and run until antifreeze comes out. Change to the Hot line and run until antifreeze comes out. Perform steps 5-6 for the bath faucet. Ensure plenty of antifreeze drains into the P-Traps for the kitchen, bath and shower drains. Flush the toilet until antifreeze starts to fill the bowl. Leave antifreeze in bowl to lubricate seal. Turn off water pump. Connect hand pump with antifreeze to the fresh tank fill connection. Pump at least 3- 4 times. Antifreeze is potable safe and will not hurt if it goes into the fresh tank. Connect hand pump with antifreeze to city connection line, turn external shower cold line on and pump until antifreeze comes through shower faucet. *TIP: It will be hard to pump in the city line if the faucets are closed. Turn cold line off and hot line on, pump until antifreeze comes through shower faucet. Connect hand pump and antifreeze to black tank flush port. (You may have to go inside and turn the in-line valve open to allow the antifreeze to freely pump into the tank. *One pump should be sufficient as we are only protecting the check valve. For 2018 Models and newer you will need 4 pumps to sufficiently protect the new flush port system. This change was put in place to meet new codes for the black tank system ensuring that no backflow of waste water can get inside the water supply line. If you are not certain if your camper is equipped with this new port then pump 4 times to be on the safe side.) FAQs The camper can be used in cold weather applications as long as the furnace is utilized to keep the components warm and above freezing temperatures. If traveling between camp sites during cold weather season it may be necessary to winterize depending on outside temperatures. If water is left in the water heater during freezing temperatures even for short periods of time, it can cause damage. RV Antifreeze is designed to replace water and should NEVER be mixed with water as diluting it will defeat its purpose. 2016-Prior-Elite-II-Valve-Configuration.pdf 2017-Current-Valve-Configuration-Sheet.pdf 18.5-Elite-2017-Current-Valve-Configuration.pdf
-
Issue: Daylight shows through night shade "appears as if material is cut". Models Impacted: Many of the white window "night" shades may have been affected between 6/13/17 - 12/01/17. Information: The new white window shades were impacted with a fabric issue regarding the night shade that appears as if the material or fabric is slit/cut but is actually an improper manufacturing of the night shade process to keep daylight from showing through the fabric. Anyone who experiences small specks of daylight showing through the nightshade will need to contact Automotion for information on warranty replacement. Shade Measurement: Elite I: 18.5' Camper Dinette Shade: 49.75" x 20" Side Bed Shades: 31.75" x 20" Rear Shade: 38" x 21.75" Elite II: 23.5' Camper Side Window Shades: 49.75" x 20" Rear Shade: 38" x 21.75" Resolution Contact Information: Auto-Motion Shade Inc. Ewa Zajch Tel. (905) 470-6198 (Ext. 0022) Ewa Zajch <ewaz@automotionshade.com> *Please be sure to include size and quantity of each shade needed.
-
Please see TSB regarding Kitchen Drawers: TSB: Galley Drawers
-
Issue: Galley drawers sliding out during transit Potential Models Impacted: 2016-2017 Information: The current blum slides being used were implemented during the 2016 model year. We have since seen three issues where a kitchen galley drawer has come loose during transit. The blum stays attached to the drawer slide and pulls loose from the drawer itself. Resolution: Process change in the way the drawer is built as well as longer screws being used to ensure this issue does not continue. What Should you do: At this time we have only seen or been made aware of three instances where this has happened. We have the same slides and design in about 127 units. If the issue occurs, please contact our service department at 866-205-2621 so we can assist with the resolution.
-
Knowledge Base Article for Zamp Solar ZS-30A Charge Controller The Zamp Solar 30 Amp 5 Stage Digital Deluxe Solar Charge Controller # ZS-30A has PWM or Pulse Width Modulation, which is a digital signal that is used to control power applications and has 5 stages of charging for best battery health and longevity. This controller can support and is programmable for the 4 typical types of deep cycle batteries – WET, GEL, AGM and Calcium. We pre-set the controller at the factory according to what batteries are installed. 12 volt solar charging power. LCD screen displays battery voltage, charging current, charging capacity, battery types and faulty codes. LED light indicators show charging status and battery condition. 5 stages of charging: Level 1 – Soft Charge – When batteries suffer an over-discharge, the controller will softly ramp the battery voltage up to 10V. Level 2 – Bulk Charge – Maximum current until batteries rise to Absorption Level. Level 3 – Absorption Charge – Constant voltage charging (battery is over 85%). This stage takes longer than any other stage to complete. You will typically see your battery status remain in this stage unless you are not using the camper. The full battery indicator is about the last 2% and while running lights and other components it will remain in the absorption stage. *Battery volts displayed during this stage are charging volts not actual battery volts. Level 4 – Equalization Charge – Only for WET battery or Calcium battery type. When the battery is deeply drained below 10V, it will automatically run this stage to bring the internal cells to equal states and fully complement the loss of capacity. (Gel and AGM batteries do not run Equalization Charge). Level 5 – Float Charge – Battery is fully charged and maintained at a safe level. Fully charge is more than 13.6V. Includes a port for an optional external battery temperature sensor. Zamp Charge Controller & Digital Monitoring System (Battery Volts) Both systems will display charging volts rather than actual battery volts when power is being supplied to the batteries. Customer interaction The charge controller has 2 buttons. One button labeled Amp/Volts can be used to scroll through relevant information Amp/Volt Button Current battery volts or charging volts Current Amps being supplied to the battery (Initial startup will be lower amps and slowly increase to maximum output depending on sunlight available. Current total of Amp Hours supplied within the 24 hour timeframe. This setting will reset with every 24 hour period. Current Battery Temperature. (Displayed in Celsius). This is used by the charge controller to monitor the battery. Battery Type Button This is pre-set at the factory based on the type of batteries installed and should only be changed if you replace your batteries with a different battery type. Zamp Error Codes: P01 - Solar Panel Reverse Connection P02 - Solar Panel Over Voltage 601 - Battery Disconnected or less than 3.0 Volts 602 - Battery Reverse Connection 603 - Battery Over Voltage (> 17.5 Volts) 604 - Battery Temperature over 65C
-
What is Galvanic Reaction? - When two dissimilar metals are in contact and exposed to an electrolyte substance it causes one of the metals to lose ions and slowly consumes that metal. - It works much like a battery. One of the metals will become and act like an Anode(Negative) and the other a Cathode(Positive). This process will slowly consume the Anode and actually strengthen the Cathode. - Galvanic reaction occurs when an electrolyte combines with water. Depending on which electrolyte is present, it will completely(strong) or partially (weak) ionize with the water to form a strong or weak electrolyte substance. What is an electrolyte substance? Strong Acids Examples: Hydrochloric Acid, Sulfuric Acid, and other Acids Strong Bases Examples: Sodium Hydroxide, Calcium Hydroxide, and other Hydroxides. Salts Sodium Chloride Winter Road Treatment: - Different cities utilize a handful of different chemicals to treat roadways for ice. Most of these are from a form of chloride which does become an electrolyte once dissolved with water. TIP: It is always a good idea to clean these chemicals from any vehicle and/or camper when possible. What type of impact does this play on Aluminum? - When oxygen is present (in water), aluminum naturally reacts to form aluminum oxide and this is the key to its ability to resist corrosion. Unless exposed to a substance or condition in which destroys the protective layer, aluminum will remain resistant to corrosion. - When aluminum contacts another metal(steel for example), it sets in place the possibility of a galvanic reaction if an electrolyte substance comes in contact with the metals. What does Oliver do to prevent this natural process? A protective layer, cavity spray, is placed between the two metals. Zinc anodes are attached to the aluminum frame The Zinc becomes the anode part of the equation and if the galvanic reaction process takes place, it will consume the Zinc anode instead of the aluminum frame. How often should I check my Anodes? - Depending on where you live or where you travel you may or may not even have a galvanic reaction but it is still a good idea to inspect your anodes at least once a year and more if you start to notice that the anode is deteriorating.
-
Issue: A/C Fan runs when mode set to furnace Models Impacted: Dometic Penguin II equipped Information: The on-board thermostat communicates with the Dometic Penguin II A/C unit and the A/C unit then communicates with the Furnace. When the mode is set to Furnace the A/C fan should not run if set to AUTO. If the fan speed is set to LOW or HIGH, this will cause the A/C unit fan to run with the Furnace as a means to distribute the inside air flow. If you are experiencing this issue, please ensure that the fan speed on the A/C is set to AUTO. Resolution: Normal Operation *If the A/C fan runs when set to Auto and mode is set to Furnace, then another issue exists and the Dometic A/C unit should be inspected by a Dometic certified technician.
-
- 8
-

-

-
- dometic
- penguin ii
- (and 3 more)
-
Rubber Gaskets Around Porch Lights
JEssary replied to Mike and Carol's topic in Mechanical & Technical Tips
I wanted to let everyone know that we are working with a rubber manufacturer and having them perform test for us, as we do not have the means to do this internally. We want to make sure that we resolve the black streak issue but not at the expense of creating a new problem. The concern with the white neoprene gaskets is that they will yellow over time especially if it is not rated for exterior use. We also have to make sure that it is rated at an IP66 rating and ensure that it won't leak. The quickest and easiest method would be to put some type of clearcoat protection over the gasket but how long will this last and how often would it have to be re-applied. We want to do our due diligence to find the best solution for our customers and not just a quick fix that might create other issues.- 97 replies
-
- 8
-
-
- lights
- captain tolley
- (and 3 more)
-
Rubber Gaskets Around Porch Lights
JEssary replied to Mike and Carol's topic in Mechanical & Technical Tips
I wanted to let everyone know that I have posted in the Technical Service Bulletins area in regards to the black streaks issue. I will be posting in this new section as I become aware of any new issues and updating as I get new information. I would also like to thank all of our customers for helping me with new issues as they arise and would like to continue getting feedback from everyone.- 97 replies
-
- 5
-
-
- lights
- captain tolley
- (and 3 more)
-
Issue: Black streaks running down side of camper due to porch light gaskets. Models Impacted: 2016 - 2017 Models Information: At this time the manufacturer of the porch lights has no intentions of replacing and/or designing a different gasket to resolve this issue. Oliver is researching and testing some different gasket materials to find a long term solution for our customers. We are aware of some different methods being used by our customers to resolve this issue, ie: Murphy's Oil and DAP silicone. Resolution: Currently in Research & Testing *This thread will be updated as new information becomes available.
-
- 22
-
-
-
- porch lights
- black streaks
- (and 1 more)
-
Hello Everyone, I have gotten several calls in regards to the axle size and capacity so I thought I would stop by say hello and make an official statement. Hope everyone is enjoying their Oliver camper and travels. The Legacy Elite 18.5' comes with a 5200lb 12x2 axle that is derated to 5000lbs because of a spring measurement that is 3/4" outside the norm for a 5200lb axle. This is the reason why the GVWR for the Legacy Elite is listed at 5,000 lbs. This axle does have the 12" brakes and 6 lug. The Legacy Elite II is currently being built with dual 3500lb. 10 x 2.25 axles putting the GVWR at 7,000 lbs. The brakes are 10"brakes and 6 lug. Some of the earlier model Elite II trailers were built with the 5200 lb. axles as well as a few models that were produced during November 2014- December 2014. This short run was because Dexter had derated it's 3500lb axle that we were using for the Elite II. We immediately ordered the 5200lb axles during that short run because we chose not to use the derated axles and only switched back to the 3500lb axle once we could get it without it being derated. The website is incorrect where it states 12" brakes on the Elite II page and I will make sure that this gets resolved. With dual axles and 4 brakes it isn't necessary to have the 12" brakes. - Hope this helps, but if anyone has any questions, please feel free to give me a call. - Jason
-
This is a great question and one that many of our customers have started to ask. To access the plumbing under the bathroom sink you would need to cut away the caulk from around the vanity. Once the caulk has been removed you should be able to pull the vanity out. *CAUTION - DO NOT try to pull it out with the caulk still in place. We use 3M 4000 caulk which is a semi-permanent caulk and it will rip the gelcoat if it isn't cut before removal.
-
Hello everyone! Rally time is getting closer. We have about 13 trailers that can be here for our 1st Oliver Rally. This Rally was put in place with very short notice and I know that many are unable to attend due to other pre-planned arrangements. Hopefully we will get another Rally on the books sometime next year and have at least 6 moths planning so more people can make it back to Tennessee. We will have some people joining us for the rally that are not currently Oliver owners but are interested in seeing the Ollie in person. I wanted to let everyone know that we will be providing your meal Friday night. It will be sandwiches and finger foods. We will be getting together there at NACO at their Town Hall for a meet & greet and food. We will also be in Town Hall Saturday morning for a Pot-Luck breakfast and ask everyone who can to prepare your favorite breakfast food to share with others. NACO has some great activities planned as well for that weekend so those of you who enjoy football can take part in their Football Fanatics party during that weekend. We will also be doing a drawing Friday night for some free giveaways. Our 2017 Inventory Demo will also be on display that weekend for everyone who would like to walk through. We have added as many options to the unit as possible so you can see what each option looks like on the trailer and how it operates.