Search the Community
Showing results for '"Backup camera"'.
-
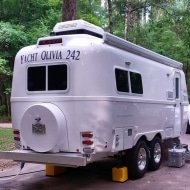
 We've never owned a truck or a trailer. My wife and I are retiring in 6 months and diving in with all 4 feet. Tell me what we don't know please. We looked at lots of trailers and are finally pulling the trigger on the LEII. I've read a bunch of threads on here over the last year. Very helpful. But if you can point me to some that have already discussed this sort of thing, I'd appreciate that, too. We prefer simple: Everything we need, but nothing we don't. So.... LEII - starting the ordering process today 🙂. Scheduling factory tour soon. Standard except as follows: Twin Bed Floor Plan Two Upgraded Foam Mattresses Hypervent for Twin Bed Floor Plan Front & Rear Propane Quick Connects Backup Camera with 4.3” display Aluminum Storage Basket Inside Basement Access Door Auto Drain (push button drain valve) - What is this? Door lock (do I need the electric one?) TV - bought yesterday 🙂 Ram 1500 Laramie, 5.7L 8 cyl hemi, 4wd, max tow, air shocks, class iv hitch, 9 pin connector, rear video Approx 1,700 load capacity Locking hard tonneau cover, bed liner Miscellaneous side purchases (yet to be made) Generator that runs on propane - to be carried in Ollie's storage basket Surge protector (no idea what sort of electrical equipment I need for generator or shore power) TPMS for trailer Screen house carpet for under awning hoses, leveling blocks, antitheft? tools? Storage - We intend to use these toys a lot. Maybe even 6 months a year. But, inevitably, they will get placed in storage when not in use. We live in a FL subdivision, with no garage space for this size stuff. So, I thinking I buy a cover for both.
 -
HDRider, The carrier with the box pictured above on my May 13, 2023 thread posted by rich.dev, was simple and has worked very well for me. It does have a 1 1/4 inch bar not an adapter. The carrier that I purchased had both a 2 and a 1 1/4 in bar. I also used a hitch clamp that stabilizes the carrier and it does not bounce around as was noted as a negative above. I can verify this in my backup camera. For sure, I stay under the load limit for the Oliver rear hitch. I have also worked out a technique to slide the carrier box assembly without removing it, to remove the tire cover and spare tire. I had to actually do this on a trip to Hohenwald last summer when I had a flat and had to use the spare. In fact, I did it again today as I rotated my tires, putting the spare into the rotation at Jason's recommendation during a tire discussion on that summer visit. Ron
-

FORD SUPER DUTY TRAILER MOUNTED CAMERA
Rolind replied to Wandering Sagebrush's topic in General Discussion
I was initially very interested in the ford wired backup camera, but was very hesitant bc I had to be hardwired to the trailer. Seemed like a lot of hassle for very little benefit. I currently have an after market tpms and the Oliver factory installed backup trailer camera. The monitor is a little small and it sure would be nice to have the backup camera on the trailer display on the truck head unit, but I am very happy with what I have. I find I only really use the backup camera for a few minutes when I back into a campsite or storage for our Oliver. The wired ford backup camera and tpms seems like a long run for a short slide! Just my humble opinion. -

FORD SUPER DUTY TRAILER MOUNTED CAMERA
ScubaRx replied to Wandering Sagebrush's topic in General Discussion
We may be talking about cameras that have two entirely different capabilities. I had a “backup camera” mounted on the rear of each of our Oliver’s. They simply provided a wide angle camera view of what was behind me. I ordered the camera I’m referring to here when I ordered the Silverado. Once installed and plugged into its port on the back of the truck, it is incorporated into the multi camera system built into the truck. Utilizing it and the other eight cameras will allow you to see up to fifteen different views of the truck and trailer. It’s much more than a simple backup camera. -
Hi All, My backup camera stopped working and the head unit cannot connect wirelessly even if it is within inches of the camera. Of course the power is on to the camera. My question is has anyone had this problem and how do i check if power is getting to the camera. Also, on my 2018 Hull #381 there doesn't seem to be a 12v fuse labled backup camera and the schematic doesn't show which one it would be. I just thought I would ask here before tearing into everything. Thanks
-
My 2023 LE2 will be ready within a month, and I am trying to get my tow vehicle setup. In particular I am curious about the size of the Furrion backup camera monitor. I see in the manual provided by Oliver that there are several models, but didn't know which one Oliver provides with the 2023 model. I have a mounting plate on my dash and I use Ram Mounts for attaching cell phone, cameras, etc. I'm looking to purchase a mount for the backup monitor but need to know the dimensions of the monitor itself. Can anybody fill me in?
-
I have a Voyager back up camera and monitor that I use with my truck camper. The Ollie we are buying doesn’t have that option, and I’d like to have one. Cameras are available for the system, and I am thinking about placing one on the rear cargo box, with the ability to move it to the spare tire cover. Power would be from the running light circuit. Has anyone located their camera there? Thoughts?
-
The rear LED marker lights are below the Oliver sign but still an excellent point to note that they should be checked as well. Several of my marker lights have leaked. Your post also reminded me that one of the first leaks that I experienced was from the backup camera cable entrance point. That dumped a lot of water into the attic area. Thanks for mentioning the marker lights!
-
Share and Enjoy !Shares View the 2023 Legacy Elite & Legacy Elite II Furrion Backup Camera Manual by clicking the button below. View Share and Enjoy !Shares The post 2023 Furrion Backup Camera Manual appeared first on Oliver Travel Trailers. Read the Full Article
-
Hi all, I searched the previous posts to see if there were any posts about the backup camera. I assumed that there would be some. Maybe I don't know the right way to search even though I put in "backup camera" in the search bar. Are you all pleased with the backup camera? I hope the one that is an OTT option can be used to give a rear view also when towing the trailer. Ideally, the monitor would mount over the truck's mirror or be somewhere easy to view while driving. If it does go over the truck mirror, then when driving there's no adjusting the vision to see the rear view. Thanks.
-
August 20th is the date by which I have to finalize my options on an Elite II. I have everything sorted except one -- the backup camera. I had a backup camera on my previous travel trailer. It wasn't great and frankly I rarely used it. The camera option on the 2023 Oliver is $850. That's a lot of money for an option I may not use, if at all. I'm curious about others' thoughts and recommendations. Do you have it, do you use it, do you find it worthwhile?
-
I am thinking I need to replace my existing 2017 Oliver backup camera with the Furrion S they now install at the factory. Was it easy to make the switch? I don't want to drill any holes just want to "hook it up - plug-n-play"!!!
-
We have the Furrion wireless backup camera, ordered as an option when we took delivery of our 2021 LE2 last September. The display is mounted on the windshield just above the dashboard, and with the brightness & contrast of the display maximized, I still find the display hard to see in most daylight driving conditions, when the view through the windshield is fairly bright. On overcast or rainy days when the view through the windshield is darker, the display brightness is acceptable. Has this been an issue for any of you?
-

Newbies taking the plunge - Are we missing anything
Steve Morris replied to Dennis and Melissa's topic in General Discussion
When we ordered last August, not getting solar was not an option with lithium. They came as a package. As noted previously, changing to lithium/solar later is a very expensive proposition. Much more than getting it from the get go. Almost all of the wiring needs to be replaced with the heavier wire that lithium needs, along with the different controllers, and other components. I'm probably misremembering, but I thought someone checked with Oliver, and it was going to be about $10k more than having it done when built. For us, the choice to add the Platinum Pro package was the most expensive option, and the easiest to swallow. On some of your other questions, here's my response as first time trailer owners (we had a square-back teardrop prior, so basically dry tent camping.) Auto Drain: We opted not to get this for two reasons. Keeping things simple (it relies on an electrical switch and a motor), but more importantly, it is out of sight, so something you might forget. With the manual handle, when closing up the trailer, I always fold the steps and look inside to make sure the handle is pressed in. Doing those routinely together ensures I'll never forget (yea, right...) And if like me, you didn't pay attention during the walkthrough, simply remember Drive-In, CampOut. Handle is in when driving, and out while camping (or dumping) We opted not to get the electric door lock. Just something else to go wrong. The key is smaller than the fob when carrying in a pocket. The backup camera was the last thing we decided on when ordering. (Actually, much later, because you can change your order up to the point where you pay off the first 50%) I had considered adding my own, but having the wiring and witch already in place saved a lot of headaches. I expected to only use it while backing into a site, but in actuality, I never do. I use it a *lot* on the highway when watching traffic behind me, and especially when changing lanes. Upgraded mattresses: When we ordered was when Oliver was changing from KTT to whoever makes the current mattresses. When visiting other owners with the KTT mattress, we loved the firmness, and had decided to go that route. When we got to the factory for our tour and to order, they'd switched vendors. Some people love them, but we found them much too soft and flimsy, almost like a cheap motel mattress. So we ordered without the upgrade option, and then ordered a pair of Oliver specific mattresses direct from KTT. Shipped to our home, they were almost the same cost as the Oliver upgrade. A few other owners have done the same. Here's what we ordered: - Oliver Legacy Elite II Twin Bed - Standard Mattresses (KTT mattresses after receipt) - Standard Fabric - Midnight - Hypervent - Omnidirectional Antenna (local weather etc. if we don't have cell service) - Street Side Awning - Frosted Cabinet Doors - Convection Microwave - 20 Gallon Propane (to keep tongue weight down) - Front/Rear Propane Quick-Connects - Standard Toilet (with possible AirHead composting replacement) - Full Truma Package AC, Furnace, Water Heater and Antifreeze kit - Lithium Platinum Package - Backup Camera - Rear Bumper Receiver (converted to 2" after receipt) - Anderson Hitch - Aluminum Storage Basket - Basement Door - No Graphics Over six months after our pickup date and 44 nights of use, there's nothing we'd have changed. -
 We have had a fast introduction to our new-to-us Elite I (hull 731) since we picked it up over Labor Day weekend in McComb, Ill. We are four years into retirement and felt ready to do some camping and to get out and see more of our country. We thought we could fit camping trips in between our life with our many local grandchildren – and help with visits to our non-local grandchildren. From our home in Pittsburgh, we’ve now taken 5 trips, visited 7 states (from Illinois to NY to Tennessee), travelled 3400 miles and camped for 13 nights. This has given us a deep dive into the Oliver camping world. I thought we’d share our first impressions and ask some questions. Overall, it is evident that the Oliver is a complex and capable trailer. We love it!! We are glad for our purchase and our start into some years (God willing) of camping adventures. The Oliver online forums and the Oliver University have been a goldmine of advice. Thanks to you all, more than once!! As we got started, we had to: · Upgrade our TV capabilities, adding a class 3 hitch, air bags and a brake controller to our 2022 V6 GMC Canyon. All this was new to me, and I’m glad to say we’ve had no towing difficulties. · Learn how to tow. I got my first lessons from our seller at pickup, a *great* guy. Caution and care were important as we started. As of this writing, we’ve been through the Adirondacks and the Smokies at least once. · Learn how to travel with our Cocker. ‘Brecon’ goes with us, almost always. But she does not sleep on our bed, so… the floor by the door proved perfect for her bed, leaving the isle free to walk to the bathroom in the middle of the night. She travels well, and is a sweet companion. · Learn the basic systems, including parking, electrical, propane, solar, water, sewage, heat, and solar. We were told at sale that both our previous owners sold after 1500 miles in part because of the complexity of these units. We sympathize! · Learn the basics of finding places to camp. We studied up on federal, state and private options, including Harvest Hosts and Hipcamp. We quickly concluded that we love remote camping, so we had to learn how to boondock. Hipcamp has been our favorite. · Learn how to live in tight quarters! We’ve been married for 46 good years, but this is a new season. As soon as we had a week of nights or so under our belt, we began to shape our Ollie to fit us. All these mods are reversable, but to date we have: · Swapped out the Furrion rear view camera (with a dim, small, fuzzy image) for a Haloview BT7 1080p Backup Camera. I used the wiring for the Furrion and relocated the camera below the Oliver light, temp caulking the previous Furrion holes. The difference was well worth it. · Taken the TV and its mount out. We don’t use it. · Taken the rail btw the front dinette seat and the rear dinette seat out. The added headroom in sleeping is well worth it. · Added 6 Tireminder TPMS transmitters. I may add 2 more to our spare tires. · Made solar work for at least two or three night stays offgrid. 8 of our first 13 nights were remote (by choice) with no hookups, so we learned to keep electrical use to a minimum, turned off the inverter when off shore-power, and added a 100 watt portable solar panel to our 230 watt rooftop panels. As we sit here and think back on our first weeks with the camper, what have we liked, what do we love? · Without exception, we have enjoyed the people we have met. This country has a lot of great people, many of them living out in the country. · The Oliver has made visiting our large family and other friends a cinch! We happily sleep in our trailer! · We are pleased with the Oliver itself, with its aesthetics, its evident craftsmanship, and its ‘mod-ability’. It fits us well. · We love being warm and snug and dry inside when it is cold and windy and wet outside. · We love waking up to sunrises streaming in the windows. We love going to sleep with night breezes across our faces. We love the hoots of the owls and the barking of the coyotes in the hills. We’ve loved sitting pondside and watching snapping turtles cruise in the evening, the swallows as they dart, and the fish as they leap. · We love the quiet and the calm of the countryside and the hills. · We love the stars deep into the nights in the countryside. We travel with a small telescope and binoculars. The stars have long been a love. Geoff and Becca Chapman
- 5 replies
-
- 13
-

-

-

-
A friend with 2021 Ford f150 is ordering an Elite. Can anyone tell me if Ford supplied tpms and backup camera is available to work woth Ford screen?
-

Newbies taking the plunge - Are we missing anything
Boudicca908 replied to Dennis and Melissa's topic in General Discussion
Welcome to the family! I’m answering from the road, on my phone, so pardon my brevity: I own the 2022 Elite II, twin bed, upgraded mattress, solar (3 lithium batteries), composting toilet, convection microwave, the convenience power connection up front, and a front basket. I tow with a 2500 HD truck and a 2-5/16” hitch ball, so I didn’t need the Anderson hitch. I chose 20# propane tanks, after I learned what they weigh when full. I love everything about my Oliver; no regrets on any of my choices. If there’s an option for backup camera size, I’d recommend larger. TOYS & OTHER EQUIPMENT: I am shopping generators. During my first OTT plant tour yesterday, Josh mentioned a newer model Honda 3200i that is smaller (fits in basket) and DUEL FUEL. It sounds pretty decent. I haven’t researched it yet. I bought the “Sand Mat” and love how it lets dirt and sand pass through. Look for sales, or used on REI. It’s not light weight, but comes with a storage bag. I have several electric adapters: 50 to 30, 15 to 30, and I’ve needed both for various purposes. Torque Wrench is a must (mine is hand powered, easy to use and lives under my back seat in the truck.) You might need to buy the right size fitting. This summer I’ve added: COOKING: a Blackstone 17” propane griddle (great thread on this forum will give you lots of options and ideas); a third 20# propane tank in the back of my truck; a Duxtop electric Induction cooktop (has two model numbers on the box! BT-200DZ and 9610LS). COMFORT: a DREO space heater model DR-HSH004-G that can run at eco setting using the battery (I never leave it on, as I didn’t need it running all night, including during 20+ degree temps, as I had winterized my trailer.) MAINTENANCE: a grease gun with extra fittings (see Jason’s excellent service video on Oliver Travel Trailer YouTube channel plus forum threads on greasing Zerks); a small mirror on a handle, to see some of the zerks, and other equipment in small spaces; a Combustible Gas Detector. EDIT: I almost forgot to mention, I’m from SW Florida and I cannot store my trailer at home. I opted not to buy the cover, and I rent a covered space in a secure storage facility. It’s north and inland from where I live, and it was worth the expense, as my Oliver didn’t suffer from Hurricane Ian last year, and was protected from UV. I’ve been on the road since early July (and I’m not home yet). I’ve only needed to empty my compost solids twice. -
 Hi All! I will be picking up my Ollie in less than 2 months. Again, as a newbie to RVing, I am still trying to learn…but so far, I feel I have learned a lot from reading these forums – so a big thanks to all of you! Anyway, I have looked at different checklists on how to set up and break down the trailer, trailer hookup, trip preparation, etc. After looking at tons of checklists (and Youtube videos), I have attempted to create my own checklists. Some may look at these lists and think they have too much info, and that they are overkill – but personally, I work better with very specific instructions. Although these checklists are long, I was hoping that you guys would look and provide feedback on them. Did I miss steps? Is the order correct? Did I use the correct terminology? And so on. I know this is a big ask as the lists are longs on detailed....but any help would be appreciated. If worst comes to worse, I guess I will find out if they are correct when I go to use them. Note that if you see RED in the script, then it is a question I have or something I still need to fill out – so if you have the answer, I would love to hear it. I have attached a document with the checklists, but I have also cut and pasted the checklist below....just to make it easier for anyone. The document is in .docx format...if you need it in another format, let me know. Also, after I complete the checklist and go through them a couple of times, I will post a file with all the updates of them so it can be downloaded by anyone interested in it. Thanks! (1a) Campsite arrival and set up - Inside trailer 1) Put steps down of Ollie. 2) Unlock Ollie door. 3) Open window shades. 4) Open windows as needed. 5) ? Open stove vent ? 6) Pull out shower drain cutoff valve (inside bathroom at toilet base) to open shower drain. 7) Open bathroom fan vent. 😎 Open Maxx fan lid/vent if it is not open. 9) If propane was not on: Verify stove is off, turn on propane outside, and light stove burner for 30 seconds (to remove air from line). 10) If at RV park (with electrical): Switch refrigerator from ‘LP’ (propane) to electric. 11) Verify refrigerator is working correct AND in correct mode (should be ‘LP’ if not at RV park with electric). 12) If boondocking and using fresh water tank: Turn on water pump. (but maybe turn on faucet first?) 13) Verify kitchen faucet is working. 14) Turn on gas water heater switch ? 15) Turn off backup camera. ? 16) Turn on furnace if cold. 17) If at RV park AND electrical is hooked up: Turn on A/C if hot. 18) Put out welcome mat, chairs, etc (1b) Campsite arrival and set up - Outside trailer 1) Using spotter, back up into campsite. Watch out for branches. 2) ? Turn off GPS in vehicle. ? 3) Put on work gloves. 4) Eyeball trailer is not too far and will be able to hook up to sewer, electrical, and water. 5) Level trailer side to side using Anderson levelers. Use level inside for final determination. 6) Set chocks - front and back of both wheels. Important: set chocks before detaching safety chains or the trailer from the hitch! 7) To unhitch trailer (after you are sure you are close enough to water/electrical/sewer): A) Detach breakaway cable from truck and stow. B) Remove hitch coupler pin (that has electric pigtail under it) from hitch coupler lever and stow. C) Detach 7-pin electric pigtail from truck and stow. D) Detach safety breakaway cord from truck and stow. E) Detach safety chains from truck and stow. F) Put leveling blocks under front jack leg so it doesn’t sink in. G) Lower front jack leg so tongue is raised about 2-4" until chains are slack. H) Pull cotter pin from WDH triangle pin. I) Pull WDH triangle pin from WDH (you may have to wiggle triangle back and forth while pulling out). J) Insert cotter pin back into WDH triangle pin (so you don’t lose it) and stow WDH triangle pin. K) Drop WDH triangle and chains on ground. L) Raise front jack leg so tongue is level with truck hitch. M) Pull up on hitch coupler lever. N) Lower front jack leg to raise tongue and release tongue from ball. If necessary, use foot to push down on hitch to help separate ball from hitch. O) Lock trailer hitch with hitch lock. 😎 Move truck to parking spot. 9) Raise or lower front jack leg onto leveling block to level trailer front to rear. Use level inside for final determination. 10) Lower rear stabilizer legs onto leveling blocks to stabilize back of Ollie. 11) After making sure that stove, heater, furnace, and water heater are off: Turn on propane 12) If at RV park: Hook up electric: A) Attach one end of electrical cord to RV. Note: Always hook up to RV first!!! B) Attach the other end to surge suppressor. C) Attach surge suppressor to 50-amp converter if needed. D) Verify that breaker is OFF on pole side before plugging in. E) Connect converter (or surge suppressor) to park electric outlet. F) Make sure no faults are detected by surge suppressor. G) Turn on breaker. 13) If at RV park: Hook up water: A) Wipe off water faucet with sanitizing wipe (or spray with disinfectant). B) Attach ‘Y’ to faucet. C) Attach 55 PSI pressure regulator to ‘Y’. D) Attach inline filter to pressure regulator. E) Attach white water hose to inline filter. F) Attach white water hose to city water line. G) Do NOT turn on water pump inside Ollie! 14) If at RV park: Hook up gray water sewage: A) Put on gloves. B) Bring out sewage drain hose support and put sewage drain hose on it. C) Remove cap and attach sewage drain hose to sewage hole. D) DO NOT pull out grey tank handle to open. Save grey water for cleaning sewage hose. 15) Check water heater for propane odor - light pilot and turn on or use auto ignite on newer models. 16) Turn furnace electric switch on - older model have switch on the furnace under the sink, newer models do not have a switch. Not sure if we have a switch or not. 17) Extent and secure awning (optional). (2a) Campsite departure preparation - Inside trailer 1) Clean up, put stuff away, secure items. 2) Vacuum. 3) Refrigerator - check inside, throw away anything old, latch door tightly, switch to ‘LP’ (propane) (if you were set to electric), and verify that refrigerator is running on propane. 4) If dumping garbage: Collect and bag garbage AND put in truck. 5) Turn off TV and stow away. 6) Verify stove burners are off. 7) Secure microwave glass plate (maybe in sink?). 😎 Close and secure ALL windows (including bathroom window). Note that non-bathroom windows can be left open ( < 4 inches) if there is no rain in the forecast and the day is hot. 9) Close ALL window shades (so they don’t have problems when traveling) unless windows are kept open. 10) Close bathroom fan vent. 11) Push in shower drain shutoff valve (inside bathroom at toilet base) to close shower drain. 12) If dumping garbage: Collect and bag garbage AND put in truck. 13) Turn off A/C. 14) Turn off furnace and lower thermostat. 15) Turn off Maxx fan - close lid/vent, turn switch and speed to off, thermostat on red. Note that the Maxx fan lid/vent can be left open if there is no rain in the forecast. 16) Make sure ALL cabinet and drawers are closed tightly. 17) Lock bathroom door. 18) Lock pantry and front closet door. 19) Turn on backup camera ? 20) Turn off water pump. 21) Bring in any outside mats. 22) Turn off all lights. (2b) Campsite departure preparation - Outside trailer 1) If at RV park/dump station: Raise 2 rear stabilizer jacks a foot. 2) If at RV park/dump station: Raise front of trailer one-half foot using electric stabilization jack so grey tank will flow out better. DO NOT raise so high that 2 rear stabilizer jacks touch ground! 3) If at RV park/dump station: Put on disposable gloves. 4) If at dump station: Connect sewage drain hose to sewer hole (it should already be attached if at RV park). 5) If at RV park/dump station: Empty black tank by pulling out black tank handle to open. 6) If at RV park/dump station: Verify sewage drain hose has stopped draining. 7) If at RV park/dump station: Push in black tank handle to close. 1) If at RV park/dump station: Empty grey tank by pulling out grey tank handle to open. 2) If at RV park/dump station: Verify sewage drain hose has stopped draining. 3) If at RV park/dump station: Push in grey tank handle to close. 4) If at RV park: Turn off white tank water at RV faucet. 5) If at RV park: Disconnect white water hose, spray with disinfectant, connect ends, and stow. 6) If at RV park/dump station: Spray black tank water hose with disinfectant and attach to RV faucet. 7) If at RV park/dump station: Attached black tank water hose to black tank flush inlet. 😎 If at RV park/dump station: Turn on water at faucet. 9) If at RV park/dump station: Monitor black tank from inside RV. When 2/3 full, pull open black tank handle. 10) If at RV park/dump station: When running clear, turn off water at faucet. 11) If at RV park/dump station: Disconnect black tank water hose, spray with disinfectant, connect ends, and stow. 12) If at RV park/dump station: Squeeze sewage drain hose so any excess goes into sewer hole. 13) If at RV park/dump station: Disconnect sewage drain hose from sewer hole 14) If at RV park/dump station: Spray sewage drain hose with disinfectant, cap, and stow. 15) If at RV park/dump station: Throw away gloves and wash hands. 16) If at RV park/dump station: Spray water hose ends with disinfectant, connect ends, and stow. 17) If at RV park: Turn off electric from electrical hookup. 18) If at RV park: Disconnect electrical cord from RV and stow. 19) If at RV park: Disconnect cable TV cord from RV and stow. 20) Stow outside thermometer. 21) Get any items you need for truck from inside trailer (water, keys, etc.). 22) Close and secure awning. 23) Bring up both stabilizers and front tongue support jacks. Stow all 3 leveling blocks. 24) Water heater - off. 25) ? Secure stove vent. ? 26) ? Put on A/C cover. ? 27) Walk around trailer and stow anything left out. 28) Lock outside storage compartments. 29) Verify all lights are out. 30) Lock trailer door. 31) Raise aluminum steps. 32) Hitch up truck to travel trailer. Follow instructions in '(3) Trailer Hookup' section below. (3) Trailer Hookup 1) Back up truck to hitch about 6 inches from trailer hitch - make sure you are straight. 2) Need to add part if trailer and truck are not straight to each other (could be tough to set up WDH). 3) Raise rear stabilizer legs all the way up and stow both leveling blocks. 4) Unlock hitch coupler lock and stow. 5) Pull up on hitch coupler lever. 6) Put leveling block under, then lower front jack leg to raise tongue so ball receiver (on trailer) will clear the hitch ball (on truck). 7) Back up truck as to position hitch ball under ball receiver, but just a little forward - about a 1/2". 😎 Raise front jack leg to lower tongue onto hitch, until hitch is snug with ball. 9) Push down on hitch coupler lever to lock hitch onto ball. 10) Insert hitch coupler pin into hitch coupler lever (so secure it). 11) Lower front jack leg until no weight on truck hitch. This not only verifies the lock/ball is secure, but allows easier installation of WDH. 12) Take cotter pin out of WDH triangle pin. 13) Slide WHD triangle under the hitch 14) Secure WDH triangle with WDH triangle pin. 15) Insert cotter pin in WDH triangle pin to secure it. 16) Raise front jack leg all the way up. 17) Verify that WDH chains are tight. 18) Attach safety chains to truck so they crisscross UNDER tow bar. 19) Attach 7-pin electrical pigtail to truck (under hitch coupler pin). 20) Attach safety breakaway cord to truck (NOT to safety chains). 21) Remove chocks and stow. 22) Pull trailer forward a little - recheck hitch to see if secure. 23) Pick up Anderson levelers and any 24) Test trailer brake lights and turn signals. 25) Walk around trailer and stow anything left out. (4) When leaving the RV for a hike or car trip 1) Retract awning. 2) Bring in any items that you don't want wet or blown away. 3) Turn off generator and lock it up. 4) Put away solar. 5) Check A/C or heat – turn on if needed. 6) Lock up trailer. (5) Trip Preparation (leaving home) 1) One day before: Connect RV to shore power (AC). 2) One day before: Check propane tanks and fill if needed. 3) One day before: Verify stove is off. 4) One day before: Open up propane valve. 5) One day before: Turn on stove for 30 seconds to clear air from propane lines. 6) One day before: Turn refrigerator on to AC and set to 9 (which is the coldest setting). 7) Check air in tires - fill to recommended psi of tires. 😎 Fill fresh water tank about 1/3 full - top it off at or near your destination. 9) Open hot water tank bypass valve - handle in vertical position to open, horizontal to bypass. 10) Turn on pump and run all faucets (not all at once) from the rear to the front - hot and cold to remove air. 11) Run water into toilet to remove air from lines and to add water to black tank before use. 12) Day of trip: Follow instructions in ‘(2a) Campsite departure preparation - Inside trailer’ section above. 13) Day of trip: Disconnect electrical cord from RV and stow. 14) Day of trip: Follow instructions in '(2b) Campsite departure preparation - Outside trailer’ section above, including any instructions in the ‘(3) Trailer Hookup’ section. Ignore any ‘If at RV park/dump station’ instructions. 15) Open Maxx fan vent. (6) Trip ending (arriving home) 1) Follow instructions in '(1b) Campsite arrival and set up - Outside trailer’ section above. 2) Put steps down of Ollie. 3) Unlock Ollie door. 4) Turn off backup camera. ? 5) Remove all items from refrigerator. Turn off refrigerator. Make sure door stays open. 6) Put dog towels in refrigerator to capture water from defrosting. 7) Turn off propane. 😎 Empty water tank. 9) Close Maxx fan vent. 10) Close window shades. (7) Filling up 30 gallon white water tank from water spigot (fresh water inlet) 1) Wipe off water faucet with sanitizing wipe (or spray with disinfectant) 2) Attach 55 PSI pressure regulator to water faucet. 3) Attach inline filters to pressure regulator. 4) Attach white water hose to inline filter. 5) Attach white water hose to fresh water tank inlet. 6) Turn on water until water overflows or Seelevel monitor says it is full - then turn off water. 7) Detach pressure regulator from water faucet. 😎 Detach white water hose from inline filter. 9) Squeeze out water from white water hose, then detach from fresh water tank inlet. 10) Wipe off white water hose with sanitizing wipe (or spray with disinfectant), connect ends. 11) Stow white water hose, pressure regulator, and inline filters. (8) Filling up 30 gallon white water tank from water container or jugs (via boondocking inlet) while you are boondocking 1) Wipe off boondocking inlet with sanitizing wipe (or spray with disinfectant) 2) Attach white water hose to boondocking inlet behind Ollie. 3) Attach white water hose to jug or container holding the water. 4) Turn ALL 4 valves counter clockwise. As info: a) upper left valve opens from rear boondocking inlet. b) lower left valve opens from fresh water tank. c) lower middle valve closes from faucets. d) lower right valve closed from city water. 5) Tun on pump – water will start flowing from water jugs to fresh water tank. 6) When all water has been pumped in, turn off pump. 7) Detach white water hose from inline filter. 😎 Squeeze out water from white water hose, then detach from boondocking inlet. 9) Wipe off white water hose with sanitizing wipe (or spray with disinfectant), connect ends. 10) Stow white water hose, pressure regulator, and inline filters. 11) To continue boondocking: a) Turn upper left valve clockwise to close rear boondocking inlet. b) Turn lower middle valve clockwise to open faucets. tripmush - checklist.docx
 -
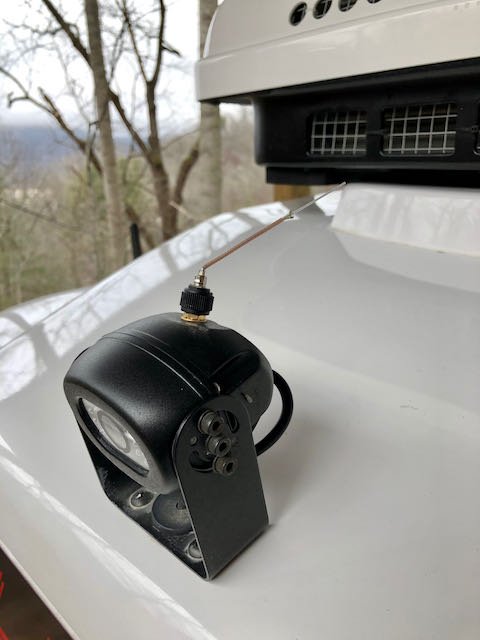
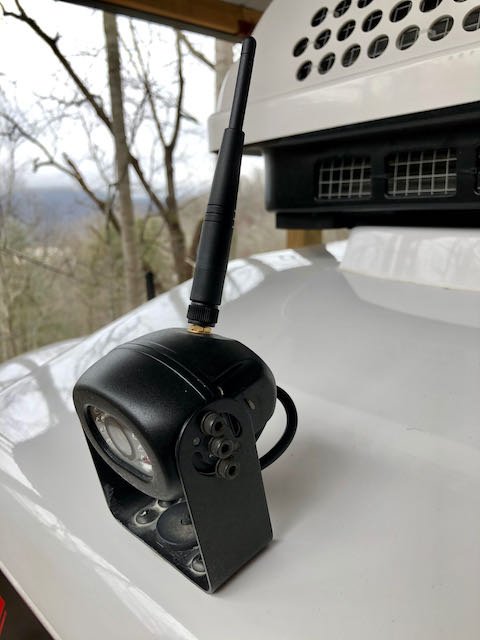
 A falling branch wiped out our backup camera antenna recently. I found this replacement at etrailer.com (p/n PXXHD0006301R fits camera model WVCMS130AP, $21 plus tax and S/H). First experience with that site, fully satisfied with their prompt shipping and protective packaging. Hoping this info may help someone. - Brian
- 1 reply
-
- 4
-
-

Question about the backup camera monitor
Rivernerd replied to shhQuiet's topic in Mechanical & Technical Tips
When our Elite II was ordered, we, too, wanted a larger monitor. Anita Johnston advised that a larger monitor was not an option. So, we decided to go with the factory-installed backup camera, but reserve the option of upgrading to a larger monitor later. Now that we have "lived with" the 4" monitor that comes with the backup camera system Oliver installs since last November, we are happy with it. It provides a clear view of the area immediately behind the trailer. Yet it occupies less dash space, and causes less visual obstruction of the area in front of the tow vehicle, than a larger monitor. We feel no need to upgrade to a larger monitor. -

Backup Camera Location
Southbird401 replied to Wandering Sagebrush's topic in Mechanical & Technical Tips
I mounted my Ford backup camera on the spare tire cover. It is integrated into the Ford surround truck camera system. It works well in that location, though if I were to carry bikes it wouldn't be so great. Its probably better up higher, but I didn't want to drill into the trailer to mount it and it was easy to run the Ford cable under the trailer and up to the top of the spare tire cover and keep it concealed. I couldn't do that for a higher mount, at least not within my limited ability. On the spare tire cover, the view is great, you just have to keep it clean, as it picks up more dust than a higher mount. It's easy to reach to just wipe off the camera lens. -
Installing a Garmin wireless camera with protective guard, to communicate with a Garmin GPS in the tow vehicle (mine is a RV660LMT). Here is a teaser shot: I had to take several deep breaths before I started drilling holes in the hull, but after the first one it was easy. The trailer is pretty dirty, I haven't been able to wash off 3000 miles of road grit yet. Lots more coming soon. John Davies Spokane WA
-

RFI: Wireless Camera System Recommendations
StillGame replied to Wandering Sagebrush's topic in Mechanical & Technical Tips
I just installed this system, as the camera was a fit for the existing Furrion bracket on my Ollie, and the monitor is 7". Found it on Amazon. https://www.amazon.com/dp/B078PDH6Z8?psc=1&ref=ppx_yo2ov_dt_b_product_details Much better picture than the Furrion 4" monitor it replaced.A MTIFO RV Backup Camera Wireless HD 1080P Trailer Bluetooth Rear View Cam System Touch Key 7'' DVR Monitor Split Screen 4 Channels for Truck Camper Adapter for Furrion Pre-Wired RVs A7 -
Paul found this in today's Harbor Freight flyer. He thought it would be a big help to me in seeing where the hitch and ball are as he's backing up and I'm signalling... It's tough for me to tell sometimes. Would probably be easier to see with a backup camera, too. I'll let you know how it works out for us. Sherry Magnetic Trailer Alignment Kit Item # 95684 Harborfreight.com/cpi/ctaf/displayitem.taf?Itemnumber=95684
-
We ended up painting a white stripe on the Bulldog which is visible by the backup camera on the tailgate. We roll down the back aft window of the Tundra and D calls me on her mobile whilst attempting to line-up the hitch ball with the Bulldog (the mobile phone keeps the active "discussion" a bit more private especially when D's commands are accentuated with something like, "...I said turn to your other *&^%ing left!")