Search the Community
Showing results for '"Winter camping"'.
-
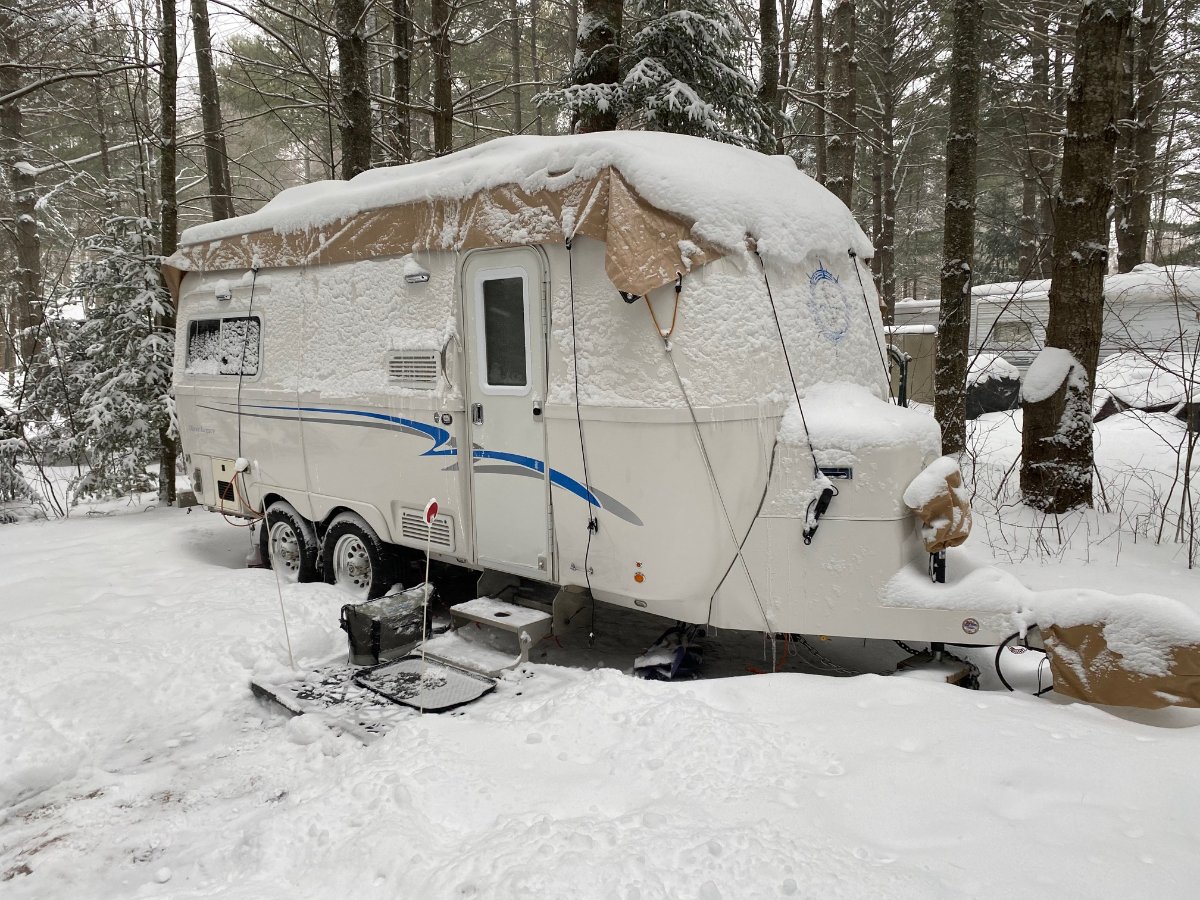
@John Welte, The humidity content is horrendous here in the winter we had so many days this year with greater than 90% humidity. We have a 3 sided metal RV port with tarps for the doors, so direct rain/snow is not on the Oli. We also can keep the Oli plugged in full time. The outside of the Oli itself during the winter along with the cement floor and the inside walls of the port would get dripping wet with moisture from the humidity. The first couple of years I opened the bathroom vent, and then turn the Maxair fan on it's lowest setting and l had the blinds completely open leaving the fan run all winter. I learned from winter camping out here if we did have constant air flow the insides of the trailer would be wet. This last year, I was so busy working on the inside of the trailer, that I left a little electric heater set to around 55 degrees in the Oli and lock the Oli up tight, with all the vents closed. This year worked much better at lowering the humidity level in the trailer, although the electric bills were higher.
-
Just saw this and thought I would pass it along. Well done Oliver! 🇺🇸 Patriot🇺🇸
-
Enjoying winter camping in my Oliver, snowmobiling every weekend.

-
You may be right. i never actually blocked the skuppers. My thought is that as long as there is moisture in the trailer and temperature differential on between air surfaces, condensation will happen. I was planning on blocking the holes just for the winter in an effort to minimize all that cold air intrusion. Guessed that warm, moist air would rise (like in the atmosphere) and that I could vent through Maxair Fan. Even mid winter, we would crack the fan cover, not turning on the fan itself unless cooking and it did wonders to cut back on condensation. Pretty much limited to windows over beds where we were breathing. We had reflectix inserts in all windows so would open up the ones by beds every couple of days to find a modest amount of frozen condensate. Took no time to dry out. I ultimately gave up on the plan as my experience with digital thermometers in vulnerable spots, proved to me that my un-winterized Oliver, even after mods, had limited cold weather use. Some have had success down to zero with their trailers. I accept their account but could not reproduce the experience myself even after literally month's of winter camping and careful testing. I always found multiple spots in the hull, that had water lines run through them, that would drop to below freezing given consistent exterior temperatures in low teens or lower. Covering some of the skuppers during the dry winter time may have really helped improve performance.
-
We installed a smart plug on our old Oliver when I noticed elevated heat around the plug. It turns out the interior lugs weren’t tight. I don’t think the smart plug solves this, but I did like what it did outside of that: we carried a “smart plug extension cord” and then had dog bones for various connectors that felt more secure and water tight than using adapters on the RV style 30a. So we could plug into 15, 20, 30, and 50a receptacles in a way that felt better than using the various adapters on a 30a cord set. I did carry a spare “RV end” of the cord, so if I had to make a new cord it would be a 5 minute procedure. For us - we did a lot of winter camping in the PNW, and the solar did not produce enough for us to do what we needed.
-
I’m not planning on doing any serious winter camping, but just in case I get caught in a cold front, this is my attempt at improving the insulation behind the garage.
-
Wish you had the Elite II like most of us! And your older hull seems to have a different layout than the late models EIs. I wonder the same, why our return and main ducts are within a few feet of each other (all rear curbside on the EII), not much heat getting to the bathroom. I have seen several other mods regarding this question. Changing the return location is something new here! Does it make sense to heat between the hulls so much? Isn't the reason for the dual hull construction to be an insulation layer? Otherwise, you'd be blowing a lot of heat to the outer hull, dissipating to the exterior. We will likely never do serious winter camping but would enjoy better heat/airflow in the interior. Thanks
-

Simple AGM to Lithium Conversion question(s)
SeaDawg replied to Danno and Donna's topic in Mechanical & Technical Tips
For many of us, that's plenty cold. Our much older 2008 is good into nighttime temps of high teens, if daytime is warmer. I'm with you. I'll leave intended winter camping to others. If and when we ever get lithium, I'll make sure I have heating for the batteries. I'm good with good blankets. -
Bathroom Vanity Cubby Modification
SeaDawg replied to Frank C's topic in Mechanical & Technical Tips
@Ronbrink, that's a marvelous solution to clean drinking water and some winter camping situations. It looks really pricey, at first, at roughly $300 for the can and replacement filters, but 500 gallons of clean water for $300 is less than you'd pay in the grocery store, and no wasteful packaging. After the first round, replacement filters were 5 for $40 on their website. Now, 6 cents a gallon. Smart improvement. Cpuld be very useful for some folks. Thanks for sharing. -
We will be in Colorado at the end of October. We will be boondocking on BLM land and there is a chance that we could see snow. What preparations do I need for winter camping? This will be the first time. Thanks in advance for your help, Paul
-
Sooo, different folks with different features can have different cold weather experiences. As outlined earlier in this chain, we spent months winter camping in our Elite 2, carefully tracking temps of pex lines in between shells, primarily with our unit winterized. 2021 with that era's furnace. While we stayed toasty warm down to negative teens, there were areas, primarily rearmost pex lines behind garage and lines feeding the exterior shower under the streetside bed, that would drop below freezing in temps around low twenties. After making outlined modes, which were extensive, the lines were good till mid teens. Had we been non winterized, running our Truma water heater, it would have made no difference as that system in the Olivers is a non circulating system so the Truma stays at temp where it is sety but the warm water does not make it to the taps unless they are open. To those that do not camp in freezing winter conditions, this is perfectly acceptable but if you camp where it can often drop below freezing you are likely to run into nightime temps that would expose lines to freezing. Especially true if daytime tempos stay below freezing. In single digit conditions, we would burn through a 30lb propane tank every other day which is both pricey and labor intensive. We loved our Oliver for the superior build quality, great ride, and comfy layout but so much of our camping was in full on winter conditions so we decided to move on. It sold, just yesterday and we have bought ourselves a Winnabego Ekko RV which is truly a 4 season unit. It was quite manageable camping in a winterized Oliver, using containerized water and our composting toilet (great) but our eyes are set on multi week ski safaris so the occasional shower is really a necessity. I've noticed that over the last couple of years Oliver has upgraded to a Truma heater and made some of the mods outlined here so I would assume the stock units can survive unwinterized to the lower temps I laid out above. Anyhow, that's my $02 worth.
-
You may have been reading one of my posts. I did that modification and wrote about it in the forum. It helped, a bit, with the limited capacity of these trailers to be used non winterized but when temps dropped into low teens for extended periods, the water connections would still freeze as would some of the pex lines. Others have claimed to have better luck with this but I spent close to three months winter camping spread over two seasons and leaned into the mods to improve cold weather capacity and never found my Oliver to be trustworthy when it was colder than that. Eventually gave up and started camping with water in jugs. Luckily had chosen the composting toilet option so this situation was less than ideal and way south of what I expected when we bought the Oliver but certainly survivable.
-
A thread for pictures of winter and/or winter camping.
-
Share and Enjoy !Shares Winterizing your travel trailer is extremely important. It ensures that your trailer can withstand harsh conditions without damage, but it also gives you peace of mind knowing your trailer will be ready to hit the road during the summer months. Plus, if you don't get your trailer ready for winter properly, you run the risk of extensive damage that can cost an arm and a leg to fix. You should follow a few steps closely if you want to make sure your travel trailer is in the best shape possible for the winter months, so we've compiled this list of everything you need to know. 1. Check the Tires Checking your trailer's tires is the first thing you should do to get it ready for winter. Make sure that the tire tread still looks good and that the tires have plenty of air. If your tires are in poor condition, it’s important to replace them before you hit the road during the summer months. You should also check the wheel bearings and brakes to ensure they’re in good working order. 2. Prepare the Interior Once you’ve inspected the tires and brakes, it’s time to turn your attention to your trailer's interior. Start by deep cleaning everything and removing any debris or dirt. If you’re storing your trailer for the winter, removing any food items or other perishable items is also a good idea. Additionally, you may want to consider installing a dehumidifier to keep the air inside your trailer from becoming too dry. 3. Inspect the Exterior You'll want to inspect the outside of your trailer before you put it away for the winter. Make sure to check the roof, windows, and doors for any signs of damage, then if you notice any cracks or holes, seal them up. Winter brings a lot of rain and snow in many places, and the last thing you want is to deal with water damage when you're ready to head out on your first camping trip of the season. It’s also important to inspect your windows and doors to make sure that they are properly sealed. If they're not, take care of it as soon as possible. 4. Insulate Your Trailer If you want to keep your trailer warm during the cold months, you'll want to insulate it. While this isn't completely necessary, some people choose to do it, especially if they use their trailer during the winter. Insulation will help keep your trailer's interior warm and cozy during the winter and can be especially beneficial if you plan to do any winter camping. 5. Add a Heater Adding a heater to your travel trailer is another great way to keep it cozy during winter. There are a variety of different types of heaters available, so make sure to do your research and choose the one that’s best for your trailer. If you're looking to have one installed, the professionals at Oliver Travel Trailers can help. If your trailer already has a heater, that's great! Just make sure you're familiar with how it works and how to maintain it. 6. Protect the Batteries The batteries are what essentially keep your trailer running, so it’s important to protect them when it's cold outside. Make sure to keep the batteries charged and stored in a dry place to prevent them from freezing. You should also check the battery terminals and clean them if necessary. Battery issues can be a major inconvenience when you're trying to go camping and they can be expensive to replace, so it's very important to take good care of them. 7. Keep an Eye on the Weather Finally, it’s important to keep an eye on the weather before you hit the road. Make sure to check the forecast for any dangerous weather conditions and plan your route accordingly if you plan on doing any winter camping. You'll also want to bring extra supplies on your adventure just in case you come across any inclement weather or issues along the way. As long as your trailer is prepped for cold weather, you should be good to go. 8. Winterize the Trailer Here’s a step-by-step guide on how to winterize your trailer: Prepare Your Trailer: Before winterizing your trailer, make sure you have a few supplies handy – such as antifreeze, rags, and a funnel. This will help make the process easier. Additionally, make sure your trailer is properly supported and level before you begin. Drain the Freshwater System: To begin, you will need to drain the freshwater system. Start by turning off the water pump and all of the faucets. Then, open the hot and cold valves on the water heater, and allow the water to drain out. You may need to use a wrench to loosen the valves. Once the water has drained out, close the valves and turn the pump back on. Add Antifreeze: Now it’s time to add antifreeze to the trailer’s freshwater system. Start by locating the city water connection and opening the valve. Then, use a funnel to slowly add antifreeze to the city water connection. Keep adding antifreeze until you see it coming out of all of the faucets. Once you’ve done this, close the city water connection and move on to the next step. Flush the Toilets: To flush the toilets, pour a gallon of antifreeze into the bowl then wait a few minutes and flush the toilet. The antifreeze should fill the entire bowl and then start draining out. Continue flushing the toilet until the drain is clear and the antifreeze has drained out.Drain the Gray and Black Water Systems: Locate the drain valves for both tanks and open them. Then, use a hose to connect the drain valve to a bucket or the ground. Allow the tanks to drain completely, then close the valves and disconnect the hose. By taking the time to get your travel trailer ready for winter, you can ensure that it’s in the best condition possible for the cold months ahead. Taking the necessary precautions can also help to ensure that you and your family have a safe and enjoyable camping experience, even if you're going during the off-season. If you are looking for a travel trailer or need more tips on how to best prepare for winter, reach out to Oliver Travel Trailers. We are more than happy to help you with any type of camping assistance you may need, whether it's purchasing a trailer or winterizing your current one. Share and Enjoy !Shares The post How to Prepare Your Travel Trailer for Winter appeared first on Oliver Travel Trailers. Read the Full Article
-
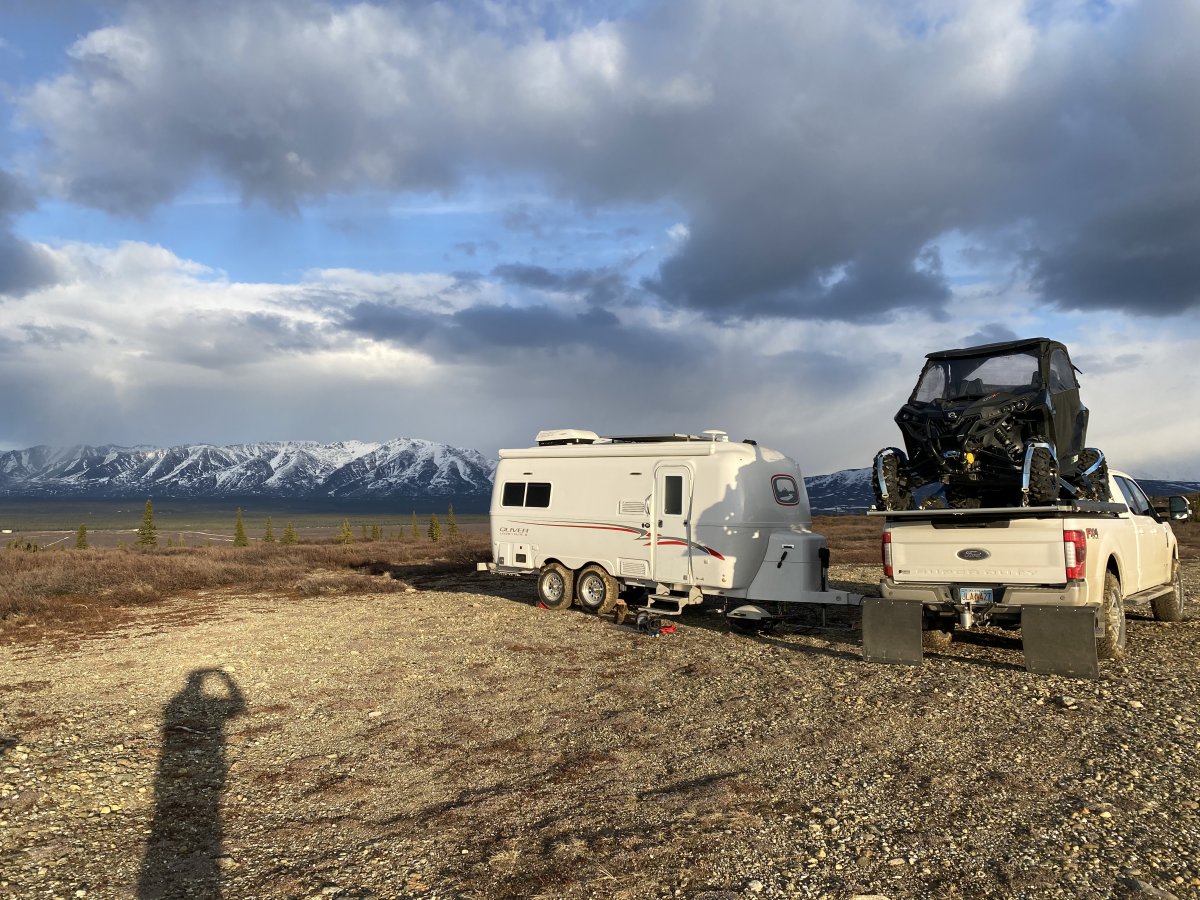
As luck would have it my upcoming trip to Alaska is going to be happening a bit sooner than i had expected in only 2-3 weeks. It looks like by the time i get up to fairbanks ill still have about a week there before it ever gets above freezing. Most of the winter camping modification threads ive been able to find on here are focused on the LE2. Can anyone point me in the right direction for stuff specific to the LE 1? i know there was a thread the other day that mentioned the lines to the kitchen sink freezing but does the LE1 have any other problem areas i need to keep a close eye on? Im planning on boondocking the whole way there roughly 7 days from Texas to Fairbanks but i should have shore power from a friends house once i get there. Ive got the lithium pro package and composting toilet and ill have probably 3-4 days in texas to get things ready to go before i head off.
-
I've got my big roll of Reflectix and a can of spray adhesive all ready to go, wanting to get my Ollie better prepared for some cold winter camping, where should I put it?
-
Thanks JD, this is super helpful! I get it now. History of my Oliver must have had a lot of extremely hard salty SW desert water (like the water at Quartzite AZ). Installing a new anode and bi-annual rinsing of the HWH should at least keep the scale at bay. Map of water hardness in the United States | U.S. Geological Survey (usgs.gov) Mountain water where we live is up to 7 grains/gallon and we enjoy our water at home, filtered for drinking only. On the map you can see the high country of AZ is in the white and blue zones, with the desert SW in the RED zone, which is where we all enjoy our winter camping. As kids, we lived in northern IL (when not yet on Lake Michigan water) where well water was up to 25 grains. I could never stand the never-rinsed feel of softened water, though perhaps the technology is better today. I remember the heavy bags of salt were useful during winter weather for added weight in our RWD vehicles of the day! You can see on the map that most of that area is also in the RED zone. Go to Chicago area now, wash your face and this 'lake' water smells strongly of chlorine!
-
We're looking into the Oliver. One of the things we'd like to use it for is winter camping in the ski areas around us. We're in Northern New England so it frequently gets down below zero at night. How comfortable would we be in an Oliver?
-
I have a corollary question: We've had several nites of single digit temps, I've done no mods other than empty the outdoor shower hose and add a layer of foam inside the door over the valve handles (further, would not have the capacity or wherewithal to do some of the amazing stuff above). I've left the lav door open because I know that space gets SUPER cold if you don't. The (standard) toilet supply line seems like it might be frozen, no water refills it when opening the valve to empty the bowl. The sink valve works fine. I've never had that happen before, anyone else (with standard toilets, obv the composters need not reply)? So, now I have the access hatch on the forward street side cabinet propped open hoping to warm that side of the trailer. Forward street side corner of the lav is most definitely the weakest part of this system! I have an electric heater (am hooked to shore power) so thinking I will put it in the lav and shut the door. OTOH, my brother is trying to be in his 3 season trailer in these temps and is having NOTHING but trouble, so I remain appreciative of the *relatively* headache free winter camping
-
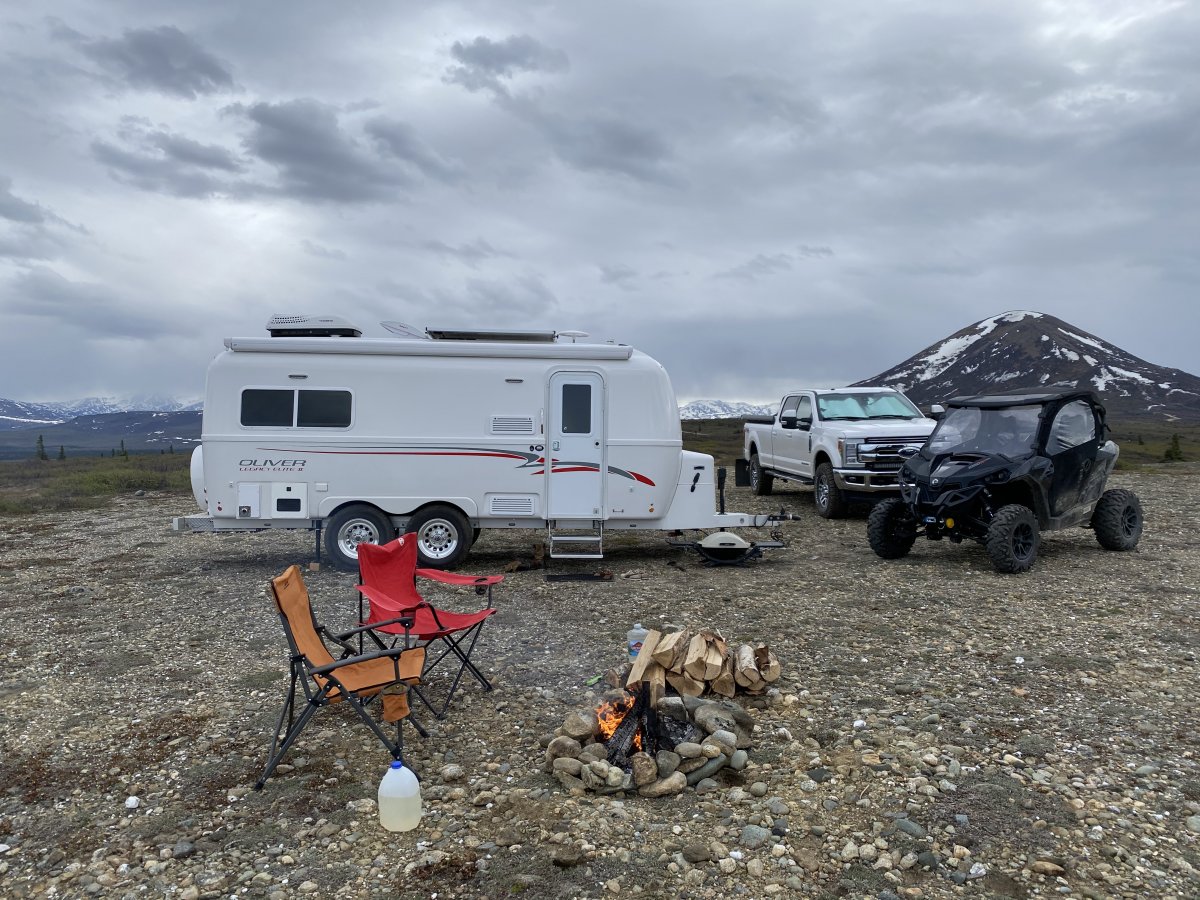
Oliver Experts, Hope this summer is treating you well. Ours in AK has been quicker than I’d like, but AK is made for social distancing. Looking forward to the winter, which is quickly approaching my neck of the woods, and I’d like to pick your collective brains. I’d like to get into snow machining/camping this winter and feel that’s one of the real reasons I chose an Oliver over the normal stick builds. I’d like to camp, leaving my Oliver winterized reference the plumbing, and just use her as a warm place to sleep and eat dinner, bringing antifreeze for the toilet (no solids) and gallon water jugs for cooking. A lot of the stick build guys do this, but I’m more particular than most. So plumbing is figured out, that brings us to the batteries. At -40, batteries freeze and split open. Any ideas for this? My winterization the past three winters has included pulling the batteries and bringing them into the heated garage and onto a tender. This is tedious as I’ve got four, and they are awkward and heavy. I’d like to avoid this, and was thinking of battery blankets and/or battery mats that will warm them. We use them on the trucks up here, but they are used daily. I would hate to rely on this, and only use Oliver once or twice a month to figure out that the blankets/mats/tenders couldn’t keep up with the -40 temps. Course of action two: remove batteries and tape of terminals, and rely on our generator to power Oliver on our occasional winter outing. Thoughts, suggestions, comments? As always, appreciate the collective genius that this forum always has! -Alex Obligatory summer camping pics!
-

Newbies taking the plunge - Are we missing anything
topgun2 replied to Dennis and Melissa's topic in General Discussion
All Olivers come standard with a surge protector. And all Olivers use a 30 amp electrical connection - not 15/20 amp and not 50 amp. Of course, you do know that if you have a 30 amp connection to shore power you can still use a lower amperage connection. However, you can not run all the things in your Oliver (i.e. microwave and air conditioner) at the same time if you are on the lower amperage supply. With regards to how long a bottle of propane will last (particularly running the air) - that depends. How hot is it outside, how cool do you want it inside? what other things are you using propane for - cooking, hot water, fridge? Perhaps what you are really asking is, "in typical usage, how long does a 20 pound tank last?"?. Or, should I really get the 20 lb tanks or the 30 pound tanks? I can run my fridge on one 20 pound tank for about 6 to 7 weeks. But, during this time I'm usually camped at altitude where the average temps are cooler and I usually camp solo, so, there isn't a bunch of opening and closing the fridge. I also use a solar shower for heating shower water except for those times when its cloudy and I use a Mr. Heater propane heater for taking the chill off those frosty mornings (this saves both propane and electricity - don't run the furnace blower). While I agree with the two comments above relative to learning - don't be discouraged! We all had to start this journey someplace and most of us are still learning. Bill edit addition: I forgot to mention the 20 versus 30 lb tanks. Obviously if you get the 30's then you will not have to get them refilled as often and you have 33% more with you. This 33% really matters if you plan to do a bunch of winter camping in cold weather. However, the downside of the 30lb tanks is that they MUST be refilled at a business that does this sort of thing. With the 20lb tanks you can "swap" them for other tanks at most grocery stores, gas stations, hardware stores, Lowes, Home depot OR you can get them refilled just like you do with the 30's. In addition, the 20's are lighter than the 30's. It should be noted that when you "swap" the 20's, they are generally not filled to the same capacity (i.e. they are not really full) and the cost per gallon or pound of propane is generally more expensive than it would be at a refill facility. But, if you are in an area that simply doesn't have a refill facility, there isn't really much you can do with that empty 30 pound tank. -
I'm none to well versed but, in my research before buying our Oliver and since, I've not found a trailer that does clearly better than ours, except for bigger models that have ducted heat to their basements and/or heat tape as standard features. The Escape Trailers from Canada seem to do about as well if you opt for their spray on insulation sealing of their bellies. They are described as 3.5 season trailers. That said, not of the same quality build. My brother owns a brandy new Airstream which is about the same size as an E2 and he claims they can now be set up for full on winter use but has not been able to test that out and I haven't bothered to dig into their forum. I'd argue, based on their forum, that they are not of the same quality as Oliver either. RVs.even smaller ones, are often good for winter camping. Given the increased popularity of winter camping I am puzzled by there not being more options. With my last modification ( to be tested starting next week) I feel my E2 will be good down to 0. Have tested in those condition quite a few times - am close to done. It was a lot of work but only cause I had partial guidance (limited but top shelf through this forum), am not handy and don't have an engineering brain so had to go slow and there was a learning curve. These mods were relatively cheap and straightforward to do so certainly not impossible.
-
@GAP, we only camp in Minnesota in shoulder seasons and summer, but I know that many state parks are open for winter camping. (Some primitive, some electric only, no water, for sure.) Sometimes flush toilets in the visitor center of bigger parks, but no dump station, nor water at sites. Some places vault toilets in winter, others, you're likely on your own. How far south in Minnesota are you looking? I94, or i90? Do you include cross country skiing or snow shoeing in your trips? Lots of great trails, from what my friends tell me. Especially around Lanesboro/Harmony/ Spring Valley bluff country, where the glaciers didn't scrape the landscape clean. I know there's a state park near Mankato that's open for camping in winter, and I have friends who have a home on one of the Kato lakes. I suspect they'd check it out for you, if I asked. When will you be in Minnesota? You must know it can be super cold in January. It's already been sub zero at night up by my brother outside Brainerd, for a night or two. January can be really, really cold, like highs around zero, lows 30 or 40 below. Depends on the year. February often brought ice storms when I lived there. Not as cold, but bitter, and crappy driving. March was unpredictable. However, if you can stay put, Minnesota plows work magic. I can reach out to Minnesota friends, or you can explore the mn state parks website, for camping. Some dnr parks also. As for highway info, mn 511 app is pretty good. @Minnesota Oli, and a few other hardy Vikings, could probably give you better info. I learned to ski near Minneapolis, at Buck Hill. Ditto, took my daughter (Florida girl) up there to learn to snowboard, from my parents' home on owatonna. It's not a great run, pretty much straight down, pretty much view of the interstate... cross country is more interesting. My hat's off to you. I gave away my skis and boots years ago.
-
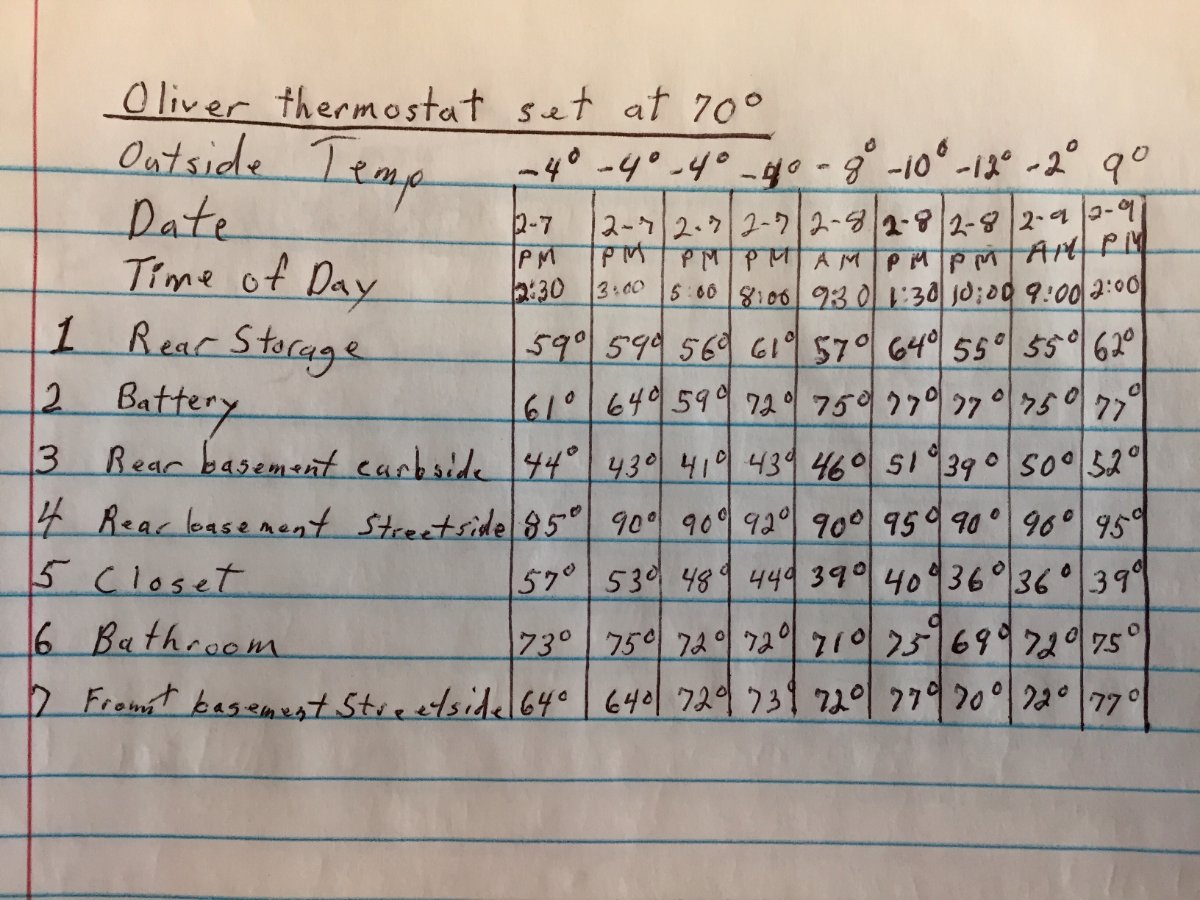
I have been following the discussion on this topic and just want to restate that with a mod done to the furnace duct system and zero changes to the water piping and adding no extra insulation I have tested in sub zero temperatures for two and half days with water system not winterized and experience no adverse affects. I have read about many different mods to accomplish the goals of a four season camper and the troubles to hit that goal. I will admit that I have not had the opportunity to do further testing such as how it would do traveling with the furnace on, or if parked and experiencing very windy conditions. I think the initial test show very promising results and the mods to the duct system were not that difficult to do. I know this is relying on the heating system functioning but even a house up in Minnesota relies on the furnace working to avoid plumbing freeze ups. I did my mods not so much to camp in the winter but to have a bench mark of what it could withstand if I got caught in a cold snap while out camping. Here is a link to a how to for anybody that is trying to get the Oliver ready for winter camping. Here are some temperatures in different locations in the camper during testing.
- 83 replies
-
- 11
-

-

-
We are planning a mid winter ski safari this year. Loose itinerary is starting in Connecticut, visit family in Virginia and northern Florida, 7-10 days skiing in Colorado, winter backcounty ski trip in Boundary Water Minnesota, Ski our way home through Montreal and Vermont. We have quite a lot of winter camping experience in New England but are concerned about driving conditions in the Colorado to Minnesota to Montreal sections so are looking for experienced input. Skiing in Colorado will all be NW of Denver and we are planning to drop down from northern Minnesota to cross over between Lake Superior and Lake Michigan to avoid the desolate stretch above Superior. There seems to be plenty of year round camping available around Colorado ski resorts but very little in Nebraska, South Dakota and southern Minnesota. Road conditions are updated frequently in Colorado but have found no resources from there through Minnesota. Will have snow rated AT tires, a set of tire cables for two tires on the Oliver and chains for the F150. Any suggestions as to safety, sanity and sites worth seeing would be appreciated. Gerry