Search the Community
Showing results for 'Generator box'.
-
 what must I do to use generator power on my 2018 elite II? What steps are required?
 -
Hello, I am a new Ollie owner, Hull number 530, and I’m a low tech user who needs help! Where can I get information on purchasing the factory front mounted storage box I’ve seen and heard about? Secondly, what is my first step in troubleshooting low water pressure coming from my pump? Thank you. Pete
-
 We've never owned a truck or a trailer. My wife and I are retiring in 6 months and diving in with all 4 feet. Tell me what we don't know please. We looked at lots of trailers and are finally pulling the trigger on the LEII. I've read a bunch of threads on here over the last year. Very helpful. But if you can point me to some that have already discussed this sort of thing, I'd appreciate that, too. We prefer simple: Everything we need, but nothing we don't. So.... LEII - starting the ordering process today 🙂. Scheduling factory tour soon. Standard except as follows: Twin Bed Floor Plan Two Upgraded Foam Mattresses Hypervent for Twin Bed Floor Plan Front & Rear Propane Quick Connects Backup Camera with 4.3” display Aluminum Storage Basket Inside Basement Access Door Auto Drain (push button drain valve) - What is this? Door lock (do I need the electric one?) TV - bought yesterday 🙂 Ram 1500 Laramie, 5.7L 8 cyl hemi, 4wd, max tow, air shocks, class iv hitch, 9 pin connector, rear video Approx 1,700 load capacity Locking hard tonneau cover, bed liner Miscellaneous side purchases (yet to be made) Generator that runs on propane - to be carried in Ollie's storage basket Surge protector (no idea what sort of electrical equipment I need for generator or shore power) TPMS for trailer Screen house carpet for under awning hoses, leveling blocks, antitheft? tools? Storage - We intend to use these toys a lot. Maybe even 6 months a year. But, inevitably, they will get placed in storage when not in use. We live in a FL subdivision, with no garage space for this size stuff. So, I thinking I buy a cover for both.
 -
@Badger Pete, We had the Oliver cargo box and realized we needed to make better use of this storage area. In hindsight, would not have purchased the Oliver cargo box if this was available at the time for many reasons. Here is the custom made enclosed cargo box we upgraded to made by - https://seabiscuitmetaldesigns.com/product/oliver-box/ They are located in Johnson City, Tennessee🇺🇸. They ship anywhere in the lower 48. With lots of room, we keep all of our immediate camp set up gear - chocks, blocks, 30 amp cord, and other various first grab items we need here. David & Kristine Hess owners of SeaBiscut metal designs are just top shelf people. We even toured the Seabiscuitmetaldesigns machine shop where they custom hand craft and produce very well made high quality products. 🇺🇸 David & Kristine Hess will be at this years Oliver owners rally at Lake Guntersville SP and will have their cargo boxes and more on display. Possibly a newly designed rear cargo box for the Oliver as well. Welcome to the forum, we are here to help so ask questions, and Happy Camping! Patriot🇺🇸

-
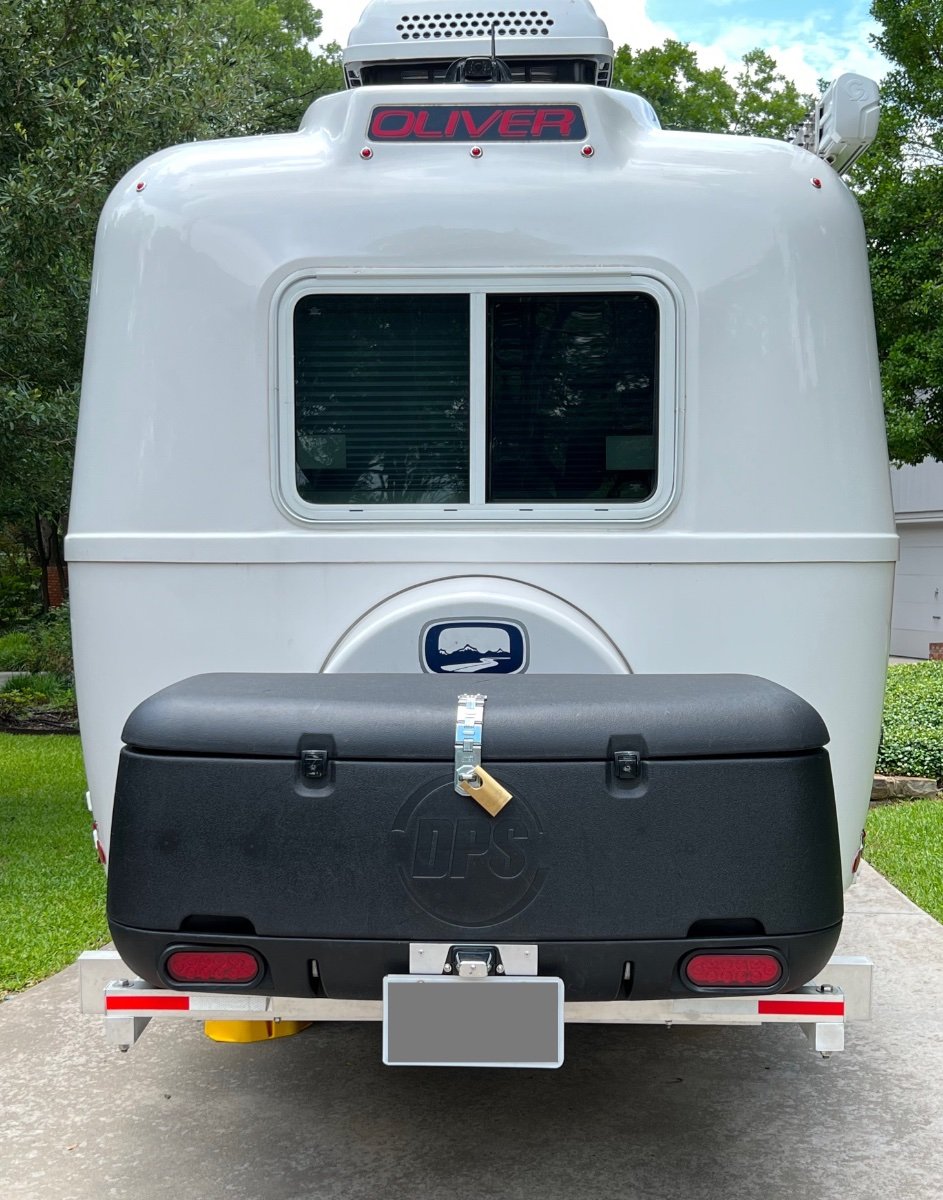
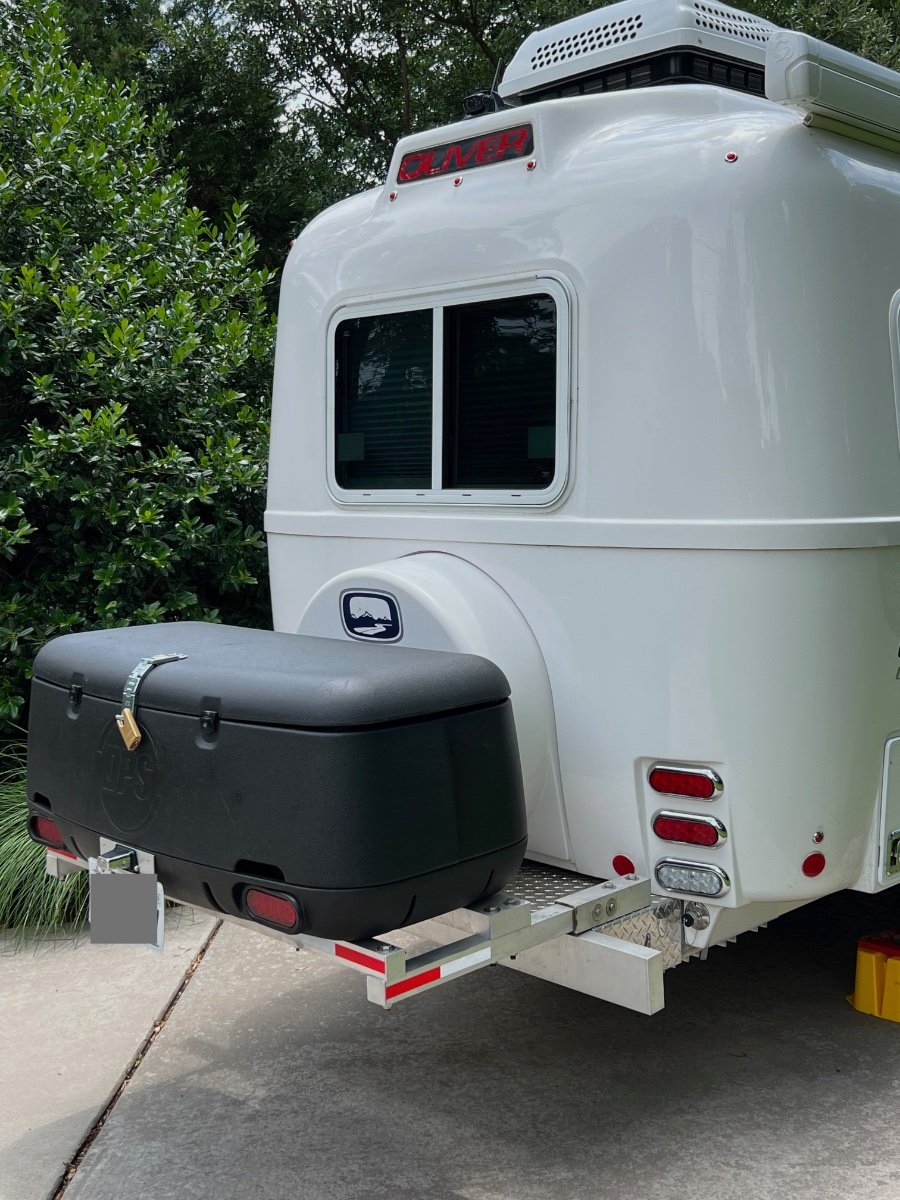
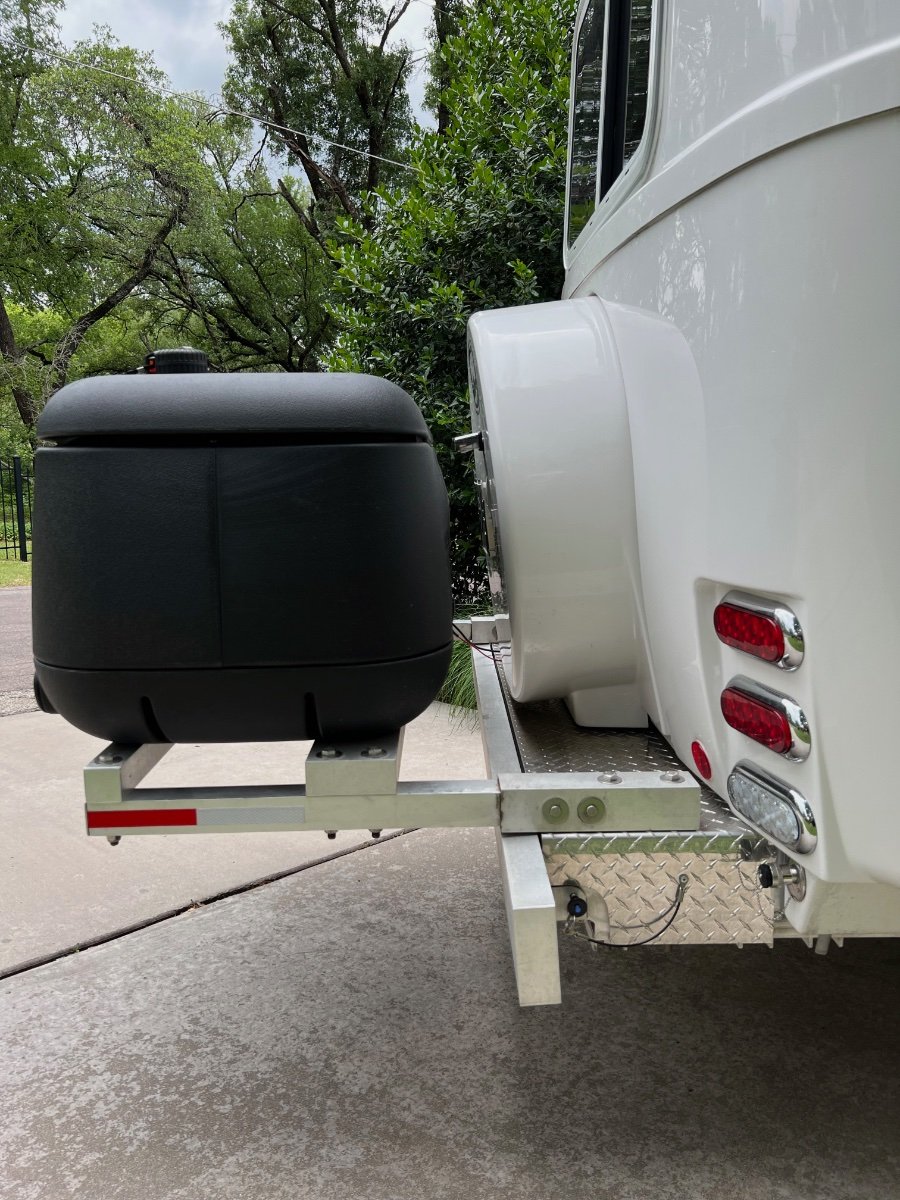
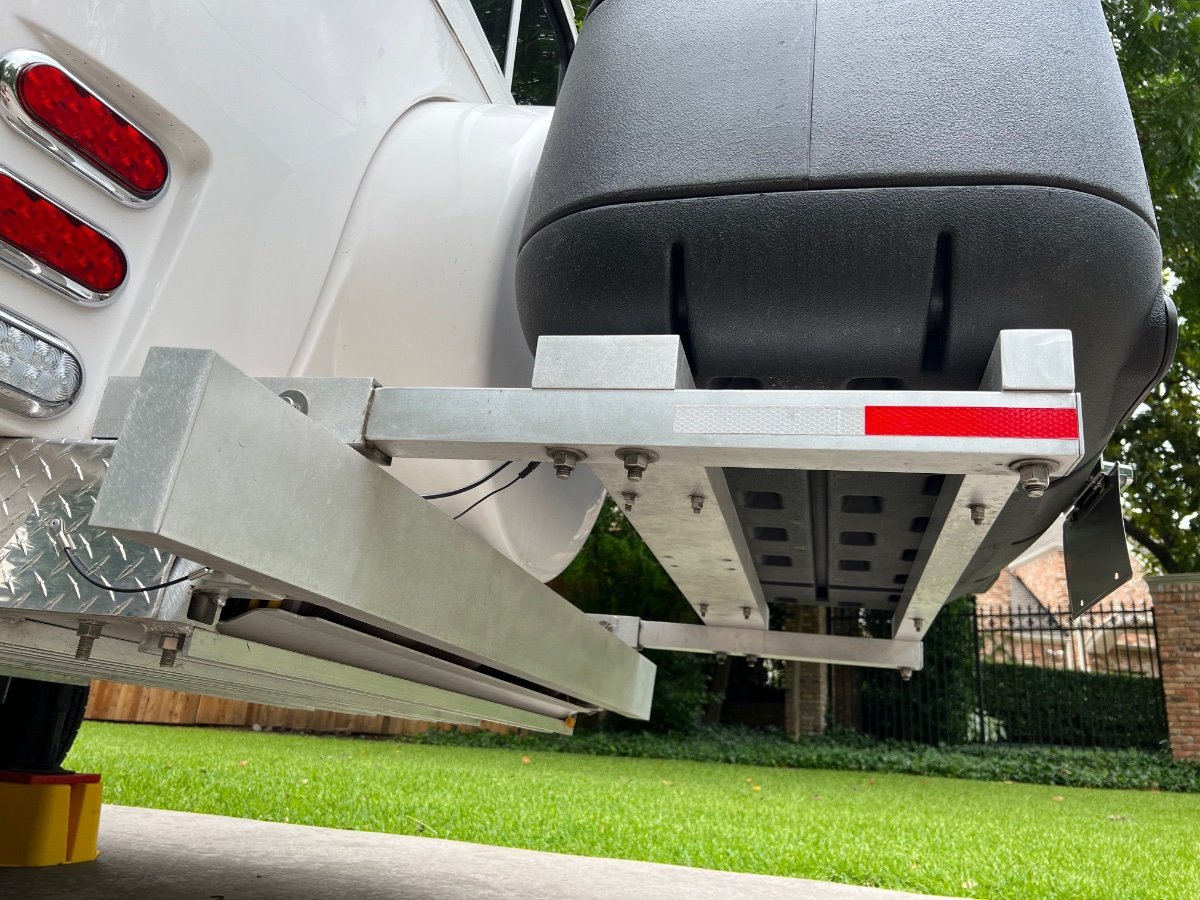
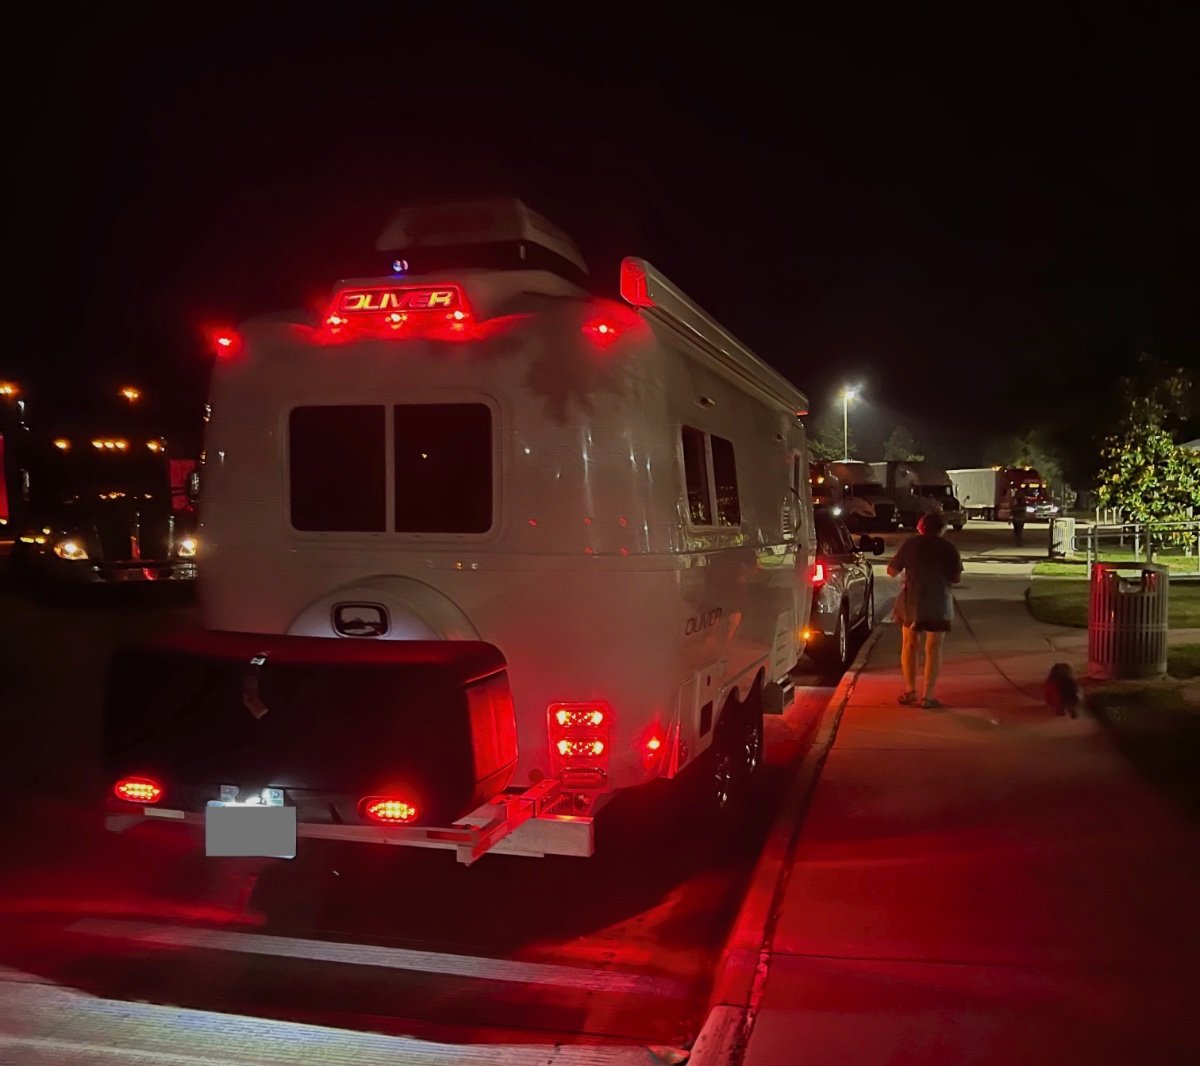
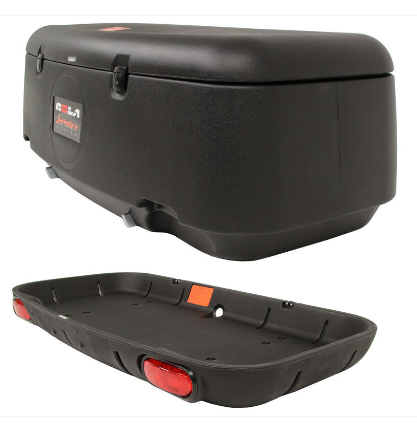
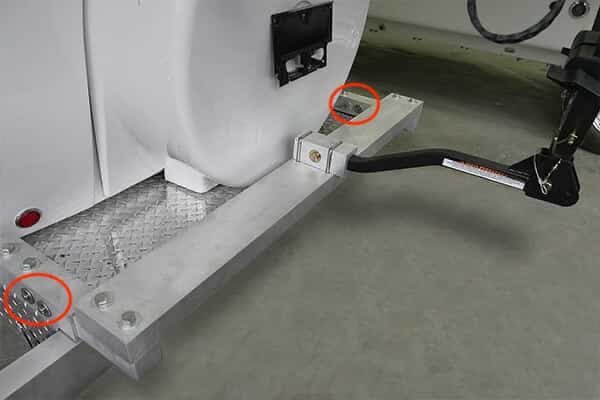
 Summary I have installed a rear mounted cargo carrier, with lights, to our 2022 Oliver Legacy Elite II (LEII) travel trailer. We recently completed a two week, ~2000 mile trip, using the cargo carrier, which performed flawlessly. Below are photos of the installed cargo carrier, which are followed by a detailed description of its installation. Storage Constraints Prior to ordering our Oliver Legacy Elite II (LEII) travel trailer I knew we would need additional storage space on the trailer. We are using a 2014 BMW X5 35d (diesel) as our tow vehicle, rather than a pickup truck. Thus, we could not plan to use the pickup bed for supplemental storage. We also needed to stay within the tow vehicle's cargo capacity of 1100 lbs and maximum tongue weight of 600 lbs.. Expecting a tongue weight of approximately 500 lbs. plus two occupants at approximately 300 lbs, we could only accommodate a maximum of 300 lbs. of other cargo. The available payload will be partially used by our camera gear, which must be protected from exposure to moisture. A tongue mounted cargo carrier was not viable, given the tongue weight limit for the tow vehicle. Storage Requirements I anticipated needing additional storage space for the following items: Champion Dual Fuel Generator- 2500 watt (~45 lbs.) (too large for basement storage) Napoleon TravelQ™ 285 Portable Propane Gas Grill and hose (~35 lbs.) (too large for basement storage) Anderson Ultimate Leveling kit (~25 lbs) Harbor Freight rubber chocks (4) (~20 lbs.) Camco Stabilizer Jack Supports (3) (~10 lbs.) Miscellaneous accessories All of these items can tolerate some exposure to moisture, which is likely when stored in any external cargo carrier. A closed and reasonably secure cargo carrier was needed. Searching the owners' forum, I found examples of rear cargo carriers/bike racks and found several examples, including: Oliver's original bike rack design using twin receivers and extending approximately 3 feet beyond the rear bumper; Various rear mounted metal cargo boxes, including custom designs; Rear mounting of an Oliver tongue cargo box by John E. Davies. I also looked extensively at aluminum cargo boxes from various manufacturers, trying to find options which could accommodate the cargo items listed above. I already owned a cargo carrier which we had used on the BMW X5 tow vehicle. This carrier has a heavy steel swing-away frame which mounts to a standard 2" receiver. Mounted on the steel frame are a polypropylene tray and an enclosed container with 13.5 cubic foot capacity. The tray and enclosed container interlock. This cargo carrier also is equipped with fully functional lights (running, brake, turn, flasher). Interlocking pins on the enclosed container mate with the tray. Locking latches secure the container to the tray. Solution Approach I decided to re-use the polypropylene tray and enclosed cargo container, but not the heavy steel frame. Instead, I would use a design similar to the original Oliver bike rack. I ordered the current optional Oliver bike rack when we placed our LEII order, planning to utilize some, but not all, of its components. The current Oliver rear hitch (photo below) utilizes twin receivers that are 11" long, constructed to receive 2" x 2" X 0.25" (wall thickness) T6061 aluminum square tube support arms, which are 17 inches long. The receivers are each mounted to the LEII frame by two long 0.5" diameter stainless steel bolts and nuts. The other components of the rack are a 2" x 5" x 0.25" T6061 aluminum cross-member, 51-1/8" long (with end caps), and a 1-1/4" receiver for connecting a bike rack. I planned to use the twin receivers, and the cross-member, but not the support arms, nor the 1-1/4" receiver. Instead, I would replace the 17" long original support arms with longer equivalents, whose length was to be determined. I would utilize the original 2" x 5" x 0.25" T6061 aluminum cross-member and add another cross member, this one 2" x 2" x 0.25" T6061 aluminum, also 51-1/8" inches long with end caps. The cross members would be bolted to the support arms, in the same manner as on the Oliver rear hitch. The tray and enclosed container from my existing cargo carrier would be mounted to the cross-members. Note the clevis pins circled in the photo below, there are two 0.50" diameter horizontal clevis pins securing the support arms in their receivers. Each clevis pin has a washer on either side of the receiver. Removing the clevis pins permits the support arms to be pulled to the rear, enabling removal of the spare tire cover and spare tire without dismount the support arms. Solution Model A critical dimension to be determined was the length of the 2" x 2" x 0.25" support arms. The new support arms need to be long enough to: Support the polypropylene tray and enclosed cargo box and attach using the molded mounting holes in the tray; Allow the lid of the enclosed cargo box to open without striking the spare tire cover; Permit removal of the spare tire cover and spare tire without removing the cargo carrier and support frame; Permit access to waste water hoses stored behind the bumper; Minimize the additional length of the cargo carrier and support frame to the LEII's length. I fabricated 2" x 2" wooden support arms, approximately 40" long. Using woodworking equipment, I cut slots into one end of each support arm to fit around the bolts holding the twin receivers to the frame. I also drilled horizontal holes for the clevis pins which retain the support arms in the receivers. Positioning the Cargo Carrier on the Cross-members The wooden support arms were inserted into the twin receivers and secured with the clevis pins. Then the 2" x 5" x 51.125" T6061 cross-member was placed across the support arms near the bumper. The additional 2" x 2" x 51.125" wooden cross-member, was also placed across the support arms, but further from the bumper. Clamps were used to hold the cross-members in place on the support arms. The polypropylene tray and enclosed container, latched together, were positioned on the cross-members, centering both to the trailer's width. I opened the lid of the enclosed container and adjusted the spacing (fore and aft) between the lid and the spare tire cover to ensure they did not contact each other. Once I had located the joined tray and enclosed container in what appeared to be a desirable position, I adjusted the positions of the cross-members fore and aft to establish alignment with the mounting holes in the tray. The 2" x 5" cross-member engages two mounting holes on each side of the tray. The 2" x 2" cross- member engages only one mounting hole on each side of the base of the tray. Six 5/16" carriage bolts will fasten the tray to the cross-members. Only four carriage bolts attached the tray to its original steel support frame. I used a mason's string stretched across the width of the tray with weights on either end to aid in aligning the mounting holes in the tray with the positions of the cross-members. I also used carpenter's squares to verify the cross-members were perpendicular to the support arms. Another check of squareness was made by measuring the distance from the trailer bumper to the cross-members. Once I was satisfied with the position of the tray and enclosed container on the support structure, I marked the locations for the holes to be drilled for the six mounting bolts to secure the tray to the cross-members. The tray overhangs the rear cross-member at the rear. With the cargo carrier tray and enclosed container in place on the clamped cross-members, I wanted to determine if the spare tire cover could be removed without removing the entire cargo carrier and support assembly. I found I could remove the clevis pins and pull the support arms aft approximately 7 inches out of the twin receivers and enable removal of the spare tire cover. With the tray and enclosed container positioned on the cross-members, I could now determine the required length of the support arms, which is 33.75 inches. The location of the rear cross-member determines the length of the support arms. After locating the mounting position of the tray and enclosed container I marked all key positions and hole locations on the wooden support arms and wooden rear cross-member. I cut the wooden support arms to the desired final length. Material Sourcing and Machining The required T6061 aluminum components required are: 2" x 2" x 0.25" x 33.75", square tube, quantity 2 (support arms), cost= $110.18 2" x 2" x 0.25" x 51.125", square tube, quantity 1 (cross-member), cost= to $99.08 2" x 12" x 0.125", flat bar, quantity 1 (to be cut into 2" squares for end caps on the support arms and rear cross-member), cost= $6.86 Sales tax= $17.83 No shipping charge. I picked up the materials at the local Metal Supermarkets warehouse Total cost= a $233.95 The above T6061 aluminum components, cut to specified length, were obtained from: Stainless steel bolts and nyloc nuts were obtained from: I was referred by Metal Supermarkets to a local machine shop: When I received the materials I took them and my wooden mockups of the support arms and cross-member to Air & Earth. I also took one of the original support arms. I discussed the machining needed: to cut the slots in one end of the support arms and to drill the needed 0.50 diameter holes for the clevis pins and mounting bolts. I also asked them to cut the 2" x 0.125" flat bar into 2" x 2" squares. I did not ask them to drill the smaller holes for mounting the cargo tray to the cross-members. I was quoted $220 and turnaround of the job within a week. They did an excellent job within the promised timeframe. Finishing and Assembly of the Support Structure After Air & Earth completed the requested machining, I performed the following finishing steps, which included: Rounding the edges of the 2" x 2" square tubing on the slotted end to be inserted into the receivers. I used a 3" wide belt sander with 100 grit sanding belts to round the corners of approximately 12" of the tube which would be inserted into the receivers . The original Oliver support arms also had the corners rounded to more easily slide within the receivers. Several trial fittings were required to verify smooth insertion and removal to/from the receivers. The support arms and the rear cross-member were sanded with an orbital sander using 200 grit disks. This sanding removed markings on the tubes and made the surface textured, similar to the Oliver rear hitch components. The support arms were inserted into their receivers and fastened with the clevis pins. The cross members were aligned with the mounting holes on the support arms and bolted into place. The cargo tray was positioned on the 2" x 5" cross-member at the previously determined mounting position and holes drilled to mount the cargo tray. Holes were then drilled in the 2" x 2" rear cross-member. Carriage bolts, flat washers and double jamb nuts were used to secure the cargo tray to the cross-members. Once all test fittings of the support assembly were completed, lithium grease was applied to the ends of the support arms which are inserted into the receivers. 2" x 2" x 0.125" caps were attached to the open ends of the support arms and the rear cross-member, similar to the end caps used by Oliver. These were attached to the square tubing using JB Weld epoxy. Cargo Carrier Lighting The cargo carrier partially blocks visibility to the taillights of the trailer, which is most noticeable when viewed from close behind the trailer. At a distance the taillights are largely visible. The cargo tray is fitted with two LED light fixtures and a wiring harness with a 4-pin flat connector. A corresponding 4-pin flat connector was installed on the LEII to integrate the lighting on the cargo carrier with the trailer lighting. Details of the installation of the 4-pin connector in the trailer are covered in a separate article. The lights on the cargo carrier ensure the trailer is quite visible from behind. A license plate mount was added to the cargo carrier tray, since the license plate mount on the spare tire cover is blocked by the cargo carrier. Lighting for the license plate mount is provided by adding a Y connector to the license plate light cable under the spare tire cover and adding an extension cable routed to the cargo tray mounted license plate mount. I also added reflective tape to the support frame members. I used the following reflective tape: https://www.amazon.com/gp/your-account/order-history/ref=ppx_yo2ov_dt_b_search?opt=ab&search=reflective Conclusion This addition to our trailer provides significant benefits, with no significant disadvantages. It does add approximately two feet to the length of the trailer. Besides the additional storage space, the cargo carrier and its load slightly reduces the tongue weight. I measured the tongue weight, using a Sherline scale, at 450 lbs., with no water onboard. Tongue weight seems sufficient, as no swaying or other handling issues have been observed. This project had a successful outcome due largely to the information I was able to glean from the Oliver Owners Forum. I hope this information is useful to others on the forum. Comments and suggestions welcome. Regards, Don
- 22 replies
-
- 19
-

-

-

-

-
HDRider, The carrier with the box pictured above on my May 13, 2023 thread posted by rich.dev, was simple and has worked very well for me. It does have a 1 1/4 inch bar not an adapter. The carrier that I purchased had both a 2 and a 1 1/4 in bar. I also used a hitch clamp that stabilizes the carrier and it does not bounce around as was noted as a negative above. I can verify this in my backup camera. For sure, I stay under the load limit for the Oliver rear hitch. I have also worked out a technique to slide the carrier box assembly without removing it, to remove the tire cover and spare tire. I had to actually do this on a trip to Hohenwald last summer when I had a flat and had to use the spare. In fact, I did it again today as I rotated my tires, putting the spare into the rotation at Jason's recommendation during a tire discussion on that summer visit. Ron
-
My nice RV mechanic suggested I place the Honda generator I plan on ordering on the bumper? What would be the best rack? Thank you!!
-
Thanks @rich.dev for the attached links. As was mentioned above, I also would advise against mounting a tray or box by the 1.25" receiver. There's a lot of dynamic load with an extended cargo tray, or bike rack for that matter. The single point Oliver hitch allows a lot of movement side to side and up and down. The two point mount used by those of us that installed boxes or trays inherently provides a high level of stability as well as a direct mount to the trailer main frame rails. Also the 2" sockets at those locations allow you to use a heavy wall 2" square tube which substantially increases the strength of those connections. Even mounted by the 2" tubes, you still use the hitch pins Oliver used to secure the bike rack mounting frame. This still allows the tray or box to be quickly removed for installing a bike rack or service needs. All this having been said, I still believe you should limit the total weight mounted to the back to the maximum that Oliver recommends. The tray or box mounted doesn't extend much farther from the bumper than a double bike rack would, so the loads should be somewhat similar to those exerted by two bikes mounted on the Oliver mount. But again the cargo box is mounted directly with two points that are extremely stable and secure. Just my thoughts. Edit: Additional thoughts. Regardless of your method of mounting a cargo box, clearance for the lid to open without hitting the spare tire cover must be considered. Also if you make the mounting tubes extend far enough into the frame sockets, you will be able to slide the box back far enough to remove the spare tire without completely removing the box from the trailer. This was very important to me because complete removal requires two people and sliding it back enough for tire access can be done by one person.
-
 I am going to be replacing my old Victron color display (push button) which took the place of the old Zamp solar charger. So yes, doing the same. For anyone reading the install, this is what I was trying to do without success so far, "The best place to insert a multiplus is inbetween the ATS (assuming you have a generator) or shore power input (if you don't) and the breaker panel itself. That way the shore or generator power will charge the batteries, and the inverter itself keeps the power on even without shore or generator. It also enables the power assist mode to function correctly, where you can dial down the current limit to match the available power, and then no longer need a power shedding device to avoid overload. Any outlets that have GFCI then continue to have GFCI as they should. Those that don't are probably better not to have GFCI, as heavy loads (air conditioner, electric heat) would end up often tripping the GFCI inconveniently and unnecessarily. The one drawback though is that you *must* then have the multiplus in on or charge only mode to have shore power pass through. If you turn it to OFF, there will be no power at any outlet, regardless of the presence of shore or generator power available. Also, no backfeeding. You don't want to deal with islanding, and you don't have to since the multiplus will do the right thing if wired correctly. Shore/gen (or ATS) is connected to AC IN1, and AC OUT1 goes to breaker panel. That's it. You *can* use AC OUT2 to switch additional loads based on other criteria (see relay assistant for control of ACOUT2 relay) but that would require an additional breaker as you couldn't then put that switched power through the existing breaker panel. Note that if you have an existing converter/charger plugged into power from the breaker panel, this will have to be removed/disabled to avoid setting up a loop (120->12->120->...) This is all assuming you have a single phase breaker panel, or one where the two phases have been merged with a jumper wire (also assuming 30a 120vac service here, not 50a 240/120 split, in which case get a multiplus2-2x). If you do have a 30a split panel (where an existing inverter has already been wired in) you would need to either connect it up the same way as the original inverter (one side of the split is "shore", the other side is "inverter"), or if you wanted to power everything through the multiplus (gain ability to operate aircon from battery) then you want to merge the two sides of the split (jumper between the two 30a breakers) and wire the multiplus in as above (shore/gen->ats->multiplus->breakers). I do this on a regular basis (upgrading mostly b, some c class RVs).
 -
I wonder what that means, pre-wired? For "pre-wired" to be viable you would have to have a roof mounted junction box. Do you? How would you add solar if not? Not easily! How would you run cables from the roof to a solar charger in near proximity to the battery bay? I took another picture for you, Gj. The only way an Oliver is truly pre-wired is if you have a junction box, like is what's pictured on ours.
-
I found a bundle of wires tucked away below the street side bed at the juncture of the upper wheel well and battery box against the outer shell. My thought at the time was these wires were part of the solar pre-wire setup.
-
 Woke up thinking about this, so briefly researched and confirmed my recollection regarding the Xantrec Freedom XC 2000 in my unit. ‘All Xantrex Inverter/Chargers incorporate an automatic transfer switch. This switch senses when outside AC Power is present and transfers the load from the inverter to the source of incoming power (shore or generator). The unit also automatically switches from invert mode to charge mode.’ I suspect the ATS in the MP2 serves the same function and that an additional TS is required to run an A/C via the inverter.
 -
You received good advice already on the storage box. This subject has been covered in dozens of threads. I wrote an upgrade thread last fall and have read many others before and a few since. There is a lot to consider here, no quick answer. Study the subject, measure your water flow rate, and ask specific questions. You will get good advice here!
-
Got some "Box Envy" going on over here... HA!
-
Several OTT owners have removed their OEM front aluminum storage box in favor of a larger enclosed one. Lkely one of them would be glad to offer to sell theirs at a reasonable cost plus shipping. GJ
-
I replaced my Zamp PWM CC with a Victron MPPT CC which I installed beneath the street side bed and I had to connect the wiring from the solar panels to the wiring going to the Victron CC. That splice was done behind the original Zamp CC location. And I found that solar panel wiring ran from the original Zamp CC location back to the attic and up into the inner/outer hull cavity and onto the combiner box. It seems to be the same route mountainoliver mentions above. Mossey
-
As far as mounting the panels, the combiner box and, the interconnect wiring…. I paid Oliver service to do that. I bought the Zamp panels from Oliver and since they know exactly where the aluminum plates are located in the outer roof, they mounted the panels as well. All other wiring and solar controls ScubaRx and I installed. I had to look the other way and bite down on a broken arrow when the first hole was drilled into my new camper but have since gotten over that trauma.
-
I don’t remember that there were any wires pre installed in the ceiling but know that there were #6 cables and the temperature sensor wire running from the basement area just aft of the pantry up the wall between the window and pantry, into the open area where the radio is located. Oliver service connected to the #6 cables near the radio and ran those back to the attic area up between the roof panels and to the location where they mounted the combiner box.
-
A few years ago, generators were all over our forum. Nearly all portable generators were of standard Motor/Generator design. I refer to them and my Dometic Penguin AC as "Hammer Mills". Then Honda came out with their inverter line. Super quiet, fuel efficient, and their EU 2000 watt unit with an EzStart would run our A/C units. The vast majority of us purchased the Honda inverter 2000 or 2200 units. But they were, and are pricy. Time has passed and most of us still have the Hondas that you could not pry out of our dead hands. But much less costly Champion, Yamaha and Predator inverters (to name a few) have come into play. With the OTT production rate acceleration, I suspect we have many new owners that likely would likely benefit from a revival of the topic. This thread is intended to hear from our owners their thoughts about their generator. Please touch upon the below as well as your experiences: Generator Name and Model Cost of Purchase Power Output (Rated Full Load) Ability to handle our A/C cycling while switched to "Eco-Mode". Please specify if you have an 11K BTU or 13.5K BTU A/C. Decibels idle and full power Ease of use Maintainability Reliability Durability Number of seasons used Thank you! GJ
- 68 replies
-
- 10
-
-
-
 I am not an electrician, I don’t play one on TV and I did not stay at a Holiday Inn Express, so please keep it simple for my simple mind. I have been reading the forum for a few days and I have found posts that talk about and around using a generator solely for charging the Ollie batteries. Is using a generator solely for charging the Ollie batteries a good idea? My objective is to have as small a dual fuel generator as possible, while I am off shore-power to compensate or complement for the 400 Watt solar panels. My larger objective is to be as untethered as possible while traveling. I don’t want to go to a bigger generator to run Ollie in full or partial mode. My Oliver Elite II is on order. It is coming with 390 AH Lithium batteries, 400 Watt Solar panels with charge controller and 3,000 Watt Pro inverter. Is there any special request I need to make to Oliver to create a plug from the generator to the battery to make the connection as clean and simple as possible? Dumb question time – Why couldn’t the generator power enter the battery system via the external solar panel connection?
 -
When we purchased our trailer in 2017 Oliver was just changing solar equipment brands. They changed from Blue Sky equipment to Zamp equipment. I didn’t know much about solar power at the time so defaulted to not getting solar. ScubaRx schooled me about the Blue Sky vs. Zamp architecture and I choose to add Blue Sky solar. The trailer (at least at that time) was “pre wired for solar.” The roof did not include the combiner box but the #6 cable was in place and a battery temperature sensor was in place as well. ScubaRx and I had to run the 4-0 welding cable as needed and other #6 cables in the basement as needed along with the main switch and circuit breakers, shunt, etc. I had the Oliver folks mount the panels and do the interconnections. Technically, the total system was not completely wired, just the hard to access cable was in place. The trailers are not turn key wired by any means, you will have to do the majority of the wiring yourself along with all of the system component installation.
-
What do you all do to cover your generators when you need to run them and it's poring rain outside? I've seen some "covers" at the Jungle Store - not sure about them.
-
 You need a neutral ground plug like this one https://www.amazon.com/Southwire-Company-LLC-44400-Generator/dp/B07F4R7BDL/ref=sr_1_4?crid=1U28YA880VP37&dib=eyJ2IjoiMSJ9.I-pLsdfsMyYCXEnn08O01KLUWNGgc26-op4qZF23eekGNYeLblqAXvM7jvBKtuyHFrxtHpXL5f6cL8FSi43Z7i0-Ghxnmndu2ScDGmdjoijtou40TOc4LQdmFPl_YTpxWreQi_NPNlG_7bxGLMmP5WcTg-GKlhR9MhCt0RYGTgW1t8Eh9g5AVLeSX4ubHy4QUgnhQ6LxszOW4yIDEK1R4Cc6DfCqmaDugvAB7mSsIRc.dTWhDb8tlbu6JiBaZ1olHYxHljGMDsnniRy5XQOetGk&dib_tag=se&keywords=generator+neutral+ground+bonding+plug&qid=1712764295&sprefix=generator+neutr%2Caps%2C317&sr=8-4
 -
Multiplus II with PD EMS wiring help
rideadeuce replied to rideadeuce's topic in Ollie Modifications
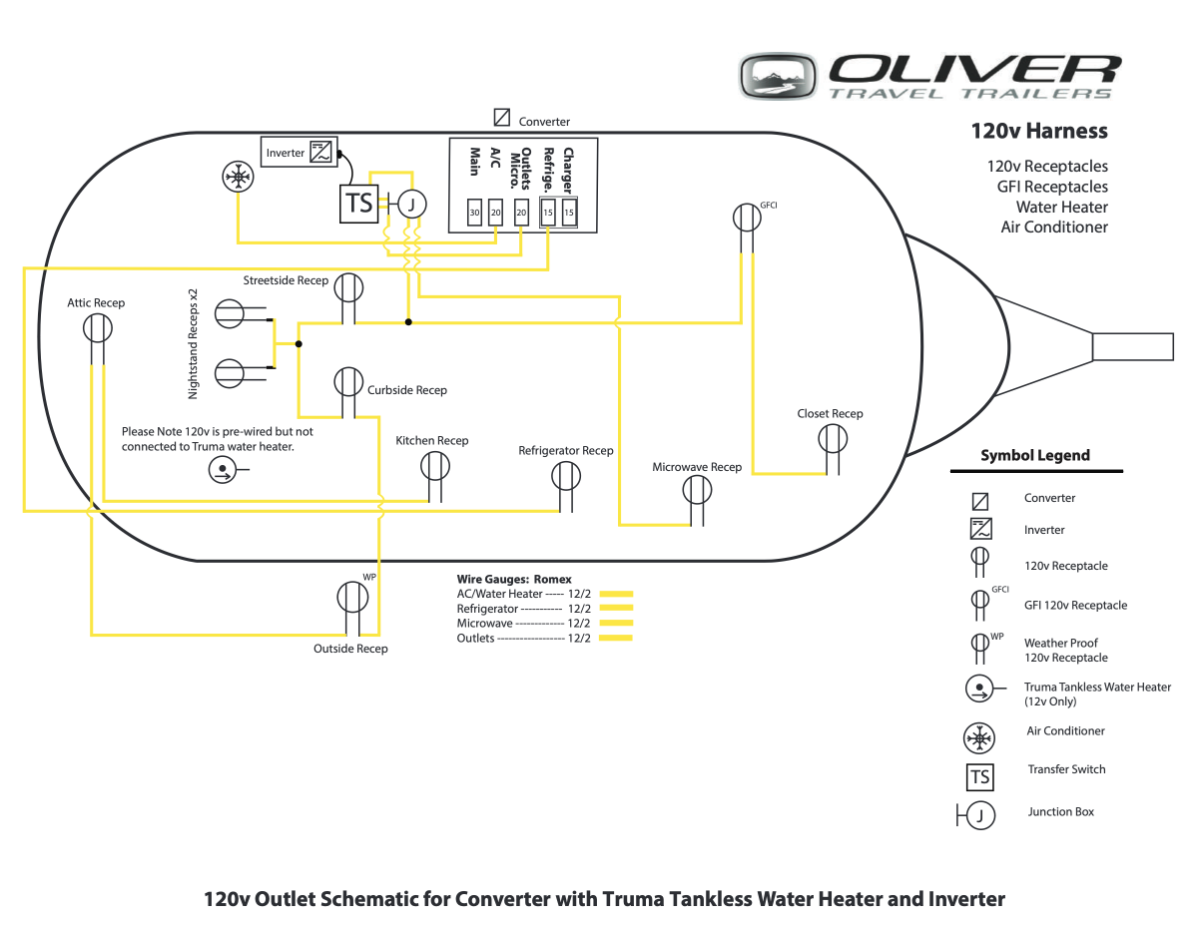
Anyone with a Multiplus II 3000W upgrade able to share how they powered A/C from the inverter. MPII has transfer switch built-in. So the plan is to remove the OEM transfer switch and Jxn box. Then connect the AC IN and AC OUT to the MPII from the old junction box wiring to power outlets and microwave. The puzzle for me is wiring/powering Air conditioner off the inverter. On this schematic, the air conditioner looks like it is powered from the converter only. My OTT is a 2018 with a 2000W ProWatt inverter OEM. Planning stages of upgrading to MPII 3000W with larger lithium battery bank so that I can run the Air conditioner when off shore power.
-
GJ - Just remember to add 'Air-Down' to your step-by-step before leaving the 'Barn', if you do 'air-up' once in. I'm following this thread, with great interest and maybe I should have joined the discussion about 9 pages ago. Our (2) rear leaves broke on the 'eye leaf' at the point where the leaf below the eye ended. I believe I saw some similar break points on other pics posted above. We were in the NWT/TUK area so resources were limited. We cobbled together 2 new but different LS's to get us back down to Whitehorse, YT. Image a horse with two worn shoes in fronts, with a loafer & tennis shoe on the rears... But it tracked & pulled straight. OKAY, maybe not that bad, we can smile but not yet laugh about it now. We had all 4 LS's replaced by 'Jacob Industries' (HIGHLY RECOMMEND IF YOU NEED WORK DONE...) the go-to suspension business in Whitehorse YT, last summer to get us home. So we'll probably not be replacing LS's unless we break another on our return adventure to AK this summer. And yes, we now carry 2 (the fronts) LS with new brass bushings if we needed. Our new LS's had some differences in length from what we had from the build, they are rated at 1830 lbs. The ride home from Whitehorse was slow and not 'stiff' at all, but by this time we were on pavement. There is a lot more that ScubaRX & I found out about LS's that are compatible with the the LE2, in research & discussion. Starting with 'where does Oliver source them from' to that sources part numbers & spec's. Even on some of the supposed same universal PN's from different suppliers sometimes there are slight/negligible differences in the A B C D measurements that make it less that totally consistent by supposedly the 'same industry PN' across suppliers. And that was just the 4 leaver's. I have spreadsheets, but this thread is way beyond that point, by going with ALCAN. I actually like the idea of going with 5 leaves, not for load increase (which we will not do), but the fact that the first leaf below the eye, extends to the eye. Snow maybe Wed, after the melt we'll pull SNYSDUP out of the nesting box, and start loading him up, Cause "WE ARE GOING CAMPING". B-Out,