Search the Community
Showing results for 'Generator box'.
-
When I needed a short-as-possible 4/0 cable to attach the new shunt, I found the shortest I could buy was 1 foot. Another thing you can do when making your own is to offset the angle of the lug (can't buy these). Notice the pic of the 2 AWG cable above, where one lug is 90 degrees to the other. I built it that way because one side mounts vertically to the battery post and the other side mounts horizontally to the power distribution box. Also check out the pic of my short cable above. I mounted the lugs 180 degrees to each other that gave me a 3/4" lift to mount on the shunt. @topgun2 since Twist and our hull 113 are cousins, send me a PM if you want me to make you a couple custom 4/0 cables, at cost to your specs.
-
 Just some trivia for a discussion topic. I’ve been looking to purchase a small inverter generator to carry on long extended camping road trips, and in comparing specs and reviews, the Honda series consistently comes out as a top choice (but pricey!). One interesting detail is the engine displacement comparison. The Honda has a significantly larger engine for the given wattage compared to the lower cost competitors. Probably explains a lot about the reliability and noise advantages of the Honda. The larger gas engine just doesn’t have to work as hard. Couldn’t find any any info on the engine horsepower ratings of each brand though. Maybe it’s on the data plate on the unit itself (there’s a direct relationship between engine horsepower and potential maximum wattage of the generator). Larger engine displacement typically means more torque, and more torque means lower RPM needed to achieve a particular horsepower. HP= torque in lb-ft x RPM/5252 1 HP=33,000 lb-ft/min=746 watts Comparison: Home Depot Ryobi 2300 watt - 79cc. ——— Harbor Freight Predator 2000 watt - 79cc. ——— Honda EU2200i 2200 watt - 121cc. ——— Champion 2500 watt - 79cc. ——— WEN 2500 watt - 80cc. ——— Craftsman 2500 watt - 98cc. ———
 -
No Art, our front receptacle appears just dusty inside, nice straight contacts, hardly used at all. We've never used it and I'm not lugging a generator, don't want to hear one and we keep our fire ring in the front bin. The front seal looks like it needs replacing since it is somewhat dissolving from weather, causing a black streak to run below it. Thanks for asking. I should replace (make) that seal. Was merely mentioning, to do a full SmartPlug conversion you would need to replace both receptacles and the cord to do it right. For $158, we will have a brand-new twist-lock receptacle, everything OEM like new!
-

Enclosed Aluminum Box Front Mount
mountainoliver replied to Tim and Christie's topic in Ollie Modifications
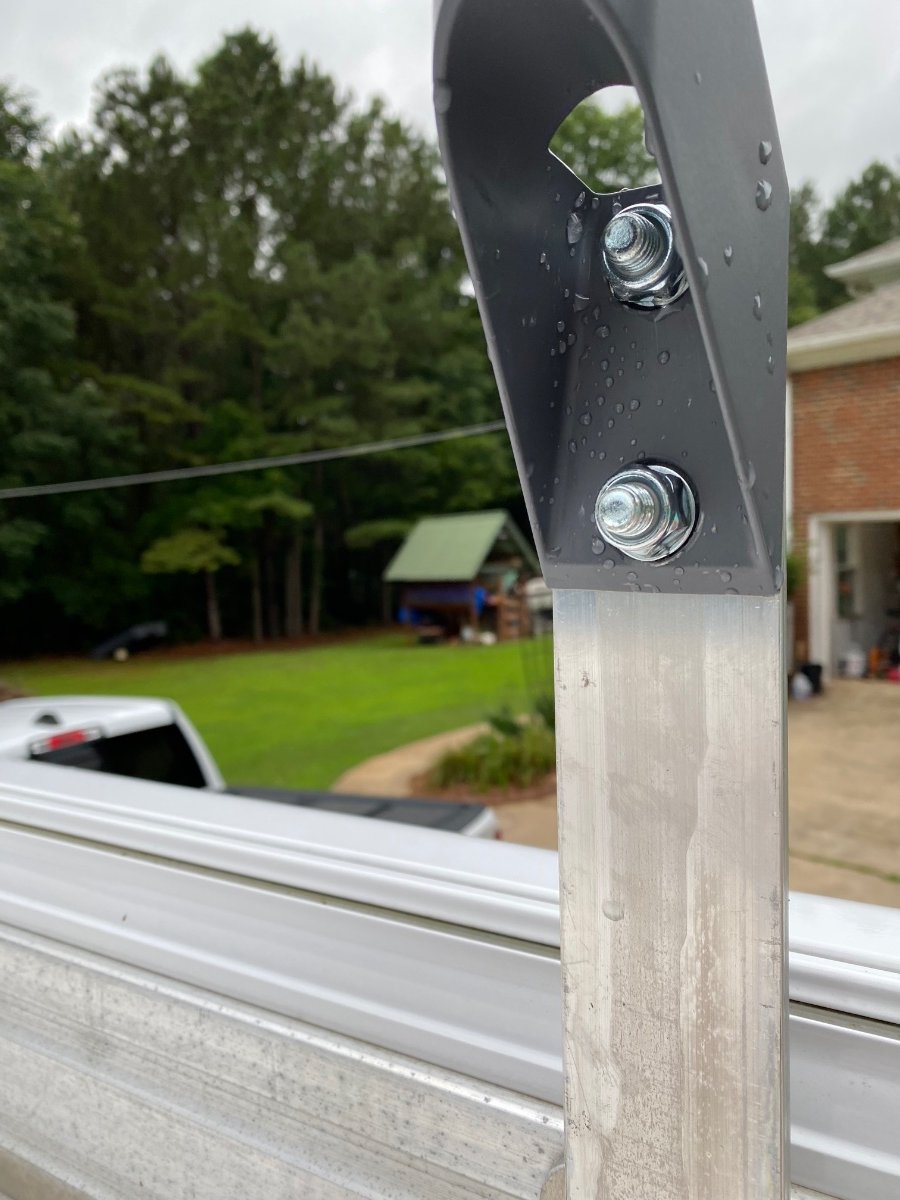
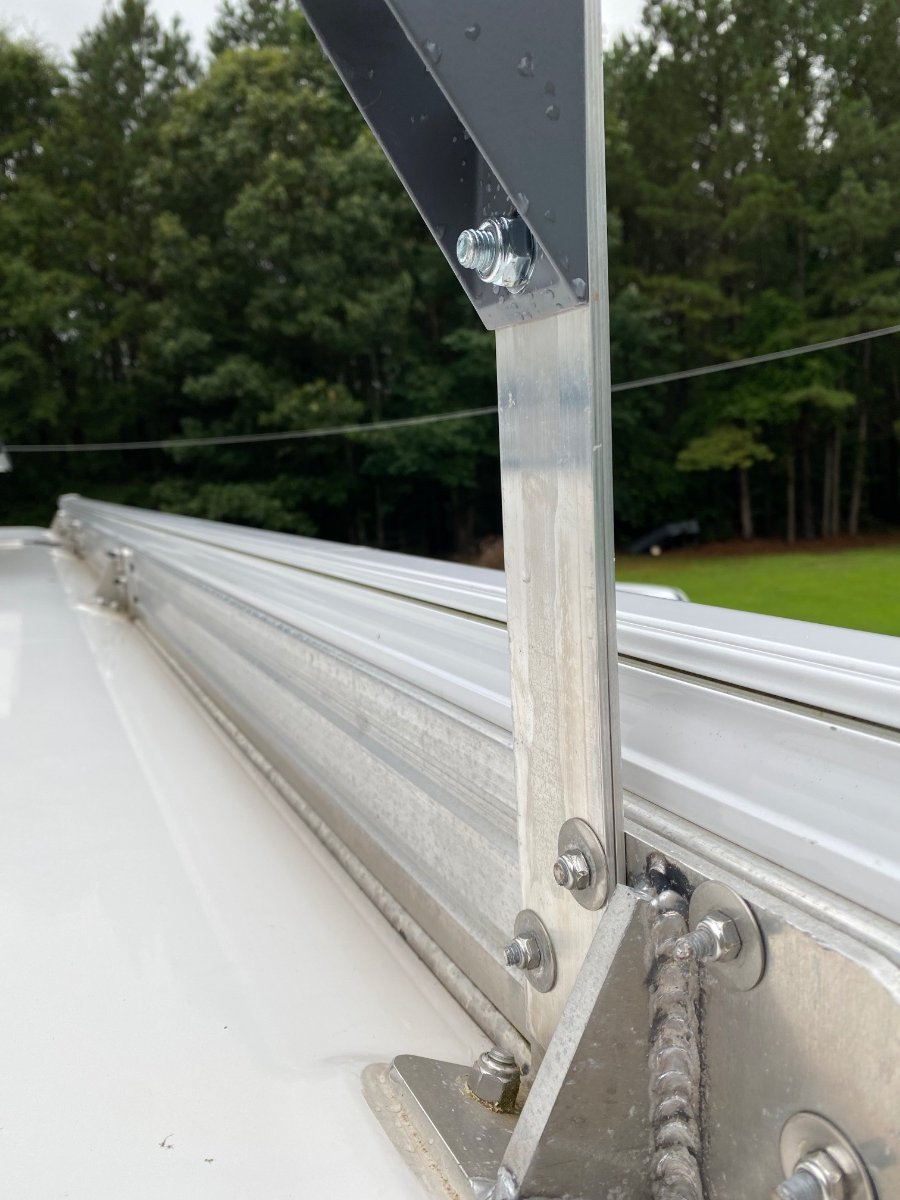
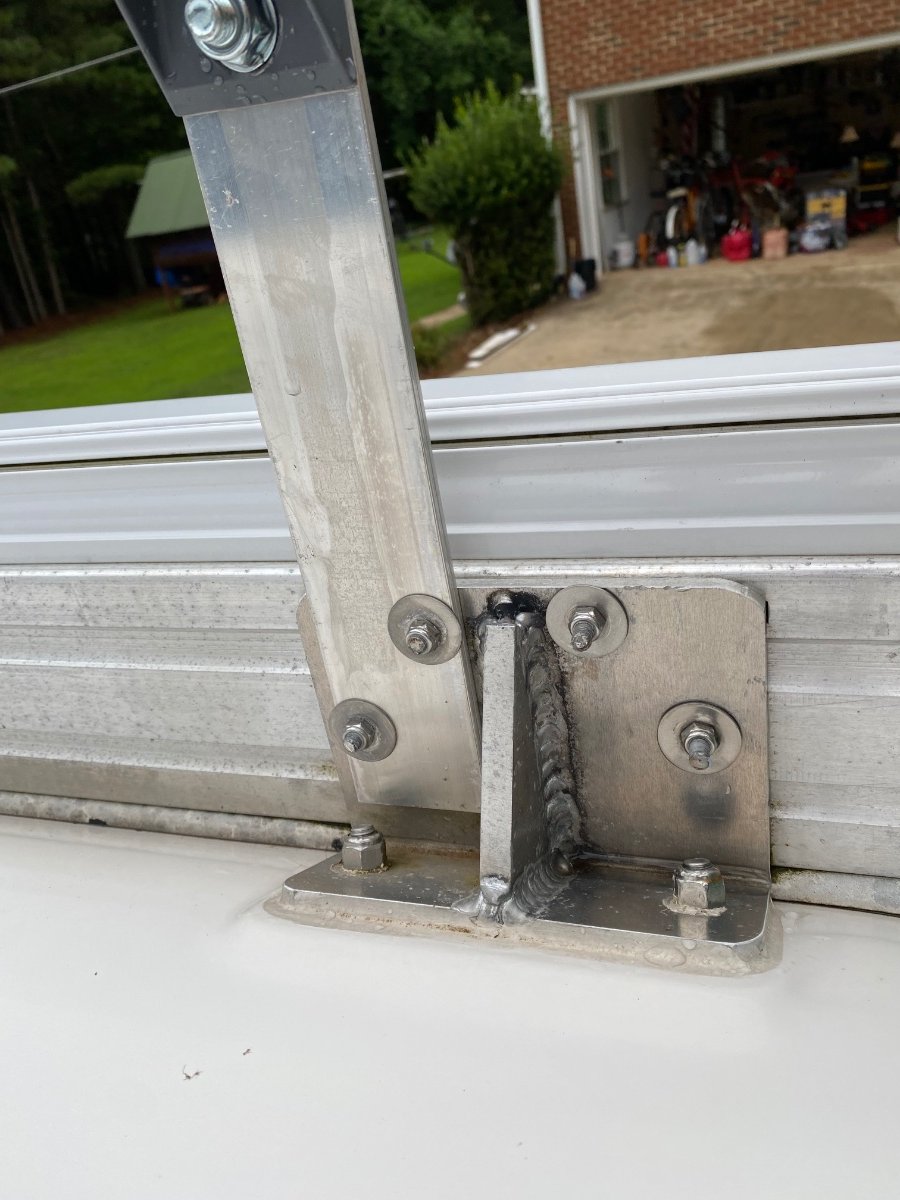
I purchased a generator box from the KSH folks while we were in Lake Havasu this past winter. I particularly wanted a box for my Honda 2000 generator. For the past five years I’ve kept the generator in the Oliver basket (the older expanded aluminum version which weighed 35 pounds empty) and covered with truckers tarp material. This has worked great but the tarp has aged and would have had to be replaced in another year or so. The stock KHS box has three openings covered with removable aluminum plates so that the generator can be used inside the box. This setup is not at all water resistant and I’m not interested in using the generator so close to my trailer. I ended up getting them to make a box without the three cutouts. The box came with two hold down brackets welded in place which I removed because they were exactly in my way where I needed to mount the box. I was able to use the existing holes in the fiberglass cowling and the original stainless u bolts. The back part of the box is mounted to a 1/4 inch thick by 6 inch wide aluminum plate. The front is mounted to a 1/8 wall 1 inch by 3 inch rectangle aluminum tube. This allows the box to be level. I made two 1/4 inch aluminum spacers for the u bolts to clamp against for inside of the box. The u bolts can also be used to strap down the generator inside the box. I made two 3/8 thick by 1 1/2 inch wide brackets for under the frame. As you can see in the photos, the front bracket was made so that I can hang the safety chains on it as well.
-
I’m hull 1139, Vic Shumate, purchased generator 2 days to help with running appliances etc,.,,,generator works great but Oliver says I need to change AC input settings from 25 to 15 on the Xantrex inverter remote panel while using generator as power source…..,,how do I change this setting on the xantrex?! I’m suppose to change it back when plugged into AC 30 for power! So I need to know how to set it!? Can’t seem to get batteries back to 12.5 -14 volts?! I turned the xantrex off! Will that help or hurt while running generator? I’m at a bluegrass festival in Okeechobee Florida through Sunday morning…….. my batteries dropped to 9.6 volts in 2 days while boon docking with roof solar panel, wanted to use generator to bring batteries back up but I’m not doing something right! Help! Got batteries back to 11.6 V today but do t know if it was solar panel or generator doing it!? Refrigerator says code C and Ice melting…not good! thanks
-
In prep for a trip to southern Utah next week I have been preparing the Oliver. I posted earlier about some water freeze issues (my fault, not the Oliver) that have been corrected. I also posted about issues with our Dometic refrigerator and thought our issues were related to the often maligned circuit board that provides power and ability to cool from AC, DC, or LP gas. With help I was able to get a new circuit board (sounds like the last in the world) and installed it this morning. I'm thinking now that it may not be the board but something else. Here's the symptoms: when I am connected to shore power and flip the ac circuit breaker in the Oliver to "on" it immediately trips a GFCI breaker located on one of our outdoor outlets...not the ac circuit breaker in the home breaker box. When I disconnect shore power and attempt to operate the refrigerator via the inverter no breakers in the Oliver trip but there is no power to the refrigerator. Looking for suggestions. Faulty refrigerator?
-
Has anyone purchased the new HONDA 3200i that has a Truma AC unit? It is rated at 3200 surge and 2800 continuous power. Will it run the AC?
-
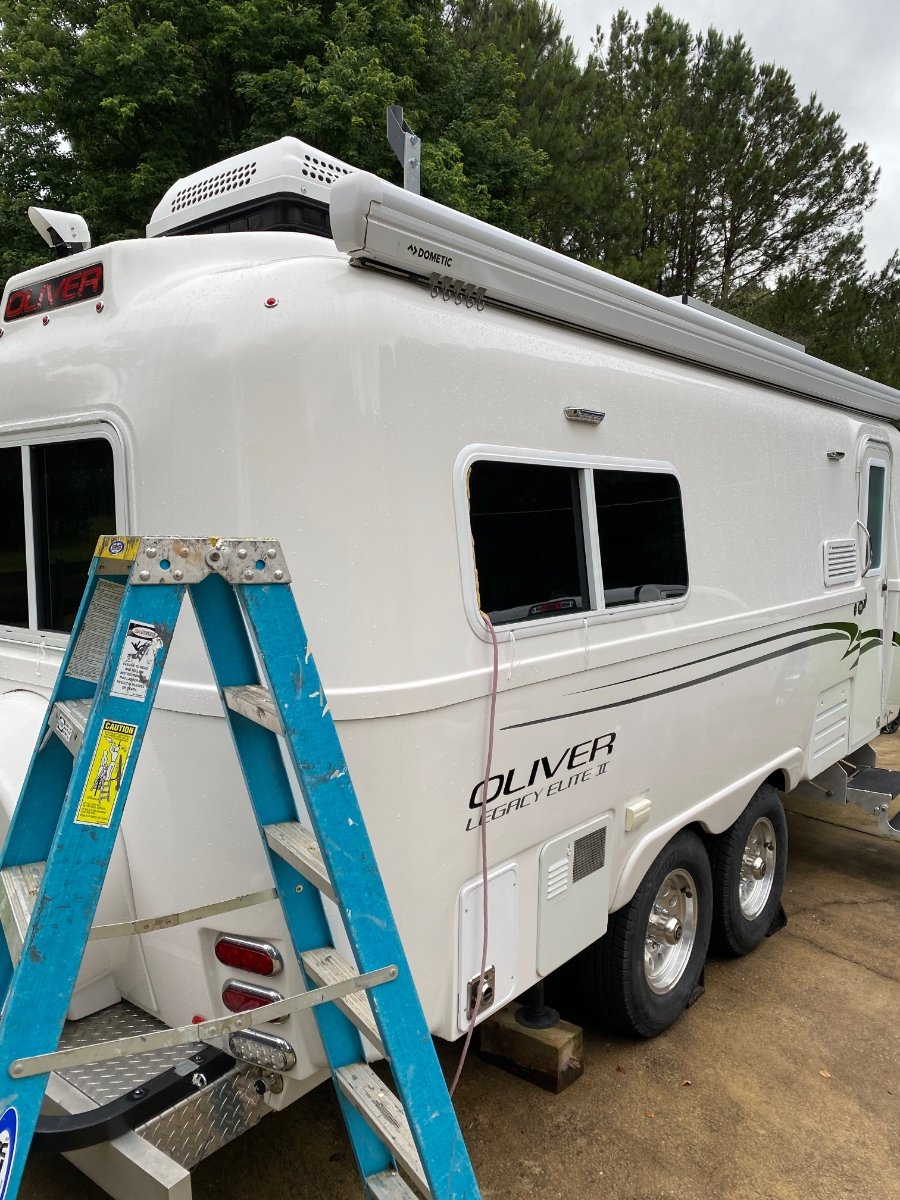
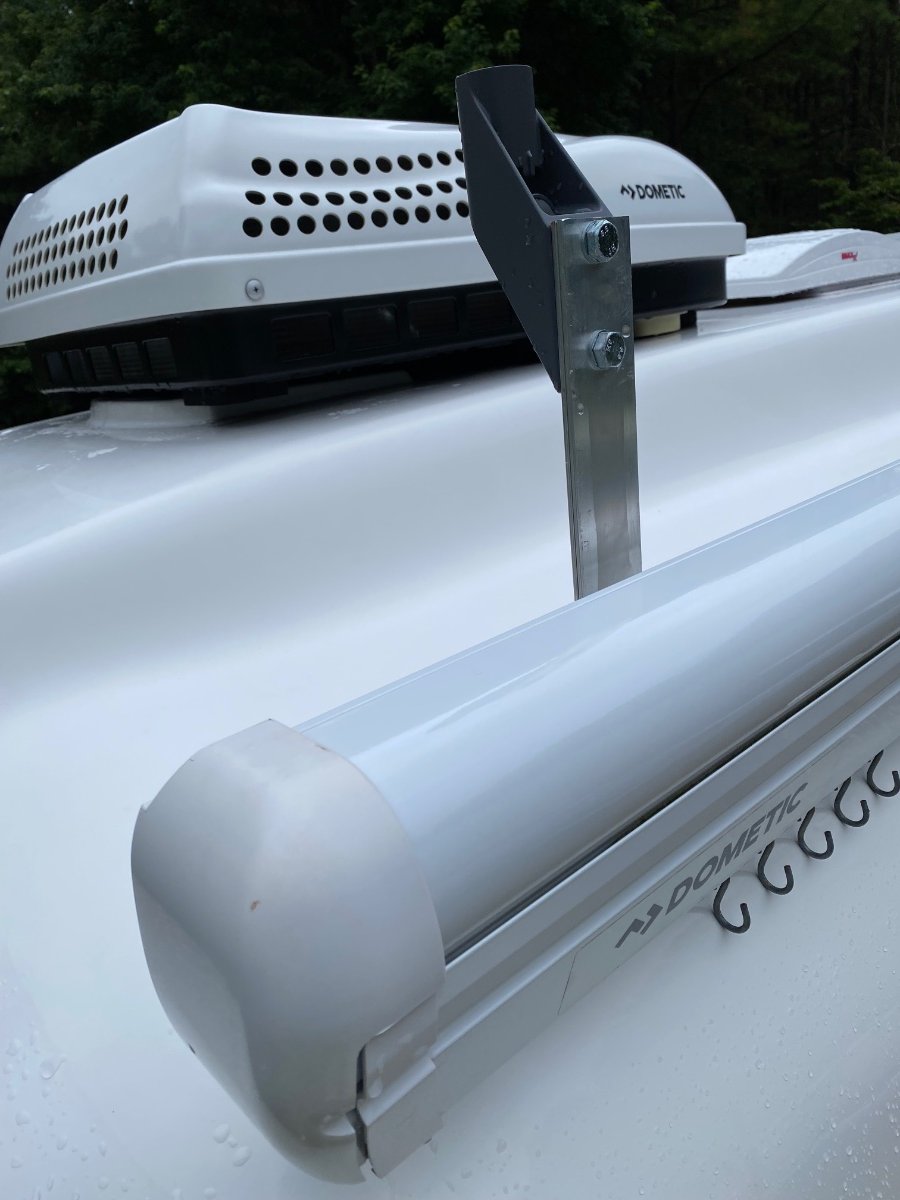
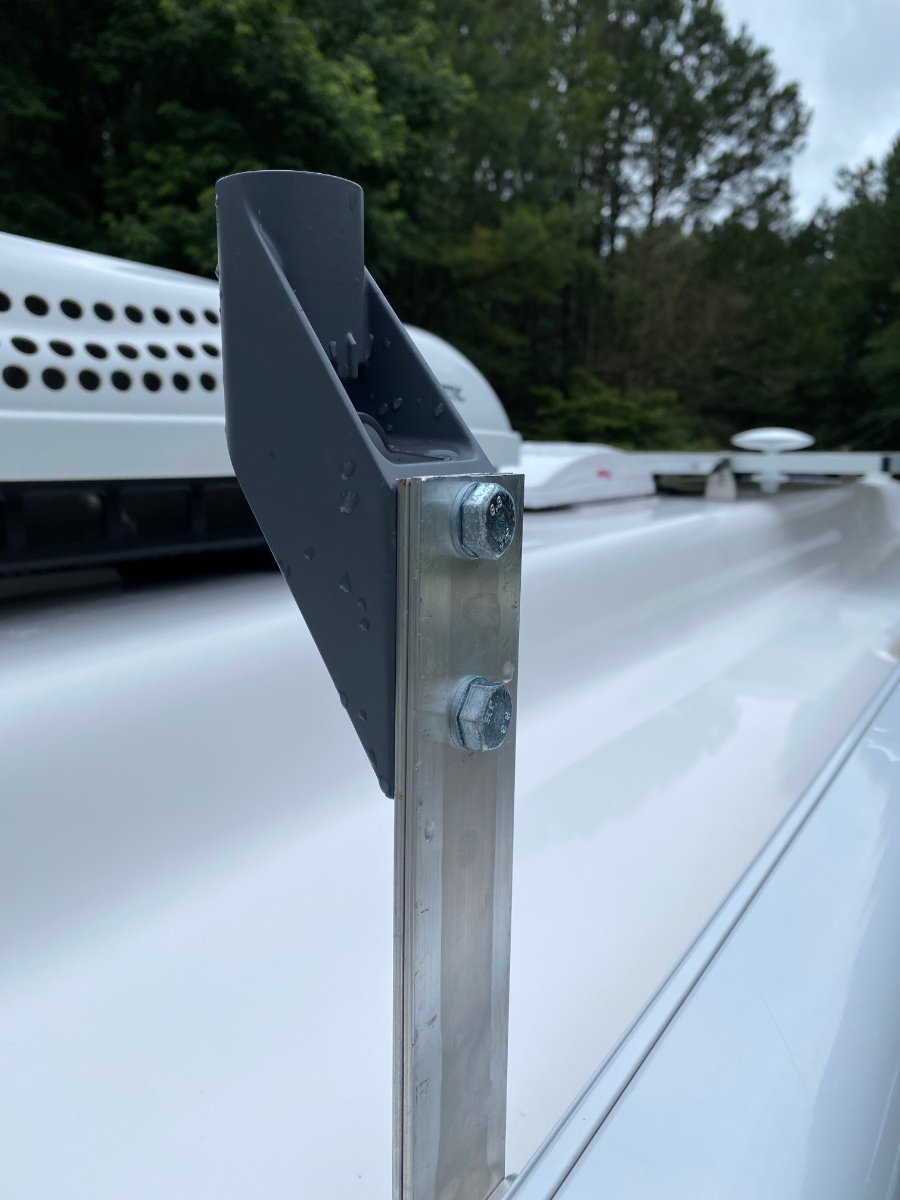
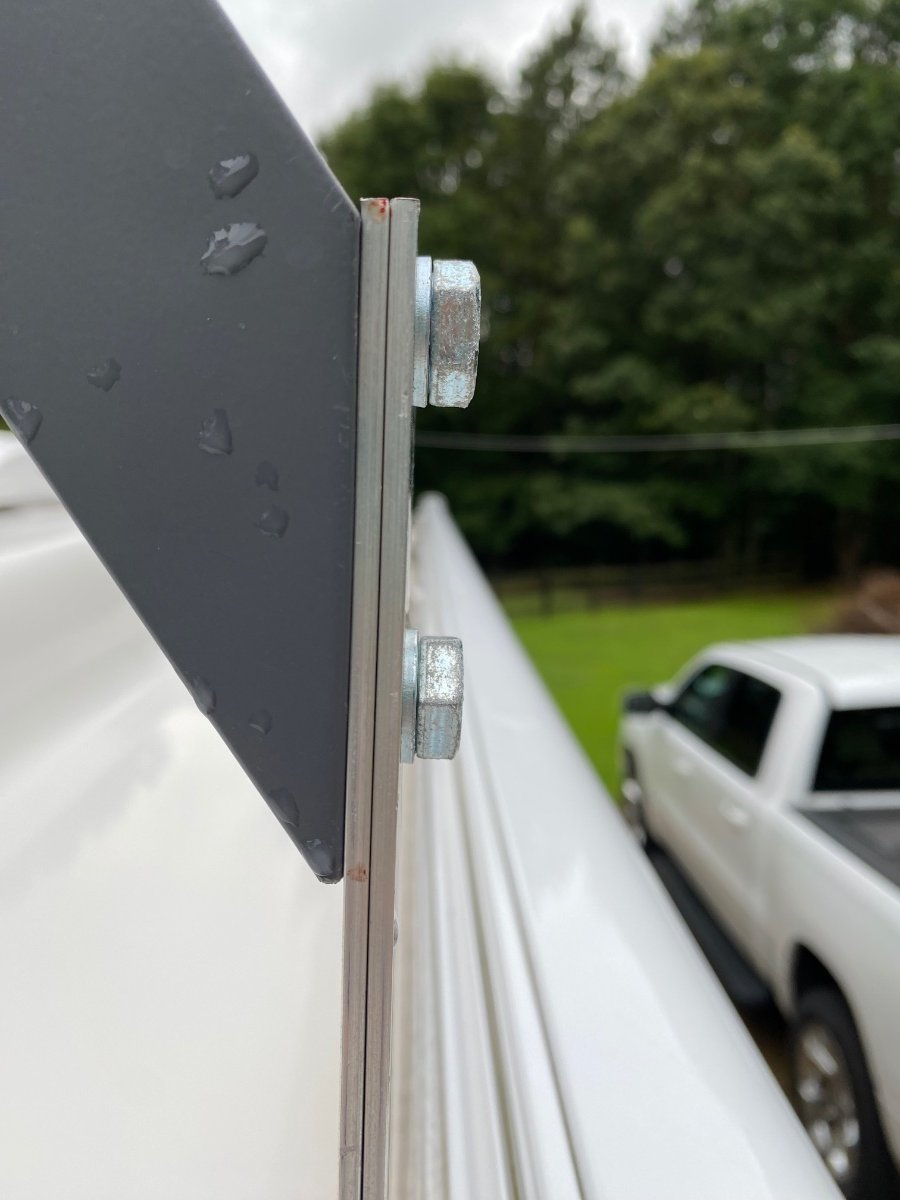
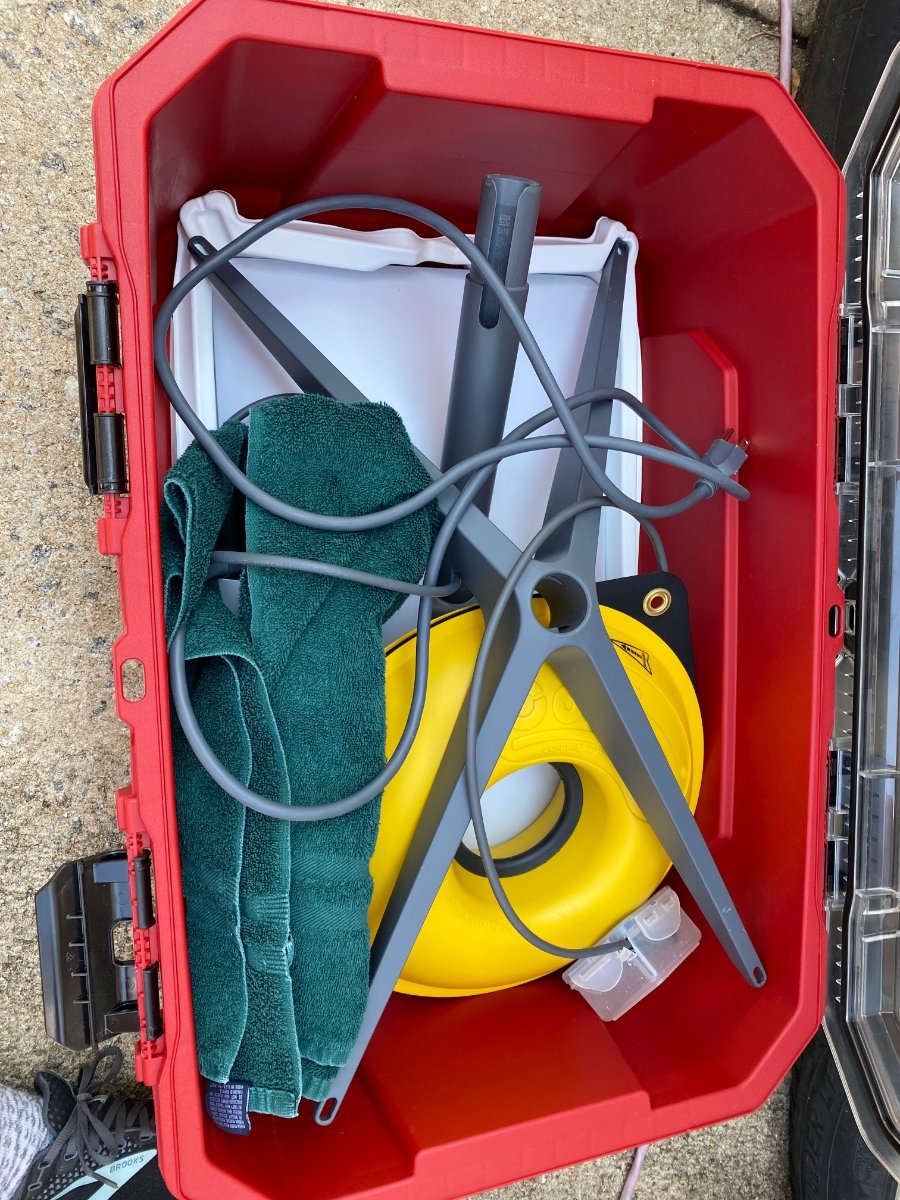
We liked the idea of mounting the Starlink bracket to the roof as we already owned the short mount from when we mounted it to the fascia board of our house. Mounting to the awning where easy and quick access to install the dish at each campground was our priority. But our 2019 Oliver has a Dometic awning whose bolt pattern is diagonal and the Starlink mounts bolt pattern is vertical. Our solution was to select a 2” wide piece of 4’ stock aluminum at Lowe’s, cut 2 pieces for strength, and drill holes on one end to match Starlink mount and the other end to match the Dometic awning. 1. We began by measuring the clearance needed for the dish to clear the awning when the dish is in stow mode, and length for the drilling of holes on both end. For our application, that length was ? We also ensured the trailer was level before starting. 2. Next we used cardboard to make a template to cut and drill the hole patterns. I am sure others may find a better way to do this, but we put dark powder on the bolts and then pressed the cardboard to them using a level on the cardboard to ensure it was straight. (We also visually assessed that it appeared perpendicular to the awning). We then pre drilled the holes in the cardboard and did a test run. NOTE: it took us at least 3 cardboard attempts before we got it right! 3. Now we transferred the template to the metal pieces. We actually drilled the awning pattern on one end of the 4’ aluminum piece before we cut the short lengths. This was in case we messed up, we would only lose a short 2” piece rather than our planned 8” lengths. We mounted the long piece to the awning, but the upper hole was slightly off, so we had to wallow that hole slightly larger, but that did not impact securing it. We cut our length and drilled the Starlink holes. We repeated this process for the second piece. 4. We purchased stainless steel bolts, washers and lock nuts for the Starlink end. So we stacked the 2 aluminum plates and installed. The direction we chose for the Starlink mount was to make it easier to see and plug in the router cable to the dish when we put it up there. NOTE: the awning bolts had been cutoff and threads were damaged so the nuts wouldn’t come off easily on the rear awning bolt set. Thus we had to use the set forward of those. 5. We have traveled at 65mph and it doesn’t seem to move and remains secure. 6. Like others, we bring the 4 legged dish mount/anchor and use it if we are under trees and need to move the dish 50’ away from the camper. We aren’t concerned about theft of the dish as it cannot be used by anyone else. Each dish is specific to the owner’s account. For interest, I am including a picture of our Husky storage box and how we pack it. We use a Cord-Pro to wrangle the 75’ router cord to prevent tangling. I also notched a Tupperware to protect the cord plug end that goes in the dish. It can be delicate and damaged easily. 7. We current put the cord thru the basement door and plug into the router via the trap door at the bottom of the bedside table (we have twins. The basement door has a notch in the rubber seal where the cord fits and allows us to close and lock the door without pinching the cord. Eventually we plan to convert the satellite port. Please ask questions, we would be happy to answer.
-
Speaking of generators and the front storage box, ideas for security. Ideas for locking down a Honda 2000 or 2200?
-

Starlink dish mount on Dometic awning brackets
MAX Burner replied to RoadKingsofGA's topic in Ollie Modifications
It's our understanding that the "proprietary" Starlink cord is labeled as such due to their unique cable end connectors (one for the Dishy end and the one for the router end). But the cord itself is just a regular "4 twisted pair" ethernet cable which makes it easy to cut/splice, add RJ45s, and through-hull connectors. @RoadKingsofGA - If you're interested in converting your Starlink to a 12vDC powered kit, shoot me a PM and I'll get the particulars to how we converted ours. It really makes set-up/take-down and operational usage simple and easy when boon docking. OBTW: We're using the same red Husky Box for stowage - perfect fit! Cheers! -
We are closer to weekenders than full-timers for sure. Many here have travel-trailered more in the last 1-2 years than we have in our lifetimes. We go for at most 4 weeks annually and 4-5 shorter trips, hopefully more when fully retired. We just spent a week in cloudy/rainy days in Yuma, the Q and West Valley. We used the Xantrex 6-8 hours a day for kitchen appliances and TV at night and occasional quick microwave. We got down to 64% after 5 days out (the last 3 nights we had hookups). I calculate that if we instead had 600AH LI batteries, the monitor should read 78%, all things being equal. The usage is in the storage, the recharge is in the solar, generator or shore power. If I can get 80% of 600AH LIs, vs. 50% 450AH of LAs, we can camp at the same use rate 2.13 times longer! Good sun, chargers or connections will of course extend what's onboard. It does take patience to watch the monitor read 64%, thinking it could quickly go lower. Would be nice to experience LiFePO4 batteries! 🤣 Are you with LI worried when it reads under 50%? You shouldn't be.
-
I haven't added wheel well storage yet, but this looks like a decent option for a bill. VEVOR Truck Bed Storage Box, Lockable Lid, Waterproof ABS Wheel Well Tool Box 6.6 Gal/20 L with Password Padlock, Compatible with Tundra 2007-2021, Driver Side, Black | VEVOR US
-
I would suggest that only 150 lbs (including the box) be added. Same weight that OTT recommends for bikes and bike racks on the back.
-

Simple AGM to Lithium Conversion question(s)
mossemi replied to Danno and Donna's topic in Mechanical & Technical Tips
Now it's time for true confessions, dang it. On the way to Lake Guntersville for the 2022 OTTO's rally, we stopped for groceries about 30 minutes from the campground. While Krunch went shopping I walked around the Ollie checking tire temperatures and the Andersen WD hitch chains and noticed that the 7 pin connector was laying on the ground. Apparently I hadn't plugged the connector in properly when hooking up the Ollie that morning. The cord had fallen out and the outer sheathing as well as the sheathing for 6 of the 7 wires inside had worn down to bare copper. We proceeded to the campground after a tape repair job on the wires and cable. I reached out to the Oliver Service Department while at the rally and they had service personnel scheduled to be on site and they were able to deliver a new cable to me. I did another temporary field repair to hold me over until I reached home. I added an outdoor rated junction box attached to the frame in the propane box and made a splice repair there, so that is where I added this toggle switch. Mossey -
 Using the "Any Victron device that has the word "Smart" in it's name has Bluetooth connectivity" may open up another option. Can we combine my having the Victron 712 Smart Shunt in the battery box and your "Higher is better than closer" concepts? What if I connect the dongle to the shunt and run its five feet of cable up to the upper cabinets of the street side. Then extend the dongle forward until I run out of cable. At that location, stick the dongle to the ceiling of the cabinet. Much higher than under the dinette location, and not much further back. Your thoughts? GJ
 -
I passed on the propane QC (Quick-Disconnect) port option to save money, knowing that Oliver runs a terminated line to the rear. I now have fore and aft QC ports on my 2020 OLEll. Here’s what I did: The terminus line cap was simply removed and an MB Sturgis Quick-Disconnect valve fitting installed. This port is primarily used to fuel my Blackstone griddle, which is generally set up at or near the rear of the trailer, or to the curbside if there is a picnic table of close proximity. For the forward QC port, a ‘T’ fitting was installed in the existing line connection. A short hose was then installed leading to within reach through the propane housing screw port where another MB Sturgis valve was positioned. I did not want the QC port located low and exposed in like manner to the way Oliver installs them. This is the QC valve fitting with a 10’ hose connected. The 10’ hose is staged on top of the propane tank just inside the screw port opening. For use the screw port is first opened, the valve is opened and hose deployed. This port is primarily used to fuel a dual-fuel generator staged on the trailer tongue or TV tailgate, or with an added length of hose for a fire pit. QC propane ports in action!
-
Simple AGM to Lithium Conversion question(s)
mountainoliver replied to Danno and Donna's topic in Mechanical & Technical Tips
My original battery setup was four 6 volt batteries. When I changed my batteries to 3 Battle Born 12 volt batteries several years ago, I basically connected the batteries in parallel in order to maintain 12 volts and provide 300 amps. I did have to make two new jumper cables between batteries using 4/0 welding cable. I also used the existing 4/0 Oliver installed cable that runs between the batteries and inside the camper. I also moved the #6 cables from the batteries to inside the camper to clean up the battery box, but this is not at all necessary for changing from lead acid batteries to lithium batteries. The only other change required (besides the previously mentioned Blue Sky setup) is to make sure the PD 4045 (shore power) charger is either switched to the lithium setting or as I had to do, replaced with a charger module that is lithium capable. My setup has been working flawlessly for about four years. I almost never turn on the PD4045 charger and depend on the solar setup to keep the batteries charged. We have a compressor type fridge which is used 24/7 and the batteries are able to keep up just fine. We are careful with power consumption but use what we need. Typically when boondocking we still make coffee every morning, cook breakfast in an electric frying pan, my wife dries her hair in the morning, we watch tv at night, occasionally use the microwave, charge cell phones and laptops occasionally, and in the winter the furnace is used. Again, we are careful with our power consumption so the above list of appliances used varies greatly based on current conditions and predicted conditions. Typically while traveling in the winter in the south west the batteries are fully charged by between noon and one o’clock. I carry a 100 watt folding solar panel and a small propane powered generator just in case and have used these once or twice due to extended overcast days. -

Generator Inverter Usage
ChrisMI replied to Wandering Sagebrush's topic in Mechanical & Technical Tips
Could you provide a picture of the new inverter and charger or inverter/charger? One possible problem if you have an older charger is sometimes the inrush current is too high with that charger. This will momentarily cause your voltage to drop and trip off the EMS. With a cheap 2k watt generator like a powerhouse (or possibly a lower wattage nice gen) eco mode cannot be used. -

Generator power not going into trailer
rich.dev replied to DonnaDuane's topic in Welcome To The Oliver Travel Trailer Forums
@DonnaDuane here is a list of the EMS codes, looks like open ground! this box should be under your rear dinette. Check out this thread, sounds like (might be) your ground bonding plug is faulty, so either get a replacement neutral ground bonding plug, or turn off the EMS and trust the generator. IF it’s a faulty ground bonding plug, a replacement bonding plug is not that expensive, that would be my go to. Stupid question, did you check if the ground bonding plug is seated properly in your generator?
-

Generator Inverter Usage
Chukarhunter replied to Wandering Sagebrush's topic in Mechanical & Technical Tips
Sorry that I may have added to the confusion. Apparently, the 2000 watt inverter installed in the 2018 Oliver was an inverter only without a battery charger built in. The 2000 watt inverter installed in my 2020 LE II is an inverter/charger. That is why I have a more sophisticated wall panel with led readout. In your 2018 Oliver, the batteries are charged by the Progressive Dynamics Converter/Charger under the dinette that also serves as the 12volt and 120 volt service panel (breakers and fuses). The PD Converter/Charger in your trailer has a fixed maximum charging rate of either 45 amps or 60 amps depending upon what model Oliver installed. The PD Converter/charger is perfectly adequate if you have lead/acid batteries or AGMs and charging at the maximum charging rate of 60 amps should not overtax a 1000 watt generator. If you ever upgraded to lithium ion batteries though, you would need to replace the PD converter/charger with a charger that offers a lithium ion charging profile built in. Progressive Dynamics makes one that is a drop in replacement for the one you have. Alternatively, you can install an updated combined converter/charger to charge your batteries and then bypass the charger in the PD Converter. That is what the factory did in my 2020 LE II. I do have a background in grid scale power and high voltage transmission, but the information above I learned the hard way when I switched out my lead acid batteries for LFP04 lithiums right after I picked up my 2020 LE II. Oliver started offering the lithium option in mid-model year about a month after I took delivery of mine so I had to figure it out myself. Information on this forum helped me out considerably.
-
Here is an interesting video which gives a pretty straight forward way to disable the speaker on an Apple Air Tag. Removal of the speaker eliminates the continuous audible chirp after 72 hrs. Removal of the speaker will not allow a bad actor to hear the chirp, then find and disable the AT by removing the battery after he/she locates it. For example an AT hidden in a car under the seat or in the trunk. Or in a piece expensive camping equipment say a portable generator or even an Oliver TT. The bad actor will eventually figure out there is an AT on the stolen item tracking them if they have an iPhone. Without the speaker chirping it will be more just a bit a lot more difficult to find. A common misconception - the map location is not the location of the air tag, it’s the map location for your truck or campers air tag that would have been the location of the persons phone who parked or walked or drove by close enough for their phone to hear the air tags broadcast. Patriot🇺🇸
-
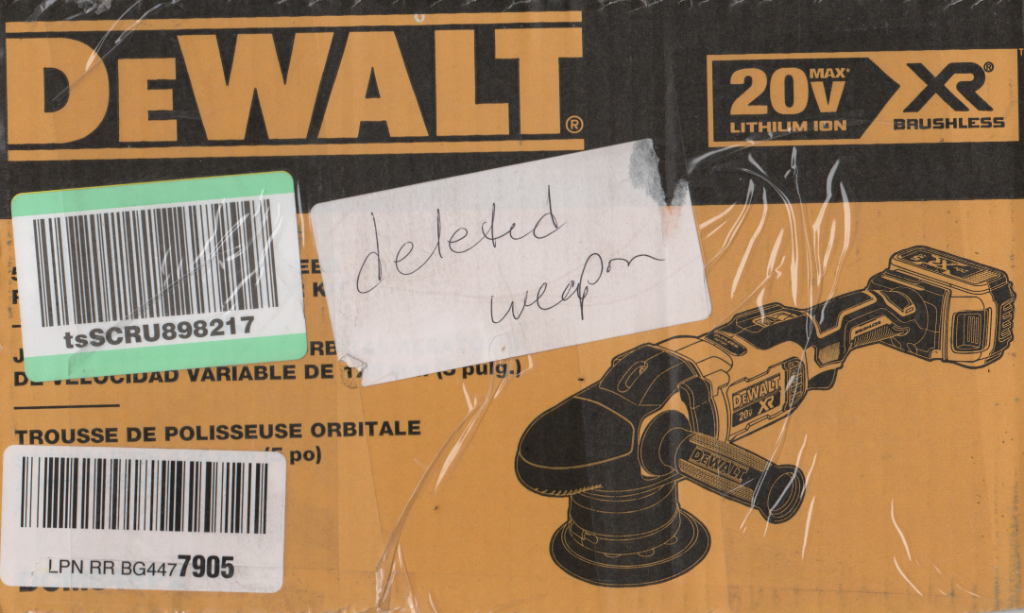
 I bought this on eBay at a great discount, they advertised it as Open Box. This is what I found on the outside of the Dewalt box: I am not sure what happened. Was this a case where somebody tried to ship a firearm illegally as "tools" and the shipping company found it? It looks like somebody tried unsuccessfully to peel off the sticker, which explains why it shipped to me inside another plain box. I have never heard of this situation when buying an item online, any comments? There was nothing wrong with the tool or any of its parts; unfortunately there was no free Uzi inside…. 😬 John Davies Spokane WA
-
For those of us with sometimes lengthy power outages, a whole home generator or big battery backup definitely make sense. Here in SW Florida, it's a selling point. Do make sure, if you buy the genset, that it has the automatic test feature. I know several friends with older systems that couldn't start their generator when needed. Sticky carburetor, dead start battery, etc. (Mark calendar for battery replacement.)
-
Tire pressure confusion - Legacy Elite 2 POLL
mossemi replied to John E Davies's topic in Towing an Oliver
It's the same with my battery jump box. Sharing is caring! Mossey -
I am aware that some owners use the Hughes Autoformers, even in combo with one of their Power Watchdog surge protectors. Although designed for easy use outside at the shore power post, they can be installed inside an RV which is what I decided to do. Without going into much detail, the Autoformers (available in 30A and 50A models) boost voltage when drops occur, as well as provide surge/spike protection. Surprisingly enough, a ‘search’ of this Forum did not show many results for these Autoformers. As a cost saving measure and matter of convenience, I passed on their Internal Hardwire Mounting Kit and simply made use of a new 10’ 30A RV extension cord. I did however, opt for their Mounting Bracket due to space limitations and ease of removal for service needs. Upon disconnecting all power sources, I proceeded with removal of the exterior street side Furrion 30A Twist Lock male plug. Although I never experienced any problems in the past, I did find the ‘white’ neutral wire connection loose, probably from vibration. You’ve heard it before and now again, routinely check your wiring connections! I then opened up the Automatic Transfer Relay and disconnected the individual wire ends of the stock 10 AWG Boat Cable. I was pleased to find my unit had the Wago Lever-Nuts wire connectors! The clamp connector was loosened and cable removed, all 24” of it. Note: I opted for the front 30A convenience plug for generator use, thus the stated ‘relay’. The female plug end of the aforementioned 30A RV extension cord was cut off, measuring ~35” of cable length below the red plug and subsequently connected it to the Furrion Twist Lock plug. I used the removed cable to gauge how far to strip back the outer cable cover and individual wire ends. Again, pleased to find that the individual wire inserts on the Furrion were color-coded to ensure proper wiring. If you forget to position the neoprene gasket prior to connecting the wires, just know it can be ‘gently’ fitted over the Furrion’s cap and base. The mounting screws were then aligned with the gasket and hull holes for reattachment. The installed female plug extension was laid out and connected to the remaining length of the male plug extension; the end of which was then fed into the relay to mark where to make another cut. For clarification, the cable right of the red plugs is the whip on the Autoformer, the left is the excess length to be trimmed. As before, the former cable was used to gauge necessary wire stripping. The cut length measured ~38” of cable below the red plug and subsequently attached to respective Wago connectors/ground. The cable clamp was then tightened and lid placed back on the relay. By connecting the two red plug ends, the circuit loop is restored to the original configuration, but now longer and modular. The connected cables can now to tucked away when bypassing the Autoformer. Note: the final position and orientation of the Autoformer will differ from this pic. The plug ends can now be disconnected from each other and connected to the Autoformer, as necessary, to bring it into play. These pics show the final position and orientation. Note: the ‘yellow’ light on the Autoformer indicates it is boosting, I have known for some time my storage facility voltage fluctuates and just another reason for this install. The above two pics shows a mockup of the Autoformer, which still needs to be properly mounted. I will update this post when undertaking that task.