Search the Community
Showing results for 'Generator box'.
-
 what must I do to use generator power on my 2018 elite II? What steps are required?
 -
Hello, I am a new Ollie owner, Hull number 530, and I’m a low tech user who needs help! Where can I get information on purchasing the factory front mounted storage box I’ve seen and heard about? Secondly, what is my first step in troubleshooting low water pressure coming from my pump? Thank you. Pete
-
My nice RV mechanic suggested I place the Honda generator I plan on ordering on the bumper? What would be the best rack? Thank you!!
-
A few years ago, generators were all over our forum. Nearly all portable generators were of standard Motor/Generator design. I refer to them and my Dometic Penguin AC as "Hammer Mills". Then Honda came out with their inverter line. Super quiet, fuel efficient, and their EU 2000 watt unit with an EzStart would run our A/C units. The vast majority of us purchased the Honda inverter 2000 or 2200 units. But they were, and are pricy. Time has passed and most of us still have the Hondas that you could not pry out of our dead hands. But much less costly Champion, Yamaha and Predator inverters (to name a few) have come into play. With the OTT production rate acceleration, I suspect we have many new owners that likely would likely benefit from a revival of the topic. This thread is intended to hear from our owners their thoughts about their generator. Please touch upon the below as well as your experiences: Generator Name and Model Cost of Purchase Power Output (Rated Full Load) Ability to handle our A/C cycling while switched to "Eco-Mode". Please specify if you have an 11K BTU or 13.5K BTU A/C. Decibels idle and full power Ease of use Maintainability Reliability Durability Number of seasons used Thank you! GJ
- 68 replies
-
- 10
-

-

-
 I am not an electrician, I don’t play one on TV and I did not stay at a Holiday Inn Express, so please keep it simple for my simple mind. I have been reading the forum for a few days and I have found posts that talk about and around using a generator solely for charging the Ollie batteries. Is using a generator solely for charging the Ollie batteries a good idea? My objective is to have as small a dual fuel generator as possible, while I am off shore-power to compensate or complement for the 400 Watt solar panels. My larger objective is to be as untethered as possible while traveling. I don’t want to go to a bigger generator to run Ollie in full or partial mode. My Oliver Elite II is on order. It is coming with 390 AH Lithium batteries, 400 Watt Solar panels with charge controller and 3,000 Watt Pro inverter. Is there any special request I need to make to Oliver to create a plug from the generator to the battery to make the connection as clean and simple as possible? Dumb question time – Why couldn’t the generator power enter the battery system via the external solar panel connection?
 -
What do you all do to cover your generators when you need to run them and it's poring rain outside? I've seen some "covers" at the Jungle Store - not sure about them.

-
Please help!! We are boondock camping and we're trying to top off our lithium batteries. I plugged into a small watt generator it did not charge anything. I switched over to a 3500 generator and there's a clicking noise going on and it's not charging. Clicking noise in the compartment of the dinette, the one on the left. I do not know what to do. Can anybody help? Thank you, Christi
-
Another winter project with help of good friend with "SKILLS" in welding aluminum. Added Bumper box. Thanks to all who contributed on the subjet. I did get endcaps put on and license plate bracket . Before picture. Picture was taken . Will update with better pictures later when snow clears.
-
Our Oliver is the first trailer we’ve owned with an EMS, and I’m a bit nervous about using a small generator (Yamaha 1000) for charging if we don’t have enough sunlight for solar and/or truck charging. I don’t yet have a grounded neutral plug, but will build or buy one before any travels. I did check to see if the generator would work, and of course it didn’t because of the floating ground. For info, we have four 6 VDC AGM batteries, and 480 watts of Solar (trailer and Zamp portable). We prefer to boondock, but are not big power users. Mostly lights, Maxfan, and furnace, but we do tow with the 3way refrigerator on DC. Any words of wisdom? Have I missed anything?
-
Honda just released a new 3200watt (26.6 ) amp generator. It is in the same format of the EU 2200i. It will fit under a tonneau cover an should also fit in the front basket. I haven’t measure the basket yet thought. 60 pounds, fuel injection, and all of the same features of the EU2200. It is a little expensive at list price $2999, the 2200 main and companion together are about $500 cheaper than the 3200. If I hadn’t just bought the EU2200i main and companion I would really consider this because of the space savings and one less generator to maintain. The 2 Eu2200i are 4400 watts or 36.6 amps vs 26.6 amps of the 3200
-
I am looking for an enclosed aluminum box to mount where the factory "basket" goes on the front frame. Has anyone found one that fits well and has some room for tools and odds and ends?
-
Hey, all. Prepping to go full-time after my Elite II pickup in late April. I have a spec sheet provided by Oliver which has measurements but perhaps someone can share pictures of the various storage cubbies in their E2? The ones on the site really just show the doors of the cubbies but not the shape + contour of things inside. Even better if this prompted a discussion here from folks who have advice on what they've settled on for dividing/organizing the various storage cubbies. Nothing exotic planned for storage needs on my end: clothes, dishes, and similar. Thx!
-
 Any ideas why my generator power isn’t showing up in the trailer despite being plugged in the same as always. The only thing that has happened since I last ran the generator last Winter is my water pump stopped working, so repair guy ran new positive line from switch to pump. could the repair guy have done something to prevent generator power to enter the trailer? thank you
 -
 Other than sitting it on the hitch shelf….. thanks
 -
 We got our LE2 with the bike rack mount and realized we will probably always carry our folding Ebikes in the back of the truck under cover. With that understanding we decided to add a cargo tray and locking box for general items needed for setup, and camp site necessities. Obviously weight is a critical factor so with the tray, box and gear inside we are shooting for less than 200# total. I'm sure we have succeeded after adding up the weigh of all items. The most difficult part is making the extended rails for the tray to mount on. I used the same T6061 aluminum that Oliver uses on their frame members. It's available in small sizes at local metal supply houses such as Metal Supermarket. The aluminum tubing drills and cuts easily with carbide woodworking tools. Use a little lite oil on the blade to keep the aluminum from fowling the blade. You must use good eye protection when cutting. I copied the way the bike rack rails were machined. Here's the results of the project: We have pulled the camper a couple times for local camp outs and the weight of the addition is completely unnoticeable while towing. The box is well made but light weight with locking double latch system. It has a double layer of aluminum in the lid and is foam filled to keep the contents from heating up too much in direct sun. The whole thing is very sturdy and at 220 pounds I can stand on the box lid to see the top of the camper with no effect to the box lid. Good traction and very solid. The softener tank is mounted with a tank wall mount and strap and is set up with quick connects and the standard hoses hook up in just a minute. The softener comes with a regeneration kit and it takes about an hour to perform a regeneration using a box of table salt. It will last up to 2000 gallons of water depending on the mineral content. No need to remove the tank for regeneration, just connect the kit to the external QD fittings and run the process. When done, you are good to go for a few more camping trips. No more hard water scale or rust on pluming fixtures. Remove the tank for winter storage inside the garage. I'm very pleased with the overall project. The box can be removed just as the bike mount is removed for spare tire access. You can actually access the spare without completely removing the tray assembly, Just slide it out about 6-8 inches and the cover and tire are removeable. I bought a self lit license frame and mounted to the back of the tray. I added a plug connection to the license light wire to power the new license plate light. I wanted a removable connection for obvious reasons. The connection is mounted on the lower part of the spare tire cover under the original license bracket. The old license plate bracket is still useable if the tray and box are removed. Tray: https://www.amazon.com/gp/product/B0017H9N4E/ref=ppx_yo_dt_b_asin_title_o02_s00?ie=UTF8&psc=1 Box: https://www.amazon.com/gp/product/B000MK4F68/ref=ppx_yo_dt_b_asin_title_o02_s01?ie=UTF8&psc=1 License Bracket: https://www.amazon.com/Car-License-Plate-Light-Chrome/dp/B00S1Y5TSK?pd_rd_w=jpDah&content-id=amzn1.sym.e8faeee7-63c9-4cb3-96e0-e50a41f3b35b&pf_rd_p=e8faeee7-63c9-4cb3-96e0-e50a41f3b35b&pf_rd_r=018MZ7KVYFFMGM0WSKBV&pd_rd_wg=mdsBW&pd_rd_r=eff79229-c9bb-45a5-8656-400649d9a361&pd_rd_i=B00S1Y5TSK&psc=1&ref_=pd_bap_d_grid_rp_0_1_ec_t Softener: https://www.amazon.com/gp/product/B09Y2KNFFL/ref=ppx_yo_dt_b_asin_title_o06_s00?ie=UTF8&th=1 Tank Bracket: https://www.amazon.com/gp/product/B00208DY76/ref=ppx_yo_dt_b_asin_title_o04_s00?ie=UTF8&psc=1
- 7 replies
-
- 12
-
-
 We've had the Battery Box on our radar screen since we purchased Casablanca back in March from its PO in TX. One of the Hull #226 selling points for us was that the PO had recently replaced the AGMs with 3 Battle Borns and added a Victron Smart Shunt. However, upon learning from the forum, the BB install by the PO was less than optimum - or at least to our understanding at the time. We were surprised that there wasn't a battery master "shut-off" switch. This fact was the main driver for this project - after looking into what we "really" had on our hands, the pervasive project "scope creep" showed its ugly head! Full Disclosure: Although we've had several RVs over the decades, never have we owned Lithiums. Thanks to these forums, learning about the nuances and particulars of LiFePOs, specifically, Battle Borns - and even more specifically, their application with the Oliver, has taken some time to digest. We didn't want to delve into the "fray" of "cleaning up" what was previously installed until our understanding of this particular system was at a high enough level not to screw something up. So, thanks to the forums, many of y'all's posts regarding the subject, and special thanks go out to @Geronimo John for his patience and guidance with what ended up being a fairly large scale re-design of Casablanca's DC distribution system. Initial Configuration and Issues: 1. A key indicator that there was an issue somewhere within the "DC system" was that the charge controller would never reach 14.4 volts; 13.6 was the max ever observed/measured. 2. The BBs were stacked in an unusual configuration on the battery tray. The rear two batts were aligned side-by-side facing left/right and the third "outer" BB was aligned 90 degrees off facing fore/aft. Several cables were too short not allowing full battery tray extension. Clearly not a neat/tidy or logical configuration. 3. The battery bank was not strapped down. 4. Although likely large enough for intended current, the three BB's parallel connections were made with 1/0 cables versus the 4/0 cables distributing the current into the trailer. 5. Several positive and negative connections were made directly to the battery bank without the use of any sort of terminal post or terminal bar even though the Smart Shunt was in place. These connections were bypassing the SS, not good - thus contributing to phantom current within the DC distribution system and not allowing the Victron App to capture all DC power activity. 6. One cable, a yellow 4 AWG, ran from a negative BB terminal to the wrong side of the Victron SS; this cable essentially paralleled the 4/0 cable from the same terminal to the shunt. This made absolutely no sense. 7. As stated above, no battery master switch. We've always had a master switch in previous campers - handy for longer term storage and eliminating phantom current. In case of fire, we wanted a "safety switch" located outside the camper and inside the battery box to quickly secure DC power after quickly exiting the rig. SUMMARY OF WORK PERFORMED: The closer we looked at the DC set-up the more questions and issues surfaced. There were other ancillary DC system "gripes" but the above list really paints the picture of what we were dealing with... After quite a bit of forum research, thought, and informative and lively discussions with Geronimo John; a clearer project plan developed. 1. We made an assumption that the PO didn't upgrade the "lead-acid" charge controller circuit board as part of the BB installation. This rationale would explain why we never observed more than 13.6 volts on shore power with the controller energized. Sure enough, after pulling the board, it was clear that the board was doing exactly what it was intended to do - charge lead-acid batteries; as it didn't have the Lithium micro-switch option. So, we ordered a replacement 45-Amp board from Amazon with the Lithium option - enter "project scope creep." Above pic shows replacing the LA charge controller with a Li-capable board. The lead-acid board is 100% functional and will be posted for sale on the forums. The new Li-board cranked right up and the BBs finally received the charge intended for a Lithium battery bank: 2. Disconnected and removed the 1/0 cables connecting the 3 BBs, labeled and stacked them sequentially from back to front. Sized cables to allow full extension of the battery tray and added nylon tie-down straps from Rangley. Cut, crimped, heat shrunk, and installed new 4/0 color-coded cables in parallel configuration: Made a terminal buss-bar from 3/16" x 1" solid copper for the Blue Sea Systems master switch (Amazon) which will be heat shrinked once it arrives. Contoured a poly board from an old cutting board to mount the switch, like many owners have done. Mounted a positive (+) terminal bar with the master switch to accommodate DC connections. In the new configuration, only 4/0 cables are connected to battery terminals - removed the various "added-on" connections and placed them appropriately between the (+) terminal bar and the Victron SS. Now, all DC (-) connections are made through the shunt so all DC power measurements are captured with the Victron Application. Peace of mind - priceless. While we were at it, we added an SAE solar input port for the 200W Renogy suitcase solar modules - more scope creep... HA! Not being an EE, I'm sure there's something left out, but in the end, we've got a clean set-up in the battery compartment, fully functional Victron SS, and the appropriate charge controller to manage the BBs. Time for a cold one. Cheers! A & D
- 8 replies
-
- 11
-
-
-
Good Day All, Just purchased the aforementioned generator (my first) and I’m wondering if it's normal for the unit to vibrate so much in ECO mode. The throttle doesn't surge and it idles very steadily. When ECO mode is off, vibrations go down. Does anyone have experience with this particular model? Thanks in advance for any thoughts.
-
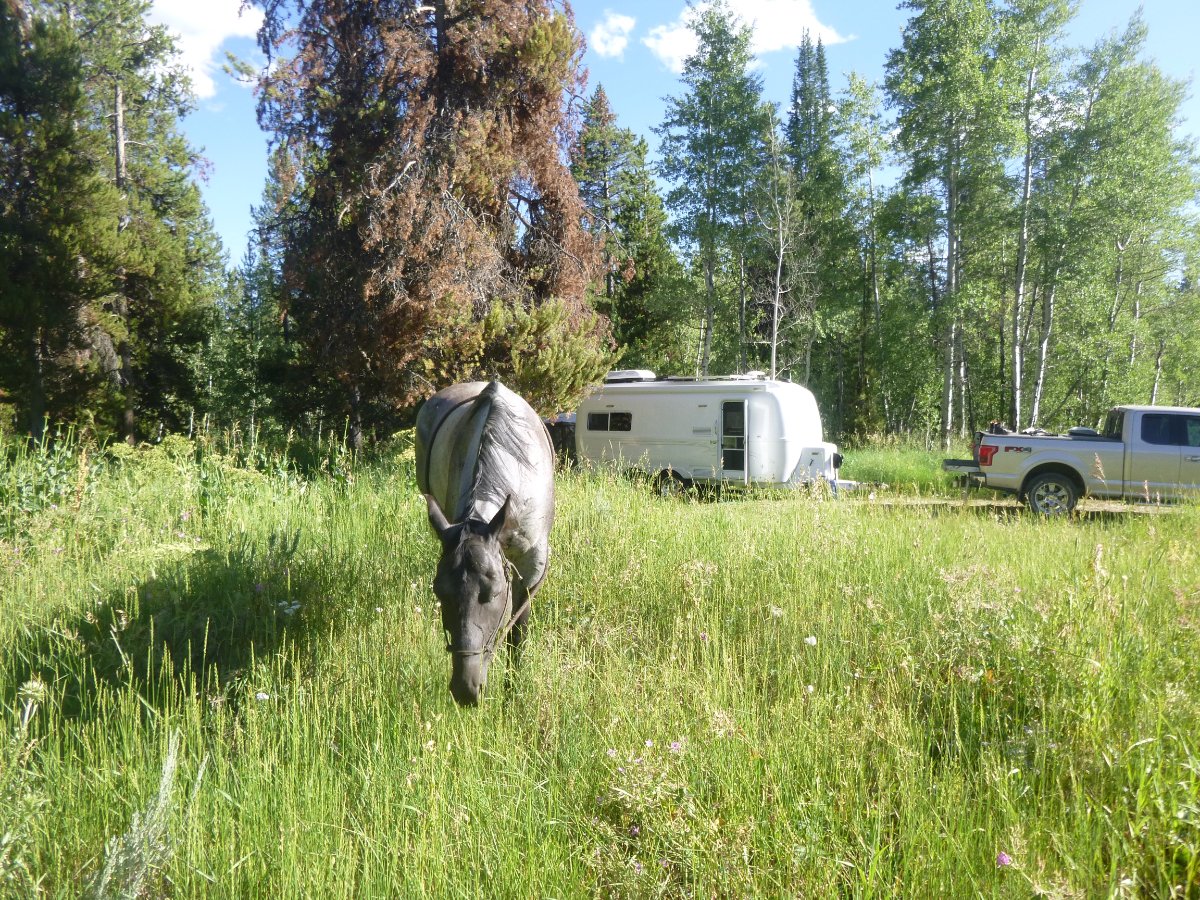
On my recent fly fishing trip to Wyoming I stumbled upon a Forest Service "de-commissioned" campground. My destination was fishing the Buffalo Fork River and I knew that there was a large Forest Service campground (Turpin Meadows) at the end of the paved Buffalo Valley Road. I also knew that there are numerous boondocking sites on this road. However, when I arrived I found the Turpin Meadows campground FULL and even the availability of many of the boondocking sites were hard to come by. So, as I headed west back toward Moran Junction I saw a small sign 9/10th of a mile west of Turpin Meadows for Box Creek Trail Head. The 3/4 mile dirt road ends at the trail head where there are 8 campsites. The Forest Service took away the picnic tables but left the bear boxes. While the pit toilet is not "serviced" by the Forest Service (this means that it is not cleaned nor do they provide TP) the campers using this facility do sweep it out and the result is that it is in better shape than the average. There is water but it is marked that it is not potable, however, both potable water and trash disposal can be done at Turpin Meadows. During the week I camped here it was never full and most nights there were only three of us staying there. It is super quiet but certainly be "bear aware". So, if you are in the Grand Teton area and want to get away from the crowds but still want great hiking and/or good fishing without a long drive on a dirt road, you might want to consider Box Creek. There are stunning views of the Tetons from many of the hiking trails, from the river and from the drive west on Buffalo Valley Road. GPS: N 43 degrees 51minutes 42.5 seconds, W 110 degrees 17 minutes 39.0 seconds Bill
- 14 replies
-
- 16
-
-
-
 I've had my heart set on a Ram 3500 Cummins HO with the Aisin transmission for a while now, but haven't pulled the trigger on the truck or the LEII yet. On the truck side I've been debating the following: Dually - Dual Axle (DA) vs Single Axle (SA) Crew Cab versus Mega Cab. 6'4" Box versus 8' Box There are three important caveats, You can only get the Mega Cab with the 6'4 box You can only get the 50 gallon Diesel tank with the 8' box. The 6'4" box comes with the standard 30 Gallon Tank. You can only get the Mega Cab starting with the Laramie trim, there are 2 lessor trim packages which could save $ Lengths: Crew 6'4"box- 19.75' wheelbase 149.5" Crew 8' box - 21.73' wheelbase 169.5" Mega 6'4" box - 20.82' wheelbase 160.5" I was leaning towards the single axle Mega Cab with the 6'4" box, but that requires at least the Laramie trim package, which I don't necessarily want. Also I really would like that 50 gallon tank, which puts me back to the Crew and 8' box which allows me to save some money and get back to the Tradesman trim. Having said all that, 90% of the time, there will only be 2 people in the truck and the Mega Cab really only benefits back seaters. Unless of course you put the seats down and use it as a flat space for storage. I wanted to see what you experienced Oliver haulers thought about these options. Any opinion on the wheelbase differences on towing or driving around town? Or is the 149.5" wheelbase already so long adding another 20" isn't going to make much difference in towing. DA vs SA, I am leaning toward SA mainly because of the rear width size during non-towing everyday driving. However, I would also appreciate any opinions on this as well. Any thoughts on the 6'4" box vs 8' box, in terms of running out of space? Everyday driving? U-turns, etc.
 -
It seems that not everything that this video claims to be is nor accurate. I can’t recommend this product.
-
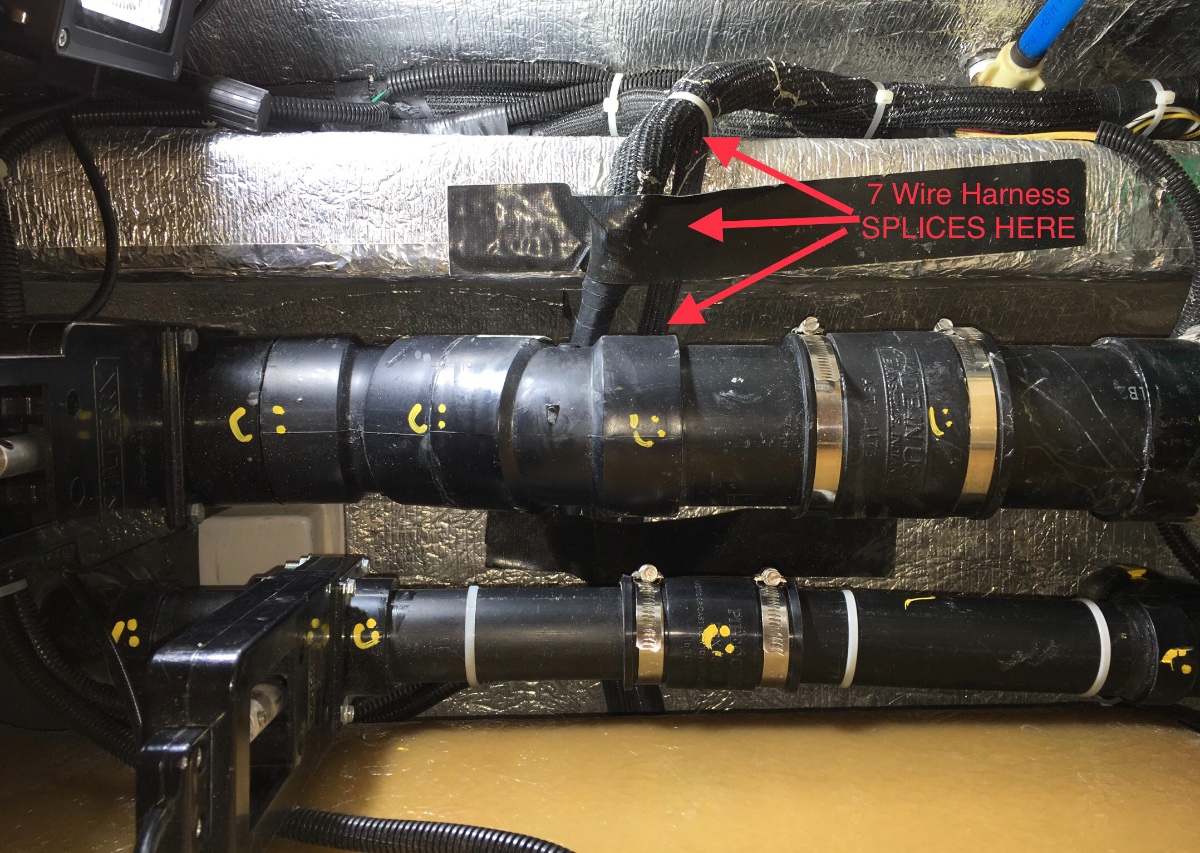
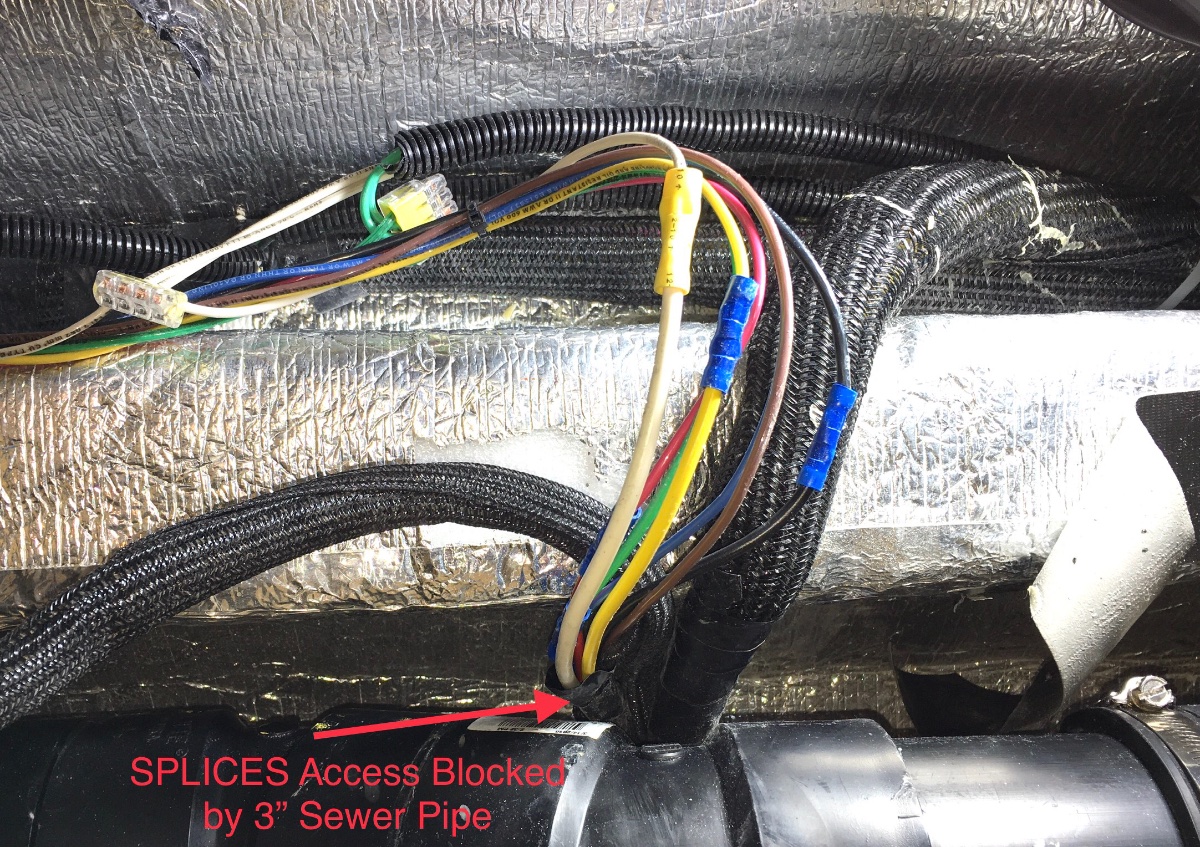
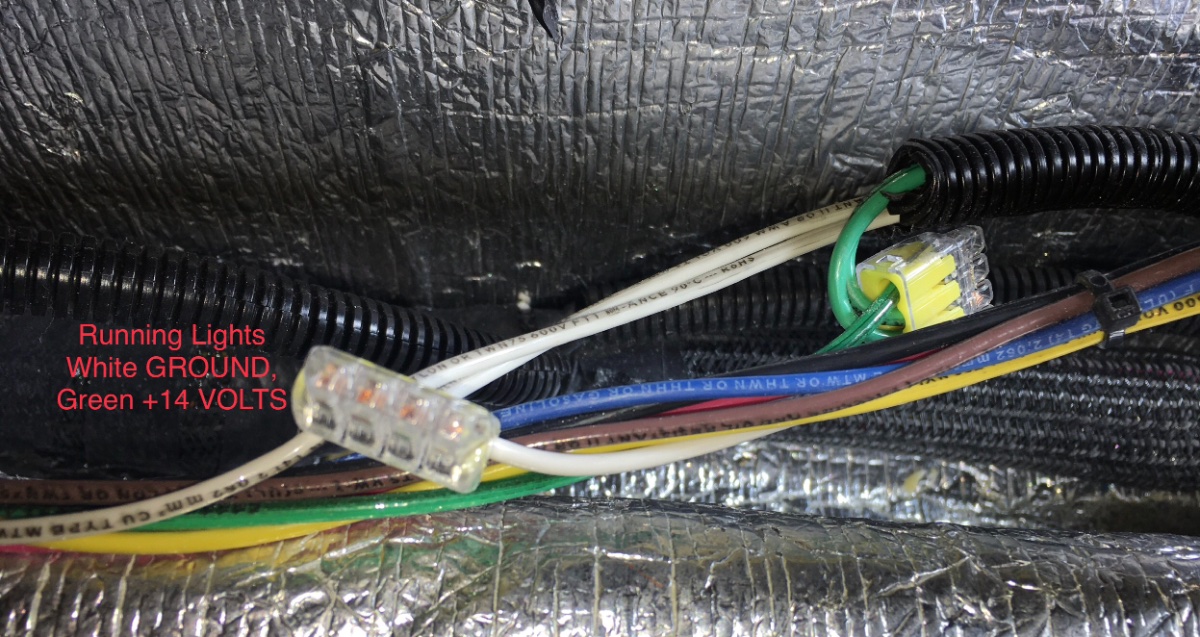
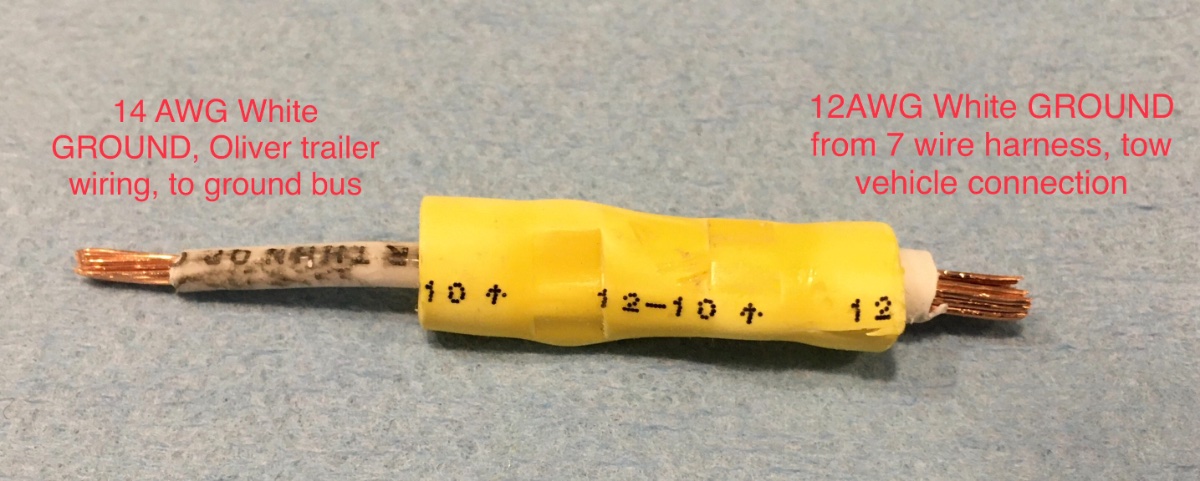
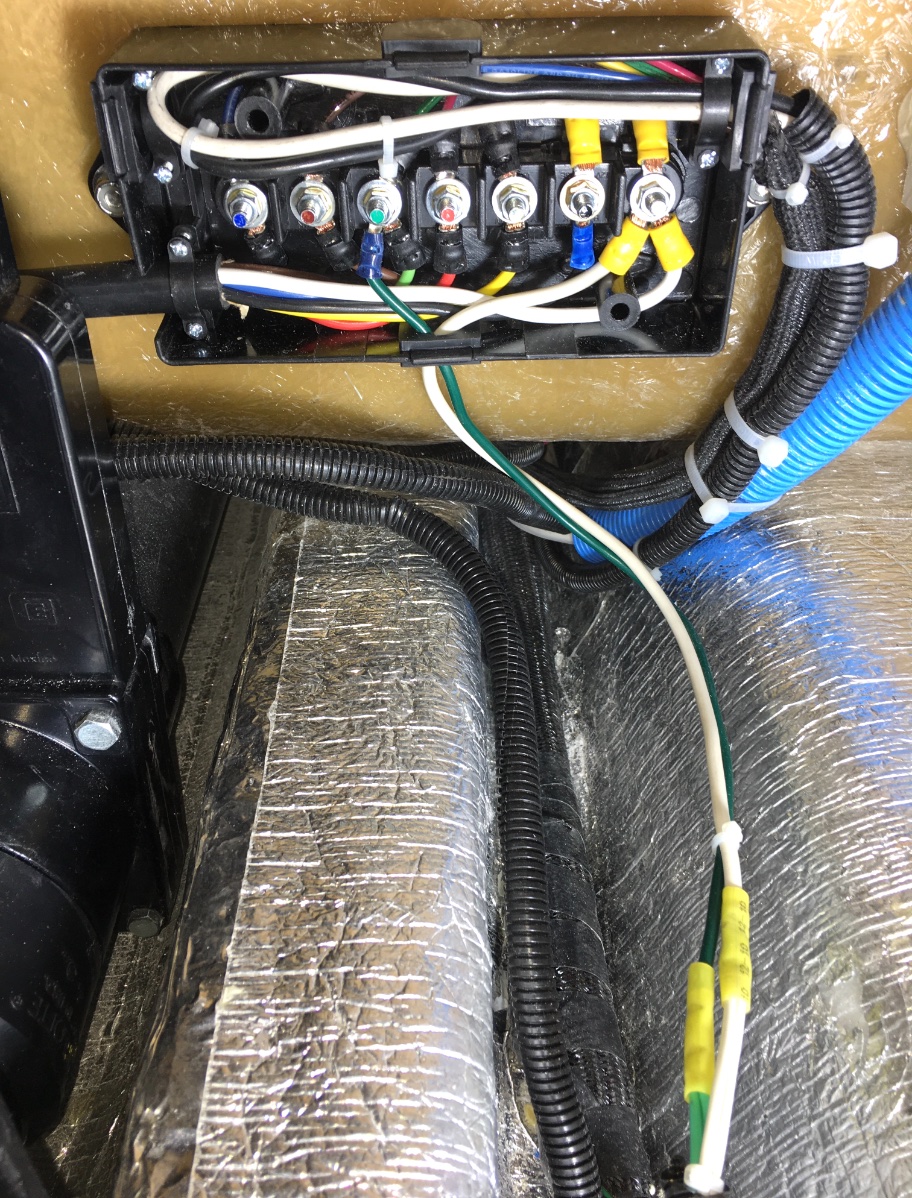
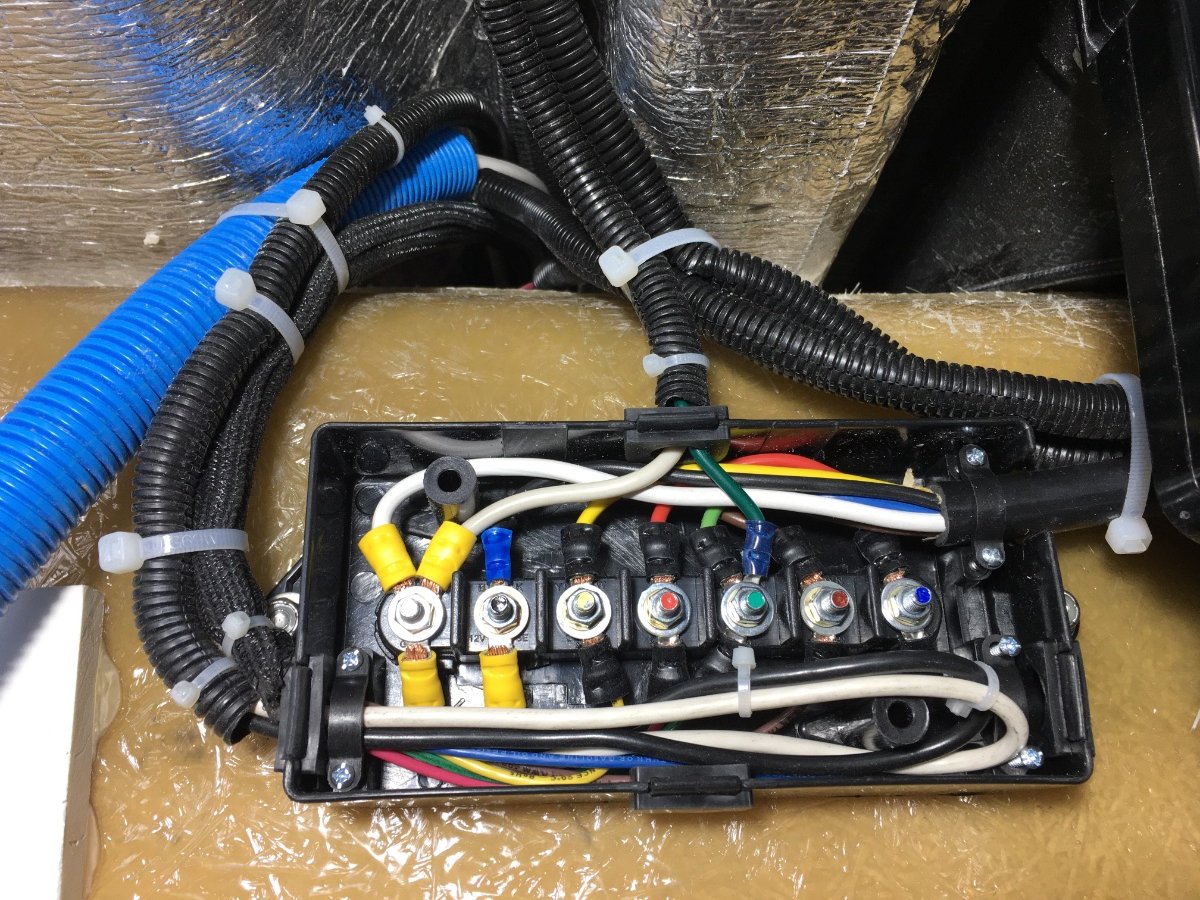
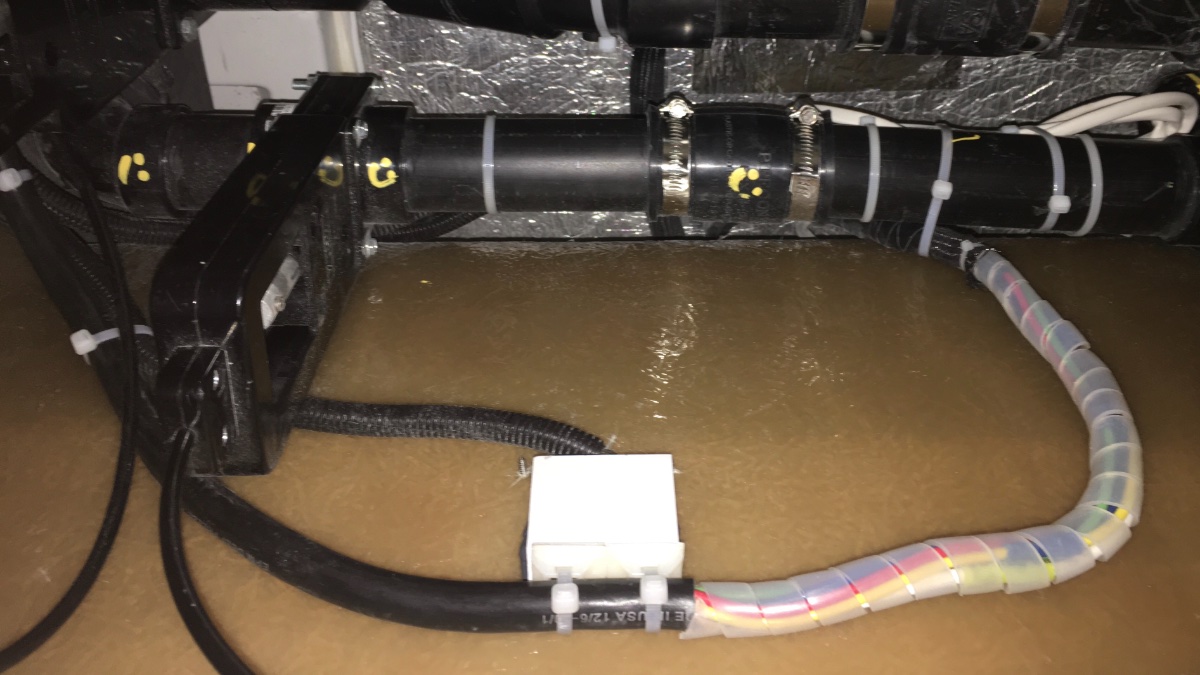
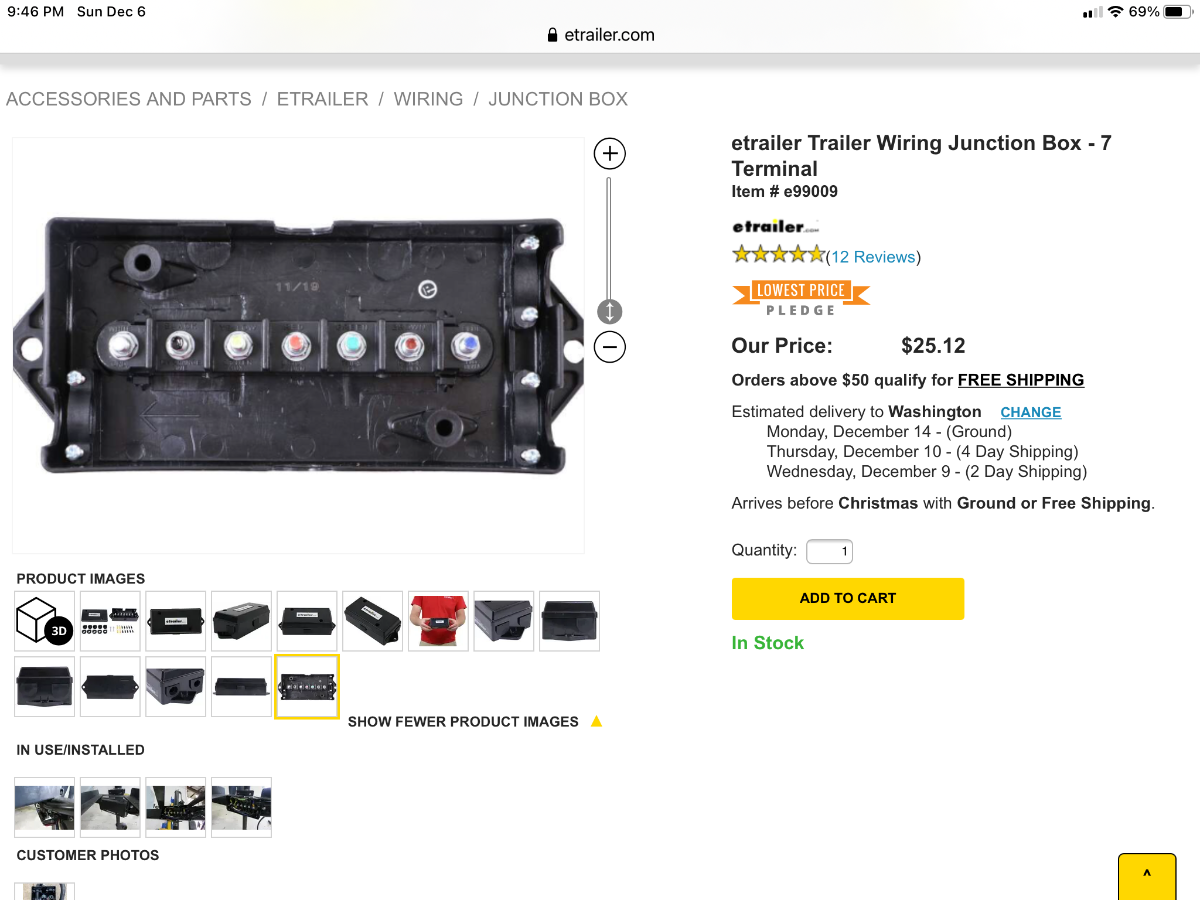
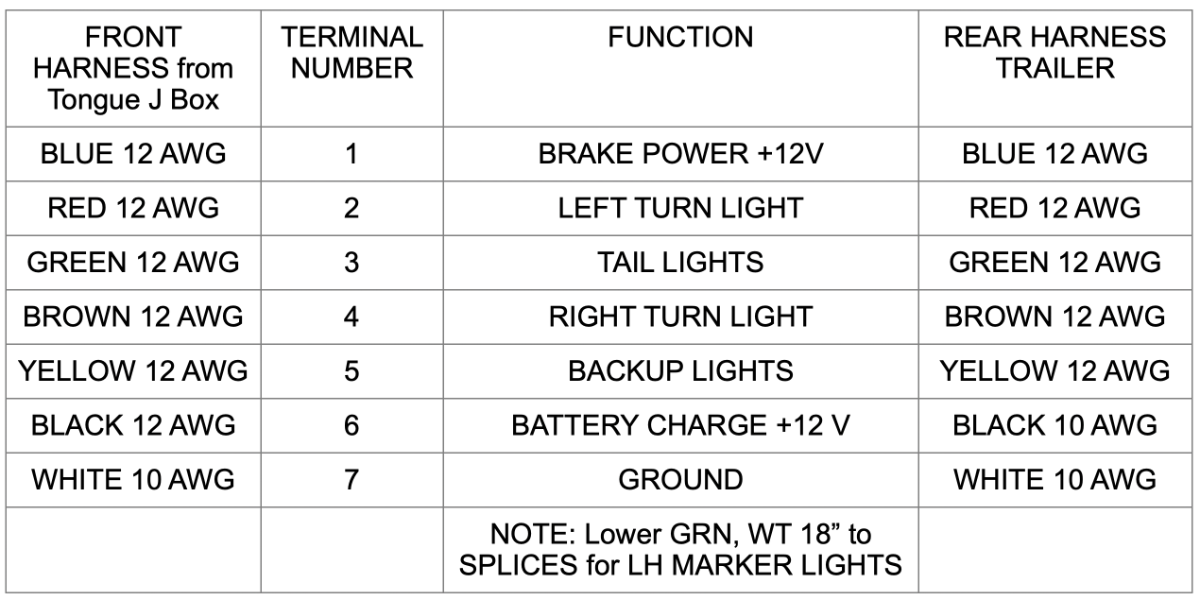
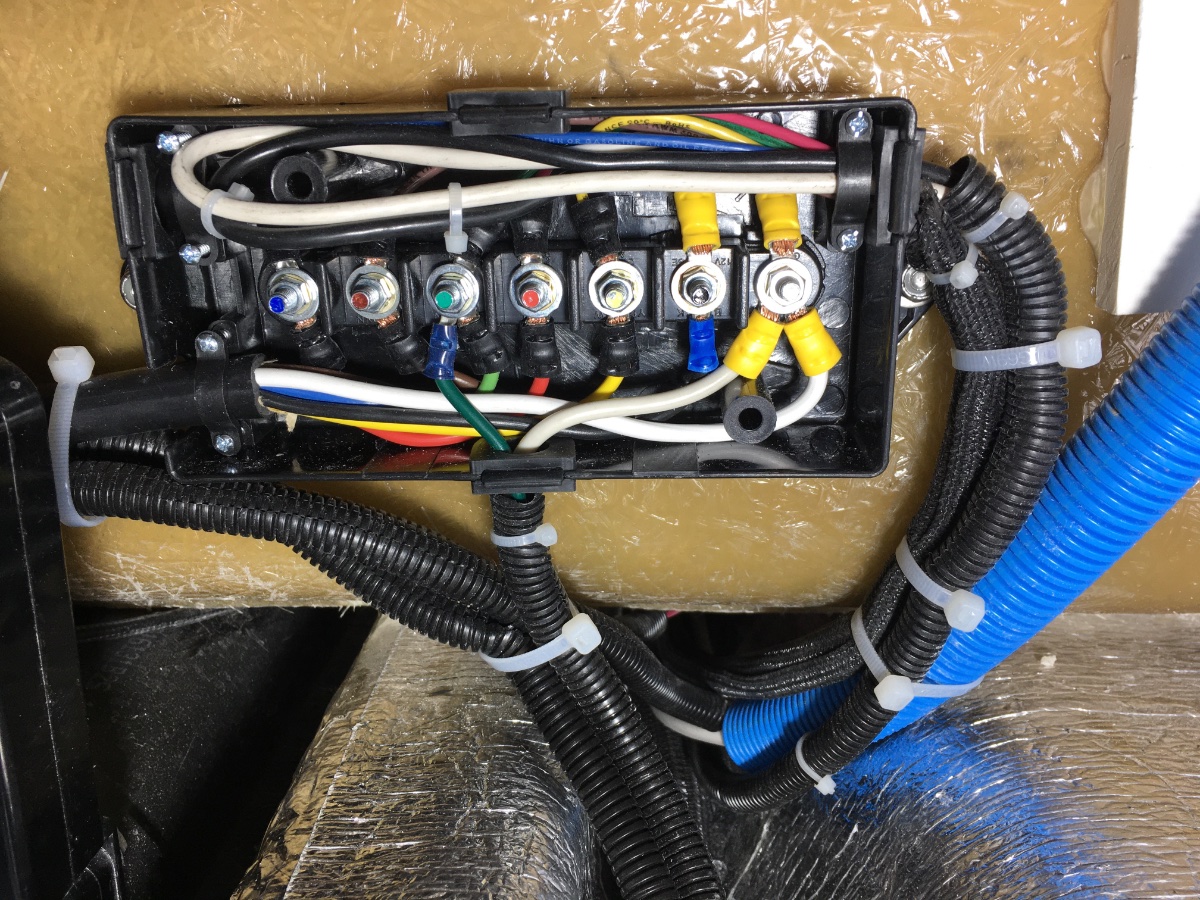
 Here is a related thread, I installed a similar box up front under the jack: ... https://olivertraveltrailers.com/forums/topic/2688-how-to-junction-box-for-trailer-harness-repair-or-extend-the-harness/ This all came about because I wanted to install a ... Redarc DC to DC Battery Charger .... and I needed to know FOR SURE that the wires were big enough. 12 AWG is the absolute minimum according to Redarc, and bigger is always better, especially in an Ollie with a very long run back to the batteries. Here are the existing butt splices, half of them are absolutely buried under the sewer pipes. Time for a J-Box! So I cut all the splices, and dragged the ends up to where I could inspect the wires. Most were OK, but the white Ground wire was not. Somebody extended the front wire with a smaller sized one. Darn it! I bolted down the box next to the 120 VAC outlet. I spliced into the green and white running light wires and brought them up to the box via the bottom hole. The other wires come in from the left and right sides. I ran heavier 10 AWG black and white wires (power and ground) from the box back to the appropriate posts. So now the Redarc charger will not suffer from excessive voltage drop, and with the easy access, it will be very simple to troubleshoot any future 7 Wire Harness problems. The new splices are easy to ID because they have clear spiral wrap plastic, and they are secured to the inside wall using a 1" thick block of HDPE plastic, bonded with JB Weld directly over the small LED light. The placard goes inside the J Box using 3M double stick tape. Here is the placard, in Apple Pages format: Oliver Junction Box wiring placard Rear 7 pin.pages Note that I indicated where those marker light splices are - I hate not knowing! John Davies Spokane WA
-
Hello everyone, I'm new on here and excited to be a part of the community. I just placed an order for a small 2500 watt dual fuel Champion generator and plan on running it off of the propane quick connects. Will i need to get a diaphragm regulator? Anyone have advice and/or photos of their setup? Thanks, Happy Camper
-
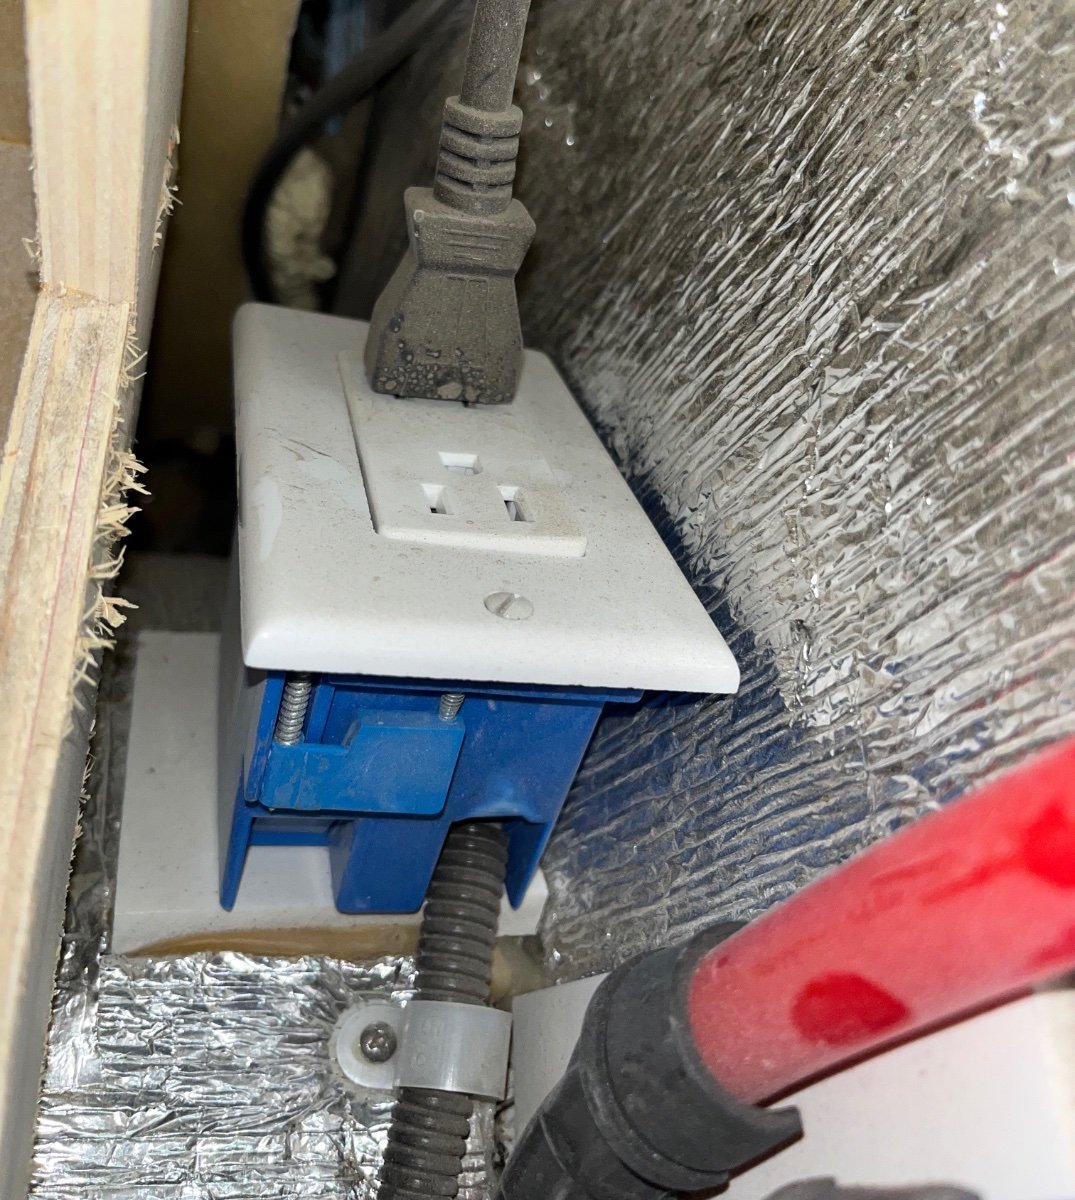
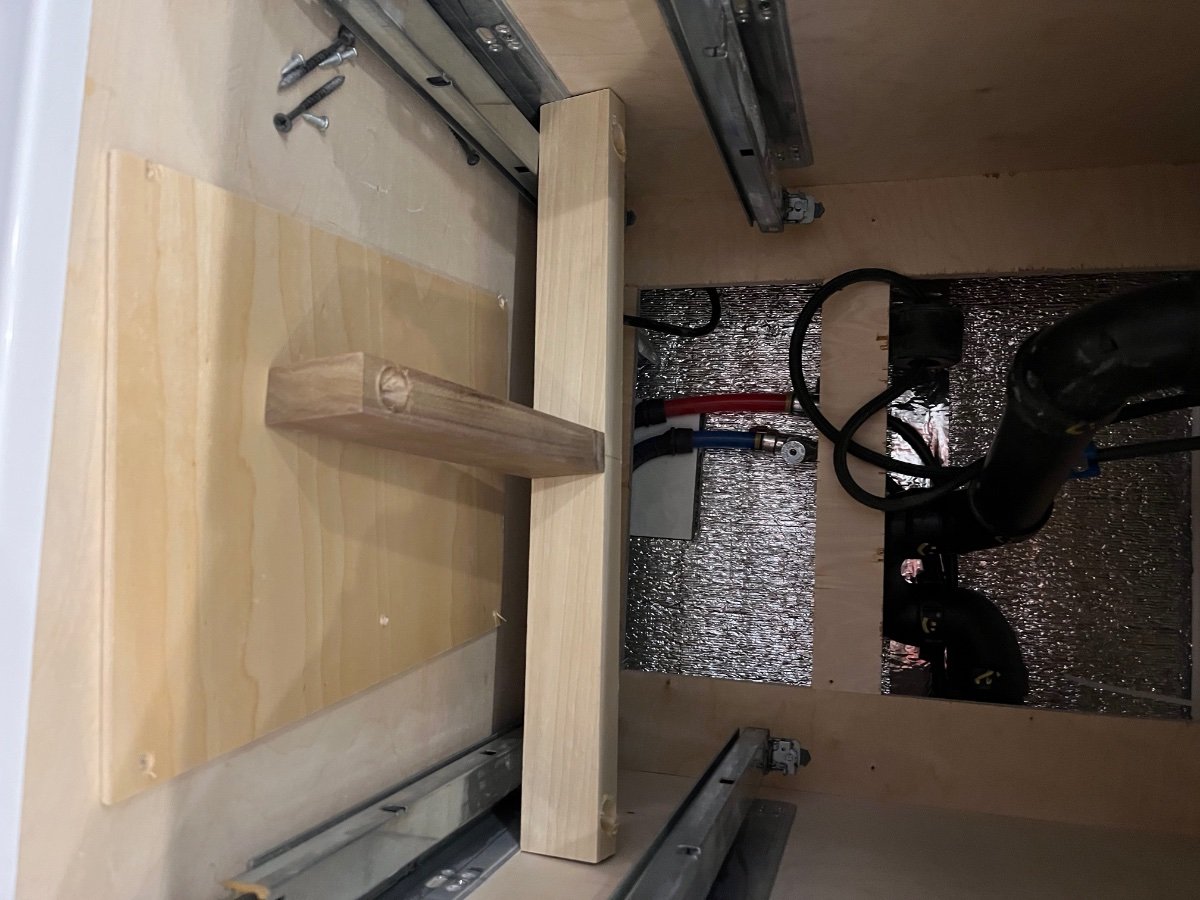
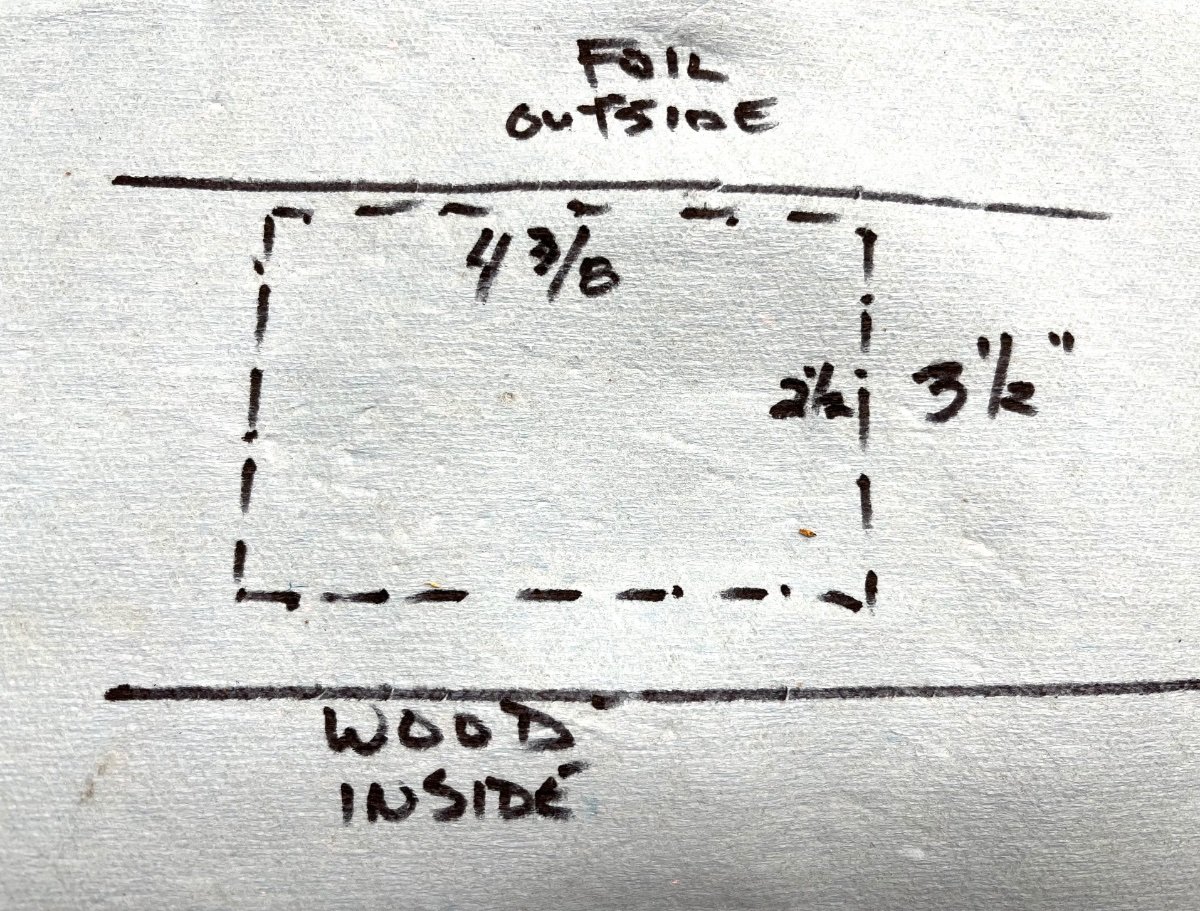
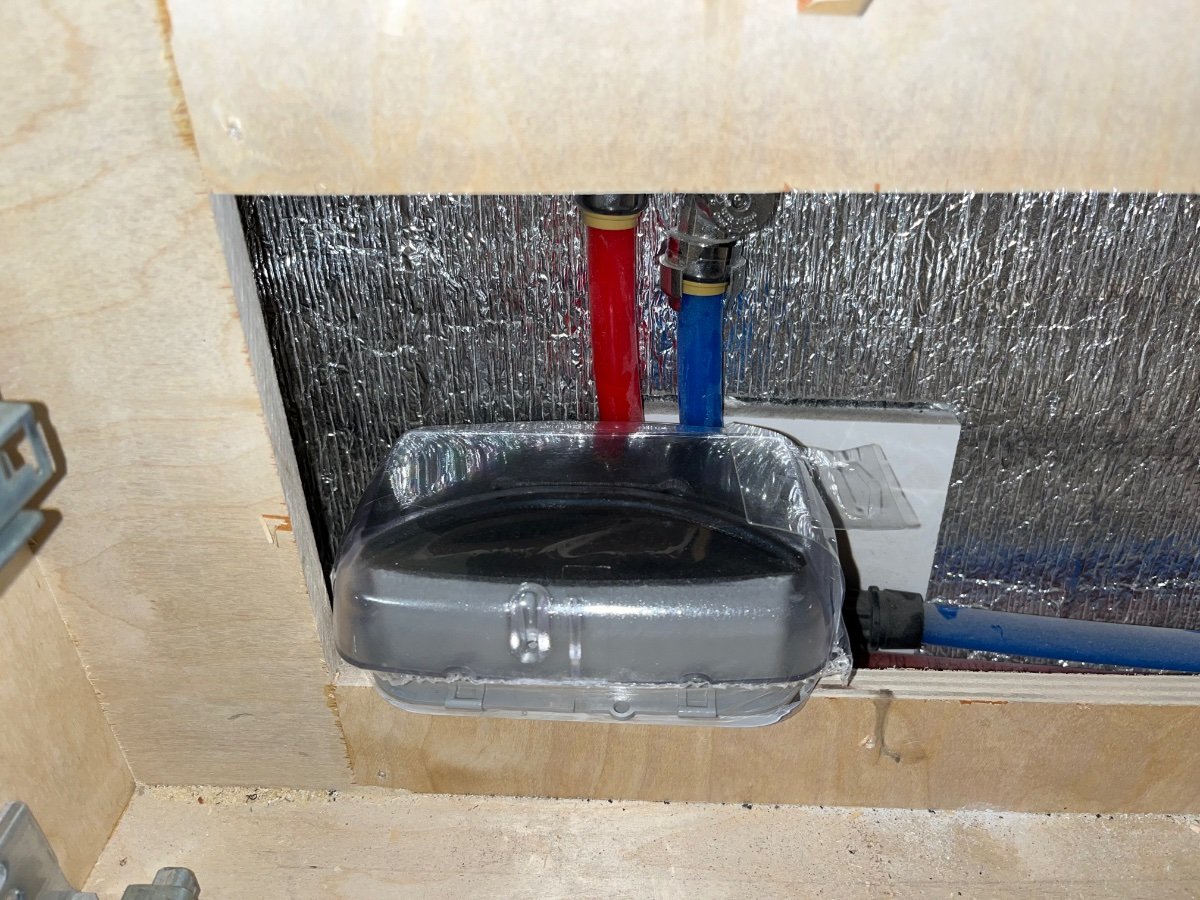
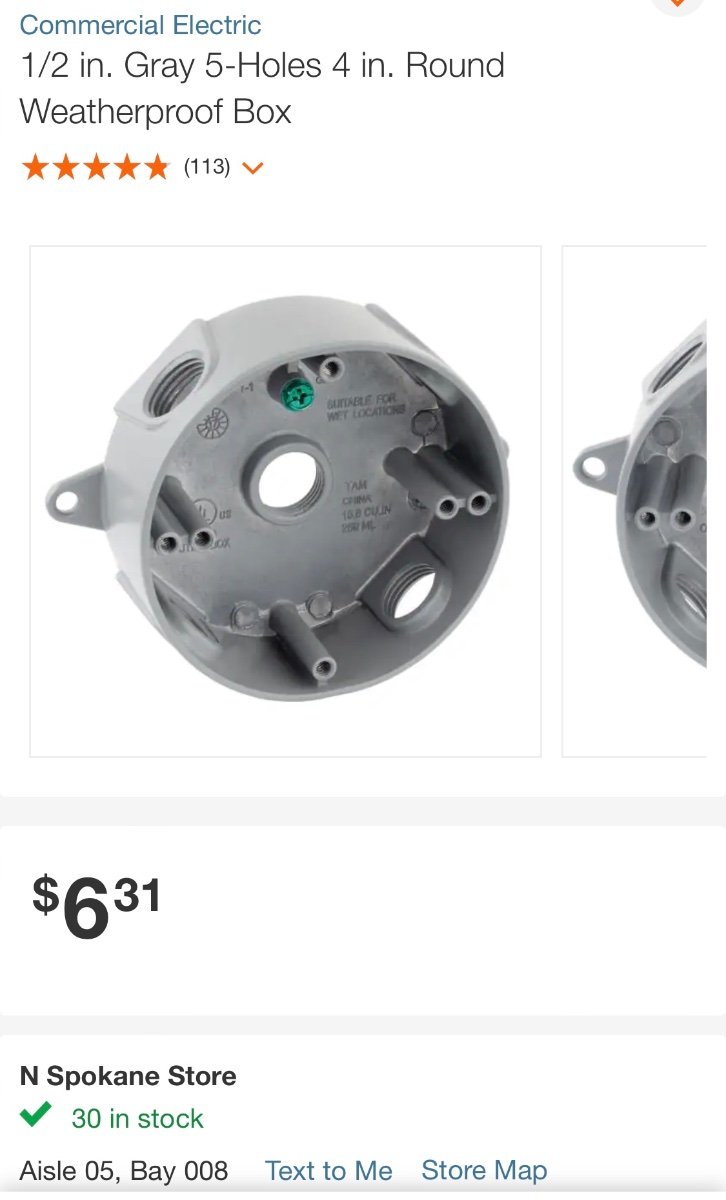
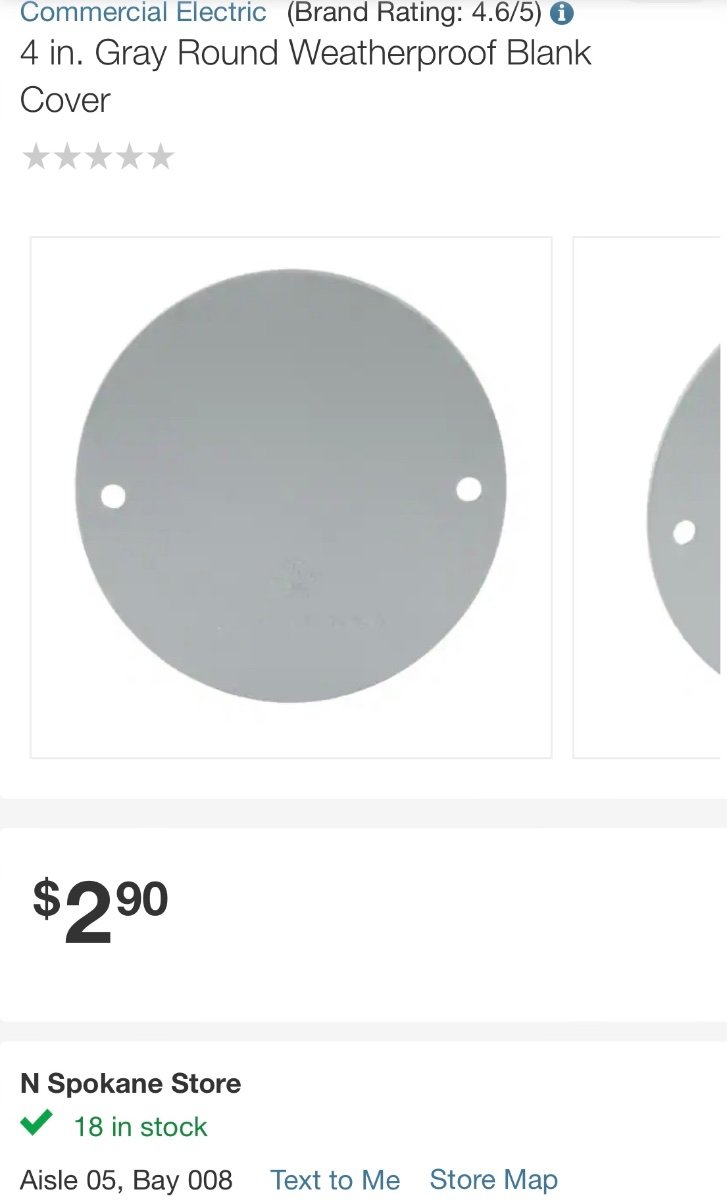
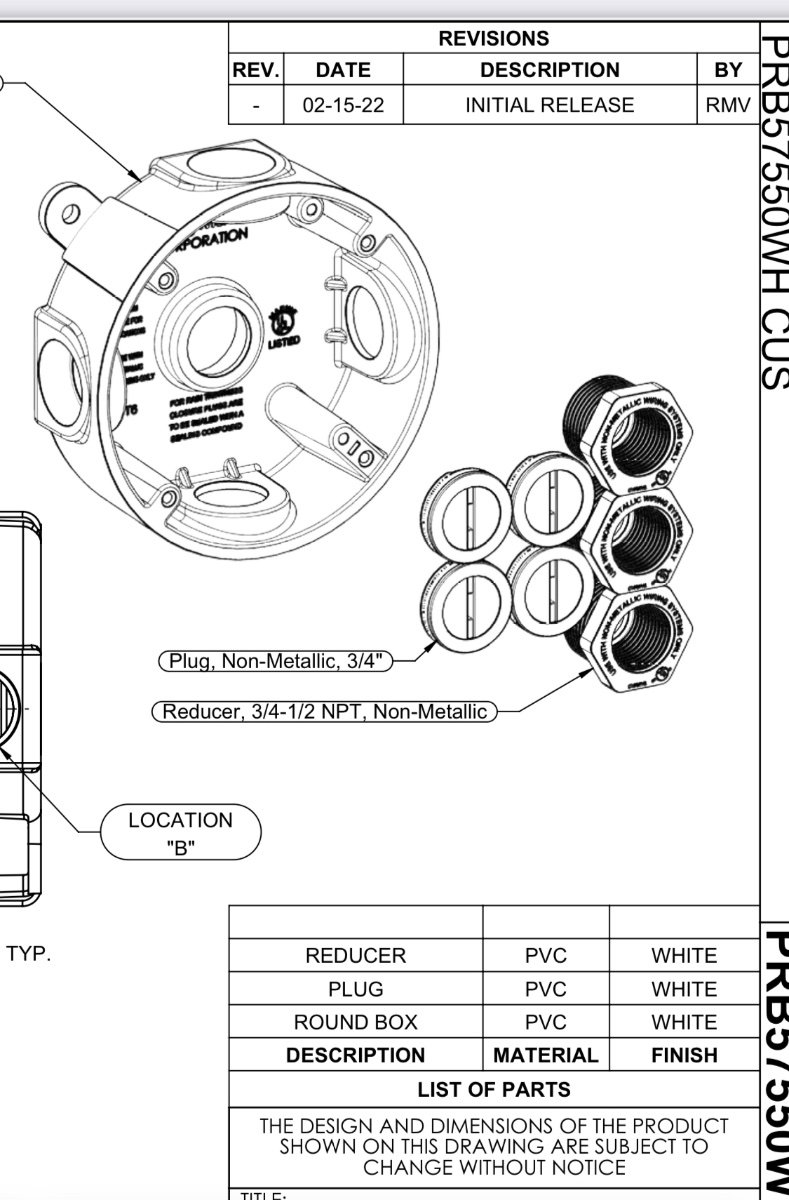
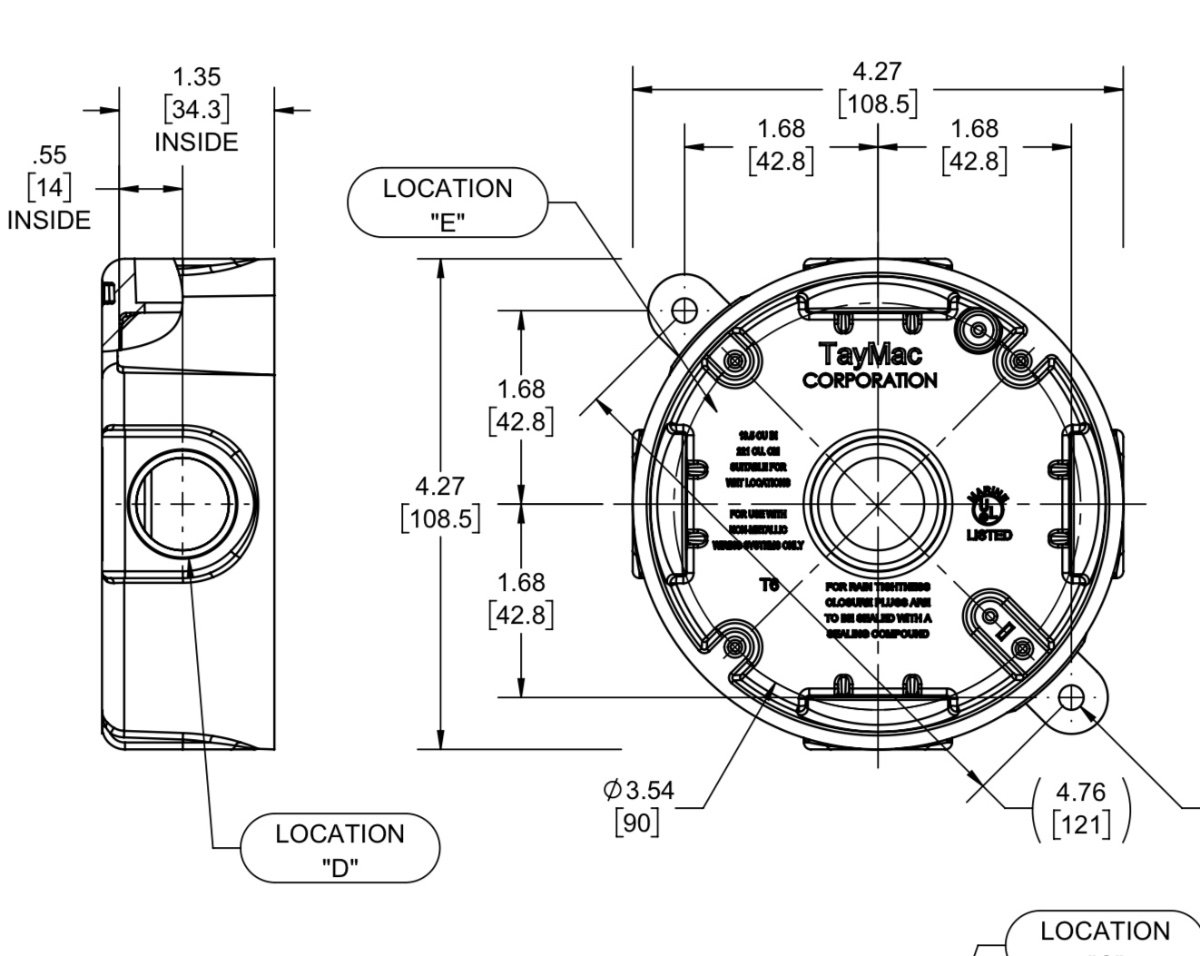
NEW JUNCTION BOX: This has literally been bugging me for five years, from the first time I saw a picture of the outlet mounted right below the faucet water supply hoses and the drain pipes. It is not even a GFCI outlet! If there is a water leak, it could be dangerous. Sorry for the rotated pics, some come through this way! Remove the two lower drawers by squeezing the orange release things, and lift up and out. Remove the flip out tray screws. Remove the tee piece (three long screws) and then the 1/8' plywood access panel. DISCONNECT SHORE POWER, double check to make sure these wires cannot be energized! Flip the main breaker to make sure! I measured the space and found that it is too tight to install a waterproof "in use" outlet cover. I even tried, I ordered one from Amazon, I can return it easily. Nope, it won't work. I decided to eliminate the outlet entirely. I am not sure why Oliver did not hard wire this in the first place...... I found this plastic junction box at Home Depot: Here is what comes in that kit: This is a true approved 100% waterproof cover; Dimensions. It is plenty thin to fit in that area. More to follow. John Davies Spokane WA
-
 Just some trivia for a discussion topic. I’ve been looking to purchase a small inverter generator to carry on long extended camping road trips, and in comparing specs and reviews, the Honda series consistently comes out as a top choice (but pricey!). One interesting detail is the engine displacement comparison. The Honda has a significantly larger engine for the given wattage compared to the lower cost competitors. Probably explains a lot about the reliability and noise advantages of the Honda. The larger gas engine just doesn’t have to work as hard. Couldn’t find any any info on the engine horsepower ratings of each brand though. Maybe it’s on the data plate on the unit itself (there’s a direct relationship between engine horsepower and potential maximum wattage of the generator). Larger engine displacement typically means more torque, and more torque means lower RPM needed to achieve a particular horsepower. HP= torque in lb-ft x RPM/5252 1 HP=33,000 lb-ft/min=746 watts Comparison: Home Depot Ryobi 2300 watt - 79cc. ——— Harbor Freight Predator 2000 watt - 79cc. ——— Honda EU2200i 2200 watt - 121cc. ——— Champion 2500 watt - 79cc. ——— WEN 2500 watt - 80cc. ——— Craftsman 2500 watt - 98cc. ———
 -
I’m hull 1139, Vic Shumate, purchased generator 2 days to help with running appliances etc,.,,,generator works great but Oliver says I need to change AC input settings from 25 to 15 on the Xantrex inverter remote panel while using generator as power source…..,,how do I change this setting on the xantrex?! I’m suppose to change it back when plugged into AC 30 for power! So I need to know how to set it!? Can’t seem to get batteries back to 12.5 -14 volts?! I turned the xantrex off! Will that help or hurt while running generator? I’m at a bluegrass festival in Okeechobee Florida through Sunday morning…….. my batteries dropped to 9.6 volts in 2 days while boon docking with roof solar panel, wanted to use generator to bring batteries back up but I’m not doing something right! Help! Got batteries back to 11.6 V today but do t know if it was solar panel or generator doing it!? Refrigerator says code C and Ice melting…not good! thanks


.thumb.jpg.79d7e8d10b37de38659b3e2851de60b2.jpg)