

Ron and Phyllis
-
Posts
68 -
Joined
-
Last visited
Posts posted by Ron and Phyllis
-
-
David, Sorry, I have been out of touch for a while, but your table is great and it's got me rethinking my set up. Did Foy end up making your table top ? And he used the same top material that's in your Ollie?
Since I last posted, I made a small cabinet that I use primarily for my wife's clothes and as extra counterspace that I find handy. (for coffee maker, etc). As her caregiver, I usually overdo it on her things but having all her stuff easily accessible is helpful. Like a lot of people I also use the space under her bed to store my stuff. But after seeing your table, I think I want to consider your table setup and maybe use some removable storage under the table for her things. Wow so many thoughts. I would appreciate any of yours. I hope you enjoy your Elite as much as we do.

-
 2
2
-
-
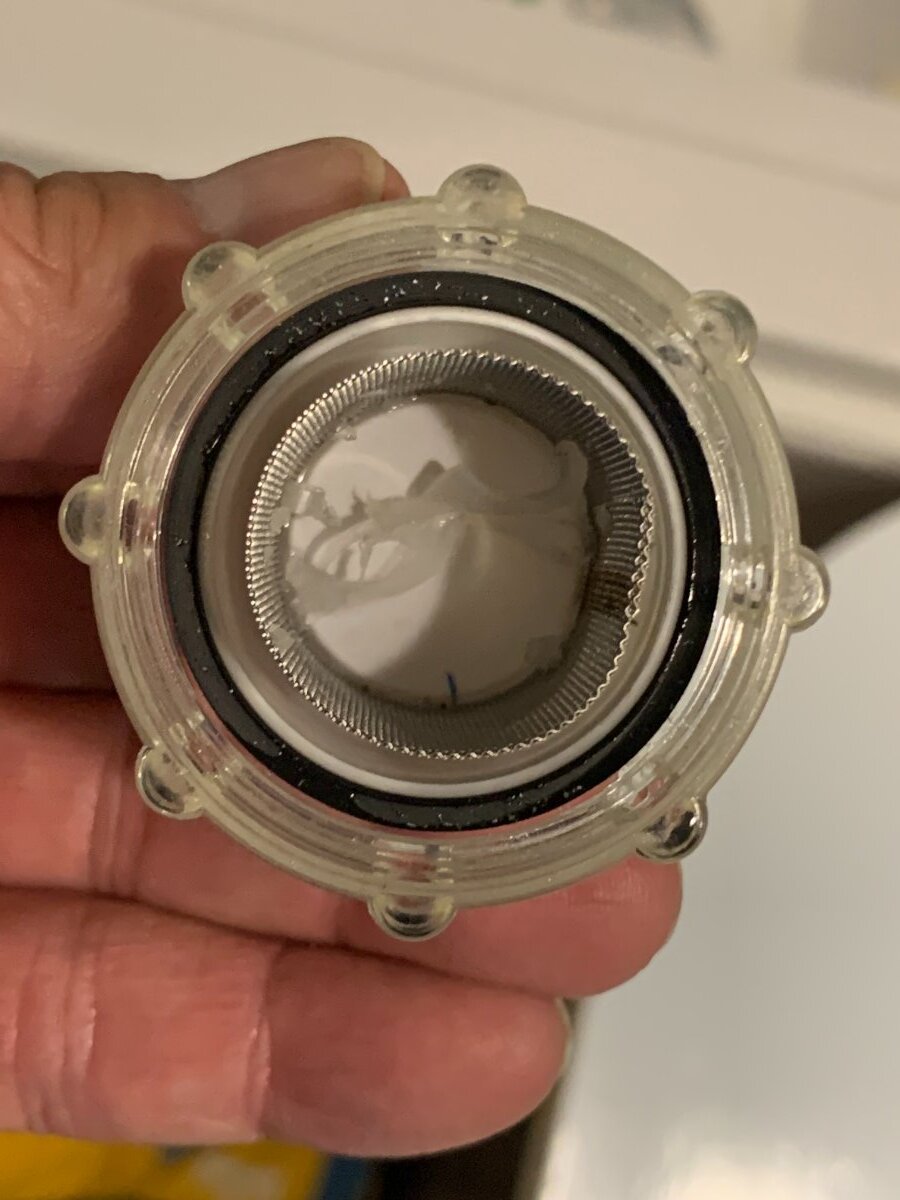
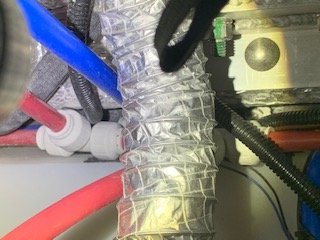
At the 2024 Rally, Jason mentioned regularly checking the water pump filter. While in the area for fridge outlet electrical issue I just posted, I did remove it and found plastic probably form winterizing or sanitizing.
-
3
-
 1
1
-
-
4 hours ago, John Dorrer said:
Glad you got it solved. I think getting answers is more likely to come from owners that have experienced this same thing and solved the problem themselves.
There is a wealth of knowledge on this site as well as the Facebook site. I can't speak as to why Oliver didn't suggest checking the next batch of connectors down the line.
IMO answering electrical questions over the phone might be hard. If you had an electrical issue with your tow vehicle, the dealer would want to see it. This is kinda a mixed bag and in the end fellow owners stepped up and the issue was solved.
Thanks again for the update and good news.
Was this located on the curb side wheel well?
Thanks, and yes the curb wheel well.
-
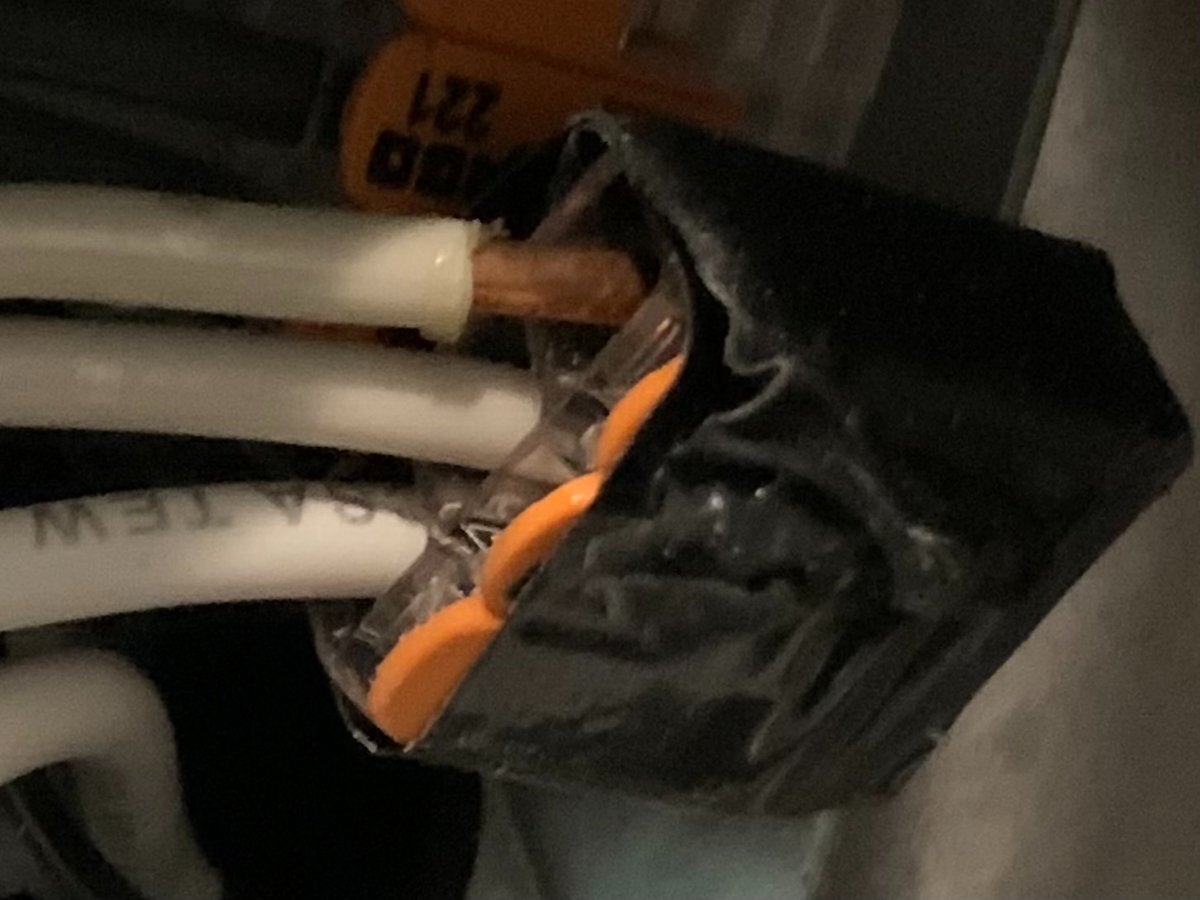
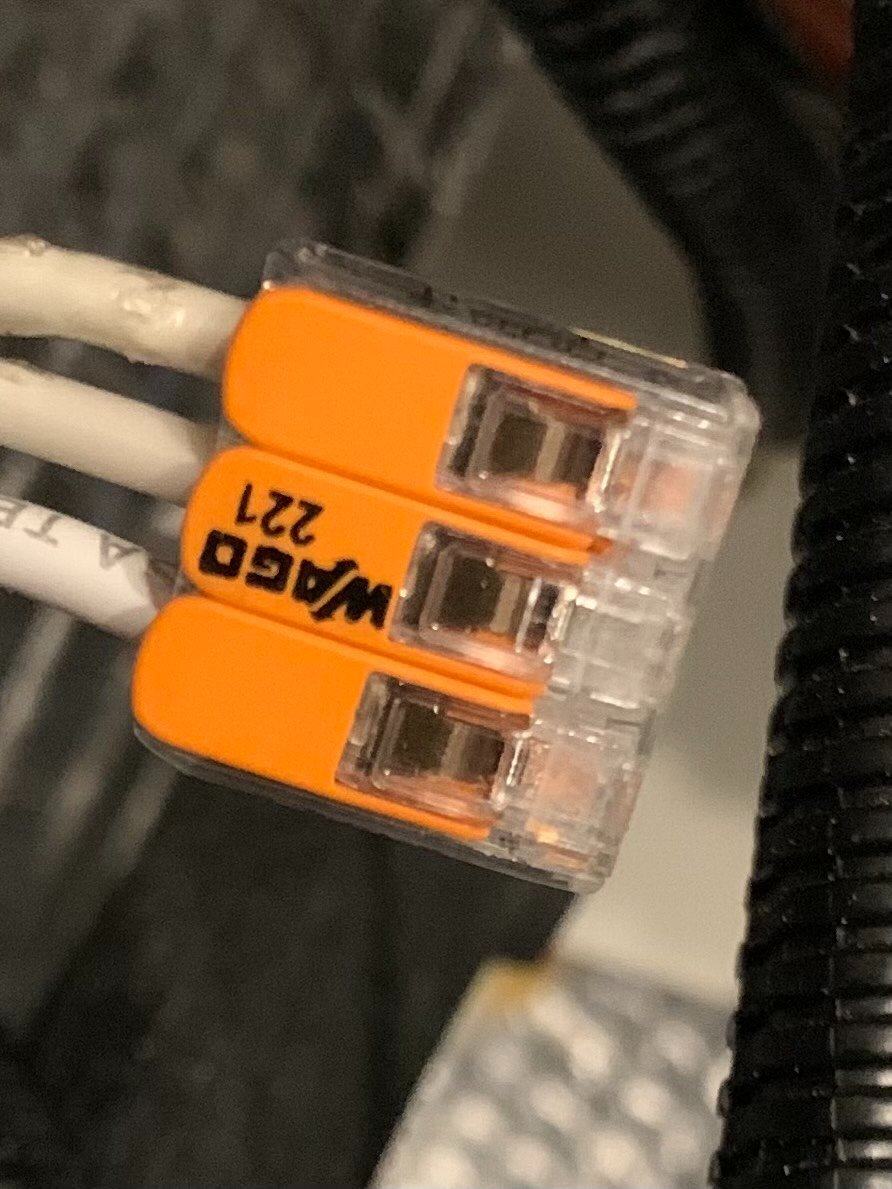
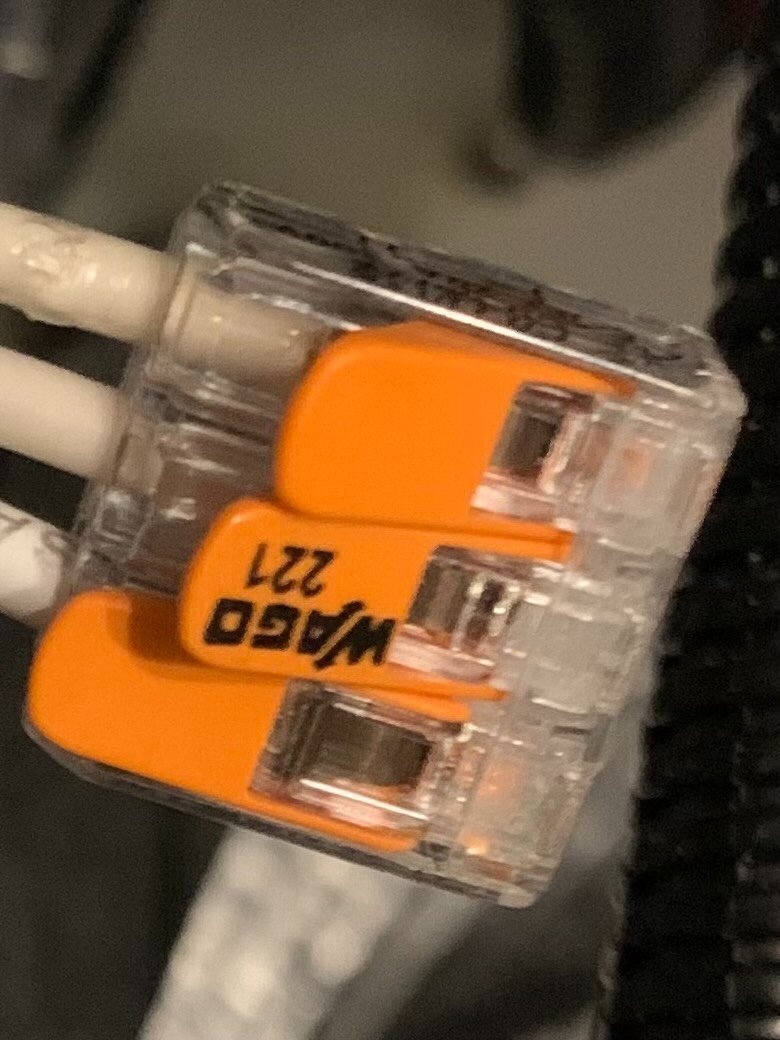
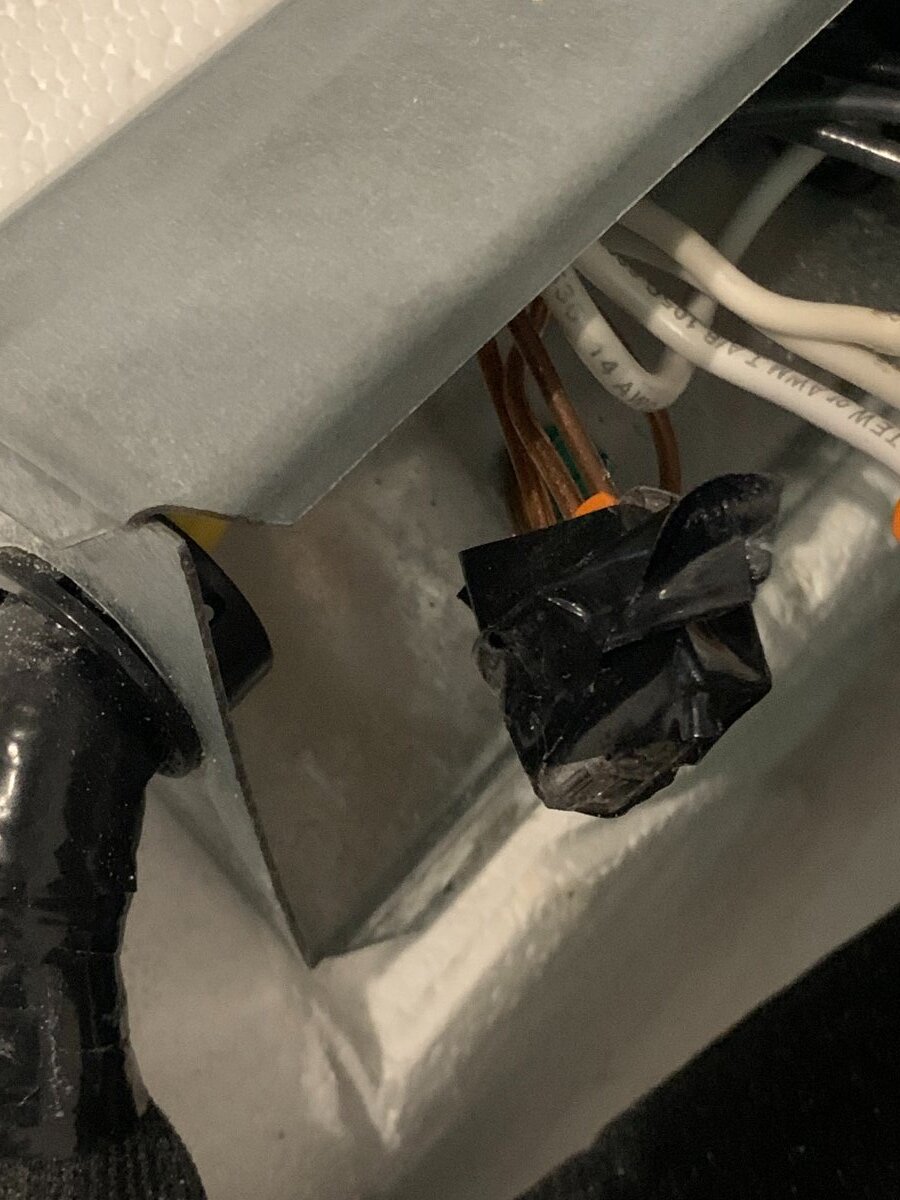
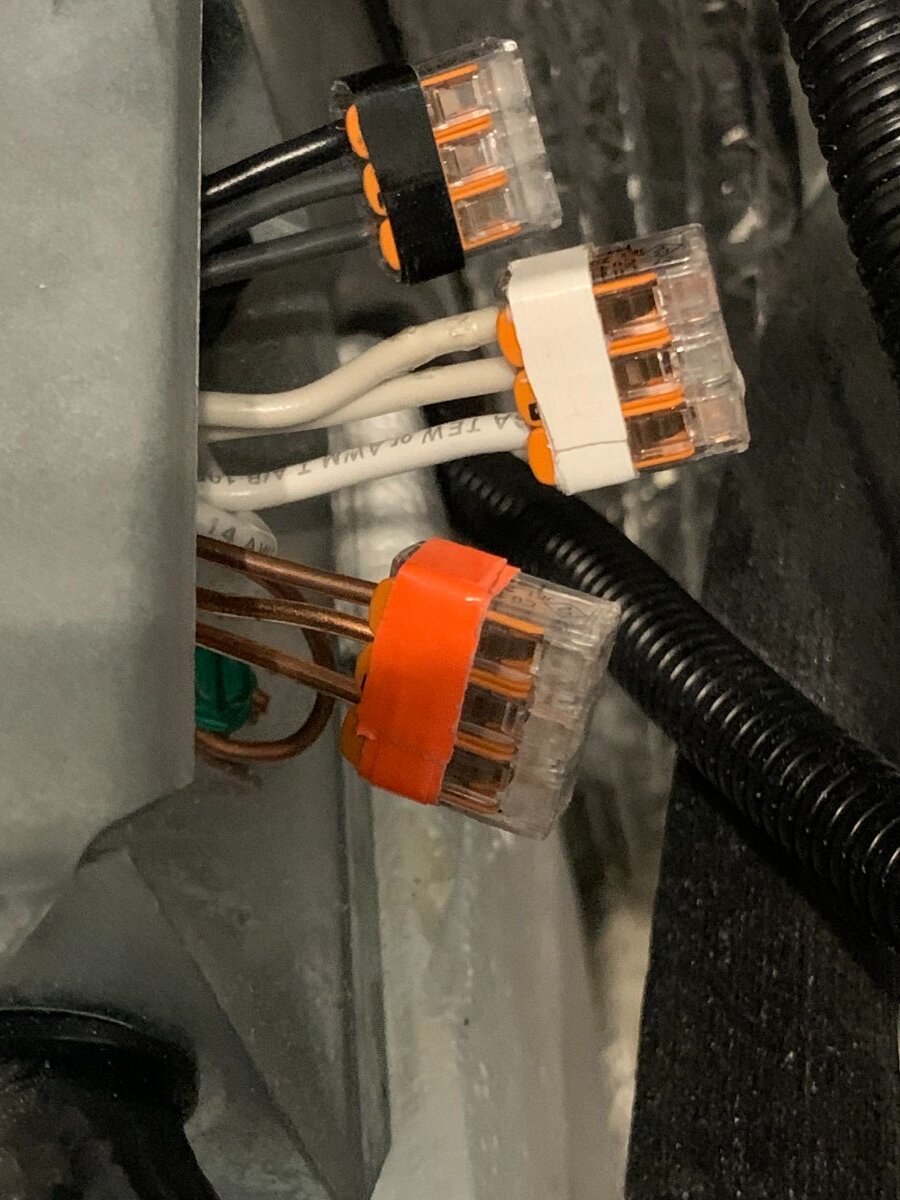
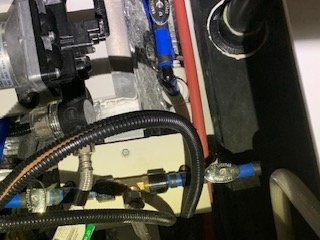
Thanks so much to everyone! Dave and Steph and Dud B particularly. The cause of the dead refrigerator outlet was at the next junction down the circuit at the hot water heater. The Wago lever nuts were rather carelessly taped and a neutral wire had slipped out. I retaped them for now and power was restored. I may very well try a better solution. I see so many positive comments on these Wago connectors, but the levers on these seem so easily opened. I'm very disappointed in the help I received from Oliver technical support. When on a trip I was told to check the breaker wires and then that the outlet might be bad. After these proved to be ok, on my second call I asked where I should check next and were there any junctions in the circuit. I was told, " if it's a 120V problem, you'll have to take it to a service center". That was it, no suggestion. I just don't understand why he didn't tell me to check the next junction that was at the water heater. You guys guided me to the next easy solution. I attached a few photos. Hopefully, it might help someone else. Thanks again!
Ron
-
4
-
-
Hello all! Last week I turned on my Norcold fridge (Elite I, 2022) and set it on AC to get cold prior to leaving as usual. It didn't get cold and it showed an "A" code of not having AC power. AC power was on to everything else. I used propane and it got cold and went on. At the campsite again it would not run on AC. I removed the bottom drawer to check that it was plugged in and it was. I called Mike at Oliver and he said to check the wiring at the breaker to see that it was tight and if ok then replace the outlet as it might be bad. I didn't have my tester but used a hairdryer and found no power to the outlet but all other outlets worked fine. Once home I used my tester and discovered power coming from the breaker was normal but the outlet was dead. I removed the wiring and find no power to this outlet while all other outlets and breakers have power testing normally. I called Oliver again and Mike said he couldn't help me and I'd have to take it to a service center. I've done some electrical wiring at home and in our old pop-up adding and replacing breakers, wiring, circuits, etc. Any suggestions?
-
1
-
-
On 5/8/2024 at 8:15 PM, Mike and Carol said:
We’re camping at David Crockett Birthplace State Park until we head to the rally. This is a small park near Johnson City and is the childhood homestead of Davy Crockett. Only about a third full right now. It’s a nice park and a good location to explore East Tennessee.

Campground Store
The Nolichucky River runs right by the campground and it is running very high. The camp hosts warned everyone this afternoon to be ready to evacuate if the storms continue.
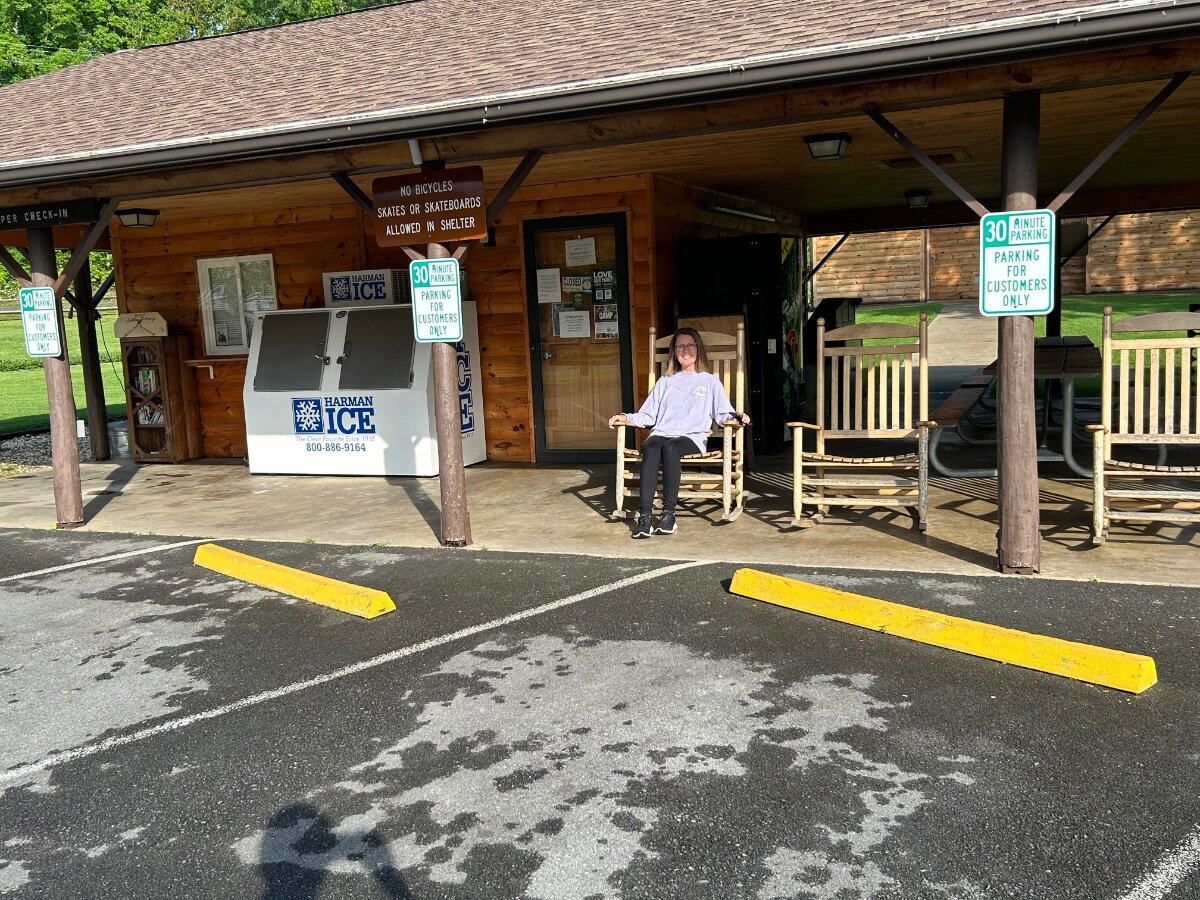
Mike, I walked over this morning May 18 at the Rally and introduced myself as you were preparing to leave for home. I wish I had done it sooner and had seen this post of your visit to David Crockett BP SP. My home for near 50 yrs now has been in nearby Greeneville. If you two ever find your way back to this area, and I can lend any assistance whatsoever, feel free to call on me. Regards, Ron Williams
-
 1
1
-
2
-
-
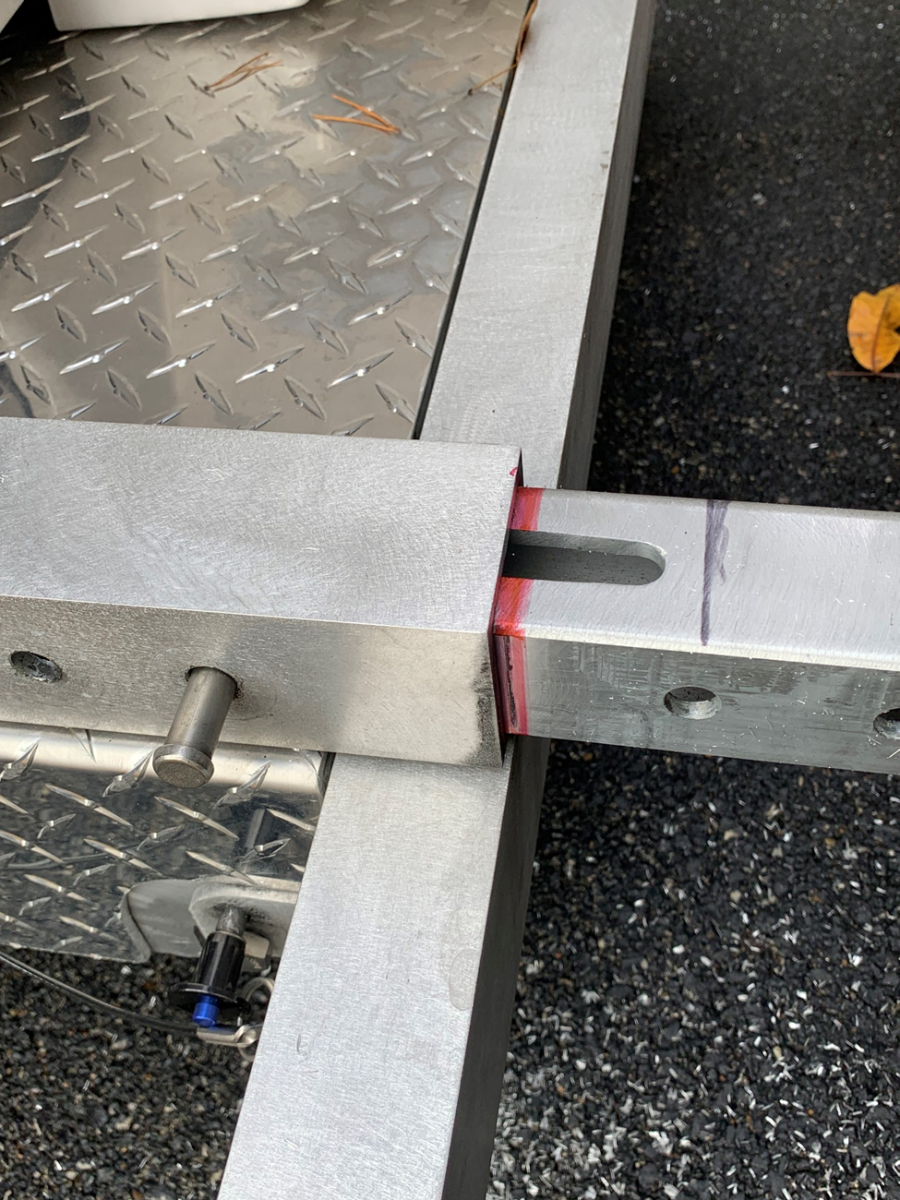
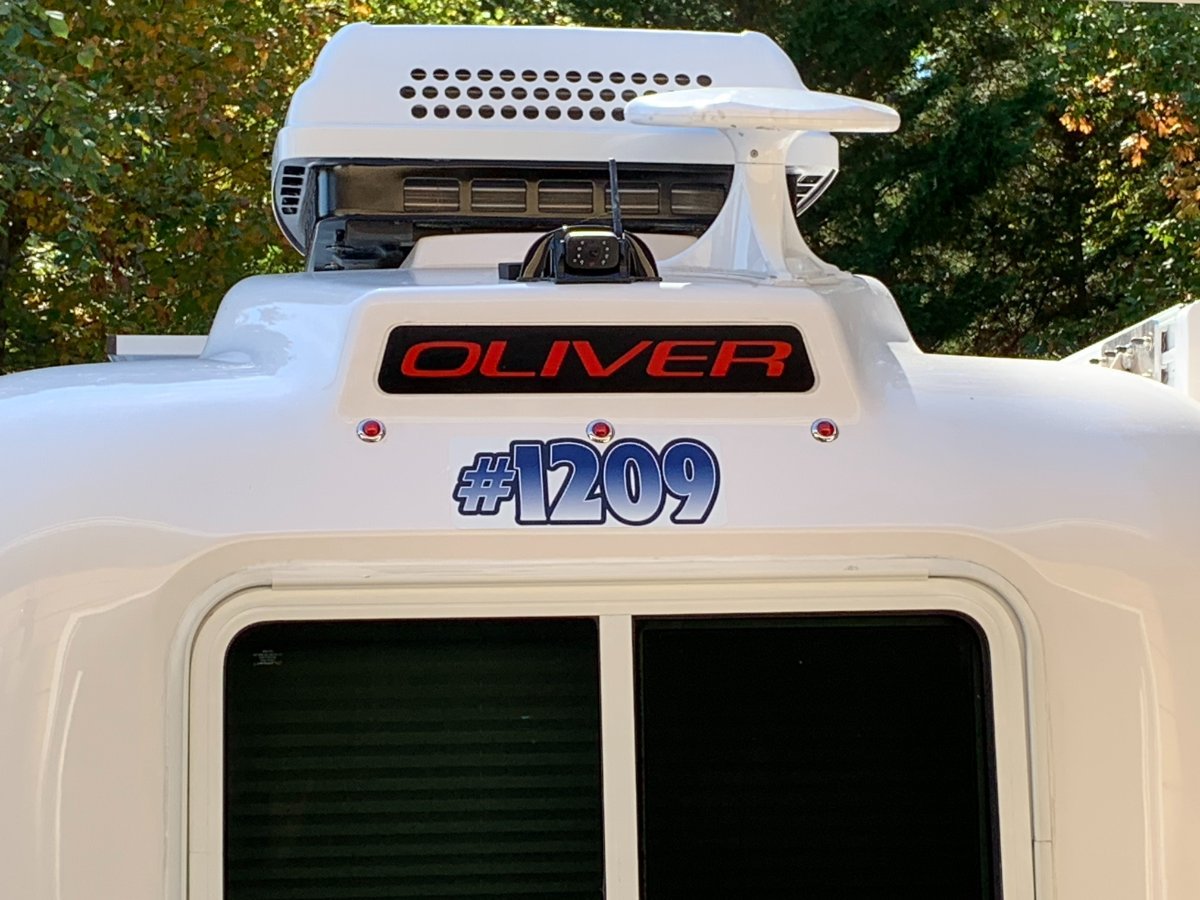
I've been meaning to write this for some time and it's primarily directed for us very few Elite I (one axle) owners. I was preparing, last summer, to take my 2022 Elite I Hull #1209 to Hohenwald just shy of it's one year anniversary. My primary issue was a fiberglass defect I discovered on the roof that several of you on this Forum suggested I get repaired. A week prior, I decided to install mudflaps inside the wheel wells on the Ollie. This required that I jack it up and remove and each tire to access the frame in the wheel well where I mounted an L bracket on which to mount the mud flap. I used a 4 ton bottle jack on the front jack point and once jacked up, a 4 ton jack stand under the rear jack point for safety. I carry both on all trips.
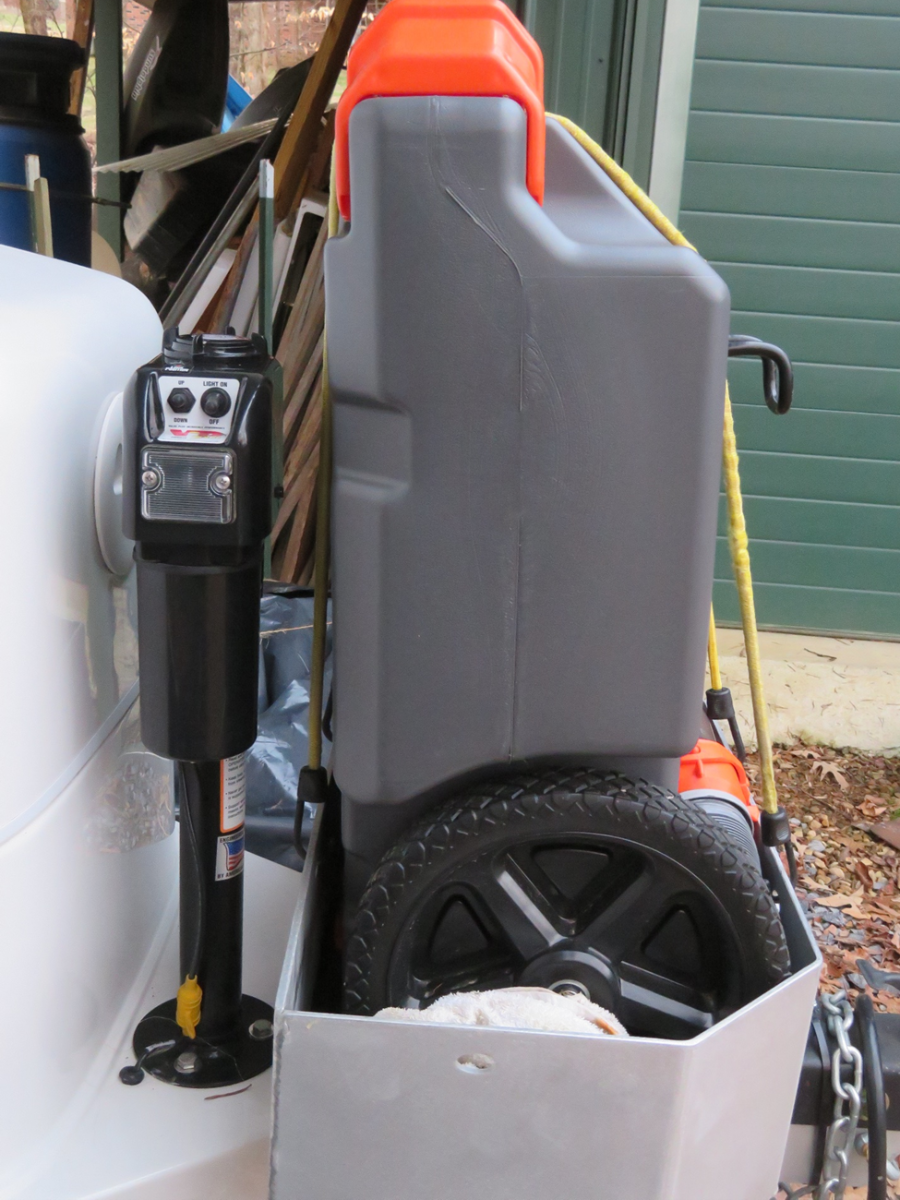
Earlier I had installed a carrier and storage box on the rear bumper receiver hitch and posted it here May 13, 2023. At that time, I developed my technique of removing the spare by just partially sliding out the rear bumper receiver hitch assembly just enough to remove the cover and spare. The carrier and box stayed filled and connected to the hitch.
I was about 90 miles SE of Hohenwald on a Sunday afternoon on a two lane highway when my EEZ RV Tire Pressure Monitor alarm sounded. My curbside tire pressure was dropping. I started looking for a place to pull over as I was in a long stretch of road with a railing and no shoulder. I saw an adequate shoulder about 0.4 miles ahead. I watched the pressure fall from 60 when the alarm sounded to 8 lbs as I got to the shoulder. There was no cell service so no AAA. My TV is a Subaru Ascent SUV. I've learned to travel lighter on each trip, but I had to dig for the jack and jack stand. Since then, it's easily accessible. It was inconvenient, but I was so thankful that I had just gone through the process of jacking up the Ollie and removing the spare. I tried first pumping the tire back up, but heard air coming from the base of the valve stem. At the tire store in Hohenwald the next day, it was the valve stem that had cracked and caused the incident.
My purpose in posting is to strongly urge, especially Elite I owners, to at least practice and prepare for this scenario and I can't recommend enough using a tire pressure monitor system! Safe travels and I hope to meet more of you at Lake Guntersville next month. (We'll be in site E25)
Ron
-
6
-
4
-
-
On 4/12/2024 at 5:18 PM, HDRider said:
I had looked at those. They used a 2" receiver. I want to stay with the stock 1 1/4"
HDRider,
The carrier with the box pictured above on my May 13, 2023 thread posted by rich.dev, was simple and has worked very well for me. It does have a 1 1/4 inch bar not an adapter. The carrier that I purchased had both a 2 and a 1 1/4 in bar. I also used a hitch clamp that stabilizes the carrier and it does not bounce around as was noted as a negative above. I can verify this in my backup camera. For sure, I stay under the load limit for the Oliver rear hitch. I have also worked out a technique to slide the carrier box assembly without removing it, to remove the tire cover and spare tire. I had to actually do this on a trip to Hohenwald last summer when I had a flat and had to use the spare. In fact, I did it again today as I rotated my tires, putting the spare into the rotation at Jason's recommendation during a tire discussion on that summer visit. Ron
-
1
-
-
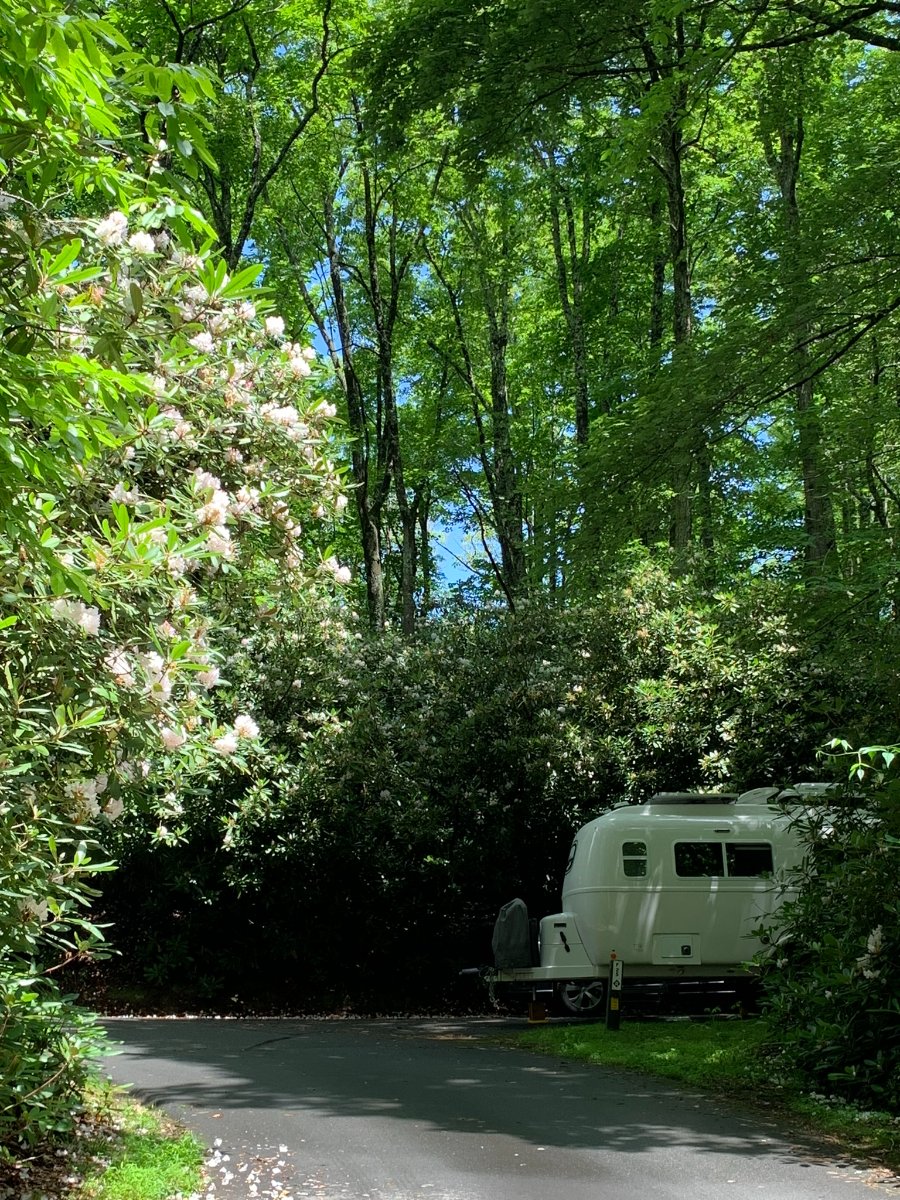
Last weekend we went to Art in the Park at Blowing Rock NC as we do every year, but normally it was in May, June, or October in our Aliner pop-up at Julian Price CG on the BRP. This time we decided to try July in our almost 1yr old Elite I (Hull #1209). We caught the peak of the Catawba Rhododendron bloom. We were in the clouds, a good bit of the time but 10-15 degrees cooler than the 90 degrees when we left home in East TN just 90mi, a couple or hours away.
-
7
-
 2
2
-
-
6 hours ago, MAX Burner said:
Very cool mods @Ron and Phyllis! Especially like your rear cargo arrangement. Can you give a link to the rear platform for the storage box, pls? Thanks, brother!
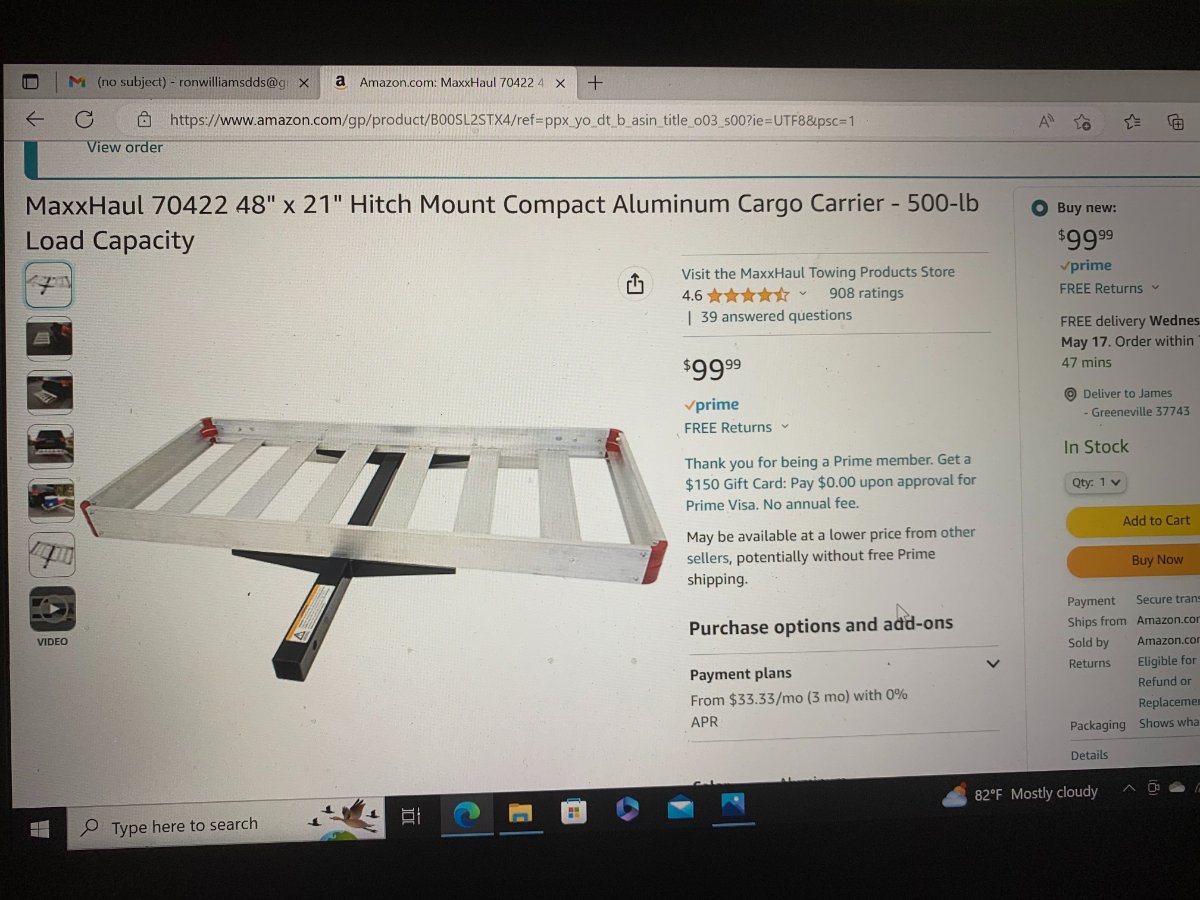
Gladly, If you use the Maxxhaul 70422 Aluminum Cargo Carrier, it looks like the support connector fits a 2" hitch. That's what I see on most of the carriers, so you'll need an adapter for the 1.25 on the Ollie. I happened to have another carrier ( Apex ACC2-4820 Metallic Aluminum Cargo Carrier) that came with two supports for either 2" or 1.25". I used the Apex 1.25" support on the Maxxhaul carrier as it fit perfectly. In a short search I don't see the Apex currently available. The box fits in either. I think it's important to use some very large washers or plates in the floor of box when mounting to prevent cracking. Now that I've used this for several trips, I think I'm going to add a small support chain inside connected to the lid to prevent it from going so far back when it's opened. All the other premade carriers I saw online were too heavy for the Oliver rear hitch or just didn't allow practically any cargo because of their weight. I uploaded screenshots of the box and MaxxHaul and hope you can open as I'm not sure how effectively I navigate around this forum. Hope it's all ok.
Ron
-
4
-
-
I’m still new to our Elite “Li’l Ollie” #1209. Thanks to all of you for sharing. With all the wise and technical information posted, I feel a little intimidated about posting much of anything. I’m sure I’m not alone. Here’s a few things I’ve done to make things a little easier on our travels so far.
Rear Storage Carrier
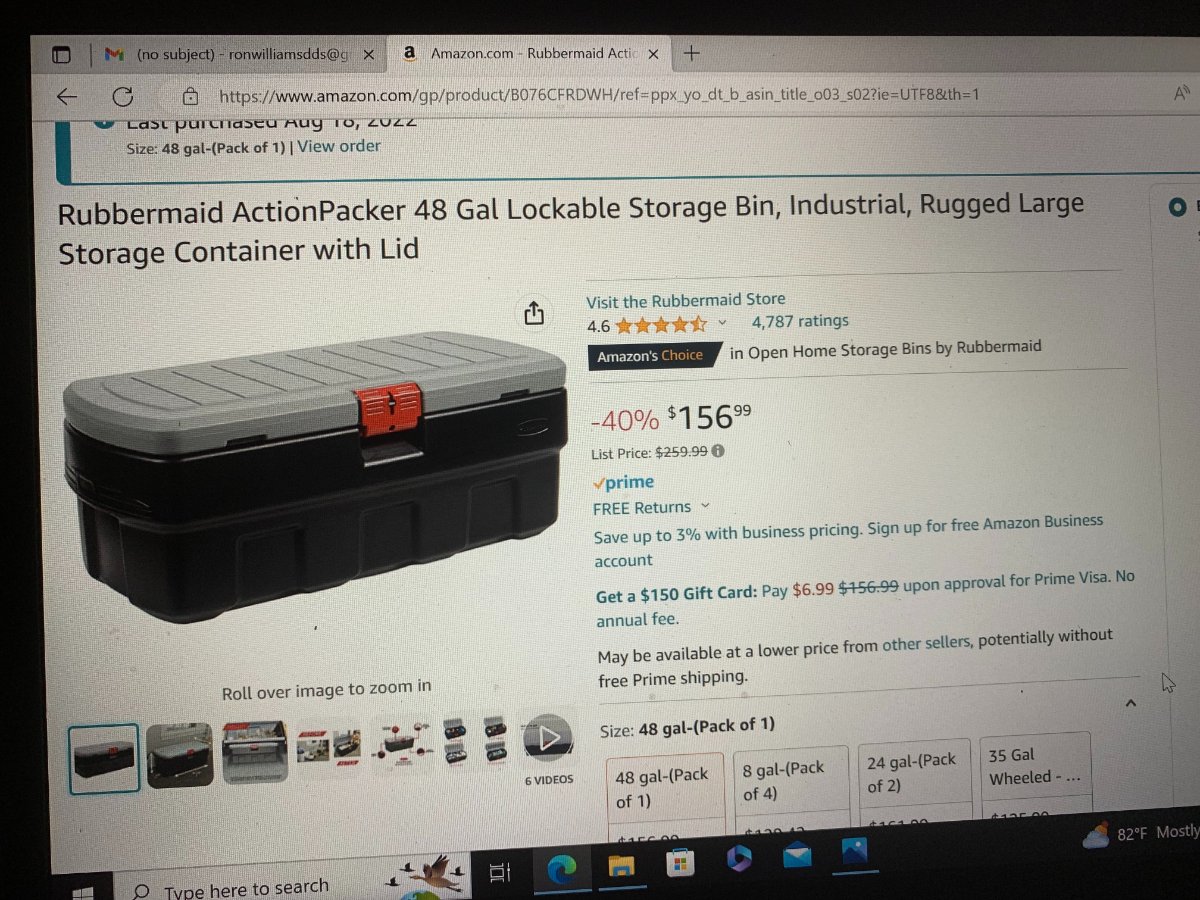
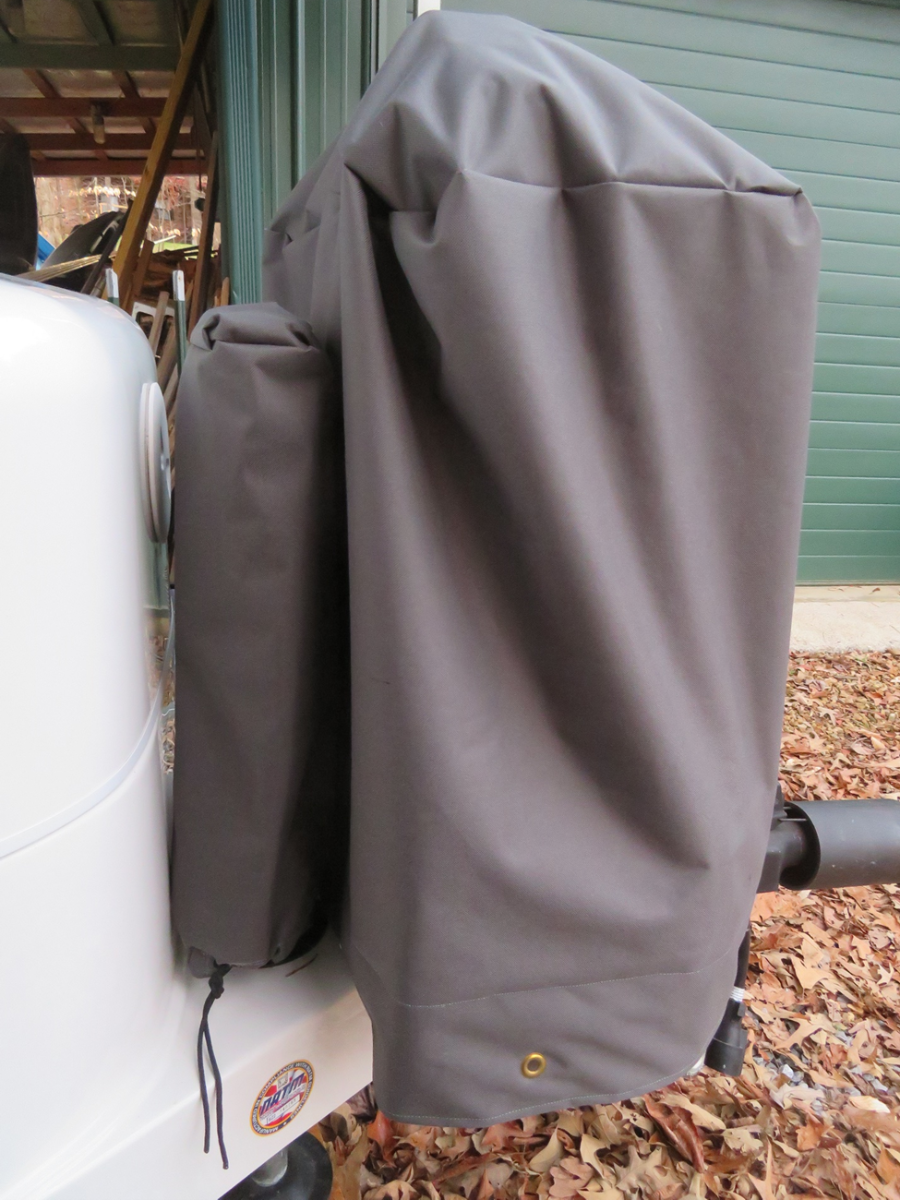
Since storage on the Elite is so limited and since my tow vehicle is a Subaru Ascent, not a truck, I’ve adapted some ideas I’ve seen on the forum that seem to be working well. I mounted a Rubbermaid ActionPacker 48 Gal using aluminum plates in the bottom and bolted it to a MaxxHaul 70422 48”x 21” Hitch Mount Cargo Carrier. Together they weigh a total of 43 lbs allowing me to carry a little over 100 lbs and be under the 150 maximum for the hitch. I also measured how far I could slide out the carrier and get the spare tire out without removing the carrier. I drilled a couple of extra holes in the hitch that allows me to slide in a retention bolt on each side to prevent the slid out assembly from falling in case I have to slide it out on the road. I did have to remount the license plate and a light that required extending the wiring.
I also made some water/UV resistant canvas covers to protect the rear cabinet, jack, and front box where I carry my portable tank, mainly to protect the plastic from the UV.
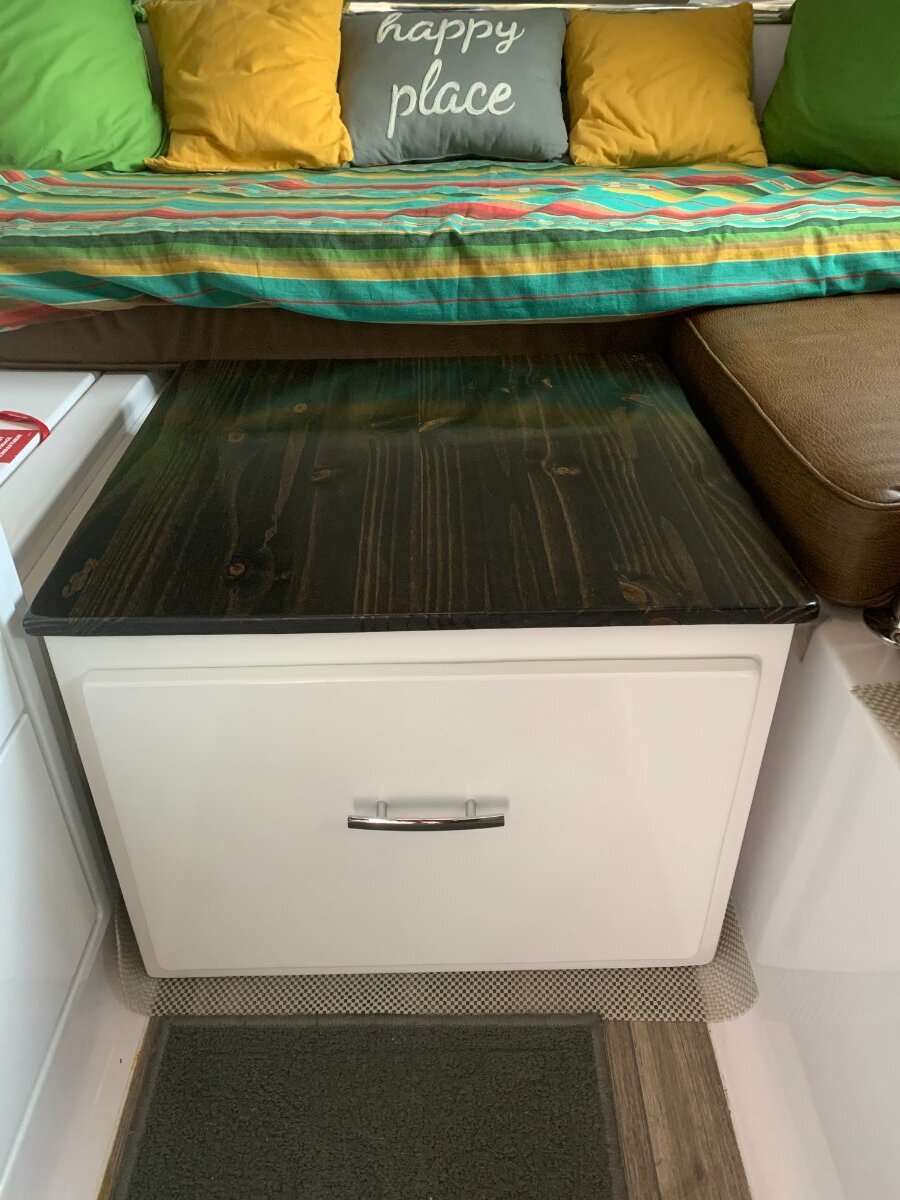
Interior Clothes Cabinet:
Since I’m a caregiver, I need to make it as easy as possible for me to easily access my wife’s clothes. We have found that the single bed across the back works best for us in our situation, that I can leave up all the time. I set up and take down my side bed. We don’t need the large dinette, so I made a smaller version to support her bed and it frees up floor space. We were storing clothes in bins below the bed having to slide them in and out. I decided to build a small cabinet that would allow us to easily access her clothes. It also serves as an extra countertop. I can pick up the cabinet for travel and set it on the floor. I learned from other posts on this forum, that by setting things on shelf liners on the floor that nothing moves during travel. I’ve found that in the evening I can set up the fiberglass extention Oliver provided and use it like an ottoman. With all the pillows it’s pretty cozy watching TV. This wouldn’t work for tall people, but my wife is tiny and I'm fine sleeping on the side bed. I think most of you tall folks have the Elite II anyway.
-
7
-
-
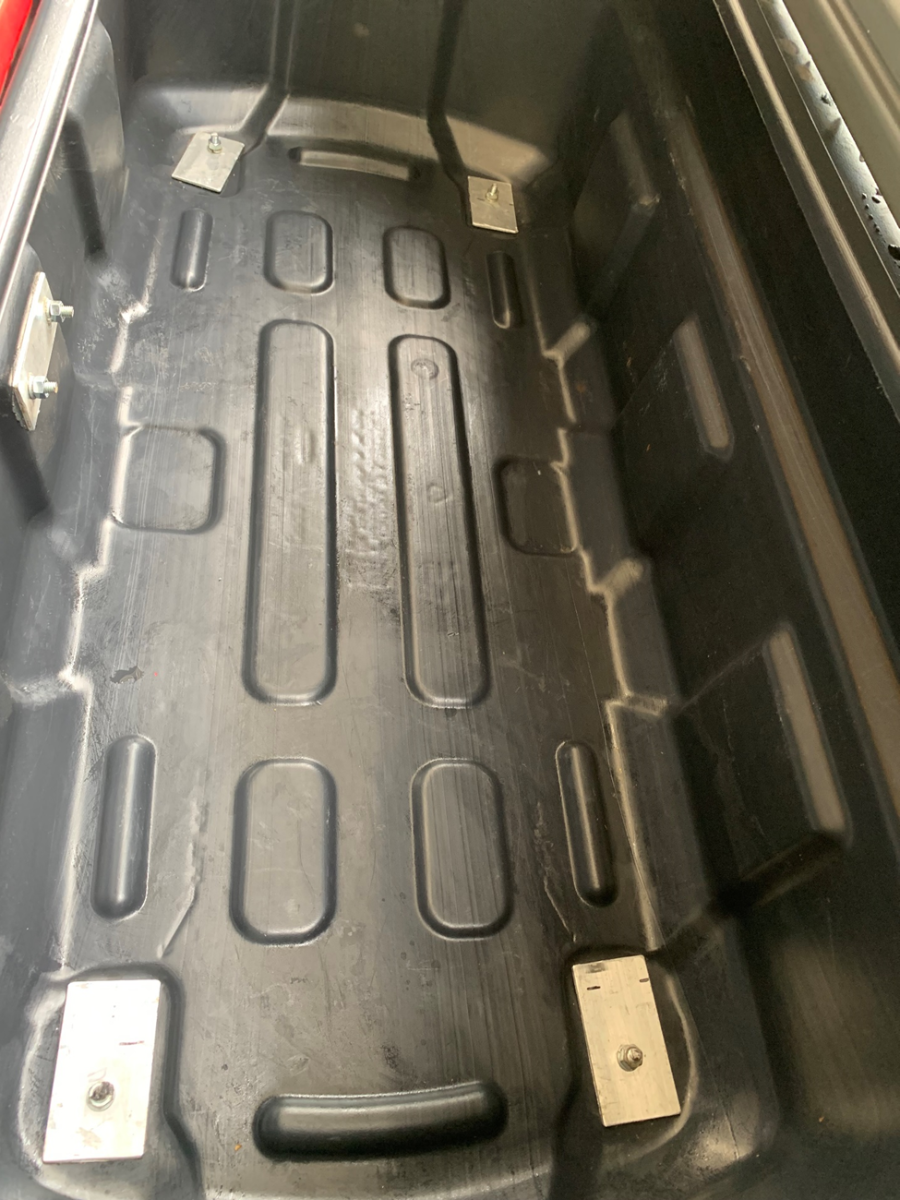
Door Lock problems
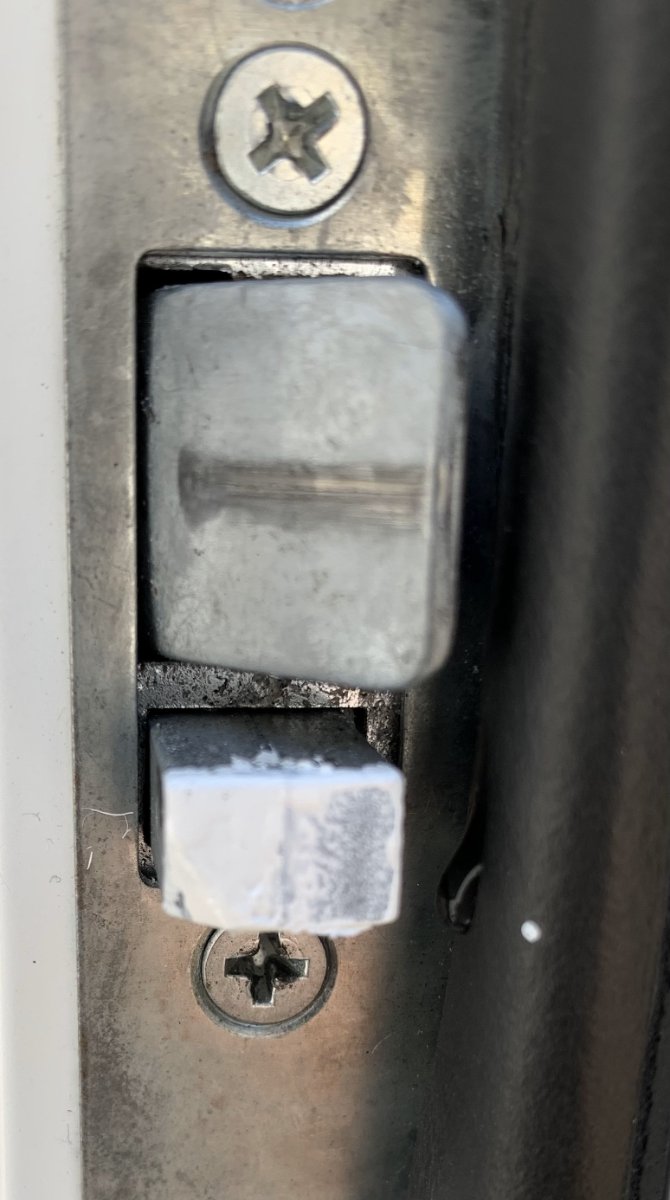
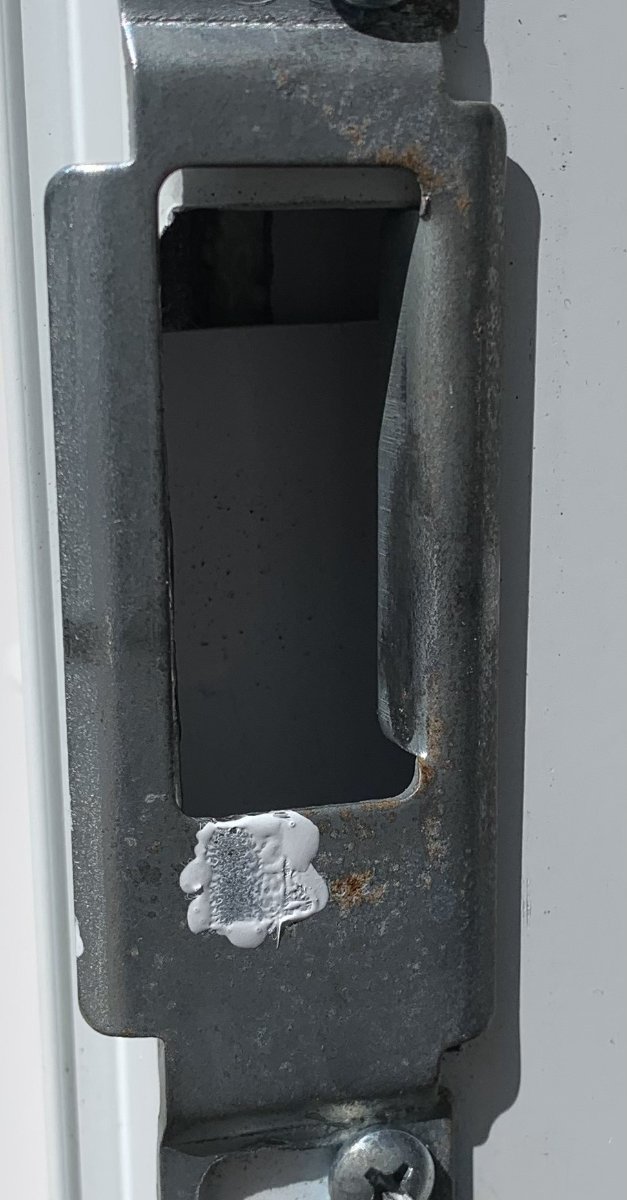
From the time I took delivery of my 2022 Elite #1209, the door has been difficult to latch. It required too much force, especially for my wife. I always lock it when we travel. On two trips the door popped open. On inspection the latch bolt barely engaged the strike plate. I adjusted the strike plate sideways but could still jerk the door open. To resolve the problem I had to grind out the opening in the aluminum door frame further and the horizontal screw hole openings in the strike plate allowing me to slide the strike plate further. This solved the problem with the latch bolt. It never occurred to me to check the deadbolt as I just assumed it was engaging. One evening I just locked the deadbolt and then easily pushed the door open. When home, I placed a small amount of white paint on the end of the dead bolt latch and locked it. As I expected, the dead bolt latch did not engage the strike place opening. In fact, dead bolt was hitting the metal on the strike plate and not functioning at all. I could not reposition the strike plate because of the position of the opening in the doorframe. I cut a square opening in the bottom of the opening in the strike plate and used the paint a time or two to insure that the dead bolt fully engaged the opening and no longer hit the strike plate. I could immediately tell that the deadbolt latch was in the opening and the door firmly locked. It was obvious that either the wrong strike plate was used at the factory or that they positioned it too high so both the latch bolt and deadbolt could not both go into the same opening.
The photos show the paint marker on the end of the deadbolt latch, where it struck the strike plate, the square opening I had to cut into the strike plate to get the deadbolt to work properly. I advise, especially new owners, to take a close look at the position of the door strike plate and insure that both bolts are engaging.
Happy travels,
Ron Williams
-
1
-
1
-
1
-
-
2 hours ago, topgun2 said:
Have you tried polishing those black spots? Have you sent these pics to Oliver Service?
I too use dehumidifiers in my Ollie while stored. I do take my single mattress out for the Winter but I leave the regular cushions in. They are stored in a vertical position though just to make sure that air gets a chance to circulate around them.
Bill
p.s. Really wish I had an Ollie port like you and Patriot.
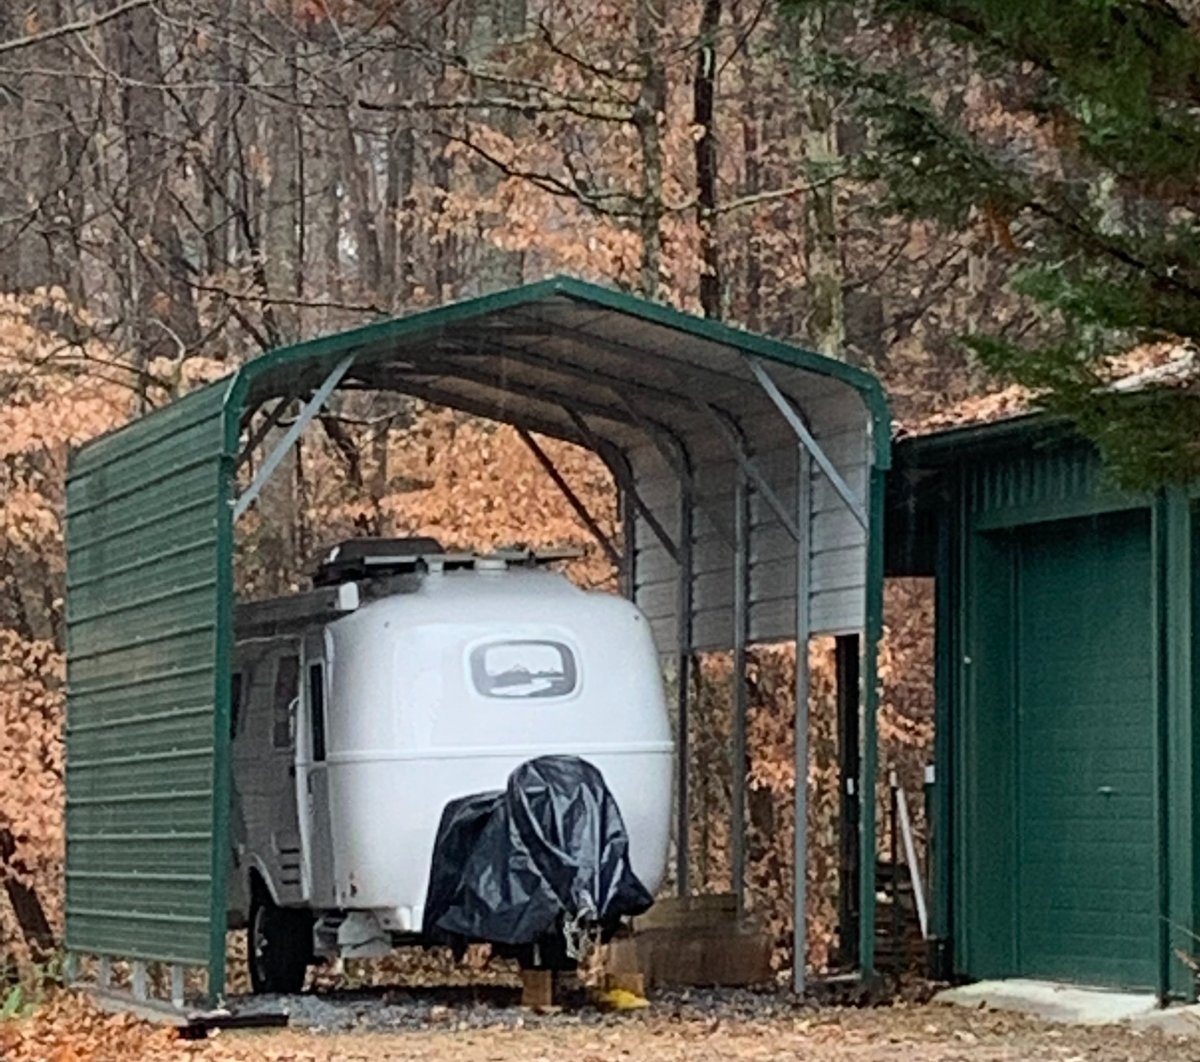
I don't think they will polish out. Due to the pattern, I suspect a gelcoat that is too thin and ScubaRx agrees. I had the Ollie port built early this summer before delivery. I leveled the site and poured concrete pads and the crew bolted it into the pads. It's from a company called MaxSteel. I was pleased with the end result and process. My site space was limited due to the metal building that is beside it and where it is all situated. Their cost for the port and installation was $3,300. I may close in the back with metal myself. I left one side somewhat open because it faces a lean to roof line where I store my firewood.
-
1
-
-
2 hours ago, ScubaRx said:
That does appear as thin gel coat. It can be repaired. As close as you are to Hohenwald, I’d have them do it.
Thank you, I think I will do it.
-
1 hour ago, johnwen said:
We had the same problem with our roof on our Elite2 when we picked it up back in January. We didn't have a chance to look at the roof since we had to get out of town for an approaching winter storm. I told Jason about it but did not open a ticket. We've not had any leaks ... knock on wood 🙂
John
👍
-
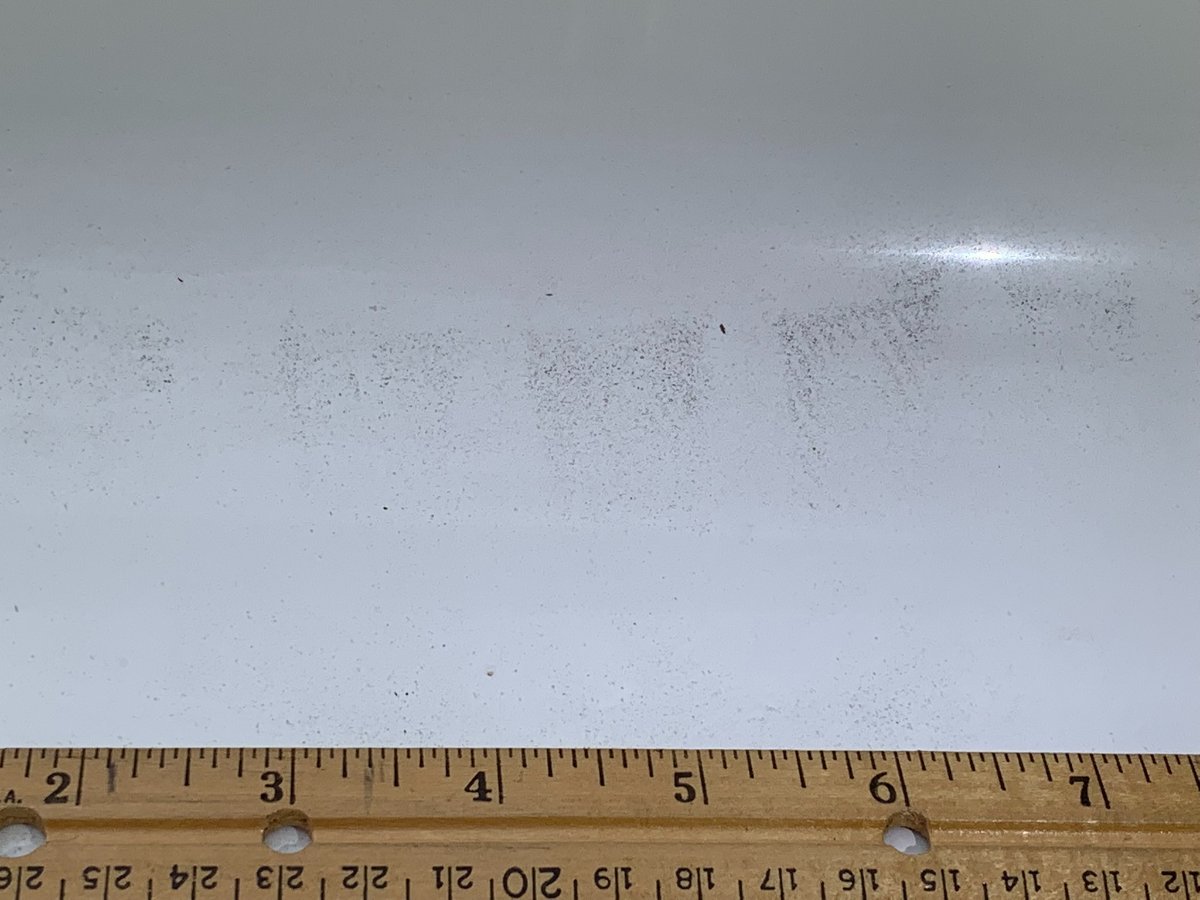
As I have washed and waxed Hull # 1209 Elite I, I inspected the roof and discovered an area that measures approximately 8 x 10 inches that is very rough and it appears that the clearcoat finish is just too thin. I think I am seeing the underlying fiberglas. My delivery was Aug 11 and I did not look at the roof. I remember a discussion about caulking just after this. My caulking in visible areas is excellent but it's very obvious that the same care was not taken on the roof. I could have done a much better job myself. My question though is about the clearcoat. Should I have this corrected. I'm attaching photos. The darkness is not dirt, it will not wash off.
Also I am storing Li'l Ollie for the winter in a carport type shed that I had built. It's well covered but open on the ends. I planned to keep electricity to the unit (AGM'S) and a dehumidifier running inside. My question is about the cushions. I always removed my cushions from my A-frame popup and stored them indoors to prevent rodent or insect (ant) damage if not used even for a few weeks. Thoughts, advice.
Thanks,
Ron
-
 2
2
-
-
We're going to be at Huntington Beach SP next week Oct 30-Nov 4. We want to go north to Wilmington for 2-3 days to visit some old dear friends. We've been there previously several times, but never camped. I've found several campground/RV parks around Hampstead, Topsail, Surf City. Can anyone recommend one? I'm trying to stay within a 30 min drive of their place in NE Wilmington.
-
Thanks to Landrover's recommendation, I used his friend Bob Hardbarger to develop graphics for Li'l Ollie. I emailed him some artwork of the TN flag and some of our East TN/ Western NC mountain scenes and he combined. He was very reasonable, as I have had logos developed and graphics for my previous business. He got the larger graphic to me just before my August 11 delivery and the young lady at Oliver, who applies their graphics, put it on for me during her lunch hour, and showed me how to apply the Hull number that I had him do later. I understand that he is retired but continues to do some work.
-
2
-
-
5 hours ago, leo said:
I have LT tires on our Elite I, and run at 70psi. I've got no deep knowledge on the tires, I run at 70psi based on past info from this forum.
We've only owned ours for 1 1/2 years so we're running on the tires put on by the previous owner (Michelin LTX). We've had no problems at
all, but no rough road traveling (lots of back highways if possible). And we're still weekend only unfortunately, looking forward to some longer trips.Might consider the ST tires when we have to change, but that'll be another year or more I think.
And @Ron and Phyllis, glad to have some other Elite I owners around.
👍
-
3 minutes ago, hobo said:
I agree with topgun2; it's so easy to winterize, why go through the steps suggested above but still worry that you didn't do it right? Just spend the 45 minutes and a couple gals of anti-freeze and sleep comfortably not worrying.
I appreciate that the odds are you'll be fine, but why take a chance?
I agree
-
10 minutes ago, topgun2 said:
By the way -
If the weather forecast changes calling for even lower temps - the regular winterization process really doesn't take very long. to either complete or to reverse. Yes, it will cost two or three gallons of anti-freeze, but, if there is any question regarding the temps then it is far cheaper to pay for the anti-freeze as compared to the cost of replacing a shower assembly, external fittings and/or anti-siphon valves (mostly found just inboard of the exterior fittings).
Bill
I promise I'll stop after this. I agree on the anti-freeze. I was just thinking about in the future insulating like you did. By fittings, I mean all the connections especially in the compartments that house the hot water heater, pump, on galley side. Some of these don't seems to lend themselves to the foam. I was just wondering if you felt it was necessary to address these areas by stuffing insulation around them. Thanks for taking the time
-
5 minutes ago, topgun2 said:
Went down to Lowe's and got a number pieces of 1/2 inch foam pipe insulation like THIS.
For that outside shower insulation - if you don't have some regular fiberglass insulation laying around then you can simply use a couple of old rags.
Bill
Understand, I've used before. I've got plenty of the fiberglass around. Did you stuff any around fittings?
-
49 minutes ago, topgun2 said:
Except for the 26 degree night (unless your weather forecasters are like our - i.e. not worth a darn) I'd would not do a thing. For that 26 degree night I'd make sure that my kitchen drawers were open (warmer air to the kitchen faucet). and the access hatches to the basement area were open and the closet door open as well as the bathroom door. Finally, you might place a small wad of insulation in the outside sower door and pour a 1/2 cup of RV anti-freeze in each of the drains (Bath sink, Kitchen sink and don't forget the shower drain) . All of this is to make sure that you get some warm(er) air into the areas where the pipes are.
In my case, I've put pipe insulation on all pipes that I can get to so I'm really not concerned until things get down below the middle 20's for short periods of time.
On a side note - you might want to PM Patriot about restaurants and other details concerning HBSP given that he just returned from there.
Bill
Sound advice, thanks Bill. What type of pipe insulation did you use? Did you wrap them or did you just stuff insulation around them or both?
-
1
-
-
Hey folks, I need some advice. I have an Elite I "Li'l Ollie" Hull #1209 in Upper East TN. In two weeks we will be at Huntington Beach SP for a week. Nighttime temps there will be in the 50's. My issue is that we're going to have 2-3 cold nights here at home 28-30 degrees then warm up to upper 30's & 40's at night and long range says maybe a dip to 26 one night over these next two weeks. I have the Ollie in a metal covered shed not heated but with electric. I was hoping to delay winterizing until I return to avoid winterizing and having to drain the antifreeze when on this trip and winterizing again. I was going to run a small ceramic heater while stored here that we use when we camp with electric that works well and open up the compartments to expose pipes as much as possible. I had also thought I might get a couple of pipe heat strips if needed. What are your thoughts, what would you do?
Ron


Elite I bed across the back and adding some color
in Ollie Modifications
Posted
I see you got the top from Oliver. It was a custom top ready for mounting? Ron