Derek B
-
Posts
47 -
Joined
-
Last visited
-
Days Won
1
Derek B's Achievements
")


-
 Gary, I do not have a victron inverter yet but have thought about this install. My guess to the left of the pantry you only have a radio with a blank space above where the zamp controller would normally be installed. If I was installing a Cerbo GX display that is where I would put it. During my solar install I tried multiple attempts to get wires up along the left side of pantry from under street side bed and had no luck. I could not get anything any further than the line where the upper and lower hulls meet. The place where I found to easily fish wires thru was to follow along the ac drain tubing from attic to lower basement area. Once in the attic the wiring can be passed along the back of the street side upper cabinet and behind the radio area.
 -
E27, DerekB, Derek and Deana, Louisiana, #484
-
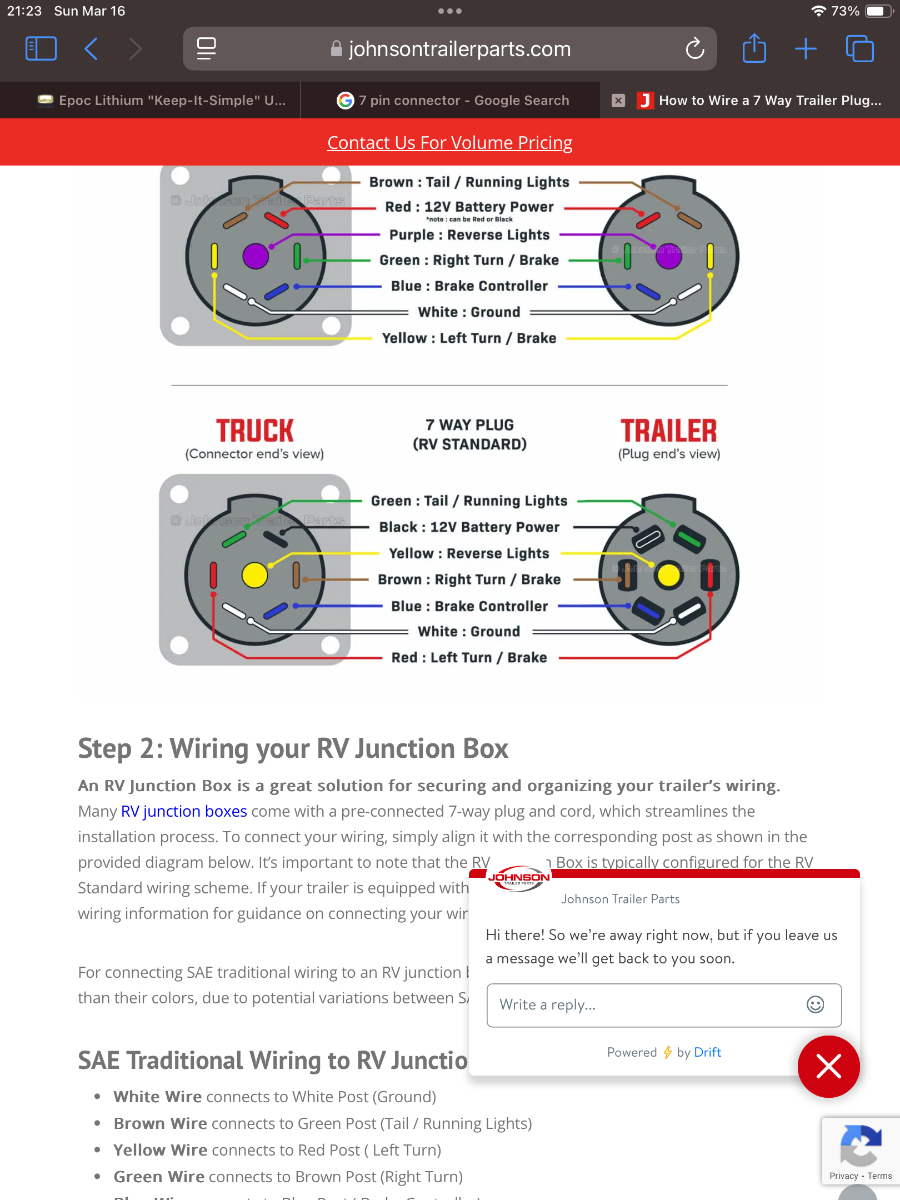
@Teaney Hull 292 there are 3 ongoing post on the forum right now about lithium up grades and I must admit I have gotten confused on what was said in each one. What I haven’t seen in your post is mention of disconnecting the charge wire for you 7 pin connection. Just want to make sure you don’t miss that requirement when going to lithium. It was discussed recently @tallmandan thread below, https://olivertraveltrailers.com/forums/topic/10748-epoc-lithium-keep-it-simple-upgrade-advice/
-
Epoc Lithium "Keep-It-Simple" Upgrade Advice
Derek B replied to tallmandan's topic in Ollie Modifications
@tallmandan nice work, you will see a huge improvement in capacity with your upgrade. -
Gary, sounds like you got a plan. I have the same PD charger and inverter only Xantrex 2000. Upgrading the inverter to inverter / charger combo can wait. What I typically do is turn off the circuit breaker for the charger and let my victron solar charge controller handle the charging since it is programmable. If solar is not keeping up for whatever reason I turn on the PD charger for top off. Will seek you out at the Rally to meet and check in on how your upgrade went.
-
Epoc Lithium "Keep-It-Simple" Upgrade Advice
Derek B replied to tallmandan's topic in Ollie Modifications
In my case I also added solar and a battery shunt. Since I was already doing the wiring I added a positive bus bar under dinette and negative under street side bed to move the 6 ga wires out of the battery compartment. Not a hard job but takes a little more planning and wiring of course. -
Epoc Lithium "Keep-It-Simple" Upgrade Advice
Derek B replied to tallmandan's topic in Ollie Modifications
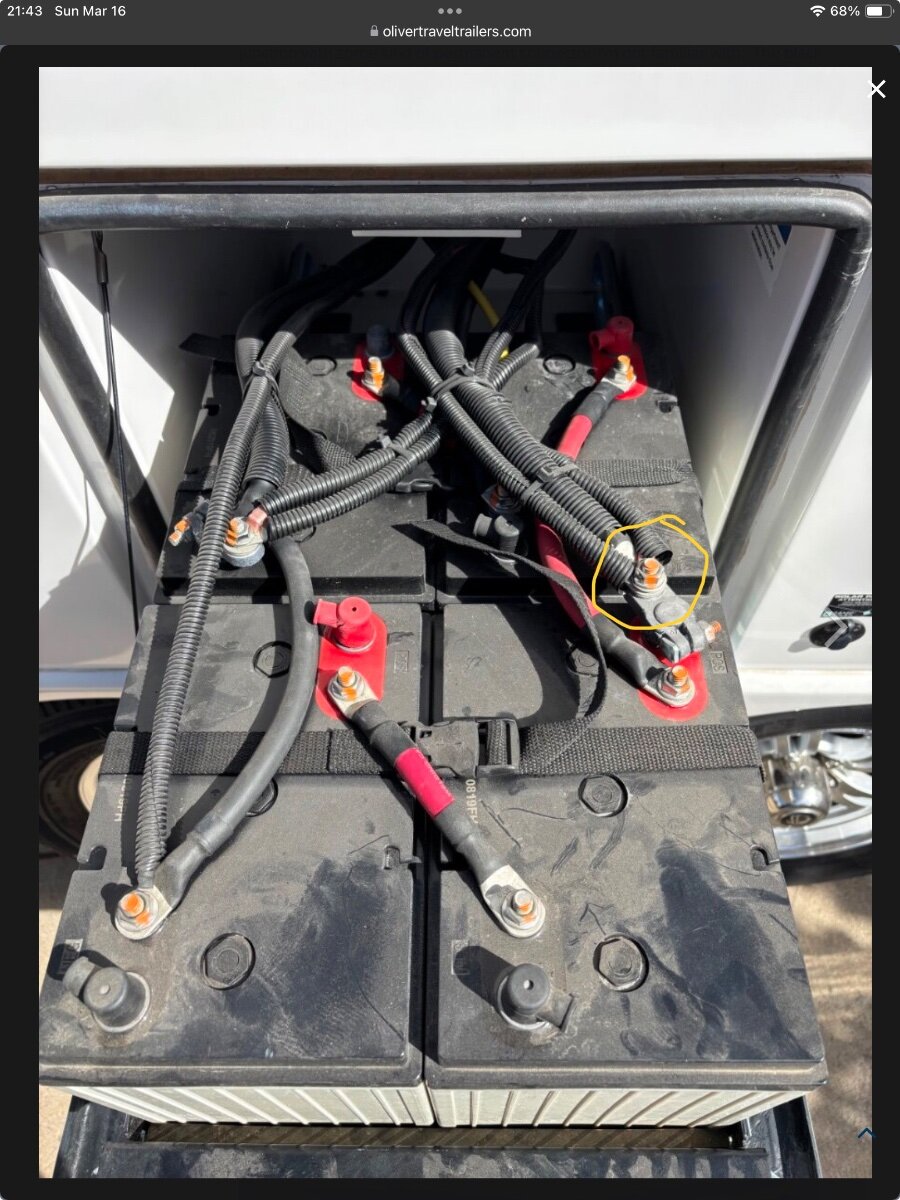
@Patriot finally got around to looking a my cables used to parallel the batteries. They are 4/0 and 12 inches eye to eye, I do agree with @jd1923 though that waiting until batteries are installed are probably best option. From the day I placed my orders I had the cables in hand 2 days later. This is a pic of my install, i chose to center each battery on existing tie down straps using 3/4 pvc sheet I had left over from previous project as a spacer. On the sides of the batteries on long length of battery compartment I used strips cut from a cheap Walmart cutting board so everything fit tight.
-
Gary, I will be at the rally and would be glad to give you a hand getting the new batteries hooked up at no charge. Would be helpful to determine whether you have the Xantrex inverter only or inverter / charger. If unsure post a picture and could help you identify. Also a pic of your current battery layout with good clear images of your current existing cables and connections.
-
You’re welcome and appreciate everyone’s feed back on this unit as well as additional information on the Atmos. Atmos still less than half the price of Oliver installed Truma. Wish there was another option for this upgrade without the additional fiberglass work. As summer approaches I will have to decide whether I can wait another year in hopes of more new units coming out or replace the Dometic.
-
One thing I have learned in the short time I have been on this forum. There are a lot of very smart Oliver Owners out there that know a lot about how different systems work. I can figure out the installation of a new AC unit and make it work but struggle with understanding the benefits of one over the other. Curious as to the boards thoughts on this unit as I still contemplate my upgrade from the Dometic Penguin. What I have been able to understand from the little I have found. 1. It should fit pre-existing hole and low profile. .5 inch taller than the Dometic. 2. Inverter ACs consume less power and would not need a soft start and run longer on batteries. 3. Quieter than dometic. 4. Would not be able to use drain tubes. 5. Uses same technology as home mini-splits. Seems to be a pretty new product with little info out there, https://www.turbro.com/products/greenland-13500-btu-inverter-rv-air-conditioner-with-heat-pump https://www.youtube.com/watch?v=8-psxzbpngA https://www.youtube.com/watch?v=rsnWzNLYGOY
-
Epoc Lithium "Keep-It-Simple" Upgrade Advice
Derek B replied to tallmandan's topic in Ollie Modifications
@tallmandan check your connection. I believe as my trailer was you have eyelet terminal connections they are just bolted to auto post style terminals due to your batteries requiring this type.
-
Epoc Lithium "Keep-It-Simple" Upgrade Advice
Derek B replied to tallmandan's topic in Ollie Modifications
For the 7 pin 12 volt connection no need to disconnect anything under the vanity. Just disconnect the black wire from the 7 pin plug itself. Disconnect and tape the wire and tuck back into plug housing. Below is example of 7 pin plug diagram and how the plug looks when disassembled. Google replacing and rv 7 pin and should find plenty of videos showing how to pull back the plug housing. My battery compartment started out looking like yours but now looks like @jd1923. The smaller gauge wires can be brought inside the trailer by installing additional bus bars but may be more than you have in mind. For ease you can just stack multiple in same battery connections but may need longer bolts then supplied by epoch. If your 4/0 gauge connections seem short you likely have some extra length of cable of cable on inside of trailer under bed. The large 4/0 negative cable should be going directly to your inverter or a shunt if installed. If so you can pull some of the length into battery compartment by loosing the grommet in battery bay. Hope this helps.
-
Epoc Lithium "Keep-It-Simple" Upgrade Advice
Derek B replied to tallmandan's topic in Ollie Modifications
I disconnected the black wire from the 7-pin connector itself. Pulled back the connector housing, disconnected and taped the wire and tucked under housing upon reinstallation. The other end is still connected at the bus. -
Epoc Lithium "Keep-It-Simple" Upgrade Advice
Derek B replied to tallmandan's topic in Ollie Modifications
I know this is the 4/0 cable I used, very flexible. I can’t seem to find my order in my email. When I get a chance will take some measurements and post.
-
Epoc Lithium "Keep-It-Simple" Upgrade Advice
Derek B replied to tallmandan's topic in Ollie Modifications
Like @jd1923 I went with the 2 - 300AH Epoch, I did need new cables for the parallel connections. My cables from my old lead acid batteries were too short. Like you I did not have the tools to crimp the big lugs and didn’t want to purchase for one job. Look up batterycablesusa.com, they will make cables in any length and gauge you want. I did a few different orders during mods for solar, adding shunt, and batteries and every order shipped within a day of me placing it.