DCKiefer
-
Posts
176 -
Joined
-
Last visited
-
Days Won
1
Everything posted by DCKiefer
-
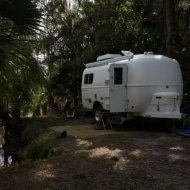
For those with 255 75R 15's you may have noticed the spare is only a 205 and a lower load range. I am a little pickey about tires and really prefer to have the same size spare with all the same specs. I took one of my 255's off and loaded it onto the spare tire rack but the cover would not fit. I didn't think it would look bad with a vinyl cover, but really wanted to keep the one from the factory. Here is where it got a little daring and I hope Oliver doesn't hate me for this. The 255 does fit into the cover. The obstruction is what I will call the foot at the bottom of the cover. This flat rectangular piece sits on top of the aluminum diamond plate near the bumper. It appears the purpose of this foot is to help hold the cover in place. I removed about a quarter inch of the foot to a point where it is at a tangent with the round part of the cover. This allows the cover to go on over the 255 and not interfer with closing the bumper. The fit is good if not excellent. I did have a little trouble with the cover wobbling a little and was going to get more creative, but noticed that if I tighted the tire clamp to where if pionts up and down, instead of left and right, this gave the cover a much better seat. The only reservation I might have is about the added weight of the larger tire, but the rear wall appears to very rigged in this location. I noticed no change in the shape of the wall when the larger tire was mounted. Below are some pics showing the mod and the fit afterwards with the 255 inside. I did add a little strip of automotive door trim protector to two sides of the bottom edge to protect from chipping. Also, the bumper closes much easier now.
-
If you are looking for a solution to protect the shower pan and one that allow it to dry faster check out this dry decking. This sight has a selection of colors and allow you to by in any quantity. I bought four piece and trimmed to fit. http://www.duragrid.com/
-
Yes, they are a little bigger than a quarter. They have two contacts that come off of the disk, that are the same as those that extend from the halogen bulb. It takes a little pressue to insert them into the socket and I recommend being careful. Too much force and you might damage the LED replacement. I had no trouble installing them.
-
Yes the plywood you see is a board I cut to cover the space just behide the propane tanks. I am able to squeze some small things in from one side and they can't escape to the road.
-
As in my earlier post about the door step shelf, I was looking for another location to carry my five gallon portable sewer tank. I was looking real hard, when laying under the trailer I noticed the space in the A-frame of the trailer tongue looked about right. I made a strap from some aluminum I had. This gives just enough to hold the tank. I then mounted a bungie cord to the middle frame member and a place to hook it to on the oppisite member. It's not difficult to reach. I leave the cap off the tank, since I am afraid I might loose it. Believe me that bungie cord is tighter than it looks in the pic and the tank is snug. I put the cap and other things on a shelf I added just behind the propane tanks. Small space, but every space is useful in a camper.
-
I was looking for some place to keep a couple of wheel chuck and pads for the jacks handy. I like for everything to have its place. I noticed there was some significant space above the step at the door. I mounted a shelf to the frame and use bungee cords to hold the stuff in place. Just enough room for one pair of chucks and three Lego blocks. Doesn't get in the way of moving the step in and out.
-
Here is a unique sewer hose system that does not use the bonnett style fittings and has a valve at the end of the hose. The system uses a cam lock setup that provides and air tight connection between the hose and sewer outlet. The valve at the end of the hose helps keep the whole system sealed. I had hoped to keep the hose on at all times but there just isn't enough room in the bumper without major sewer outlet modifications. Note that once you commit to this setup there is no turning back since the bonnett tabs must be removed and the adapter glued into place. I hope to use the valve at the end of the hose to fill a portable tank when sewer is not available at the camp site. The hose is also unique since it stays in place and doesn't act like a slinky.
-
Ok here is the least expensive backup camera system I have come across. For $140 you get a small round camera, seperate wireless transmitter, 20 foot cable extension(purchased seperately) and wireless monitor/reciever with mounts. The unit is intened to be used as a backup camera, but I have wired it so I can leave it on during towing and see what's going on behind the trailer. I will let you now in April how well the setup works and longer term road test will prove if this can be used as a perminent rearview camera. Here is were I purchased the unit. http://www.4ucam.com/index.html Mounted the weather resistant camera on the rear bumper, should say double stuck for now. Put the wireless transmitter on the front of the trailer in the propane compartment. Not sure of the weather resistance of this unit, so I will have to see how it goes. Took power from inside and have a switch so the camera and transmitter can be turned off when not in use. Ran the cable to the camer under the trailer, you can follow the proprane line or frame. Here is the monitor with the image being recieved. Not bad with the transmitter being inside a closed area. I'll post an update in April about the units performance.
-
Paste the following into an eBay search. Here is a link. http://cgi.ebay.com/ws/eBayISAPI.dll?ViewItem&ssPageName=STRK:MEWAX:IT&item=390031556809 If that does work past this the text below into an eBay search. Brightest 120 Lumen G4 Base 10 SMD LED Bulb 12V AC DC
-
I know this has been on the board before, but I have to mention LED's again because it isn't often that I think I may have paid to much for something, only to find it to possibly be one of the best purchases I have made. I recently bought LED replacements for four of our puck lights. The main reason for this might not be what you think, trying to save power. I really disliked the heat from the holagens, but thought the light was greate until? Until I bought four LED replacements on ebay. I love light and these where listed as the brighest at 120 lums obtained from 10 LEDs on each replacement. The light is fantastic and no heat, plus saving electricity. A little high priced at about $16 each, but not the most expeincive out there. You might be able to get them cheaper in an auction. They produce wonderful white light that makes you relize how yellow the holagens are. I'm buying three more to replace all the most frequently used lights in our trailer. I now there has been some discussion about overhead lighting. I think with the replacements I bought I get more lighting bouncing off the white walls of the trailer, that I no longer feel as much of a need for a center light.
-
Any opinions on backup cameras? I played with the cheap Walmart version and it worked for two trips before it proved useless, got lucky and got my money back. I learned one thing from using it, if the camera is aimed straight off the back of the trailer the sun and headlights at night make it impossible to use. Considering the unit at this link below. Well under $200 and the transmitter can be located away from the camera to get it closer to the tow vehicle. Only problem is no shielding from the sun or headlights. http://www.4ucam.com/Wireless-Backup-Round-Camera-Color-Monitor-RV-Cam-Truck-Trailer-Rear-View-IR-Night-Vision.html Any thoughts on the value of a backup camera would be most appreciated.
-
I have thought the same thing when doing things in the middle of the trailer. The ceiling and roof appear solid in the middle so running a wire doesn't seem possible. I thought of finding some kind of small light fixture I could mount up on the cabinet, then aim the light to the ceiling, bouncing the light off of the ceiling. Not sure how welll this would work, but it's the start of an idea.
-
I thought of the same location. I can't recall the exact issue I had with the spot, but one may have been that the storage insert occupies more of the space than I thought. I think the second had to do with fishing the lines between there and the sink.
-
As you know you should sanitize your water system and Oliver gives great instruction in the manual. But, even after proper sanitizing, I am still reluctant to drink from the tap. You can carry bottled water or maybe install a good filter to strain out the bad guys. One such filter is made a brand call Sea Gull. Had one on our last camper so I wanted to install one in our Oliver. This proved to be bit of a challenge. The first hurdle to overcome is where to install the filter. It must be easily accessible for changing and proper care. I decided to mount in behind the larger drawer under the sink. From this point on I will admit this is a tough job. I won't go into details just list what it involved to get the end result. 1. Remove drawer, easy. 2. Accessing the fitting to the cold water side of the sink faucet proved challenging. Removed the stove to gain better access. 3. Installed fitting and filter faucet, very slow do to limited access, took about a hour. 4. Mount filter tested. Had some difficulty getting the fitting snug and drip free. Access to this are is difficult. 5. Modified large drawer to accommodate the space now used by the filter. Had to remove about four inches from the back of the drawer.
-
Did the spray on stuff last weekend, only took a couple of hours. Put the flaps on yesterday. I thought about the aluminum flaps, but didn't think I had the tools to making smooth cuts that would follow the curves of the Oliver.
-
I agree the stability is fantastic. This past summer we took our Oliver out to the beach with a hurricane brewing in the Gulf. We were driving in 15 to 25 mph winds and the trailer handled great.
-
Forgot to mention the little aluminum block at the top keep the upper part of the flap in place. It is double stuck to the trailer with super duty double stick tape. Again, no wholes in the body.
-
Looking for a way to keep the dirt, mud and rocks from hitting the under side of your Oliver. Here is a pic of the mud flaps I made. Went to Pep Boys and found some retangular straight flaps. Cut them to fit the contour of the Oliver. Mounted the flap to a piece of aluminum, which is then mounted to the trailer frame. No wholes in the fiber glass. The flaps mount just a couple of inches past the wheel well. And if you happen to notice, yes the wheel well is black. I taped off the well, sanded it, then used some stray on bed liner. Will have to see how well this holds up.
-
Need to add one note. I had an extra light, so I mounted this light in the sewer hose compartment. Ran power from the switch for the light in the outside shower. It make it much easier to do those before sun up dumps.
-
If you are having a tough time getting your propane tanks in and out here is a suggestion the works for me. Take a look at the bracket that the gas regulator is on. You will notice that the rod for the bracket that holds the tanks in place runs through both ends of the C shaped bracket. The lower part of the C is what appears to cause the most trouble by getting in the way of the tanks. I removed the braket from the regulator and removed the bottom part of the C with a hack saw. Now I just have an upside down L. Re-installed the bracket and now the tanks are much easier to load and unload.
-
I finally did what you are suppose to do about understanding the weight of your trailer. I put her on the scale and here is what I found. Let me first define the following number. I wasn't headed out on a trip, so this reading does not include a full tank of water, the entire system is drained. It does include the things we leave in the trailer, like pots and pans, bathroom and toilet supplies, some storage containers, a few tools, leveling blocks, chairs, bedding and blankets, one very light table, small portable solar panel, sewer hose, etc. I also had one full tank of propane and one that is half full. Our Oliver pretty much came with all the major features you could order, like double pained windows, likely heavy. The big exception is no King Dome nor a microwave. I have added some small things like a water filter, TV antenna, some extra lights. So no big extras that weigh in heavy, like a generator or a hot tub. On last note, I weighted the tow vehile by itself first, then returned with the trailer, so these numbers are calculations from the different axle readings. I am pretty good in math so I am confident these are accurate calculations. And in this corner weighing in at 3700 lbs. trailer number 28. I clearly see the reason for the axle upgrade. Tongue weight came in at 440 lbs. The tongue on my trailer is not extended, as you know we can do. Adding a full tank of water and a full hot water heater, 37 gallons total (using 9 lbs. per gallon), brings us up to 4033 lbs. I then weighed the food, clothing, books, camers and miscallaneous items. Total weight trip ready calculates out to 4178 lbs. Unless you are collecting rocks like Lucy in the "The Long, Long Trailer', the 5200 lb axle should be plenty. The tow vehicle in my case is a 2008 Toyota FJ Cruiser 4X4 with maximum trailer weight of 5000lbs and total vehilce tow rating of 9500lbs. I added the weight of one passenger and the additional gear we carry in the vehicle. The total trip ready vehicle(with full tank of gas) and trailer comes out to 9200 lbs. You can subtract about 120 lbs from this since I do have a winch on the front of the vehicle. Getting close to the total for the FJ, but well within a managable margin. If we take canoes or bikes, I use my Tacoma with total of 11100 lbs. I hope this is helpful.
-
Experienced something similar, a friend in the RV business said I would not be able to get financing, even before the credit cirsis. But fortunately for me my company credit union pitched in. Might have something to do with direct deposit from my pay check, they know where I am.
-
Maybe you have had this happen. Nature calls, you get into the bathroom and in a most inconvenient moment you realize the what pump isn't on. Here's a solution, add a switch to turn the pump on in the bathroom. I added one in the two rack next to the floor light switch. I really wanted a four-way switch, but could not find one. So I basically added what amounts too an override of the circuit that draw from it's on power. This switch will turn the pump on, but the others will not turn it off. Turning this switch off, will allow the original two to function normally. As an additional feature and to help trouble shoot why the original switches are not turning the pump off, I added a red LED. The LED illuminates the upper towel bar when the bathroom pump switch is on. This pic is kind of dark to illustrate, but the light is visible even in the well lite bathroom.
-
I don't know about the rest of you, but I have trouble seeing in the cabinets. The black insulated coating and black shelf mat only adds to light from the rest of the cabin from just disappearing into the cabinets. On solution was to keep a small flash light hand, but this can be frustrating when you need two hands. Solution, inter cabinet lighting. Pictures may be blurry, wanted to illustrate the illumination. I found some slim LED light at auto zone, the were actually in the driving light section, don't think they would really work for that purpose. I mount five of them with double stick tape to the ceiling in the overhead cabinets. The light can be seen in the upper right of this picture. Mounted a switch next to the main panel near the door. Used a switch with a light so we don't forget they ar on. Probably could do the whole project a bit cheaper. This one cost about $80. Lights, wire and switch, most being the lights.
-
I don't see the antenna on the Lowe's website, but here are some pics. They might be a little blurry. You can see the antenna mount to the third brakelight plate. I used heavy duty double stick tape and a right angle bracket I had.