

DCKiefer
-
Posts
176 -
Joined
-
Last visited
-
Days Won
1
Everything posted by DCKiefer
-
I was in need of a little extra light in the dark when backing up so I installed these stainless transom lights with LED's as backup lights. I had to add the circuit to the seven prong plug since Oliver didn't utilize it. The lights are surfaced mounted so I only had to drill a small hole for the wires.
-
The benfit is how the batteries are connected to the system. In order to get 12 volts from two six volt batteries they must be wired in series. Not only does this give you 12 volts, it also insures the power drawn from the batteries is even as the batteries get older and performance drops. When two 12 volt batteries are used they must be wired in parellel, unless you need 24 volts. When they are wired this way there is now way to control how much each battery is drawn done when in use. If one battery starts to degrade in performance, which they do with age and use, it will drawn down the good battery. This will leave you wondering why your batteries never get back to full charge. There is a lot more to my explaination, but I just wanted to say the benifits are enough that I am going with 6 volts when my current batteries need replacing.
-
I wanted to be able to adjust how much the rear window is open. Here a simple solution. I drilled two holes in the rear window rod at the positions I would like to leave the window open to. I then put a pop rivet in each. You have to make sure the rivet is narrow enough to pass through the slot the rod goes through.
-
I may have found the problem. I removed the stove and the safety shut off sensor line for the larger burner was pretty much sitting agianst the bottom of the stove for about three inches. My theory is that this was allowing the sensor fead to disappate enought head to make it think the flame went out. I'm now thinking the issue was more temperature related than altitude. Won't bea ble to know for sure until winter or next mountain trip.
-
Eric, Nice job, but the thing that got my attention was the cabinet doors in the microwas spot. We did want a microwave either so the install a kind of bread box contraption with a rollup door. Takes up a lot of potentially useful space. What number is your Oliver, it must have been made after ours. Either way I going to give them a call and see if they happen to have one of those cabinet doors sitting around.
-
Don't believe there are any adjustment that can be made. We also had the same trouble with the ignitors. You have to hold the burner knob in for about 10 seconds then press the ignitor. Sometimes results in a bit of a puff start, so we also use the handle held starter.
-
Has anyone else had issue with the large burner on the stove not staying on? We have a problem where the safety cut off on the larger burner cuts the gas after a couple of minutes and won't reset. The issue does not occur on the small burner. I have tried to troubleshoot this in the past, but when we are at home the thing keeps burning non-stop. This got me thinking, we seem to have trouble when in mountainous terrain, so I thought altitude may have something to do with it. It appears that the problem occurs at somewhere around 4,000 feet and above. Am I nuts,or has this happened to any of you full timers?
-
I found a solution that is working pretty well. This adhessive film is used for covering your kitchen appliances to make them look like they are stainless steel. I can't tell for sure, but this is actually suppose to be very thin metal film. Typically when the film is applied you cut it larger than needed, then trim it to size on the surface it is applied to. I had some concerns about my skills at doing this, so I took a chance at measuring and precutting to size. Applying it already precut meant I had to make sure it was lined up correctly for the full length of the do. The results look great and the back side of the door is now protected from scratches. http://www.ezfauxdecor.com/StainlessSteelSoftMetalFilm.html
-
I have what I think to be a really stupid question. I was greasing the bearings yesterday in preperation for a trip when I noticed something clinking around in the brake drum when spinning the wheel. I removed the drum to find a single nut that seems to have served no purpose. Couldn't find anything missing a nut, so I just thought it may have fallen in their from the manufacture. Went to the other wheel and found the same thing, a loose nut that appeared to belong to nothing inside the brake drum. I would give this up as chance, but as some of you may know, this is our second axle on our Oliver. I was recalling the removal of the orginal axle when I remembered having the same thing occur with both wheels on that axle. The nut is the same size nut that holds the back of the brake mounting assembly to the axle ends. I carefully checked the entire assembly and found nothing missing a nut. Now the dumb question. Am I incredibly lucky to have an extra nut left in four diffent wheels or is this loose nut serving some kind of mistic purpose I am not aware of?
-
Riveting Fiberglass Advice - Door Prop Broken
DCKiefer replied to technomadia's topic in Mechanical & Technical Tips
There very likely is a backing plate that may not stay in place. I had to re-secure my awning brackets and got very lucky on the front braket. It was accessible with the double inner wall in the closet. I recommend trying to re-rivot the empty hole before drilling out the upper hole in the photo. -
I have considered window film, but I can't get a clear answer about whether or not it would stick to the flat finish on the bact of the mirror. I have ordered a material that has some adhesive on the back and will see how it works. It is actually something for covering your home appliances to make the look like stainless steel. I'll give it shot and post the results.
-
Not sure how many Olivers are like this, but is the back of your bathroom door grey and basically the back of the mirror? Our is and the material is prone to scratches which then affects the reflective coating of the mirror. Before ours gets to scratch up I have been trying to come up with a way to protect the back of the door. I was thinking of applying something like window film, but not sure it would stick. Any ideas appreciated.
-
Has anyone noticed that accessing the closet can be a little uncomfortable since you have to duck a little due to the lower ceiling near the door, plus negotiate the opend closet door. This is assuming your closet door opens to the left and your accessing the closed while standing inside the Oliver. Here is a solution that was not all that difficult, simply reverse the door so it opens to the right. With the door now opening to right it is so much easier to access the closet. The closet is also still relatively easy to access from the entry door step, but the main improvement is from inside. Big difference. Changing the direction of opening simply requires the removed of the screws on the rear of the door frame. You'll see these from inside the closet. Remove the frames and simply place everything 180 degrees from where it was, including the upper and lower from sections. Removing the section opposite the hing is the most difficult, but should be occomplished relativley easily. Once that pieced is removed, the upper and lower section can be removed next, the the hinged section with holds the door. The screw holes will not likely line up agian, but I simply used the orginal self tapping screws to resecure the sections.
-
Basically as you lower the jack tube, the tube will insert in to the extension I made by about two inches. Nothing to bolt on, just plug and play. I simply store the extensions in the bumper when we hook up for the road. I made them after getting into situations where I did not have enough leveler blocks. Some of the places we visit sometimes have a lack of level sights or we don't care for the ones that are more level.
-
If you have the four inch lift on your Oliver you know you loose some of the lift distance of the left and right levelers. I was looking for a way to regain that lost lift had the unfortunate event of the curb side jack failing. But, I turned a bad thing into something good. Robert sent be a replacement jack and I got to keep the broken one. From this I now have a spare motor, plus the broken jack tube. I chopped up the broken tube and made the extension shown in the picture. I simply stow the extensions when traveling and slip them under the jack tube when extending the jack. I saw a new product in Trailer Life that is for the tongue jack that I thought I might replace these with, but I think my idea is safer on slopes.
-
I have been wanting some additional outdoor lighting directed to the front and rear of the tralier. The two lights on the left and right provide great light, especially with a six led upgrade. I wanted something similar so I could have complete 360 lighting out side. I found what are basically to stainless steel boat transom light fixtures, which is what the other two outdoor lights are on the Oliver. I didn't want to put any wholes in the main shell structure some I came up with mounting one on the rear tire cover and one on the lower portion of the propane tank cover. The rear tire cover light had to be off center since it protrudes into the tire cover and need to stay within the space created by the rim on the spare tire. It little too bright to around our house, so I won't get a real good test until we are dry camping again.
-
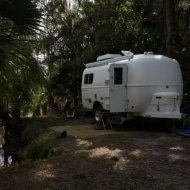
Oliver Trailer In International Publication
DCKiefer replied to DCKiefer's topic in General Discussion
The picture location is Lake Meredith National Recreation Area, just north of Amarillo, Texas. The site has a couple of areas that over look the lake. There are no facilities of any kind other than paved road and picnic tables. Very isolated even though there are towns within eye sight across the lake. There wasn't any official campground so we just parked for the night. We were the only people there on a week night and I'm not really sure how much the area we were at is even used. It was clean and look maintained even though the access to the lake from were we were looked to have dried up years ago. -
Not sure where this fits in the forum, but I wanted to share this with everyone. I subscribe to a very nice vehicle adventure magizine called Overland Journal. A couple of months ago I wrote a letter to the editor and included a picture of our Toyota FJ Cruiser with the Oliver hooked up to it. My letter and picture have been published in this year's first issue. Sorry I don't have a soft copy I can post and they don't put the full magizine online. Either way the Oliver may get some recognition in some new circles and possibly around the world.
-
AUBREY'S PLUG, a power cord cover solution
DCKiefer replied to mountainborn's topic in Ollie Modifications
Does he have any extras? Sure would like to have one. -
I'm wondering if interest in the Oliver is starting to pickup again, maybe the econimy is slowly turning around. I say this be cause I just logged in and saw that there were five guests on the forum. Most I have seen, but have noticed two or three guests regularly lately.
-
Sounds like there may be an accumulation of Olivers in Florida this winter. Are there any plans to meet up anywhere for a rally?
-
Care of the Termination Valve Handles
DCKiefer replied to allenpamela's topic in Mechanical & Technical Tips
I don't recall exactly where each of the three valve cables where tied off too, but if you look in the access area under the dinette seat near the bath and the one on the driver side rear, you may see them tied to some fixed object. The cables are black. The ties appear to force the cable into too sharp of a turn, which made it difficult to operate the valves. Release the ties allow for the widest possible turn of the cable. -
Maybe one of the modirators can tell us what the risk of loosing the forum is? If it where to happen, what would the cost of keeping it going be?
-
Care of the Termination Valve Handles
DCKiefer replied to allenpamela's topic in Mechanical & Technical Tips
Just wanted to mention that the valves on our Oliver were rather difficult to opporate at first. I then noticed they had the cables zip tied to the side and I removed the zip tie allowing the cable to go where it naturally wanted to. After that the valves operated much more freely. -
Forest Service Camping discounts shrinking
DCKiefer replied to earthdancer's topic in General Discussion
Figures, I have to wait until I'm 67 to get full social security, if it will even be there and now you took away the only other thing I was looking forward to.
