
KarenLukens
-
Posts
1,046 -
Joined
-
Last visited
-
Days Won
28
Posts posted by KarenLukens
-
-
Thanks John :)
I'm having fun myself :) Paula broke her foot, she found out today... It took her a week to get into the doctor but she got it diagnosed today... Then Karen came down with a migraine this morning, but she's doing OK.. And me? Well I actually got stopped last night and propositioned by a hooker in Florence last night... Lol. That was a first for me... I was just leaving Safeway and the next thing you know, I hear her calling me over, so I looked, she motioned and waved me over again... and then I naturally turned the car and went.... the other way as fast as I could :)
I mean in Florence! really... The girls here have all been laughing all day over that one :)
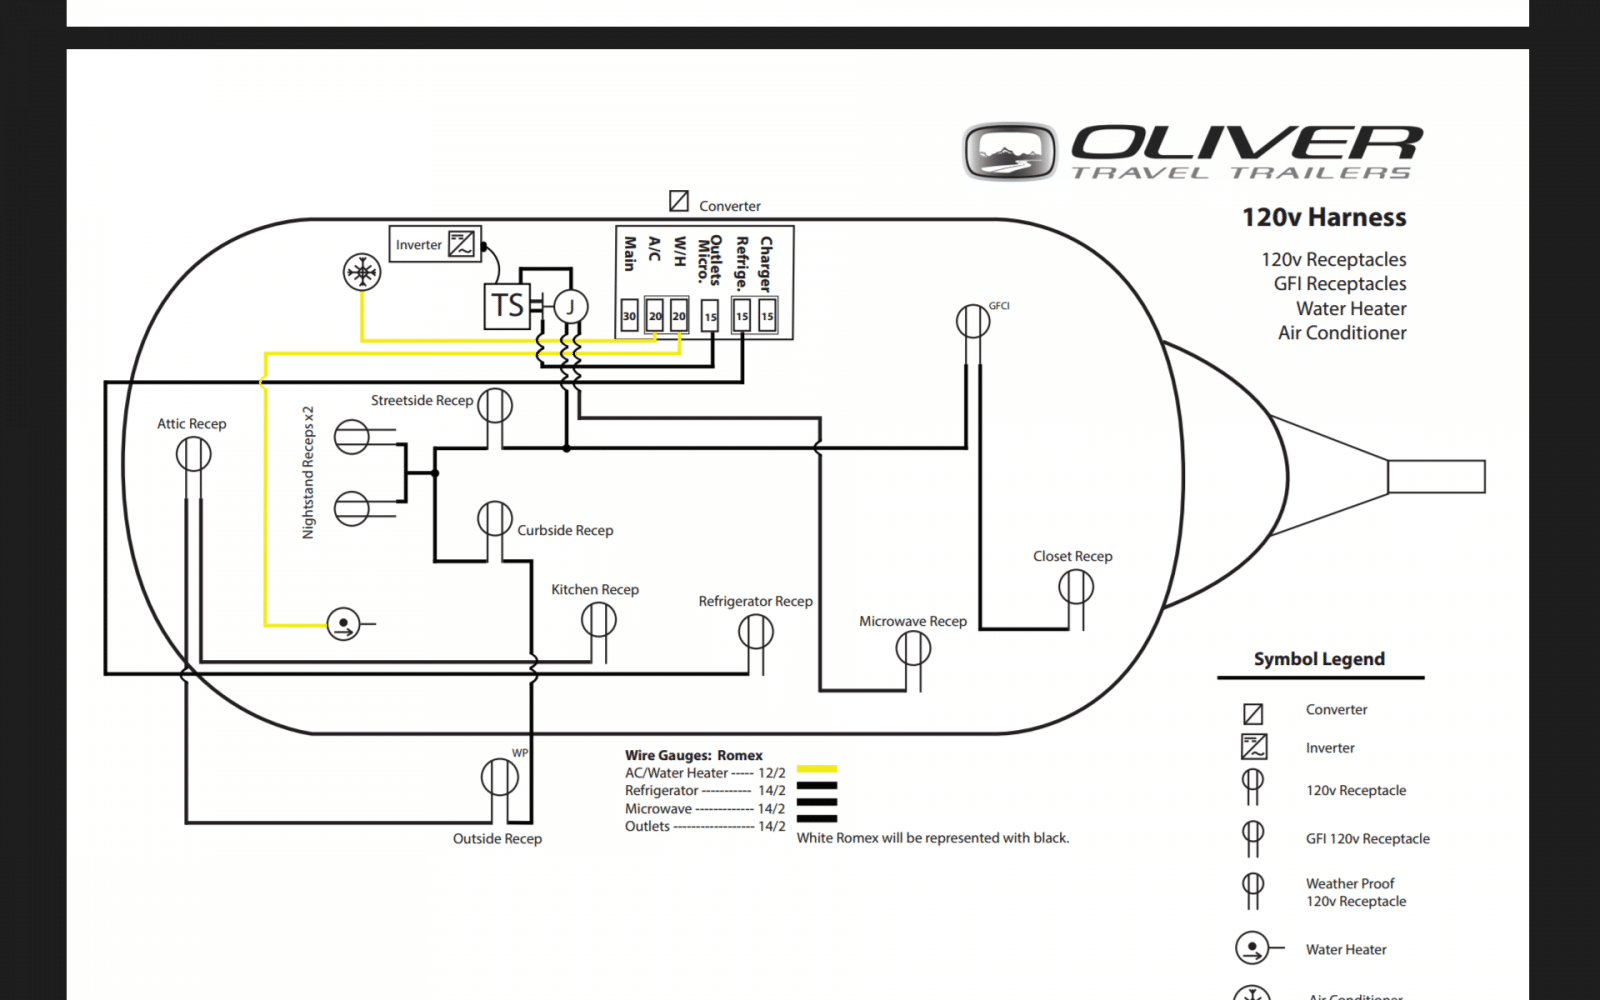
I'm thinking of putting in a double throw 120vac toggle for the AC unit so that I can simply flip it over to the inverter when I'm not running off of shore power or the generator. I should be able to run the AC off of the inverter for maybe up to 3 hours a day, I'm guessing when needed. More or less it's just an experiment, but if it works and we can run it for a couple of hours in the afternoon in full sun by itself, then it will have been worth while.
Reed
-
OK, I looked at the schematic and answered my own question... The AC isn't wired thru the inverter...
Yet :)
Has anyone wired the air conditioner thru the inverter yet? It should work fine with the Micro-Air being that the inverter has a 3000watt max surge...
Reed

-
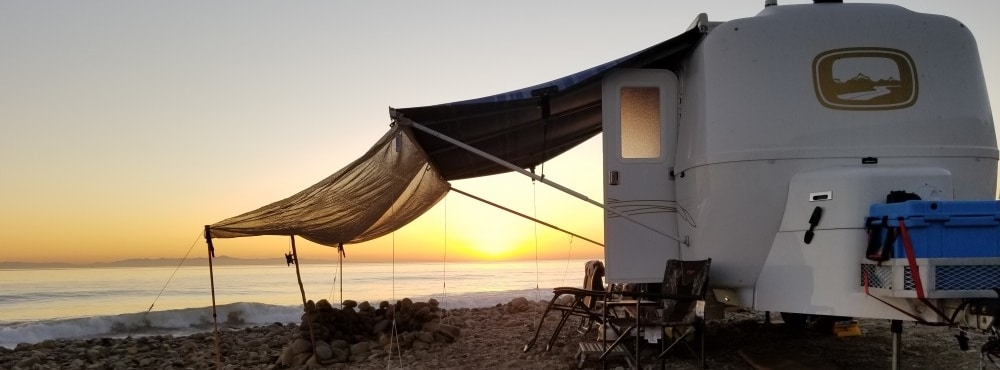
We've been here in Florence, Oregon for a week and went our for a drive yesterday while not towing for a change... Lol, I hadn't seen great mileage in a while since we've been going so many places with Goldilocks. We've been boondocking behind mom's house, out in the full sun with the highs in the mid 70°s and the Zamp has been keeping up just fine, but still this is with 14 hours of full sun every day. We're about 200 yards from the beach and having a great time :)
I tried starting the AC with the batteries today and with the Micro-Air it was a no go... I got an E7 fault and no AC with full batteries and the inverter turned on... So... I checked the owners manuals and they told me to refer to the manufacturers manual... And I didn't feel like digging it out. But anyway online, the E7 says that there's a problem with the 120vac.
Does it not run thru the inverter like everything else? Hmmm... I'll check that later when I can plug in if nobody here has an answer...
For now it's back to having fun :)
Reed
-
That looks like fun :)
What's up with your awning? The front right side looks loose. After you crank it out all the way, put the center bar in and push out on the 2 pieces while tightening it into place against the main bar. Pulling in on it flexes the main bar in and allows the canvas to flex in the wind more also, allowing it to act like a sail. Then when the bars are all set, crank it in just enough to pull the canvas tight and this will help protect it if you get hit with a big gust of wind :)
Reed
-
We use ours daily but we also have the thicker cushions and I store the back cushion under the seat with the tank flush valve in it. It's really comfortable to sit at but the table is too short so Karen wants me to make a new table. That's on the list and I want to make it long enough to just clear the fridge door when it's fully opened and have the extra piece be able to completely fold under and lock in place up and out of the way when traveling. Or I may just put in a space saver pull up table like this one below but made to fit our way.
-
Hi Sherry :)
The Sprinter wasn't comfortable to sit in for long periods because it sits you up totally straight, where I prefer a small tilt in my seat for comfort. Then my knee's were hitting the dash and the stick shift, knocking it out of gear too many times on our test drive. You just can't beat an SUV for comforting the old bones...
-
 1
1
-
-
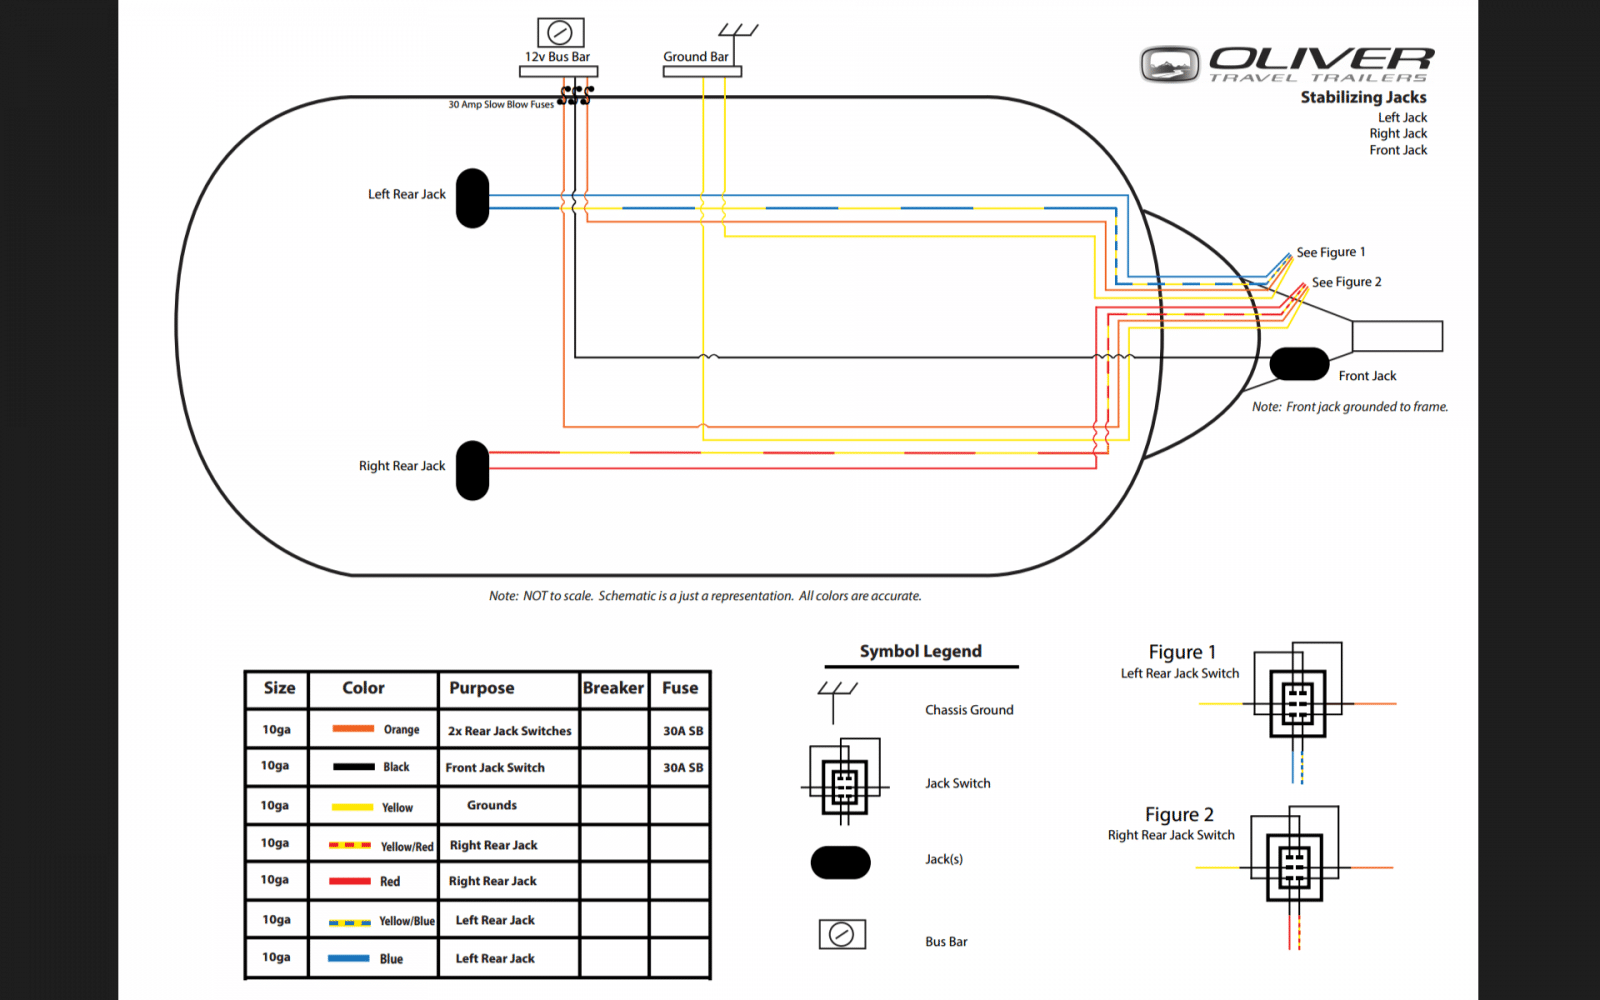
You can run the jumper from the right rear jack, that would be easy enough anyway.
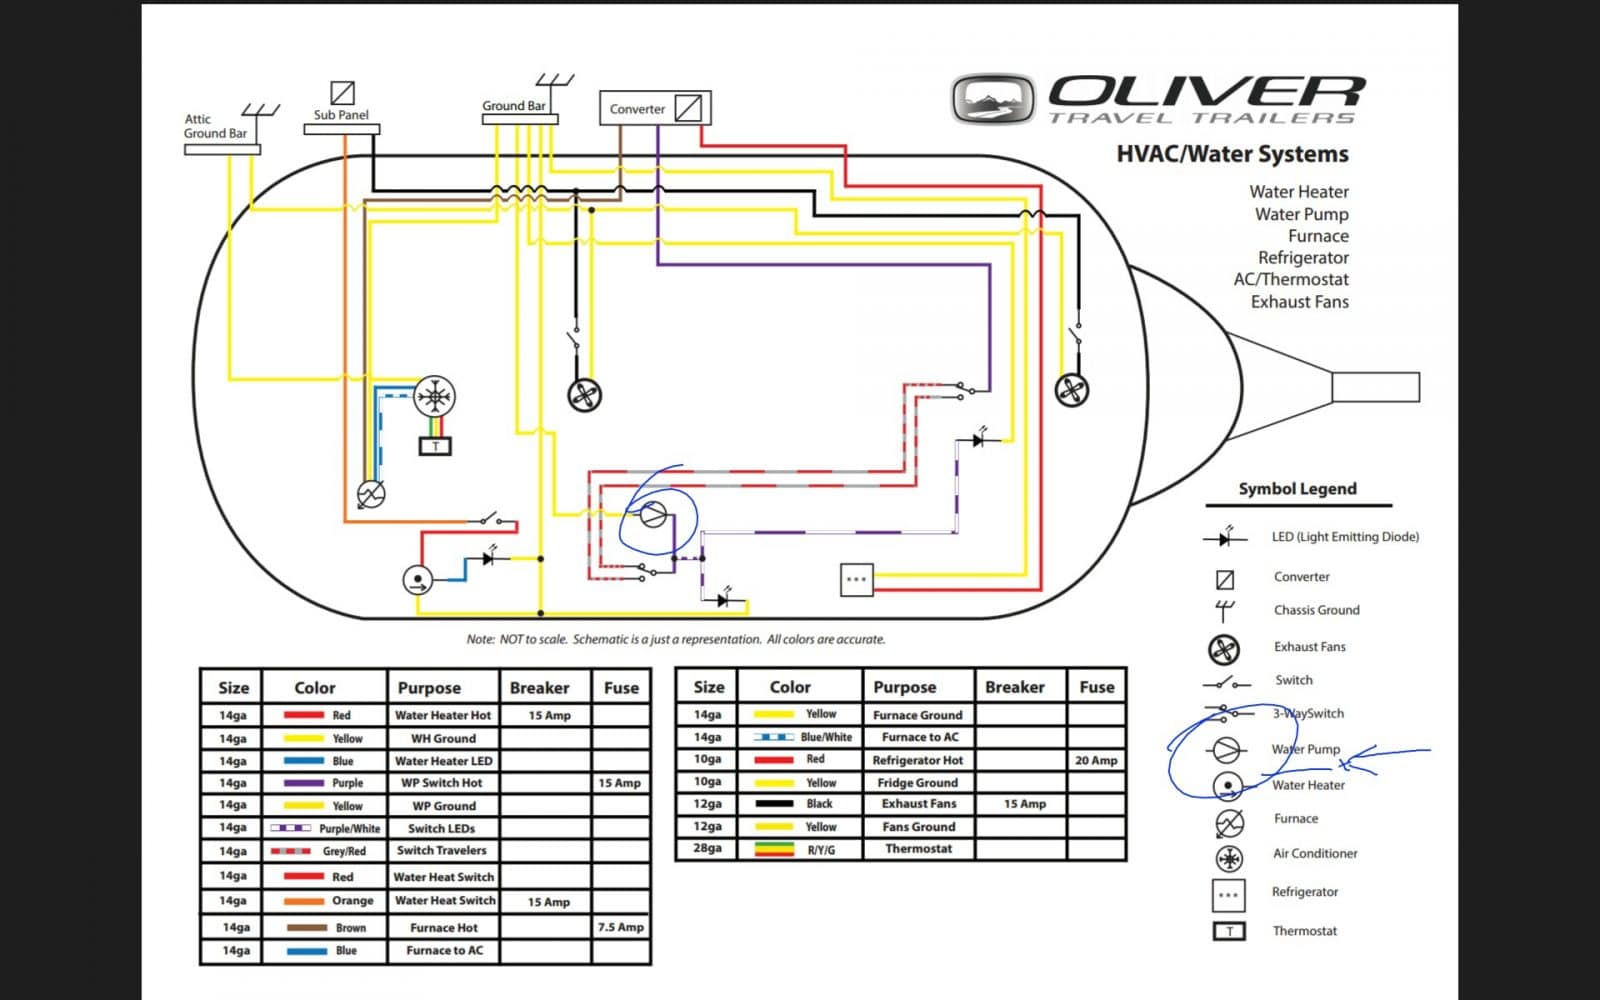
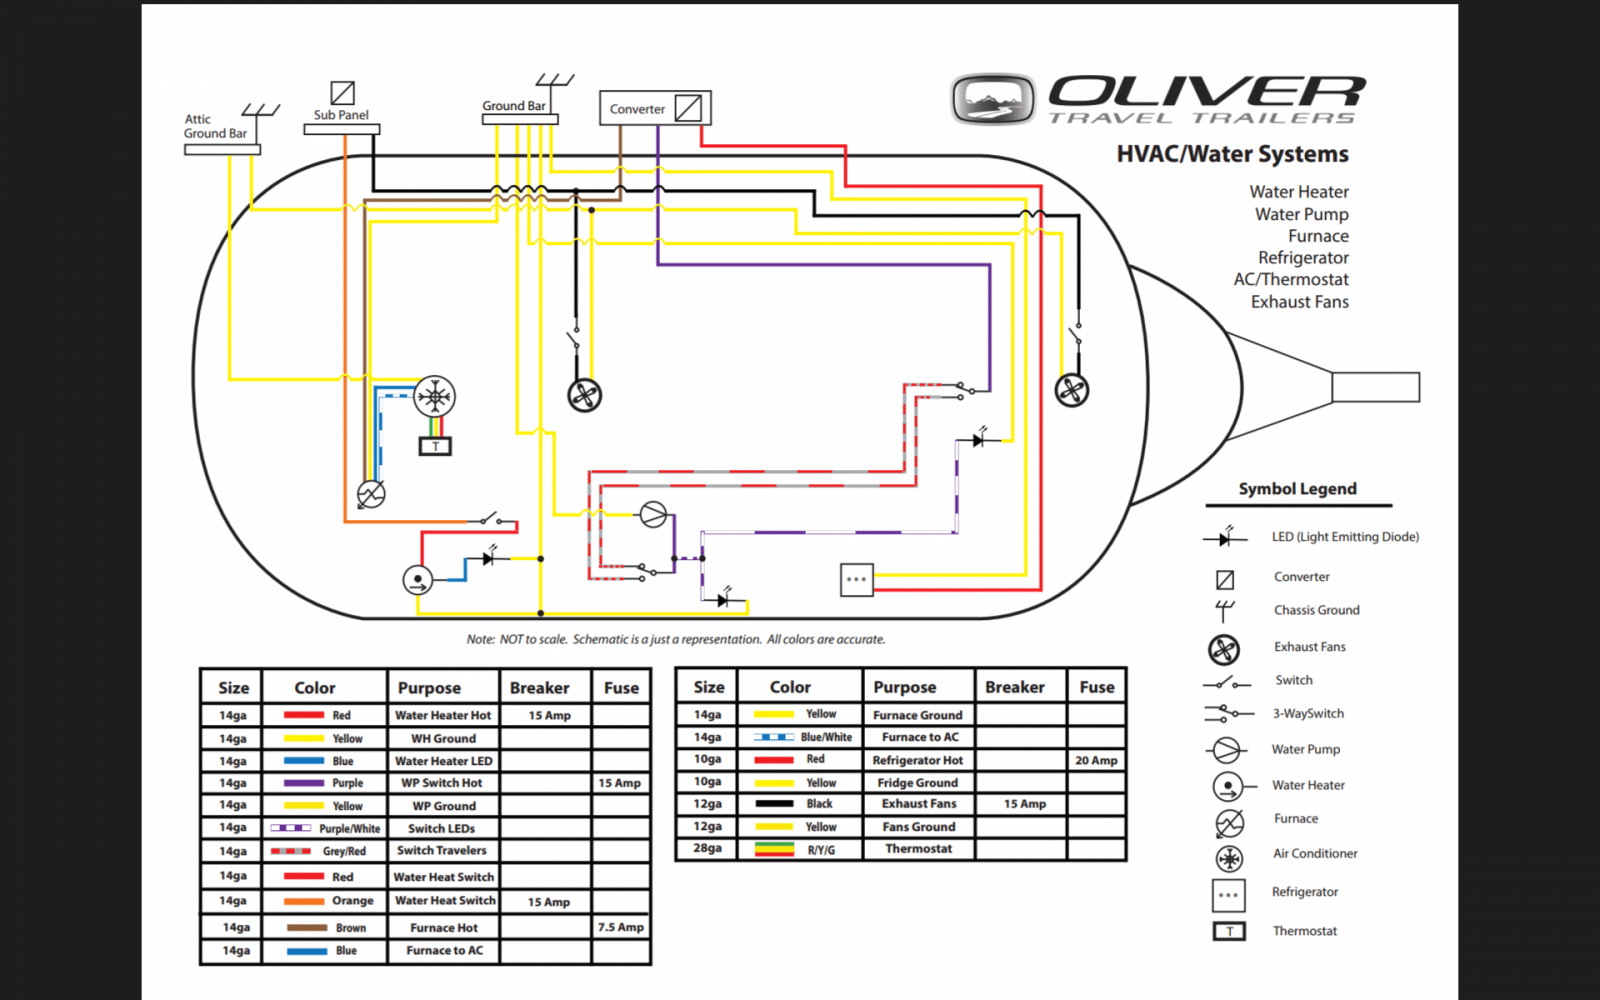
Then below shows you the pump circled in blue but these are the 2017 schematics
And once again without the Blue marks
You can see from the schematic that if the broken line is one of the 3way switch lines, that it will take some work to trace it and replace it, but it can be done most likely with a second person to help feel the wire tension. Ours is all ran in plastic Flex conduit which makes it pretty easy... Sometimes...but if you locate one wire, then you can just pull 2 wires with it to just replace both. Or... You can forget the bathroom switch for now if you find those 2 lines are where the problem is because the main power goes from the converter straight to the bathroom 3way switch that you see in purple. So if any of those 3 lines are broken, it's going to be a pain. You could pull the bathroom switch and then connect the 3 lines together there and that will show you which of the 3 is broken. If there's no power at all then it's the purple line from the bathroom to the converter.
Reed
-
2
-
-
Look for access behind the batteries first and cut back there if needed. I'm thinking on an Elite II anyway. You should run a 12vdc jumper to the pump to make sure it works, then see if you can get it working or rewired up to the switch above the stove, while bypassing the one in the bathroom. Or if the pump works, you can run a temporary switch straight up from the pump.
Do you have an Elite or Elite II?
-
Video #1 :)
-
1
-
-
I'm resurrecting your older thread Dave since now the problem has been resolved :)
Reed
Pick up tube installation videos -
-
2
-
-
You know the old saying, "A happy wife makes for a happy life.".. Well our lives have really changed here since the water tank has been fixed, and I didn't realize the amount of pressure that I felt I was under to get it fixed until yesterday... The doom and gloom feeling of having more work to do on Goldilocks is gone :)
You were right Raspy :) getting it over & done with has sure made a difference around here along with the nice phone call that we had with Scott Oliver. Having every major problem completely fixed now has brought smiles back to both of our faces. Yes, we still have some small issues that we are working with, but those are simply manufacturers defects and not Olivers. Today I actually felt like filming again and I finished the first movie in my series on the 2017 Legacy Elite II. I started filming the first episode back in May and then just mothballed it. Then last night I finished it and edited it. So this afternoon we will have another movie out... the first in our series that has been in the works since we picked up Goldilocks back in February. Life is good! and peace has returned to our household once again :)
Reed
-
We made it to Florence, OR with our friend Paula and I ended up setting up on extremely unlevel ground on top of loose gravel to make room for the 2 trailers. To date, this is my most extreme set up with the Blaylock or Anderson style of leveling systems. First I put the 2x6 under the Blaylock ramp and it just spun my tires trying to get it on. So then I ramped it with 3/4" plywood onto the 2x6 with the Blaylock on top to get it to go up, and that worked fine. So the Blaylock is up around 7", then with it on top of the 2x6 makes it around 8-1/2" and then I had to unhook the trailer from the car... With it being so high on the one side, I didn't want to just raise the tongue giving the trailer a chance to shift, so I put blocks and boards under the rear jack and raised the street side high enough to add the 3 high stack under the rear tire and then set that side back down to where that tire was sitting firm on the blocks. Then I went around and blocked the other side with the rest of the 10 stack or 6 blocks and also used plywood under both the right rear and the tongue. To keep the trailer from shifting at all, I then raised the trailer off of the ball using the 3 jacks to hold it steady while lifting the trailer into the air off of the car and it worked fine. None of the jacks struggled at all holding most of the weight of the trailer in the air with the tires still blocked up. After moving the car out of the way, I lowered everything back down and finished leveling and setting up, so all's well that ends well :)
Reed
-
It's on here :)
-
1
-
-
Here's the installation videos
Part 1 -
Part 2 -
-
5
-
-
I talked to Scott Oliver today about this and everything else and they are anxiously waiting to see what we did. I finished editing the movie tonight and it will be uploaded in a couple of days for everyone to check out. They want to compare our fix to theirs and I made a few recommendations on other things as well. It was a good conversation and they want to have everything perfect just like we do.
I also talked with him about the Zamp switcheroo and he is checking into the real reason behind that also. There's definitely a wall up between owners and some of the staff because he had only heard of one other owner that had mentioned the tank issue and that wasn't Dave... So I think that we are seeing some changes for the good. At least it seemed that way. Scott said that they listen to and also read our input and they had already implemented the sewer drain fix that I did to mine into the new trailers, I was surprised to say the least and he came off as genuinely caring to me, not just blowing smoke :)
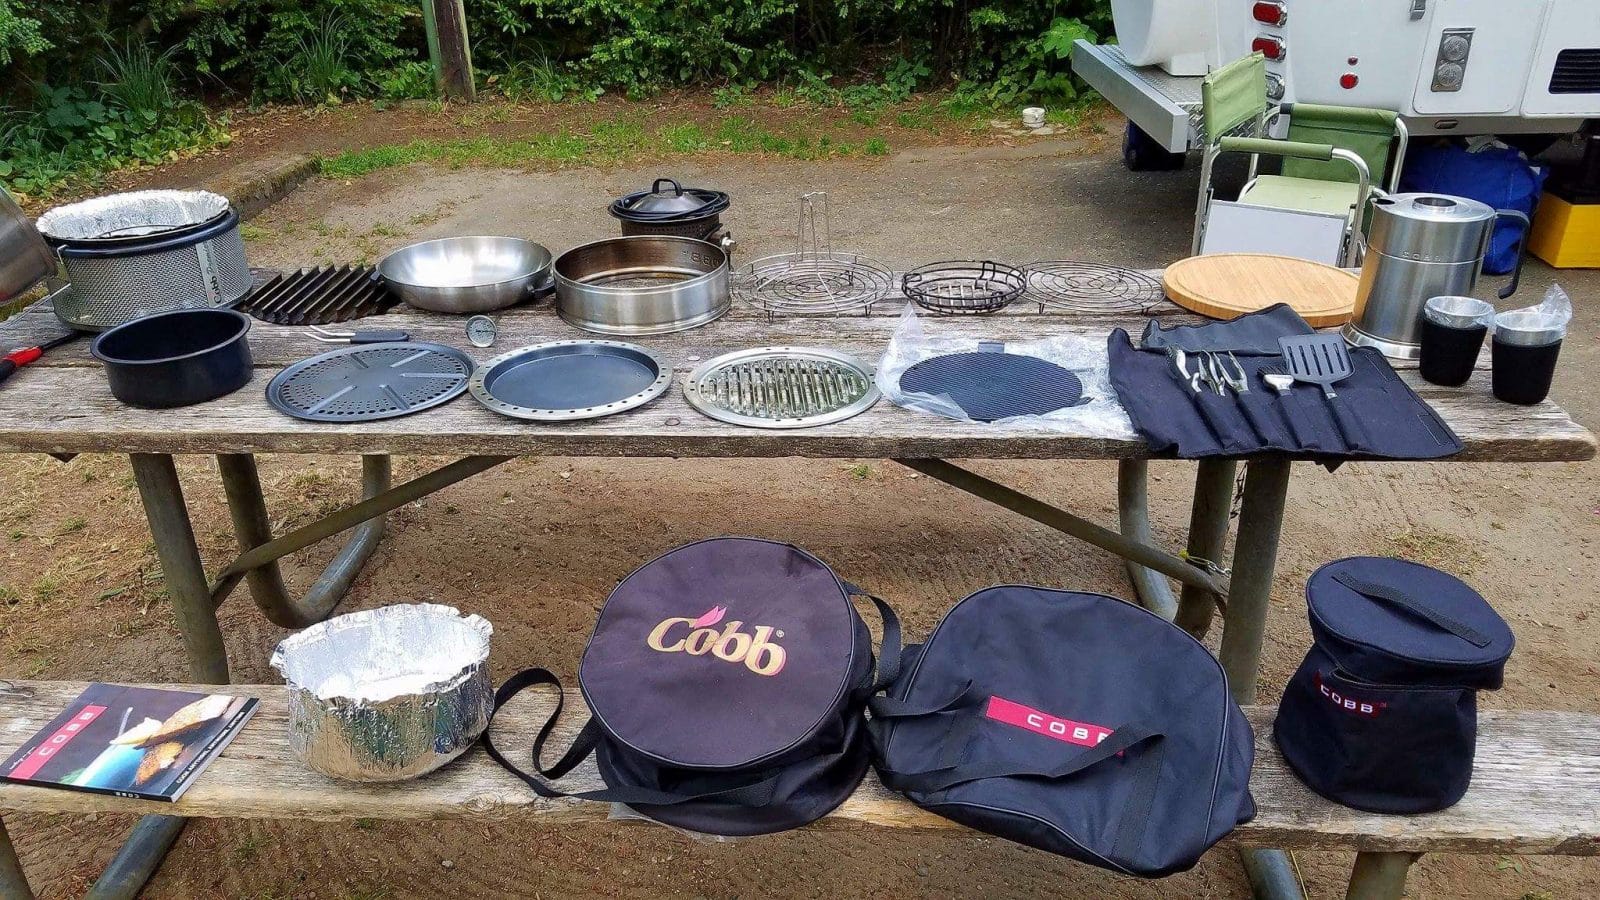
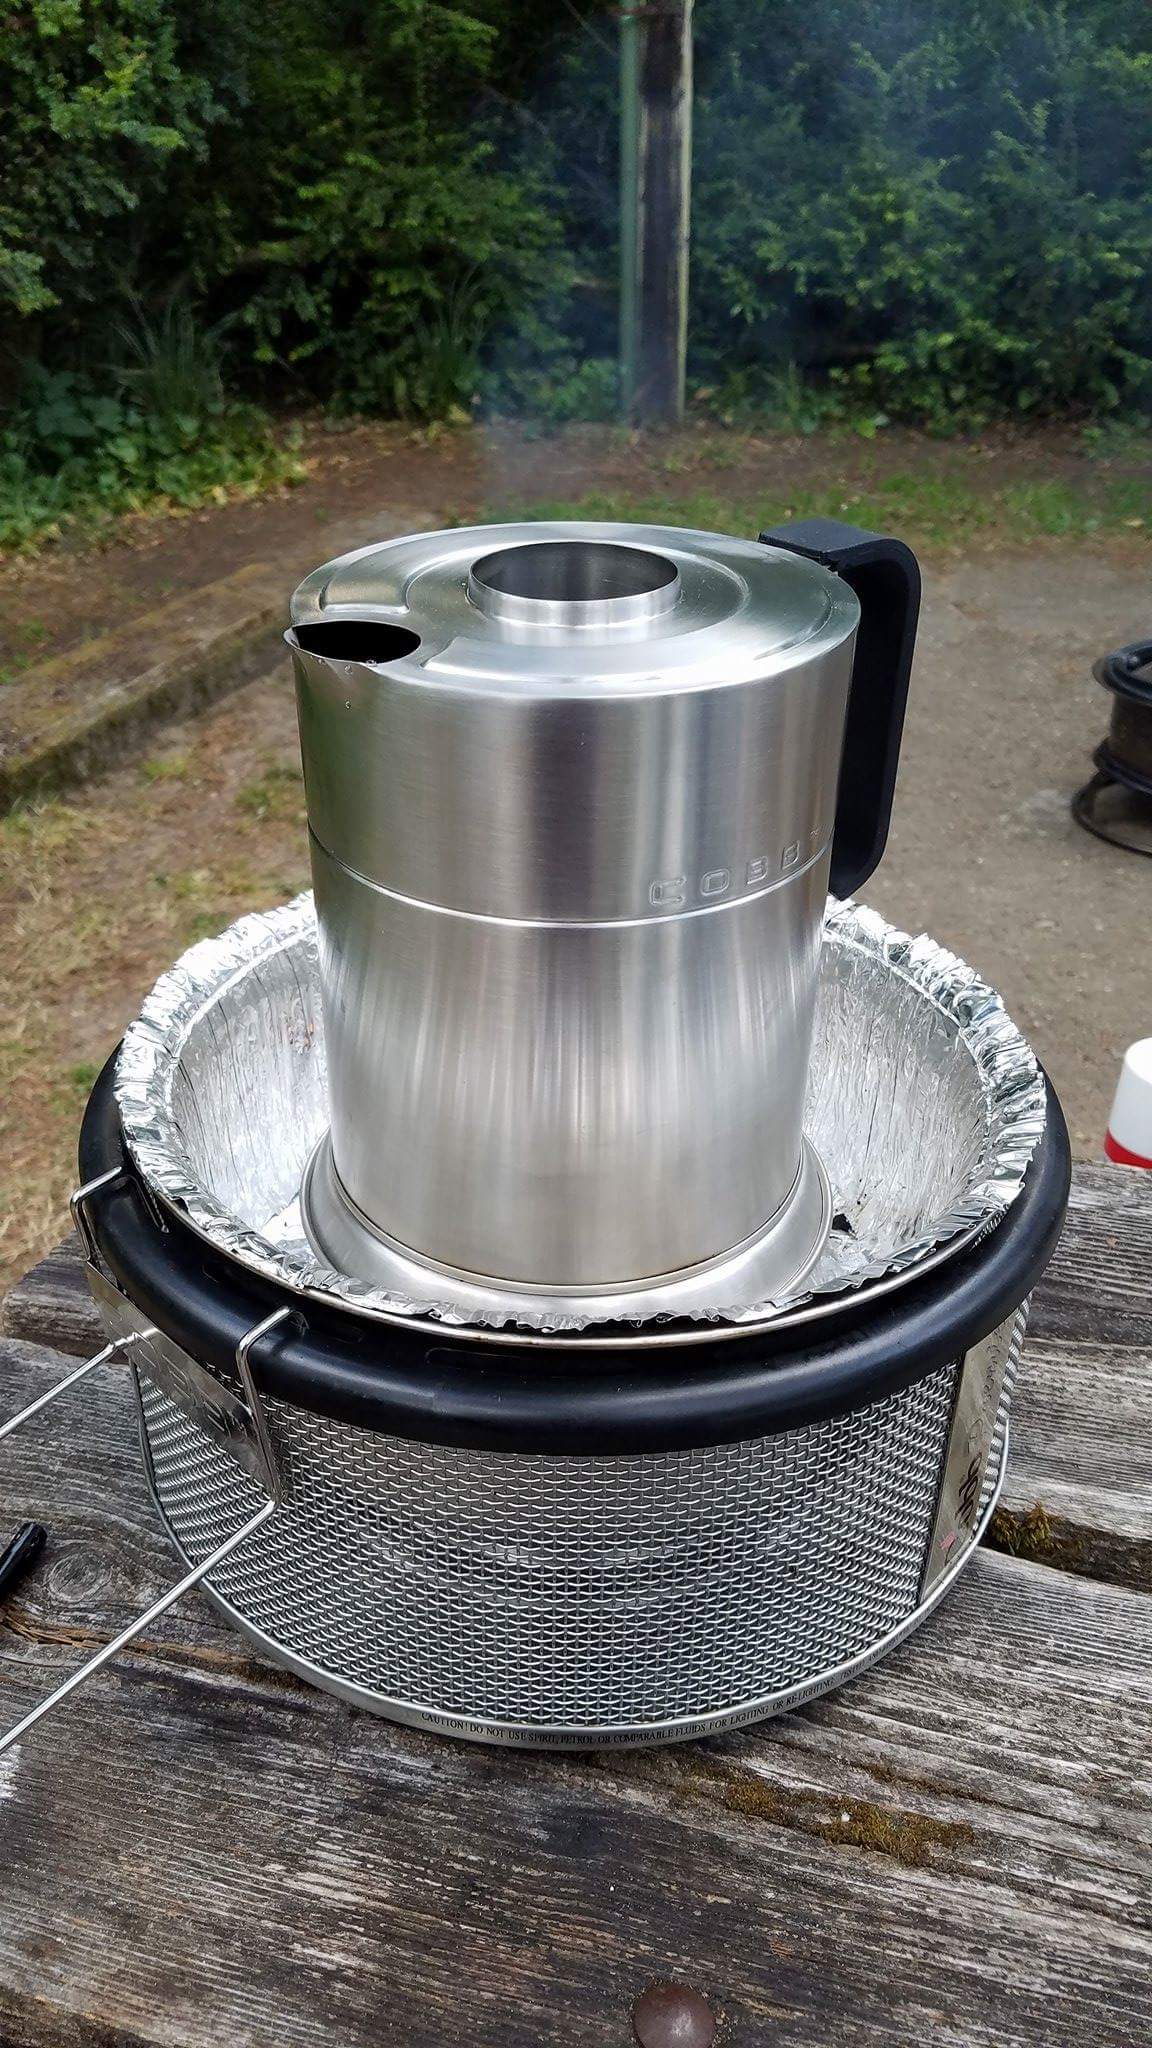
Karen broke out the Cobb tonight and we bbqed once again :)
Reed
-
2
-
-
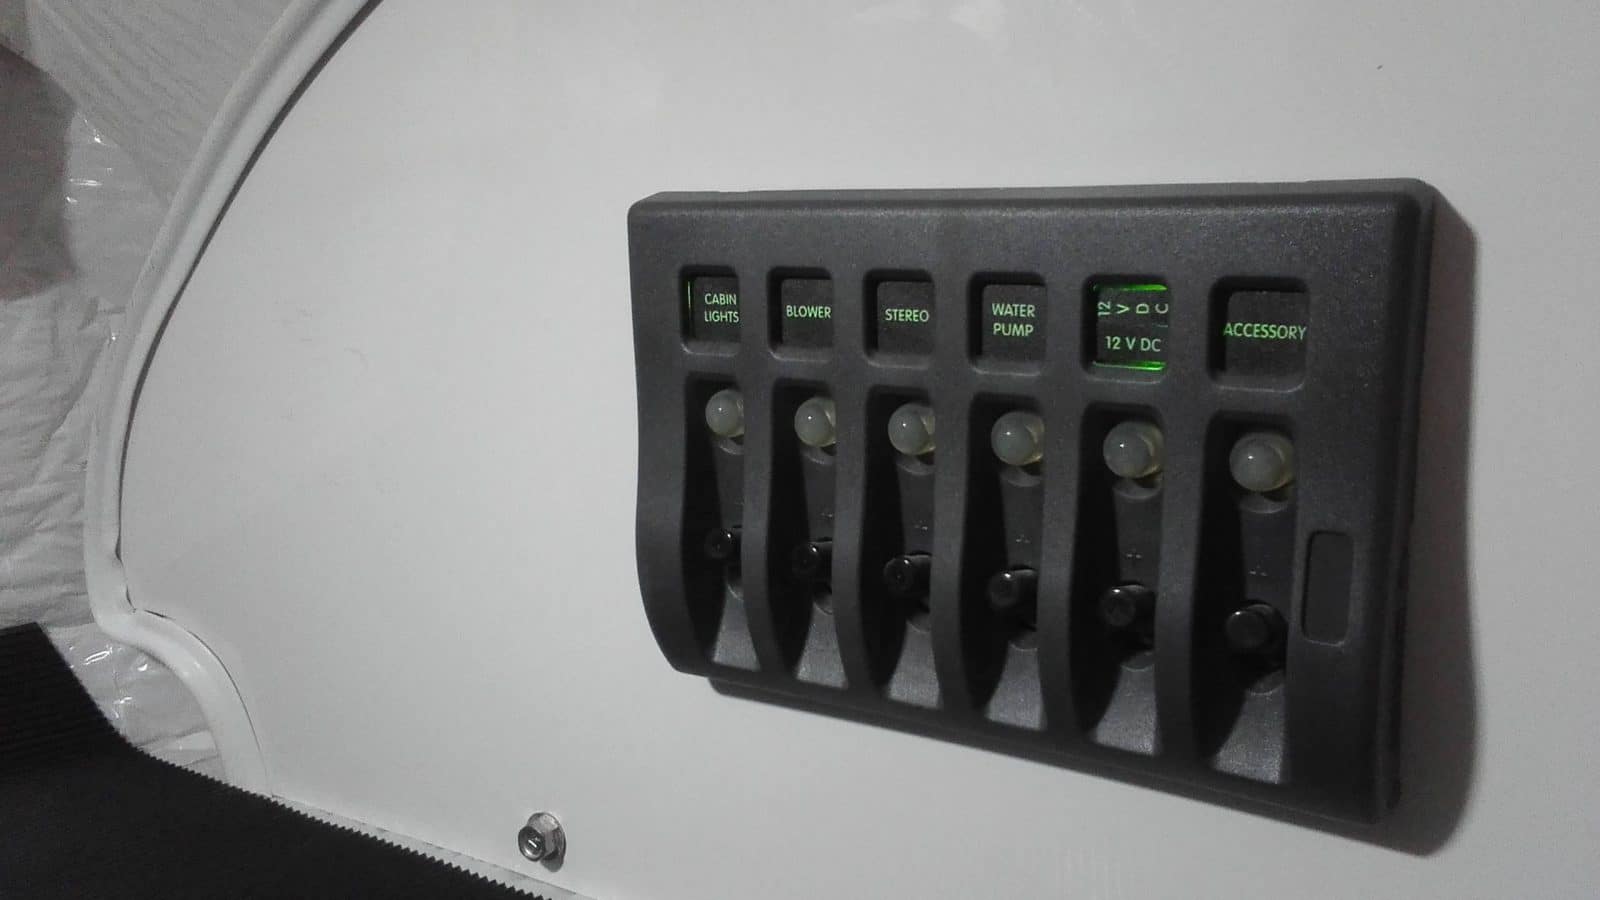
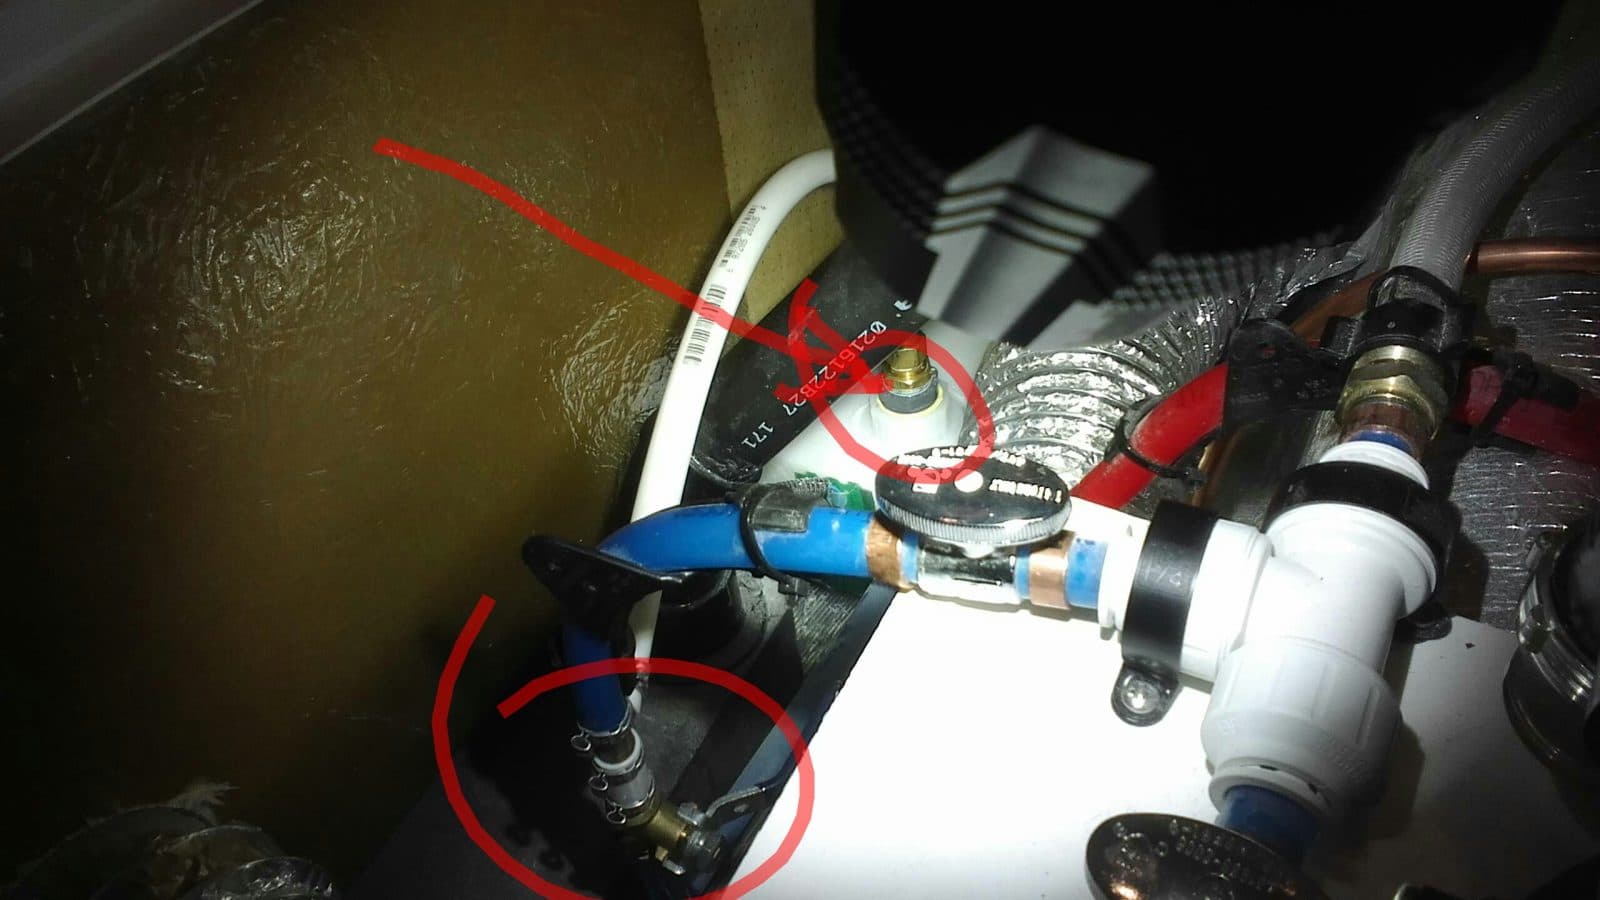
Here's a pic of the new panel in the rear storage
-
One other thing that John noticed was that the water spin weld fitting that was put in at the factory or by the manufacturer of my tank is about an inch off of the bottom; where on his 2015 Elite II it's approximately 1/2" or as close to the bottom as is practical. So things definitely changed this year. Where it was not as much of an issue in previous years, the 2017 models have really opened a few new doors with all of the changes that were made in the last 8 months or so.
The good thing is that the water tank doesn't need to be an issue for anyone ever again. We are heading up to Karen's mom's house tomorrow and I will be able to upload the installation videos with her internet. There's going to be 2 short videos on the complete installation, the first being the prep up to and including the spin weld. We also had a small shop vac with a 3/4" hose taped to the vacuum line to clean all of the plastic shavings out of the tank. I had my tank almost completely dry before installation by putting a stack of blocks under the tongue jack and raising it up to around 20° from level. I let the pump suck as much water out as it could being that we are in a park right now, then opened the drain valve and got the rest of the water out. I also had the trailer tilted just a touch to the curb side so that everything would flow to the corner where the pipes are. Then after it was drained as much as possible, I took the tongue jack back down to a little below level with the nose down to keep what little water was left in the tank up in the front of the water tank and away from the work area.
Reed
-
Here's a pic of the plug that we pulled out of the tank. Notice the difference in thickness, it's about 3/16ths on the thin side and almost 5/16" on the thick side that was towards the wall.
-
The Rally ends today John, Raspy is thinking along the same lines and they headed out this morning. Give me a week to let things materialize, I will be calling the Oliver's tomorrow hopefully. Raspy says he will put a complete kit together for each person that wants to do it themselves if Oliver comes on board of doing the tank fix our way. My take on it is, we fixed the problem and made a complete installation video. I just need to finish editing it and then we're heading up to moms in a few days where I can use her internet to upload the complete movie for everyone to look at.
Reed
-
1
-
-
:) Now that was funny Randy :)
I'm putting together the whole water tank mod video but it's too big to upload from my tablet so here is the quicky video of the spin weld itself that we did Friday afternoon. You turn on the router watch the plastic melt and form, then shut off the router, done!
Reed
-
1
-
-
I started editing the video tonight and I will make one of the spin weld itself also, it really was way too simple :)
Today we had probably 40 people come over and go thru and ask questions about our Oliver. Karen is really happy now that the water issue is fixed and she was right back in her element today happily answering all of the questions about the inside of the trailer, while I had a crowd of guys around the outside going thru everything about the sewer set up and storage, the 4 batteries, the Trojan Hydrolink system, the Blaylock Ez-Leveler, the Dexter Easy Flex, the back up camera and back up lights, the Truma AquaGo water heater, my tool box and outside shower and last but not least, the Zamp solar that I will be changing out soon. It was a good day :) My only issue is that we have now been plugged in to a normal 30amp service for 4 days and I'm still watching the Zamp system struggle thru out the day to switch over to float mode. It sits between 13.3 - 13.6 with the batteries plugged in and fully charged,yet never goes into float... So I'm thinking that the Zamp system may have some other issues going on. I've seen it hit 14.1vdc once in the last few days in full sun and it has not kicked over to float at all that I have seen... The panels are spotlessly clean along with the rest of the trailer and car, so that's not the problem. Open house in our loop was from 1pm to 3pm and we had people here at our trailer until around 4pm, so it was a full afternoon and a great showing and this morning I pulled open the grey water drain valve, went in and took my first Endless Shower in a long time with full hook ups. I was in there Ooing and Aawing for half an hour with super hot water flowing at 62psi the whole time. I do love my Valtera adjustable water pressure regulator. The pump itself it set at 55psi, so I kick it up just a touch myself to 62psi because the pex lines are rated up to 130psi, so it makes for a killer shower with the Truma AquaGo :)
Reed
-
If you spin weld a fitting and mess it up, could you cut it off flush with its base, redrill the big hole and spin weld a replacement directly on top? Would the heat re-weld the old flange as well as the new? I am thinking about screw-ups and alternatives to replacing the entire tank! Keep up your great posts, I usually find them very interesting and informative. Thanks, John Davies Spokane WA
Yes, you can cut it off, then level it top and bottom or inside as best you can, drill your new hole and spin weld a new piece in. But you won't have a problem John being the tank varies from 3/16" to 1/4" thick on the outer edge of mine; with the 1" spin weld fitting being 1/8" thick. You simply hold it in place with the router, turn it on, watch the bead melt around and then turn it off and hold it in place for a few seconds after the weld is complete. You turn it on, watch it spin, then smoke and melt around the edge like a normal weld, then stop. It only took about 1-1/2 seconds to complete the spin weld. Then you hold it in place to let it set up and cool for a few seconds and that's it. Once the melted bead completes it's circle in less then 2 seconds on this one, you're done. We then let it sit and cool after removing the router for about 10 minutes while we cut the line from the pump infeed just below the 90° and installed a ball valve and a tee above it for the new pex line to the dip tube. We used a 1" pipe spin weld fitting on mine because I do want to eventually put in a gravity feed water filling system. Raspy used 3/4" on his but after putting in my 1"fitting, it really is a much stronger and more stable fitting then the 3/4" pipe by far. You've got to figure it's 4x stronger at least. Everything went perfect with mine and now it starts drawing air at 6% when level and continues to pull water until it runs out a few minutes later. Problem Solved!
Reed
-
Or if she needs it now, have the son in law run a jumper wire to any hot 12vdc wire and then just leave it on for her. As far as smacking the pump, personally I've tapped the side with a crescent wrench once to start it in my old motorhome.
-
1
-
-
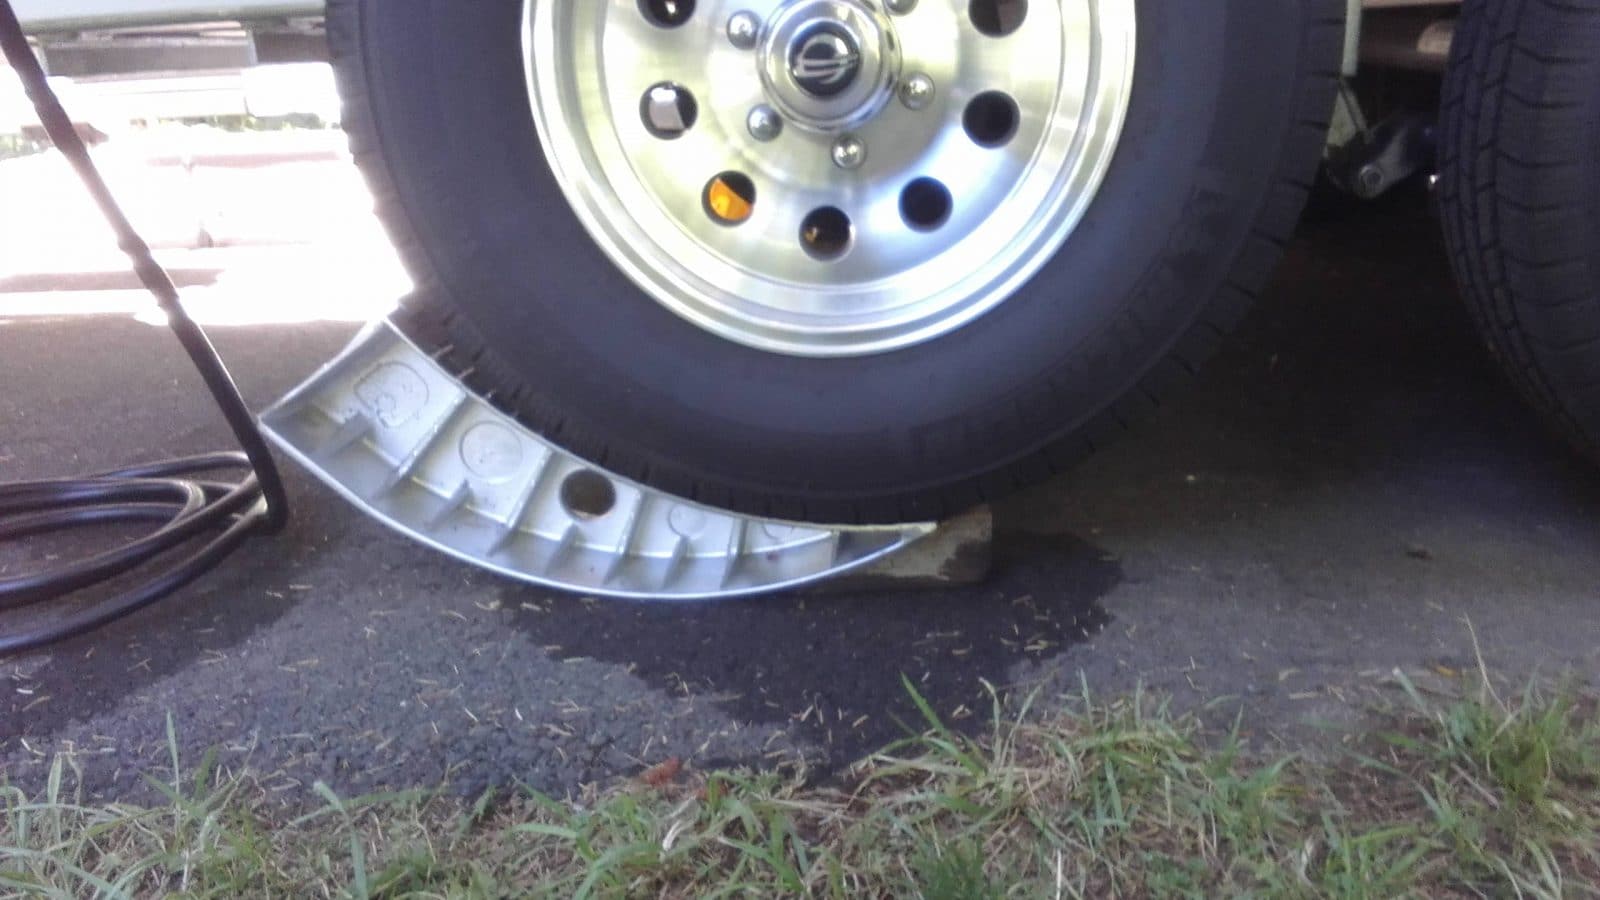
9 weeks later.... And we are plugged in at Bullards Beach Campground in Oregon for the first time since May 26th at the annual Bandon Fiberglass RV Rally. So we boondocked for 9 weeks and all is well :) We used the Blaylock leveler that we bought from John Davies for the first time and it works fine just like our Anderson Leveler did. I always carry a couple of wedges that I cut out of a 4x4 and I drove one in with my rubber mallet under the Blaylock to hold everything in place and it's incredibly stable.
It stores behind my seat easy enough just like the Anderson, but personally, I like it a lot better because it's not plastic... Our Anderson chipped when we drove off of it one time and this one fits just right under the tire. I've never tried it without blocking the other side because, the Anderson rolled a bit and this one is no different, so... I'm still using my wedges like always :)
Tomorrow is another big day at the Rally, the day everyone comes to see the trailers. And we have 2 Ollie's here, Raspy's Twin bed Legacy Elite II and our King bed. We've both had a ton of people asking questions already... As usual with the Oliver's :)
Today, Karen gave a Cobb grill presentation to about 20 people and then she had an adult coloring class in the afternoon, while John came over an installed his water tank fix for us. The spin welding was incredibly easy and everything went perfect. So now we have that fixed, Jason sent out another box of parts for some other fixes, and now we are ready to call Scott Oliver :) They called us today but we were right in the middle of the spin weld so the phone stayed across the room and we've all been leaving messages for each other with the time difference having its usual affect... You can see the new fitting along with the new valve, and I videoed the whole thing, so that should be up in a few days :)
Reed
-
2
-


Reed & Karen's Blog -
in Submit Your Story
Posted
Here's better pictures, if you need more just ask or you can download the 2016 & 2017 owners manual pdf's off of the Facebook page under the files section.