

hobo
-
Posts
370 -
Joined
-
Last visited
-
Days Won
4
Posts posted by hobo
-
-
9 minutes ago, Frank C said:
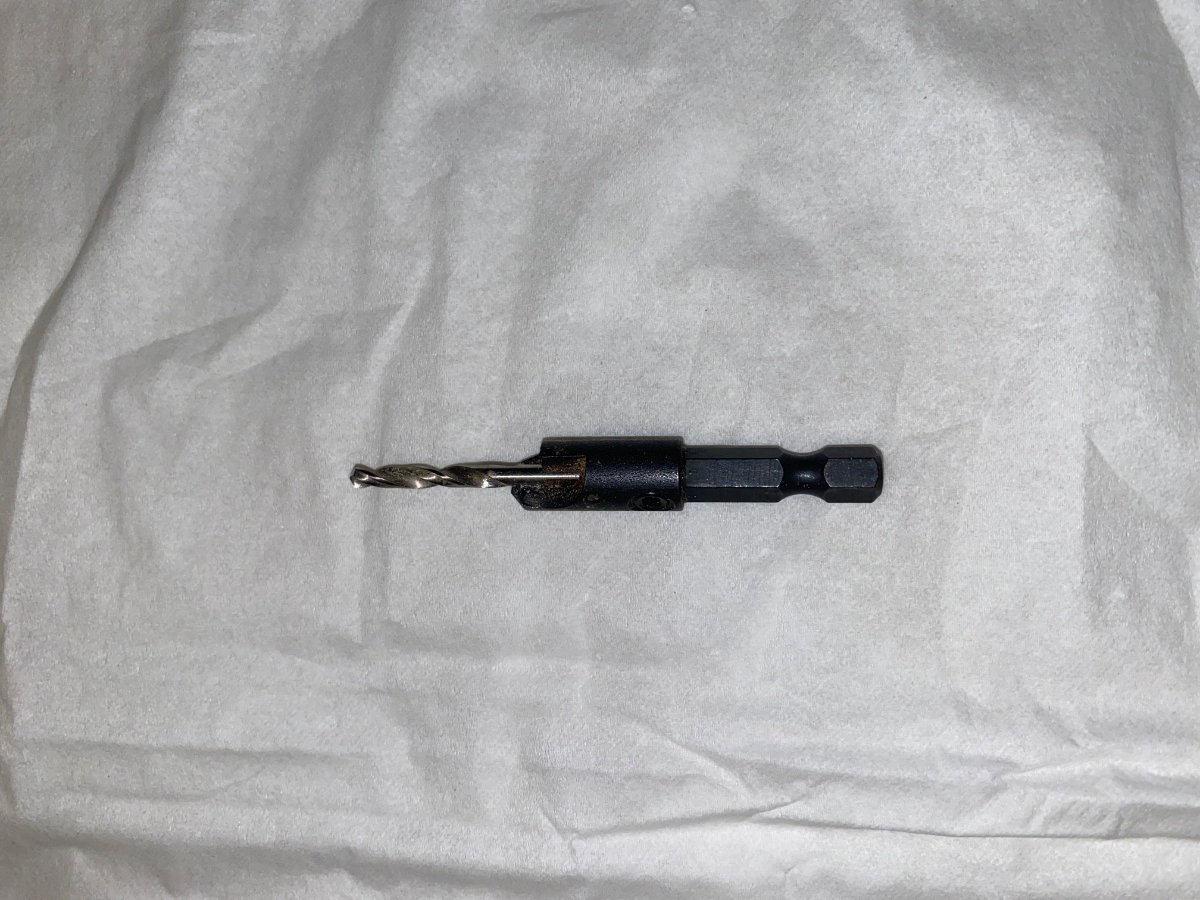
Here’s a picture of the type of countersinking bit I used first on the fiberglass to clean up/chamfer the gel coat surface. This one has a small enough diameter drill bit (1/8”) to fit through the original hole, so only the chamfered section of the bit touched the fiberglass to create the chamfered edge on the gel coat layer. Then after chamfering I used a 1/4” bit to open up the clearance hole through the fiberglass.

Thanks for the pic. Perfect.
-
 2
2
-
-
I will attest to the fact that when replacing the glass, you might as well resign yourself to the fact that you'll probably end up replacing at least the inside frame.
The inside frame is where the female tab (two serrated wings which ride over the square male post) are located. Regardless of how careful you are using the provided spreader clips, invariably, several of the wings will break off. In my case, six of them broke.
I am not replacing the outside frame as new caulking is provided with the Zarcor kit and the outside frame is undamaged when separating the two halfs.
If you don't want to mess with dealing with Lippert (window manufacturer), Zarcor has the frames in stock. I paid about $23 for the inside frame.
If I were to do this again, I'd go ahead and order the inside frame moulding when I ordered the window. My guess is you could return it if you didn't need it. At least you'd have the part in hand if you did break some of the tabs thus finishing the project in relatively short order vice having to stop and order another piece.
-
 1
1
-
2
-
-
2 minutes ago, Frank C said:
Countersinking/chamfering bits are available at any hardware store (Lowe's, etc.). And yes, holes were chamfered with the countersinking bit before enlarging the hole diameter (see photos in original post for sequence of steps).
Thanks.
-
On 8/17/2022 at 5:00 PM, Frank C said:
Link is in the original post.
Frank, What bit did you use to chamfer the holes in the fiberglass? Also, I assume you did that step before you enlarged the hole to 1/4"?
-
9 hours ago, dhaig said:
Based on the posting by @hobo, I contacted John Halter, Owner of Zarcor. We have scheduled installation of a Zarcor window on our 2022 LEII, Hull #990 in August 31. John is sending me paperwork for the free window and installation.
Following the installation, I plan to post an update with photos, and possibly video of the installation.
My thanks to @hobo for providing the information on this opportunity.
Don
Looking forward to seeing the install video. Glad I could pass on John's generous offer. Win/win for everyone. HOBO
-
1
-
-
11 minutes ago, John Dehne said:
This will definitely be my next minor upgrade. Looking forward to seeing outside the door window. Now do I choose clear or tinted? I’m thinking tinted with white blinds. Is there a one way mirror glass available?
We're installing a tinted with white blinds. I'll let you know how it turns out.
-
3
-
-
I was talking to John (owner of ZARCOR) today with a technical question and he advised me they are looking for someone in the Dallas, TX area with a late model (2021 or newer) Oliver Elite so they can install and film one of their very nice door replacement windows.
They will provide the parts and labor free-of-charge for use of the trailer to do the installation video.
Here's an opportunity for a free upgraded window and your trailer will be a star.
Call John at ZARCOR and tell him I sent you over.
Paul
-
3
-
 2
2
-
-
I believe at the rally demo, it was suggested to keep a check valve in the repair kit too. I just don't remember what size.
-
1
-
2
-
-
7 hours ago, Foy_Mirna said:
As many of you know I am raising my prices as my costs have increased significantly over the last 3 months. If you ordered before today you are grandfathered in at the old pricing. Link to PDF Catalog: https://drive.google.com/file/d/17XFL_5ine1WusHVKYguUBRmkj2KnJUN_/view?usp=sharing
Yeah, yeah, yeah: it's to pay for that new Georgia mansion. We know what's going on. (love you guys). 2 HOBOS
-
2
-
 1
1
-
-
I'd be looking at a Nordic Tug 26 or a Sargo 25 or 28. Especially if I lived on the west coast.
-
On 7/25/2022 at 8:09 AM, ScottyGS said:Sounds Like Cigars and Cognac at the Next Oliver Rally! Can't wait.
OK, so when my wife asks me where the "burning old socks" smell is coming from, I'll have an answer.
-
 1
1
-
-
John, Following your findings and installation as well. Very interested in this product but your insight will be particularly helpful as you are the latest test case and you'll certainly find "better" ways to do it. That's just the "John Davies" touch we've come to expect.
-
1
-
1
-
-
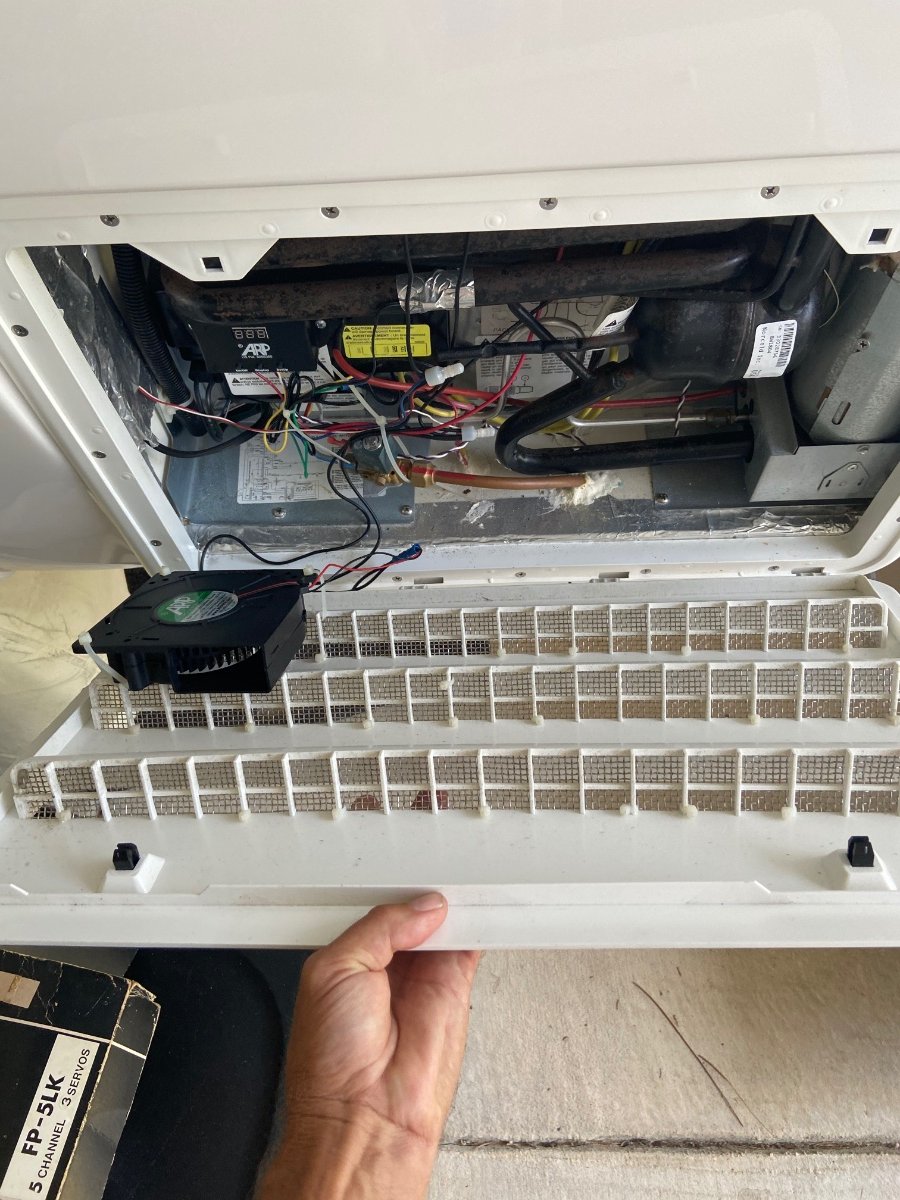
13 hours ago, C&MCurrie said:
The fans are not weather proof as far as I know. However, I have not seen a significant amount of water entering through the frig vents while traveling in rainy weather. When washing the trailer I try to be careful with hose and not direct water upward into the vents.
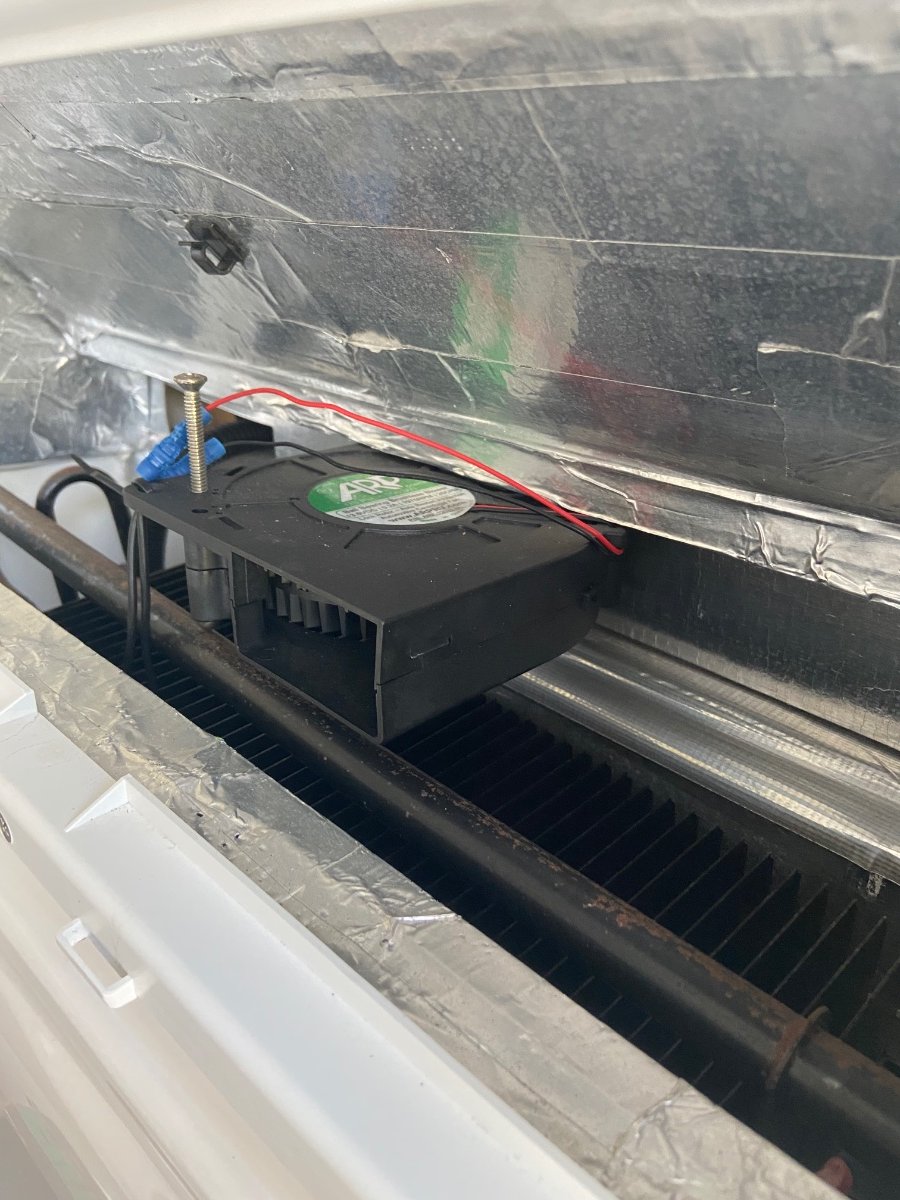
When installing upper fan I used 20 gauge wire to extend the leads off the ARP module to the fan.
Yes, when sitting under the awning the fans can be heard occasionally. More so on very hot days. Not too annoying though.
There are 2 temperature sensors. One is mounted against one of the horizontal tubes that zig zag on rear of refrigerator and the other is behind the heat shield on I guess what you would call the boiler tube. The instructions are very specific where to mount probes on the tubes. Especially the boiler tube.
Have had the system for a year now with zero issues. After installation, there is nothing else that needs to be done. Comes on automatically when refrigerator is powered up.Just for clarification: You say "One is mounted on the horizontal tubes that zig zag on the rear of the refrigerator..." Does this mean I have to access the refrigerator from the inside of the trailer or is everything done from the outside? Sorry if I misunderstood your directions.
-
2 hours ago, Sak said:
After a quick research, I think ARP is great if you are using propane. It's not necessary, please correct me if I am wrong, if your fridge is using shore power or DC.
I am interested in this product but for ventilation propose. My Norcold doesn't work well if outside temperature is very high. After looking at pricing for ARP, I think I am going to try something else cheaper. Either Titan or Beech Lane cooling fan.
I'd be interest in your research:
It would seem to me (and I'm certainly no mechanical engineer) the function of the refrigeration process which causes heat to build up in the refrigerant during the cooling process , occurs regardless of which energy source you're using to drive it. (otherwise, no cold air). The ARP product apparently protects the system by shutting it down before it gets to a critical temperature which will cause catastrophic damage to the hardware. Most issues apparently are caused by the gases and liquids within the system requiring the units to be fairly level so liquid levels can remain within operating design parameters. (This is my understanding anyway.)
If there is something I'm missing, would love to learn more about it.
Thanks
-
3
-
-
On 7/20/2022 at 6:29 PM, Frank C said:
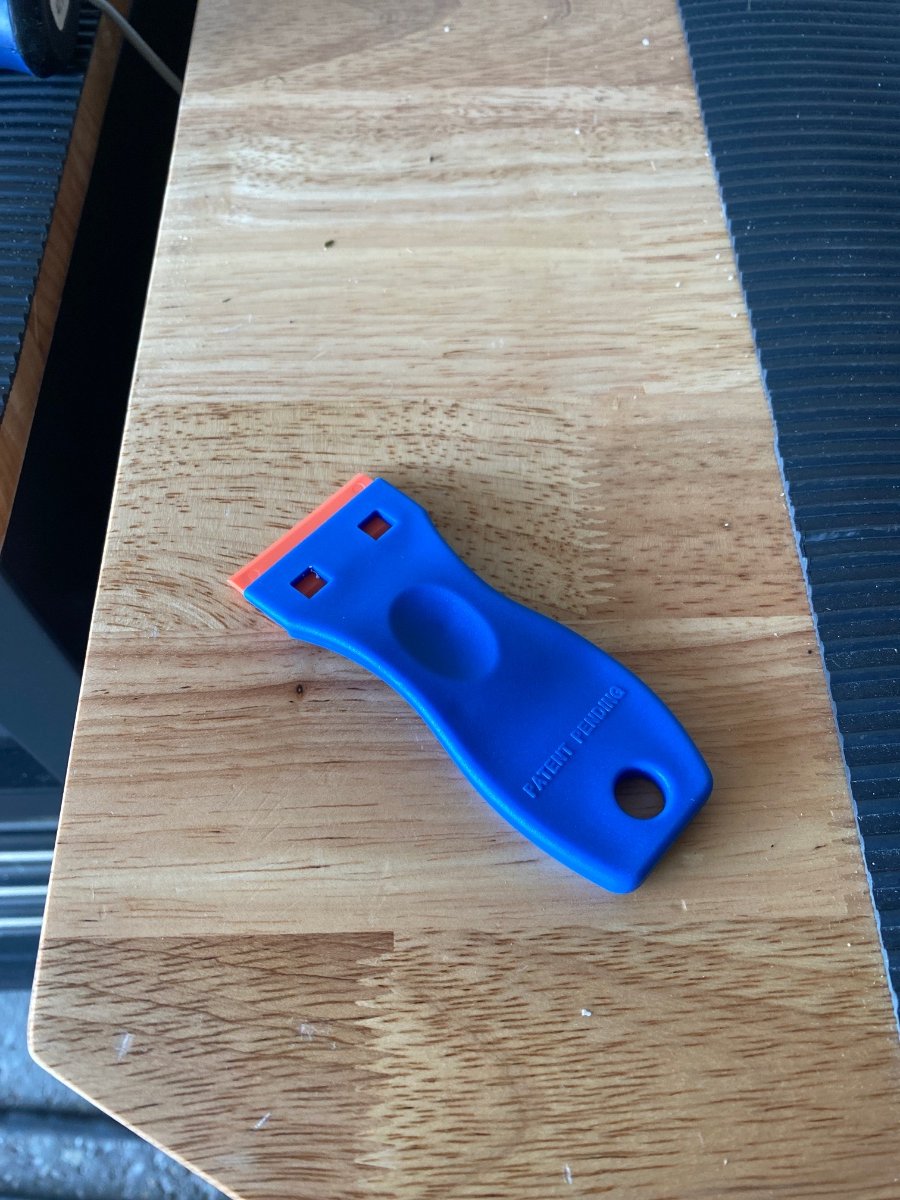
For anyone removing the awning seal adhesive or other “sticky stuff” from the hull, here’s a tool I’ve found very useful on the Oliver for removing caulk or adhesive without damaging the gel-coat. Plastic razor blade scrapers. Gets most of the stuff off, then final cleanup with isopropyl alcohol or automotive wax/tar remover.
Limited-time deal: Plastic Razor Blade Scraper, 2PCS Scraper Tool with 60PCS Plastic Blades, Cleaning Scraper Remover for Stickers, Decals, Adhesive, Labels, Paint, Glass, Car, Window, Stove Top, Caulk, No Scratches https://a.co/d/4bf3egM
I purchased a set. Thanks for the heads-up.
-
2
-
-
On 6/24/2022 at 11:53 PM, ScubaRx said:
I guess we never worry about our bathroom vent popping open as many times I’ll leave it open with the rear windows open a bit to let air flow through while traveling down the road.
Issue I had, when leaving it open when traveling, is the foam gasket came loose a couple of times. I keep mine closed now only for that reason.
-
1
-
2
-
-
21 hours ago, C&MCurrie said:
Installation was easy. Hardest part was deciding where and how to mount vent fans. Used double sided VHB tape along with a long screw for added support on the upper fan and zip tied lower fan on vent panel. Would liked to have centered lower fan left to right but space constraints dictated mounting to the left.
Where in the bottom pic is the location of the temperature sensor ? Is it behind the shield on the right side?
-
Would also like to know whether you notice the fans (noise) when you're sitting outside under the awning?
-
On 7/15/2022 at 4:17 PM, C&MCurrie said:
I installed the system last year as an extra measure of safety. Added benefit are the 2 fans that come with it , one mounted in upper and lower outside vents. I opted for 2 additional interior fans that help keep internal temperature uniform. So far, so good. Fridge has operated flawlessly even in very hot weather.
Did you do the install yourself? Otherwise, how difficult is the installation process?
-
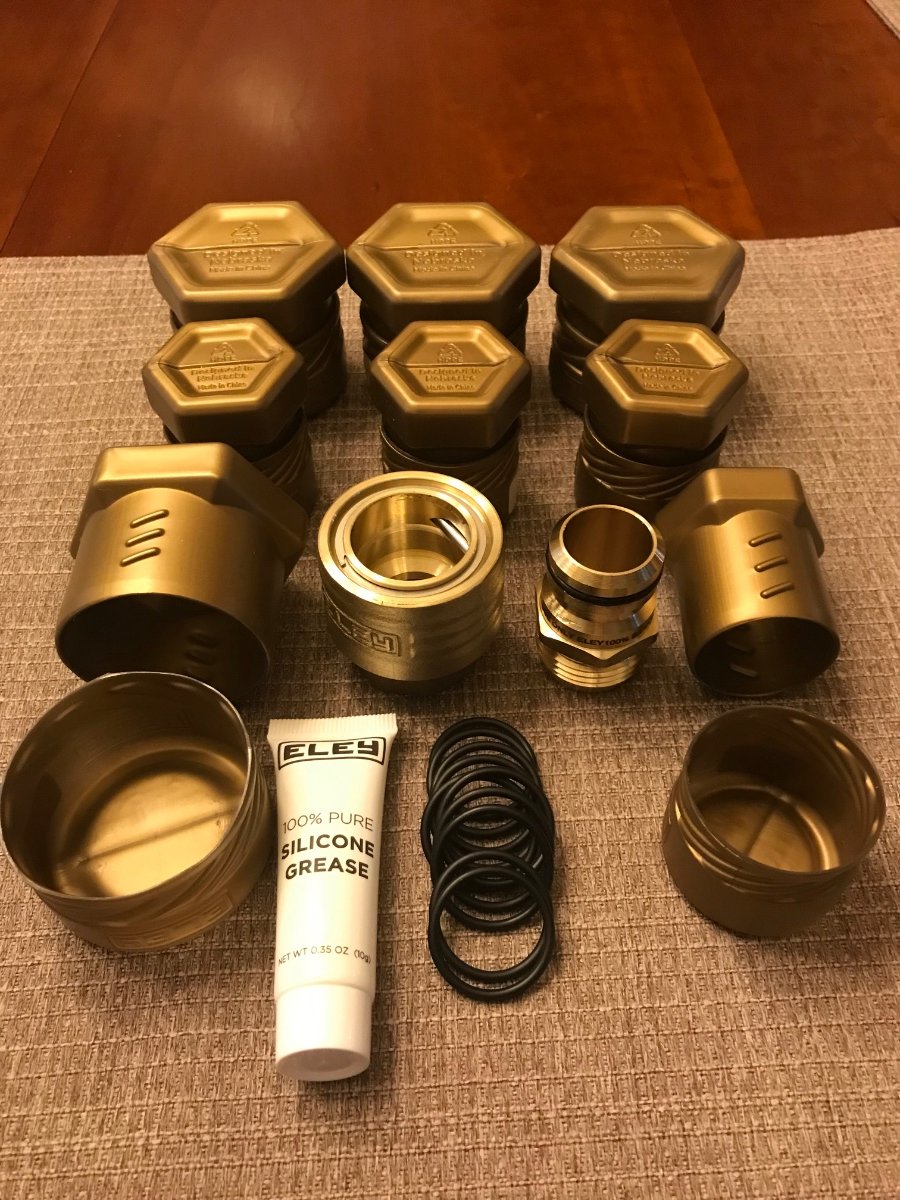
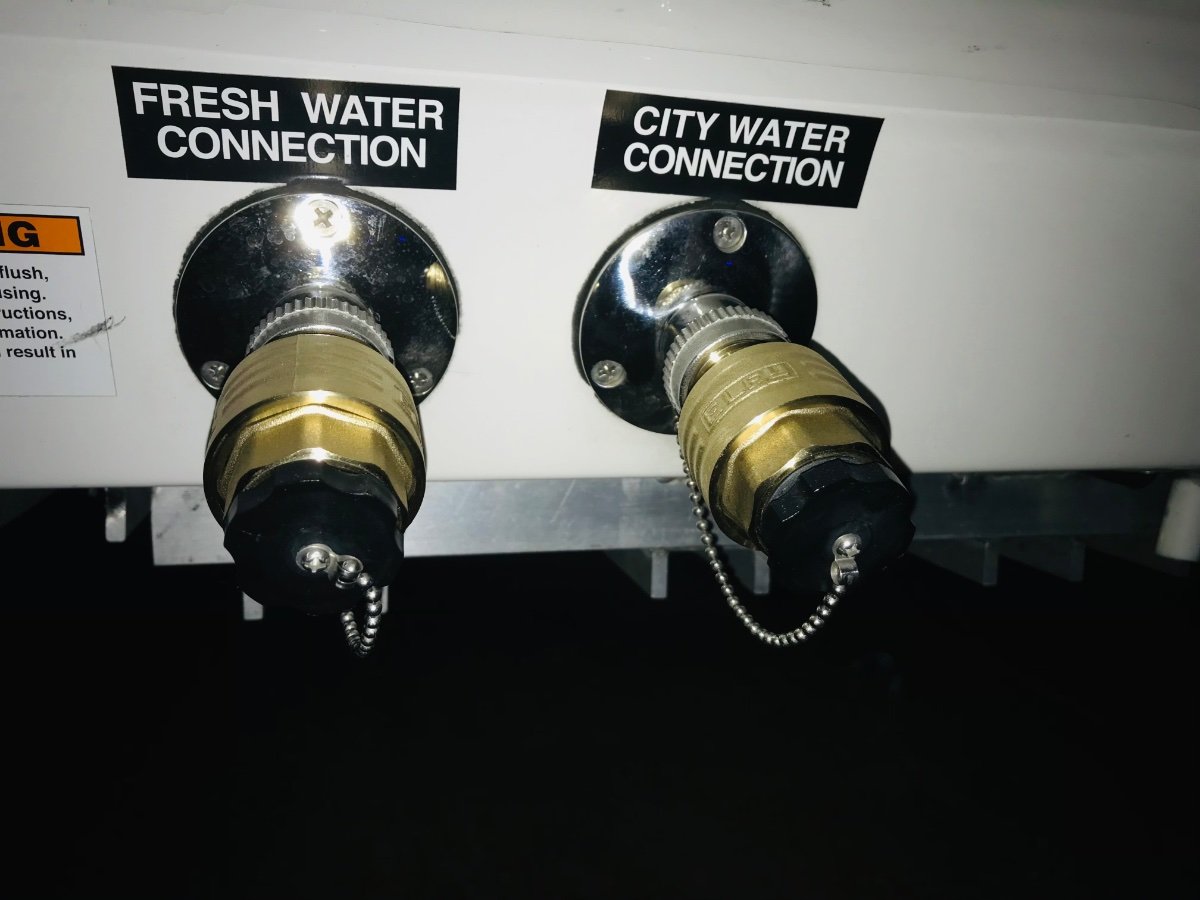
On 7/24/2022 at 5:40 AM, Patriot said:
I decided to order these much higher quality Eley QC’s based on a recommendation from another member on here. Verrrrry nice and very high quality vs the aluminum Chinese junk sold on Amazon (above). These are made in the USA 🇺🇸 and top shelf. I would purchase these again based on the fit and finish and they come with a 10 year warranty. Order here if interested - https://www.eleyhosereels.com
- Patriot
Curious if the caps "screw" in or do they simply slip in? Getting the cap on and off on my trailer is a two handed operation which is what I would like to mitigate with quick connects. Thanks, BTW: Eley are the absolute best!
-
1
-
-
On 7/22/2022 at 9:16 AM, csevel said:
John and Wendy,
Thank you so much for the pix! I'm pretty sure I'm going to stick with the original type stripping. It's taller and rain seems to flow along it and out at the ends without much overflow. Other than the deterioration, I've been pretty happy with the way it works despite the collection of debris behind the brackets. If I was physically unable to get up there to clean, I would probably go with the J-channel style.
As far as the window vents go, I've consulted with a patent attorney (who's a dear friend) to see what's involved with stepping forward with my design. The consensus is to make and sell a few (10-15) to see what the interest is and go from there. I have been busy camping so I've sort of put it on the back burner. I saw one member here make one and I was thrilled to see their attempt! Stay tuned.. 🙂
Claudia,
Donna and I would purchase a couple too.
I thought hard about how to cleanly and repeatedly make the cut-outs in the plastic and have some ideas but haven't gotten around to actually implementing my thoughts. If I ever get around to it, and if it worked out, I'd just send you either the finished base pieces for your production process or provide you the jig. It's your idea so I wouldn't want anything except to see you succeed in your business.
Hoping you just make a few and sell them so I don't have to do "too much thinkin".
Paul & Donna (2 HOBOS)
-
1
-
-
I have my reservations already but the wife was asking the actual dates of next years rally and I couldn't remember.
Can someone advise?
Thanks, 2 Hobos
-
I owned a DiamondBack for several years on my Dodge and was fairly satisfied with it. Fairly watertight. Unlike my Bakflip which leaks like a sieve.
Downside with the DiamondBack is the center panel. It prevents large items being put into the bed unless you unclamp and remove the whole thing which is somewhat cumbersome and time consuming. Also, a lot of "stuff" on the underside which gets in the way of loads.
The ultimate hard lid is the Renegade. When I finally get rid of my BakFlip (which came from the factory on my truck), that's what I'm going to put on it. Expensive!
-
6 minutes ago, ScubaRx said:
I mounted my signal booster inside the bathroom vanity attached to the front wall. I drew power from the switch that turns the camera on.
Our new truck monitors the trailer tires as well as its own so I removed it all and sold it to a new owner
Steve,
How did you tie into the camera power? Also, inside the "vanity"? Is this the overhead cabinet above the toilet or behind the towel bar below the sink?
Thanks,
-
2
-


Frosted door window change to clear glass.
in General Discussion
Posted
UPDATE ALSO: In the installation videos they show the outside frame should be taped to keep it in place. DO IT!
I thought I would defy the local wisdom and simply hold the glass and frame in place while removing the old glass and putting in the new: Well two things happened (neither of which were good).
First, while trying to push the new window firmly into the outside frame (to compress the caulking while seating the glass, I loosened up the outer frame thereby requiring I remove the outer frame from the door and re-caulk it since I broke the bead.
Second reason for the tape is to hold the new glass in place while you are messing with trying to snap the inner and out frames together. I again learned a valuable lesson because when it was all over and done, it appears the glass slipped down slightly which has caused the inner frame to be slightly warped which prevents me from putting in the tightly fitted shade. Once you put the new glass in place, recommend you apply duct tape to it to keep it in position while you're wrestling with the frames.
That said, I am now faced with taking the inner frame apart from the outer frame (praying I don't break any of the tabs on my newly purchased inner frame) and then removing and re-caulking the new glass and essentially doing the project twice.