

DavePhelps
-
Posts
337 -
Joined
-
Last visited
-
Days Won
20
Posts posted by DavePhelps
-
-
That's great Reed. I'm really glad this whole idea of the pick-up tube has worked. Really nice work, and I truly hope Oliver carries this forward, because it really is an important design issue. I have access "obstacles" in my Elite that you don't have in your Elite 2. My hot water tank pretty much covers the back end of my fresh water tank. So in order to spin weld a fitting on the top of the FWT, I need to first remove the HWT! ughh. I am still hoping that somehow I can insert a bent tube inside the original outflow fitting, and letting it rest on the tank bottom. I'm waiting to hear what Oliver comes up with. What was the pipe dope you used? Not seen that before but I'll get some when I dive into this. Thanks again for bringing this all to light again.
Dave
-
 2
2
-
-
It is pretty plain to see if your fuse has blown. If they look to be in good shape, then I would really recommend looking at the switch connections.
Those spade connectors can easily slide off if not crimped correctly and/or if you travel rough roads. In my Elite, one of the two switches is in the kitchen sink cabinet. I pulled out a drawer to get access to the back side. For you, with the switch under the pantry, I don't know. There has to be an access hatch somewhere. The cover plate for these switches will not come off as far as I can tell, however, the switch itself can be popped out of the cover plate (use a plastic putty knife so no scratches). Less room to work, but you can at least check all the connections. The bathroom switch may not pop off the same way, haven't tried it, I'd ask Jason about that. If any one of the connections to those two switches has come loose, the pump will not work! Just my two cents. Please let us know what the issue ends up being. Good luck!
Dave
-
4
-
-
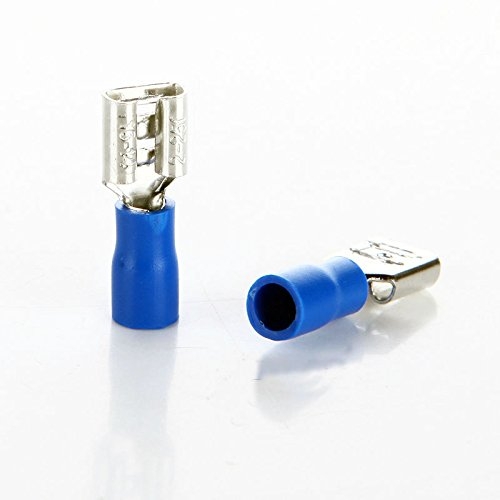
You may want to check the switch itself. This happened to me as well. The wire connection to the switch is a simple female spade wire connector. Ours slid off one of the two tabs on the back of the switch. I took the loose connector and pinched it closer together with some pliers and then slid it back on the switch tab. Back in business. Hope it's as simple for you. Here's a pic of the connector that was used on our rig:

Dave
-
1
-
-
I'm glad some of you found this useful, and hope the trim works for your cover. I'm hoping that Oliver makes them all about the same thickness. The thickness of my cover fell within the specs of the trim. Filing really helped to smooth out that edge and even thing out. To me, it has made a huge visual difference for the better. My wife didn't notice..! LOL. Oh well, we all see things differently, that's for sure. Happy camping!
Dave
-
3
-
-
- Popular Post
- Popular Post
Thought I would put this up here in case anyone else is having the same issue I had. Soon after leaving the factory, the plastic strip that lines the bottom edge of the tank cover started to come off. It was a very cheap piece of 'L' plastic kind of glued on here and there. Really, it was pretty ugly even when new. So I finally found this very nice 'U' channel on Amazon that fits perfectly. These trims come in a vast variety of sizes and colors. It appears to be a very high quality vinyl compound and has internal fins that grab the cover on both sides, so no gluing is involved. I just set it in the sun to warm up and gently tapped it on with a rubber mallet. Before doing this, I carefully scraped off all the old glue residue with MEK and a plastic razor blade, followed by a light scrub with a 3M WHITE scotch brite pad (love these for tough cleanup jobs on the trailer, no scratching) Then I filed all the edges to make sure there were no sharp edges or bumps in the fiberglass. Then a good wash. Here's the product:
https://www.amazon.com/gp/product/B01F9FXQLU/ref=oh_aui_detailpage_o01_s00?ie=UTF8&psc=1
This looks so much better to me, and the fit is great, better than with the stock plastic trim. It's supposed to be marine grade, so hopefully it will last. My Elite took 5 feet to do. Those with the Elite 2 will need to measure, but the stuff is available in different lengths. It's all in the details!
Dave
-
22
-
 1
1
-
For the record, my water pump starts sucking air at about 35% full. I have to tip up the trailer after that, or refill.
The hardest part of this project will be getting access to the area for wrenches and other tools. With the tank out at the factory, it would take no time at all. Really, as there is no option for an outlet on the bottom of the tank, it has to be on the side, which requires some kind of draw tube entering the tank. I'll be curious to hear what Oliver comes up with. For the rest of us, anyone taking this project on please post pics if you are able. Thanks.
Dave
-
1
-
-
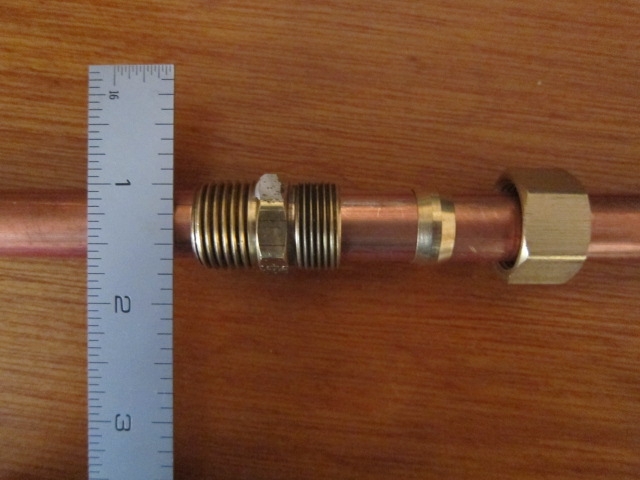
Here's a pic of my test setup with 1/2" copper tube. Will the comp fitting screw into my tank fitting? That I could not figure for sure until I took it all apart.... Left side hopefully screws into tank, rt. to trailer plumbing.
Dave
-
I must not be visualizing this correctly, plumbing is not a strength for me.... But, it seems like if the comp fitting screws to the tank outlet, the pickup tube needs to run completely through it, half bent down in the tank, and half sticking out to reconnect to trailer plumbing. This is not how comp fittings are designed to be used and requires modification. I must be missing something big here. If you put something together, please send pics!
Dave
-
If you guys can find an adhesive that will glue pex to anything, I would like to know about it. I asked several plumbers and they knew of none. Although this mod is not a typical use of the material. I tried JB Weld for plastic, West Systems epoxy, silicone, and polyurethane sealant, none worked. And yes I did wipe all parts down with MEK before gluing them together. It will have to stand up to vibration and temp changes, no pressure concerns to speak of. Do you think the compression fitting is problematic?
Dave
-
Here's another pic of the compression fitting idea I got off the web. I planned to bend the tube differently than in this pic but the idea is the same.
Dave
-
OK, it's all coming back to me. You are right Reed about not being able to screw in the soldered fitting as the pickup tube would hit the side of the tank. That is why I came up with the compression fitting idea, although there are still some unknowns about that. With the compression fitting, the pickup tube could still be rotated after the 1/2" threaded side of the fitting was screwed into the tank. Length of the pickup tube (inside of the tank) would not be as critical here as one could just rotate it until one side of the tube was just touching the tank bottom. Then the compression ring and nut could be tightened down to lock it in place. Then a transition fitting to attach the exterior portion of the copper tube to the pex in the trailer. Questions I had was whether I could even get the bent copper tube through the tank outlet fitting, and was the thread on the compression fitting the same as on the tank fitting? I didn't want to find a bad answer after I removed my hot water heater and who knows what else to get into the area. I also experimented with nylon plugs drilled through for a pex pickup tube, but could find no adhesive that would bond the two together..... Really hope we can all come up with a solution here! Thanks for bringing this issue to light again.
Dave
-
1
-
-
Here's a pic of someone's mod I got off the web. Apparently this is not an issue unique to Oliver. It's a soldered setup, not the compression fitting I was talking about earlier. I'll post that pic as soon as I can find the patch cord for my camera..... This, or something like it might work.
-
2
-
-
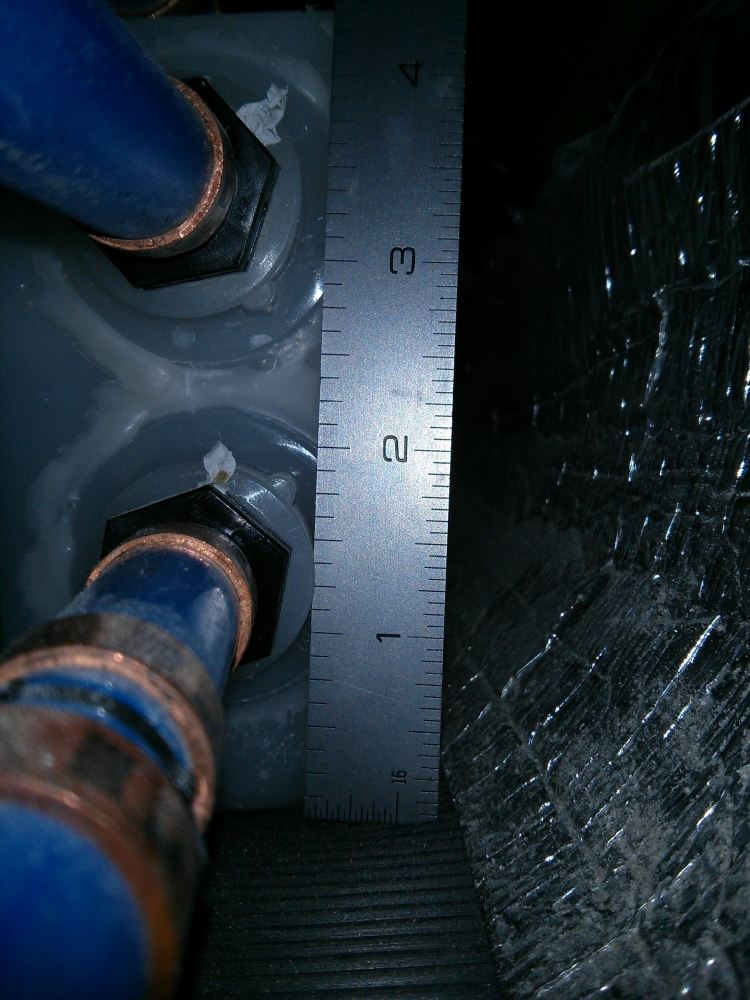
The fresh water tank design has been a issue for me from the start. I posted something about it a long time ago but it didn't get much traction. I assumed because most folks must use hookups and are not boondocking. AFAIK, the tanks come from the factory with the inflow and outflow bungs already glued to the tank. You can see from the pic that as soon as the water level reaches the top of the lower outflow tube, the water pump will start sucking air and loose prime. I talked to Oliver about installing a suction tube at that lower connection that could be bent down to reach the bottom of the tank, but that didn't seem to interest them. To do the work now, I need to pull the hot water tank to get access (I have the smaller Elite), there is just no room to work. It would be so easy to do before hand at the factory, I guess that has been the most frustrating part for me. Now, like everyone else I have to raise the front of the trailer. Not so huge a deal, but you do need to raise it up quite a bit to get at most of your water, which makes being in the trailer not so pleasant. Like Reed, I just have to fill it more than I would like to. Also, the fact that it is hard, if even possible to completely drain the FWT, I myself would not put RV antifreeze in there. Maybe I worry too much, but I just don't want any of that in water I may be drinking. If Oliver
ever does decide to change the design, I may take another trip back for the upgrade. Anxious to see what you come up with Reed. I drilled out a brass compression fitting that would screw in to the bung so a 1/2 copper tube could just slide through. I was going to bend the tube down a bit so it would rest on the bottom of the tank. But being a relative newbie at this, and not wanting to open a can of worms, and with the very difficult access problem, I abandoned the project.
Dave
-
2
-
-
Great, thanks everyone. I'll sanitize the whole system.
We don't drink out of the tanks either as a rule, but I like to think that I could if we got in a pinch. I actually have some Purogene on hand. I always thought it was mostly for treating water that you were going to drink, but I will have to look into that. I'm sure it would be great for seasonal sanitizing as well. Thanks for the reminder Sherry! Onward.....
Dave
-
Well I'm just full of questions these days getting my Ollie ready for upcoming trips.
When doing the Spring fresh water sanitize with bleach, should I bypass the hot water tank? Seems like it would be a good idea but I'm not sure. I plan on following Buzzy's technique as he posted here a while back but there was no mention about the hot water tank. Thanks.
Dave
-
Thanks for replies everyone.
Sherry, the Fiamma awning sits right on top of the gasket. It really traps a lot of debris and I think I'm going to remove it.
We'll see how it works out....
Dave
-
I am getting ready for my Spring wash and wax and had a question about that full length white gasket under the Fiamma awning. First off, it's a real dirt, moss, and pine needle trap. I have to keep my Ollie out in the open, and this area is a real pain to keep clean. So I am wondering, is it really necessary to have it there? Yes, if it's raining and you are under the awning, water will run down the side of the trailer but is that really a problem? Just trying to figure out its purpose as I'm ready to pull it off for better air and debris circulation in that area.
Also has anyone tried using the white 3M cleansing pads for the wash. They are the least abrasive of all the woven pads (in fact these are virtually non abrasive). They seem to cut the crud really well with no scratching of the gel coat.
https://www.amazon.com/gp/product/B00EW7M5S2/ref=oh_aui_detailpage_o01_s00?ie=UTF8&psc=1
Thanks,
Dave
-
I second the Gus Hill lock (The Bull). I'd also spring for the better ASSA lock. Really a great setup.
https://gushill.com/product/the-bull-bulldog-hitch-lock/
Dave
-
OK, now I don't get this.
Buzzy said: "I asked the question regarding your battery choice for a reason. Please keep in mind you must never allow the controller to equalize your AGMs. That process will fry your batteries and they would need to be replaced."
But Lifeline Batteries says this about their AGM's:
http://lifelinebatteries.com/2015/10/can-i-equalize-agm-batteries/
So what am I missing here? I'm off to AM Solar tomorrow to have my system checked out to be sure everything is set up properly. The Blue Sky manual(s) have been very difficult for me to navigate.The truth is out there somewhere... I hope :-) !! -
I use the same grinder as GrayGhost, it is awesome and highly recommended. I also settled on drip coffee because I love the flavor plus cleanup is so easy and requires minimal water. I got the Kalita drip cone as it's stainless steel and also very beautiful to look at. They make two sizes depending on quantity of brew. I drip right into my insulated mug, ahhhh. :)
I'm mostly a tea drinker at home, but while on the road traveling, a good cup of coffee is hard to beat!
Dave
-
1
-
-
Canoe12,
Yes, I agree completely with all the points you made.
Dave
-
You know, I sure hope Oliver reads these forums. These kinds of issues are really unacceptable. There is great potential here with the Olivers, and they do a pretty good job, but they really need to pay more attention to the construction process. These are not complicated units compared to the aforementioned class A behemoths. The systems are simple and straightforward, which is what drew me to them in the first place.
Quality is in the details, most of which are not readily visible. All the bling is just a smokescreen. Whoever does QC over there needs to up their game and get the production crew on board. As I said, Oliver makes a fine trailer, and I'm proud to own one. But there is so much more potential that could be realized without too much extra effort or expense, that it frustrates me to see them struggle in this way.
Dave
-
Thanks for the reply's. I would probably place the AL on a 2x8 for support and that little extra bit of lift if necessary. I looked at the Blaylock EZ-100 leveler but they offer no mating chock (wedge) to stabilize it. So I guess you would have to find or make one. I like that it is cast Aluminum though.
Dave
-
Reviving this thread with a question about the Anderson Levelers that have been mentioned. I've never had trouble with racking in my little Elite but see that the AL could be handy and save battery power and wear and tear on the "stabilizer" jacks. So if you pull in, or back in to a spot with a slope front to back, as well as side to side, would you place the AL on the uphill or downhill side of the tire? I called Anderson about this and was told that it should be placed on the uphill side with the mating chock placed on the downhill side but I'm not sure if the person I spoke with fully understood the situation I was describing. I am also concerned about the stability of this setup as the raised wheel is not really chocked and could still potentially roll? Maybe the Stabilizing jacks when snugged down would secure everything. Still figuring out the details as I'm still pretty new to this game. Thanks for any insights.
Dave


Shureflo water pump not working!
in Mechanical & Technical Tips
Posted
!!All right then!! Good idea to get access through the tank gauge opening.
Note to Oliver: As far as I know, the National Electric Code requires access to all connections. It also requires that a switch or receptacle needs enough extra wire to be pulled out of its box at least 6" for maintenance or repair/replacement. There should be an access port inside the hidden compartment and don't skimp on your wire!
Glad you're up and running again!
Dave