
ScubaRx
-
Posts
3,296 -
Joined
-
Last visited
-
Days Won
170
Posts posted by ScubaRx
-
-
Several have asked about costs and a parts list. I installed disc brakes on The Outlaw Oliver this past March. I posted about it in my thread "Mods of The Outlaw Oliver."
I chose to use the Hydrastar/Kodiak products and a list of all parts, their costs and where I got them is listed in the included pdf.
-
 3
3
-
-
Tali and I participated in the original design conception for the Oliver Elite II. We had previously owned one of the original 2008 smaller Oliver elites with the stove turned vertically. I suggested at that time that the stove be turned horizontally to create more perceived counter space. That is how it became the "standard." I did not like having to reach across the front burner to the rear. All the observations made by everyone else are valid and it really boils down to which is your personal preference. The amount of counter space is exactly the same no matter which way the burners are turned.
-
1
-
-
The next total eclipse to be seen in parts of the United States will occur on April 8, 2024...
Crap, I've got the plumber coming that afternoon.
-
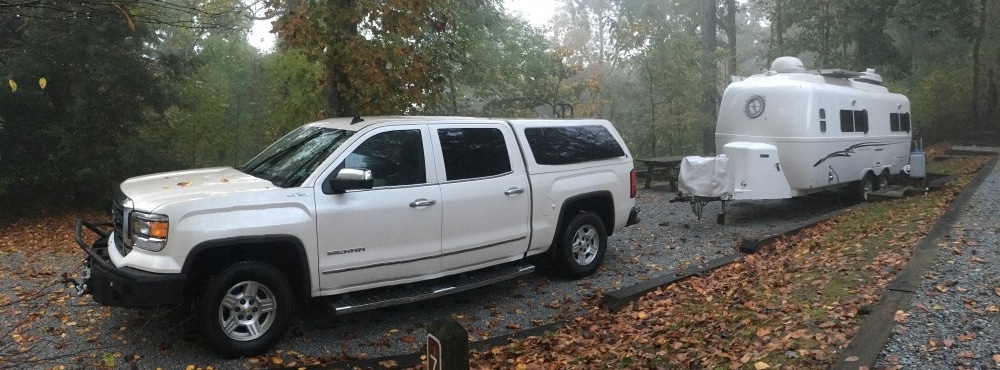
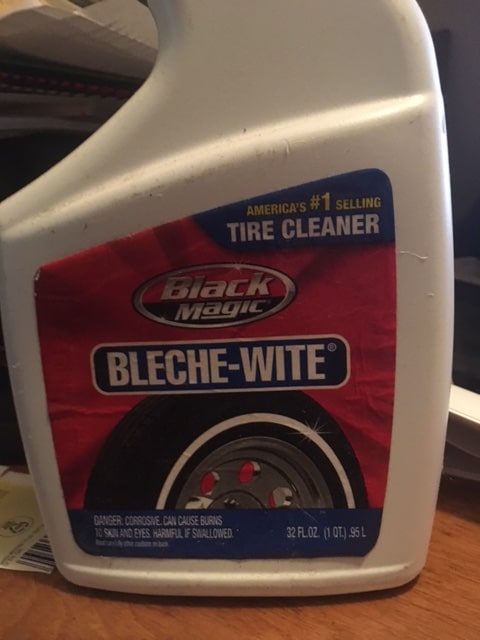
Our white vehicles sit under some kind of tree that provides a ton of shade in the summer but they also drop gallons of sap all over them. A year of so ago The Outlaw Oliver sat out of the garage for a month while I was working on it. The top got so much sap on it it was almost black. I went to NAPA and asked the guys for a recommendation and they suggested this. It did a good job of removing the black stains, although not without some scrubbing.

-
1
-
-
The storage inserts were available in the 2008 and 2009 models of the original Elites. They were constructed in two pieces of some sort of reasonable heavy ABS type material using a vacuum mold system and were then pop riveted together. During the conception and build of the early Elite II's, I questioned their absence and was told that they would no longer be making them due to the increased storage capacity of the larger trailers. Since they were not making the smaller Elite I at that time and had no immediate plan to do so, that idea was placed on a far back burner. As far as I know, that policy is still in effect, and I do not know if they are available for the current Elites. The lower compartments are arraigned completely different in the new models so the old molds would not work for them.
However, they worked well in the early models if you used them to store lightweight items. If you filled them with about 40 pounds of canned goods, they then collapsed and fell into the well making it the dickens to remove.
All that being said, it would be a good idea to revisit for the Elites since storage space is still at a premium.
-
1
-
-
My only hang ups right now are…King bed: Seems like such a waist the way its done. Uncomfortable looking and I am NOT looking forward to setting it up every day. My SO says just leave it. I agree but think there is so much lost storage space there. I wish it was a fixed in place queen with more storage on the sides and underneath with a wall / divider for closing.
You could opt for the twin beds. Ours are raised and have 13 cubic feet of storage beneath each one. No set up or take down. A dividing closure is doable.
...Dinette: Wish it had a slider for extending out and more space for games / working – Not going to be enough from the dinette bed / conversion for when two teens join us from time to time. So one or both will have to tent camp –I have seen threads with people outlining the way to extend their dinette tops and realistically, how often will these teens be joining you guys? Usually we eat outside anyway when there's more than just the two of us.
...Price. We are seeing amazing deals on excellent condition lightly used AS. So we are likely to be 20K more with an Ollie tricked out for boon-docking like Two Plus Lu laid out...From what my AS buddies tell me, to get an AS tricked out with the solar and extra batteries will cost in the neighborhood of $10K. That assumes, of course, you are not looking at a used one already so outfitted.
Good luck with your search, both Oliver and Airstream are the best in their respective classes.
-
We are planning an Alaska trip in 2018, perhaps heading out after the Oliver Rally or thereabouts.
-
2
-
 1
1
-
-
We have reserved E-9 and will be wearing our bells.
-
That thread appears to have disappeared.
-
Is there any place out west not inundated with these fires? I have a window of opportunity and would like to take off for several days, but its an ugly mess here in Montana, and hardly worth camping anywhere in the state. How about ID, UT, WY or other areas, anyone been to these places recently? Thanks, odd request for sure.
Hey Rob, we just returned from most of those places. We found a beautiful Forest Service campground on the East side of Lake Cascade in Idaho. It is French Creek Campground. We stayed there about 5 nights. I think it was about $5-6. Lake was filling up at that time from the melt off from the Mountains further to the East. Should be up by now. There was fresh water available.
We had led a group of 15 fiberglass trailers on a 3 week jaunt thru all 5 National Parks in Southern Utah, camping in several boondocking spots and some pretty nice campgrounds (none over $7-8.)
We haven't been to WY in a couple of years. One of the other members is going soon but he stated that campsites were few and far between due to the coming eclipse. That's probably the case in most place along the path, but you guys shouldn't have too much problem finding a "wide open space" out there!!!!
Good Camping
-
Short of setting something really hot on the counter top surface, I don't believe you could damage the fiberglass very easily. A close examination of our tops will reveal swirls and scratches due to wiping them off, but you would really have to look very closely to see them.
-
3
-
-
What type of cable is it. HDMI, RCA?
-
I love the idea of combining a western-state Ollie rally with this tank modification.
That is brilliant. Durango CO in late Spring 2018 works for me! John Davies Spokane WA
The regular Oliver sponsored rally is in late spring of 2018 (early May) in Guntersville, AL. I think a Western based rally would divide the population of owners by making them choose which to go to. Have it a little later and we could attend both.
-
1
-
-
Mike and Carol and Pete too. They all live in your neck of the woods. You will not be sorry for any of those decisions. Retire when you're able and enjoy life. Buy an Oliver, travel and REALLY enjoy life. Our style of travel is exactly what you describe. We wander the country, boondocking, seeing the sights, especially the units of the National Park system, just taking our time. We recently got back from a trip of about 75 nights on the road. We were only plugged in for 4 of them. Life is good....
-
1
-
-
CPap machines…I thought most, at least ours, was really 12 volt. If so you could eliminate the small inverters too. Just use a 12V cord and plug it in direct?
Tali and I both use a CPAP machine. When we were having the Outlaw Oliver built, I had 12 volt outlets installed inside the cabinets over our twin beds. I also plumbed a fitting thru the floor of the cabinets to attach our hoses to. I found that the commercial 12 volt cords were over $50 each and they had a proprietary plug that went into the machines. I went to our local home health office that provides our machines and supplies and asked if they had any old non-working power supply's. With two in hand (for free) I went home, cut the cords off, attached a 12 volt male plug and viola, free cords. We run both all night, every night with a draw of less than 4 amp hours.
-
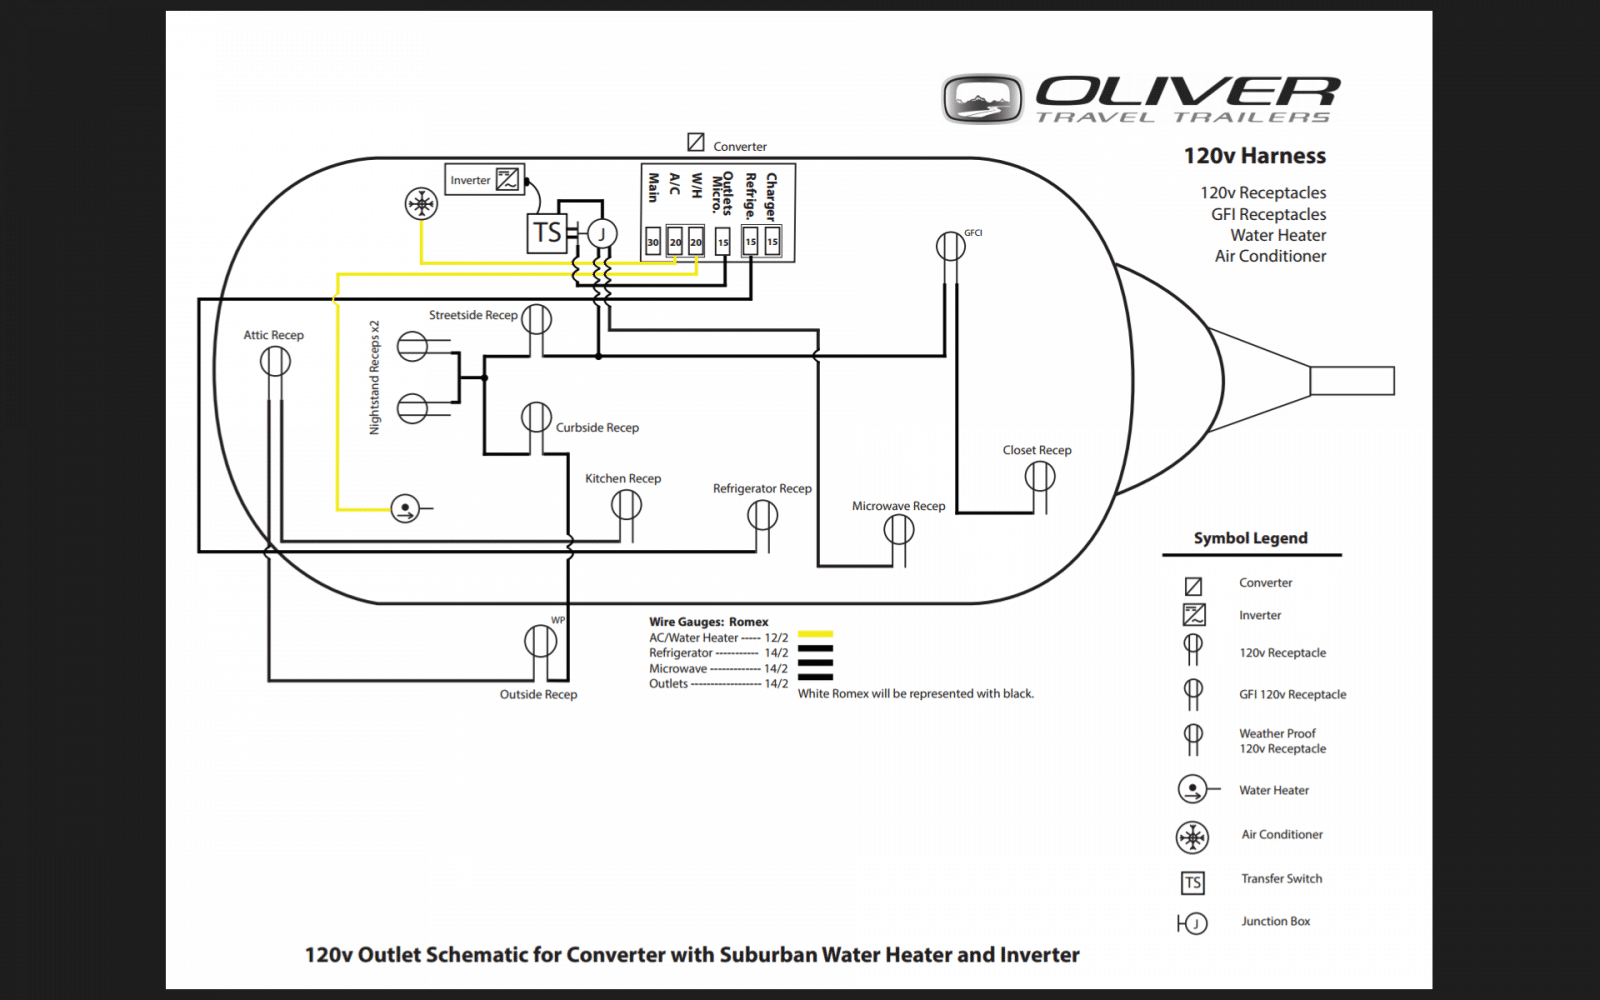
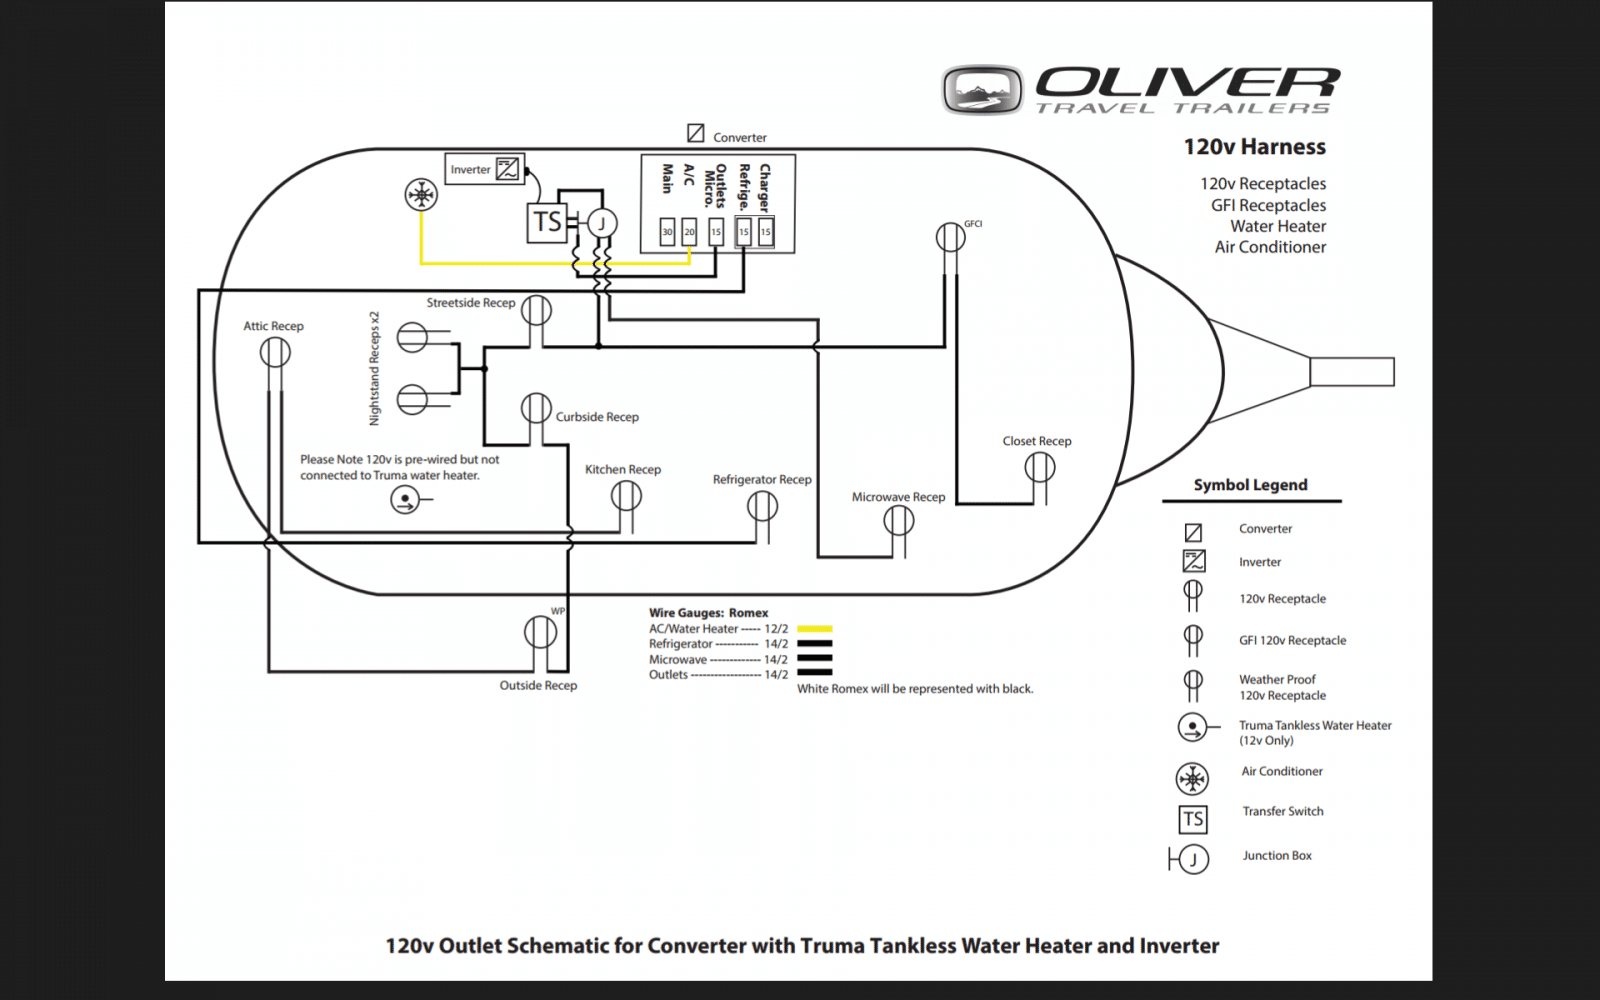
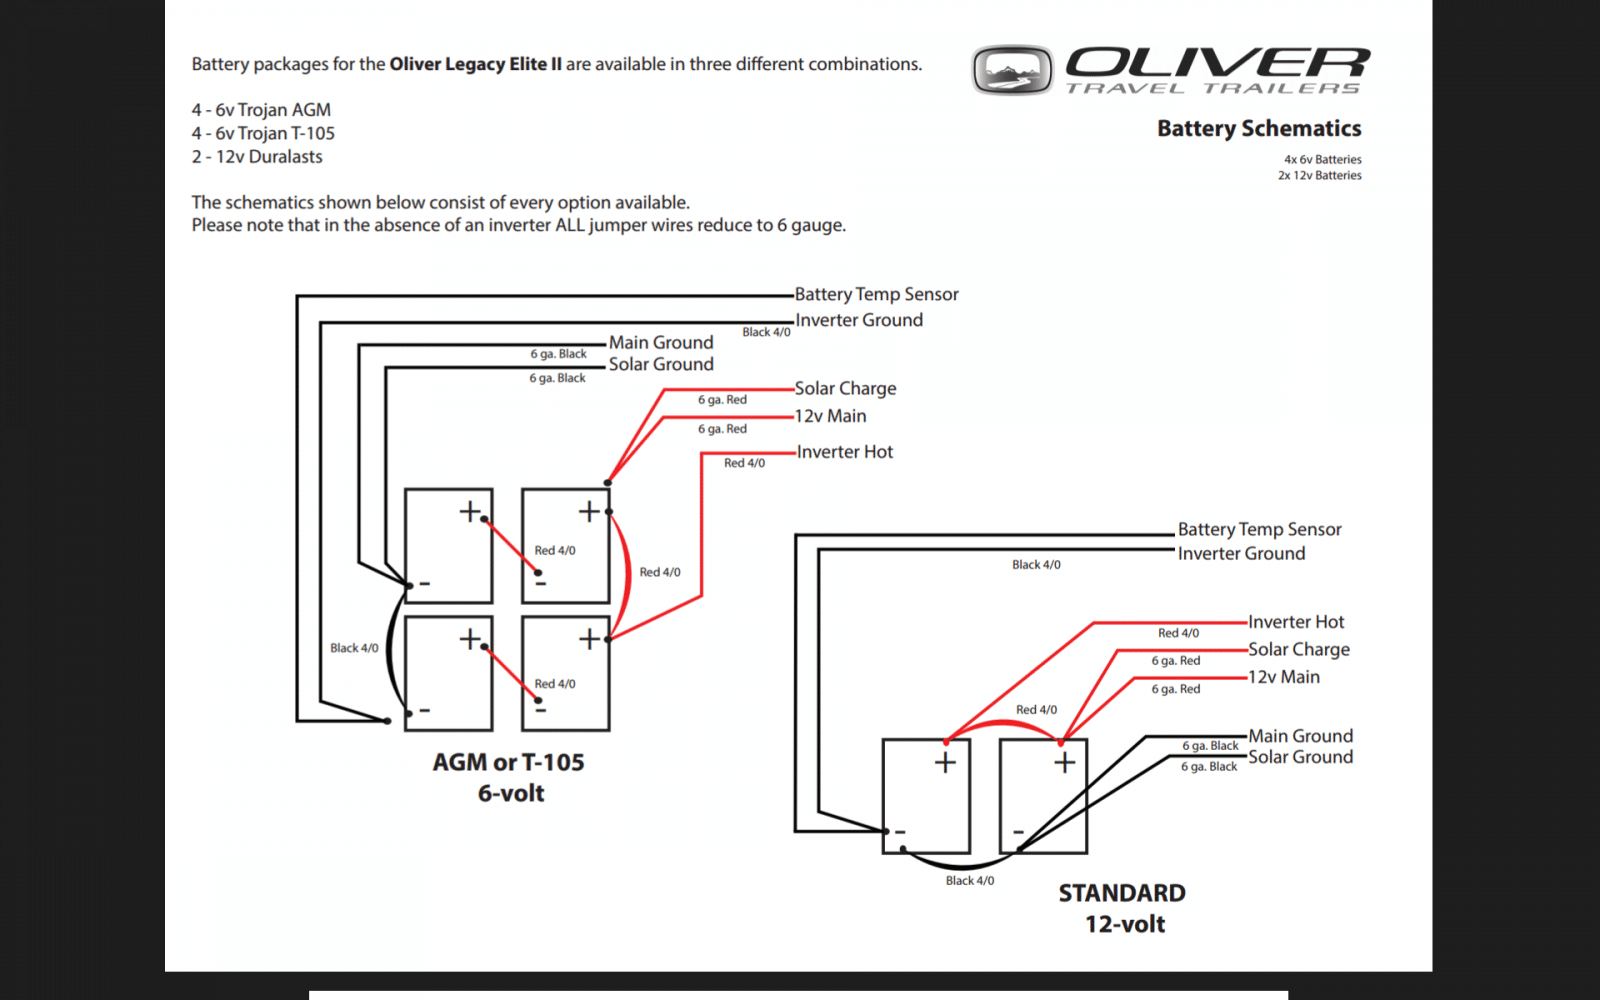
IF you have a Blue Sky solar controller with a shunt installed (standard equipment before the Zamp changeover), or IF you ever anticipate installing a shunted battery monitor, THEN the wiring for the 4 x 6 volt batteries is incorrect. All negative leads MUST go the the shunt first in order for any monitor to be able to accurately measure the amps into and out of the batteries. Scott and I talked about this a couple of years ago. None of the trailers produced to that point were wired with the shunt first, but since they were in the "change to Zamp" mode it was never addressed. Since the Zamp system does not provide the amp in/out information, the above wiring is acceptable.
-
When we are traveling, we make the dinette down every night into a bed for Reacher, our 100 lb Doberman Pincher. Yes, that's as in Jack Reacher. Most of the time the post comes out easily, some mornings I must screw it in too tight and it becomes a four handed effort to remove that evening. I would just make him sleep on the floor, but he IS Reacher!!!
-
The entire door is fiberglass, it's just that with way the door is molded, there is no way to gelcoat the interior, therefore no "slick" surface on that side. To dress it up the company paints the back side. This is just like what is applied to the inside of the cupboard door and the underside of all the hatch lids and the table tops. I'm quite sure you can glue a hook to it, although as thick as it is, I would just attach it with screws.
-
2
-
-
John, the xtend and climb ladder that we have is stored in the closet against the bathroom wall. It stands on the floor and fits perfectly under the black plastic vent pipe that runs along that wall. I just wrapped a bungee cord around the pipe and the ladder and it has never shifted during travels. The clothes hanging in there also help to secure it. That's a pretty low-tech approach to securing a piece of equipment and I never intended for it to be my final solution. I put it there in a hurry when we were leaving on a trip. That was in early 2014 and it has worked so well that I've never gotten around to seeking a better way.
-
1
-
-
That's the way Pete says he sanitizes his tank. He will take a half a cup or so of Clorox and pour it into the hose and then connected to the faucet and turn it on.
I would be doing my sanitizing in the same manner had I not installed the electric transfer valves in the Outlaw Oliver. Getting down under our beds to manually turn the valves was, in my opinion, just too much trouble. Now it is a simple matter of flipping one switch to reverse the valves and another to turn the pump on.
-
I can't speak to how Aubrey might inject the purogene, but when we sanitize our freshwater tank with Clorox, we mix the proper amount in a couple of gallons of water in a bucket and simply pump it in through the convenient auxiliary tank fill that Oliver installs on all the trailers.
-
I don’t know if this applies to your rig, but my new Elite II has circuit breakers mounted in the end cabinet above the rear window. One of them is marked pump. Brad – Santa Fe NM
This is a relatively new addition resurrected from the same type panel that was installed by the entrance on the early model (2007-2009) Elites.
-
Spike,
This article will tell you more than you ever wanted to know about fuses. The ones in our Oliver's are like the ones shown as ATO (regular) but you will probably find them as ATC fuses. The difference being that the ATC has a fuse element that is closed (hence the “C” in the code) inside the plastic housing, sealing it from the environment to prevent corrosion from developing. The ATO fuse is open on the bottom, exposing the fuse element between the blades. You will need some 10 amp, 15 amp and 20 amp ones. The jacks in the rear are now being wired with fuses that are inline near each jack (like the outside front jack) rather than being fused at the box. They require 30 amp AG (all glass) slow blow fuses. I would keep a few of these on hand also.
-
1
-
-
Is JrBirdman still on the Forum? I would love to see more about his system. -Angela
You can find a discussion about his filtration system and other things in this thread...
Hope this helps.
Storing Ollie in Country
in Mechanical & Technical Tips
Posted
Tom,
Living in North Mississippi, it would be difficult for me to address the possibility of snow damage on our Oliver travel trailers. Around here an average snow fall will probably barely cover the ground and that might not happen every year. A really big snow might drop 4 to 6 inches and that might not happen every decade. Ice is another story altogether as it regularly brings down trees, limbs and powerlines.
All that being said, if you can afford a carport, then by all means I can highly recommend that route. Not only does it protect from snow and wind in the wintertime, but also the rain during the rest of the year. A carport would also afford you protection from the sun and it's damaging effects on our beautiful gecosts.
In addition, you do not have put forth the effort of installing the cover after each outing. All this obviously depends on whether or not you have the financial resources and room at your house for an enclosure and it assumes that there are no restrictions in your neighborhood against such.
I am not sure if a marriage could stand the putting on and taking off of a cover too many times!