
CedarForks
-
Posts
82 -
Joined
-
Last visited
-
Days Won
3
Everything posted by CedarForks
-
Exterior cleaning - Wax recommendations
CedarForks replied to BackofBeyond's topic in General Discussion
We've had our travel trailer since January 2019. Other than taking it home (Northern Kentucky, near Augusta) we've never taken it on a camping trip due to illness. We've left it outside since early Spring and we were dismayed to discover black stripes all over, just like Overland showed. We've run through the gamut of detailers, finally settling on Duragloss 923, which removed most of the stripes but still left a feint black shadow. As BackofBeyound reported, none of the detailers were effective in removing these stripes from the white plastic window trim. In desperation I read this thread again and noticed a suggestion by Underdug to use a product called "Roll-Off". I ordered a bottle and it effortlessly removed the black stripes from both the gelcoat and the plastic window trim. I mean effortlessly: squirt, wipe, done. -
We also used ‘Banana Banners’ out of Bowdoinham, Maine as Mainiac described above. Everything was done online.
-
Can the sewer drain be deployed for the length of a stay at a full hookup site? As a neophyte, it seems to me that the front of the trailer (at the ball) has to be elevated to about 30" to achieve continuous draining of the grey tank -- this makes the trailer slope uncomfortably. I thought that, at a certain level of capacity, it would start draining and effectively stay at that level without needing any front elevation. Not so, in my case. I filled the grey tank by opening the kitchen faucet and letting it drain. Without elevating the tongue, it still just trickles out weakly. But by then elevating the tongue, it just whooshes out. Count me as thoroughly confused. But then again, at 75 years old, confusion is perhaps my new permanent state.
-
I've struggled all day today to remove the bumper pins and drain the grey tank. No luck. Then my daughter and family arrive for a visit. He stares at the structure for about a minute and then LIFTS the bumper UP near each pin and they just slide out effortlessly.
-
From Wikipedia at https://en.wikipedia.org/wiki/Atmosphere_of_Earth : "By volume, dry air contains 78.09% nitrogen, 20.95% oxygen, 0.93% argon, 0.04% carbon dioxide, and small amounts of other gases. Air also contains a variable amount of water vapor, on average around 1% at sea level, and 0.4% over the entire atmosphere." I assume that if you kept on filling with air, you'll just be gradually increasing the percentage of Oxygen and other gasses until you reach a state equivalent to pure air. Or not. Just spit-balling...
-
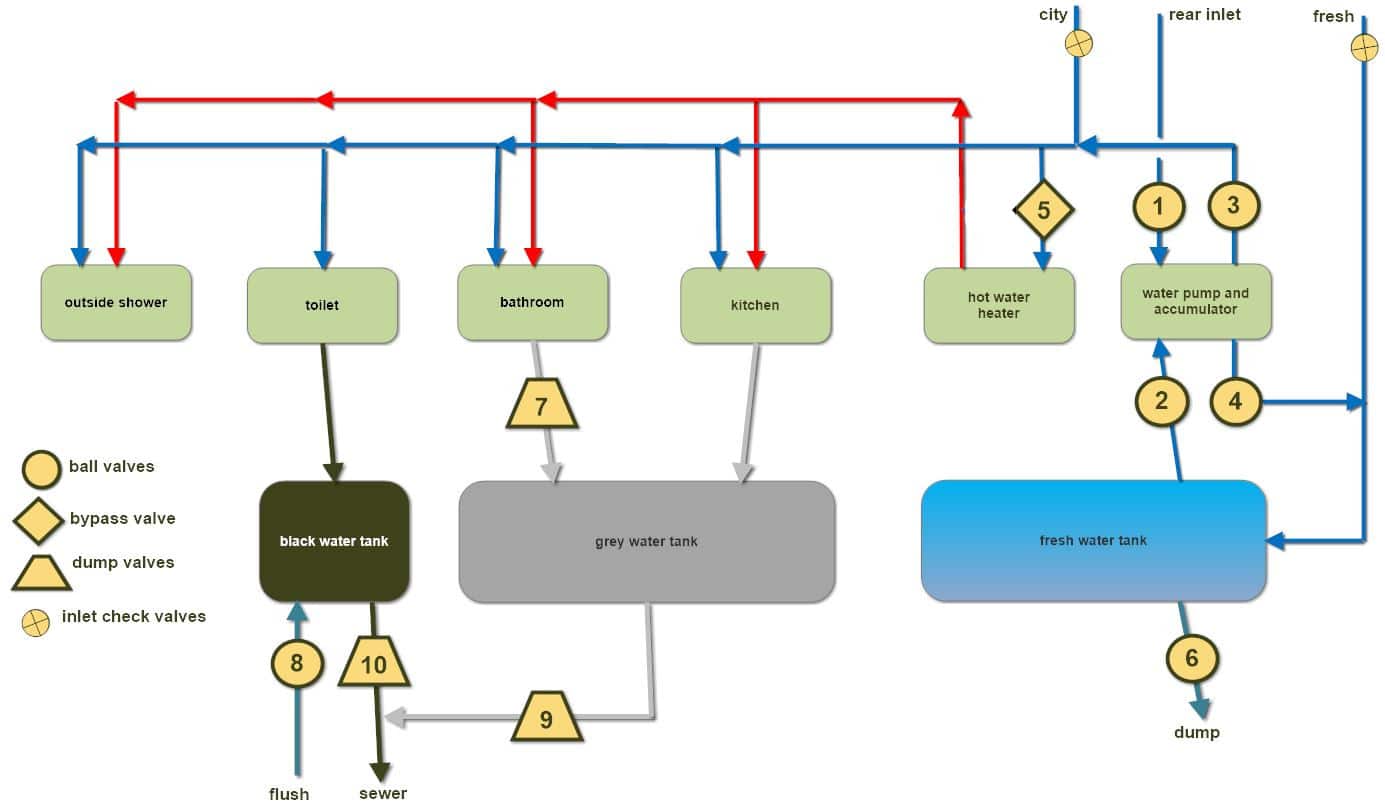
Geronimo John: Thanks for doing that: it's much better to have it all on one page. I've received some comments pointing out a missing check valve. It's minor. but once corrected, I'll send the amended diagram to you.
-
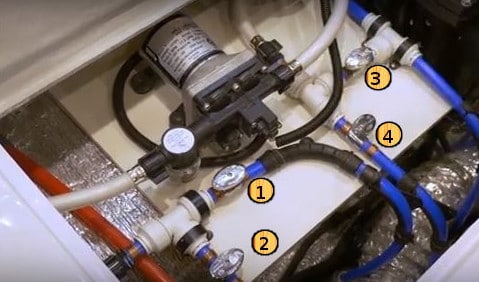
Thanks. I'll add the check valve. Yeah: that's why I specified that it only applies to later Legacy II models. Can one just say that valves 1 & 2 emulate a three-way valve as do valves 3 & 4 ?-
-
Yes. Visio & Gimp (clumsily).
-
That helped a lot: it's draining again.
-
The attached three images shows a plumbing flow diagram rather than an approximate physical layout diagram. The images are for later Legacy II models. I print out all three and lay them out side by side when trying to follow water flow. Please advise of any errors or omissions.

-
This is my first attempt at de-winterizing/sanitizing. The tank was 60% full and now reads 25% but it has stopped draining. I tried opening the faucets to increase pressure but that hasn't helped. Help please!
-
Or is it hidden somewhere?
-
Norcold Refrigerator Digital Readout Shifted Up
CedarForks replied to CedarForks's topic in Mechanical & Technical Tips
Our TT is brand new and still factory winterized from our January pickup. The rally will be our first camping trip. I find it hard to believe that OTT can install a faulty appliance and then expect us to address the problem. We live in a rural area far removed from a service center. -
We can only see the bottom third of the digits displayed. If we lie with our head on the floor and stare upwards, we can nearly see whatever is displayed. Can this be adjusted in the field or is this a manufacturing error?
-
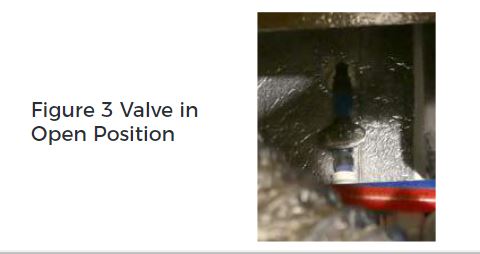
I'm still searching for the elusive freshwater drain valve (2019 Elite II). The attached picture is from the Owners' Manual page 99. It's not very helpful as it shows the drain valve after one has located it. To add to my confusion, the caption says it's in the 'open position', but the ball valve seems to be closed.
-
The basket doesn't have any weep holes. One could either drill some or manufacture a cover. I recall a posting to this forum that describes such a cover with snap-on studs, but now cannot find it. Thanks.
-
How could I have missed that? Thanks!
-
Re-awakening the question about WHY the Tow-Ready 20142 seems to work: When picking up our Legacy Elite II last month it immediately showed the 'Trailer Disconnected' message. I had a Tow-Ready 20142 on hand (I'd been camping out on this forum quite a bit) and it immediately solved the problem. I have not removed it since (while traveling) so I can't be sure if the initial error message was spurious or not I also don't have a clue why it works. Could it have to do with the fact that certain algorithms in some brake controllers also monitor the current draw of the braking lights and/or indicators and issue this message when the current draw is below a lower threshold? So the advent of low current LEDs trigger this message and that the 20142 increases resistance/current draw to alleviate this condition? I read something on an Airstream Forum that seemed to hint at this solution but I now cannot find it. Does anyone have this problem with pre-LED trailers? Or, is this way off course?
-
Is there some other way to download the attachment? I've tried many strategies; all in vain... (reference: the spreadsheet attached by KWRJRPE above)
-
I'd better disclose the real reason for looking for a disconnect solution: rambunctious grandchildren -- who cannot resist making a three ton egg move with a mere fingertip, especially when grandpa has just achieved a perfect level and has temporarily left ...
-
MDL (Slow-blow) Fuses for the Jacks
CedarForks replied to CedarForks's topic in Mechanical & Technical Tips
Thanks very much for that comprehensive response: it goes on my 'to-do' list. I was unaware of the blade type slo-blo fuses. The front fuse holder is of less concern to me as it is easily opened and closed where it is situated. -
Ideas will be appreciated...
-
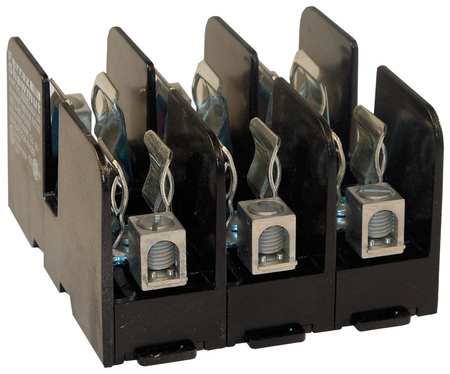
Shortly after taking delivery of our 2019 Oliver EL2 the front jack became inoperable. I checked the three (yellow) fuse holders under the street side twin bed. Of the three, I found a blown fuse in the last one checked (of course). It was the middle one, and not the most forward one as I had assumed. However, pulling and tugging those fuse holders when opening (and closing) them was frustrating and difficult for my aging hands. Has anyone considered replacing them with a 3 pole fuse block such as the attached image?
-
The Andersen Manual says: "Hand-tighten both shackle pins until they are fully seated, then back them off 1/4 rotation. Doing this prevents them from seating too tightly over time and becoming too difficult to unscrew." Before reading the manual I was worried about them unscrewing over time, so I secured them tightly and threaded a plastic tie through the shackle eye (in lieu of the usual twisted wire). I'll revert to the Andersen instructions but must admit that I don't understand.
-
The 12V fuses in both the under-dinette and attic fuse boxes are not annotated. Is there a list somewhere? (We are just starting to explore our newly acquired 2019 hull #421 and are completely in awe of the production quality -- but we have many naive questions and will attempt to ask them in separate threads.) Thanks.