

DavePhelps
-
Posts
337 -
Joined
-
Last visited
-
Days Won
20
Posts posted by DavePhelps
-
-
I would never recommend having your trailer shipped. Mainly because you miss the shakedown opportunity at a local CG where problems can be identified and fixed at the factory. Our trailer was also ready to pick up in December but I didn't want to drive out to Tennessee and back in the middle of winter. So Oliver held my trailer for me until I picked it up in late April. Hopefully they would still do this. It's a great trip out there, and especially back with your new Oliver! I'd recommend at least two days in the local CG that Oliver sets you up in and thoroughly go through all the systems. Then you can be on your way. Shipping would be a last resort for me.
Dave
-
 2
2
-
-
The Bulldog hitch is a great hitch! Please don't take a pry bar to it🤯.
Something is amiss. It's a very simple, solid design. As soon as you lift the lever and the retaining collar slides back, the hitch should pop open releasing the ball.
So I would say what Mike and Carol said about the swing gate not opening fully is a good place to start. Is the spring in place that opens the spring gate when the collar is retracted? When open, is the back of the spring gate pressing against the inside of the retaining collar? The hinge is at the front of the hitch and the retaining collar is what limits how far the swing gate will open. If these are both yes, I'd call Bulldog and see what they say. I can't think of what else it may be other than a faulty hitch if the above questions are both positive. And yes, be sure to keep a light coat of grease on the hitch ball! Good luck. Mine has worked flawlessly for over 5 years.Dave
-
2
-
-
Hopefully the std. models will look different than the TRD Pro model.
Otherwise, this is very disappointing indeed. Toyota's design crew really blew this.
Guess I'll be moving on to the HDPP F150 after all....Dave
-
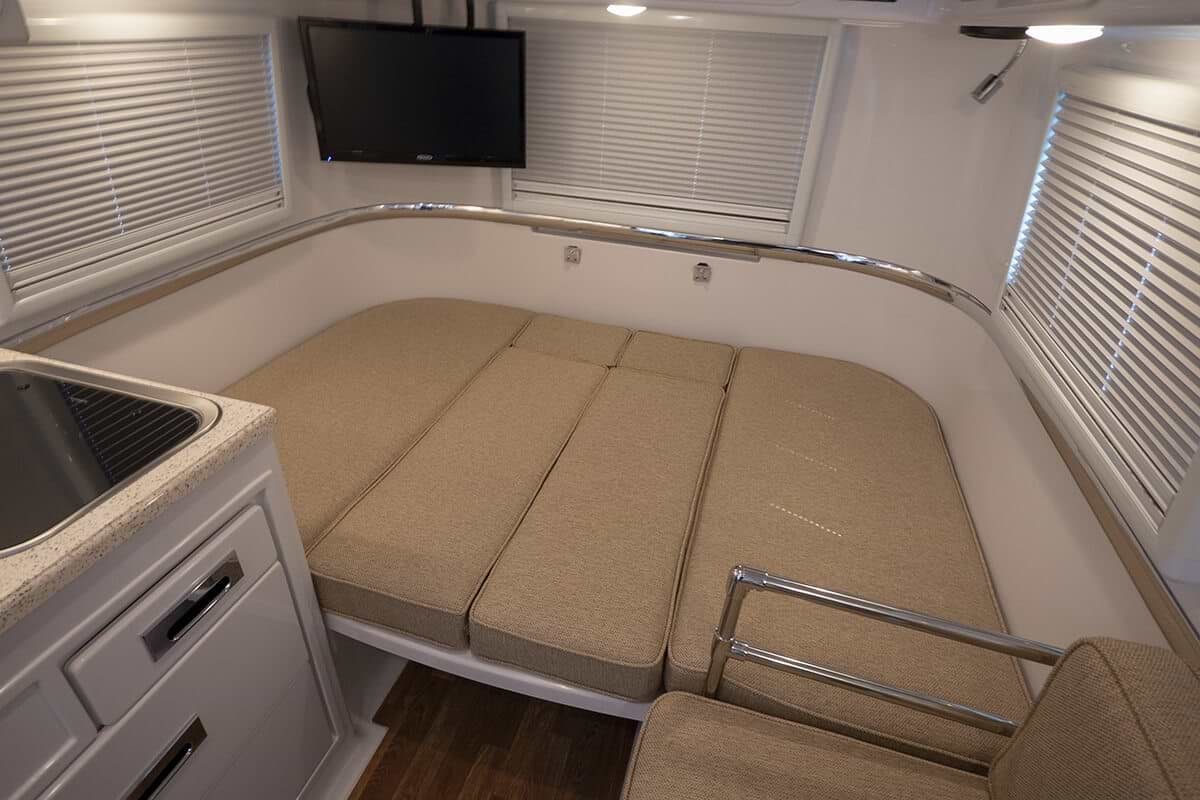
Here's a pic right off Oliver's website of a 2022 model Elite.
So I don't know what is going on with your trailer Longstride.
It does look like the window in the pic was placed higher however. Note no sticker and the shade frame pretty much touches the upper cabinet.
That would give just enough room for a continuous belly band.Dave

-
 1
1
-
2
-
-
Hmm. Pics of the 2022 Elite interior show a continuous belly band around the back of the trailer. The window is definitely bigger, which is nice, but everything fits pretty tight and there is no room for error in the layout. Not sure what could be done now. Maybe the shades could be raised and a new belly band installed, but I'd ask Jason what is really going on here.
Dave
-
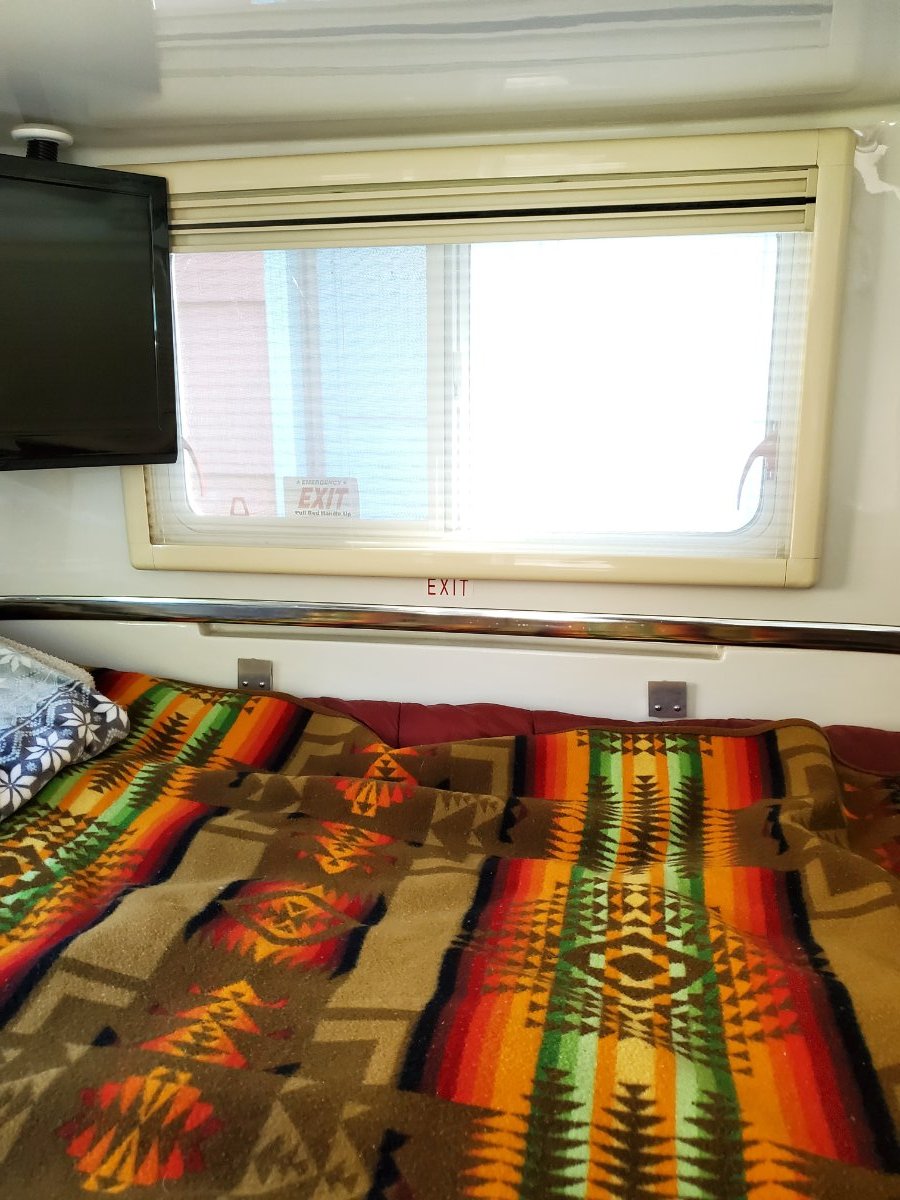
Here's a pic of my 2015 Elite1.
Has Oliver made the rear window larger in later models? Not sure why your trim would be like that. Well, I can think of some reasons but would rather let more informed people speak up first! As for the brackets, mine are a little crooked too. Not so great craftsmanship there but the table still attaches fine.
Dave

-
1
-
-
Here's a pic of my 2015 Elite1.
Has Oliver made the rear window larger in later models? Not sure why your trim would be like that. Well, I can think of some reasons but would rather let more informed people speak up first! As for the brackets, mine are a little crooked too. Not so great craftsmanship there but the table still attaches fine.
Dave
-
1
-
-
I haven't taken the motor head apart but recently had to replace both switches on the front jack due to corrosion. I looked all over for the parts and Barker by far had the best prices, plus they threw in 3 extra fuses. So I would recommend dealing directly with them for parts. Oddly the person I spoke with said not to take the motor head off for greasing and other maintenance. Not sure what to make of that. Especially after seeing John's "playdough" grease! Curious to know what gave out. Good luck fixing it!
Dave
-
Should have figured you didn't have it quite yet. I've looked high and low on the internet and haven't found those blinds yet! Hope the new rig works well for you. It sure sounds like it will!
Dave
-
1
-
-
Hey John,
It's been a long while. You were of great help to me brainstorming and fixing my fresh water supply issues way back when. No troubles since! 👍
That's quite the new rig you have there. Looks like it will be able to follow anywhere your truck can pull it! One thing that caught my eye when I looked the trailer up were the shades that are used. Since I still love my little Oliver, I am continually upgrading parts that I don't really like. The stock Oliver shades, while somewhat functional, are very bulky, a pita to restring, etc. Do you know the maker of your shades? Do you think they would be a good fit/improvement for the Oliver? And hopefully the X22 shades use a torsion(?) spring mechanism like a regular roller shade with no strings and tension springs to deal with.
Cheers!
Dave
-
1
-
-
Here's a link to a Practical Sailors article/review on different sealants that SeaDawg may have been talking about. Our discussion above got me thinking a bit more about sealants in particular applications and I came upon this fine review:
https://www.practical-sailor.com/boat-maintenance/marine-sealant-adhesion-tests
Education is ever evolving!
Dave
-
1
-
2
-
-
Seadawg,
Yes, the lense is radiused, but more importantly, the cut out in the fiberglass is square cut, this is not good practice.
As for the butyl tape, not all are created equal. Best I've found so far after reading many boating forums and personal use is Bed-it tape from Compass Marine.
Here is a link talking about the tape and how fiberglass should be properly worked:
https://marinehowto.com/bed-it-tape/ It is of course directed towards marine users, but all the fundamentals still apply for our trailers!The 4200 has stuck to my lense so far. I carefully wiped the edge of the lense with MEK on a Q-tip before installing and sealing. But you may be right about there being better sealants for that particular application. I have 3m 4200 around as it works well for everything else on the trailer.
Dave
-
 1
1
-
-
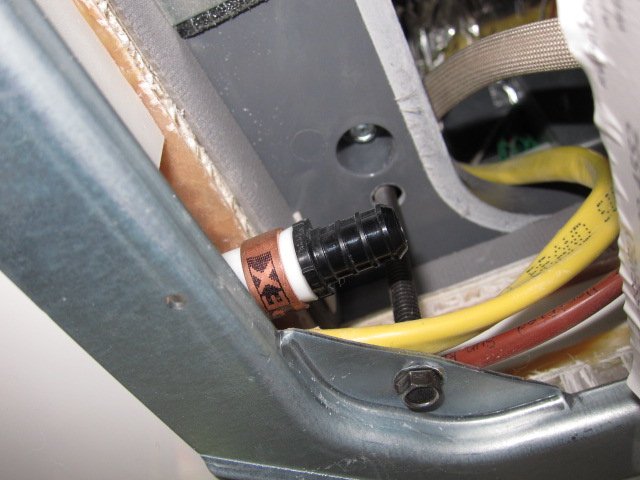
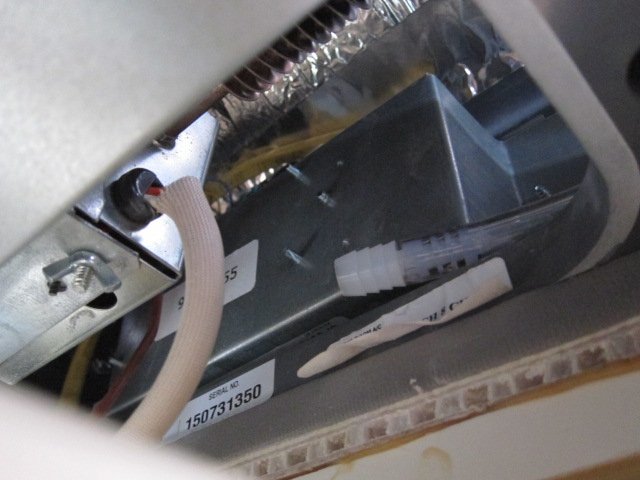
Steve,
On our Elite (2015), the condensate drain off the AC unit was not connected to the condensate drain installed by Oliver. Oliver's drain line is a white pex line that diverts the condensate to the outside. I bought a piece of silicone tubing to fit (can't remember the exact size) and connected to two tubes. The black fitting goes to the exterior, the white is off the AC unit. If you remove the interior cover, you should be able to see if they are connected. Other than that, I've heard pine needles can cause issues up top. Remove the top cover and make sure everything is clean. Haven't done this in a while so sorry for the somewhat vague description! Good luck.
Dave
-
2
-
-
That was a great repair you did csevel, very clean!!
This whole lense issue seems seems to be a pita to me. They all eventually leak, and the way Oliver cuts them in is just not good practice. Referring to John's pic above, a square corner cut has no place in fiberglass work, especially work that is subject to the stresses that boats and trailers are. Why Oliver does not properly radius their corners really bugs me as I know they must know better. Square corners concentrate stresses to a point greatly increasing the likelihood of fracture. I already have small fractures in the gelcoat radiating out from my rear lense corners. In fact, all the cutouts in my trailer were hacked out with what looks like a sawzall! Some corners are even overcut! It is just poor workmanship plain and simple. It may seem trivial, but when I lift up my seat access panels and see overcut square corners, it just makes me feel bad, as I know Oliver could do so much better. And they should do better if they really want to live up to their claim of building a superior trailer, which I will admit, they almost do. But, they still have lots of room to improve.... Personally, I'd prefer a small light bar up there or nothing at all. Finally, I believe a continuous ribbon of good quality marine butyl tape with a tight, carefully scarfed butt joint will not leak (best done on a cool day). Follow up with a thin bead of 3m 4200 around the exterior perimeter to clean it all up and you should be good to go for a very long time. My 2 cents!
Dave
-
3
-
-
John,
A bit late to this.... This mod has been on my mind for quite some time! But for different reasons though. The sound deadening potential of moving the cold air return (CAR) away from the furnace unit is one I hadn't thought of, but I think it is a great idea and probably would make a difference deadening the rocket.
I have the Elite. The furnace is under the front dinette seat next to the bathroom wall. The CAR is also right there cut into the seat riser. There has been lots of discussion of ways to heat between the hulls while boondocking and using the furnace. For us Elite owners (don't know about the Elite 2, but maybe similar?), the rear street and curb side between the hull corners are problematic in cold weather. What with the water pump and associated plumbing being on the curb side, and the check valves for water fill, and the exterior shower on the street side, they are relatively exposed. There is no space to run supply ducts to this area, so my thought was why not move the CAR back to the rear of the trailer. This way, when the fan kicks on, conditioned air from the cabin would be drawn down between the hulls at the rear of the trailer and make its way forward to the furnace fan. Even if the return air is not as warm as the supply air, it is somewhat warm and just having the air movement between the hulls would really help prevent any freezing down there. The main issue that has come up regarding this is that the blower could potentially receive less air due to passage restriction and/or have to work harder to get the air, causing overheating and furnace shut down. This is what Jason brought up when I posed him the question, but he wasn't sure. He said he would bring it up during the next design meeting. I don't really see this being an issue as there is lots of free space down below for air to move, just no space for duct work. One other potential drawback that I can think of is the fact that RV furnaces don't filter the return air like our home furnaces do. So whatever return air that makes its way to be blower will be recirculated in to the living space. There is a lot of dust from construction between the hulls. Oliver isn't as tidy as I wish they could be. Don't know if this could be a problem or not. Maybe the slow movement of the return air would not pick up any of the fiberglass dust and all that is down there.
What I plan to do is tape off the current CAR. Cut out the required space in a sheet of cardboard for a new CAR and tape it to the removed rear seat cover (dining table seat, curb side) and see what happens. I'm buying some remote temp sensors (thanks contributors on the forum for recommendations) to place in the furnace compartment and in the rear basement to see if there is any change in temperature. I'm not an HVAC person, but this seems like it's an idea worth pursuing for the cold weather campers out there. I'll post back in a few weeks when I get my test all completed.
Cheers,
Dave
-
2
-
-
On 8/30/2020 at 9:58 PM, Dean said:
The other option I am considering is the F150 XLT crew with 3.5EB max tow/ max payload, but really didn’t want an 8’ bed and that’s the only way to get the payload option.
The F150 HDPP is available with the shorter 6.5" bed with the Crew Cab. At least I've configured it that way many times!
Dave
-
Topgun,
Did you mean you got the OEM 36 gallon tank? Or did you get the 45 gallon tank from Transferflow?
Dave
-
Transferflow also makes a 46 gallon gas replacement tank for the Tundra. AFAIK, this tank and the one for the F150 are the only two gas replacement tanks available.
Also, it seems for 2021 model year, Ford is still only offering the HDPP package on the F150 up to the Mid XLT trim, nothing higher.
I saw a build sheet somewhere and that was the case. Kind of disappointing....
I suppose when the trucks actually are produced, things could change, but I'm not holding my breath on that.Dave
-
1
-
 1
1
-
-
There seems to be a pretty good thread over on the Fiberglass RV forum you should check out.
https://www.fiberglassrv.com/forums/f55/you-can-repair-fiberglass-52498.html
Good luck!
Dave
-
1
-
-
My trim in the bathroom also started coming off after a year or so. It's a difficult area due to all the moisture, etc.
If you want to go the extra mile when it comes time to reattachment, I would also highly recommend using this 3M adhesive promoter:https://www.amazon.com/gp/product/B00RY8L9U6/ref=ppx_yo_dt_b_search_asin_title?ie=UTF8&psc=1
After you clean the area with isopropyl alcohol, just wipe this stuff on before applying the trim. It has worked very well for me.
Dave
-
2
-
1
-
-
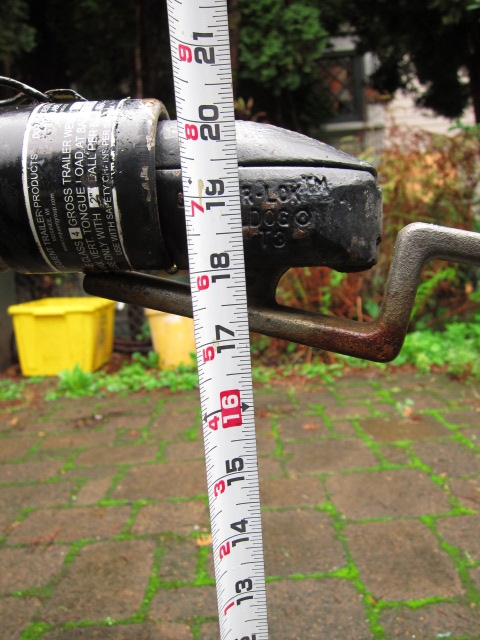
Hi Mark,
Here is a pic I posted some time back of out Elite1. Oliver has since changed the hitch design (no more telescoping hitch) but I would think that would not affect the measurement. Our trailer is as level as I could make it for the pic. Don't forget to allow for the rear end of your TV to drop a bit when you do your calculating. Tongue weight on the E1 is around 450 lbs +/-.
Good luck and congrats on your new Elite1, we love ours.
Dave
-
One thing I would like to see improved is better between the hull heating, especially the lower hull where all of the vulnerable plumbing resides.
One idea I thought may help is moving the return air vent for the furnace as far away from the furnace as I can place it. So as the furnace cycles on and off, hopefully some of the warmer cabin air would be drawn down between the hulls on its way back to the furnace. Even if the temperature wasn't raised a whole lot, just having the movement of air down there would be very helpful. On our Elite1, the return air vent is located under the front dinette seat which is also where the furnace is, so this offers no help. Think it might work?
The AC really needs to be worked over. It's loud to the point that we don't use it. Plus it's just way oversized for our trailer.
Hope everyone is staying well!Dave
-
1
-
-
That's a nice saw for sure. All I could recommend is a HD contractors garbage bag to put it in. Not too glamorous I know....
For those without a generator (like me), I would highly recommend a Silky Katanaboy 500 or 650. I have the 650 and it is razor sharp and cuts very quickly, almost as fast as a traditional 2-man bucksaw. Get some pocket wedges and you're good to go. Enjoy your Makita though...know your binds and be careful!
Dave
-
1
-
-
City water and FWT fill both leaking like that? My guess is that both check valves froze and busted open. That back corner of the trailer is the most vulnerable in freezing weather. Especially with all that plumbing back there. The pex lines won't rupture but the fittings sure will. From all the water coming out your weep holes it should be easy to find. Good luck.
Dave
-
1
-
Drain Valve in Bathroom
in Mechanical & Technical Tips
Posted
If the issue is with a sticking gate valve, which is opened and closed by that metal rod, pour some of this down the drain, let it sit for a few minutes, then open and close the valve a few times. It's actually good to add to your black and gray tanks now and again to lube those gate valves as well.
https://www.amazon.com/Thetford-Drain-Valve-Lubricant-15843/dp/B000BGK2L0/ref=asc_df_B000BGK2L0/?tag=hyprod-20&linkCode=df0&hvadid=312192374842&hvpos=&hvnetw=g&hvrand=4939187814671232371&hvpone=&hvptwo=&hvqmt=&hvdev=c&hvdvcmdl=&hvlocint=&hvlocphy=9061081&hvtargid=pla-569810088199&psc=1
Dave