

Pat Maundrell
-
Posts
140 -
Joined
-
Last visited
-
Days Won
1
Posts posted by Pat Maundrell
-
-
On 5/14/2021 at 12:05 PM, KWRJRPE said:
My triangle plate is an older style (not the "sleek-looking curved end" triangle plate introduced a few years ago). Most notably, my plate does not have the metal "ring" on the end that slips onto the bottom of the shaft, I must hold the plate in place while trying to push the pin through the shaft and plate holes straddling each side of the shaft. Should I consider purchasing the "curved" triangle plate to make life easier
?
I did and I am glad I did, the best $100.00 you will spend!. You not only get an improved Bat Wing but you also get the updated Ball Assembly with the new Friction Hold down Ring.
Don't forget to add get the Tractor Supply Pin & Spring Clip at your local Tractor Supply Store, again the best $8.00 you will spend!
-
 1
1
-
-
29 minutes ago, mccrusn said:
We have F150, 3.5l, 4x4, super crew, 5 1/2’ bed. We pick up our LEII 4/29. Should we get the Anderson anti sway bar stabilizer or not? Need the answers from folks with actual on road experience and similar trailer/TV configurations.
I have for over 45 years of RV Towing experience, plus another 50 years in the "Heavy Duty Truck Industry" severing in both Service/Sales related jobs, in the USA as well as eight years overseas. One thing I've learned is that you never stop learning! Today's RVs and TVs are much different and better in many ways than ever before. However, there is no Substitute for a properly Balanced TV and Trailer combination! All the fancy Air Suspensions and Electronic Brake/Towing Stabilization Systems can't make you Safer by themselves.
I assume your question is "centered around Safety" and "Handling" issues! Judging from how you asked the question, I am sure you have heard all kinds of things regarding WDH. IMO, the best WDHs are either the Hensley or the ProPride Hitches. The reason is simple, these are the only WDH that can eliminate Trailer Sway, almost 100%! Unfortunately they cannot be installed on an Oliver without substantial modifications. The bottom line is, the Andersen WDH is the only options, other than no WDH at all. Many RVERs assume that because your TV maybe able to carry the additional Rear Load and their TV is equipped with some type of magical Electronic System, they don't need a WDH. They can help, but they are still only Aids.
To answer your question directly, there is no situation that I can think of, that I would be comfortable Towing any RV Trailer, regardless of Type/Size/weight without some type of either a WDH or Sway Control device!
-
3
-
-
Good for you, you got Andy's recommendations, we did also! He is the Man!
We also set the Andersen WDH's Initial Chain Tension Setting (Baseline is the same every time) and then make"Fine-Tuning-Adjustments," based on the Feel of the TV's Front Axle! Our TV is a Mercedes GL450 with 4 Wheel Air Suspension. The "Feel" can vary depending on the Load in either the TV or Trailer. For example, when we leave on a Trip, Loaded we will have to adjust the Chains only 1/2 Turn tighter from the "Initial-Setting" than when we return empty from the same trip empty, which is understandable. I was however surprised to learn, that such a seemly small amount of change, could make such a big difference in the way the TV Feels/Handles!
By the way, we use a "3/4 Inch Thick Gauge Block," (to set the Initial-settings) which we insert over the Adjusting Screws, to measure the amount of the Screw Thread protrude outside the RED BUSHINGS. Interesting that this procedure results in the Chains not being overly tight, while providing an excellent Ride! I would encourage you to try this method for yourself, I think you will like it.
-
IMHO, I would seriously review the need for some type of Anti-Sway device! If your TV was a Peterbuilt Semi Truck, my suggestions would be the same. I've seen videos of RV Trailer accident, when the TV was a "Dually Pick Up," but the trailer still Jack Knifed( in Snowy Road conditions) causing an accident. I would suggest that you review the "Reasons why RV Trailers" have accidents in the first place and I think you will realize that no TV is immune to having an accident! We all should better understand the "Top Reasons," for accidents and then focus on them to be safer. My philosophy is, "IF IT CAN HAPPEN IT WILL!," and I for one, I don't want to be on the receiving end!
I am sure this will probably set off all kinds of Posts suggesting that you don't need a WDH or an Anti Sway Device with just a big TV. However, I think a comprehensive review of the reasons why RV Trailers have accidents in the first place, might change some minds.
-
I've got the same Locking Pin'Ring set up, but prefer the Heavy Duty 1/4 Spring Clip. I think it is harder to accidentally fall out.
I guess my point in bring this up again, is that I am surprised how just a "Simple/Inexpensive" and "Extremely Effective" Modification is, it isn't more commonly used by a larger number of Oliver owners!
More to the point! You hear all kinds of complaints about how hard the Andersen Hitch is to use, (it does have its moments) but when there is something that can GREATLY IMPROVE the situation to few people use it. Go figure! I would expect this to be used by almost everyone.
I've sent this idea along to Andersen for their comments.
-
 1
1
-
1
-
-
We just returned from a 4 day trip where we used the Tractor Supply Hitch Pin for the first time.
I am amazed at what a huge improvement this has made! When we went to Hitch-Up, alway a trying time, the New Pin made things easy, and I mean easy! For an investment of $8.00, you get a priceless improvement! I wonder if Andersen has ever considered making this Standard Equipment or an accessory?
Several of the previous Posts indicated that this idea has been around for years, but of the 28 Trailers at Alabama, I only saw one trailer using it. Of course, not all trailers used the Andersen Hitch, maybe 75% did, thats still a big number not using this Pin!
I can't recommend it more, best thing since sliced bread.
-
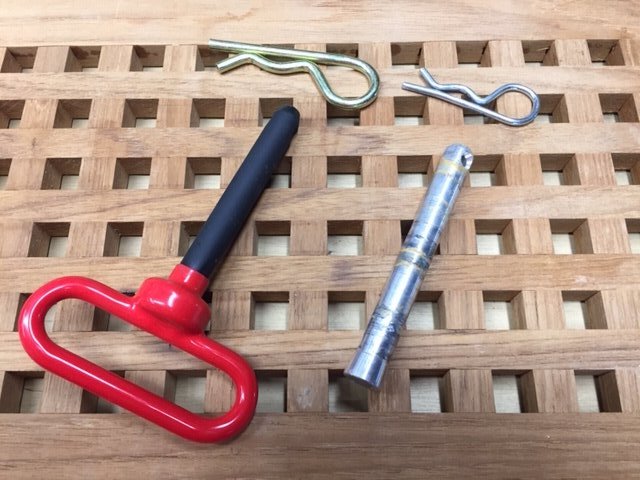
Here is a "Nice Tip" I got during the Oliver Rally in Alabama, which I think will make life a little easier.
I don't remember the guy's name, but I think it is a great Idea, thanks!
Basically, it involves replacing the original 5/8 inch Silver-Pin/Light Duty Spring Clip with the Red-Pin/Heavier Duty Spring Clip. IMHO, there are several benefits, 1. The Pin has a Handle (Red) which makes installing and removing the Pin much easier. I also elected to get a 1/4 inch Spring Clip which is much heavier than the Stock Clip, and therefore is harder to come out accidentally. 2. The 5/8 inch Pin has a Tapered Tip so it can aid in centering the Pin into the hole. 3. The Pin (p/n 269028) is available at Tractor Supply for only $4.99, the Spring Clip (p/n 268616) for $2.99.
Finally, I put a light coat of Vaseline on the Pin and in the corresponding holes in the Hitch to make inserting the Pin a little easier, it won't stain your cloths either.

-
1
-
4
-
-
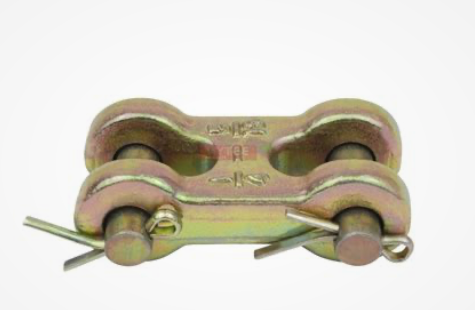
13 hours ago, LongStride said:
These are what the pros use to extend chain lengths. Do a web search for "tow chain repair links" and you will find them. They can't come apart unless you take out the cotter pins. You should use one that has (or exceeds) the rating of your chain. The quick links typically used to extend the chains on the Anderson system are simply the wrong item for the application.

Normally, I don't like to re-engineer things because of liability reason, but it hard to find fault with your fix. I'll consider using them. Thanks.
-
8 hours ago, John E Davies said:
Those repair links are great and I would definitely use them on trailer SAFETY chains, but I would be reluctant to put them on the Andersen chains. IMHO each of those chains needs an inexpensive mechanical “fuse” that will fail before the actual chain does. If you drive over a really severe dip, like a 20 degree driveway approach ramp, the chains get super tight. The red bushings are supposed to take care of that situation, but if you already have your tension set tight, which I personally don’t, then the chains can get extremely loaded, especially if your speed is too high. I would rather pop one of those than split the red spring bushings.
IMHO….! It is too bad that Andersen does not talk about this. I think they chose these for a valid reason, but they are not used at all with the standard length kits…. How confusing.
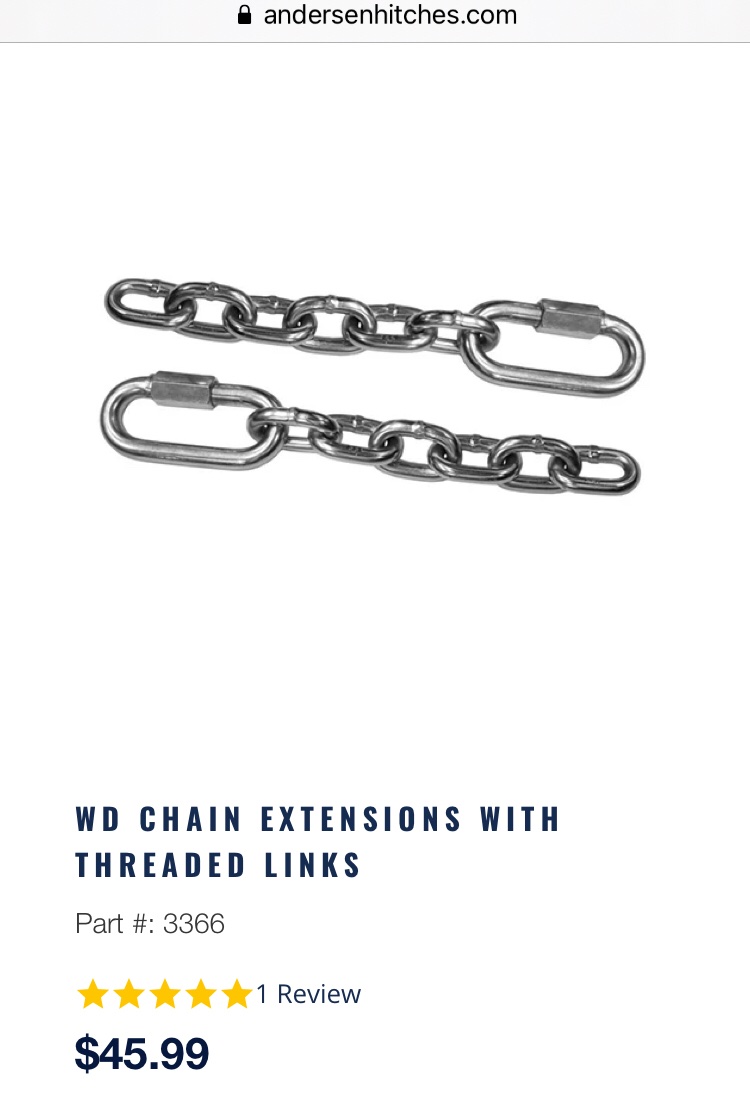
BTW I think the cost of Andersen spare parts is obscene…. Like ONE red urethane spring for $35. These are no different than the suspension bushings or bump stops that you can buy for $10 a pair… https://andersenhitches.com/collections/weight-distribution-hitch-parts-accessories
I don’t use loctite and I do use a wrench to tighten them. So far neither of mine has showed any sign of distress, with very light chain tension.
John Davies
Spokane WA
Oliver uses Blue Loctite!
Note, I personally tightened mine 2500 miles earlier and put a drop of Blue Loctite on both of them, they still loosened! The Blue Loctite I used was old (spoiled?) and I only put a drop on each so maybe that contributed to them loosening. These Connectors are not meant to be taken apart, particularly in this application. I used Red Loctite because it is even more permanent.
-
4 hours ago, John E Davies said:
Maybe because if it fails you will say very bad words and have to fix it by the side of the highway, or in a rainstorm…..? That is assuming you even carry a spare one. If you don’t have one, then you have to limp along and find a hardware store and hope they have one. Like electrical fuses, who cares? Until you need one….
John Davies
Spokane WA
I carry a Spare now and would recommend them.
-
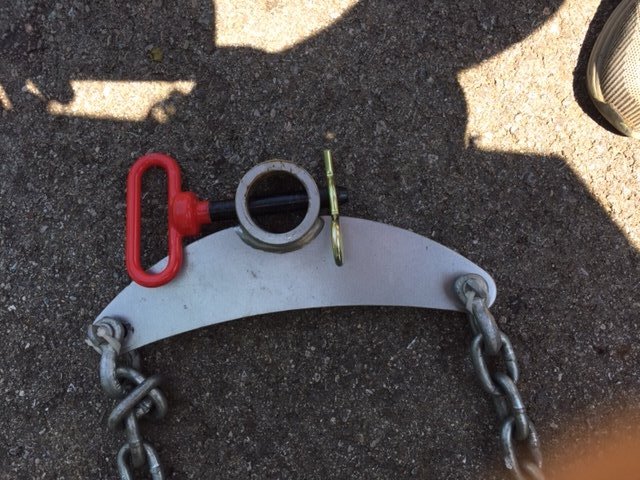
It happened to me while attending the Rally in Alabama.
When I started to disconnect my TV, I noticed that one of my Chain Connectors had come apart and was almost completely straighten out, but still connected to the Chain, ref the pic. I remember that this had happened to others on the forum so I was familiar with this problem. However, I was surprised because I had tightened both of my Connectors, having known of the problem and even put a Dap of Blue Loctite on them. I thought I better take the other side Connector off for comparison purposes, to make sure I got the same size replacement Part. I was SHOCKED to find it was finger tight! Note, I probably have 2000 miles since I first tighten and put Loctite on the threads! I got a replacement Connector at Lowes and flooded the threads with Red Loctite to ensure it didn't loosen up again.
I would highly recommend that everyone check their Connectors to avoid this problem frequently!
I showed my bent Connector to Oliver the next week and they said "they install Blue Loctite on them at the Service Center." Note, Blue Loctite can be disassembled easier than Red Loctite.
-
I attended the Non Rally last week and thought I would list, (not in any order) what I saw/learned from all the Oliver Guys/Gals I met. I made my list, starting on day one of things I thought would be of value to me, maybe others also. I don't have pictures of each of these, but maybe the "Guilty Parties" could follow up.
On a personal note, I did experienced a Flat Tire on my TV, which needed a new tire. Also had an Andersen Hitch Link failure, which I'll cover separately. The Gas Shortage wasn't a big deal, but I did see several Stations that limited purchases.
My list:
1. Reflective Red/Silver Tape on the lower parts of their Oliver, like you would see on a Semi Trailer, to improve visibility at night. Great Idea!
2. Motion Detector Lights mounted on all 4 sides of the trailer, I liked this idea to improve security.
3.Andersen Hitch Pin Handle, available from Tractor Supply, 8000 lbs capacity. This replaces the "Bat Wing Pin" and greatly assists in pulling the Pin in/out.
4. Mount a Level on the Front Basket or front of the trailer, that is visible in the TV's Back up Camera to assist in leveling (side-side). This tell you when you are level, without having to get out of the TV and checking several times.
5. Umbrella Storage PVC Tube mounted inside the door.
6. Entry Door Clear Window Kit, I go to add this.
7. Bed Mattresses, KTT or Southern or just Cushions, I am still on the fence!
8. Screen Door Towel Bar, of course.
9. Andersen Hitch Chains, Link or Dog Bone connectors?
10. Trailer Jack to change a Flat Tire.
11. Reverse the Window Shades to improve privacy! I've already done this!
12. Extra Back-Up Lights mounted on Back Bumper of the trailer. I likes this idea and plan on adding these.
13. Business Cards, great to exchange when you meet people.
14. LPG, Fire Pit. both Outland and Heiinger offer them. No wet wood to try to get to burn!
15. Apple/Sirius Radio added to the Oliver, must have.
16. Apparently the 2021 Olivers have added an extra 3 way Switch, in the lower Panty Cabinet to turn on/off the Courtesy lights, nice addition.
Overall, the Non Rally was a big success, I understand there were 28 Olivers in attendance, very nice time. I look forward to next year's Rally!
-
2
-
7
-
-
Thanks for the info, it will be helpful in modifying our Door. We plan on modifying our Bath Door by converting it to a Nautical Looking "Panel Door," something you would find on a Classical Sailboat, probably made of Teak. By removing the Mirror and replace it with a 1/4 Teak Panel, we hope to keep the weight close to the original door. The Teak Panel will take the place of the Mirror within the Door's frame. The exterior of the Door will consist of two panels, 40% upper over a 60% lower panel. These panels will be framed by 1 1/2 - 2 inch wide Teak. A Towel bar will divide the two panels, while a Chrome 15 inch Port Hole Mirror will be mounted in the Top Panel.
-
I am coming from Cincinnati and don't expect any Fuel Shortage problems in route, but just to be safe, I will be caring an extra 5 Gallons with me and will be filling up at the Half Tank Mark.
BTW, I'll have my Tongue Scale with me if anyone wants to measure their's, site E10.
One of my objective during the Rally is to get recommendations on which Mattresses to get, currently just cushions. You know Papa Bear/Mother Bear/Baby Bear. Which one is just right?
-
2
-
-
The question is, What "GOOD QUALITY" chairs to buy?
Let me appeal to logic! Everyone probably bought their Oliver because of the quality of workmanship/design/materials, all of which translates into durability. IMHO, these all these attributes, along with comfort, should also be present in your Camp Chairs, you know style!
We've had our two ZeeDee Chairs (used) for almost 20 years now and they were probably 10 years old when we acquired them. We recently change the Sunbrella fabric on them not because they were worn, but because we wanted a different color to match our Oliver's. There no question they are more expensive, around $180.00 each, but when you do the math, ($180.00/30 years = $6 year) they are actually cheap. BTW they are extremely comfortable. Stop by our Site E10 at the Rally for a Road Test and a cold one.
-
1
-
2
-
-
On 4/22/2021 at 9:33 PM, Pat Maundrell said:
We bought our 2019 EL2 used, it was equipped with everything we needed except a Receiver Hitch to attach a Bike Rack. After reviewing all the Posts on the subject I got to work and made one, reference the attached pics.
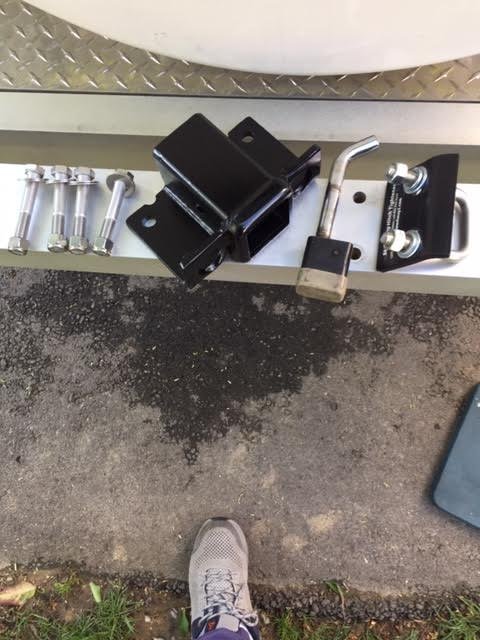
1-1 jpg shows the Receiver Hitch and attaching Stainless Steel Bolts, Lock Pin, Anti Ratter Device. Receiver Hitch= Harbor Freight $20.00.
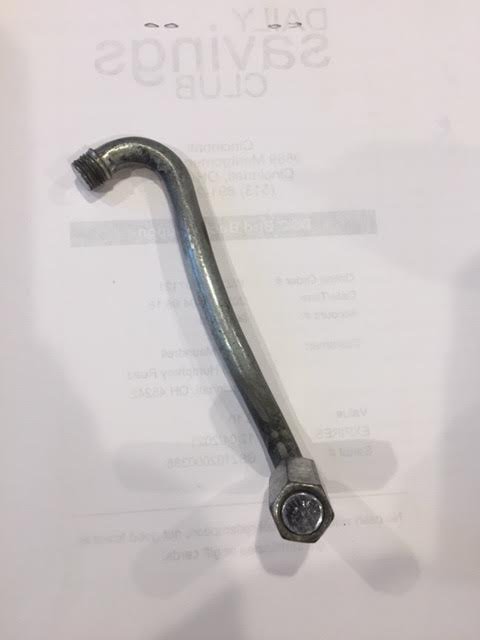
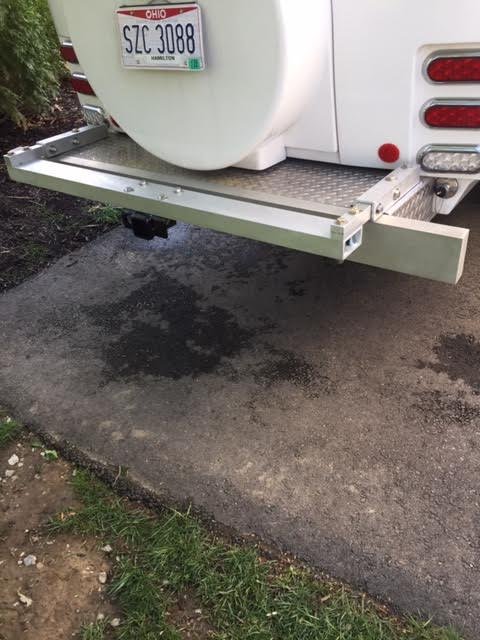
1-2 jpg shows the finished assembly. Not shown are the Spacers inside the Channels Beams to prevent the Beams from collapsing when the bolts are torqued. The Spare Tire cover can be removed and the Rear Bumper can be lowered to access the Sewer Pipes.
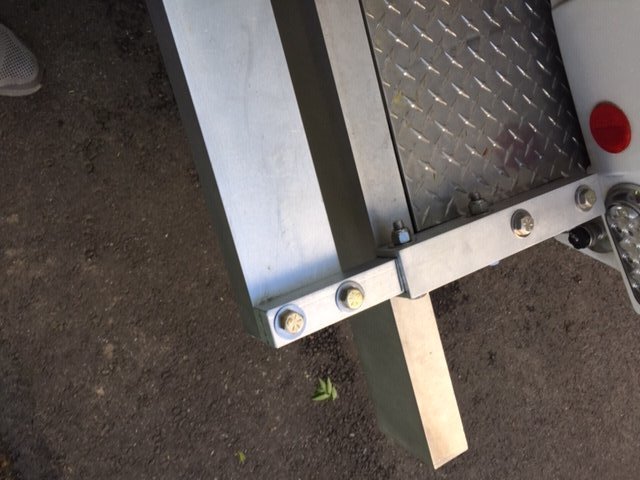
1-3/img0684 jpg shows the left/right hand ends of the assembly. Note all Aluminum is Aircraft 6016, and all fasteners are SS. Approx $150.00 in Bolts and $120.00 in Alum.
img 0683 jpg show the underneath view.
DSCF 1981 jpeg Shows a Stowaway 2 Storage Trunk mounted to the back of our MH to carry our 2 Folding Bikes at the time, Sold. I am thinking about getting another Trunk (this time used and White) to carry one of our ebikes (60 lbs) when we get them. I am not 100% sure of this idea yet, but it does have the benefit of greater security and protection for the ebikes. The Trunks weighs about the same as a Bike Rack (30 lbs), but is about $500.00 less expensive and can carry a few extra light weight things.
Note: I plan on limiting the total weight on the rear to include the Alum Receiver Hitch, Bike Rack or Trunk, plus one ebike to around 125 lbs, or so.
I may have to rethink the above Trunk idea! The above picture shows our old Folding Bikes, not ebikes attached to the back of our old Motor Home. It wasn't a problem lifting these into the Trunk because they are much lighter. My intent was to put only one ebike in the Trunk, about 55 lbs without the battery, over twice a regular Folding Bike. I am 72 years old and could probably lift the ebike, but sooner or later it would probably hurt myself. My ebike is expected to arrive in one week, so I better get in shape.
-
1
-
-
On 4/22/2021 at 9:33 PM, Pat Maundrell said:
We bought our 2019 EL2 used, it was equipped with everything we needed except a Receiver Hitch to attach a Bike Rack. After reviewing all the Posts on the subject I got to work and made one, reference the attached pics.
1-1 jpg shows the Receiver Hitch and attaching Stainless Steel Bolts, Lock Pin, Anti Ratter Device. Receiver Hitch= Harbor Freight $20.00.
1-2 jpg shows the finished assembly. Not shown are the Spacers inside the Channels Beams to prevent the Beams from collapsing when the bolts are torqued. The Spare Tire cover can be removed and the Rear Bumper can be lowered to access the Sewer Pipes.
1-3/img0684 jpg shows the left/right hand ends of the assembly. Note all Aluminum is Aircraft 6016, and all fasteners are SS. Approx $150.00 in Bolts and $120.00 in Alum.
img 0683 jpg show the underneath view.
DSCF 1981 jpeg Shows a Stowaway 2 Storage Trunk mounted to the back of our MH to carry our 2 Folding Bikes at the time, Sold. I am thinking about getting another Trunk (this time used and White) to carry one of our ebikes (60 lbs) when we get them. I am not 100% sure of this idea yet, but it does have the benefit of greater security and protection for the ebikes. The Trunks weighs about the same as a Bike Rack (30 lbs), but is about $500.00 less expensive and can carry a few extra light weight things.
Note: I plan on limiting the total weight on the rear to include the Alum Receiver Hitch, Bike Rack or Trunk, plus one ebike to around 125 lbs, or so.
Unfortunately I need to rethink the Trunk idea. Although the idea has mostly positive benefits, with regards to storing my ebike inside, there is one big problem! The two folding bike in the above picture were not ebike (much lighter) and were not an issue lifting them up high enough to clear the trunk. Ebike on the other hand are around 55 lbs without the Battery. I am 72 years old and can probably lift that amount of weight, but I would probably hurt myself in do so sooner or later.
My thinking is now a Bike Rack. The trick is to lift the Front Wheel first onto the Bike Rack and then the Rear Wheel, this results in lifting only half the weight at one time.
-
We bought our 2019 EL2 used, it was equipped with everything we needed except a Receiver Hitch to attach a Bike Rack. After reviewing all the Posts on the subject I got to work and made one, reference the attached pics.
1-1 jpg shows the Receiver Hitch and attaching Stainless Steel Bolts, Lock Pin, Anti Ratter Device. Receiver Hitch= Harbor Freight $20.00.
1-2 jpg shows the finished assembly. Not shown are the Spacers inside the Channels Beams to prevent the Beams from collapsing when the bolts are torqued. The Spare Tire cover can be removed and the Rear Bumper can be lowered to access the Sewer Pipes.
1-3/img0684 jpg shows the left/right hand ends of the assembly. Note all Aluminum is Aircraft 6016, and all fasteners are SS. Approx $150.00 in Bolts and $120.00 in Alum.
img 0683 jpg show the underneath view.
DSCF 1981 jpeg Shows a Stowaway 2 Storage Trunk mounted to the back of our MH to carry our 2 Folding Bikes at the time, Sold. I am thinking about getting another Trunk (this time used and White) to carry one of our ebikes (60 lbs) when we get them. I am not 100% sure of this idea yet, but it does have the benefit of greater security and protection for the ebikes. The Trunks weighs about the same as a Bike Rack (30 lbs), but is about $500.00 less expensive and can carry a few extra light weight things.
Note: I plan on limiting the total weight on the rear to include the Alum Receiver Hitch, Bike Rack or Trunk, plus one ebike to around 125 lbs, or so.
-
2
-
4
-
-
On 4/5/2021 at 8:31 PM, Pat Maundrell said:
I plan on attending, Hull 466, Section G.
I was able to change from Section G to Section E, swee you guys there.
-
1
-
-
On 4/11/2021 at 8:16 AM, Mountainman198 said:
I searched and searched the Net and local brick and mortar over to find what may be one of the last tins of 3M Marine Ultra. A email to 3M reveals that this product has been discontinued and Their suggested replacement is the liquid-based 3M™ Perfect-It™ Boat Wax, 36113. As a fan of paste waxes, a liquid replacement is not great news but I will try a bottle and see.
Now that's what I am talking about! Great looking finish on your Oliver, good job.
-
On 3/24/2021 at 2:03 PM, Mattnan said:
We started by connecting the way we were showed during our orientation, just the way Mike described it. Admittedly, my backing up and straight line positioning skills need some work. This admittedly took some time and trips in and out of the cab of the truck. I will admit I now generally use the method described by SNY SD UP. This seems to work better for me. When perfectly straight and level the chains are equally tight. A slight change in elevation of the truck or trailer, or slight angle left or right does manifest in a difference in chain tension. To me this is an indication we have this set up about right. I checked but have never needed to adjust the red bushings yet. I can tell you after this thread I will definitely check that link regularly and may add a little lock-tite. Thanks for sharing. One more thing to the exterior check list!!
Generally speaking this type of link is not intended to be used as "Quick Disconnect Fittings," therefore they should not intended to be taken apart regularly. I have used these Links for years in all sorts of applications and always have considered the possibility of them coming apart. It has alway been my procedure to install Loc-tite on the threads of these Links before assembling them. This accomplishes two things, 1st it makes sure they have been assembled and tighten correctly, 2nd the Loc-Tite makes sure they do not loosen
-
1
-
-
My fallback position is always Youtube! You will find all kind of recommendations there, some bad, but many really good. I learned a new method called "Road Flush" that uses a mixture of Borax (remember 20 Mule Team) and Dawn Dish Soap. This is primarily a Corrective Action procedure, but can also be used as a Preventive Maintenance Practice! No need for expensive stuff.
-
You do not have to Stamp the Vin on the Frame itself, you can make a "Vin Plate" out of Aluminum and Rivet/Bolt it directly to the Frame. I've had to do this myself several times and was surprised it was done at the direction of the Police.
-
I've tried most of the "Magic Concoctions," out there, and they all claim to work better than the other one, but in the end, I have found good old Elbow Grease to be the best!


Aluminum tongue tool box
in Ollie Modifications
Posted
I couldn't recommend a Tongue Storage Box more! We adapted the Stock Oliver Basket into a Storage Box and store our Leveling Ramps/Chocks and a few other Tools used during the Hitching process. Additionally, we store our Water Hose/Filter as well as our Shore Power Cables/Adapters. We secure this Box with Pad Locks, that are keyed the same as the Hitch Latch Lock as well as our two Electric Bikes Locks. I would estimate the total weight of items to be around 10-15 lbs.
I've given the "After Market Aluminum Boxes" some serious consideration also, but because they are a little wider than the Stock Oliver Basket, (I think by 4 inches,) I am worried that they can causing a problem when you making very shape turn with the Trailer. I've come close to hitting our Stock Oliver Basket with our TV during Shape U-Turns in Parking Lots.