

Ronbrink
-
Posts
558 -
Joined
-
Last visited
-
Days Won
7
Posts posted by Ronbrink
-
-
On 8/11/2023 at 11:53 AM, Brian and Brandelyne said:
Hey man, catching up on some old posts. We are looking at installing a shower curtain rod and yours looks perfect. Where did you get this one? Thanks for the detail in your post.
Appreciate anything you can share.
Brian
Brian, let me know if my install is of interest.
-
 2
2
-
-
On 8/10/2023 at 9:03 AM, Geronimo John said:
Instructions have the info. Basically the transfer switch comes with a super duty plug and that line plugs into the inverter.
You disconnet the 20 amp wire at the breaker that serves the ac and replace it with a longer wire that goes back from the rear dinette seat to the back of the rear bunk. This line goes to the switch input labeled for the utility company supply.
The other switch connection is used to reconnect the ac power supply.
I mounted my second switch aft of the OEM one under the street side bunk. This required me to replace the super duty switch cord that was too short. Some owners elect to mount the switch on the wheel well to avoid this. Personally I like bolting the add on equipment through the fiber glass to a cutting board JB welded and bolted in place. I use small SS fender washers and bolts and it does not detract from the appearance under the bed overhang.
GJ
Gj, great information, thanks for sharing. I too like to have add-ons maintain a factory- installed appearance
-
11 hours ago, mountainoliver said:
Something that should be mentioned in running the air conditioner on the batteries is that the older inverter is 2,000 watt capacity and according to the manufacturer it will safely handle 2,000 watts continuously. FOLLOW THE MANUFACTURER SPECS! Something else that should be noted here and may have already been mentioned is that the air conditioner should have the easy start module installed and really no other DC loads or AC loads can be running. Especially no other AC loads as the 2,000 watt inverter will be very close to maximum capacity running the original Dometic unit. Additionally, all of the high amperage DC lugs and connections should be checked to make sure that they are tight. I found one factory crimped lug to very warm while running the air conditioner on the batteries so I needed to re-crimp it. My air conditioner draws on average over 100 amps DC and that is dependent on cabin temperature. As the trailer cools down the DC amp draw goes down a bit (less compressor head pressure).
All of your points are duly noted, thanks for sharing! There have been numerous recent comments on the Oliver FBs recommending diligent inspection of wiring connections, something I will definitely undergo prior to wiring in the second TS. I oftentimes use my smaller genny to run the a/c, which is probably comparable to the 2000w inverter, so I am accustomed to and conscientious of the limitations of my system. Again thanks!
-
11 hours ago, mountainoliver said:
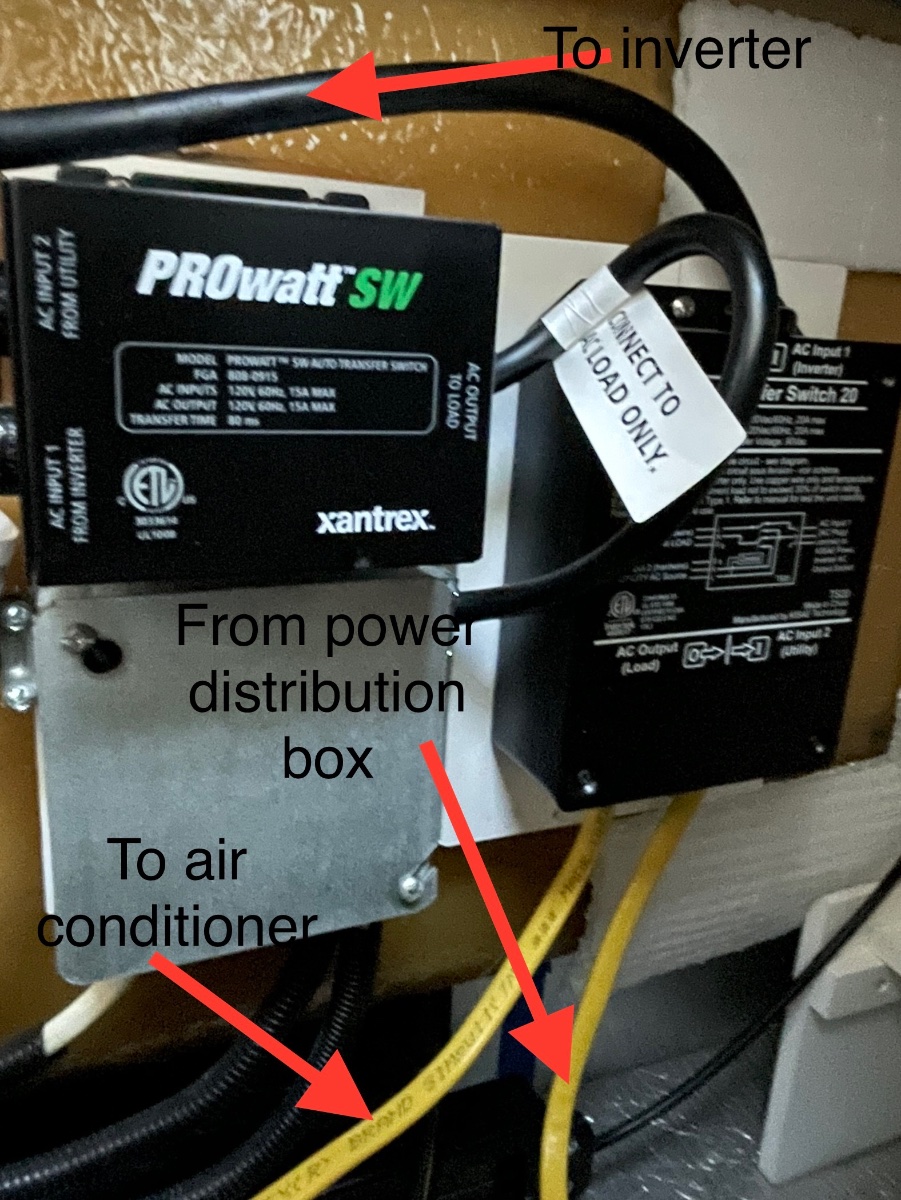
When I upgraded my batteries from flooded cell lead acid batteries to three Battle Born batteries a few years ago, I also made a few electrical upgrades as well. One upgrade was to clean up/simplify the DC wiring and the other was to add a new 20 amp transfer switch to allow me to run the air conditioner on the batteries by way of the inverter. In the photo the new 20 amp Kisae brand transfer switch needed is on the right and the various wires are labeled. The black wire has a 20 amp plug on it and just simply plugs into the inverter. The two yellow wires (12 gauge wires) are the ones that you’ll need to cut. The one on the right comes from the air conditioner breaker in the power distribution panel and the wire on the left goes up to the air conditioner. The correct diagram is printed on the transfer switch cover. I hope this helps.
Thank you, this is the pertinent information I’ve been seeking!
-
22 hours ago, Geronimo John said:
There is a post on our site from another owner that installed one with pictures. Likely was John D., but I may be foggy on that.
GJ
Gj, thanks for the information provided, much appreciated!
-
2 hours ago, Geronimo John said:
Yes. Basicallly my goal is to be able to use our 300 AH of Battleborns and our 3,000 watt inverter to power up the Houghton A/C.
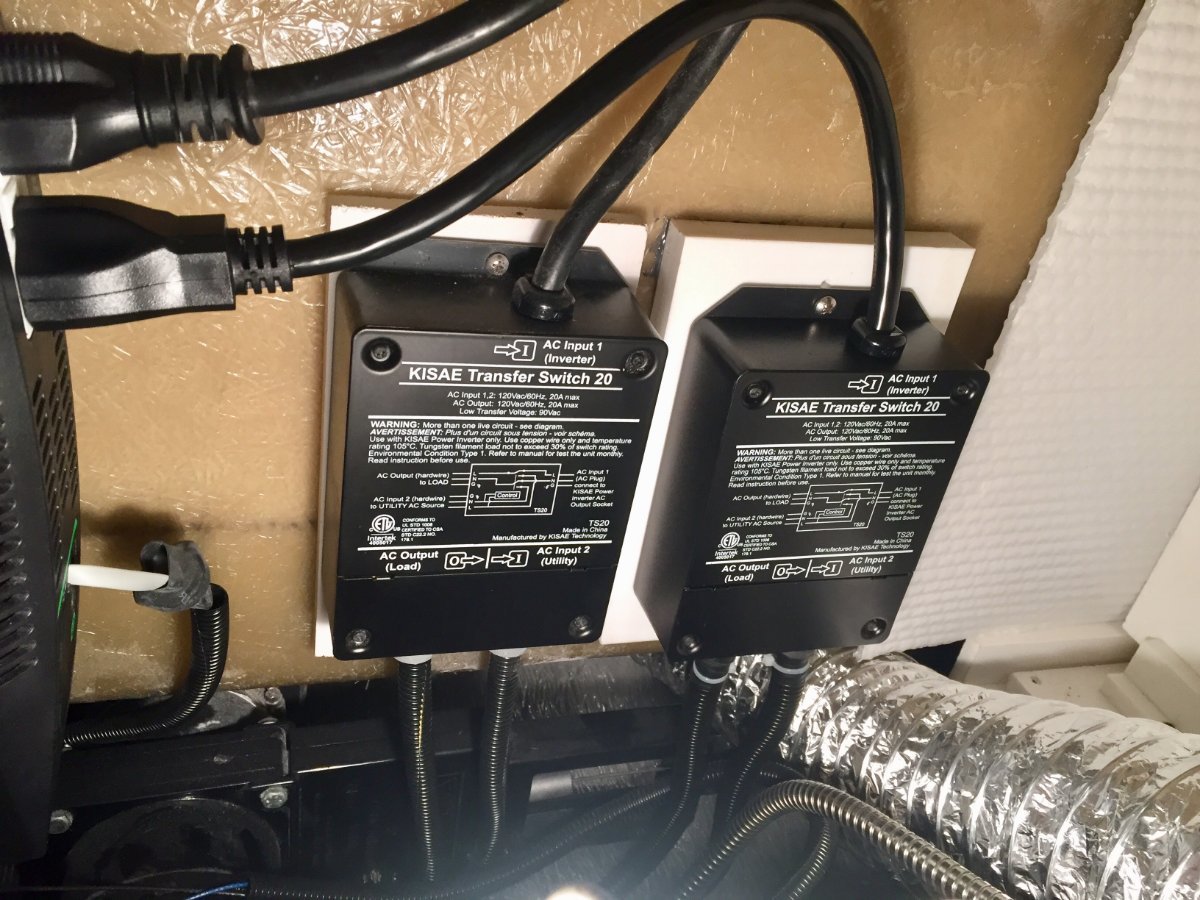
Consensuss approach is to install a second power transfer switch next to the OEM. This does require changing out the 20 amp power feed from the existing breaker to the second power transfer switch. Took about 6 hours to complete the job.
GJ
Gj, thanks for your response. We both have the same goal, however I have yet to do an a/c swap; that will be my next big mod for sure. I currently have the Dometic 11,000 with soft start in my 2020. Can you provide the basic wiring configuration for the second transfer switch, or is that illustrated in the Kisae TS instructions? Again, thanks!
-
On 9/7/2021 at 4:55 PM, Minnesota Oli said:
Besides the huge improvement in the sound level there is also another area where it surpasses the Dometic AC that I had replaced. The Houghton with the compressor running draws 10 amps while the Dometic was pulling 16 amps. So I decided to install a second transfer switch for the air conditioner to test it running off the batteries.
It was 11 o'clock in the morning on a cloudless sunny day the temperature was 88 degrees. I had my batteries 400 Ah fully charged with 340 watts on the roof and 230 watts remote ready to feed it. I set the thermostat at 70 degrees and turned on the AC. Once it brought the temperature down to 70 I noticed it was cycling four minutes on with the compressor and four minutes off. I left it running until about 5 o'clock and was surprised to see that the batteries were at 97 percent. So I was happy with those results but time will tell if that is the norm.
I put the picture in to also show it's nice low profile.
Paul
How was the second transfer switch for the a/c wired in? I have a 2020 OLEll with the 2000 w inverter and just upgraded with 460Ah lithium, want to run the a/c on batteries for shout duration during stops/breaks when traveling. Thanks
-
On 3/20/2022 at 6:29 PM, Geronimo John said:
Good idea. I believe the 2019 A/C pulls 16 amps. @ 120 volts thats 1920 watts.
How durable is the stock 2,000 watt inverter if one was to only power up the A/C against it?
Gj, did you ever get an answer to your question?
-
On 7/30/2023 at 7:29 AM, Geronimo John said:
Yes, you need a second transfer switch.
GJ
Gj, please see my last response addressed to you. My son is a retired Naval electronics tech and asked me obtain the aforementioned wiring schematics for use in wiring in the additional transfer switch. He knows his stuff, so any informational details from you or any other knowledgable individual on how to properly complete the install would be greatly appreciated. My goal is to briefly run the A/C off the lithium batteries (460Ah total) during stops, and fully understand the inherent limitations of my system. Given the competence of my son, I feel he can perform this task in a safe manner. Thank you
-
Gj, thanks for your response! Can you provide any details on the additional TS install? I have reached out to Oliver for a more detailed and comprehensive wiring schematic, but they have yet to respond to the request.
-
Spike, was the Kisae transfer switch installed in addition to an existing one? I just upgraded my 2020 OLEll (no solar) to lithium, but the Dometic a/c only works on shore power. As I understand, the Kisae TS will allow me to operate the a/c via the 2000w inverter.
-
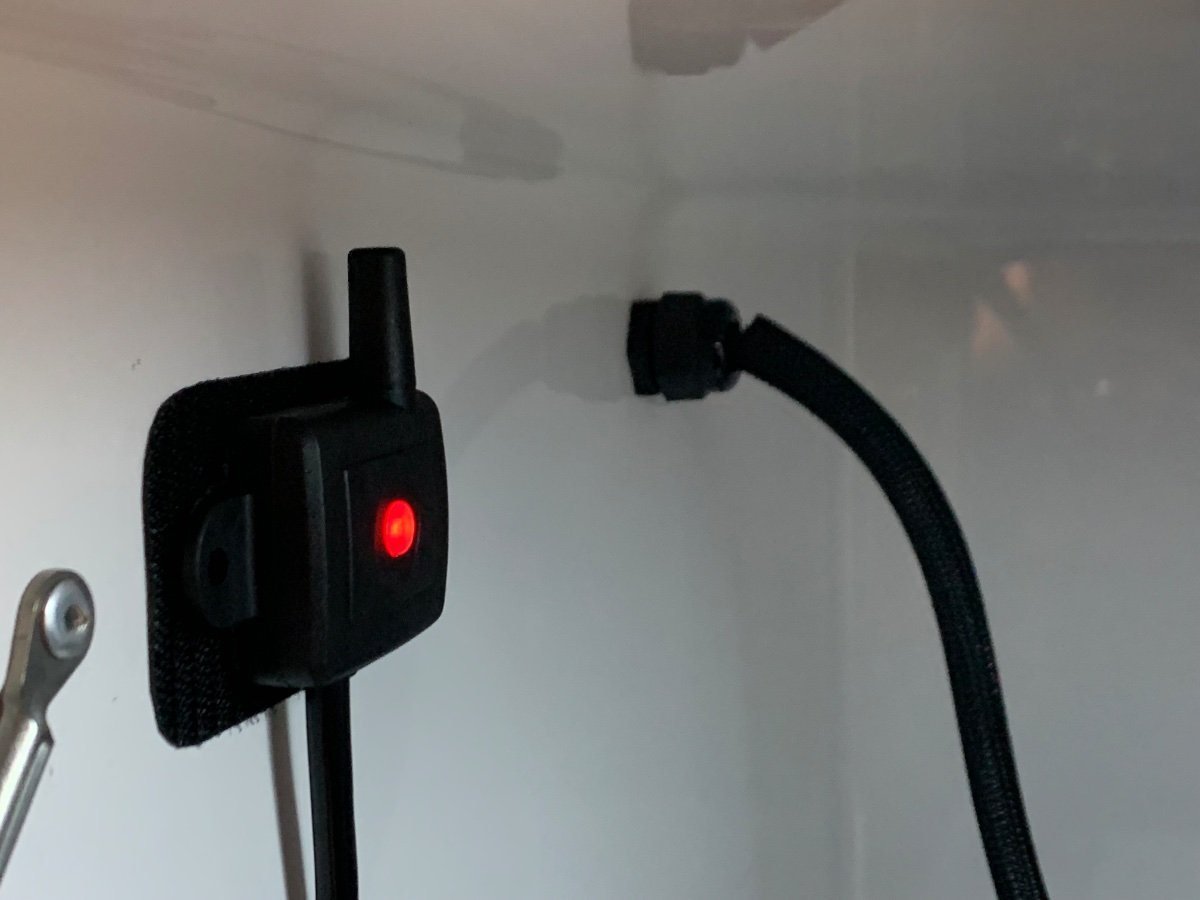
I did the same, the battery box is a great alternative location for my TST repeater. Simple installation with direct connection to batteries via clips and excellent reception of cap sensors (TV and OTT) by the monitor.

-
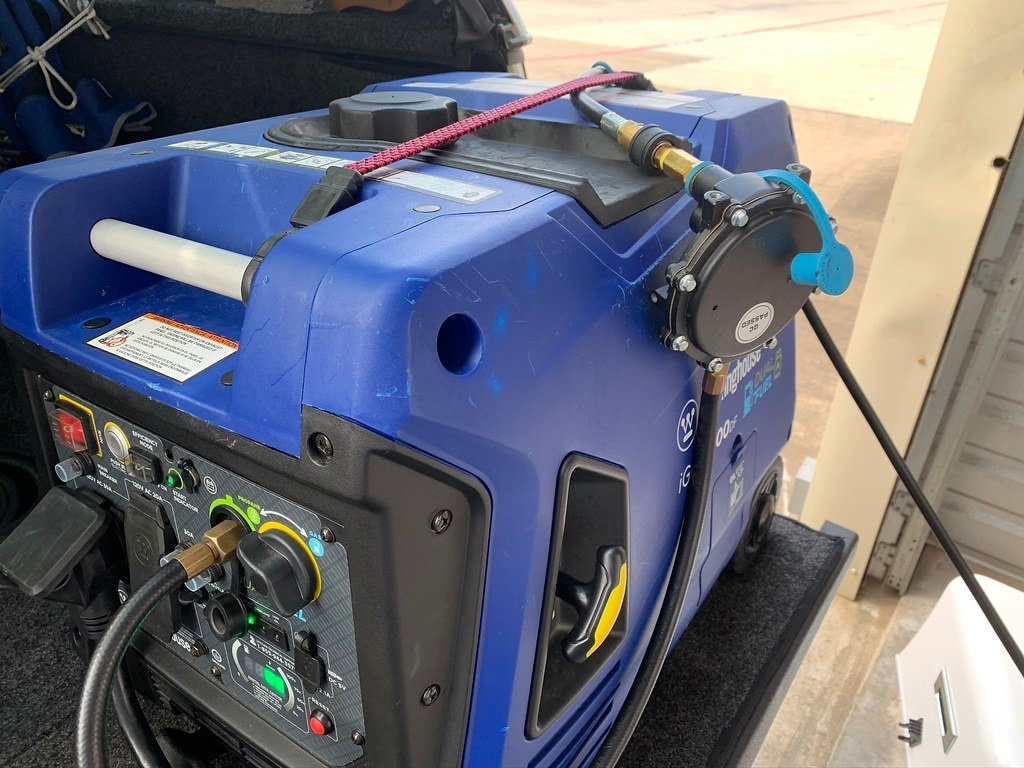
I have been able to run both of my dual fuel generators in the same manner, either directly to a propane tank or the OTT’s QC ports. The following has been posted a few times on Oliver FBs in response to others requesting pertinent information: To answer your question, alter the two stage regulator system that comes with most dual fuels by installing a QC between the first stage (primary) and second stage (secondary) regulators. When utilizing the Oliver’s QC for propane, the primary regulator is removed and only the secondary is needed to operate the genny within reach of a hose. I typically pass an extension hose connected to the Oliver’s front QC through the access port on the front tank housing and stage the genny on the trailer tongue, TV tailgate or ground. If you want to connect directly to one of the trailer’s tanks or a spare, you simply utilize the two stage regulator by rejoining with the QC.
Attached photos show the divided regulator and secondary stage only being used to operate generator by an extension hose from the OTT’s front QC.
Additional info: I too have the Westinghouse iGen4500DF and find on long hose runs to have the regulators close to the generator with use of an extension hose when spanning directly from a propane tank to the generator.
-
 2
2
-
-
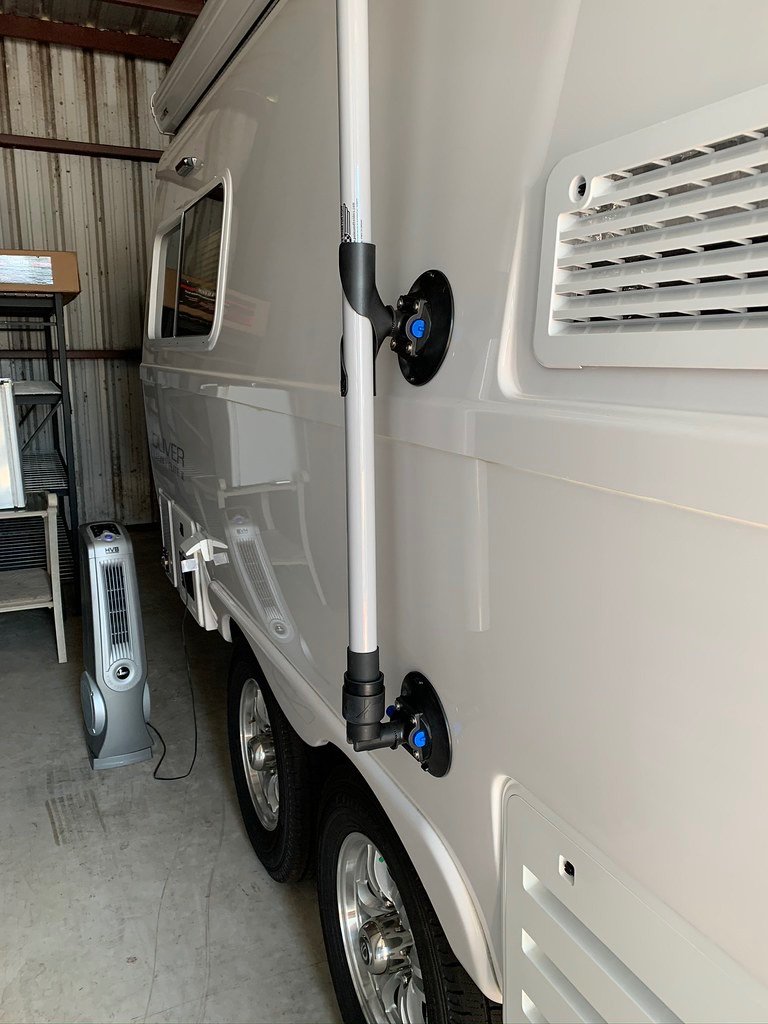
That is one solid pole mount!
-
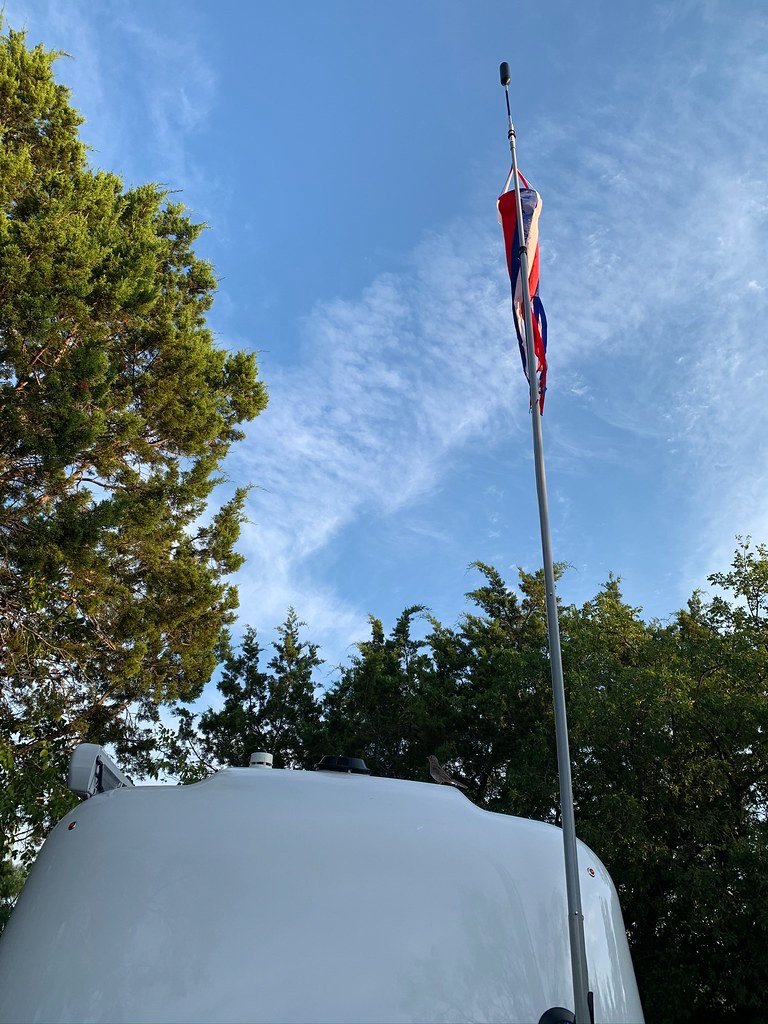
Flagpole Buddy indeed, 1.5” mounts and 16’ fiberglass pole. The suction cups work great with the slanted sides, but proper spacing is important to have a perfect vertical pole. I like the versatility in positioning around the trailer, excluding the curb side if the awning is in use. Pic of mock up on curb side.
-
1
-
2
-
-
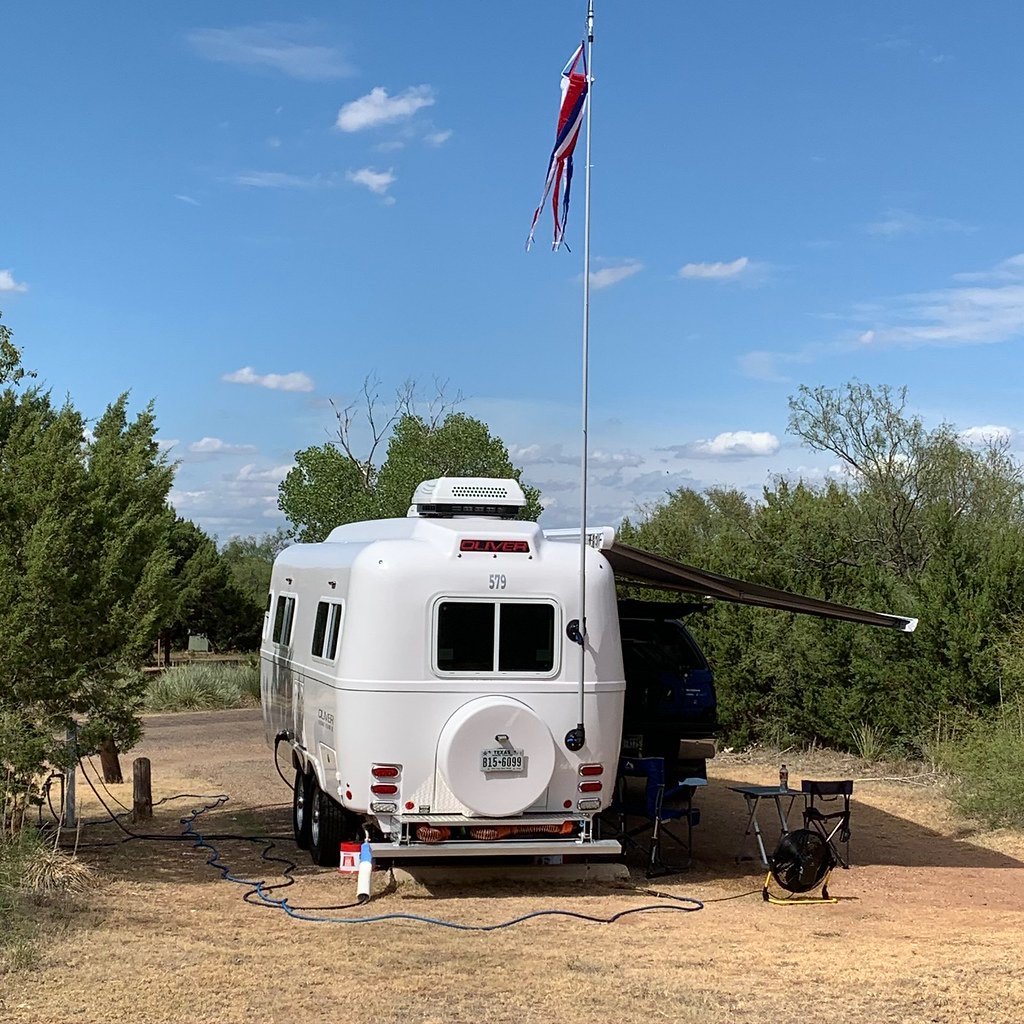
Yep, mounted a WeBoost atop the flagpole. Works good when nestled under trees and better when not. Fabricated antenna mount to fit pole end.
-
1
-
6
-
 1
1
-
-
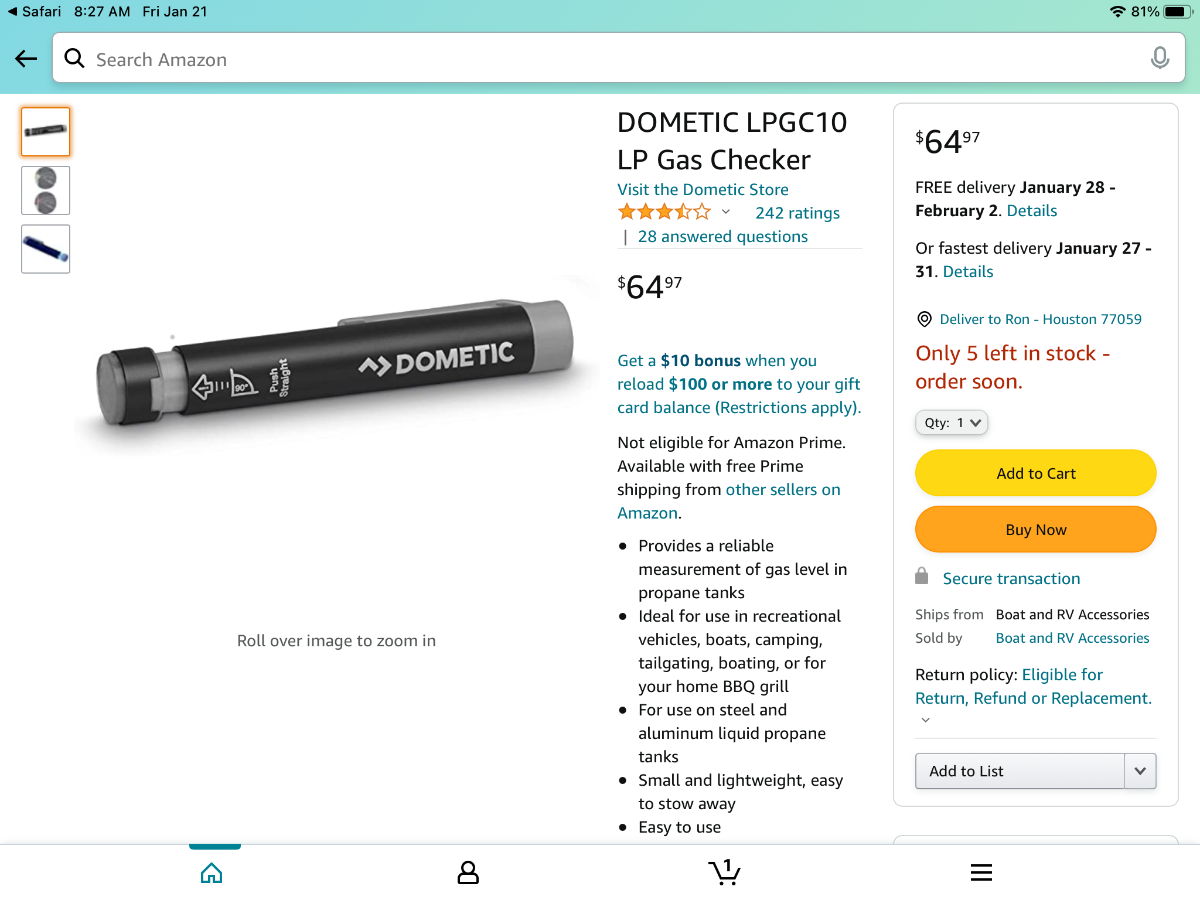
I’ve been using a similar device to the one Mossey featured above, but made by Dometic. It is easy to use and provides an accurate assessment of the tank levels. Regardless of the brand, each seem to be comparable in function and pricing.
-
2
-
-
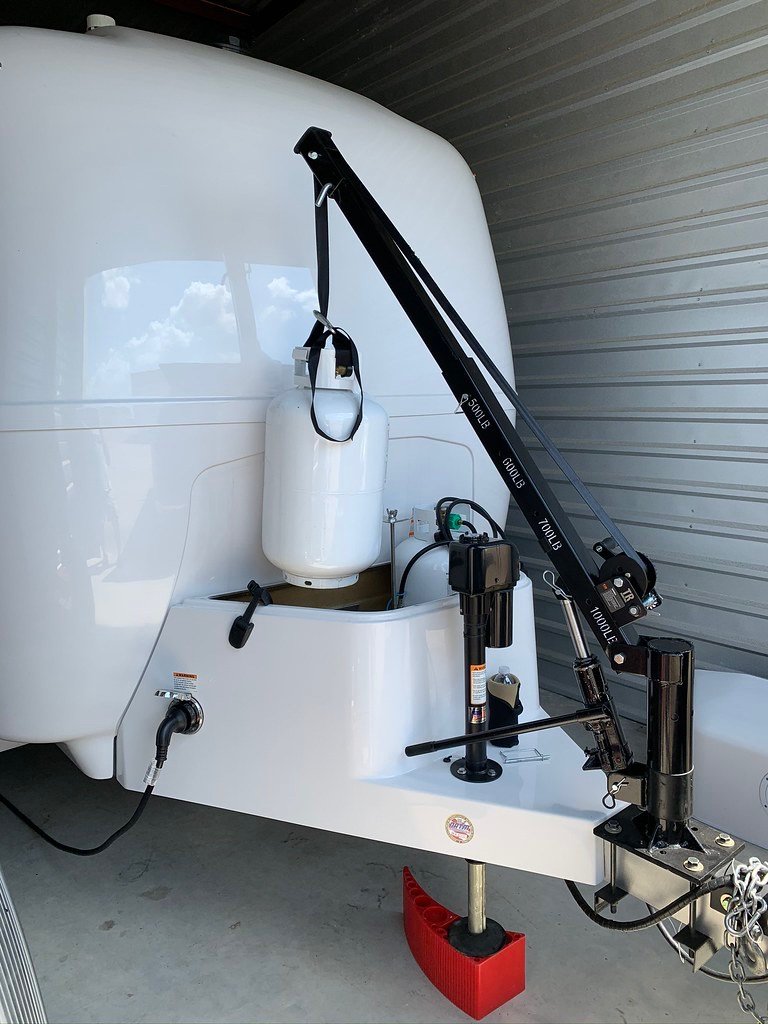
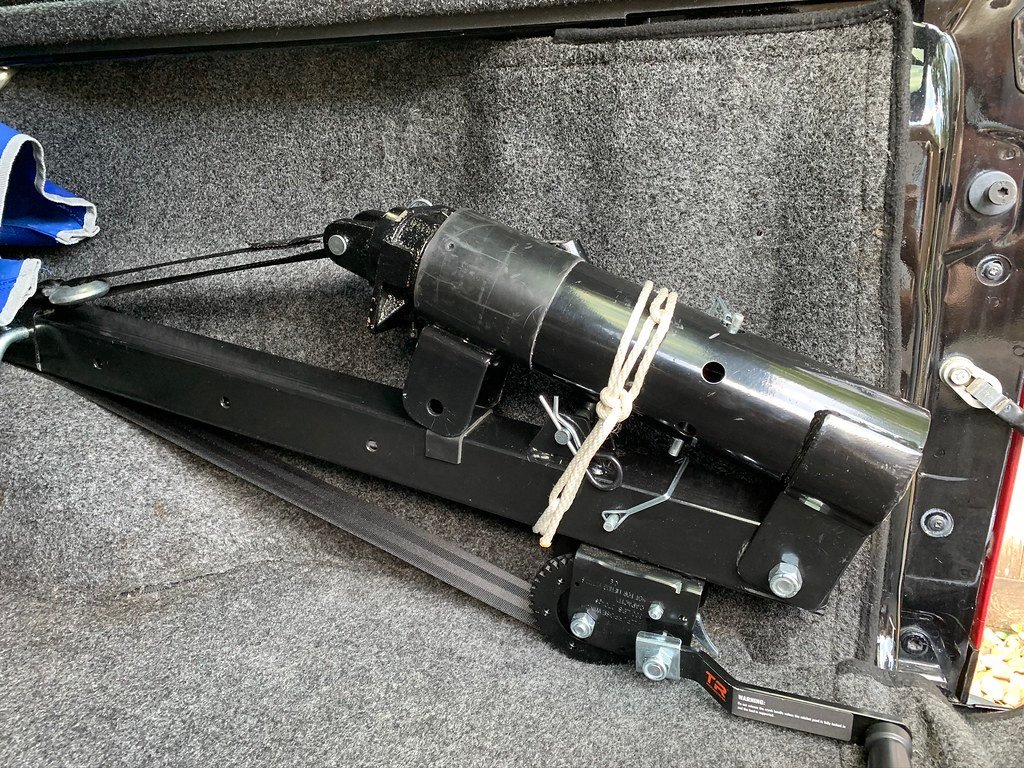
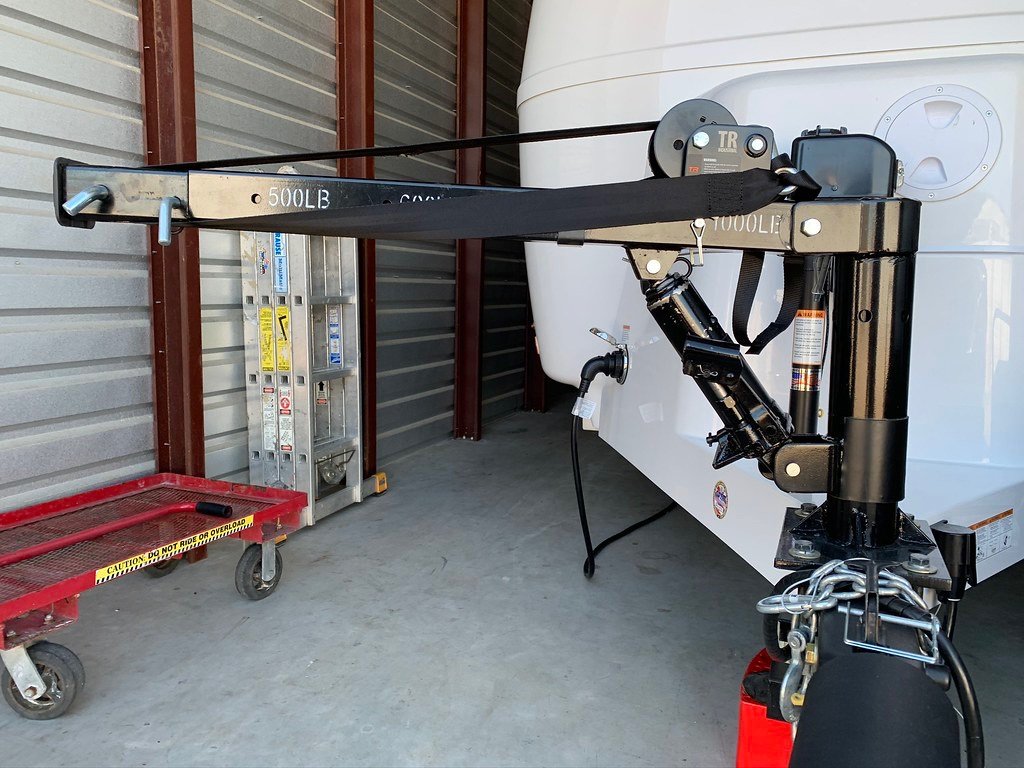
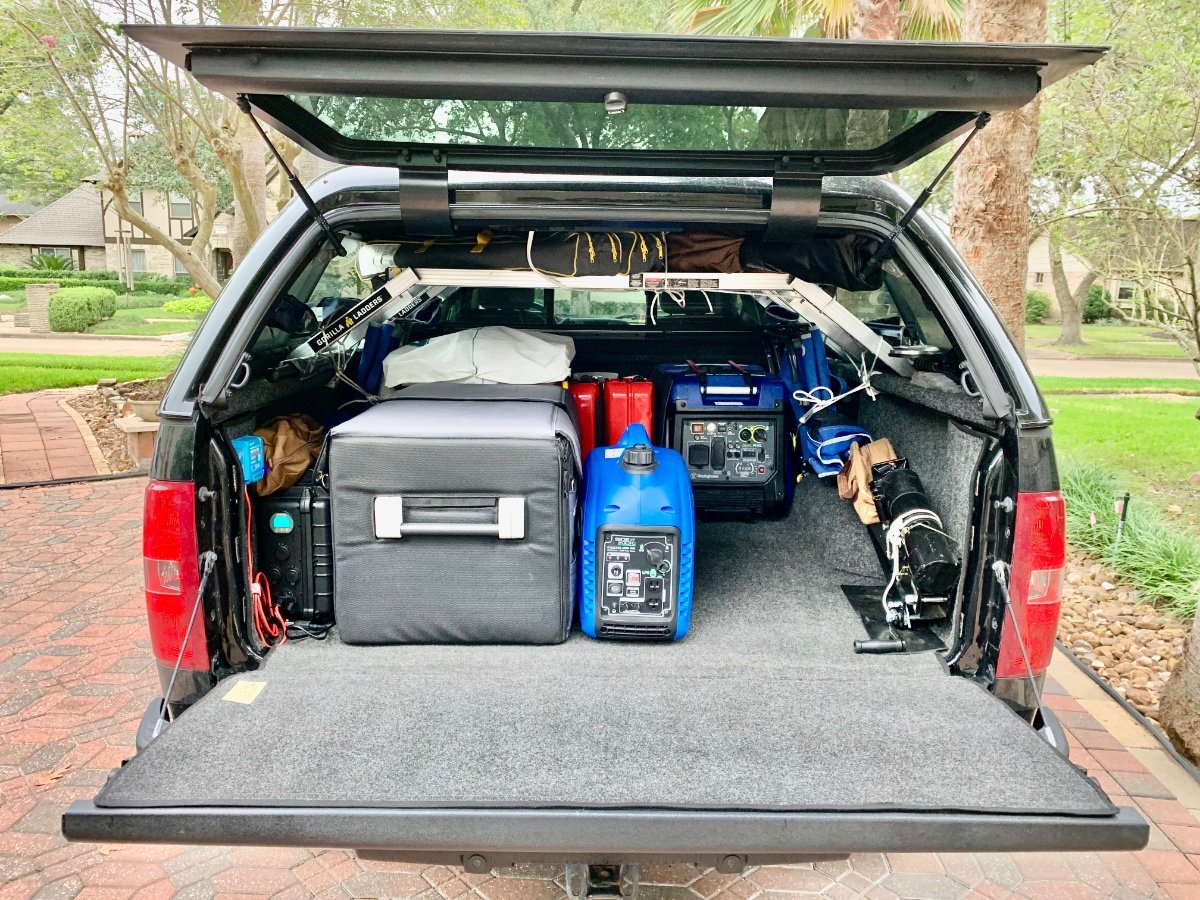
That is correct, this model is designed to mount behind the wheel well with the pedestal bolted to a truck bed, but in my application I collapse the boom and all for easy stowage under cap and the pedestal remains mounted on the Oliver. Your weight guesstimate is in the ball park for the entire unit, but the part I have to manhandle is probably a little north of 30 lbs. I can also use it to lift my folding ebikes in and out of the TV where kept when underway; the bike rack is transported on the front receiver hitch where it usually remains, especially when camping.
-
1
-
-
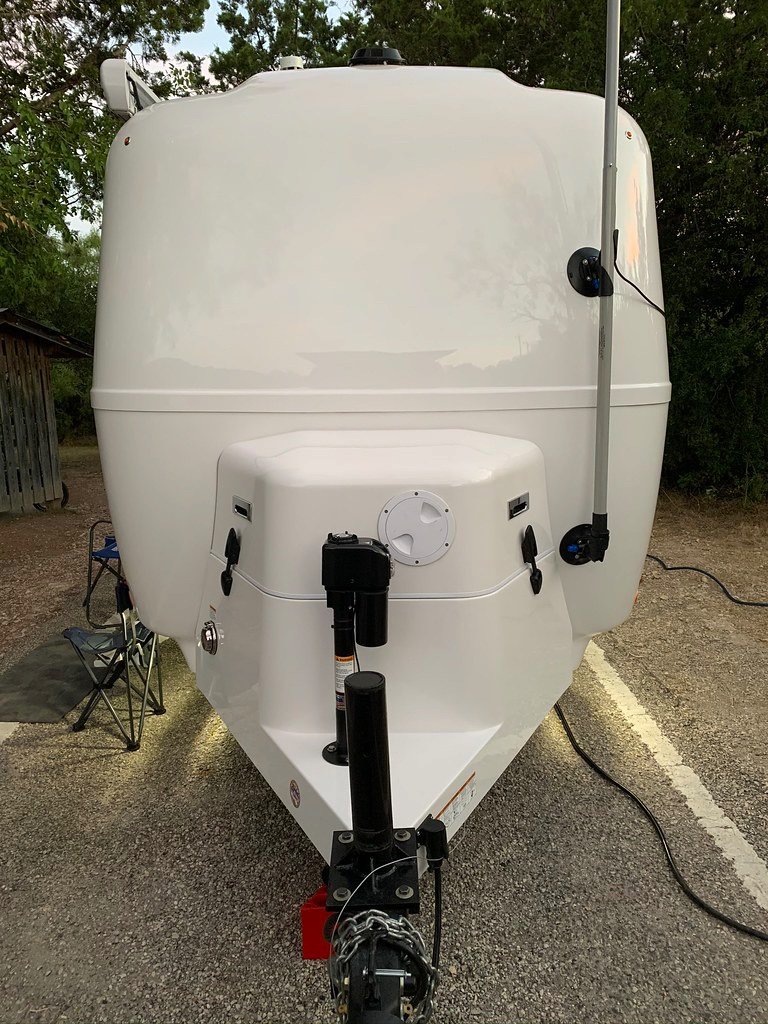
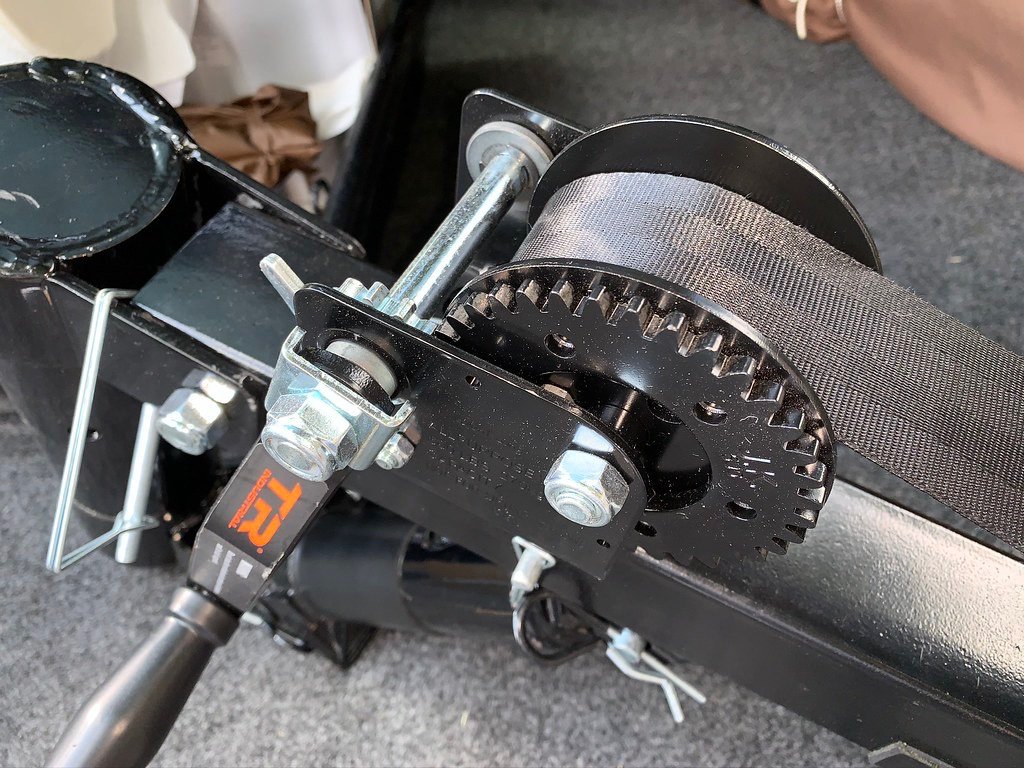
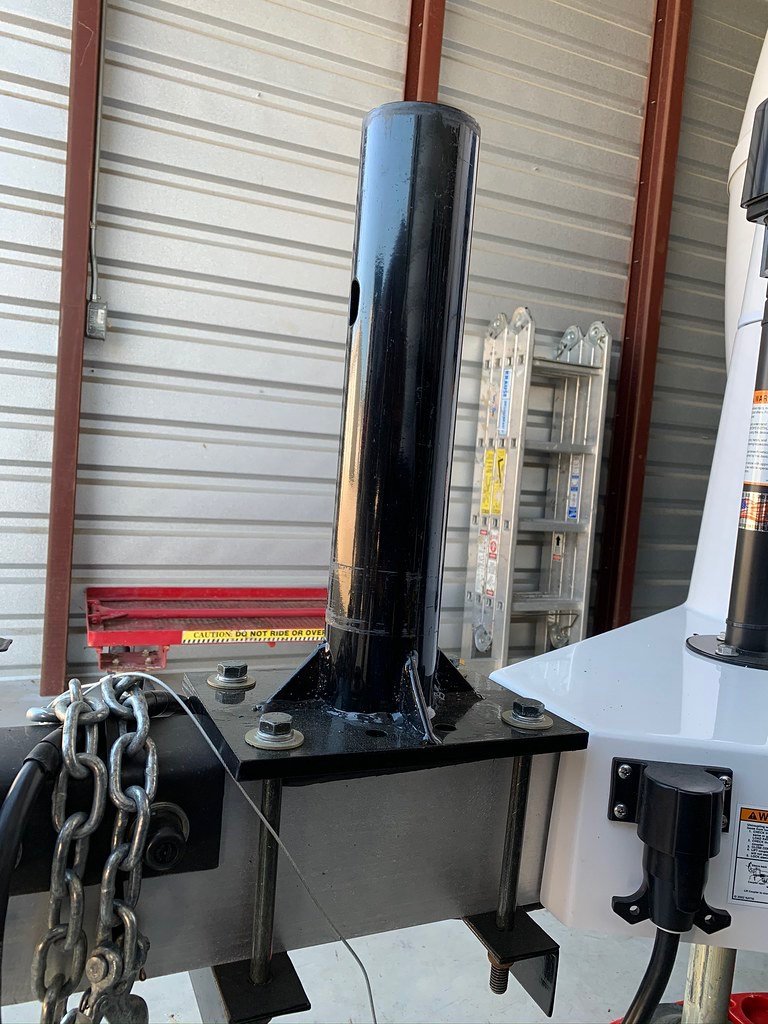
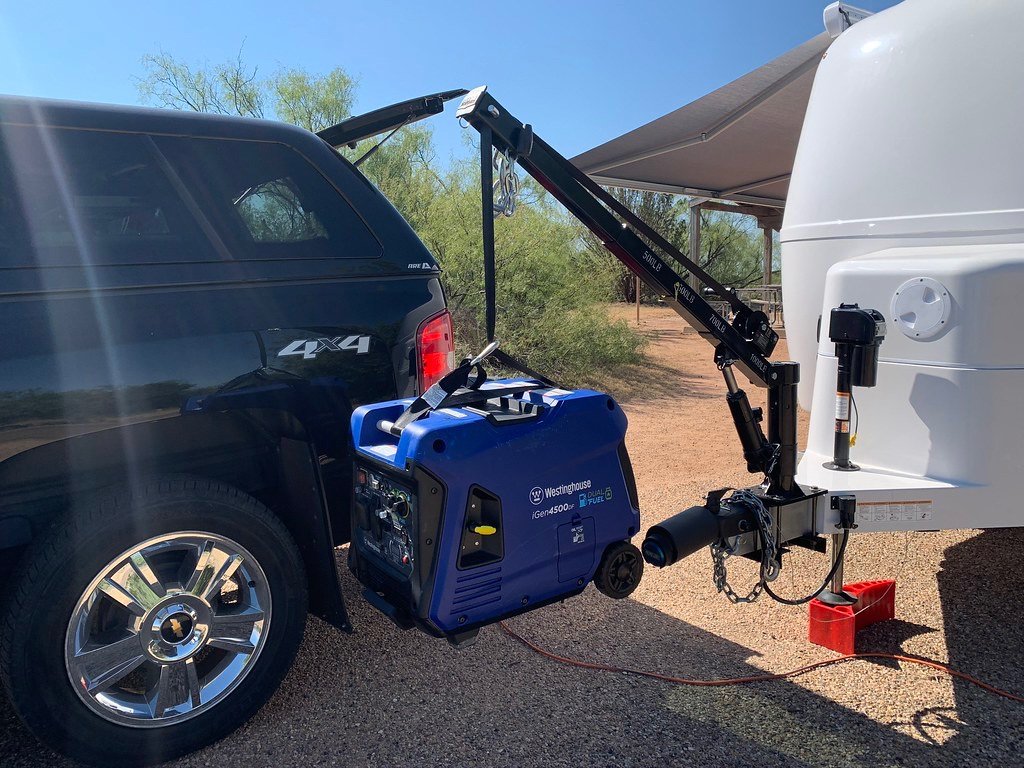
The hoist is a real back saver, use it to load the generator, as well as the Dometic completely loaded and full 30# propane tanks. The ‘truck crane’ is marketed for a truck bed installation, but I modified it to mount on the tongue of the Oliver. I also added a strap winch for enhanced performance which involved some fabrication. The Anderson under the front stabilizer is a Rapid Jack put to good use!
-
1
-
5
-
-
Yep, two generators both dual fuel. The Oliver is my hurricane escape pod and the larger one has served me well for those 3-4 day mandatory evacuations. It will run 16 hours on a tank of gas, non-ethanol, and continuously during those times. I have also used it in roadside and parking lot overnight stays when the wife demands all of the comforts of home! I then got the smaller one primarily as a convenience for A/C on stops for meals or breaks when traveling; but have used it, on propane, for brief overnight stays, as well. I have solar panels atop my TV cap to run the Dometic dual zone and a DC-DC charger to keep the trailer batteries topped off.
-
4
-
-
I was able to resolve the cumbersome stowage of my Sky Escape by installing an upper shelf under cap. The Clam is positioned diagonally along with the separate panel bag and assorted camp tables. This mod really freed up a lot of bed space for all of my other necessities!
-
1
-
3
-
-
I agree, the Sirocco ll fans are tops! I did not want a permanent mount, so I used heavy duty Velcro to secure the fans (His and Hers) in optimum locations to maximize their use and be more obscure. One over each bed at the cabin rear and another curbside at mid-cabin (see pic) to better serve the galley and dinette areas, as needed. If you look closely, the white Velcro to secure the rear curbside fan is hardly noticeable. The fans are stowed in the attic when not in use or underway. I did alter the wiring to facilitate use of the 12v female lighter sockets of proximity. The rear street side fan cable loops through the cord hole servicing the TV to the socket in the attic, and for now the rear curbside is routed through the attic doorway until I make a hole to route it in similar fashion as the street side. I utilize the under counter socket above the cooktop for mid-cabin fan use. I installed DC 2.1x5.5mm female socket jacks and connected the fans’ stock power wire internally in each. I then altered two DC 2.1x5.5mm power plug extension cables by replacing the female end with a male lighter socket plug connector. This set up now allows for ‘plug and play’ versatility if I want to use the fans in my TV or an outdoor setting.
-
4
-
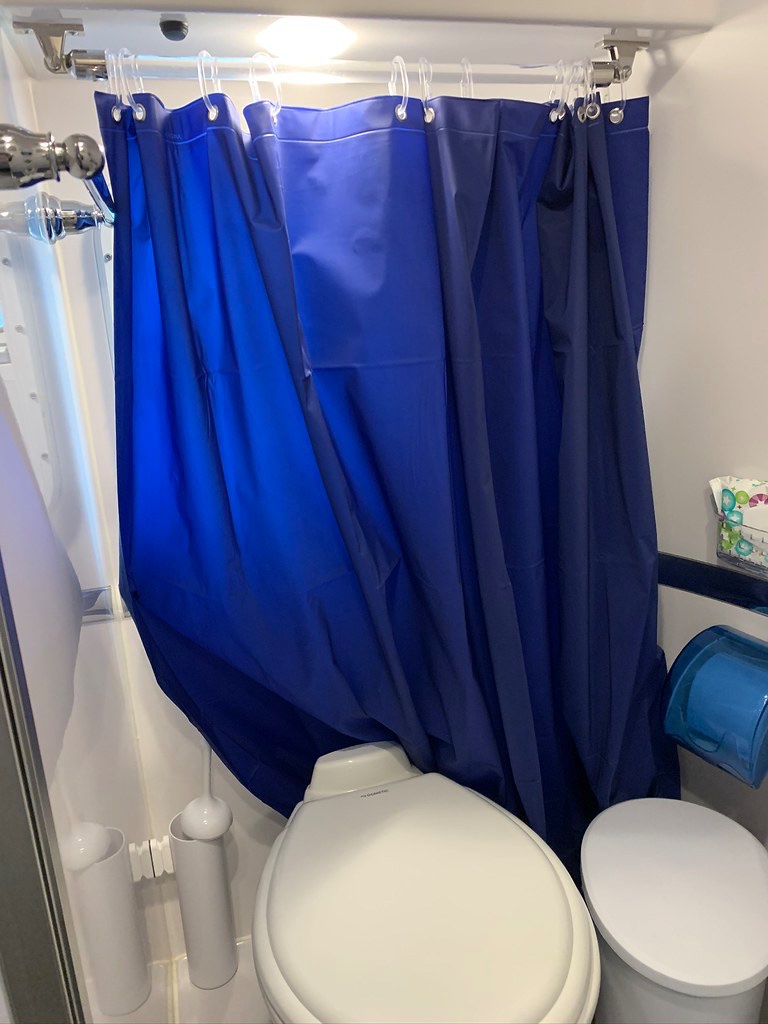
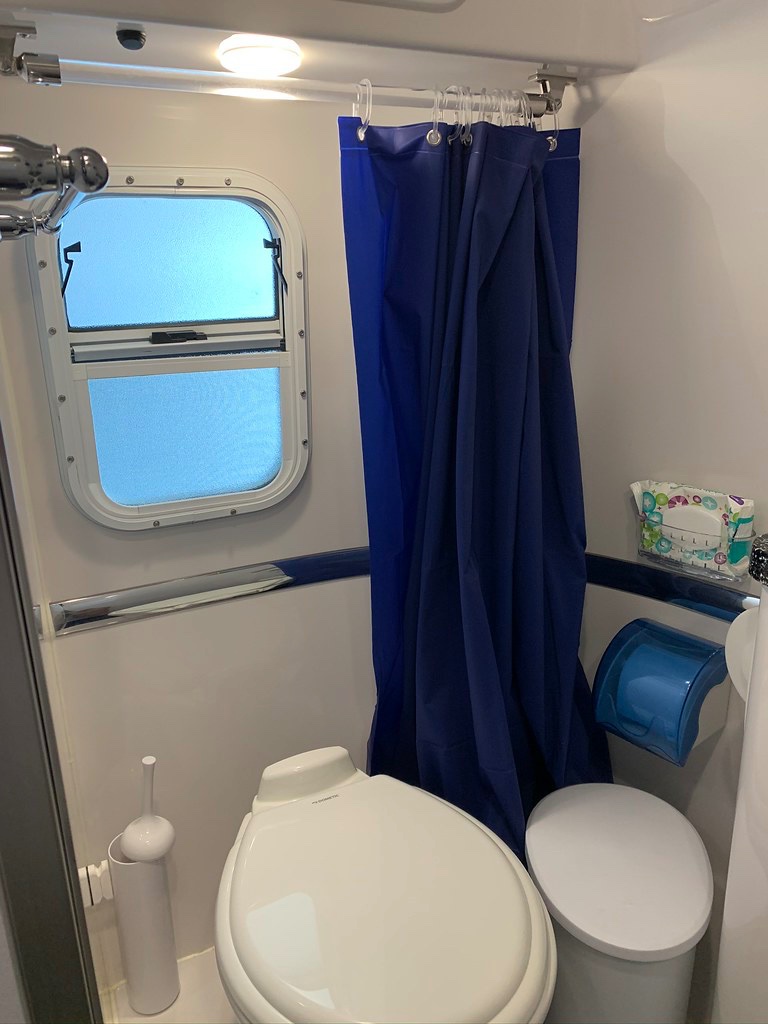


Factory Installed Curved Shower Rod (for curtain in front of toilet)
in Ollie Modifications
Posted
Understood, I had the same dilemma and concerns with my install. The under-cabinet mount could impede access to the light switch, so care needs to be taken in positioning; although right-handed I find it easier, given the restricted switch access, to now reach in with the left hand, palm up, and turn the switch on with a fingertip. I became accustomed after a few times and this concern is no longer an issue. I was also concerned that a rod passing under the light would adversely affect the lighting, so to negate the issue a ‘clear’ acrylic rod and plastic rings were used; problem solved. It seems a rod installed under the cabinet door, an option you are considering, would further impede the lighting. I like that the curtain hugs the corner walls when tucked away and that it can easily be pulled over to cover the window for more privacy, as needed. In doing so, the bottom of the curtain fits behind the toilet well enough to not be in the way when seated, a concern I had if the rod was positioned further out. I don’t see much difference in the two mounting options you are considering with regards to draping the curtain over the towel rack and toilet when showering. Good luck with your endeavor.