Jason Essary
-
Posts
78 -
Joined
-
Last visited
-
Days Won
23
Everything posted by Jason Essary
-
 Important Update: Customer Support & Service/Parts Department Changes Dear Oliver Travel Trailer Family, As we continue to grow, we are making important changes to better serve you. Beginning September 5th, our Customer Support Department will be relocated to our production facility and will now be managed by our Plant Operations Team This change allows us to dedicate resources more effectively, ensuring you receive the specialized support you deserve. What’s Changing Customer Support Managed by our Plant Operations Team Primary Contact: Brett Johnson Handles phone support, warranty questions or warranty parts requests Additional team members will be added to strengthen support capacity Phone: 888-526-3978 (select Option #2 - Technical Support) Email: support@olivertraveltrailers.com o Hours of Operation for Phone Support Monday - Thursday: 7:00 am - 4:30pm CST Friday: 7:00am - 11:00am CST Closed Saturday & Sunday Service & Parts Remains at our Sales & Service facility Primary Contact: Mike Sharpe Handles service scheduling and parts purchases Phone: 888-526-3978 (select Option #3 – Parts & Service) Email: service@olivertraveltrailers.com Hours of Operation for Inside Service remains Monday - Friday 8am - 5pm CST Important Notes Starting September 5th, the Phone Support Department and Service & Parts Department will be completely separated. Mike will not be taking phone support calls, and Brett will not be scheduling service. Emailing either department will automatically create a ticket in their system. However, tickets are not shared between departments. Why the Change? As Oliver Travel Trailers continues to grow, we want to provide a better experience by having team members focused on specific tasks rather than managing multiple roles. This separation ensures that your questions and needs are addressed by the right people more efficiently. We appreciate your understanding and support as we take this step forward. Thank you for being a valued part of the Oliver Travel Trailers family.
-
- 12
-

-

-

-

-
Please see Announcement:
-
We want to take a moment to address a recent change regarding our dealer network in Texas, and what it means for both new and existing Oliver owners in the area. No Current Dealers in Texas At this time, Oliver Travel Trailers no longer has any active dealer sales representation in the state of Texas. We understand this may come as a surprise—especially to those who purchased through our former Texas dealers. This was a business decision, and we sincerely apologize that a formal update was not sent to affected customers when this change occurred just a few weeks ago. Continued Service Support in Texas The good news is that warranty and service support remains strong in Texas. While there are no current Oliver dealers operating under our network in the state, both of our former dealer partners—Princess Craft and United RV—have confirmed they are continuing to service Oliver Travel Trailers, including warranty repairs, for owners in their respective areas. Additionally: Our factory-based Technical Support remains your go-to resource for any questions, approvals, or coordination related to warranty service. We also work with other reputable service centers where needed to ensure coverage in areas not directly served by Princess Craft or United RV. For those who prefer factory service, our Hohenwald-based Service Department is readily available to assist with scheduling and support.
-
- 8
-
-
-
Towing a trailer safely—especially one over 3,000 lbs—requires more than just hitching it up and driving off. One of the most critical components in trailer safety is the brake controller, which synchronizes the trailer’s electric brakes with your tow vehicle. 1. What is a Trailer Brake Controller? A brake controller is an electronic device installed in the tow vehicle's cabin that sends a signal to the trailer’s electric or electric-over-hydraulic brakes. This allows the trailer to brake in proportion to the tow vehicle, improving stability, stopping distance, and overall safety. There are two main types: Time-Delayed Controllers: Apply a preset amount of braking power after a delay when the vehicle brakes are applied. Proportional (Inertia-Based) Controllers: Use a motion sensor to apply the same amount of braking force as the tow vehicle in real time. For smoother, safer towing—especially on varied terrain—a proportional controller is highly recommended. 2. Proper Setup of Trailer Brakes Brake Gain Adjustment "Gain" is how much braking power the controller sends to the trailer. Start with a gain setting of about 5.0 (mid-range). Perform a slow-speed test (around 20 mph) in a safe area: Manually activate the trailer brakes using the controller lever. The trailer should slow the vehicle slightly without locking up its wheels. Increase gain if the trailer doesn’t brake enough; decrease if it jerks or skids. TIP: Re-adjust gain if your trailer load changes significantly (e.g., adding water or cargo) 3. Safety & Maintenance Tips Brake Sync Check: Ensure braking feels smooth and proportional. If it’s jerky or the trailer pushes/pulls, adjust the gain or inspect brake components. Manual Override Lever: Know its location—it can be used independently in emergencies (e.g., trailer sway). Inspect Brake Pads/Shoes: Just like your vehicle, trailer brakes wear and need regular checks. Pre-Trip Check: Ensure the brake controller is powered, brakes engage, and lights/signals work. Breakaway Cable & Battery: Confirm the cable is securely attached to the tow vehicle (not the hitch). Make sure the camper’s battery is charged so the breakaway system works in an emergency. Tip: 2026 models include a dedicated breakaway battery pack—test it before each trip to ensure it's functional. 4. Final Reminders for Safe Towing Always stay within your vehicle's towing capacity (check owner's manual). Distribute weight evenly in the trailer, with 10–15% on the hitch. Use a weight-distribution hitch as needed. Drive cautiously—slow, wide turns and extended stopping distances are critical. Tow Smart. Tow Safe.
-
- 8
-
-
-
Truck Weight Class ≠ Tow Capacity Truth! Think your truck’s weight class tells you everything you need to know about towing? Think again. Many assume that a 1500, 2500, or 3500 series badge automatically dictates if a weight distribution (WD) hitch is needed—but that's not the case. Did you know? Today’s 1500-series trucks (a.k.a. half-tons) can tow anywhere from 7,000 to 13,300 lbs, depending on their specific configuration. Compare that to 1-ton trucks from the 1990s, which often maxed out around 8,500–10,000 lbs towing capacity. That's right—modern half-ton trucks can outperform the 1-tons of the past! 😲 Just because two trucks look identical on the outside doesn’t mean they have the same guts. You MUST: Check your exact vehicle build and tow rating. Consult your vehicle’s manual to see if a weight distribution hitch is recommended or required. Call your insurance company—some require WD hitch use when recommended by the manufacturer, others don’t. Additionally, while the Andersen Weight Distribution Hitch includes integrated sway control, it’s important to know that most half-ton trucks recommend the use of a weight distribution hitch when towing over 5,000 lbs—especially to help manage trailer sway safely. Bottom line: Don’t judge a truck by its series number. Know your numbers. Protect your tow. Example of 1500 Truck series and tow capacity ranges based on engine and other equipment: Please note: We are not recommending Chevrolet or any specific truck brand—this example was simply used to illustrate the wide range of towing capacities within a single truck class. Quick Tow Tip: Did you know that in most cases, a 2WD truck can tow more than a 4WD version of the same model? That’s because 2WD trucks typically weigh less, leaving more of the vehicle’s Gross Combined Weight Rating (GCWR) available for towing. Always check your specific truck’s tow rating!

-
- 11
-
-
-
Important Update on Campground Scheduling Policy We’ve received final confirmation that campground reservations cannot be scheduled more than 12 months in advance. This comes despite earlier guidance indicating that extended scheduling beyond that timeframe would be possible. While this is a change from the initial understanding, we are adjusting accordingly and will continue to keep you informed of any future updates or alternative options.
-
I am checking into this as I was told when we set the date that campsites could be scheduled. I specifically asked about the 1-year reservation rule and they told me that this was not the case. I will provide an update as some I have confirmation. Dates: Wednesday, October 28 – Sunday, November 1, 2026 Wednesday, October 21 - Sunday, October 25, 2026 The slash is to signify that the original dates were canceled. The park contacted and said that the campground was already full so the dates had to be changed to ensure available camp sites.
-
Rear Electric Stabilizer Jack adjustment - help?
Jason Essary replied to tallmandan's topic in Mechanical & Technical Tips
With regards to this issue, specifically the jack making contact to the underside of the access panel, it is something I have seen in the past and was a result of the bracket welded to the side of the Barker Jack being mounted too high. I was just recently brought into the know on this issue and advised Mike because manufacturing had not provided him with an answer. The proper channel for issues that Mike or the new Jason do not fully know how to resolve, should be escalated to manufacturing so that the engineer & quality managers can review and see if there is specific information needed. I have a meeting scheduled between Service and Manufacturing on a weekly basis so that escalated issues can be resolved in a more timely manner or at least to request more pictures, more information or a service visit. I will address with the departments that this took a month as we should be in contact at minimum on a weekly basis. Regarding the warranty of the jack, if that is the actual issue as I am making an assumption of what I have seen before, then it would fall under the Barker Manufacturing warranty which is for a 1-year warranty period. If we can verify that the issue is due to an improper placement of the bracket, Barker may still cover it under warranty but it would be something we would have to reach out to them about once we have the definite cause of the issue. In an out of warranty situation I also recommend the customer also reaching out to the vendor, in this case Barker, as they are more apt to cover out of warranty items for customers rather than when we ask. Also, please note that most warranties are only extended to the original purchaser of the product and they may require proof of purchase. -
Everyone can go ahead and start scheduling a campsite with the park.
-
Please note that the dates were changed. When scheduling the dates for the rally, the Lodge did not check with the campground to verify availability. The original dates were already booked at the campground due to a yearly Halloween event. Oliver Rally Date: October 21 - 25, 2026
-
We are thrilled to announce the 2026 Oliver Rally will be held at the stunning Lake Guntersville State Park in Alabama from October 21 to October 25, 2026! Get ready for another unforgettable gathering of Oliver Travel Trailer owners and enthusiasts as we come together to celebrate community, adventure, and the great outdoors. This annual event is your opportunity to connect with fellow Ollie owners, exchange travel stories, learn helpful tips, and enjoy the camaraderie that makes the Oliver family so special. Location: Lake Guntersville State Park, Alabama Breathtaking lake views, hiking trails, wildlife, and top-notch camping facilities await! Dates: Wednesday, October 28 – Sunday, November 1, 2026 Wednesday, October 21 - Sunday, October 25, 2026 What to Expect: Welcome Reception & Meet-and-Greet Educational Workshops Vendor Exhibits & Product Demonstrations Group Activities, Games & Outdoor Adventures Evening Campfires & Entertainment Raffle Prizes, Giveaways & More! Whether you're a seasoned rally-goer or attending for the first time, there's something for everyone at the 2026 Oliver Rally. We can’t wait to make new memories and celebrate our shared love of travel, craftsmanship, and community. Registration details and event schedule coming soon – stay tuned! Until then, mark your calendars and start planning your route to Lake Guntersville — we’ll see you there!
-
We've recently updated our phone tree to help you reach the right department more quickly and efficiently. As our team continues to grow, each member is dedicated to a specific department and may not be able to assist with issues outside their area. To receive the best service possible, please select the correct department when calling: 📞 Department Directory #1 Sales: For purchasing information, product availability, pricing, and other sales-related inquiries. This department is dedicated to sales matters only and cannot assist with support, service, parts, recall, or warranty questions. #2 Customer Phone Support: For all general questions, external inquiries, or phone-based technical assistance. If we are unable to answer immediately or you experience long hold times, please leave a detailed voicemail with your name, phone number, and reason for calling. We will return your call as soon as possible. Please do not contact other departments to bypass wait times. All team members are instructed to redirect unrelated inquiries back to the appropriate department. This allows us to maintain efficient, accurate service for every customer. Tech Support calls are routed directly to our primary Tech Specialist, Mike Sharpe, and will ring his line for up to 9 times. If Mike is unavailable, the call will automatically transfer to Jason Balentine, and ring him for up to 9 more times. If both team members are assisting other customers or unavailable, the system will send the call to voicemail. Please leave a message, which will be sent to both Mike and Jason and also create a support ticket in our system to ensure follow-up. #3 Service: For scheduling appointments or checking the status of existing repairs. #4 Parts: For ordering replacement parts (not including warranty items). Service & Parts Routing: Calls for Service and Parts first ring Jason Balentine (6 times), then transfer to Mike Sharpe (6 times). If both are unavailable, the system will route to voicemail. As with Tech Support, voicemails are sent to both Jason and Mike and generate a ticket in our system for tracking and follow-up. Important Note: Please do not contact other departments to bypass wait times. As explained above it will only create duplication and take us longer to get back in touch with you and we may not have all information if you leave multiple voicemails in different departments. ⏰ After-Hours Calls If you reach us after business hours, all department lines will go directly to voicemail. Please leave a message, and the appropriate team will return your call on the next business day. 👥 Staffing Updates We are actively working to expand our team and onboard an additional member to assist with phone support. We appreciate your patience and understanding as we continue to grow and improve our service. Thank you for helping us serve you better by choosing the appropriate department. Warranty: Contact Customer Support for external warranty questions, claims or assistance scheduling an appointment externally. Contact Service to schedule a warranty-related appointment with our in-house shop. Recalls: Our Quality department handles all recall questions and concerns. Our Tech Support person is not authorized to assist with recalls as it is considered a safety issue and must go through our quality division. This information is also NOT in our tech support ticketing system Service can only schedule you an appointment with our in-house service department For all other recall inquiries please reach out to OTTwarranty@olivertraveltrailers.com We are working on getting a dedicated phone line for recalls. This line will NOT be shared with Service or Phone Support.
-
- 4
-
-
Mount-It https://mount-it.com/products/mount-it-under-cabinet-ceiling-tv-mount-lcd-cm211 Specifications SKU: MI-4211 Compatible Screen Size: 13" to 27" Weight Capacity: 44lbs Tilt: 90 degrees Swivel: 90 degrees Height Adjustable: 5.125" VESA 75x75mm, 100x100mm If you are looking to install a larger TV, Mount-It does have a similar mount that allows up to a 37" TV. NOTICE: We have not installed one of these and I cannot guarantee a good fit. https://mount-it.com/products/mount-it-fold-in-under-cabinet-ceiling-tv-mount-mi-4222 NOTICE: This mount is for the Elite II models Only!
-
- 5
-
-
-
In the past, several people have gotten camping spots for the next years rally. At this time I don't know the exact dates yet and wanted to advise not to secure any spots for next year until I can finalize the dates. I will be speaking with the campground and shoring up the dates and will let everyone know as soon as they are set in stone.
-
- 11
-
-
-
I am currently acting as the Service Director overseeing the service department & technical support. Jason B. & Mike will be handling more of the daily activities while I will be putting a bit more time in traveling to our dealer partners assisting with Sales & Service training. I would say 75% of the time I will still be here onsite working with Rodney in sales & Jason B & Mike in service.
- 10 replies
-
- 12
-
-
-
-
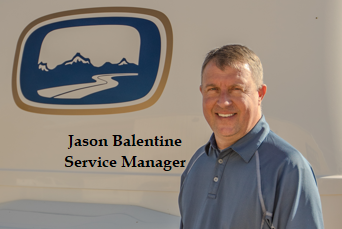
As our business continues to flourish we strive to grow our staffing so we can continue to meet your needs. At this time we would like to welcome and introduce Jason Balentine, our new Service Manager. Jason will be running the daily operations of the in-house service department. Mike Sharpe will continue in his role as our head technical support supervisor. We have separated our phone system out where you can select Technical Support or Service & Parts. Technical Support is for external support, general questions or help locating a service center or dealer near you. Service & Parts will be directed to Jason in Service and he will assist with scheduling appointments for our in-house service department and help with parts requests. And to answer everyone's question, Yes, evidently your name has to be Jason to work here.
- 10 replies
-
- 10
-
-
-
-
Oliver Support Tickets - Creating, Merging, & Splitting
Jason Essary replied to Jason Essary's topic in Service Talk
Contacting Support & Using the Service Portal Service Portal: https://support.olivertraveltrailers.com/portal/en/home This is a website that allows you to login and view all of your open tickets as well as your history of tickets with us. This is just like a credit card website with security. Whatever email is used to initially create the login is the only way you can login. You can change your email but it requires you to login with the original email used and then manage your profile to change the email. We cannot change this from our side for security reasons. If you email us using multiple emails this causes the system to create multiple accounts which means your tickets are not all kept in the same location and you may not be able to see all of your history with us. Support Email: support@olivertraveltrailers.com When you email us at the above email our system automatically creates a new ticket unless you are replying on an old email from us. For responses to an existing ticket it is best to respond so that the system keeps the new email with the communication we have already had in the past. For new issues it is best to send a new email so that our previous communication doesn't get overwhelming clustered. It is important that you have a primary email that you use as this is what registers who you are in our system and provides us with all of your information so we can help faster. When using a different email than what we have, we have no idea who we are speaking with, what camper you have, what history communication we may have been speaking with you about, etc... This is also true if a spouse or friend reaches out to us on your behalf. We will not know who we are speaking with regarding camper information unless a VIN number is provided. This will also separate the history of this communication from the other email account used and we may not have all the information needed to assist the best we can.- 1 reply
-
- 9
-
-
-
Oliver Travel Trailers is excited to have our new dealer partners onboard to work with our Oliver owners as we strive to improve your Oliver Experience. We will be working directly with our dealers so that you receive the same quality service closer to home. Our customer support team will still be available to assist with any questions and work with you and our dealer partners to get any services you need resolved. As our service team will be working with the dealer's service departments on location, we feel it is prudent to discontinue most service work here at our location in Tennessee. However, we will continue doing major repairs, including fiberglass and aluminum, at our Plant Facility. At this time we plan to phase out the service department no later than the end of July and we are no longer taking on new appointments. As you continue reaching out to us with your questions and service needs, rest assured that we will help answer them and coordinate you with a dealership partner nearest to you. Whether on the road or at home, we are working to ensure owners receive the same excellent customer service you have come to trust here at Oliver Travel Trailers. If you have any questions or require further information regarding this update, please do not hesitate to contact us or call us at 1-888-526-3978. We are always here to assist you. Warm regards, Oliver Travel Trailers Team ------------------------------------------------------------------------------------------------------------------------------------------------------------------------------------------------------------ Of course, my team is still here to help support you as we always have with any technical and service questions as well as facilitating services for your Oliver. Thank you! Jason Essary Customer Service Director 888-526-3978 Important Update about Oliver Service.pdf
-
I wanted to reach out to everyone regarding this issue. We have been made aware of the issue and are currently investigating. At this time it appears to be a single incident but we will be continuing our investigation.
- 103 replies
-
- 14
-
-
-
Hey Ron, Another Oliver owner reached out to me about your issue and provided this post. I apologize that you had this issue. Looking at the pictures it looks like the striker plate is on upside down which was stopping the deadbolt from engaging at all. Do you know if the deadbolt has ever worked since you picked up the camper from delivery day? Looking at the white piece inside the door, it looks like the striker plate has been flipped at some point as the white piece is installed as a background so you don't see the inside of the door frame. .
- 7 replies
-
- 10
-
-
-
Oliver offers a yearly maintenance package for our customers. The maintenance items included in this package are things that need to be performed for typical camper use at least once per year. This does not mean that this is the only time of the year that you will need or have to perform some of the these maintenance items. Some customers may be able to go longer than one year for some of the items as maintenance is based on usage & environment. Many of the items have been added to our yearly maintenance list because so many people do not perform them and we felt it was best to perform it once per year rather than never. A/C Filter Cleaning: We perform this in the yearly maintenance but in dry environments it should be done weekly. A/C Condenser Coil: Recommended with Dometic A/C at least once per year however depending on the environment of use it could need to be cleaned as often as 2-4 times per year. Birds can also make nests inside when left unused for a period which would also require cleaning. Exterior Caulking: We recommend doing this at least once per year. Depending on the use and environment it may need to be done sooner or if you keep the camper stored half of the year inside then you may be able to go two years. If you do not caulk every year, we recommend that you at least inspect the caulk. Furnace Cleaning: Basic cleaning should be done once per year however insects can invade and build nests that would require cleaning as needed. Plumbing Decalcification: We recommend at least once per year but depending on hard water use & gallons used you may find that it is necessary to perform this 3-6 times per year. Some areas are known for extremely hard water content and you may have to decalcify once per month or use a water softener. Water Filtration systems do not soften water. Water Heater Decalcification: We recommend at least once per year but again depending on use you may have to perform this 2-4 times per year. The Truma water heater will flash when decalcification is necessary however once the unit needs to be decalcified you must stop use and perform the steps. The Suburban water heater does not provide a warning and you will need to periodically drain & inspect. Blade Valve Lubrication: We would recommend lubricating valves about every 2-3 months to ensure best results. Repack Bearings: Dexter recommends every 12 months or 12,000 Miles, whichever comes first. If you drive more than 12,000 miles per year we would highly recommend having the bearings repacked by the 12,000 mile point. Failure to repack the bearings in time can result in failure & breakdown. Grease EZ Flex: This should be done every 3 months or 3,000 miles whichever comes first. 7-Pin: The 7-Pin should be inspected every time you connect it. Water intrusion can cause corrosion which will lead to issues. A freshly cleaned 7-Pin that has water intrusion can corrode as quickly as just a few days. Coupler: Lubricating the coupler should be done as often as needed. Lubrication on an exposed part does not last. The coupler does not have to be greased but a good lubricant should be used to ensure the spring & lever operation works smoothly. Some rust buildup is normal on a steel coupler. Bulldog recommends greasing the ball pocket however Andersen does not recommend greasing for the ball. Grease will not prevent wear but it will help with rust. Tire Pressure: This should be checked every time you pull the camper. Air, over time, can escape thru the sidewall of the tires. Improper tire pressure can cause the tires to wear sooner. Window Tracks: Depending on where you camp you may need to clean the window tracks out as often as every week. Tree debris & sap can start to buildup in the tracks on day one. Once the white window glazing is left uncleaned for a period of time it will remain stained with mildew. The design of the window track makes it near impossible to completely clean the entire track as part of it is hidden under the stationary window. Air helps to free any debris on that side of the track & running water through it with the glazing removed. You can take a rag and clean as much of the track as you can but don't fret if some staining is left. The primary objective is to remove as much debris as possible that will block the weep holes. If the weep holes get blocked then water will backup and overflow to the interior. Sanitize Fresh Water System: If you leave the camper sitting for a period of time it is a good idea to sanitize before hand. This will keep algae from growing in your tank when water is left sitting for too long. You should also sanitize before using the camper after it has set for a long period of time (2-3 months). Deodorize/Clean Black & Grey Tanks: This should be done with every fill (Complete tank fill, not a single use). When setting up camp & using the tanks it is best practice to add treatment to the tanks. Black tank treatment helps breakdown waste during use but once the tank is flushed the treatment is gone. The black tank should be allowed to fill up with waste during use and a single waste dump once the tank is near full. This allows time for the waste to breakdown and a better waste dump. *Never connect to a dump station with your black tank valve open as to dump while in use. This will cause the water to flow quicker than the solids leaving the solids behind in the tank. As is with all maintenance, the better you maintain your camper the better performance you will receive. Failure to properly maintain will result in more issues. All the listed items above are recommended maintenance for the best camping experience. The yearly maintenance package is to complete required and recommended maintenances at least once per year but should not be considered the only time you maintain your camper. There are other items that should be done regularly that we do not perform in the yearly maintenance. Some of these items are: Fan Cleaning: Dust & grease from cooking inside the camper can accumulate on the fans. You should clean the fans periodically as needed. Failure to clean the fans can cause unwanted noise & performance issues. Wash & Wax: This is NOT performed during our yearly maintenance package but we do recommend that you wash your camper frequently & wax it at least once per year. Again, waxing once per year is the minimum and it is better to wax twice per year. If you really want to keep the exterior looking its best than it is recommended to wash frequently & use a good spray on wax such as Duragloss Aquawax every time you wash. The spray on wax does not however take place of the old fashioned wax that should be done once or twice per year unless you are washing & spray waxing the camper every week. Black Tank Flush: There is a water inlet dedicated just for flushing the black tank. This is something that is best done every time you drain the tank. Water Pump Filter Check: Inspect the water pump filter before or after every camping trip. The filter's purpose is to catch unwanted debris that may be in the tank from entering the fresh water pipes.
-
- 17
-
-
-
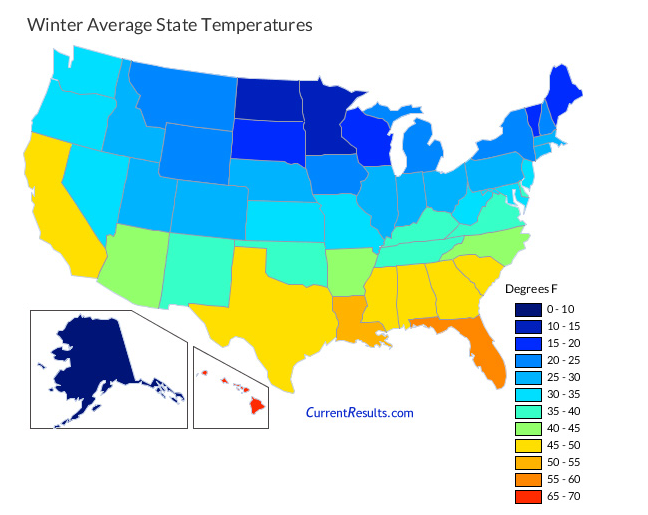
I have had a few questions regarding 4-Season camping with the Oliver and wanted to make a post so it would be available for everyone. What is 4-Season camping? It simply means that the Oliver is capable of being used through all 4-seasons. It does not mean that it will necessarily have no freeze issues in certain areas during certain climates. This is no different than a house. Here in Tennessee we recently saw sub-zero temperatures and many people had their water lines freeze and burst causing lots of damage. Does that mean that their house is not capable of being used during the winter? No, it simply means that in certain temperatures you may need to make arrangements to combat the temperature. In the past I have had my water lines freeze that were located on an exterior wall of my house so this time when they said we would see sub-zero temperatures I placed a space heater on that wall area to help keep it warmer and the next morning I had no freeze damage. Below is an average winter temperature for the United States however this is just an average and when temperatures go below the average especially when going into the low single digits or below zero, whether in a camper or a house you may have to perform steps to ensure freeze damage does not occur.
- 83 replies
-
- 12
-
-
-
I requested that production swap the furnace & water heater locations because the furnace ducting was running right over the top of the water heater bypass valve. This made locating the valve difficult for new owners as well as having to move the duct aside with the potential to tear it. Hopefully this change has made it better for access and does not cause any issues. I have also requested the return air vents as well and they did start putting a return vent in the bath where the air can return below the dinette about a year ago. They are still working on getting one placed in the closet which should be one on the top & one on the bottom for better air circulation through that area. The return air vents is something that can be easily added on older models if you choose to.
- 70 replies
-
- 16
-
-
-
Due to the volume of inactive on hold tickets with no response I have set a 45 day automatic closure. My phone support team should be reaching out to you before that deadline expires in an attempt to get your questions answered or issues resolved. Closed tickets will remain in your history file and can be reviewed at any time but are no longer active. Please keep in mind that notifying us of an issue does not place the warranty on hold. All issues must be resolved within the warranty period and no one in the service department has the authority to extend the Oliver warranty or a vendor warranty. If your ticket gets closed and you still have an issue, a new ticket can be created when you are ready to schedule for service or you are able to perform necessary steps to get the issue resolved.
-
- 1
-
-
Understanding the Support Tickets How do I create a support ticket? All voicemails to phone support or parts & service automatically creates a support ticket in the proper department initiating a return call request. Keep in mind that we work through returning calls in the order they were received unless it is an emergency situation. All emails sent to support@olivertraveltrailers.com will automatically create a support ticket based on your emails subject line and it will automatically pull in your information as long as the email you used is in our system in your account. If you are submitting a new request, please send it as a new email not as a reply to an old email. This will help to speed up the response If you are contacting regarding an open/ongoing issue it is best to reply to the email chain and it will automatically flag the open current ticket for review and bump it up on our list. You can visit the Owners service page on our website or the forum main page and click the "Submit Ticket" button You can contact us via phone and the phone support personnel should create a ticket for you if one does not already exist. What to do if you have multiple issues? You can list all of your issues in a single ticket. If you choose this method, please list the issues in bullet format if possible to ensure all issues are captured properly. You can create an individual ticket for each issue if you prefer. Why was my ticket split into multiple tickets? We might split your ticket into multiple tickets for communication with the vendor or manufacturer of the component so that everything stays organized and we can work with the vendor to get the issue resolved as quickly as possible. Why were my tickets merged into a single ticket? We might merge multiple tickets into a single ticket when necessary: Multiple tickets but the same issue Similar issues Cause/Correction resolves multiple issues reported Example: Fridge does not work on AC power & A/C Inoperative where the cause was found to be an issue with the incoming shore power which means the true issue was "No 120v power". This is common as a camper equipped with an inverter could still be supplying power to the Microwave and Receptacles making it seem like 120v power was working. All issues are scheduled for service either here or at a 3rd party service center and should be resolved at one time under a single work order.
- 1 reply
-
- 6
-
-