

JEssary
-
Posts
61 -
Joined
-
Last visited
-
Days Won
21
Posts posted by JEssary
-
-
I wanted to reach out to everyone regarding this issue. We have been made aware of the issue and are currently investigating. At this time it appears to be a single incident but we will be continuing our investigation.
-
 6
6
-
 7
7
-
-
Hey Ron,
Another Oliver owner reached out to me about your issue and provided this post. I apologize that you had this issue.
Looking at the pictures it looks like the striker plate is on upside down which was stopping the deadbolt from engaging at all. Do you know if the deadbolt has ever worked since you picked up the camper from delivery day? Looking at the white piece inside the door, it looks like the striker plate has been flipped at some point as the white piece is installed as a background so you don't see the inside of the door frame.

.
-
1
-
9
-
-
- Popular Post
- Popular Post
Oliver offers a yearly maintenance package for our customers. The maintenance items included in this package are things that need to be performed for typical camper use at least once per year. This does not mean that this is the only time of the year that you will need or have to perform some of the these maintenance items. Some customers may be able to go longer than one year for some of the items as maintenance is based on usage & environment. Many of the items have been added to our yearly maintenance list because so many people do not perform them and we felt it was best to perform it once per year rather than never.
A/C Filter Cleaning: We perform this in the yearly maintenance but in dry environments it should be done weekly.
A/C Condenser Coil: Recommended with Dometic A/C at least once per year however depending on the environment of use it could need to be cleaned as often as 2-4 times per year. Birds can also make nests inside when left unused for a period which would also require cleaning.
Exterior Caulking: We recommend doing this at least once per year. Depending on the use and environment it may need to be done sooner or if you keep the camper stored half of the year inside then you may be able to go two years. If you do not caulk every year, we recommend that you at least inspect the caulk.
Furnace Cleaning: Basic cleaning should be done once per year however insects can invade and build nests that would require cleaning as needed.
Plumbing Decalcification: We recommend at least once per year but depending on hard water use & gallons used you may find that it is necessary to perform this 3-6 times per year. Some areas are known for extremely hard water content and you may have to decalcify once per month or use a water softener. Water Filtration systems do not soften water.
Water Heater Decalcification: We recommend at least once per year but again depending on use you may have to perform this 2-4 times per year. The Truma water heater will flash when decalcification is necessary however once the unit needs to be decalcified you must stop use and perform the steps. The Suburban water heater does not provide a warning and you will need to periodically drain & inspect.
Blade Valve Lubrication: We would recommend lubricating valves about every 2-3 months to ensure best results.
Repack Bearings: Dexter recommends every 12 months or 12,000 Miles, whichever comes first. If you drive more than 12,000 miles per year we would highly recommend having the bearings repacked by the 12,000 mile point. Failure to repack the bearings in time can result in failure & breakdown.
Grease EZ Flex: This should be done every 3 months or 3,000 miles whichever comes first.
7-Pin: The 7-Pin should be inspected every time you connect it. Water intrusion can cause corrosion which will lead to issues. A freshly cleaned 7-Pin that has water intrusion can corrode as quickly as just a few days.
Coupler: Lubricating the coupler should be done as often as needed. Lubrication on an exposed part does not last. The coupler does not have to be greased but a good lubricant should be used to ensure the spring & lever operation works smoothly. Some rust buildup is normal on a steel coupler. Bulldog recommends greasing the ball pocket however Andersen does not recommend greasing for the ball. Grease will not prevent wear but it will help with rust.
Tire Pressure: This should be checked every time you pull the camper. Air, over time, can escape thru the sidewall of the tires. Improper tire pressure can cause the tires to wear sooner.
Window Tracks: Depending on where you camp you may need to clean the window tracks out as often as every week. Tree debris & sap can start to buildup in the tracks on day one. Once the white window glazing is left uncleaned for a period of time it will remain stained with mildew. The design of the window track makes it near impossible to completely clean the entire track as part of it is hidden under the stationary window. Air helps to free any debris on that side of the track & running water through it with the glazing removed. You can take a rag and clean as much of the track as you can but don't fret if some staining is left. The primary objective is to remove as much debris as possible that will block the weep holes. If the weep holes get blocked then water will backup and overflow to the interior.
Sanitize Fresh Water System: If you leave the camper sitting for a period of time it is a good idea to sanitize before hand. This will keep algae from growing in your tank when water is left sitting for too long. You should also sanitize before using the camper after it has set for a long period of time (2-3 months).
Deodorize/Clean Black & Grey Tanks: This should be done with every fill (Complete tank fill, not a single use). When setting up camp & using the tanks it is best practice to add treatment to the tanks. Black tank treatment helps breakdown waste during use but once the tank is flushed the treatment is gone. The black tank should be allowed to fill up with waste during use and a single waste dump once the tank is near full. This allows time for the waste to breakdown and a better waste dump. *Never connect to a dump station with your black tank valve open as to dump while in use. This will cause the water to flow quicker than the solids leaving the solids behind in the tank.
As is with all maintenance, the better you maintain your camper the better performance you will receive. Failure to properly maintain will result in more issues.
All the listed items above are recommended maintenance for the best camping experience. The yearly maintenance package is to complete required and recommended maintenances at least once per year but should not be considered the only time you maintain your camper.
There are other items that should be done regularly that we do not perform in the yearly maintenance. Some of these items are:
Fan Cleaning: Dust & grease from cooking inside the camper can accumulate on the fans. You should clean the fans periodically as needed. Failure to clean the fans can cause unwanted noise & performance issues.
Wash & Wax: This is NOT performed during our yearly maintenance package but we do recommend that you wash your camper frequently & wax it at least once per year. Again, waxing once per year is the minimum and it is better to wax twice per year. If you really want to keep the exterior looking its best than it is recommended to wash frequently & use a good spray on wax such as Duragloss Aquawax every time you wash. The spray on wax does not however take place of the old fashioned wax that should be done once or twice per year unless you are washing & spray waxing the camper every week.
Black Tank Flush: There is a water inlet dedicated just for flushing the black tank. This is something that is best done every time you drain the tank.
Water Pump Filter Check: Inspect the water pump filter before or after every camping trip. The filter's purpose is to catch unwanted debris that may be in the tank from entering the fresh water pipes.
-
8
-
8
-
I have had a few questions regarding 4-Season camping with the Oliver and wanted to make a post so it would be available for everyone.
What is 4-Season camping? It simply means that the Oliver is capable of being used through all 4-seasons. It does not mean that it will necessarily have no freeze issues in certain areas during certain climates. This is no different than a house. Here in Tennessee we recently saw sub-zero temperatures and many people had their water lines freeze and burst causing lots of damage. Does that mean that their house is not capable of being used during the winter? No, it simply means that in certain temperatures you may need to make arrangements to combat the temperature. In the past I have had my water lines freeze that were located on an exterior wall of my house so this time when they said we would see sub-zero temperatures I placed a space heater on that wall area to help keep it warmer and the next morning I had no freeze damage.
Below is an average winter temperature for the United States however this is just an average and when temperatures go below the average especially when going into the low single digits or below zero, whether in a camper or a house you may have to perform steps to ensure freeze damage does not occur.
-
2
-
10
-
-
- Popular Post
- Popular Post
I requested that production swap the furnace & water heater locations because the furnace ducting was running right over the top of the water heater bypass valve. This made locating the valve difficult for new owners as well as having to move the duct aside with the potential to tear it. Hopefully this change has made it better for access and does not cause any issues.
I have also requested the return air vents as well and they did start putting a return vent in the bath where the air can return below the dinette about a year ago. They are still working on getting one placed in the closet which should be one on the top & one on the bottom for better air circulation through that area. The return air vents is something that can be easily added on older models if you choose to.
-
11
-
6
-
Due to the volume of inactive on hold tickets with no response I have set a 45 day automatic closure. My phone support team should be reaching out to you before that deadline expires in an attempt to get your questions answered or issues resolved. Closed tickets will remain in your history file and can be reviewed at any time but are no longer active.
Please keep in mind that notifying us of an issue does not place the warranty on hold. All issues must be resolved within the warranty period and no one in the service department has the authority to extend the Oliver warranty or a vendor warranty. If your ticket gets closed and you still have an issue, a new ticket can be created when you are ready to schedule for service or you are able to perform necessary steps to get the issue resolved.
-
1
-
-
Understanding the Support Tickets
How do I create a support ticket?
-
All voicemails to phone support or parts & service automatically creates a support ticket in the proper department initiating a return call request.
- Keep in mind that we work through returning calls in the order they were received unless it is an emergency situation.
-
All emails sent to support@olivertraveltrailers.com will automatically create a support ticket based on your emails subject line and it will automatically pull in your information as long as the email you used is in our system in your account.
- If you are submitting a new request, please send it as a new email not as a reply to an old email. This will help to speed up the response
- If you are contacting regarding an open/ongoing issue it is best to reply to the email chain and it will automatically flag the open current ticket for review and bump it up on our list.
- You can visit the Owners service page on our website or the forum main page and click the "Submit Ticket" button
- You can contact us via phone and the phone support personnel should create a ticket for you if one does not already exist.
What to do if you have multiple issues?
- You can list all of your issues in a single ticket. If you choose this method, please list the issues in bullet format if possible to ensure all issues are captured properly.
- You can create an individual ticket for each issue if you prefer.
Why was my ticket split into multiple tickets?
- We might split your ticket into multiple tickets for communication with the vendor or manufacturer of the component so that everything stays organized and we can work with the vendor to get the issue resolved as quickly as possible.
Why were my tickets merged into a single ticket?
-
We might merge multiple tickets into a single ticket when necessary:
- Multiple tickets but the same issue
- Similar issues
-
Cause/Correction resolves multiple issues reported
- Example: Fridge does not work on AC power & A/C Inoperative where the cause was found to be an issue with the incoming shore power which means the true issue was "No 120v power". This is common as a camper equipped with an inverter could still be supplying power to the Microwave and Receptacles making it seem like 120v power was working.
- All issues are scheduled for service either here or at a 3rd party service center and should be resolved at one time under a single work order.
-
2
-
3
-
All voicemails to phone support or parts & service automatically creates a support ticket in the proper department initiating a return call request.
-
Several customers have had this issue so I wanted to try to get it out to everyone. Cookies is something with your internet browser and depending on which browser you use there are different ways to enable, disable and customize the settings. I pulled this from various places for the most common browsers as I am not an IT person but I have run into this issue as well on other sites and had to deal with the frustrations of not getting a website to work when I wanted it to. I hope this helpsENABLE COOKIESTable of contents
HOW TO ENABLE, DISABLE, CLEAR COOKIES
iPhone & iPad Users
SAFARI Browser: https://support.apple.com/en-us/HT201265Google Chrome Browser: Cookies are on & stay on. No interaction necessaryAndroid Users
In the Chrome app
-
On your Android phone or tablet, open the Chrome app .
-
At the top right, tap More Settings.
-
Tap Site settings Cookies.
- Turn Cookies on or off.
Fix problems
If you can't use your Google Account and get a message that cookies are turned off:
- Follow the steps above to turn on cookies.
- Try signing in again.
If you still get the error message, here are some possible solutions. Try each one, then try signing in.
- Open a new browser window.
- Clear your browser's cache and cookies. Learn how to clear cache and cookies.
- Browse in private. Learn how to browse privately in Chrome.
- Change your browser's privacy settings. Learn how to change privacy settings.
For Browsers other than Chrome on Android you will need to visit the support website for your browser.Computer Users
In Chrome
- On your computer, open Chrome.
-
At the top right, click More Settings.
- Under "Privacy and security," click Site settings.
- Click Cookies.
-
From here, you can:
- Turn on cookies: Next to "Blocked," turn on the switch.
- Turn off cookies: Turn off Allow sites to save and read cookie data.
Learn how to change more cookie settings in Chrome.
Fix problems
If you can't use your Google Account and get a message that cookies are turned off:
- Follow the steps above to turn on cookies.
- Try signing in again.
If you still get the error message, here are some possible solutions. Try each one, then try signing in.
- Open a new browser window.
- Clear your browser's cache and cookies. Learn how to clear cache and cookies.
- Browse in private. Learn how to browse privately in Chrome.
- Change your browser's privacy settings. Learn how to change privacy settings.
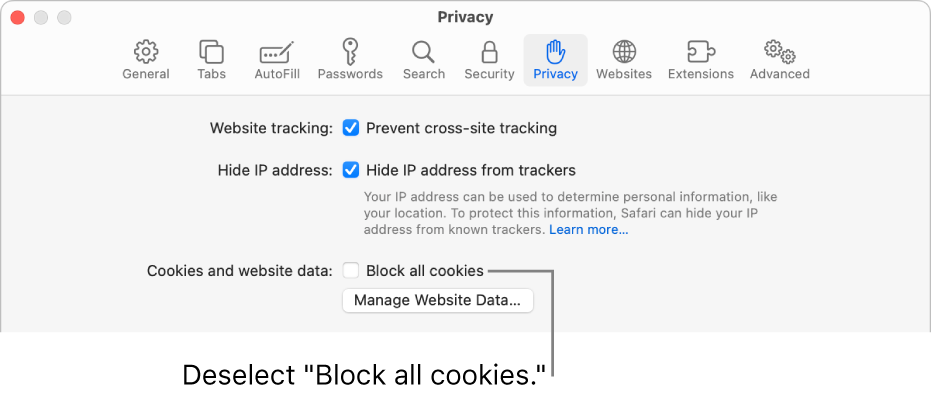
For SafariEnable cookies in Safari on MacYou can change Safari settings so that Safari always accepts or always blocks cookies and website data.
-
In the Safari app
on your Mac, choose Safari > Settings, then click Privacy.
-
Deselect “Block all cookies.”
Websites, third parties, and advertisers can store cookies and other data on your Mac.
Prevent cross-site tracking in Safari on Mac
Some websites use third-party content providers. You can stop third-party content providers from tracking you across websites to advertise products and services.
1. In the Safari app
on your Mac, choose Safari > Settings, then click Privacy.
2. Select “Prevent cross-site tracking.”
Unless you visit and interact with the third-party content provider as a first-party website, their cookies and website data are deleted.
Social media sites often put Share, Like, or Comment buttons on other websites. These buttons can be used to track your web browsing—even if you don’t use them. Safari blocks that tracking. If you still want to use the buttons, you’ll be asked for your permission to allow the site to see your activities on the other websites.
COOKIES ARE SOMETHING USED BY YOUR BROWSER AND WEBSITES THAT YOU VISIT. OLIVER TRAVEL TRAILERS HAS NO CONTROL OF COOKIES AND CANNOT ASSIST WITH YOUR BROWSER. WE HAVE PROVIDED THE INFORMATION ABOVE WITH LINKS TO CORRESPONDING BROWSER SUPPORT PAGES TO HELP BUT YOU MAY NEED TO CONTACT THE SUPPORT CENTER FOR YOUR PRODUCT WHETHER IT BE APPLE, GOOGLE OR ANY OTHER BROWSER.
DO NOT CLEAR YOUR BROWSING HISTORY UNLESS YOU ARE CERTAIN OF THAT STEP AS IT WILL ERASE ALL YOUR BROWSING HISTORY, SAVED PAGES VISITED, ETC...-
1
-
1
-
On your Android phone or tablet, open the Chrome app
-
This is a Dometic Recall and the repairs must be performed by a Dometic Authorized service center. You can use Dometic's Find a Dealer website to locate the nearest service center. If you need assistance in finding a Dometic Authorized Service Center you can contact Dometic Customer Support or the Oliver Service Department
Dometic Customer Support
Ph: 800-544-4881
email: customersupport@dometic.com
-
3
-
2
-
-
Question: Is there a risk of providing too much charging current to the batteries if you're hooked up to shore power and it's a sunny day with the solar panels on?
Answer: No, the solar charger and inverter/charger can be operated at the same time. Each system will monitor the battery state and provide charge as required.
Question: What if I am seeing a high voltage (above 14.8v) reading on the solar and/or seelevel system?
Answer: Check to make sure your Lithium batteries are turned on
-
1
-
4
-
-
Lithionics Technical Service Bulletin
Note: This only applies to campers that have a 3000w inverter AND the 130ah batteries.
Information was released recently regarding potential for internal battery BMS damage. This is a rare case as certain things would have to fall in place in order for the situation to have an opportunity to potentially occur.
Lithionics has found that under certain conditions if your 3000w inverter is left on, which many people do, and your batteries are turned off, by you or the BMS, and you were not connected to shore power, and you turn a single battery on by itself; the entire load from the inverter for in-rush capacitance would hit the single battery which was not designed to handle that much load. So to help ensure that you do not accidentally damage one of your Lithionics batteries we have released a technical bulletin for a restart/reboot process to eliminate this small potential for error. For more information regarding the proper Restart/Reboot sequence, please see the attached technical service bulletin.
Q&A
Do I have to do this every time I use my camper?
- No, this is only done if the batteries have been turned off.
Do I have to follow the restart process if I am aware of the situation and plan to turn on all the batteries at once?
- Yes, Lithionics recommends following this procedure to ensure that the batteries are brought back online safely.
Why do I have to do all the steps with the inverter?
- If the inverter loses 12v power as it does when you trip the inverter breaker then it must be powered on properly to load the communication software to the remote display. Failure to do this will cause an Error 20 condition and the remote display will not function.
Additional Notes:
I recommend that the inverter is NEVER left on. Make sure that you understand that the Xantrex Freedom 3000 is an Inverter and a charger all-in-one. When you connect to shore power it will automatically power up as the incoming 120v power runs through it to power your microwave, receptacles and A/C. Since the power automatically runs through it there is no need to turn it on or off. However when you are not connected to shore power aka a 120v power source, then you must manually turn the inverter side on and/or off as needed. On the Xantrex Remote display there is a round button with the power symbol next to it. This button is to power the inverter side only. The only time I recommend having this power button ON is when you are NOT connected to shore power and you want to utilize the microwave, receptacles and/or A/C. The reason for this is that if it is left powered on and you are connected to shore power but the onboard surge protector sees an issue with the incoming shore power, it will shut it off. When this happens the inverter can pick up the load within seconds and you may never know that you have lost incoming shore power. This may sound great and you may think why wouldn't I want it to pick it up and keep supplying the power to my microwave, receptacles and A/C. Well, if you are unaware of this power changeover to the inverter you may keep letting the A/C run and keep working on a laptop that is plugged into the receptacle for power and a few hours later ,unbeknownst to you, your batteries shut off because they have become depleted. If on the other hand you lost the incoming shore power and were aware of the situation then you have the decision to inspect and determine the reason for the failure and/or make an informed decision to switch to inverter/battery power and manage how much you use to ensure you do not deplete your batteries.
-
4
-
1
-
-
LITHIONICS BATTERY
NOTE: Attached documents are current to the date of this posting. Revisions are done periodically, you will need to visit https://lithionicsbattery.com/support/ to download the latest version in order to have the most up-to-date information.
Understanding Battery State of Charge (SOC)
State of Charge is a metered reading from a Hall Effect Shunt and is a count-down meter that is most accurate on its first cycle after calibration but becomes less accurate over time. What this means is that once the batteries are fully charged the SOC reading will be more accurate but as you use the batteries thru *micro cycles and do not fully charge them the SOC will no longer be accurate. You may see a 80% SOC but the batteries might actually be at a 20% rate. Lithionics recommends performing a full charge on the batteries every 2 weeks to recalibrate the internal Hall Effect Sensor shunt. *Please see attached document: "Lithionics - Understanding SOC" for more information. *A micro cycle is considered a discharge/recharge where the batteries are used but not fully charged.
Voltage vs SOC
Lithium batteries maintain a higher voltage throughout the state of charge compared to sealed lead acid (SLA) batteries. Voltage is not a good indicator to determine the state of charge for a Lithium battery as the charge/discharge curve is not linear. The battery management system counts AMPs going in and out to determine SOC, however, as stated above a full charge cycle on the batteries must occur every 2 weeks to keep it calibrated for proper readings. With this being said there is a chart to display ROUGH assimilation between SOC and open circuit voltage. Please see the attached document: "Lithionics Voltage vs SOC" for more information as well as graphs & charts regarding voltage and state of charge.
Lithium Battery Storage Procedures
Proper storage of your Lithium batteries is very important in order to keep the battery healthy and give it the most life. Proper storage is determined by the length of storage as well as the temperature and humidity at which they will be stored. Please see the attached document: "Lithionics Storage Procedure Rev. 7" for more information. Note: Lithionics has updated the storage procedure to include storing the batteries with a constant charge if you are storing in winter conidtions.
Lithionics Battery Bluetooth App
The Lithionics batteries can be monitored via a bluetooth connection with your smart device. You will need to download the Lithionics app and connect to the battery. NOTE: You can only connect to a single battery at a time. Please see attached document: "Lithionics Battery App" for more information. If you already have the app but are having trouble connecting to your battery, please see attached document: Lithionics Bluetooth Connectivity Support".
Lithionics Voltage vs SOC.pdf Lithionics - Understanding SOC.pdf Lithionics Storage Procedure Rev.7.pdf Lithionics 130A Battery - User Guide.pdf Lithionics 315A Battery - User Manual.pdf Lithionics Battery App.pdf Lithionics Bluetooth Connectivity Support.pdf
-
2
-
1
-
-
Note: For the most up-to-date information please visit Nature's Head Website
For how to use your new compost toilet, please see attached user guide or visit Nature's head website to download the manual.
Troubleshooting
Fan is not working
-
Ensure the power cord is securely fastened to the fan located on the side of the toilet.
-
-
If the power cord is securely seated at the fan, use a volt meter to test for 12v power.
- Place the positive lead inside the power cord while touching the negative lead to the outside body
-
-
If you are getting power to the fan but it is not operating, you would need to replace the fan.
- Contact Nature's Head at 251-295-3043 or sales@natureshead.net with test results and they will ship a replacement fan directly to you.
- Contact Oliver Service and we can contact Nature's Head on your behalf to get a fan shipped directly to you.
-
If you are not getting any power at the fan, Check the fuse for the fan.
- Depending on your year model, the fuse will be located either in the 12v fuse panel, and should be listed, or in-line at the main 12v breaker located under the street side access panel.
-
-
If the fuse is good but you still have no power at the toilet power cord then it is most likely a wiring connection and would require service.
- Contact the Oliver service department for further assistance.
The below information was captured from the Nature's Head Troubleshooting page. For a full list of troubleshooting, please visit https://natureshead.net/troubleshooting/
Should the Fan run all the time?
- If using the toilet full time, using the fan full time will enable the compost to process faster. If you are NOT going to be using the toilet for 10 days or more, unplug the fan, as the compost would tend to become too dry and hard. Do empty and clean the urine bottle before leaving. https://natureshead.net/troubleshooting/
Agitator Handle Hard to Turn
- If the compost gets dry, the handle may not turn easily. Adding used coffee grounds results in added moisture and keeps the compost loose so that it mixes better. https://natureshead.net/troubleshooting/
Compost is Too Dry
- If the compost is dry or hard, add some water and turn the agitator after the sphagnum peat moss has absorbed the moisture.
Compost is Too Wet
- If too wet due to prolonged diarrhea, add a small amount of sphagnum peat moss. If wet due to excessive condensation, also add a little spagnum peat moss. Make sure excessive wetness is not due to someone urinating directly into the compost section. This can also contribute to an unpleasant odor. The compost area should have only a musty smell. If a sewage odor is present, please contact Nature�s Head for consultation.
How Often should you Empty the Solids Bin
- The time frame for to empty the solids bin varies with number of people and the time period. Generally 2 people full time empty approx. 3 weeks, additional people will shorten that time. The toilet is designed for 1 to 4 people full time. If using just weekends with 2 people, that can extend time to 2 months or more. Just a couple of days of non use extends the period of time. Usually, the level of the compost will not increase; if it does it will be minimal.
When to Empty Liquids Bottle- It is best if you do not leave the liquid wastes in the tank for extended periods. While everyone is different, some urine will smell bad if allowed to sit for extended periods.
Does Compost work in cold temperatures
- Composting works from 55 degrees and warmer. The warmer it is, the faster it compost. When the temperature drops to freezing, the compost will be dormant until heat is introduced into the area.
How to Remove Buildup in the Liquids Bottle
- Empty the bottle. Add 1/4 cup of Lemishine Detergent Booster per gallon to the bottle and let it sit for 24 hours. Another suggestion is to rinse the bottle, add vinegar and some pea gravel. Shake well and the buildup will break loose.
-
3
-
3
-
Ensure the power cord is securely fastened to the fan located on the side of the toilet.
-
Normal Configuration
This is the configuration that the valves will be in most of the time. This will allow for use of the plumbing system when connected to city water or when using the water pump to pull from the onboard fresh water tank.
Boondocking Configuration
This configuration utilizes the rear water inlet and water pump to pull from an external source. It will then pump the fluid directly into the onboard fresh water tank. You can set a 5gal water jug below the water inlet with a 2ft or shorter hose to refill your fresh water supply. You can also use this to sanitize your fresh water tank.
Winterization Configuration
This configuration also utilizes the rear water inlet and water pump to pull from an external source and push the fluid directly to the plumbing fixtures inside your camper. You can use this to winterize the camper by pulling RV antifreeze into the plumbing. You can also use distilled white vinegar to decalcify the plumbing lines & fixtures.CAUTION: NEVER mix bleach & vinegar! You should never perform the decalcification and sanitization together. Mixing bleach and vinegar causes a toxic chlorine gas.Visit the Oliver Service Portal for more helpful articles!
-
7
-
-
Normal Configuration
This is the configuration that the valves will be in most of the time. This will allow for use of the plumbing system when connected to city water or when using the water pump to pull from the onboard fresh water tank.
Boondocking Configuration
This configuration utilizes the rear water inlet and water pump to pull from an external source. It will then pump the fluid directly into the onboard fresh water tank. You can set a 5gal water jug below the water inlet with a 2ft or shorter hose to refill your fresh water supply. You can also use this to sanitize your fresh water tank.
Winterization Configuration
This configuration also utilizes the rear water inlet and water pump to pull from an external source and push the fluid directly to the plumbing fixtures inside your camper. You can use this to winterize the camper by pulling RV antifreeze into the plumbing. You can also use distilled white vinegar to decalcify the plumbing lines & fixtures.CAUTION: NEVER mix bleach & vinegar! You should never perform the decalcification and sanitization together. Mixing bleach and vinegar causes a toxic chlorine gas.Visit the Oliver Service Portal for more helpful articles!
-
5
-
-
Note: This information is specifically related to the Xantrex Freedom 2000w or 3000w Inverter/Chargers.
Inverter - What is it and how does it work?
An inverter produces 120V AC power from a 12V DC power source. The easiest way to think about this is 12v power x 10 = 120v. This is not exactly accurate as it takes slightly more power but this is the easiest way to do a quick conversion. For instance, a laptop might be rated to use 3 amps when plugged into 120VAC but when used through the inverter it would equate to 3a x 10 = 30 amps. The importance of this is because while on shore power your energy is endless. When using the inverter, you are limited to the battery’s capacity. Battery capacity varies from battery to battery.
Charger - What is it and how does it work?
The charger uses incoming 120VAC power and steps it down to 12VDC power. The charger is setup with a specific charge profile based on the type of batteries and the number of batteries that you have. Each and every battery has a charge profile set by the battery manufacturer. The charger has 3 stages of charging: Bulk Charge, Absorption Charge & Float. In Bulk charge it will supply a set amount of voltage, typically 14.0 - 14.6 volts and a large amount of amperage to replenish your battery charge quickly. The length of this stage depends on the battery type, number of batteries, charge profile and *incoming power. Absorption charge is a timed charge cycle. It keeps the voltage high but lowers the amperage going into the batteries. Once in Float charge mode it drops the voltage right above the batteries resting voltage to top them off & maintain them.
Note: When in Bulk Charge rate it is passing the max amount of energy allowed to the batteries. With Lithium batteries this is a large amount of amperage which generates a tremendous amount of heat. During this stage it is normal for the fan to run at a high speed which causes it to produce a lot of noise. *Amps setting based on battery type & number of batteries.
Shore Power *Incoming Power
The camper is designed for 30 amps however smaller power sources can be connected using adapters. It is important to understand that the camper and the inverter/charger are setup for 30 amps and when using a power source smaller than 30, it may result in poor performance or failure.
House: When you are connected to a regular home receptacle, you are connected to a 20a or 15a circuit, unless you had a dedicated 30a receptacle installed. You also have to consider that the circuit most likely is not dedicated to the camper which means other appliances inside your house are running on that same circuit. When connected to a house circuit you may also experience failure at the circuit breaker in your hose. If this occurs, you have overloaded your house circuit meaning you are requesting more power than what it is rated to provide. You would need to locate a dedicated circuit, a circuit that is not being used, or turn off some of the appliances to lighten the load.
Generator: When you are connected to a generator the incoming power depends on the size of the generator. We recommend at least a 3000w generator which will provide about 25 amps of power. You can use a smaller generator however you will again be limited to how much power it can provide. Note: When using a generator, because it is not grounded, it is recommended to use a Neutral Ground Plug. Without the plug you would be required to turn off the surge protector, which we DO NOT recommend.
WARNING: Using an undersized or long extension cord may result in poor performance and failure.
When using an extension cord it is important that you use the appropriate size & length. A 100ft extension cord will have voltage loss resulting in heat buildup at the power inlet which can cause the inlet & cord to melt. We recommend using a 10ga/25ft max extension cord.
Flow of Power
Solar & Shore power have their own path to the batteries for charging and they work independently of each other. The battery is just the storage device for the energy whether that energy comes from Solar or the Charger via shore connection. See pic below for path of power
The red arrows indicate the direction of power with both stopping at the battery bank.
NOTE: The Inverter/Charger has two connections to the AC Panel as shown above. One connection comes from the Main power supply to the input side of the inverter. The Input side is what supplies 120vac power to the inverter/charger. Once the inverter/charger has the incoming power it passes it through the output side back to the AC Panel on a split bar to allow AC power to any breaker located on that side of the panel. The inverter/charger also uses this same power to charge the batteries. When not connected to 120vac power and the inverter is turned on it pulls 12vdc power from the battery bank and converts it to 120vac power, sending it down the same output connection in order to supply power to the AC panel on the split bar.
Caution: We do not recommend leaving the inverter on. The inverter will pick up the AC load within seconds if something happens to the incoming 120vac power but this will start to pull from your batteries which will cause the batteries to drain without your knowledge.
Solar vs Charger
Solar collects and charges at 12vdc whereas the Charger uses 120vac incoming power to charge at 12vdc. The difference is in the amount of amps supplied to the battery. The max amp output that the solar panels can provide is 18.8a per hour however this is dependent on the sun, while the charger can put out up to 150a per hour depending on the charge rate setting in the charger. Bottom line is that a shore power connection whether it be at a camp ground, your house or a generator will always charge faster than the solar.
Areas highlighted in light blue below are the primary settings to review. Please make sure you locate the appropriate battery column for your camper build.
Below are some links to the Service Knowledge Base articles. *These links may require login credentials as some of the articles are posted for Oliver owners only and cannot be viewed without an account.
-
8
-
3
-
-
The Oliver service department utilizes ASI 335 white & clear silicone, Red Devil butyl sealant, butyl tape, and Dicor self-leveling sealant to re-caulk/reseal the exterior of your camper. This process is based on years of experience here in the Oliver service department addressing and preventing leaks on our trailers. The primary goal when re-caulking/resealing at service intervals, especially roof penetrations, is ensuring there are no leaks. The roof is an area that is not typically seen unless you climb up on top but, again, is the most likely area for a leak to occur. Due to Oliver’s double fiberglass hull construction, any leaking water is trapped between the hulls until the water can find an escape point. Those points are typically a window cutout or one of the weep holes in the lower outer shell. Windows being a primary entry point often leads to an initial diagnosis that the window is leaking which is not necessarily the case. During the yearly maintenance, the exterior is sealed with the appropriate ASI 335 silicone. Once the silicone is cured, bolts and screws located on the roof then have an additional application of self-leveling sealant to provide an additional layer of protection, again, these areas aren’t typically seen to affect the aesthetics of the trailer. The additional layer also helps protect the silicone from sun exposure as well as sealing the head of screws and/or bolts. This precautionary step can be removed from the process if you prefer to have neat caulk seams over the extra protective layer of self-leveling sealant. The primary goal here at Oliver is to provide you the customer with a trailer free of leaks for enjoyable camping adventures.
-
8
-
4
-
 1
1
-
-
The settings inside the inverter are dependent on the type of batteries, number of batteries, incoming AC power, and how it is used. Below is a link to the Xantrex Inverter Settings article for best setup. You may find that some settings require a change as not everyone uses their camper in the same way but we have reviewed these settings and set them based on majority rule and least amount of callbacks for issues. You may have to change some of the settings based on your current location, current shore power connection, or if you make a change to your battery bank.
https://support.olivertraveltrailers.com/portal/en/kb/articles/xantrex-inverter-settings
If you need assistance changing your settings please contact the Oliver service department. If you are able to download the Xantrex App and Bluetooth connect to the inverter remote it is much easier to change the settings. How to connect via Bluetooth is included in the article link above.
-
7
-
-
Oliver Travel Trailers Service Portal Knowledge Base
Please visit the service portal and review our knowledge base area. We will be adding new articles and new videos periodically. This is the best place to get specific troubleshooting information as well as contact the service department for assistance.
Latest Article: Xantrex Inverter - Error 20
This system does require you to create a user account & setup a password so that you can manage your service tickets. It is an Oliver Travel Trailers Service portal for the purpose of customer support and is maintained by service department personnel. You can also visit the Oliver University located on the Oliver website that includes operational manuals which is maintained by the Oliver Travel Trailers marketing department.
-
1
-
 1
1
-
-
This is a recent issue that several people have been seeing on the Xantrex Inverter. We have already been in contact with Xantrex to determine what is causing this issue as replacing the remote or inverter does not resolve the issue. At this time Xantrex believes it to be a software issue and they are working on a firmware update. I currently do not have any other information as we are waiting on Xantrex to complete the firmware update, test to ensure it does resolve the issue and then communicate to us and other service centers on how they plan to implement this new software update. Anyone that is having this issue, if you haven't already, I would recommend submitting a service ticket so we know who to contact once we have more information.
Until the issue is resolved you can still use the inverter by turning it off and on at the main panel. The inverter is located under the driver side bed and the main panel screen looks just like the remote. Simply press the round button to turn the inverter on for powering the 120v systems with battery power. You do not have to turn this on when connected to shore power.
You can submit a service ticket at: Service Ticketing System
-
8
-
3
-
-
We have a Service Ticketing system in place that allows our customer to open and monitor issue requests. This system also has a Knowledge Base system that we will continue to build to help our customers. Many of our customers have already been using this system as it's been in place for several months now.
Below are links to the main dashboard of your ticket system as well as a password reset link if you are unable to login.
-
6
-
1
-
-
- Popular Post
- Popular Post
No matter what power source you use, 30a shore power, generator or inverter/battery power, you should better understand power management. Your Oliver camper was designed with the 30amp power in mind so your factory installed components are designed to work within the constraints of 30 amps. The inverter option that we currently offer can provide about 15 amps of power to the 120v receptacles before it will max out and shut down. Generators can vary based on their rating but they will be constrained to the 30 amp max that the camper is designed for.
How does this impact you or your style of camping?
Campground Camping with 30a Shore Power
What happens if you go over the 30 amps? The breaker will kick just like at home if you turn to many appliances on in a single room. This situation typically will only occur when you are plugging in high power demanding appliances or devices in the camper. Every appliance that you want to add to your camper should first be checked to see how many amps are required to power it. Many hair dryers can pull 1800 watts of power which will immediately take up about half of your available power. Add in a space heater and it may just put you over the limit. What this means is that you must be conscientious of what is plugged in and pulling power. The worst thing that could happen is it would kick the breaker and you would simply reset it and turn some things off that aren’t being used at the moment.
Boondocking with Generator Power
When you are connected to a generator power source you are limited within the 30 amps but also the max amp that the generator will put out. A typical 2000-watt generator will only supply 15-16 amps of power so this means the max power is limited to the generator and if you are demanding more than the generator can supply it will kick the breaker on the generator. The generator may continue to run but will not be supplying power into the camper. Some of the components in the camper like the Dometic Penguin II A/C will demand much of this power especially when the compressor engages (Start Phase). The optional MicroAir Easy Start does help to contain this short fast burst of power to about 11 amps but that is about 75% of what the 2000-watt generator supplies. Once the compressor moves into the run phase it requires less power and drops to about 9 amps. The compressor will continue to run until the cabin temperature reaches the requested temperature on the thermostat. The compressor will then disengage or shut down. Once the cabin temperature drops below a certain threshold the compressor will once again enter the starting phase which requires 11 amps of power. This is where you may run into an issue that is normal. You may have a coffee maker running or a laptop plugged in or a combination of any other type of added appliance that under the compressor running stage falls just under the max 15-16 amps provided by the generator but when the compressor re-enters the starting phase it can cause it to jump over the max long enough to kick the breaker on the generator. No worries, all you need to do is practice power management and unplug something temporarily and reset the breaker. TIP: When using a generator, the surge protector may see it as an ungrounded power supply and stop all power from entering the camper. The best resolution for this is to plug in a neutral ground plug into the 120v receptacle on the generator.
Boondocking with the Inverter
The optional inverter is a 2000-watt Xantrex inverter but it actually only supplies about 1800 watts of power. If you remember from earlier, we mentioned that many hair dryers require 1800 watts of power. Power hungry appliances they are! This means you are even more limited to what you can use at the same time or even by itself. The inverter is connected to the 120v receptacles and also the microwave. The microwave by itself will pull most of the power supplied by the inverter so when running the microwave on inverter power be sure not to have other things plugged in and running. Also keep in mind that the inverter is dependent on battery power. The inverter pulls battery power and converts it into 120v power. So, with this option you must manage both the available battery power and inverter power. For instance, the microwave under 120v power uses 12 amps but the converted rate from 12v battery to 120v through the inverter actually means you are using about 135 amps. Has this gotten a bit confusing yet? Putting it simply, you manage the 12 amps required by the microwave from 120v to the available amps of 15 amps provided by the inverter. With the 135 amps you simply need to know that this is draining the batteries at a much faster rate as they cannot sustain that rate of power consumption for too long before loss of 12v power would occur. However, the inverter will shut down before total power loss from the 12v battery system will occur as it requires at least 10.5v for it to operate. The good news is that the microwave is usually only used for short periods of time. You would however want to apply this way of thinking to other appliances that you may want to use while on inverter power so that you better manage the available power.
-
14
-
2
-
UPDATE 4/15/2019
The Andersen Hitch company has once again designed a new inner cone for the ball housing. This new cone is supposed to resolve the grinding/binding issue that has been occurring for some owners. The new design does require that the ball assembly be shipped to Andersen for installation of the new cone as well as the new collar on top that was designed to keep the cone in place. Any customer with questions regarding this new design or how they can get their current Andersen Ball assembly modified should contact Andersen Hitch at 800-635-6106.
-
4
-
-
As the cold season closes in on most of us, it is time once again to discuss proper winterization to protect all the plumbing and water systems inside the camper.
First let's discuss what components are susceptible to freeze damage which would result in water leaks and potential costly service repairs.
1. Brass Check Valves – These valves are in-line valves that keep water from spilling back out of the water fill ports. These valves will be located on the Fresh Water Line, City Connection Line and the Black Tank Flush Line.
2. Plastic Check Valve – The Dometic Standard toilet has a plastic check valve located at the rear of the toilet.
3. Water Valves – These valves are used to control the flow of water. You may have 2 or 4 valves located next to the water pump, 1 located on the lower shell floor to drain the fresh tank, and 1 located on the black tank flush port line.
4. P-Traps – These are used in the sink and shower drain plumbing lines. It retains water and traps debris that has drained from the sink and prevents it from forming a clog deep within the plumbing system, and stops sewer gases from passing into the camper.
5. Water Pump & Filter – The water pump filter is used to trap debris and keep it from entering the pump and water line system that is delivered to the faucets.
6. PEX Push Fittings – These fittings are used to connect different runs of pex pipe through out the camper. Pex itself is freeze tolerant but these plastic and/or brass fittings are not.
7. Faucets – The kitchen, bathroom and external shower faucets all maintain water at the faucet when in use and thus present a potential freeze issue if not properly winterized.
8. Water Heaters – All water heaters should be fully drained of all water and the bypass valve must be set to winterization/bypass mode. This allows for RV antifreeze to be utilized in the plumbing system without filling the water heater itself. *Even when using the camper in cold weather it may be necessary to fully drain the water heater when traveling between campsites, especially the on-demand water heaters as they only hold a small amount of water that can freeze in a short period of time.
*Proper winterization method to ensure that all components are protected.
You can visit the following link for a walkthrough with John Oliver on how to winterize your Oliver Travel Trailer:
Step by Step Methods provided below
1. Drain all water from the system (All tanks, water heaters)
2. Set bypass valve at water heater for winterization mode.
3. Change valve configuration at water pump for winterization mode.
4. Use water pump to draw RV Antifreeze (potable Safe) into the camper.
5. Turn on the kitchen faucet (Cold Line) and run until antifreeze comes out.
6. Change to the Hot line and run until antifreeze comes out.
7. Perform steps 5-6 for the bath faucet.
8. Ensure plenty of antifreeze drains into the P-Traps for the kitchen, bath and shower drains.
9. Flush the toilet until antifreeze starts to fill the bowl. Leave antifreeze in bowl to lubricate seal.
10. Turn off water pump.
11. Connect hand pump with antifreeze to the fresh tank fill connection. Pump at least 3- 4 times. Antifreeze is potable safe and will not hurt if it goes into the fresh tank.
12. Connect hand pump with antifreeze to city connection line, turn external shower cold line on and pump until antifreeze comes through shower faucet.
*TIP: It will be hard to pump in the city line if the faucets are closed.
13. Turn cold line off and hot line on, pump until antifreeze comes through shower faucet.
14. Connect hand pump and antifreeze to black tank flush port. (You may have to go inside and turn the in-line valve open to allow the antifreeze to freely pump into the tank. One pump should be sufficient as we are only protecting the check valve.)
For proper battery storage please visit:
TIPS
• The camper can be used in cold weather applications as long as the furnace is utilized to keep the components warm and above freezing temperatures.
• If traveling between campsites during cold weather season it may be necessary to winterize depending on outside temperatures.
• If water is left in the water heater during freezing temperatures even for short periods of time, it can cause damage.
• RV Antifreeze is designed to replace water and should NEVER be mixed with water as diluting it will defeat its purpose.
Oliver Travel Trailers Service: 866-205-2621
-
9
-


Important Update about Oliver Service
in General Announcements
Posted
Oliver Travel Trailers is excited to have our new dealer partners onboard to work with our Oliver owners as we strive to improve your Oliver Experience. We will be working directly with our dealers so that you receive the same quality service closer to home.
Our customer support team will still be available to assist with any questions and work with you and our dealer partners to get any services you need resolved.
As our service team will be working with the dealer's service departments on location, we feel it is prudent to discontinue most service work here at our location in Tennessee. However, we will continue doing major repairs, including fiberglass and aluminum, at our Plant Facility. At this time we plan to phase out the service department no later than the end of July and we are no longer taking on new appointments.
As you continue reaching out to us with your questions and service needs, rest assured that we will help answer them and coordinate you with a dealership partner nearest to you.
Whether on the road or at home, we are working to ensure owners receive the same excellent customer service you have come to trust here at Oliver Travel Trailers.
If you have any questions or require further information regarding this update, please do not hesitate to contact us or call us at 1-888-526-3978. We are always here to assist you.
Warm regards,
Oliver Travel Trailers Team
------------------------------------------------------------------------------------------------------------------------------------------------------------------------------------------------------------
Of course, my team is still here to help support you as we always have with any technical and service questions as well as facilitating services for your Oliver.
Thank you!
Jason Essary
Customer Service Director
888-526-3978
Important Update about Oliver Service.pdf