

AlbertNTerri
-
Posts
157 -
Joined
-
Last visited
-
Days Won
1
Posts posted by AlbertNTerri
-
-
I just saw your other thread, I don't know any heater-guys. I do know of a good fiberglass repair shop in Denver.
-
 1
1
-
-
what type of repair are you needing?
-
A bit un-nerving when passing a semi-car carrier going the other way, but not a problem. Don't exceed the speed limit
-
2
-
-
We got the composting toilet with some trepidation. After using it for the past season I'll never go back to a trailer "flush" toilet. Dealing with the solids once every 3-4 weeks is so much easier than dealing with the black tank every few days. No smell, I mean NO SMELL. if it smells then something needs tweeking because it shouldn't smell. You do have to empty the urine bucket every couple or three days, but that is easy and can be done at any gas station rest room, porta potty, dump station etc. The water savings is significant. We bought a roll of clear 38gal law/leaf trash bags. I pull the bag over the toilet when using the shower to keep things dry, that also avoids any water getting into the urine bucket holder. NH recommends drilling holes in the bottom of the urine bucket holder if you use it in a wet bath but we avoided having to drill the holder by using the trash bag as a cover. After the shower we hang up the trash bag, let it dry, fold it up and reuse it...saves on trash bags. You absolutely have to sit to pee, if that's an issue for you then this isn't the potty for you, but other than that, I have no problems with it. I think it's well worth the cost. It's also very nice when emptying the gray tank since there's never going to be any black water contamination in my back bumper. I think it's much more sanitary to not have that sewer (black water) hose and black water remnants in my trailer bumper.
I'd like to see someone make an incinerating toilet upgrade, I asked about it when we ordered our E2 but they said the only options were the standard toilet or NH. Incinerating toilets require a chimney so I'm not comfortable going down that pathway with the Oliver since it would require cutting through both hulls.
-
1
-
-
Our bolts are also way too long, the black caps are too big for the diameter of the bolts so the factory put a dab of silicone caulk on the pressed on the black cap, which then fell off and resulted in me being gouged in the arm during one of our first adventures. Cutting the bolts to size is on my "to do" list and every time I open the closet door I'm remined of being bled by the bolt.
-
3
-
-
Foy is an Oliver owner and wood worker who makes many upgrades for our Ollies, here's a link to his catalog, if you scroll down to page 17 there is an option for you to consider to covert the twins to a king.
https://drive.google.com/file/d/17XFL_5ine1WusHVKYguUBRmkj2KnJUN_/view
-
I was using the bubble level on the front jack but everytime we'd be sitting in the trailer and say to each other, "boy, it feels like we're leaning." Go check the level and it's right on, so I pulled out my carpenter's leval and put it on the floor of the trailer and it was off by quite a bit. I wiggled the bubble level on the front jack and bingo, it agreed with the carpenter's level. Take home: the front jack level is a waste of time. My solution is a LevelMatePRO. You initially have to level the trailer using whatever method works, then mount the sending device on the trailer, I fastened it to the inside of the front wall of the closet so it's close enough to the truck that it can be seen by the bluetooth phone-app while I'm still in the driver's seat. I put out my anderson curved levelers and drive up on them until my LevelMate indicates i'm level. It works great. The only issue I've had is having to change the batteries is a pain since it's easier to do it on the table (IE removing it from the mounting location) then trying to do it in the back of a dark closet and risk dropping the screws and batteries, so I have to dismount and remount it every so often. It has an automatic shut-off but I've found I can extend the battery life significantly if I just turn it on when I need it and shut it off when we're done leveling. Additionally, when we first pull into a site, I turn the unit on and drive around or back and forth until I find an appropriate location that is mostly (if not completely) level to start with since it gives real-time feedback, sometimes I don't even need to pull out the levelers. Sometimes just moving 8-10 inches forward or back will result in it going from being 1-2 inches off to being within1/4 inch...
I love living in the 21st Century!!!!
albert
https://www.amazon.com/LogicBlue-Technology-LevelMatePRO-Wireless-Leveling/dp/B01FGGSWPW?th=1
-
 1
1
-
5
-
-
we had this problem when we stayed at a Peak One National Forest in Frisco CO at about 9000 feet. When we came back down below 9000 everything started working again. We opened a service ticket at the time and in the end we (and Oliver service) wrote it off to the altitude. Not very satisfying but have not had a problem since, and we've not tried using it much above 7500 feet either so I'm not sure that was the problem but it's what we're going with.
-
1
-
-
in most rain we've encountered it usually only affects one side and not the other, we open the "dry" side and the bathroom window, turn the fans on and haven't had a problem. I do like the louvers I've seen in the forum and will probably make a set at some point, but it's not a real high priority since there always seems to be a dry side and when there's not you can always open the bath window and just dry off what little comes in after the storm.
-
4
-
-
On 5/30/2022 at 5:27 PM, dhaig said:
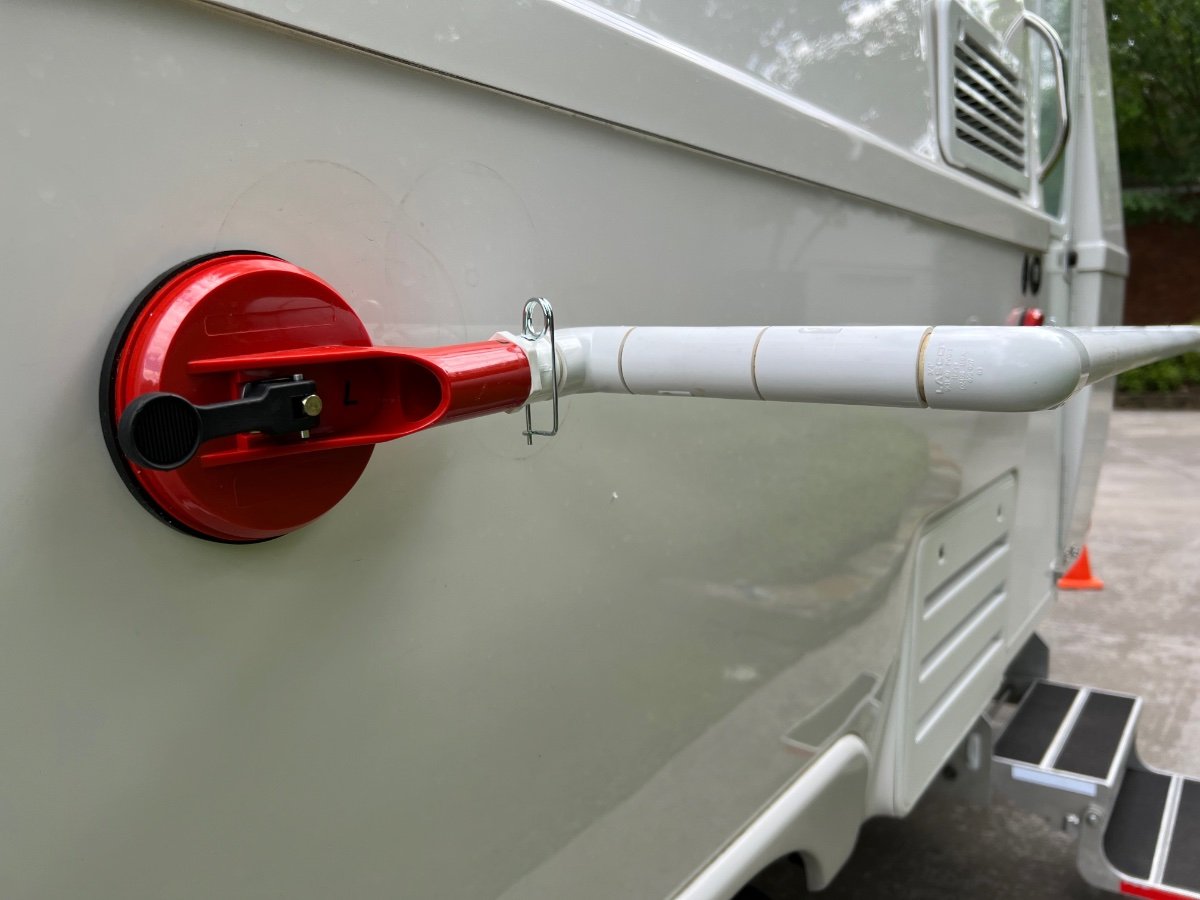
I had seen the posting on 4/22/21 by @Calypso showing an externally mounted towel bar on the side of Hull #520. The towel bar was made from a suction cup lifter and a piece of ¾" PVC tubing. I thought this a great idea and made one for our LEII picked up on 2/17/22. Due to nearly constant downpours in central TN the week we picked up Hull #990, we had immediate need for an external towel bar.
We recently returned from a two week trip during which we also encountered several downpours. We used the towel bar nearly every day, often not having enough space to hang damp items. Upon our return I was about to make a second towel bar. I was thinking of adding an improvement to offset the bar/tube further from the hull of our LEII, to avoid having towels in contact with dirt on the hull. After mulling over a design for several days, I had an Aha! moment. I could modify my existing PVC towel bar assembly and add additional tubes for greater capacity, while also moving the tubes further away from the hull. Below are photos and a description of the result.
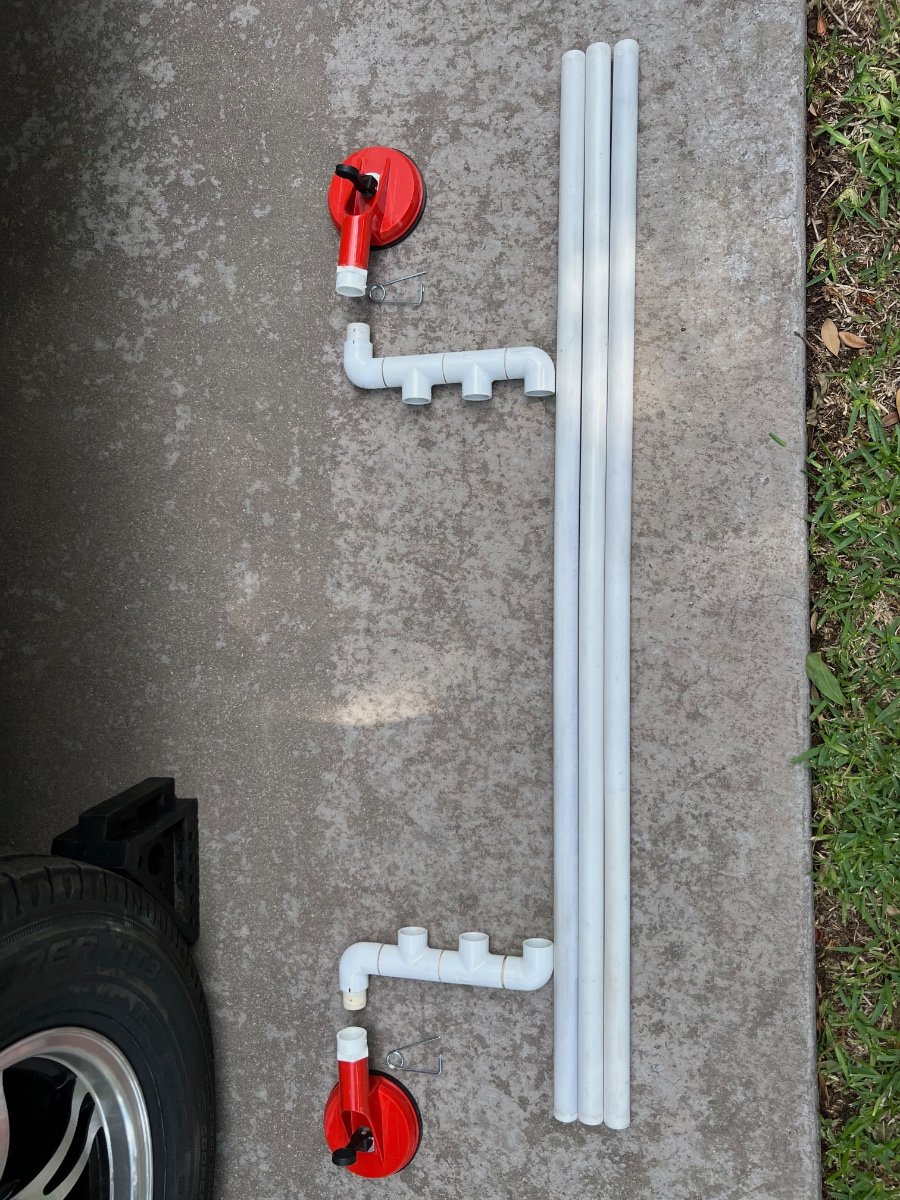
Materials (Quantity, Description, Source, Cost, URL)
1- 4-2/3 In., 125 Lb. Dual Suction Cup Lifter (Harbor Freight, $8.99, https://www.harborfreight.com/4-23-in-125-lb-dual-suction-cup-lifter-57501.html?_br_psugg_q=suction+cup+lifters)
2- 3/4 in. PVC Schedule 40 MPT x S Male Adapter (Home Depot,$0.71/each, https://www.homedepot.com/p/Charlotte-Pipe-3-4-in-PVC-Schedule-40-MPT-x-S-Male-Adapter-PVC021090800HD/203811638
4- 3/4 in. PVC Schedule. 40 90° S x S Elbow Fitting (Home Depot, $0.75/each, https://www.homedepot.com/p/Charlotte-Pipe-3-4-in-PVC-Schedule-40-90-S-x-S-Elbow-Fitting-PVC023000800HD/203812123)
4- 3/4 in. Schedule 40 S x S x S Tee (Home Depot. $0.85, https://www.homedepot.com/p/Charlotte-Pipe-3-4-in-Schedule-40-S-x-S-x-S-Tee-PVC024000800HD/203812197)
2- 3/4 in. x 10 ft. PVC Schedule 40 Plain-End Pipe (Home Depot, $6.98/each, https://www.homedepot.com/p/Charlotte-Pipe-3-4-in-x-10-ft-PVC-Schedule-40-Plain-End-Pipe-PVC-04007-0600/100348472)
1- 0.091 in. x 2-3/4 in. Zinc-Plated Safety Pin (2-Piece) (Home Depot, $2.31, https://www.homedepot.com/p/Everbilt-0-091-in-x-2-3-4-in-Zinc-Plated-Safety-Pin-2-Piece-815408/204276312#overlay)
The finished towel bar/drying rack shown in place below.

The disassembled parts are shown below:
I chose NOT to cement the entire assembly, since it would be much harder to store when in transit.
Construction
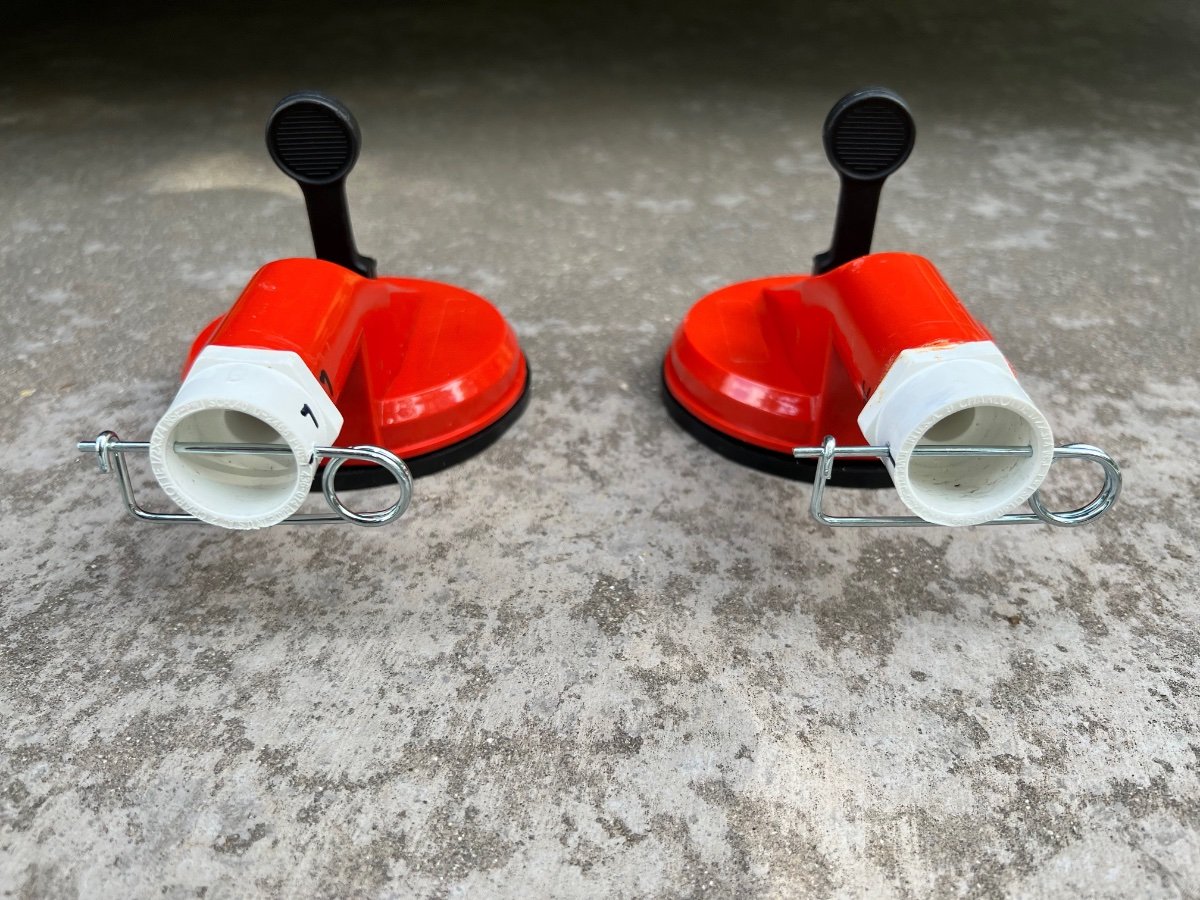
- Cut the handle of the HF Dual Suction Cup Lifter in half transversely. A hack saw or bandsaw is recommended. File/sand the cut edges to remove burrs.
- Use PVC primer and cement to fasten the threaded end of each 3/4 in. PVC Schedule 40 MPT x S Male Adapters to each of the cut ends of the handles of the Dual Suction Cup Lifter.
-
Cut the ¾" PVC tubing for the hanging tubes
- I chose to make 3 hanging tubes, each 45" long. This length easily fits in our rear cargo carrier and sags very little Adjust length to suit yourself.
- Cut 8 pieces of ¾" PVC tube to 1-½" in length. These short pieces serve to couple the elbows, tees and adapter together.
- Using a belt sander I slightly beveled the cut ends of the hanging tubes and the connector tubes so they would more easily slide into the tee and elbow sockets.
-
Assemble the two "manifolds" as shown above, each having: 2 elbows, 2 tees and 4 of the 1-½" connector tubes. Use PVC primer and regular PVC cement to assemble one joint at a time. Be sure to align the open sockets of the tees and elbows. Hold each joint until cement prevents movement of components. The manifolds should be identical.
- NOTE: do not put PVC primer or cement on the short connector tubes which will be inserted into the adapters cemented onto each handle of the Dual Suction Cup Lifter.
- When the manifolds are assembled insert the hanging tubes into the three open sockets on each manifold. Again, I chose not to glue the hanging tubes to the manifolds for ease of storage.
- Insert the connector tube on each manifold into the adapters cemented to each half of the Dual Suction Cup handle. Again, do not use PVC primer or glue.
- With all components assembled, do a test fitting on the hull of your Oliver. Slightly dampening the suction cups significantly improves their grip on the hull.
- The hanging tubes and manifolds assembled should largely support themselves horizontally. I had leveled my trailer and used a level to also level the towel bar/rack.
- When the towel bar/rack is level drill a 7/64" hole vertically through the adapter coupling joining each half of the Dual Suction Cup Lifter to the short connector tube of each manifold. The purpose of the hole is to permit insertion of the zinc plated safety pin which will prevent the towel bar/rack from sagging, while still permitting the rack to be disassembled.
- Insert the zinc plated safety pins through the holes drilled into the adapter couplings to maintain the towel bar/rack in a horizontal position extending from the hull.
- I marked the suction cups and manifolds Left and Right to avoid difficulty later inserting the pins through the connectors. I also put an index mark on the adapters and manifold connectors for easier alignment.
I have not yet tested this assembly in the field, but am confident it is strong enough to hold as many towels and clothes as will fit. I expect it could also support wet shoes or hiking boots. I hope this is useful to other owners. I welcome suggestions for improvements.
As a final note, update your departure checklists to include removing and stowing the towel bar/rack.
can you post a link (or quote) the original modification for this towel rack, I saw it when it was originally posted but am having a hard time finding it now. I'm interested in seeing the difference between that one and yours. I'm planning on making one of these. Your comment of making it so the towels don't come in contact with the dirt on the trailer are spot-on. Since reading that I thought, how about if we make a fourth rail (proximal to the trailer) that one could hang something like a shower curtain (cut to size) that would act as a divider to keep the towels off the trailer surface?
-
not sure, it stopped for about 45 minutes, I was able to get in touch with one of the fine people at OTT and while we were trouble-shooting it it started working again. We're thinking it may have frozen up and thawed out over the timeframe, but not sure.
-
 3
3
-
 1
1
-
-
Got it working!
-
2
-
-
Help! Help! AC Quit Working, it’s only two months old. We’re getting plenty of power to the circuit breaker and the circuit breaker seems fine. It was working wonderfully, we went out for a drive and when we came back it’s not working. I set it down to 55° and it doesn’t kick on, We’d had it set in the low 70s. What is the next thing to check??
-
I loved my '69 dodge pickup, slant 6, 3 on the tree, step side, aqua factory color. I could sit on the front fender with my feet on the chassis rails when working on the motor
aaaaah, nostalgia
-
2
-
 1
1
-
-
10 hours ago, John Dehne said:
I purchased the Honda EU2200i to charge the batteries and run the AC when needed. Just need to select what is your priority and change the Xantrex setting. It just purrs away in eco mode with the AC running and is very quiet. So far so good. Definitely would wait some time per John’s recommendation before purchasing the EU 3200. Using the Honda app is nice to keep a eye on the generator load and shutting it down without leaving the trailer at night.
what xantrex setting changes do you do to run the generator? I have a Wen 2250
-
2
-
-
we ordered the curtain option and have a composting toilet. We used the curtain a couple of times and then tried without it. after a couple of showers without the curtain the compost was getting too moist and put off a foul odor. Added some more coir and bought a roll of clear large trash bags. Pulled the bag over the nature's head and have had several more showers since then without a problem. Let the bag dry and reuse it. I prefer the clear bags over the non-clear ones, it just seems nicer...
I think the only real advantage to the curtain is you can leave the door open while showering but closing it across the toilet makes the shower too small for me. I vote against the curtain rod upgrade.
BTH, if you do opt to try the curtain rod option, it includes a custom fitted curtain to the shape of the curved wall, so no need to buy one (like we did).
-
3
-
-
On 7/22/2022 at 7:16 AM, csevel said:
John and Wendy,
Thank you so much for the pix! I'm pretty sure I'm going to stick with the original type stripping. It's taller and rain seems to flow along it and out at the ends without much overflow. Other than the deterioration, I've been pretty happy with the way it works despite the collection of debris behind the brackets. If I was physically unable to get up there to clean, I would probably go with the J-channel style.
As far as the window vents go, I've consulted with a patent attorney (who's a dear friend) to see what's involved with stepping forward with my design. The consensus is to make and sell a few (10-15) to see what the interest is and go from there. I have been busy camping so I've sort of put it on the back burner. I saw one member here make one and I was thrilled to see their attempt! Stay tuned.. 🙂
Please put us down for a set of vents as well if they become available.
albert
-
1
-
-
I saw someone recommend those plastic "razors" a couple of months ago and bought one on amazon. It comes with about 100 blades and it was only about $12, WOW, what a great product. I used it to remove the caulking around the access panel on the bathroom vanity and it worked better than anything I've ever used in the past to remove silicone caulk with no worries about damaging the gel coat. I highly recommend it!
albert
-
5
-
-
As far as I know when the hose is hooked up then the bumper remains open
-
Thanks Seadawg, I never noticed that, that does make me feel better
🙂!
-
1
-
-
Listed as Hitch Option $230 for our 2022 E2. I didn't get the 2" hitch to take home, didn't ask for it and not really interested in it, it would just be something else to clutter up my limited storage space. I was a bit miffed when they told me that by ordering the upgraded mattresses that I would not be getting the regular cushions which we paid for the fabric upgrade, but also don't have a place to keep them and probably will never use them since we keep the king size bed set up all the time. I figure it's just some more profit for OTT.

-
Oliver supplied the 2 5/16 coupler we had installed on our build. They charged me something like $250 to make it happen...I just had to ask for it. One of the few custom upgrades still available.
-
3
-
-
didn't know they have rechargeable now, We'll have to look into that when we run out of our butane refills
-
the static weight limit on the Thule is 750#, the weight limit underway is 150#, the Kayak is 120# so I'm ok as far as that goes. Swapping out for two smaller kayaks was a consideration but given our current state of health the tandem is the better option for us. As for crane failure, getting lifting help would be the only option at that point. It's really not that big of a deal to lift the nose to the roof then lift-and-slide the kayak up. Do-able single handed but much easier with two lifting. I came across the crane and bought it then realized that I'd need to modify it to get the height needed to load anything on the roof. It's been a real help so far when dealing with a loaded yeti in and out of the truck and like I said, it will be nice when lifting full 30# propane tanks (which are about 50# when full).
For now I'm looking at adding a bar across the cab (or possibly a rhino rack) and looking for a suitable way to lift the kayak singlehandedly to the roof hence a modified crane.
a.
-
1
-


Problem with rear emergency escape window
in General Discussion
Posted
sounds like a warranty issue, Oliver should be able to give you the name of someone in your area who can solve the problem. Please keep us updated on the issue as it evolves. I'm going to check my rear window.
albert