mdernier
-
Posts
30 -
Joined
-
Last visited
-
Days Won
1
mdernier's Achievements
")


-
Wheels, model, warranty, care
mdernier replied to John E Davies's topic in Mechanical & Technical Tips
Thank God everyone is OK. I'm no expert, but my sense is that if you had just gotten work done on the axles (EZ-Flex install), then it is just too coincidental that the wheels literally came off from a pot hole. Just a theory . . . but there is a possibility that the technician did not torque the lug nuts correctly. If (and a big IF) the lug nuts were not torqued properly, then the most likely error would be under-torqued (possibly not even tightened down). I'm not saying that this ever happens at OTT, but in general not tightening lug nuts after service happens regularly from basic human error. If loose lug nuts were a latent issue on your trailer, here is a possible failure scenario: (1) the lug nuts all begin to back off and fall off at different times during the trip, (2) eventually one tire falls off first (leaving lugs in the hub), (3) the lugs on the remaining wheel get beaten badly and begin shearing off one by one until they all go. -
Remove the rain seal on the awning?
mdernier replied to John E Davies's topic in Ollie Modifications
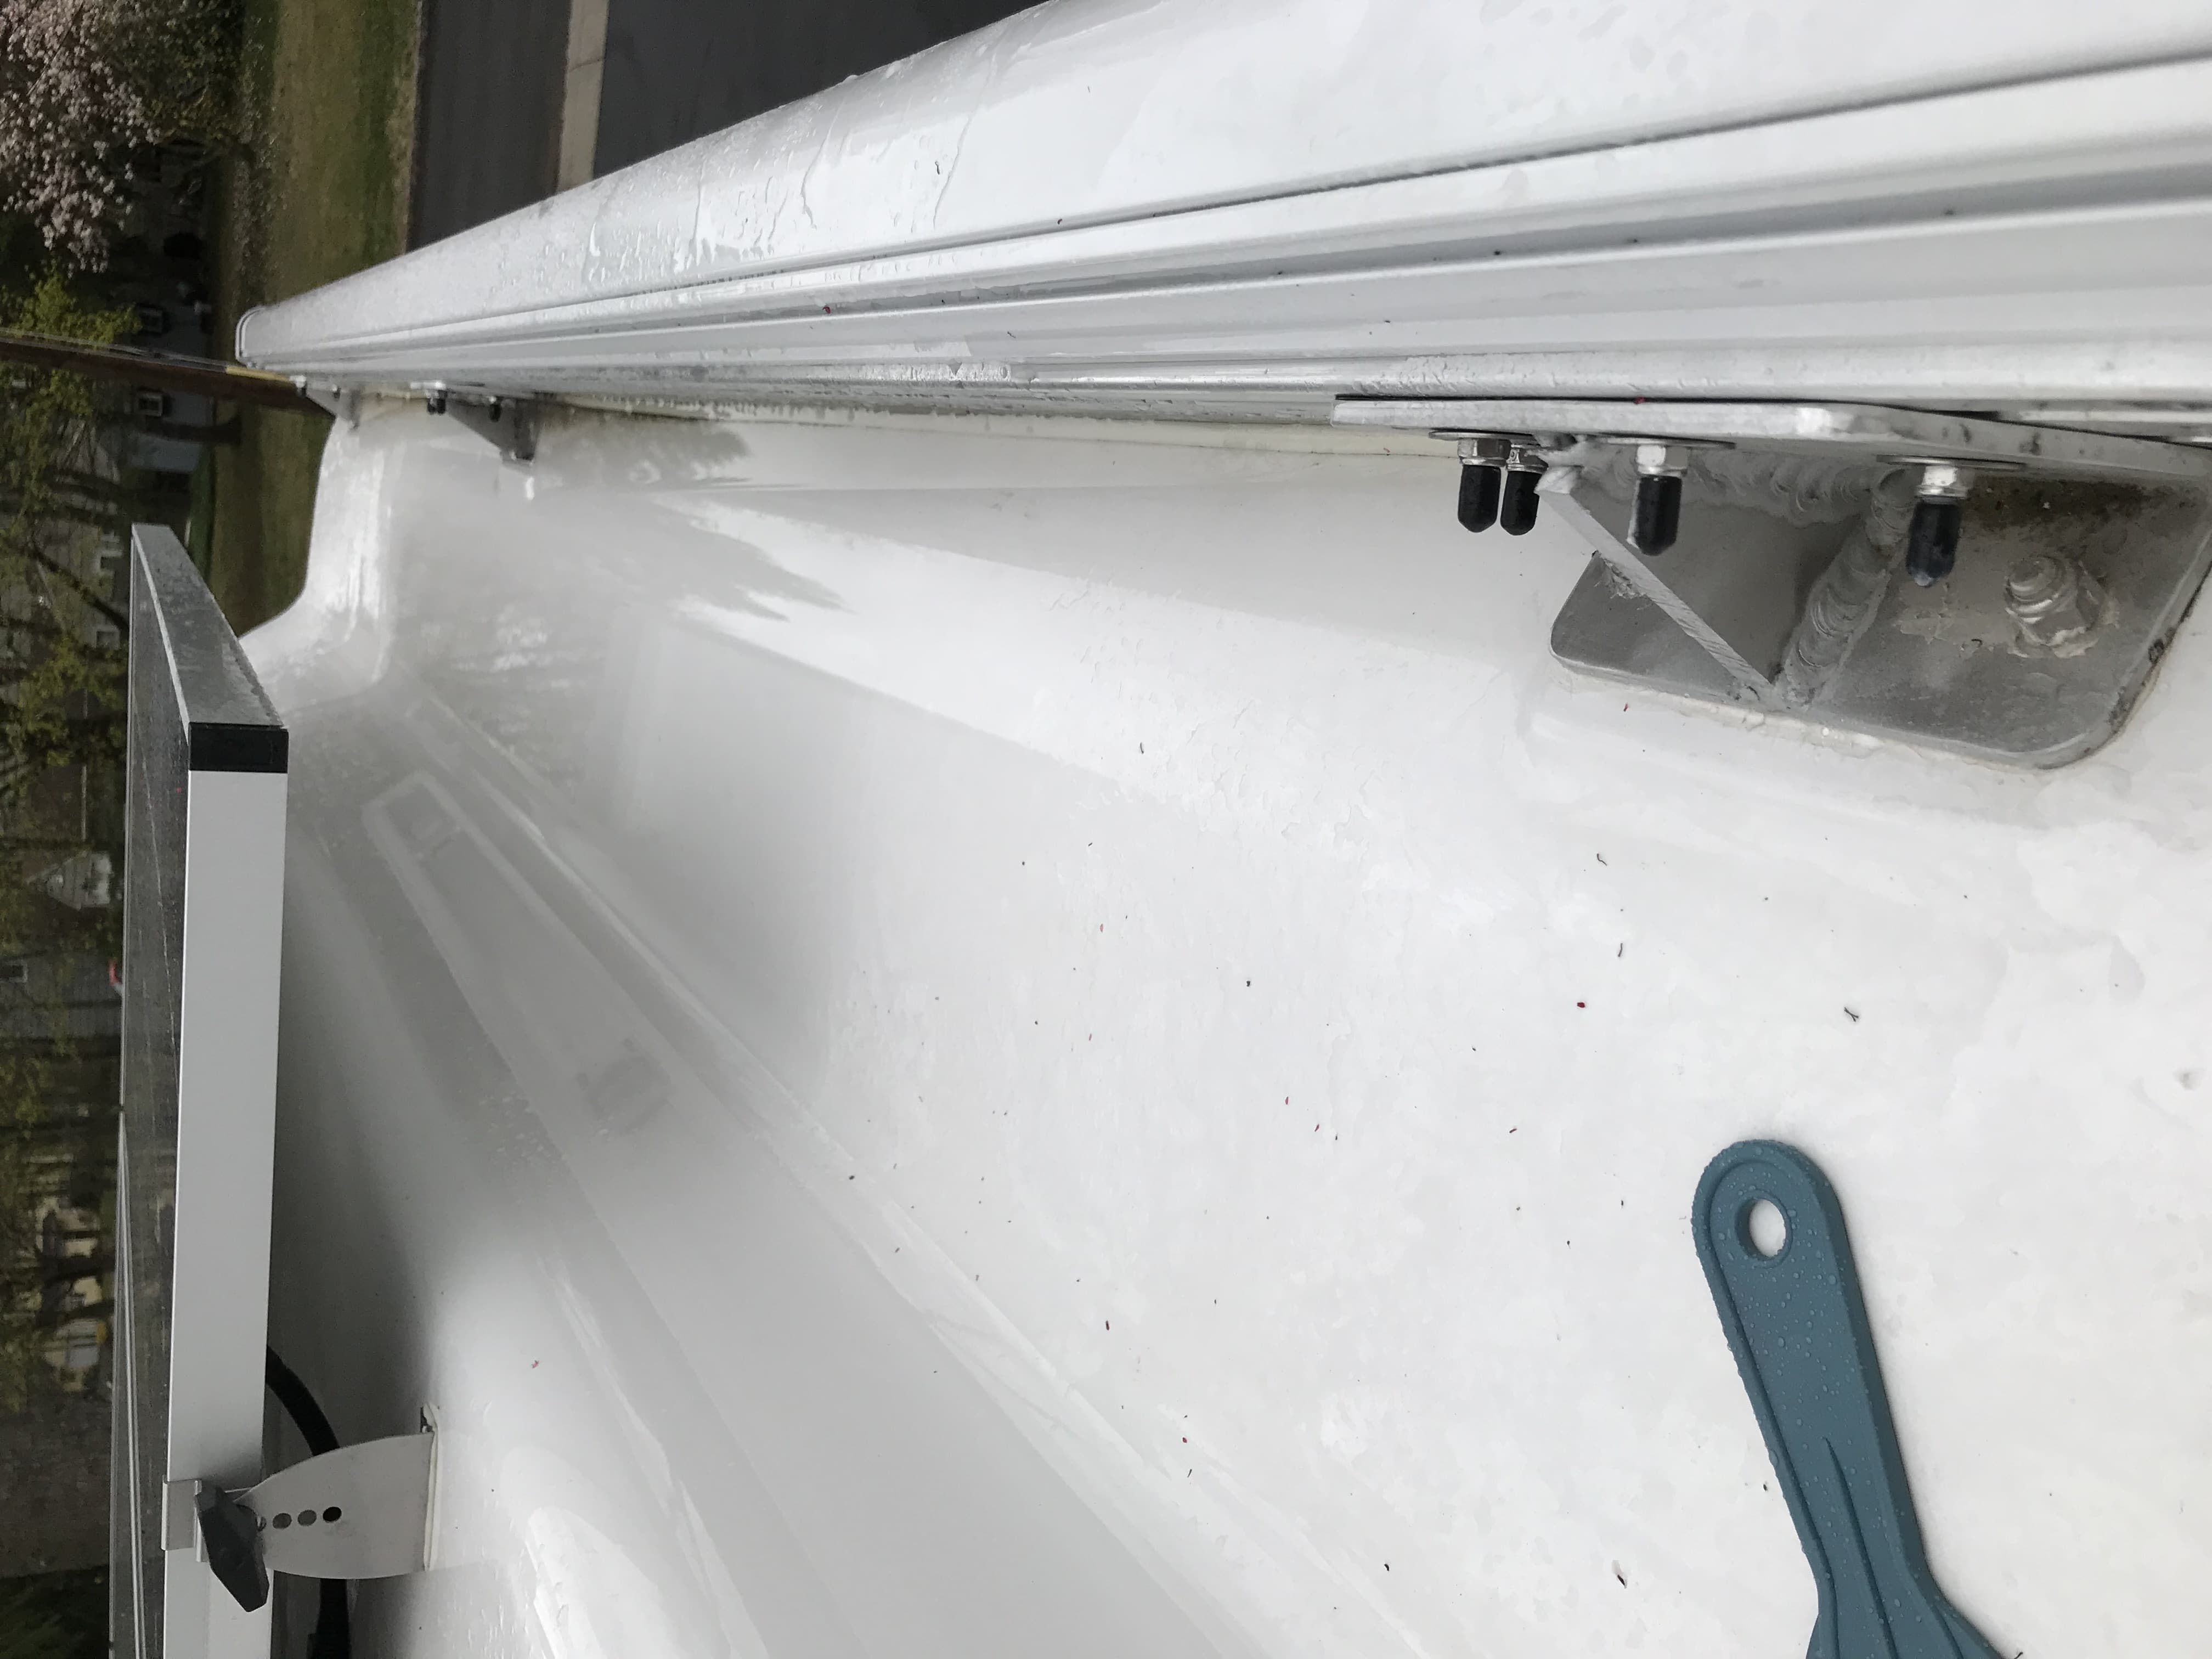
John, Thanks for the idea - which I implemented. (See attached pic.) I used a 3/8 drill bit on about half of them until it broke, then completed the rest with a 5/16. A hose test just after completing the drilling process passed with flying colors. But that test was sterile, i.e., there was no "gunk" from overhanging trees on the roof which would flow and lodge within the holes. Alas, it's spring, so I've allowed said gunk to build - and indeed it gets lodged at the entrance to each hole. Yet, the water still drains off, albeit a bit slower than when the holes are completely clear. So, keeping up with the debris on the roof is (another) maintenance item. P.S. I plan to apply some Dicor lap sealant to the bracket as water will obviously get behind the bracket (and do bad things, especially in the winter). In fact, I've applied Dicor to all of the roof components.
-
Remove the rain seal on the awning?
mdernier replied to John E Davies's topic in Ollie Modifications
Well, John, I opted to drill drain holes through the bracket webs as you suggested. See attached pic (sorry, but the Forum software always seems to turn my pics 90 degrees). I went with a 5/16 diameter drill bit. I'm sure that debris will clog the holes from time to time, but I'll just have to keep after them (along with the other 1,000 items that I'm keeping after). I'll let everyone know how/if it works.
-
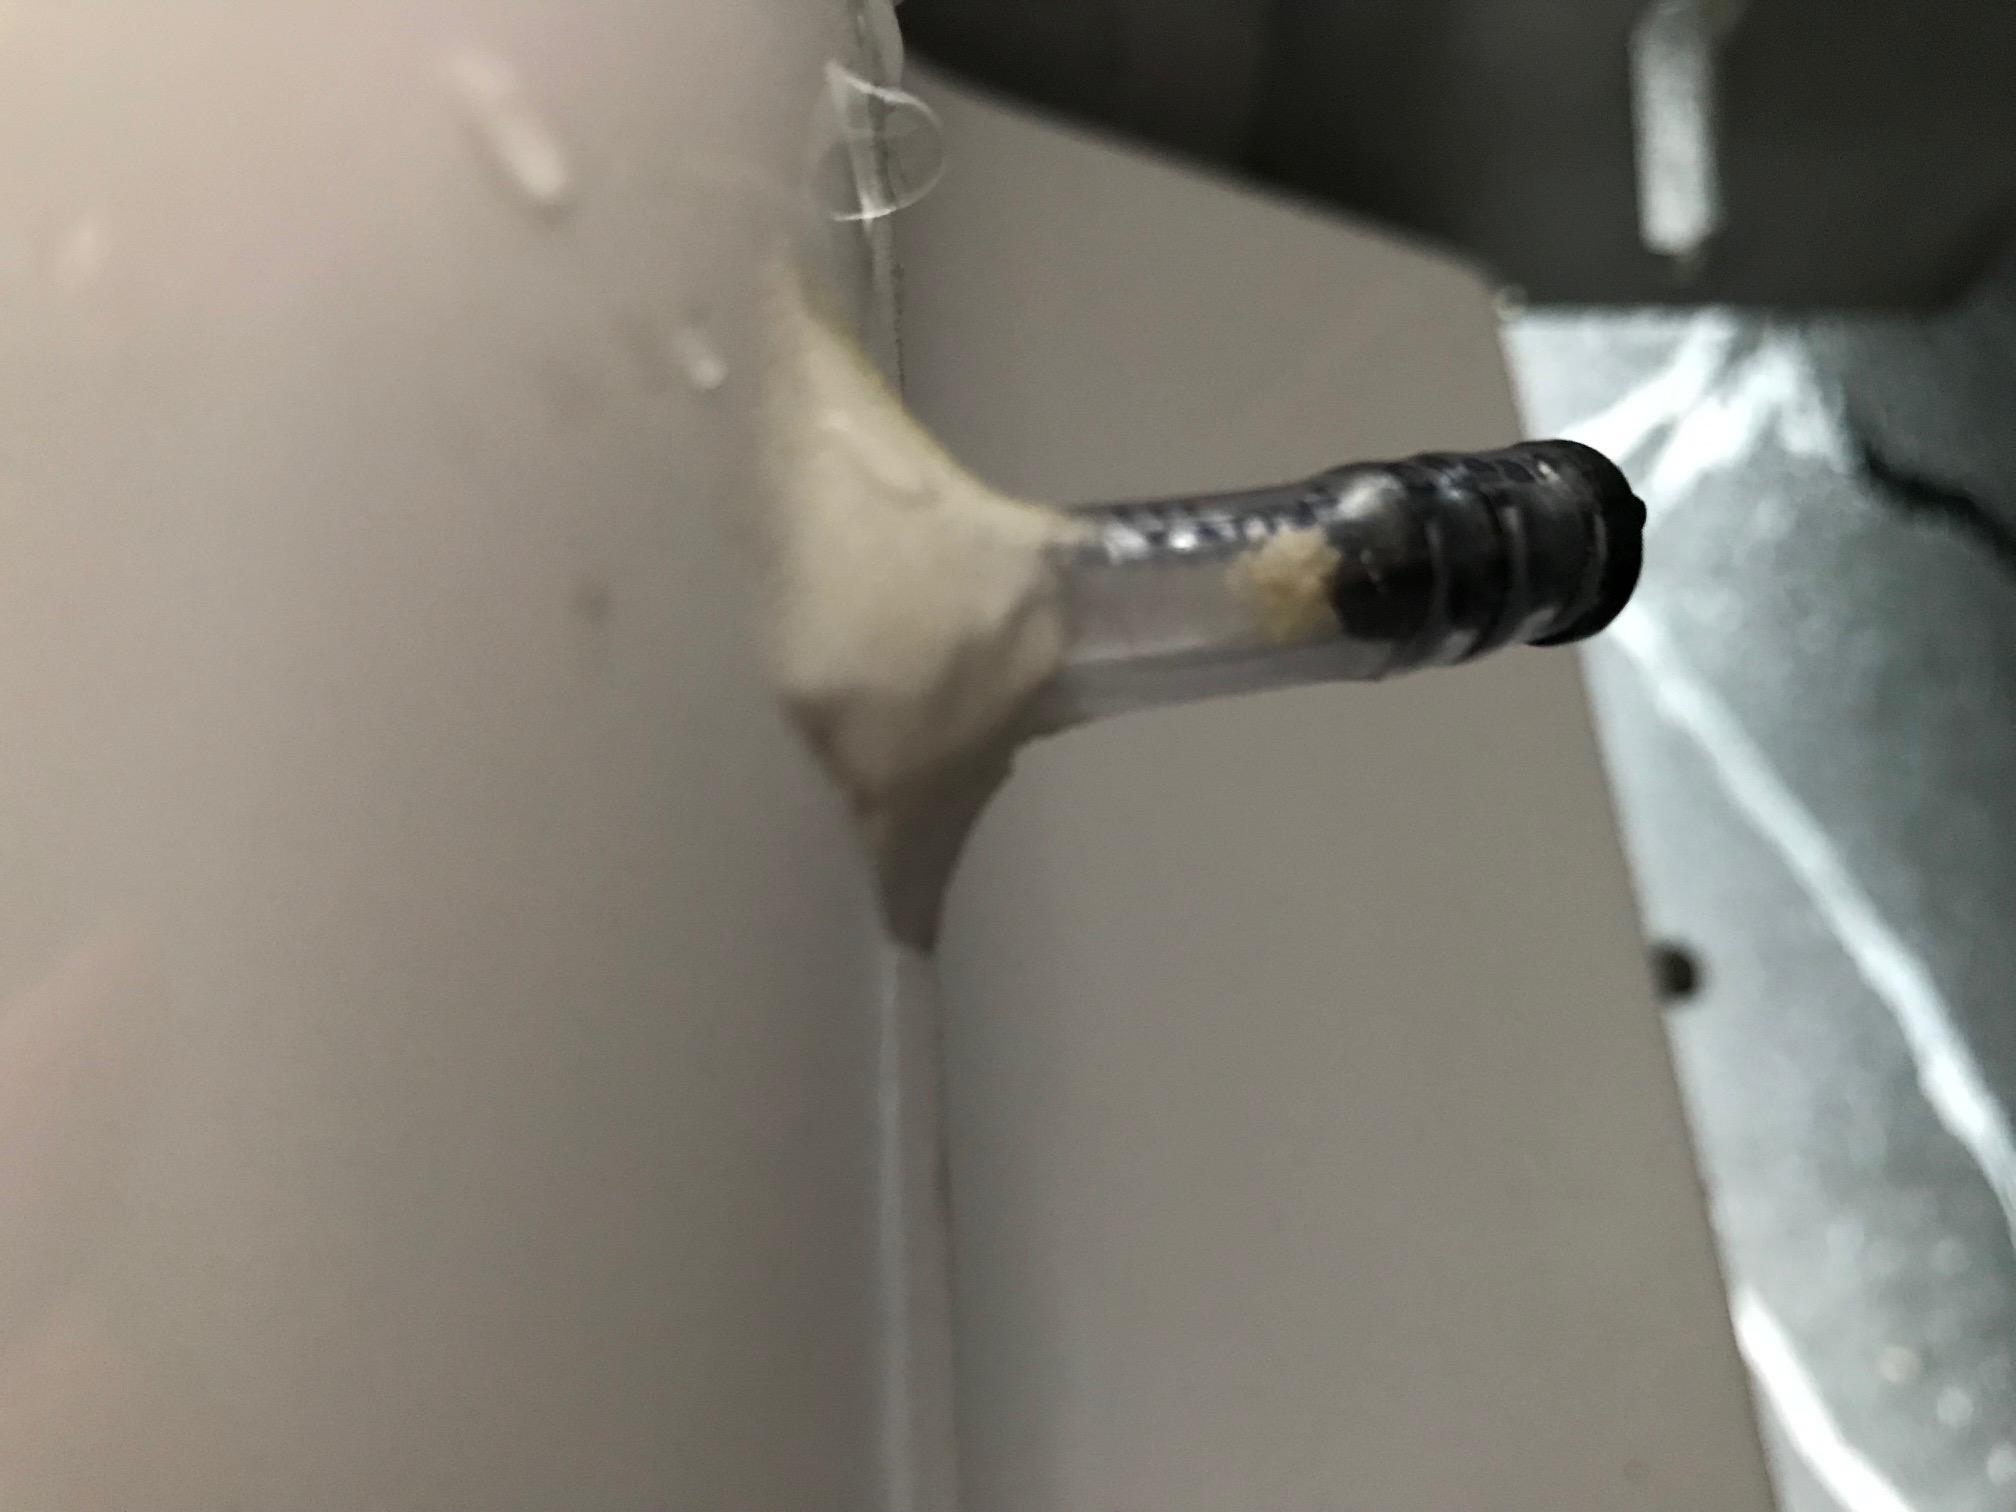
Norcold Refrigerator - Externail drain hose PLUG?
mdernier replied to mdernier's topic in General Discussion
Thank you Mike. Ah, I'm sure mine is the same - I just didn't see holes. I'll look closer. -
I noticed this external drain hose under the Norcold refrigerator compartment (see pic IMG_6253). It appears to be intentionally plugged, which I find odd. Why have it at all? Any ideas? Thanks in advance.
-
Remove the rain seal on the awning?
mdernier replied to John E Davies's topic in Ollie Modifications
John, thanks for the idea. I may wind up doing that in the long run. I kind of like the idea of removing the seal altogether, except for over the door and as many of the windows as possible. I plan on informing the factory but have not yet done so. -
Remove the rain seal on the awning?
mdernier replied to John E Davies's topic in Ollie Modifications
I agree with you, Overland. That design is just a non-starter for me. -
Remove the rain seal on the awning?
mdernier replied to John E Davies's topic in Ollie Modifications
I'm resurrecting this thread because I just picked up my rig (on 04-11-2019) and see that water pools behind the awning when the seal is in place (see pic #1, IMG_6248). Although I like the idea of preventing rain from running down the entire side of the rig, I don't like 2-3 inches of water pooling back there. The water pools around the awning brackets and much of the bracket is submerged. I suspect that the holes for the bracket bolts go all the way through the outer shell, thereby presenting 8 potential leak points. There is evidence of sealant on only some of the mounting brackets and bolts, so I would assume a steady diet of pooled water would find its way into the rig up there. I'm trying an alternative to removing the seal altogether, which is to slide in a small drain tube in each "pool basin" (see pic #2, IMG 6250). We'll see.
-
Trainman: Thanks for your post . . . "I would put a 2×12 stick of lumber (or whatever combination of lumber) in the ditch . . ." Yep, I've got lumber ready too. This little rig is just another option. "I do question the raise of the trailer hitch ball so high, this just lowers the rear of the trailer . . ." I started with the 20" ball height because OTT recommends a 23.5" ball height for trailering. I'm 3-4 inches under that, so the LEII should sit sloped with the tail slightly higher (a little anyway). My investigation so far indicates that I should not have a problem with drag even if the LEII were perfectly level. If I do, I have other ball/mount options at the ready when I get into it for the first time.
-
"I really want to add a front receiver but I’m surprised that the Curt hitch is so low." Overland: The center of my front hitch is probably more like 13-14 inches off the ground. I think most (all?) off the shelf front hitches are on the low side because they are made to clear all the "stuff" (like the the grill, bumper, etc.) from underneath. Otherwise, the installation would require some more serious re-work on those elements and sales would probably be much lower. I've heard of people fabricating custom front hitches, cutting holes in the grill/bumper, and/or moving other parts so the receiver is higher. I didn't want to go that route.
-
BACKGROUND: In previous threads I learned that a front hitch on my F150 should help with maneuvering my LE2 up a 7 degree driveway, and around the side of the house. I purchased and installed a Curt FH for the F150 (that was fun). The receiver of the FH sits even with the front axle (12 inches off the ground). That’s not very high. To get a better height to meet the hitch on the LE2, I’m using a 5” rise ball mount with a 2” rise ball (so the top of the ball is about 20” off the ground). ISSUE: Here’s the thing, I expect that when I push the LE2 up the driveway, and my front tires are still on the road, the bottom of the ball mount will meet (SCRAPE) the sloped ramp of the driveway. Unloaded, there is about 1” clearance, but with 500-600 lb of tongue weight, not so much. SOLUTION: Ultra-Fab Receiver Mount Protector. (A better name is a “ball mount protector”). The roller engages the slope before the bottom of the ball mount and keeps the nose up until the front wheels of the F150 leave the road and engage the ramp as well. See the pic Ultra-Fab Products 48-979020 Receiver Mount Protector https://www.amazon.com/dp/B003YJHZKW/ref=cm_sw_r_cp_api_i_B9yJCbCS6W9DQ
-
Thanks for the tips. Which Viair compressor do you recommend? And what leveling system (or systems) do you recommend?
-
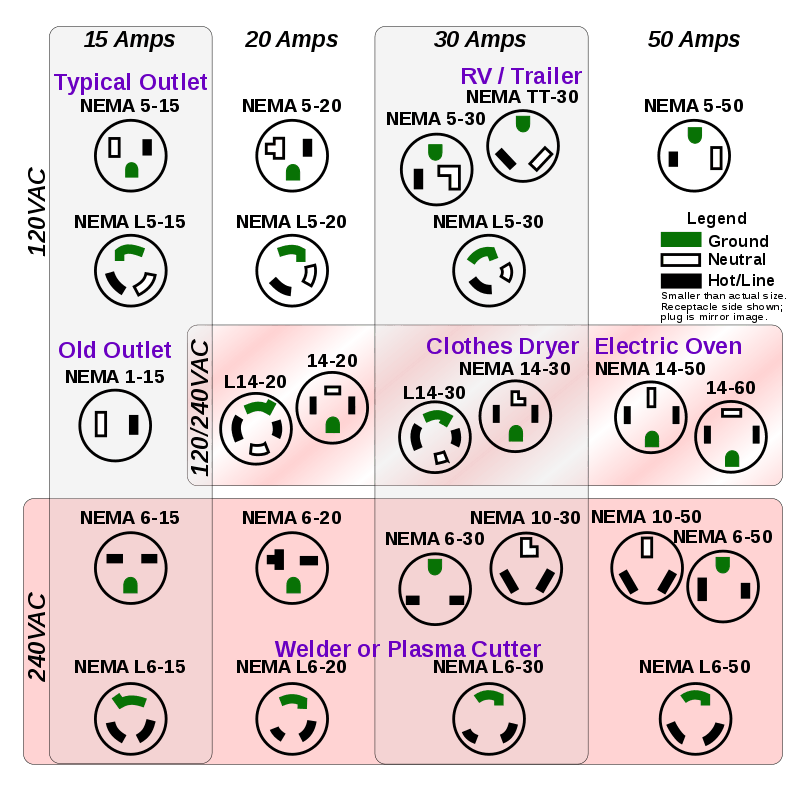
"I know it is correct because I hooked it up a few days ago. My trailer- hull # 218 – has a Furuno stainless marine 30a shore power connection. I can’t comment on what they are using now.OTH I don’t think they have changed." John: I think you're right - that Oliver probably still uses a NEMA L5-30P on the rig. Since that is a marine configuration, the power cord that Oliver gives you is probably an adapter configuration, going from the NEMA L5-30P on the rig to a NEMA TT-30P for plugging into the shore power at an RV site. Furrion makes such a cable. They also make straight TT-to-TT and L5-L5 versions. Since the NEMA TT-30 plug/receptacle system was specifically designed for travel trailers (i.e., the "TT" in the acronym), I assumed that Oliver would use the NEMA TT-30P on the LE2. Perhaps they really really like marine equipment! I asked our rep in the sales department at Oliver to clarify all this, but I think they thought I was nuts. Admittedly, my thinking is well in the weeds. Anyway, thanks again for your posts.
-
John: the picture you included shows the 30A receptacle on the adapter being a NEMA L5-30; however, isn't the plug on the LE2 a NEMA TT-30P?
-
You will need an adapter no matter which generator (2000i regular or companion). Here is why (with reference to the attached figure). The Oliver is equipped with a TT-30 P, which is a plug (not a receptacle) on the side of the rig (and the aux if you have that option). The 2000i regular comes with NEMA 5-15 receptacles (like a standard 15A home receptacle). Thus, you would need a TT-30R (receptacle connector) to NEMA 5-15 (plug connector) adapter cable. The 2000i companion comes with a NEMA L5-30 receptacle (which delivers only 15A unless you tandem another 15A generator/inverter). Thus, you would need a TT-30R (receptacle connector) to NEMA L5-30 (plug connector) adapter cable.