

Hokieman
-
Posts
318 -
Joined
-
Last visited
-
Days Won
4
Posts posted by Hokieman
-
-
-
Glad to hear that’s all it was. You might want to contact Natures Head anyway when you get a chance. I called them to order a spare fan, and they sent me two of them at no charge, just as they did for John Davies.
-
 2
2
-
-
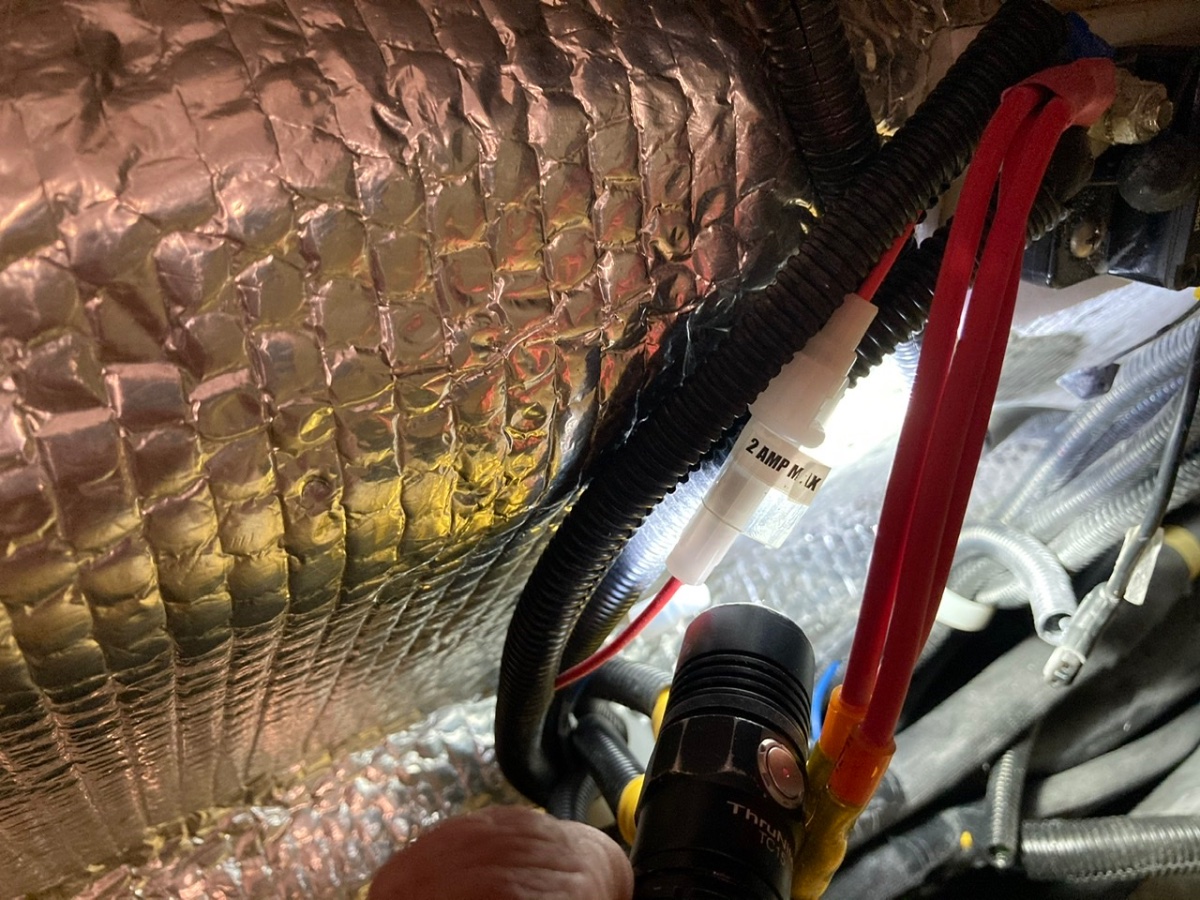
3 hours ago, cc121 said:
I did find a 1 amp fuse there and replaced it with a 3 but still no power.
Apologies, I responded hastily without thinking. That 1A blade fuse is for the LPCO monitor. Please take the 3A fuse out and put the 1A fuse back in there, I assume it was not blown. Bhnbc is correct, it’s a 2A slow blow glass fuse. My previous response was edited and photo replaced. I just sent you a PM to draw your attention to it.
-
 1
1
-
2
-
-
Try under the street side bed. It is a 2A slow blow glass fuse. See photo below.
This post was edited due to an error in original response.

-
1
-
1
-
-
8 minutes ago, John Welte said:
Would there be any reason to not have them covered?
No reason I can think of, except maybe to save a few $. All cars and trucks with drum brakes had them from the factory.
-
1
-
2
-
-
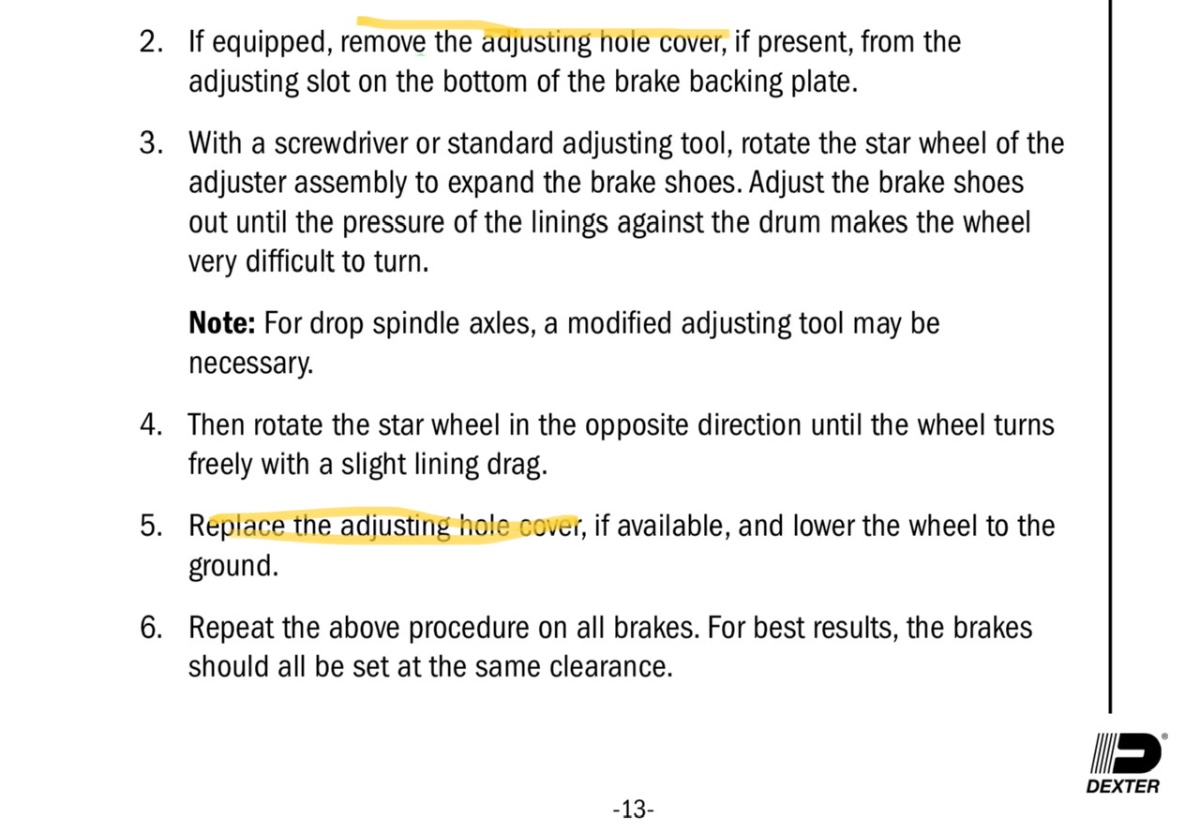
11 minutes ago, John Welte said:
What do they do
There are access holes on the backside of the brakes that allow you to adjust the brake shoes. Inserting rubber plugs in the holes help prevent water and dirt from getting in. See snip from Dexter Manual. I haven’t had a chance to crawl under mine to look to see if I have them or not. If not, I’m going to order some.
-
1
-
-
On 11/10/2022 at 5:55 PM, Geronimo John said:
Below is Jason's response to the lug not torque question. Glad to hear that OTT has recognized the reality of torque tool accuracy and not having owners exceeding the MFG maximum recommended lug nut torque.
Big thanks to Geronimo John! Thanks to his persistence, Oliver changed the torque specs in the 2023 Owners Manual. Unfortunately, they did not bother to amend the previous owners manuals. I’ve been running mine at 100 ft-lbs, never a loose one. I copied and pasted a snip from the 2023 manual (page 88).
LUG NUT TORQUE SPECS
It is also important to have the wheel nuts checked regularly to make sure they have not
loosened during travel. Follow the schedule for regular wheel nut torque checks. If you
suspect that wheel nuts have loosened at any time, have them checked and torqued to
proper limits immediately (110 ft/lbs).
-
2
-
-
On 11/21/2022 at 7:13 PM, AndrewK said:
My theory is there is moisture building up between the upper hulls and freezing overnight. When were turn up the temperature in the morning, the ice begins to melt between the hulls and leaks.
Quite a puzzle Andrew. I regret I have no solutions yet, but giving it some serious thought. I like your theory, but can’t think of how any significant moisture could get between the upper shells? Anyone else got ideas?
-
4 hours ago, John Welte said:
I haven't read all the manuals yet, but what do you do when running your heater?
I usually have the bath vent open and the Maxair vent open a few turns. Yes, a lot of heat escapes, but we seldom have condensation. I’ve also not camped in single digit temps yet, relying on folks like you to figure this out 🤔 Your heating system is different than the older models and hopefully much improved.
-
2
-
-
18 hours ago, John Welte said:
I didn't open any windows or vents. I assume there's some way for the air being pushed into the trailer to escape.Not by design on my 2021 John, it’s a closed loop forced air furnace system. Lot’s of posts on this subject. Best to do some checking on your new one or else you’re at risk in a confined space when running LP appliances. That being said, I am delighted the cold weather performance was good for you, and that you are pleased with your trailer. Looking forward to hearing more.
-
1
-
-
2 hours ago, Going said:
So I am going with the three 100s as you have pictured here. Are the SCC110030210 SmartSolar MPPT 100/30 Charge Controller with Bluetooth AND the PD4045CSV Progressive Dynamics Replacements 4000 Series 45 Amp Lithium Converter just simple swap outs?
@Going, If are asking me these questions, I cannot say. I kept my Oliver installed Zamp 30A solar controller and Progressive Dynamics PD9260 60A Charger/Converter. I don’t have nor want an inverter. For me, it was a simple swap of batteries, with an addition of a Blue Seas battery switch. Others in this forum have made the conversions you referenced. A diligent search of posts will reveal detailed instructions.
-
1
-
-
On 9/11/2022 at 10:23 AM, Hokieman said:
If I were to do it over again, I’d probably go with the 270 Gamechanger.
Initially this suggestion by Frank C. seemed like a good option, but Frank measured the compartment and determined it wouldn’t fit.
On 9/11/2022 at 10:46 AM, Frank C said:Just double checked the dimensions of the slide out battery tray on our Oliver and neither of the BattleBorn 270 amp-hour batteries will fit in the existing battery tray. Just a bit too long.
So my amended post would state “ unless you know for sure you need more than 200AH, just start with 2x 100AH, and add a 3rd later if it’s not enough. In my case, I should have stuck with just 2 x 100AH, but the Black Friday sale prices lured me in. 🤑
-
3
-
-
13 hours ago, Margaret said:
Is it safe to caulk under the window, or ill advised.
Are you referring to caulking under the windows inside, or outside? As Mike mentioned above, the windows are already caulked outside. They need to be re-caulked periodically, Oliver has a video and detailed instructions as to when and how to do this. Do not caulk the windows inside. In fact, don’t implement any solution until you have determined the root cause. You previously reported window leaks in a post on August 8th (see link), due to rain. Patriot recommended you remove all your window seals and clean the weep holes, and provided additional info as to how. If the weep holes are plugged they can cause a leak inside, from condensation, just like you describe. Have you removed your window seals, cleaned your window tracks and confirmed that the weep holes are not obstructed?
-
1
-
1
-
-
4 hours ago, Chris and Lisa said:
Our driveway is long, curved and on a hill so it is very difficult to back in.
Consider pushing it up your driveway with a front mounted receiver hitch. A rear camera on the trailer will help. Perhaps you have a friend with a front receiver and you could try it.
Front Receiver Hitch -
Update: Mike Sharpe at Service got back to my service ticket promptly. He’s going to go out on production line tomorrow morning to see if he can come up with best way to get it straightened out. I’ve found a few flaws with my Oliver, nothing major. The response and solutions from their Service Dept. are outstanding, It’s one of the best companies I’ve ever done business with.
-
7
-
-
1 hour ago, bhncb said:
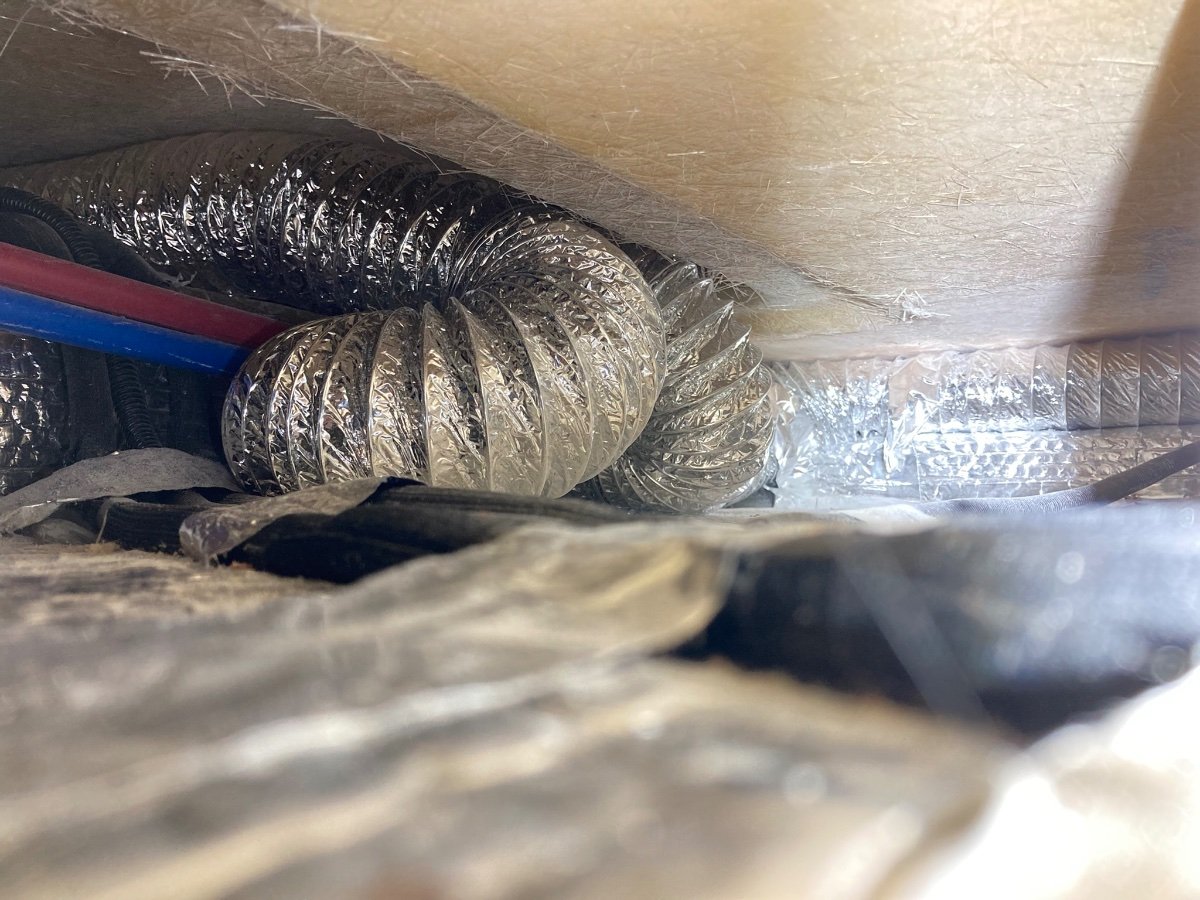
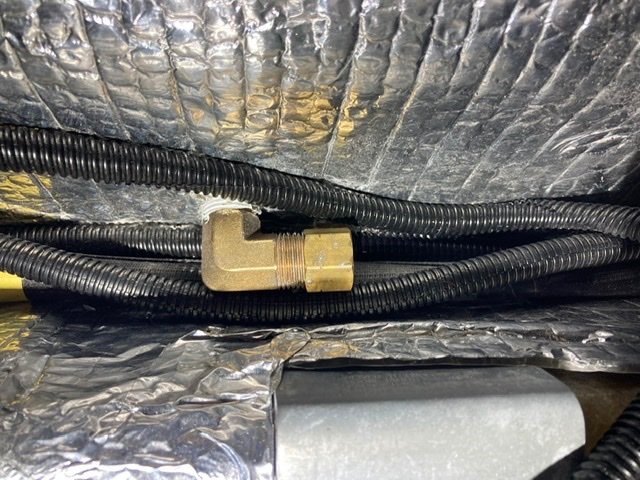
I think you should open up the bath vanity and check to see if the duct is even connected.
Good suggestion, but I’ve been inside the vanity before, the duct is connected. I did not know about these loops or I would have addressed it then. I’ll wait until Service gets back to me before I dive in there again. I’m hoping I can just pull it gently and uncoil it, then cut off the excess. If it tears underneath the floor, I want it to be Oliver’s problem. When I do open up the vanity again, I’m going to implement this mod. And I will let all know what Service advises. I made this post so that others might want to check their duct work. It’s not in a place you’d see unless you go looking for it. I’m learning to explore all unseen areas when possible.

-
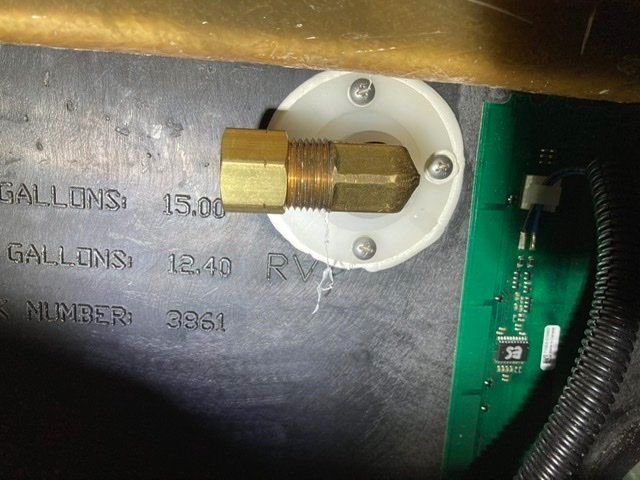
The inadequate flow to the bathroom vent in the LE2 has been discussed many times, along with some possible solutions. Just to be sure I did not have a kink, I went poking around under the front dinette seat taking pics in the bilge. I discovered loops of flex duct hose, possibly it may be pinched. Surely this restricts the flow somewhat, but how to straighten it out? I could remove the panel under the bath sink, and try to gently tug on it to get the kinks out. I’m concerned I will tear the hose, and it does not look easy to get to for repair under that floor. I’ve got a Service Ticket in to ask, but I thought I’d check here to see if anyone has noticed a similar problem.
-
1
-
 3
3
-
-
4 hours ago, John Welte said:
We brought our Coleman two burner portable stove, a dark green unit that has a cover that we bought about 35 years ago when we tent camped. We have propane cannisters but maybe we can connect to the quick connects on the trailer.
I may have the same old vintage stove John, the Coleman Classic. Unfortunately it will not run on the low pressure gas QD fittings as stock. There may be a way to convert it, but I haven’t been able to find an adapter that fits yet. I use a separate 20 lb propane tank with adapter hose, readily available at Home Depot or Amazon. We also use a Weber Q1000 grill that was easy to convert to low pressure QD with a kit. You could buy a new 2 burner stove that will work on the low pressure QD, there are several threads that discuss what others are using such as this one.
I’ve been waiting for my Coleman to die and replace with something more convenient, but it has sentimental value and may outlast me.
-
1
-
-
2 hours ago, John Welte said:
"The downside of that orientation is that you have to reach across the front burner to utilize the back burner."
My wife is concerned about that as well.
No worries, getting to the back burner is no more trouble than using the back burners on your range at home. We tend to use our left arm, so we don’t bump the shield on the right side, and it’s easier to get to the two control knobs. The splatter shield is built in, keeps a hot pot or skillet from accidentally being pushed onto the bed. That being said, we mostly cook outside, and don’t cook anything inside that has a chance of splatters.
-
2
-
-
1 hour ago, newbee said:
Service department at Oliver says there are 3 in the streetside bed compartment.
Are you confusing the Service Dept. instructions and looking for spare fuses under that bunk? If so, you won’t find any spares there. There should be 3 yellow fuse holders as Frank shows in his photos, they connect to the 3 levelers. I had one spare in my kit just like Frank showed, and I bought a 2 pack for spares.
-
1
-
-
1 hour ago, newbee said:
I now NEED one for my front jack and can’t even order one.
I ordered mine on Amazon. I haven’t blown one yet, these are just spares. I think I checked them when I got them, but now I don’t remember. If anyone sees a problem with them, please let me know.
-
16 hours ago, Mike and Carol said:
I’ve seen some pictures of what is in other trailers and they are not all the same.
Apparently Oliver has changed this arrangement up more than once. My trailer does not have any check valves on the black tank, just a simple brass elbow, possibly connected to a spray nozzle. Connected to it is a white pex line that goes up under the sink in the head, attached to a brass vacuum break valve. I think it also has a brass check valve. Then it loops back down to the flush inlet on the side, also a simple brass elbow. Since I have a Natures Head, this line is not used. The heavy brass valves were not secured, and rattled around under the sink. I removed all of it and capped off the elbows, stored it away. While I was under the sink, I easily removed the toilet water supply line and valve, also not used. Now I do not have to winterize that line. I don’t have a pic of the vacuum breaker valve but I can get one if you are interested. This vacuum break arrangement is not shown in the 2021 or 2022 Elite II owners manual plumbing diagram, but it is shown in the Elite diagram.
-
3
-
-
With Winter coming on, there have been many posts about cold weather storage of Lithionics batteries in newer Oliver trailers with solar packages. Many of us have converted from lead/acid batteries to Battle Born brand LiFePOH. In their storage instructions, they reference extreme conditions, but don’t specify what those temps are. I thought that would be useful info to some who might live or camp in very cold climates, so I called Jacob at BB Tech Support. He explained their batteries can be safely stored down to -10F (internal battery temp), but they should be charged to 100% and disconnected. Below that temp, they recommend warmer storage.
The following are specific details from the BB manual about safe operating & charging temperatures:
- The BMS will not allow a charging or discharging current if the internal temperature of the battery has reached 135°F (57.2°C).
- The BMS will not allow a charging current under 25°F (-3.9°C) but will continue to discharge down to -4°F (-20°C).
- NOTE: The BB10012|BB10012H has an operating temperature range of -4°F (-20°C) to 135°F (57.2°C).
-
How to Properly Store Batteries
- We recommend bringing the Battle Born batteries to a 100% state of charge. Then, disconnect the battery from any loads by removing the negative cable from one battery. On average, the batteries lose approximately 2-3% capacity per month. This is subject to increasing if stored in extreme environmental conditions.
-
On 9/11/2022 at 2:15 PM, Hokieman said:
Attached are some quick notes I made for myself, as I quickly forget my own research. Disclaimer to All: I am NOT an electrical expert, so please forgive any technical errors. If you are a legitimate electrical expert, please enlighten us all with details.
I was reviewing my notes and had some concerns. I called Battleborn Tech Support and had a lengthy discussion with Hugh. I’m glad I did, because he convinced me I had either been misled by what I had researched on the web, or didn’t understand it. Probably both. In any case, I have edited my notes and pasted here to set the record straight. As I mentioned before, I am not an electrical expert, so if any of you that are experts see any discrepancies or additional information, please provide feedback.


#1290 is back in Beaverton, Oregon
in General Discussion
Posted
In addition to having some vents open, we usually keep all the shades open during showers, cooking on stove, and also while sleeping. If not, we often get condensation on the inside of the windows. We will shut a shade or two if bright lights are shining in. This option might not appeal to some who want privacy, or sleeping in past sunrise, but it does help keep the windows clear.