
ScubaRx
-
Posts
3,240 -
Joined
-
Last visited
-
Days Won
167
Posts posted by ScubaRx
-
-
17 hours ago, Patriot said:
Naturally batteries included.

That’s exactly what I see in my mind when someone mentions a Tesla truck, just butt-ugly. I believe that this particular one runs on 450,000 Triple-A batteries though. There is a lever on the side that releases them all when they need replacing.
-
 1
1
-
 5
5
-
-
Or nothing at all. We don’t use any chemicals. No odors, we don’t put anything in the black tank other than poop and pee. You should never put tissue, wipes, feminine hygiene products or cigarette butts into the toilet system. When dumping, we flush the black tank 2-3 times until the water runs clear. Ten years in and never an issue.
-
5
-
-
On 6/20/2023 at 2:20 PM, rich.dev said:
Unless it's changed since September 2022, I was advised there are anchor points in the hull for solar panels even if you don't get solar during production.
The in-hull anchor plates were still there, but since they're now using a completely different panel, the plates are in the wrong spots. The old panels are too short to easily use them where the old mounts were installed.
-
On 5/11/2024 at 9:58 AM, MAX Burner said:
If'n that crick comes up much more, yo're liable to get yer feathers wet.
-
1
-
2
-
-
20 hours ago, Minnesota Oli said:
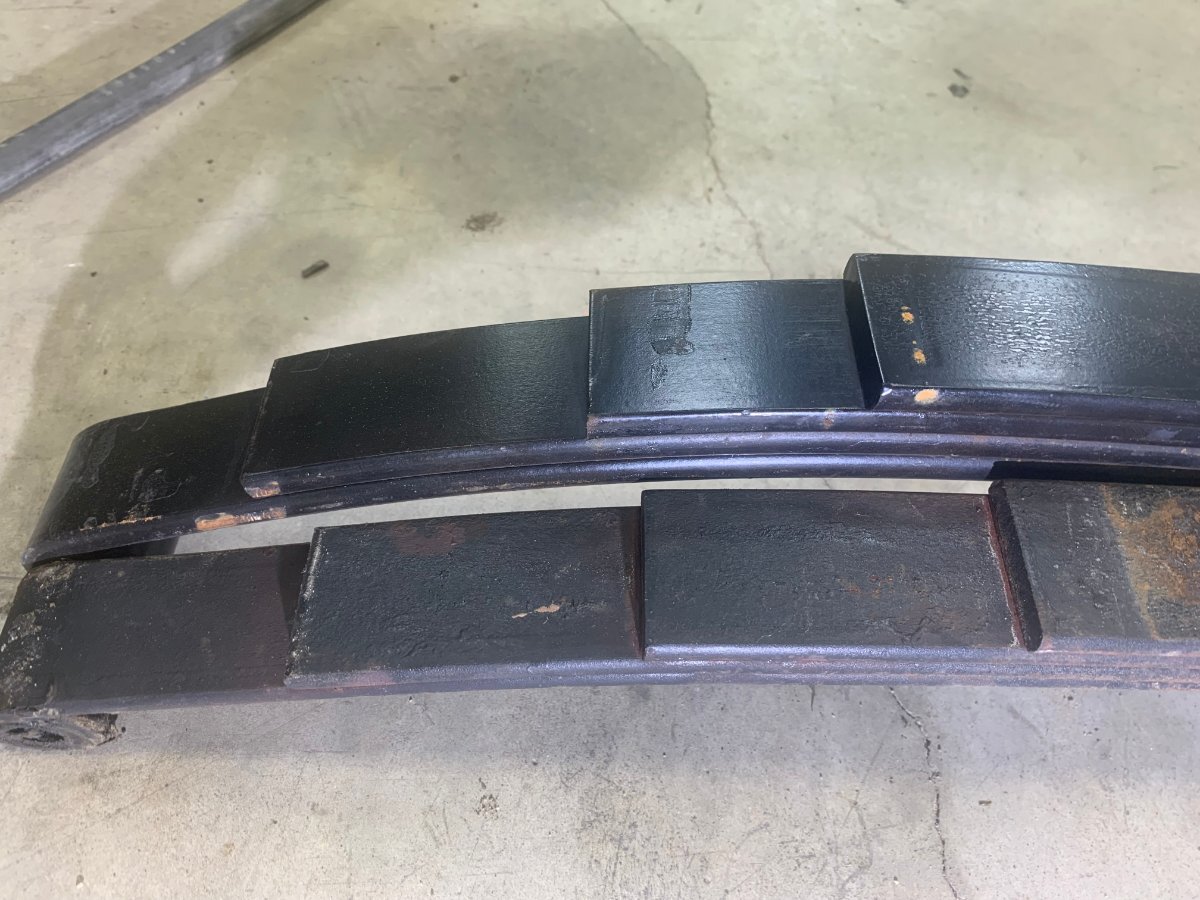
I been following this topic and it got me to look at my springs and sure enough 1,750 pound four leaf springs were failing. I was leaning to ALCAN five leaf for replacement but when Geromimo John came up with the Dexter 2400 pound rated 4-leaf I decided that would be a better fit. My thinking is keep the ride as soft as I can but have springs strong enough not to distort them from the load that the Oliver puts on them. So this bumps the 7000 pound rating to 9600 pound rating and I think this should be sufficient for them to carry the load with out distorting the springs. I included a pic of the 2400# spring next to the worst 1750# spring.
For anyone desiring the quality and design of the Alcan branded springs, be aware that they do NOT make a spring rated at only 2400 pounds for either a 3500 pound or a 5200 pound axle. Their only spring is a 2750 pound rated pack.
Every spring that I have seen broken has been the fifth leaf at the point where the fourth leaf ends. The best design feature of the Alcan's is that the fourth leaf extends out to where the spring eye starts to form at the end of the fifth leaf. This dramatically increases the strength of the fifth leaf and virtually negates the possibility of a break occurring at the tradition failure point. This one attribute convinced me that these are the best designed springs available. I was not interested in a lighter duty 2000 or 2400 pound spring pack, so the 2750 rating was perfect.
The spring pictured here has the same potential for breakage as the OEMs and would not be my choice.
-
6
-
-
On 4/9/2024 at 9:15 AM, Paul and Santina said:
I also just ordered springs from ALCAN for my 2022 LE2. My existing U-bolts measured 1/2” diameter (thread) by 3” wide (axle diameter), but Lou mentioned that other Oliver’s U-bolts have been 9/16” diameter by 3” wide, or 1/2” diameter by 2 1/2” wide. Anyone else have the 1/2” by 3” U-bolts?
The original U-Bolts on my 2014 EII were 1/2" in diameter with a round top bend for a 3" axle. These were for my original Dexter five-leaf spring packs and 5200 pound axles. The U-Bolts you will receive will be 9/16". They would not fit through my mounting plate as it was originally drilled. I drilled out the holes to 19/32" and they fit perfectly.
-
3
-
-
14 hours ago, Geronimo John said:
Steve:
You are set to fall from a 3th floor to the concrete ground. You can choose between wearing multiple layers Bubble Wrap or Alloy Steel?
Conclusion: In many instances, more steel is the wrong answer.
So far, it appears that we, Dexter Techs, and ALCAN Techs all seem to agree on is that the OEM 1750-pound 4 leaf springs were not strong enough to haul the OE2’s at the weights and uses we today are requiring.
I continue to believe that increasing the load capacity to 2400-pound rated 4 leaf is the better solution for the OE2 fleet. Why? Because I feel that a 37% increase in a 4-leaf spring capacity (as compared to OEM 1750) is sufficient capacity and the ride of a 4-leaf spring is less harsh than the 5-leaf option.
On the other hand, the 2750-pound rated 5 leaf springs would be a 1,000-pound increase per spring, a 57% increase in rating. That much spring and being a 5-leaf will result in too harsh a ride for the OE2. It likely will exasperate frame weld failures, as well as other ride related issues.
So, we agree to disagree. When OTT decides to wade in on this discussion remains to be seen. But likely it will be evident in follow on year’s products.
GJ
OK, we can agree to disagree.
All I can say is our 2014 trailer is the first EII sold after the 5 year hiatus. Fully loaded and ready to camp it has always weighed more than 7000 pounds. It has been on the road for over 100,000 miles most of it on tires set at 80psi. It has had five-leaf 5200 pound spring packs and 5200 pound axles since it was built over 10 years ago. A year or so into its life I switched to twelve inch disk brakes.
Admittedly, nobody rides back there so I can't attest to what it might feel like. But, during the past decade the trailer has never complained and I've not seen any evidence of all this devastation that is predicted to happen. No broken drawers, no blinds constantly falling off while under way, no cabinet doors coming open, nothing. Apparently, in my case at least, Jim Oliver was correct when he recommended the heavier duty suspension for our trailer.
I have been preaching that the four-leaf OEM springs are way under rated for these trailers for years and have had more than one discussion with Oliver about it. They did move forward and make the 5200 pound axles standard, but I think that was just to be able to give folks the Nev-R-Lube (not Nev-R-Fail) hubs that many had asked for. Whether they follow with an upgrade to the springs, only time will tell.
Whether owners decide to upgrade their springs is up to them. I predict no slow down in the number of springs that will eventually fail. And, I promise when it happens, it will never be in a convenient place. At least buy some cheap springs to carry as spares against the possibility.
In the past week we have gotten new springs, shocks, and tires. I'm happy with my decisions.
And, by the way, only a fool would pick a suit of armor to fall three stories in. Seriously though, I see the point you were trying to make.
-
7
-
-
Looks the same in Mississippi...
-
1
-
1
-
-
On 4/23/2024 at 10:05 PM, Geronimo John said:
All of a sudden, the Dexter 2400 pounders don't seem so radical after all.
If proven to be the case,then maybe a rethink of running your tires at 40 or 50 PSI is in order. Likely maybe 28 PSI????But the great news is that those ALCAN's are great springs and will certainly last ten life times. Maybe 100 life times!
Steve, please tell us that your post was just a joke! Please.My condolences to those "early adopters".
GJ
I was thrilled with the news that they were actually rated at 2750 pounds. I had abandoned the idea of buying them if they were only rated at 2000-2400 pounds. I will continue to run 50 psi in my tires. With a rating of only 10.4K pounds the axles are now the weakest link in our entire suspension/wheel/tire system.
-
2
-
 1
1
-
-
The Outlaw Oliver now has 4 new five leaf Alcan Springs, 4 new Monroe 555001 Shocks and 4 new Hercules H-901 Commercial Light Truck tires. Tali and I installed the springs and shocks earlier this week and the new tires went on yesterday. Our next trip will likely be 10K miles over the next three months or so. I believe we are good to go now.
We will leave Monday for the Rally in AL, then on to the Rally in ME and from there to CO for a few weeks. We hope to hit a few more National Park Units. As of December 2023, there are 429 official units of the National Park System, We've visited almost 300 so far.
-
8
-
1
-
 1
1
-
-
On 5/3/2024 at 10:47 PM, Jason Foster said:
Gotta be able to pull it with my truck....
One of the former owners sold his Oliver, bought a Super-C and a Jeep to pull behind it, sold that and ordered an LV. It took nearly two years to get it and cost around $500k. They require you to have a one ton truck before they will sell you one. His weighed 18,000 pounds.
-
2
-
2
-
-
I have often successfully used super glue and baking soda to fill a hole in plastic. It will solidify into a substance that you can mill, drill, sand ect. Fill and pack the existing hole with baking soda. Put a few drops of super glue on top and let it soak in. It will shrink down somewhat as it hardens. Fill again until flush with the top of the old hole. Use a file or sand paper to obtain a flat surface. Find the center and drill the new hole. This stuff is really hard when cured and won't expand much. If you drill the hole too small it will shatter when you put the screw in. Do a couple of practice runs on something else before you try to repair the blind. If you get it right, I've never had one to fail.
-
 1
1
-
4
-
-
Tali and I have been around and under the trailer all day installing the new Alcan springs. While under there, I counted eight cross members behind the rear axle with one doubled.
-
1
-
2
-
-
2 hours ago, CRM said:
My 2010 has 6 cross members from the rear axle back. Do later models really have 12 of them?
No, but originally there were only four. Like mine, the belly behind the axles started to sag and more were added. Yours was likely repaired prior to your acquisition.
1 hour ago, CRM said:I think I see where the difference in cross members count may be. I have the original brochure for the E2's that came out before the shutdown and they show the rear bumper almost flush with the back of the hull. Maybe 2 or 3 extra cross members added when they extended the bumper and storage area out further? The first one or two E2's that that Oliver's kept must have been built as shown in the brochure and then the design was changed for the one I currently own since my dimensions match the current dimensions.
You are correct that the frame's were shorter and the bumpers were almost flush with the back of the hull when the first two 22 footers were built in 2008-2009. They were likely done this way because that's the way the 17 foot Elite rear storage area had been designed.
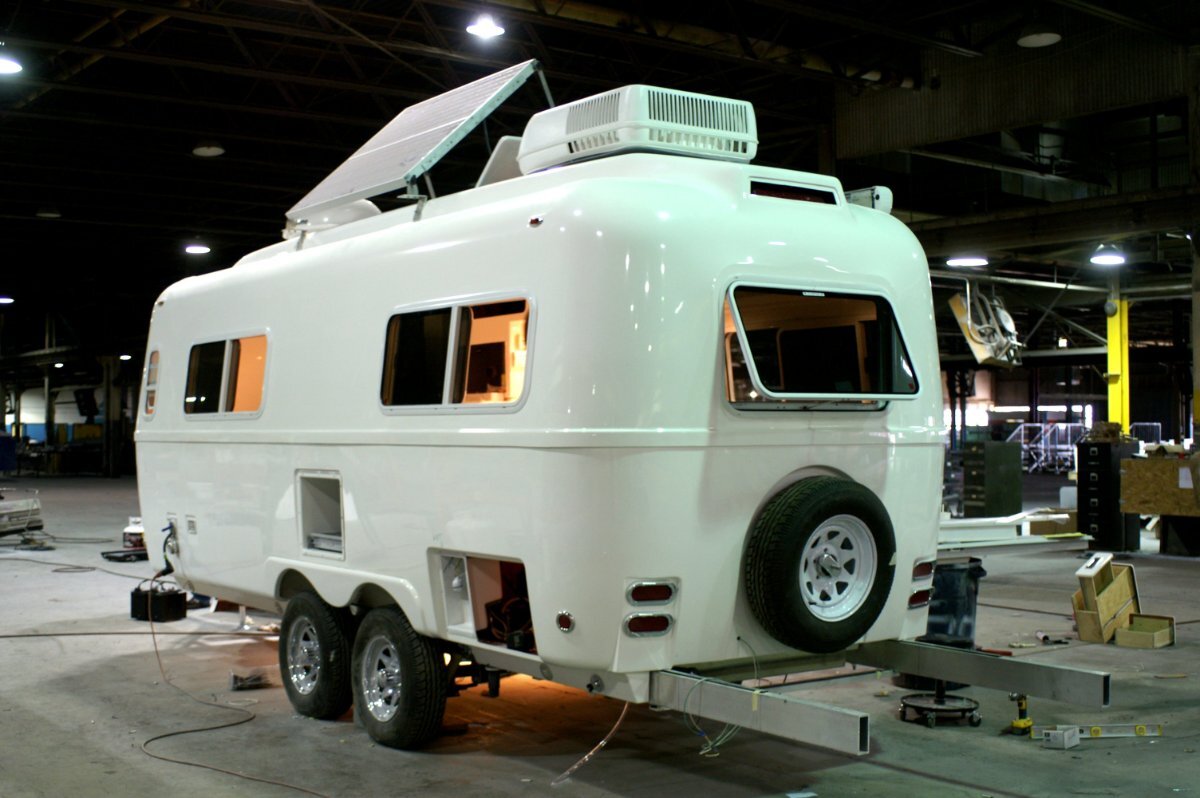
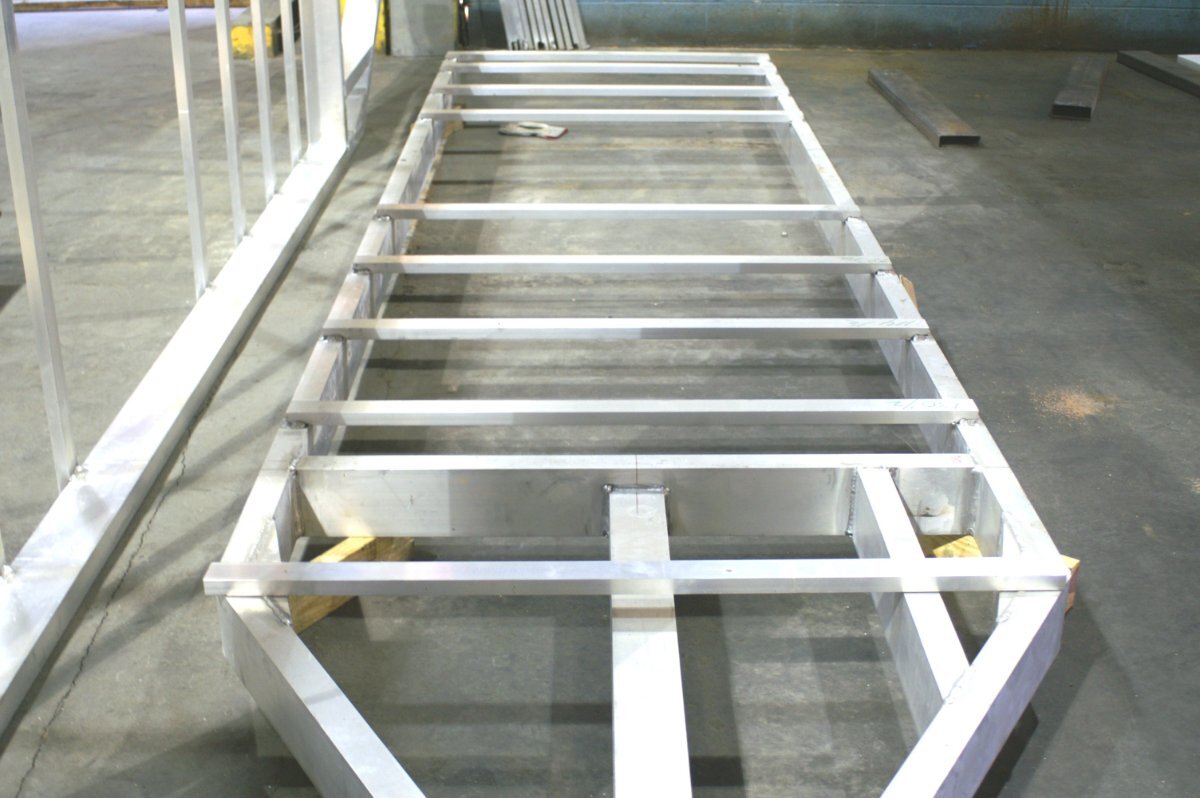
In 2014, after the hiatus, the decision was made to lengthen the frame on both the models. This was done for looks and since there was no other fiberglass travel trailer this big it made for good marketing. The length of a travel trailer is defined by the distance from the tip of the hitch to the back of the bumper, so the 17 foot Elite became 18.5 feet long and the 22 footer became 23.5 feet long and was finally given an official name, becoming the Elite II.
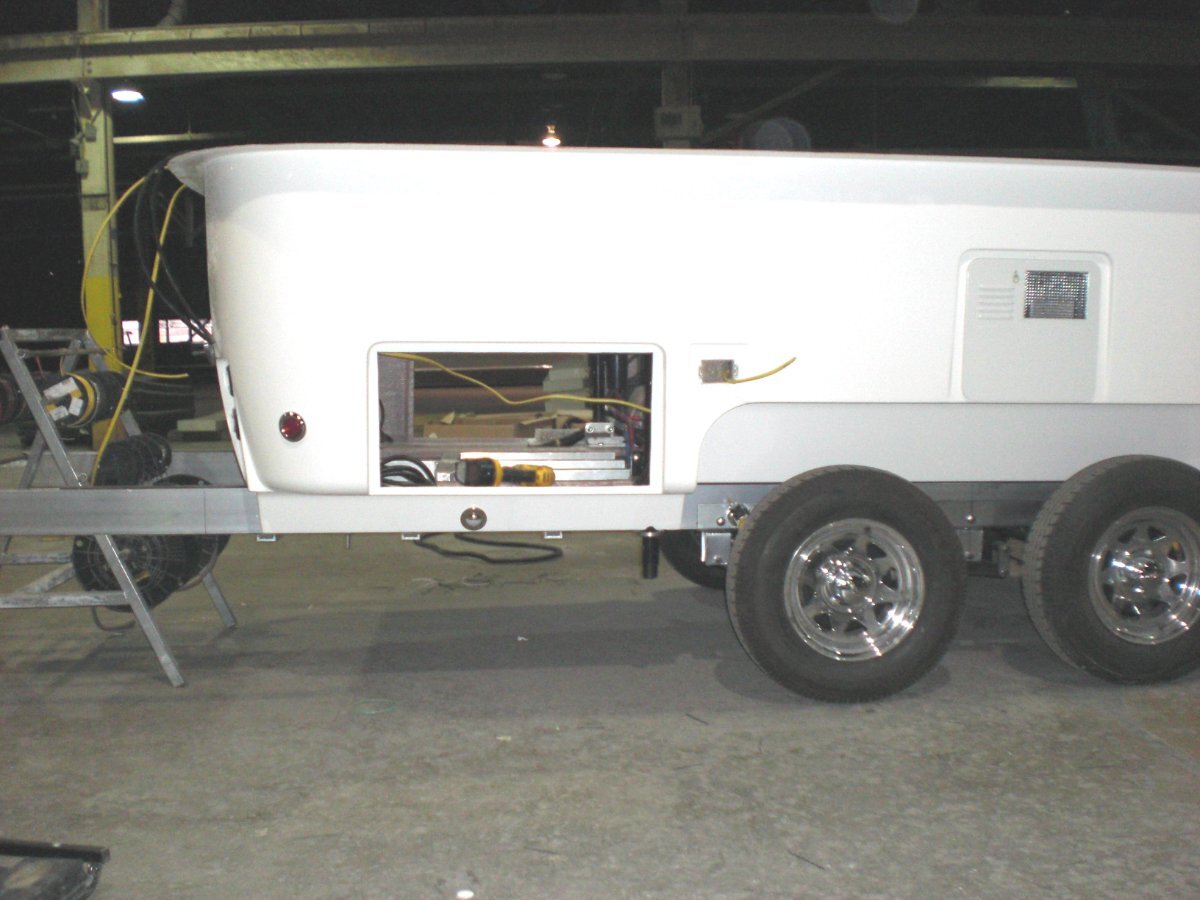
Even though the rear of the frame was lengthened by 1.5 feet the number of cross members remained the same as before. This 22 foot trailer were built during late 2008 and early 2009 although it was not sold right away. Another unit was built for Jim Oliver and it was completed. He named it "The beast". A third unit was planned but the company decided to shutter the trailer line and it was never started. Here are a few construction pictures taken during that time period. Some were taken by myself and some by Robert Partee, the sales manager at the time.
Here you can plainly see the frame rails extending far beyond the rear of the body and the cross members welded below the belly.
-
4
-
5
-
1
-
-
On 4/12/2024 at 7:53 AM, MAX Burner said:
(Copied and pasted from the leaf spring thread):
…I also suspect that Oliver engineers designed the frame to withstand "normal" usage (that may be difficult to define, however). Thoughts?
Jim Oliver told me personally that the frame was designed to handle up to 3X the GVWR. He quoted the number at 21K pounds.
I do know that the number of rear cross members is now twice those of the three 22 footers that were built in 2010 (that was what the Elite II’s were called back then.)
-
1
-
7
-
-
36 minutes ago, John Dorrer said:
Is it possible to convert one of the two 110 exterior plugs to 12v?
It could be done. You would want make sure to use a polarized plug so that the positive and negative can’t be reversed. It might not even matter, depending on what you plan to use it for.
-
2
-
-
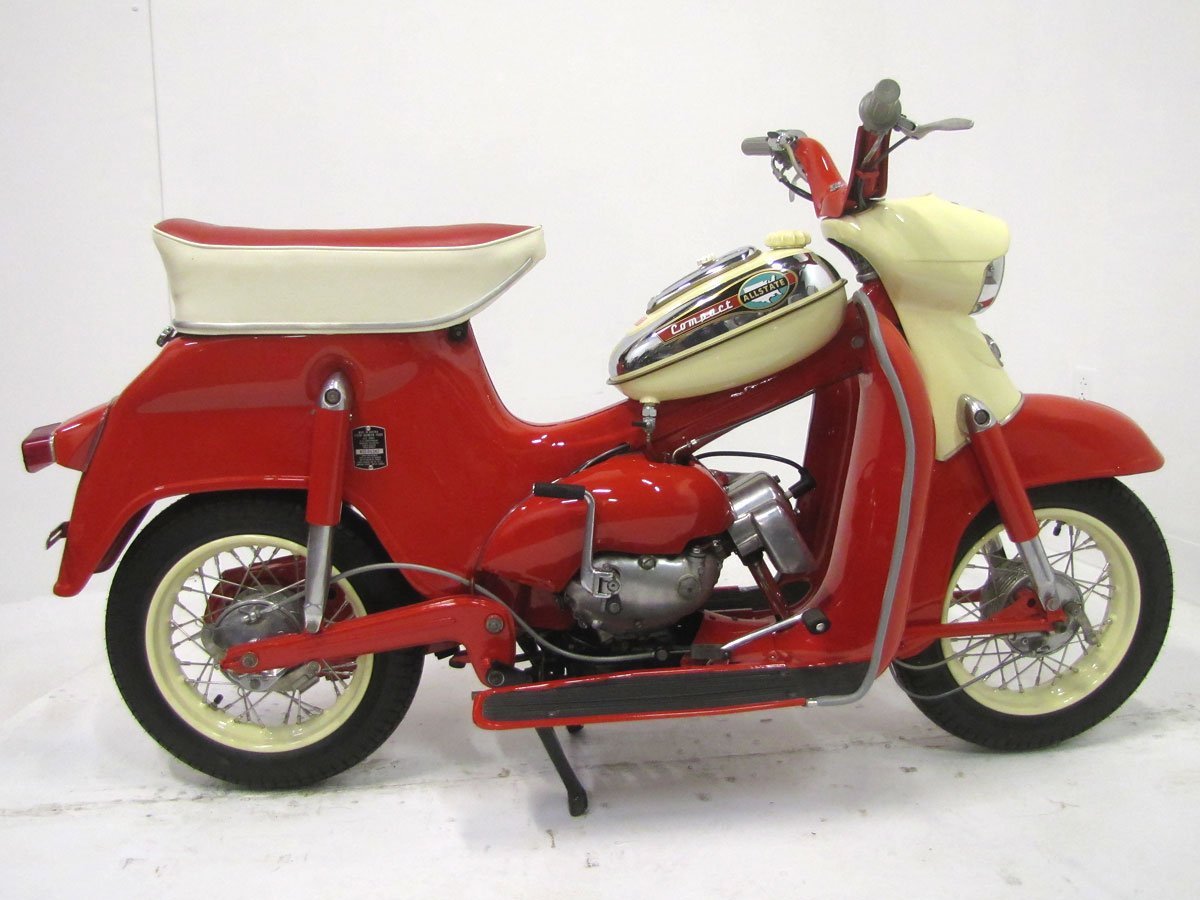
My bike was not quite as fancy as the ones you guys ride. But, when you're 15 years old, in the 10th grade and all the senior cheerleaders are begging you to take them riding on Saturday and Sunday afternoons, it was pretty cool. Hang on tight, baby...
-
1
-
2
-
-
On 4/25/2024 at 9:38 PM, Traveling Angels said:
Any ideas for easy install of a 12V access to exterior of Elite 2? We want to run an external freezer without running inverter! I have a few ideas, but has anyone already installed this?
I would pick a location where you want the freezer to sit and install one of these near it. You would probably want to run a new power line from the distribution center under the dinette to power only this receptacle. You can pick up the negative side from the buss bar under the aft dinette seat. You'll need a 1-1/8" hole saw to cut the mounting hole.
-
4
-
-
20 hours ago, Geronimo John said:
Also "Wired straight to the batteries" is something to ponder upon.
The negative side should run through the shunt rather than to the batteries.
-
3
-
-
19 hours ago, MAX Burner said:
Is the girl standard or optional?
-
1
-
3
-
-
This is why I preach always use blocks under all three jacks.
The service team should alway place a six inch block under the front jack foot when readying a trailer for pick-up.
-
5
-
-
Forum is alive and kicking @ 0243 on 04-27-2024.
-
4
-
-
On 12/23/2023 at 12:22 PM, Chukarhunter said:
And unlike every charging station in place today, these chargers would continue to work when the grid goes down. Rural economies would be the big winners.
I suppose other parts of the country must have grid problems much more often than our neck of the woods. I've lived within 20 miles of where I live currently for greater than the last 7 decades. Our power comes from TVA and has for almost 100 years. Tupelo was the first TVA city starting in the early 1930's. At least in my lifetime that grid has never failed. I've lived in this house for over 40 years and I can remember only twice the power went out. Once during a severe ice storm in 1994 and again in 2014 after an EF3 tornado that we missed because we were traveling.
-
3
-
-
On 12/23/2023 at 10:23 AM, bugeyedriver said:
We do not live in ' Fifteen Minute Cities'. We hit the roads and explore . . .
Well, most of us do. We've already racked up over 6K miles since the middle of January with our yearly trip to Quartzsite and then back to Texas for the Eclipse. Next are two Oliver rally's back to back and then out to Colorado and back. Probably another 12-15K miles over the next 3-4 months.
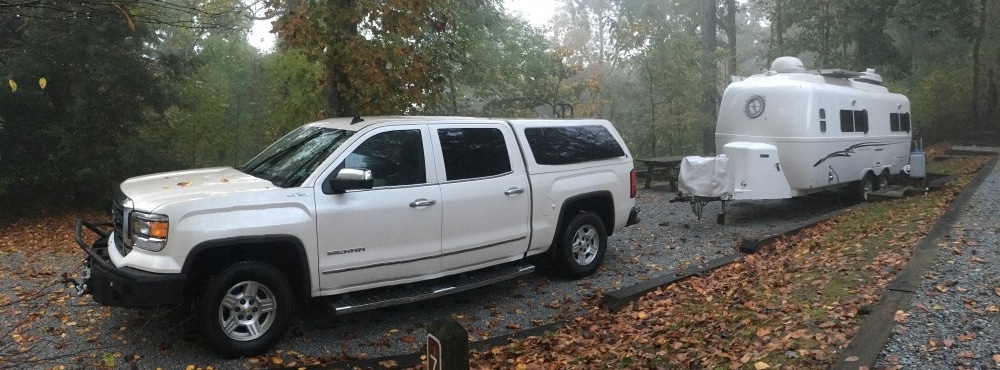
We've seen two car haulers full of those cyber trucks in the last few months. I still think they are butt ugly.
-
1
-
2
-


Guntersville Angels
in General Discussion
Posted
The others were Chris Scarff, Rhonda Friedberg, Steve Johnson plus Donna and Scott Gerould.