mountainoliver
-
Posts
329 -
Joined
-
Last visited
-
Days Won
14
Posts posted by mountainoliver
-
-
Just for reference adding to the discussion, I replaced all of my brakes and hub/drums three years ago. In the process of pricing out the various components (at that time) Textrail (Sparta, TN) was the least expensive even with shipping. For example the complete brake assemblies were $46.03 each left or right for the self adjusting type. I’ve never had any problems with this type, don’t know just saying. The hub/drum assembly complete with bearings (chinese) and seals were $60.36 each. I also have never had any problems with the factory seals. Maybe because I polished the spindle seal area and pre lube the seals a little at installation. The prices from Textrail that I found at the time were half of my local Dexter supplier/trailer shop. With shipping, taxes, everything from Tennessee to my driveway in Virginia $571.03 I have since replaced the bearings with genuine Timken bearings purchased from an industrial power transmission supplier that I have dealt with for years at work and upgraded the grease to Red Line CV-2 grease. Timken bearings are not inexpensive but are of great quality. Also, Textrail is the axle supplier for Oliver (at least they were three years ago) and have offices all across the country.
-
 1
1
-
 3
3
-
-
johnwen what brand/style tires are on your Oliver? For example my older 2017 hull 208 came with Michelin LT tires.
-
Simple solution! Very good idea! Thanks for sharing. Upon closer examination of the first image it appears that the new courtesy lights are different from the “older” ones. It looks like the new ones are much brighter.
-
3
-
-
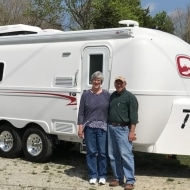
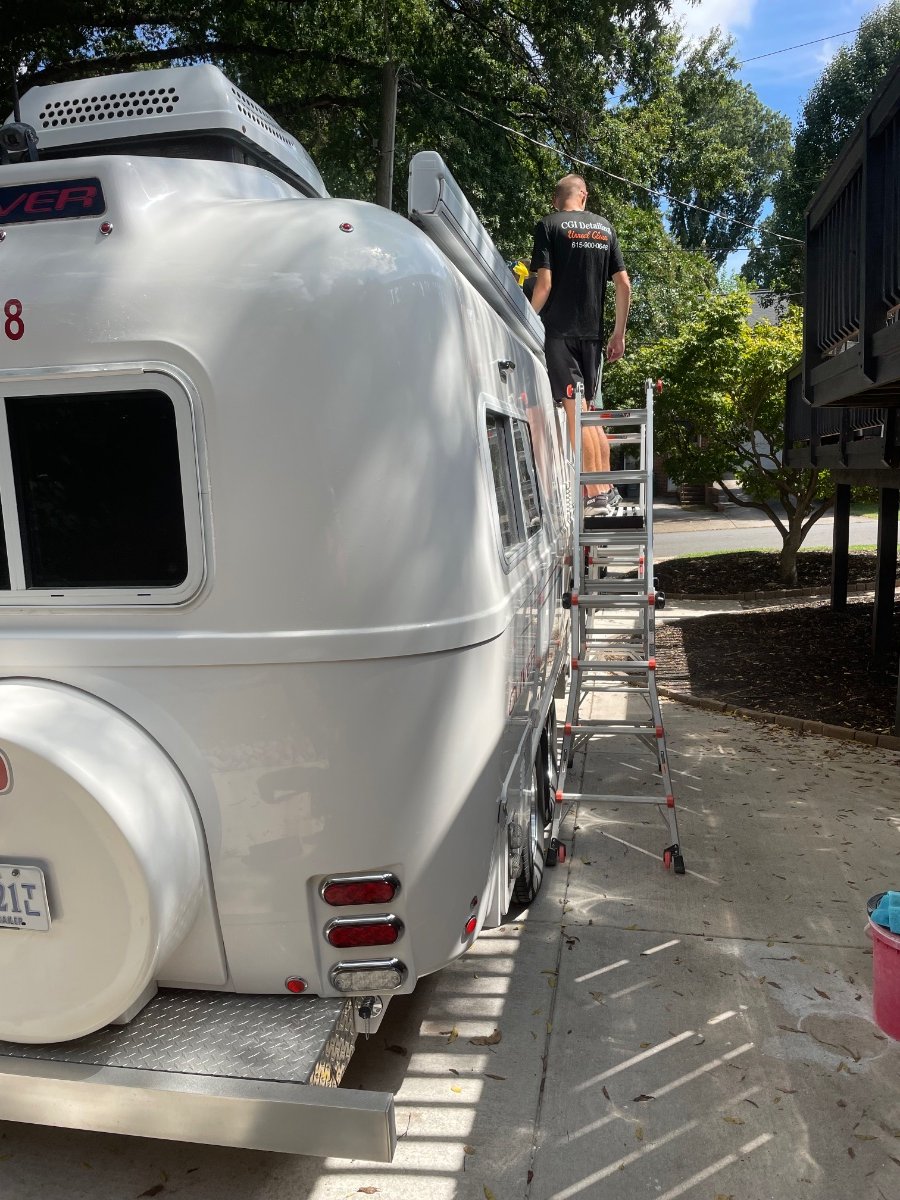
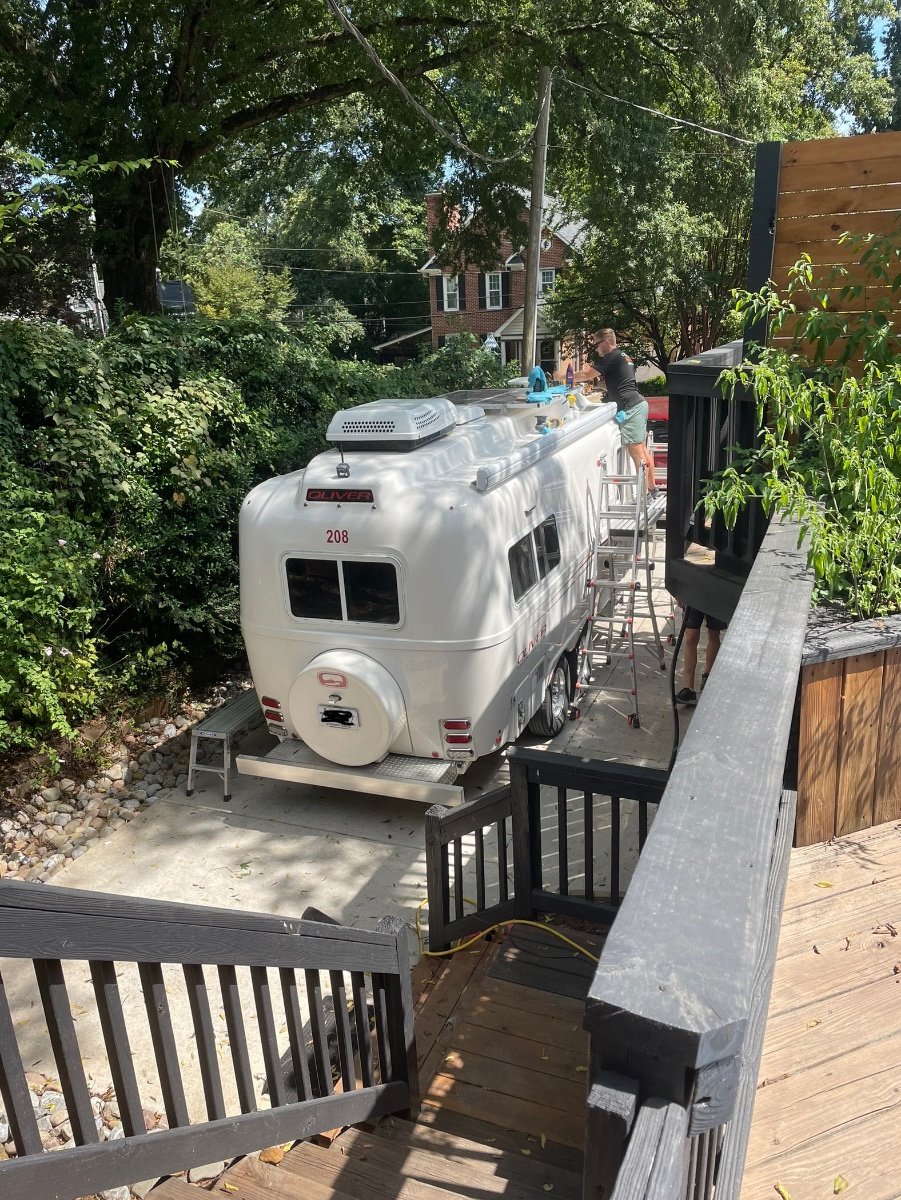
We just got home from meeting the CGI guys in Charlotte, NC to coat our trailer. We met them at an air b&b and they did the whole job in the driveway. They certainly are the nicest bunch of guys! I can’t believe how hard they work at the whole process and what a difference between before and after! After six plus years outside 24/7/365 it really needed some help. Now knowing that the gel coat will be protected, looks better than new, and having a little easier cleanup routine really means a lot.

-
6
-
-
Something that should be mentioned in running the air conditioner on the batteries is that the older inverter is 2,000 watt capacity and according to the manufacturer it will safely handle 1,800 watts continuously. FOLLOW THE MANUFACTURER SPECS! Something else that should be noted here and may have already been mentioned is that the air conditioner should have the easy start module installed and really no other DC loads or AC loads can be running. Especially no other AC loads as the 2,000 watt inverter will be very close to maximum capacity running the original Dometic unit. Additionally, all of the high amperage DC lugs and connections should be checked to make sure that they are tight. I found one factory crimped lug to very warm while running the air conditioner on the batteries so I needed to re-crimp it. My air conditioner draws on average over 100 amps DC and that is dependent on cabin temperature. As the trailer cools down the DC amp draw goes down a bit (less compressor head pressure).
-
5
-
-
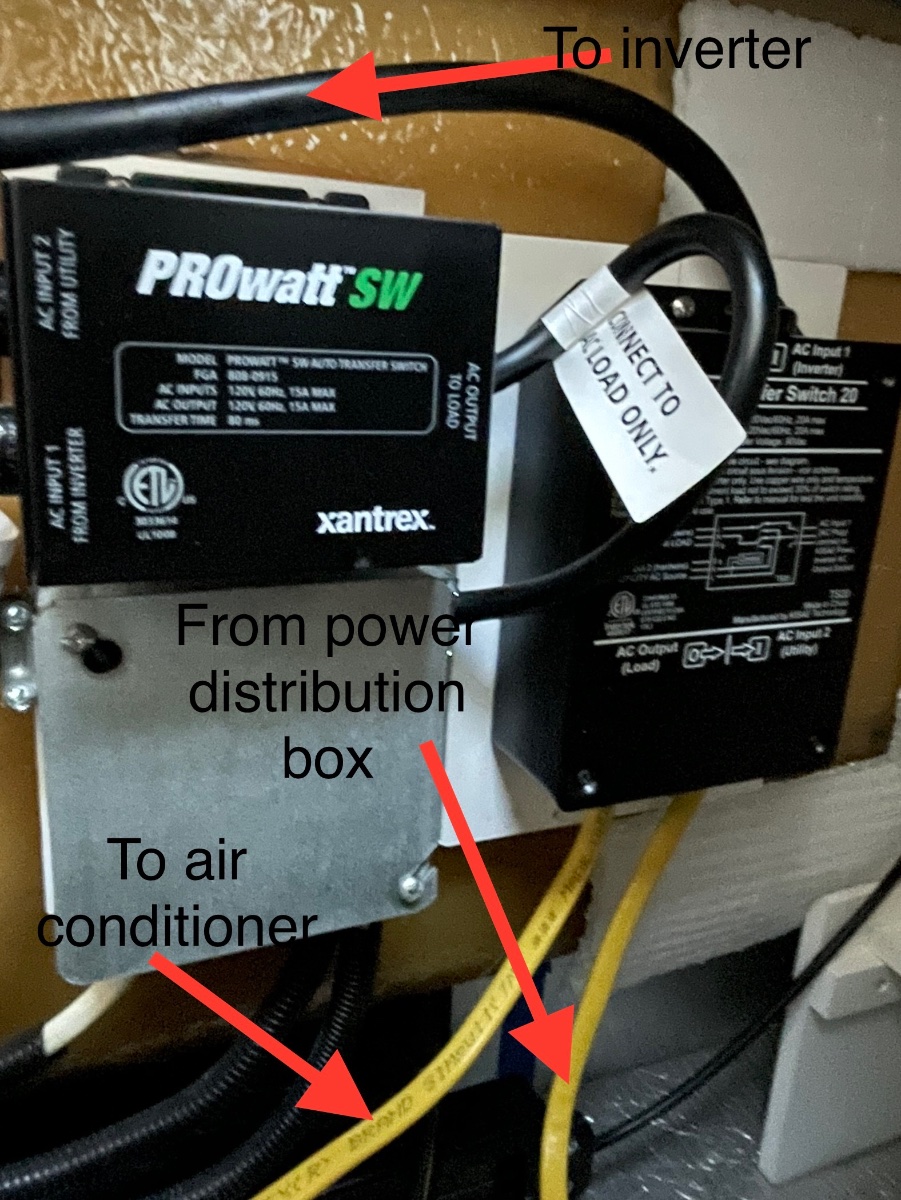
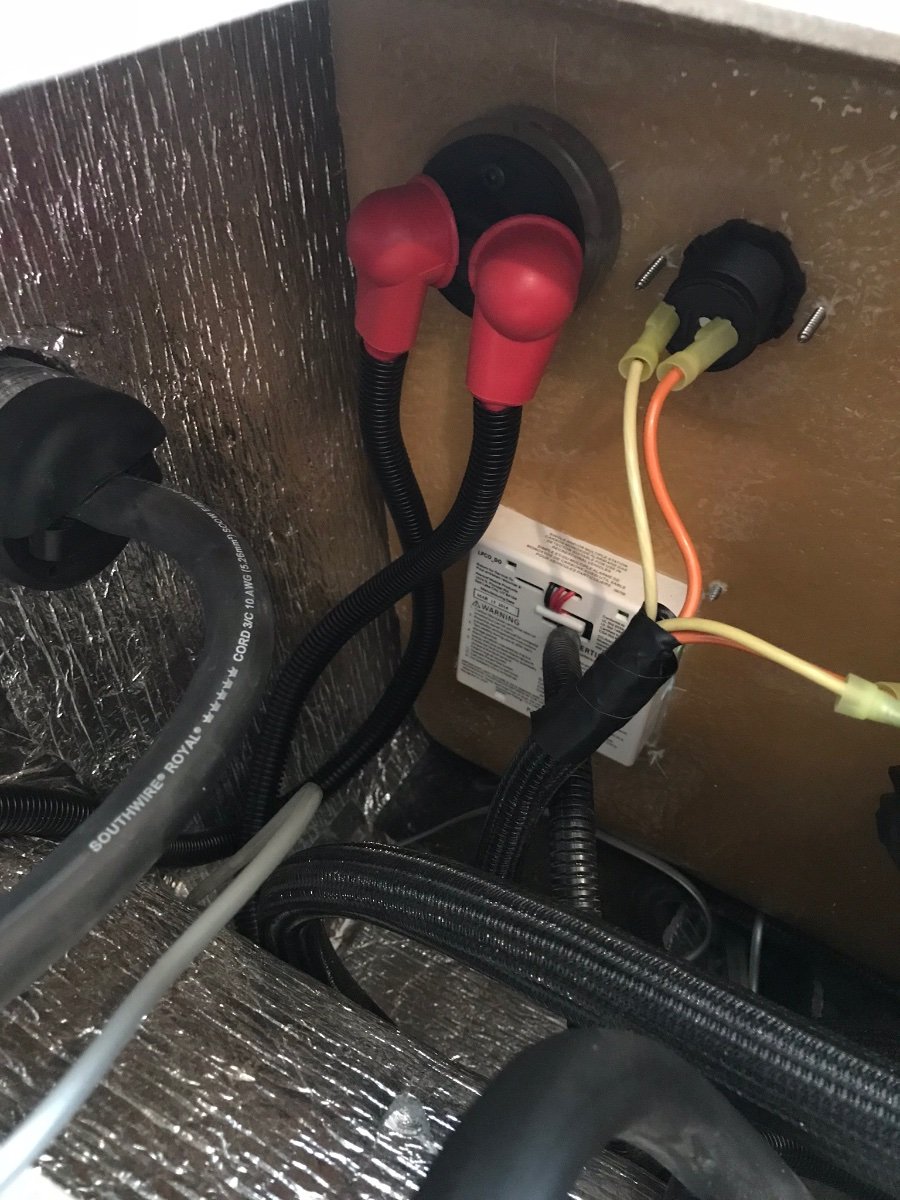
When I upgraded my batteries from flooded cell lead acid batteries to three Battle Born batteries a few years ago, I also made a few electrical upgrades as well. One upgrade was to clean up/simplify the DC wiring and the other was to add a new 20 amp transfer switch to allow me to run the air conditioner on the batteries by way of the inverter. In the photo the new 20 amp Kisae brand transfer switch needed is on the right and the various wires are labeled. The black wire has a 20 amp plug on it and just simply plugs into the inverter. The two yellow wires (12 gauge wires) are the ones that you’ll need to cut. The one on the right comes from the air conditioner breaker in the power distribution panel and the wire on the left goes up to the air conditioner. The correct diagram is printed on the transfer switch cover. I hope this helps.
-
5
-
-
My valves are Shurflo brand (Trinidad style) the same manufacturer as our water pump. These are very similar to the Scandvik brand if not identical. I actually did not buy the valves because I had the Oliver folks do the modifications before we took delivery of our trailer in 2017. I would imagine that we could buy direct from the Shurflo folks. Also, we don’t leave the shower head hanging while traveling. We wrap the shower head in a towel and then lay it on the floor.
-
4
-
-
John I have not checked this information personally, but this was posted in the forums (I think) maybe a year ago or so.
-
5
-
-
Patriot, I hope that I don’t have a theft issue either! It was under a tarp for five years which could have been removed easily with a pocket knife. I did have a strong cable and lock but, as far as I know no one ever peaked under the tarp to find out. Yes, I have thought about a heavy hasp (probably home made) to tie the lid to the box. Still thinking about that. Then again no one knows what is in the box and weather it’s even worth the hassle to find out. Added locks gives the impression that there is something important in the box. Who knows?
-
1
-
-
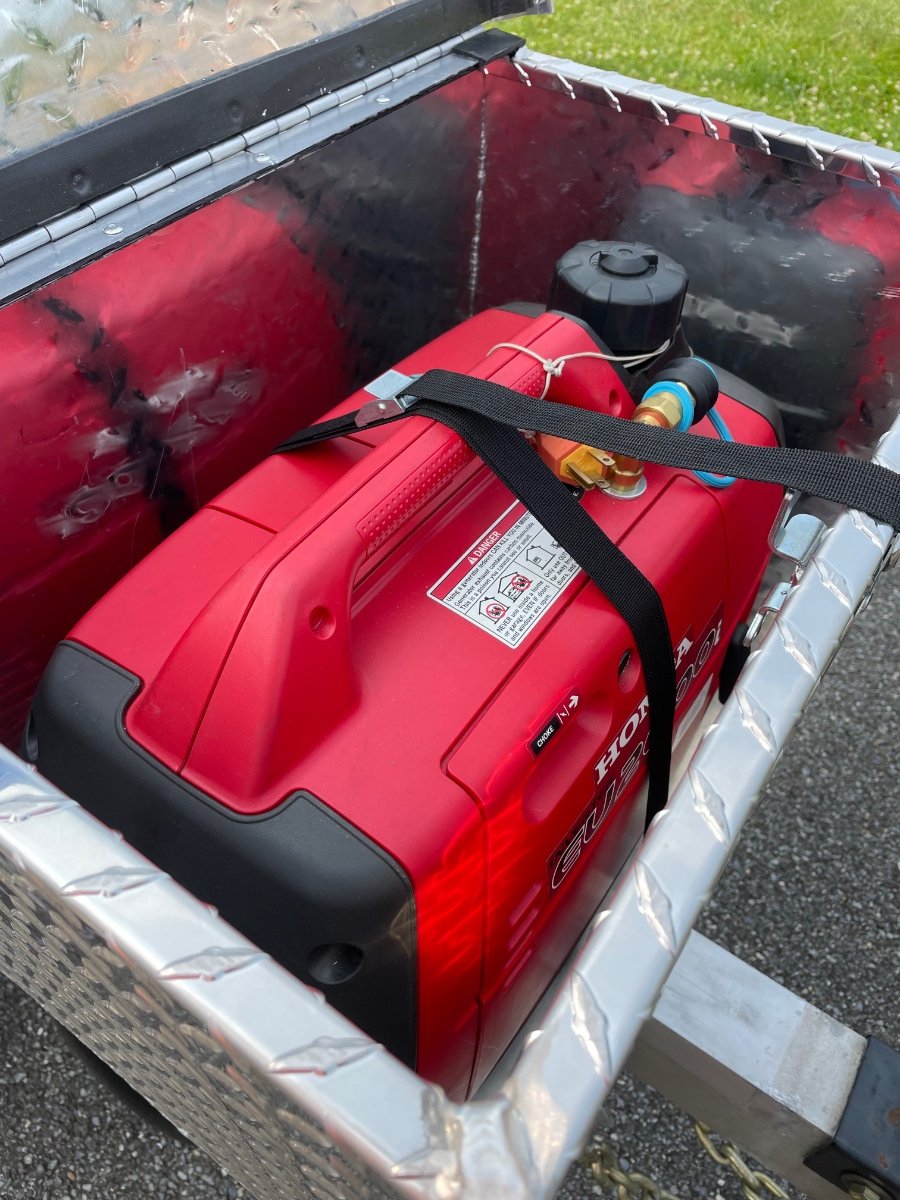
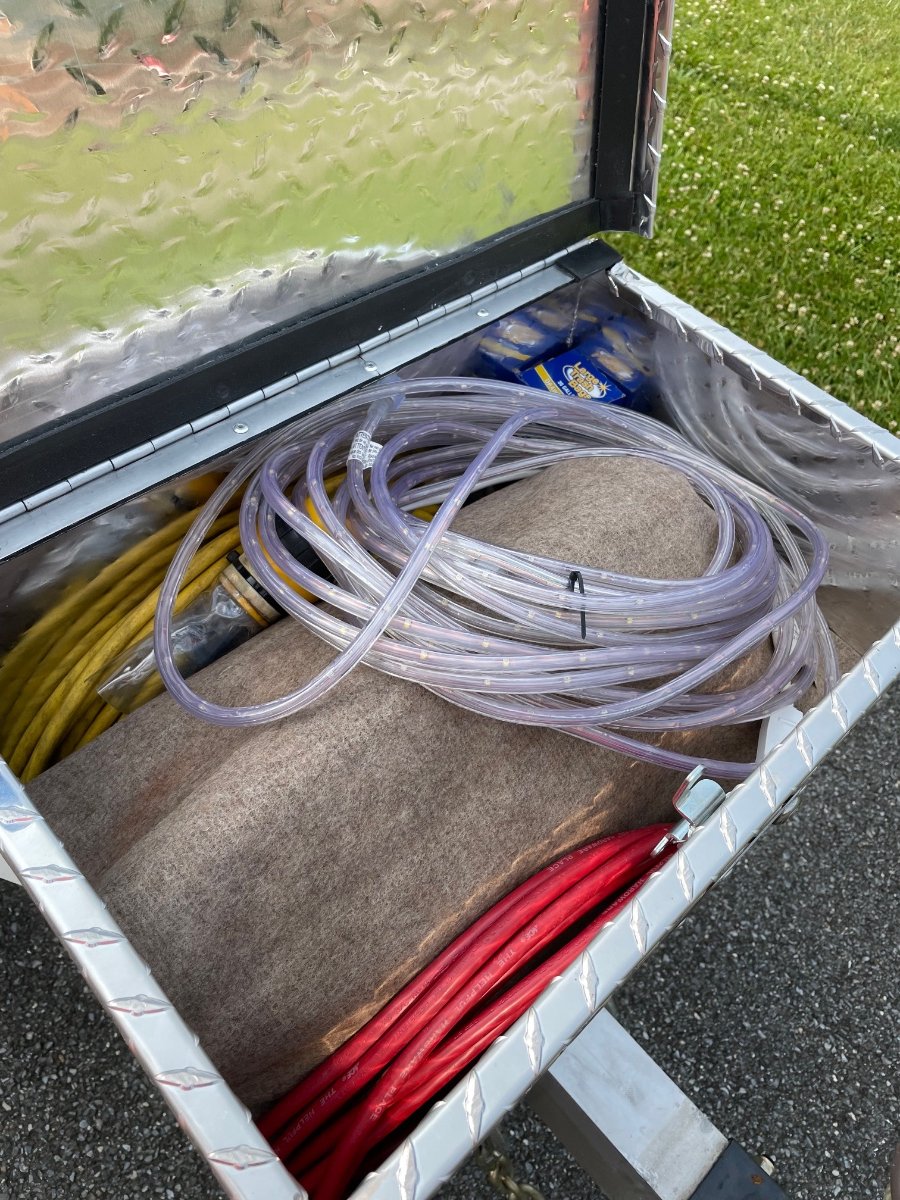
The trip that we just returned from last night was a month long road test to make sure that the box was weatherproof before I put the generator in. So as requested, I put the generator in the box this morning. The nylon strap that KSH supplied seems more than sufficient to hold the generator solidly in place. The original strap anchors that were welded inside the box may not have been sufficiently strong enough to hold the generator. I removed them because they were in the way of using the original Oliver supplied basket anchoring u bolts. If I were to buy this box again, I’d ask that the welded in strap anchors not be used. There is enough space for my extension cords and rope lights (pack rat deterrent) as well. I draped a piece of indoor/outdoor carpet over the generator to prevent any damage from the cords, etc. I’m very pleased with the results! The extra plus is that the generator box is about six inches narrower (front to back) and eight inches total narrower (side to side). This gives me a little tighter turning radius and a little less worry while backing up. I’m also saving about 15-18 pounds on the tongue. I would have liked to use a “store bought” triangular shaped aluminum tongue box but I never could find one of reasonable size that my generator could fit into.
-
6
-
-
The light? Hahaha, no particular meaning to it. I found it at a campsite. The previous folks threw it away because it didn’t work. Just cleaning up the contacts fixed it. I made an adapter for it and it’s just on a strong magnet. It stays in the back of the truck while traveling.
-
5
-
 2
2
-
-
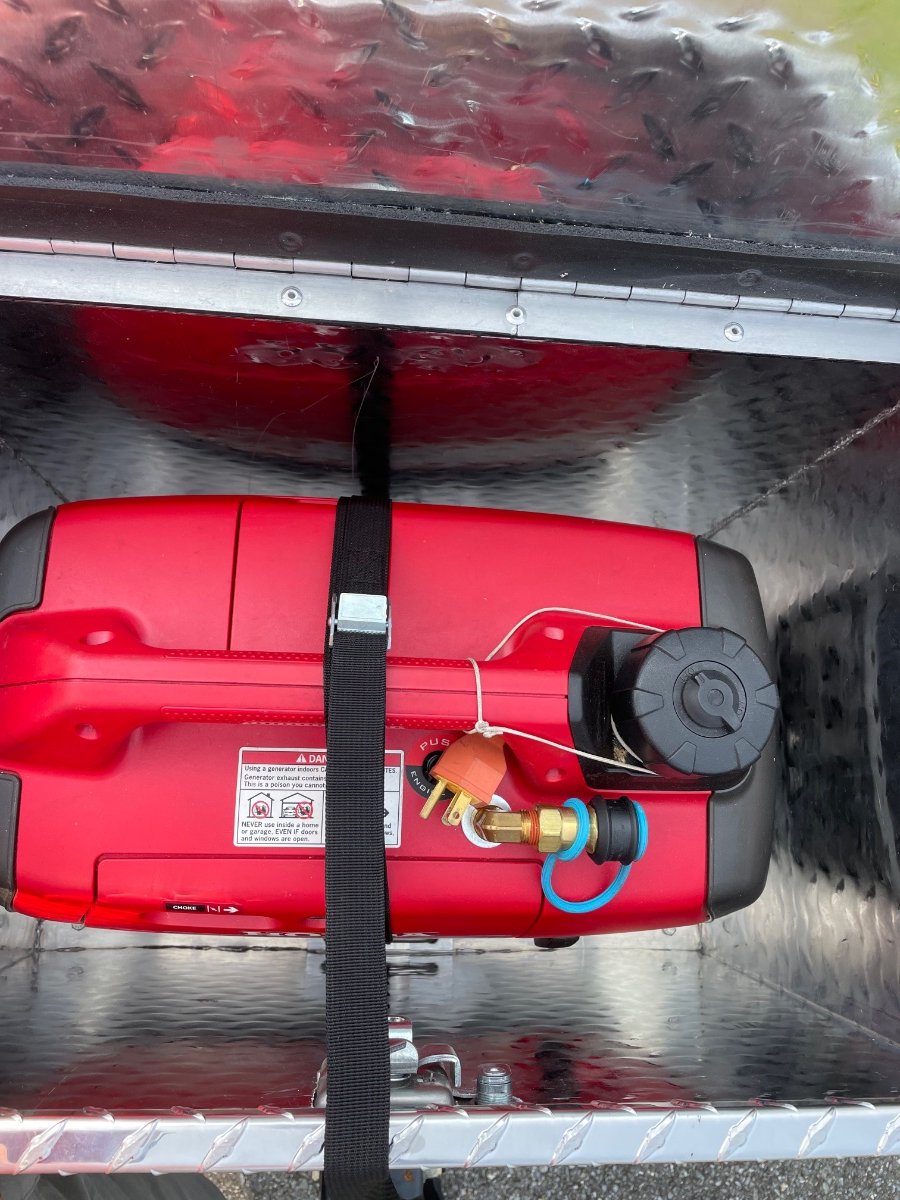
The KSH folks provide a cam lock nylon strap for securing the generator. Looking at the photo of the u bolt inside the box, notice a 1/4 gap under the u bolt. I plan on running the straps under the u bolts and over the generator. I’ll probably also line the box with some sort of rubber to further protect the generator just in case.
-
2
-
-
So Patriot, would that be a flocking violation? Too many eggs in one place.
-
 3
3
-
-
I purchased a generator box from the KSH folks while we were in Lake Havasu this past winter. I particularly wanted a box for my Honda 2000 generator. For the past five years I’ve kept the generator in the Oliver basket (the older expanded aluminum version which weighed 35 pounds empty) and covered with truckers tarp material. This has worked great but the tarp has aged and would have had to be replaced in another year or so. The stock KHS box has three openings covered with removable aluminum plates so that the generator can be used inside the box. This setup is not at all water resistant and I’m not interested in using the generator so close to my trailer. I ended up getting them to make a box without the three cutouts. The box came with two hold down brackets welded in place which I removed because they were exactly in my way where I needed to mount the box. I was able to use the existing holes in the fiberglass cowling and the original stainless u bolts. The back part of the box is mounted to a 1/4 inch thick by 6 inch wide aluminum plate. The front is mounted to a 1/8 wall 1 inch by 3 inch rectangle aluminum tube. This allows the box to be level. I made two 1/4 inch aluminum spacers for the u bolts to clamp against for inside of the box. The u bolts can also be used to strap down the generator inside the box. I made two 3/8 thick by 1 1/2 inch wide brackets for under the frame. As you can see in the photos, the front bracket was made so that I can hang the safety chains on it as well.
-
7
-
-
Another great molded fiberglass rally in Hiawassee, GA with 14 Oliver trailers in attendance this year. Riverbend campground is a beautiful area right on the Hiawassee River. Great weather this year again and not too hot during the day. There was interest in the Oliver Elite that was here, which sounds like it may very well lead to a sales call.
-
6
-
-
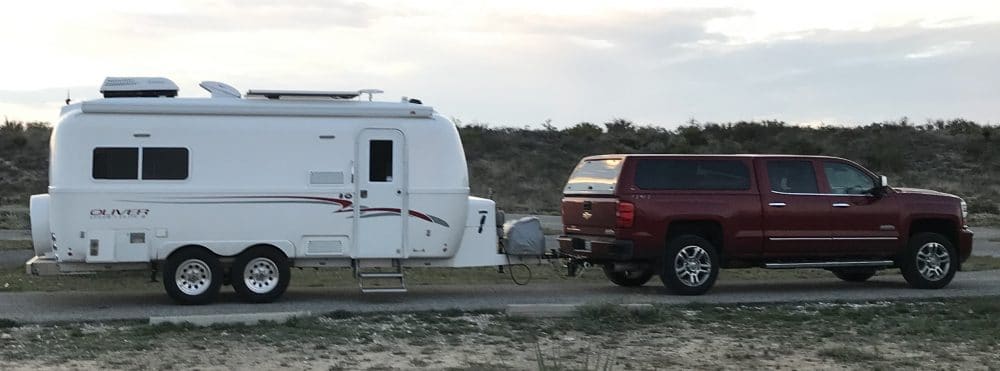
When we first purchased our Elite II in 2017 I owned a 3/4 ton diesel Dodge truck that was over 20 years old and with more miles on it than I cared to use for towing a new camper with. I purchased a new Toyota Tundra which was I my humble opinion was a mistake. Right away I started installing “band aids” on the truck that were to allow it or tow better. On level open roads there wasn’t an issue but in the hills and mountains I really noticed a deficiency. Anyway, I ended up trading that in on a 3/4 ton Chevy with the Duramax engine. I couldn’t be happier with this truck. Some say it’s a bit overkill, well maybe. Just last week while on our way home from a three and a half month trip I had to make an emergency stop on the highway from about 65 MPH. Overkill? Not really. The truck handled the trailer not the other way around. Just as it should be! We were able to stop quickly and in a straight line. The trailer didn’t even try to fishtail but just stopped straight. This told me that my brake setup for the trailer is right and that the truck has enough brake power to handle the load. Not overkill at all. It’s always about safe handling in emergency situations.
-
6
-
-
Yes, as the tube enters the foam gasket to attach to the cups. Make sure that butyl caulk is still sticky and is firmly stuck to both the foam and the drain tubing. You don’t need to worry about the tubing itself being clogged somewhere, the back flush will blow out all of the crud growth in the tubing. I also used a stainless worm type hose clamp to make sure that the heater hose (or whatever type hose) is firmly attached to the Oliver condensation drain. Also don’t worry about access to the cups, the water will flush everything and actually overflows the cups onto the roof. I wouldn’t run the water at a high flow or for much longer than just a few seconds, probably less than a minute is gracious plenty to get er done.
-
1
-
3
-
-
My condensate tubing used to plug up on a regular basis. One of the tubes located in the ac inlet area just behind the inlet filter was slightly kinked and wouldn’t drain well so would plug up often. Once I straightened that out I’ve not had any issues. To clear the plugged line before I eliminated the kink, I used a short section of 3/4 in heater hose and adapted it to a garden hose. The heater hose fit perfectly over the condensation drain underneath the trailer so I would simply back flush the drain line. The water would overflow the cups forcing built up crud out onto the roof. You should also make sure that the soft caulking that’s around the two drain hoses as they go through the roof seal (just behind the ac inlet grill/filter) to the cups is complete. Otherwise water from the cups can wick back into the trailer and drip through the inlet grill and onto the floor.
-
1
-
2
-
-
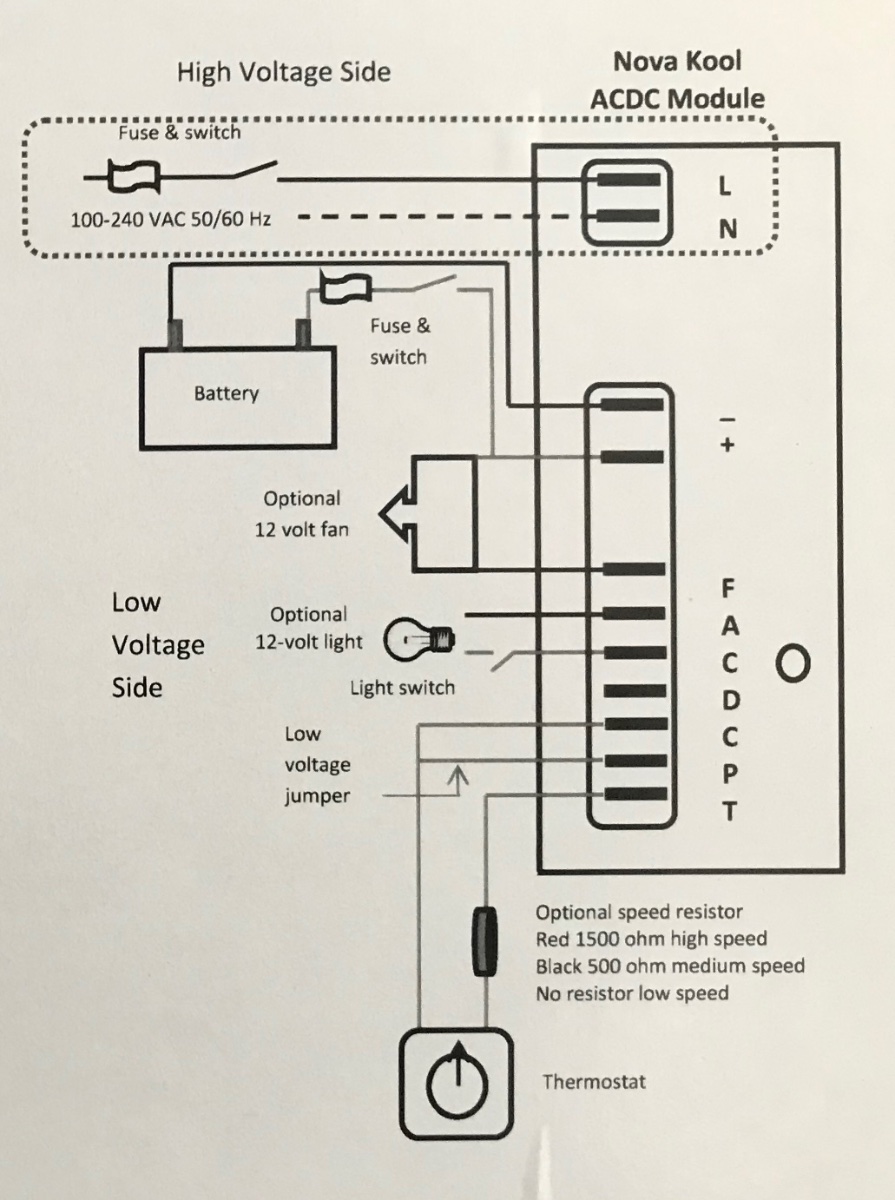
Also, here’s a schematic that may help. Even though the module is labeled Nova Kool in reality it’s a standard Secop AC/DC compressor inverter module.
-
2
-
1
-
-
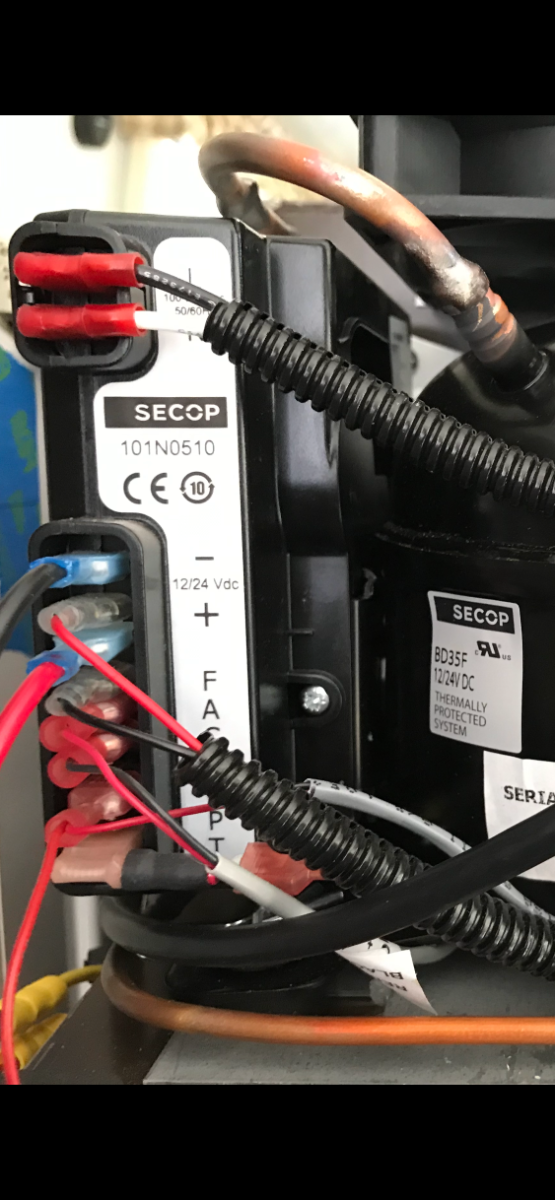
I went through the whole thing and rerouted many of the wires and secured some, especially the main input wires. If your AC input cable isn’t long enough you can just get a long computer cable to replace the the supplied one. I’ve found that someplace like Goodwill will have tons of odd cables for less than a dollar. The AC input cable on my fridge is a typical computer type that’s 16 gauge, very common. Your fridge should have had the AC input wire assembly already installed.
-
2
-
-
John, that’s the AC input. On my fridge a separate “computer” type socket/cord is mounted/grounded/fused elsewhere on the fridge chassis but close to the compressor. As you can see the DC connection is down in the lower section of spade terminals.
-
1
-
2
-
-
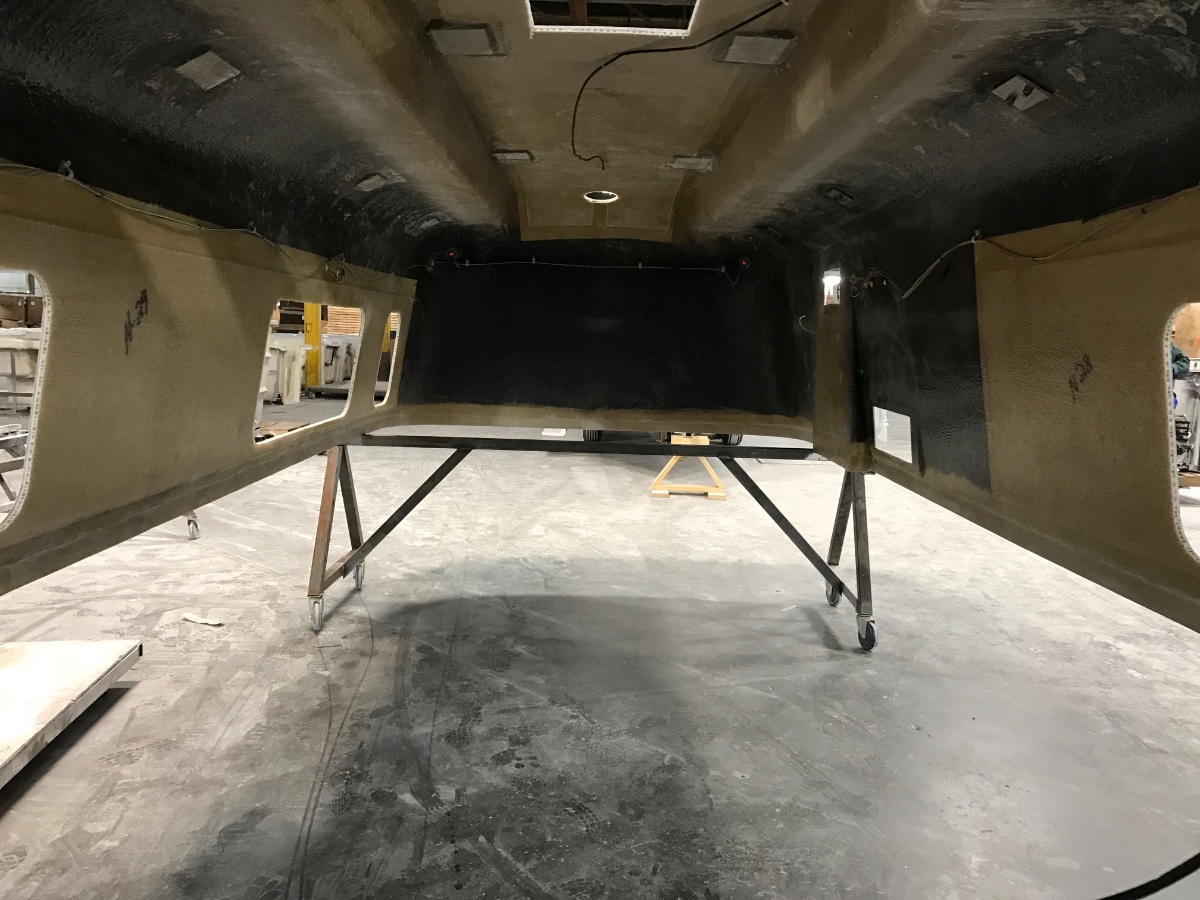
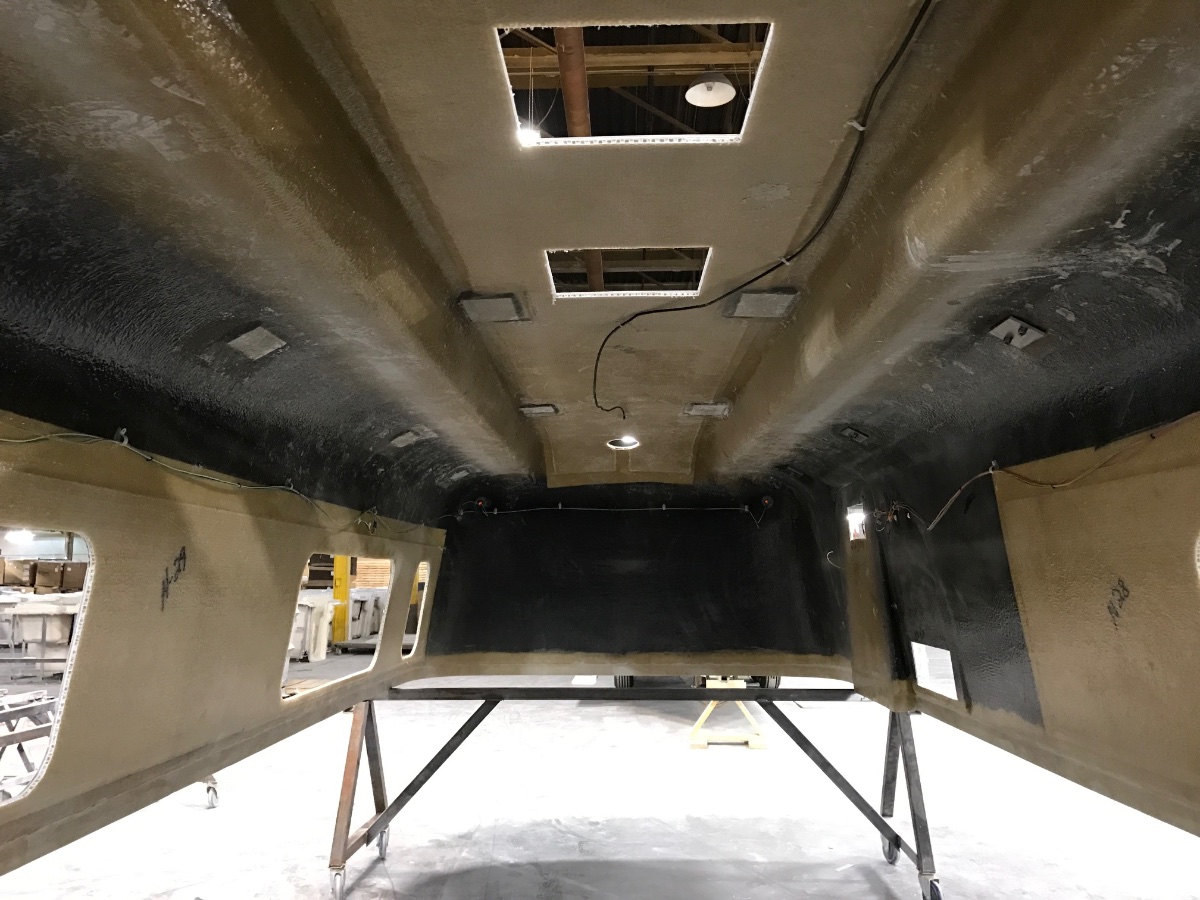
My 2017 hull #208 has the solar panel backing plates. My trailer did not originally come with solar. ScubaRx helped me install the controls and wiring and Oliver service installed the panels. I have a photo that I took during construction of the underside of the outer shell that clearly shows the plates fiberglassed in place along with plates in all of the awning mounting locations as well.
-
1
-
2
-
-
What year is your trailer? I just went through this similar situation on my 2017. I found that the jack is grounded through one or two of the mounting bolts to the frame. I noticed that there was rust under two of the stainless washers and found out that Oliver uses steel star washers to cut through the paint on the jack. The shifting load may be moving the jack enough to lose the ground. I ran an actual ground wire to the frame to permanently fix the grounding issue. You may check the bolt tightness and/or add a ground wire.
-
8
-
-
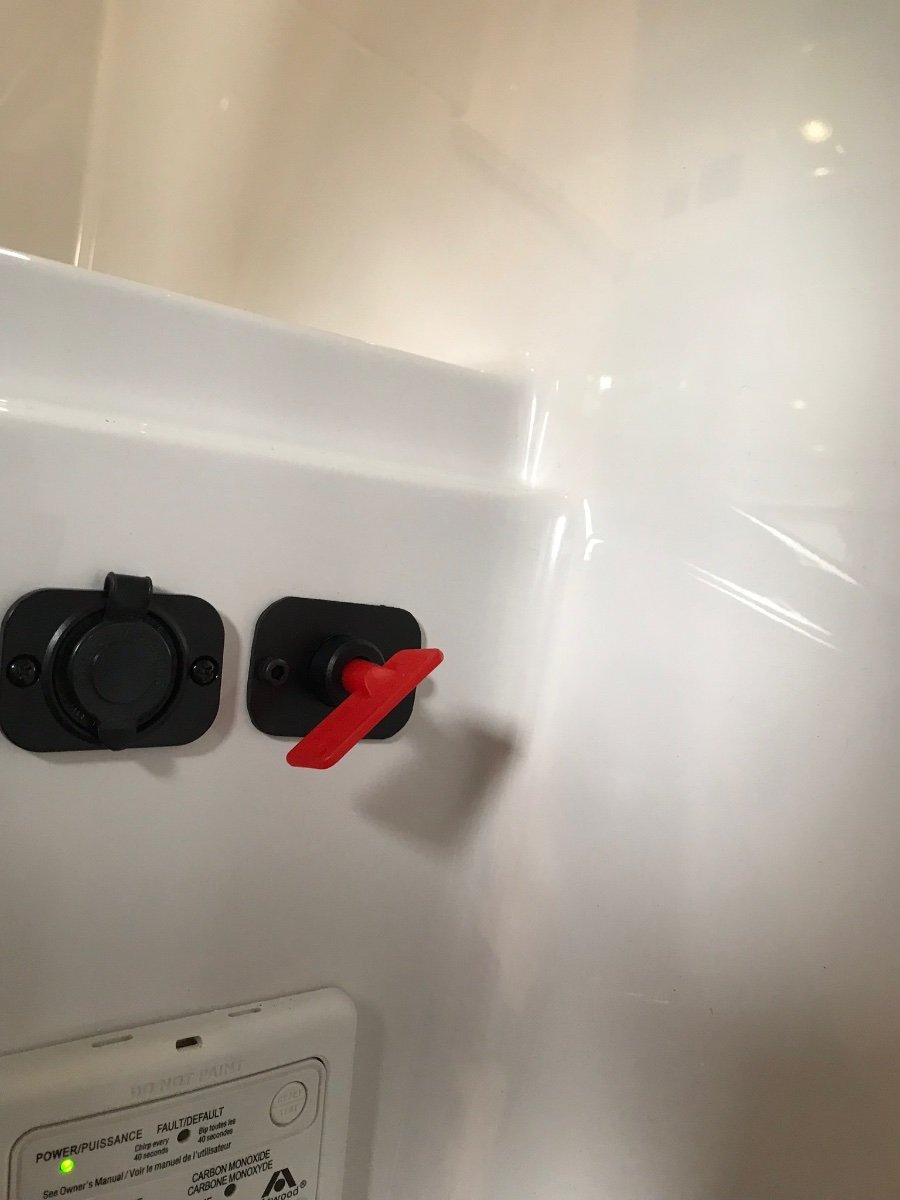
A couple of years ago I added a master switch to disable all of the leveling jacks as a theft deterrent. It’s probably difficult to move the trailer with all three jacks firmly lifting the trailer a bit. I moved the USB charging outlet from under the dinette and used that location for the leveling jack switch.

-
6
-


Suspension and Brakes Maintenance
in Mechanical & Technical Tips
Posted
On the differences between brake assemblies, probably a redesigned version in order to manufacture the assembly more cheaply (inexpensively). Oliver purchases the axle assemblies by the pallet load and just grabs two at a time for each LEII. They don’t disassemble them for inspection other than checking to see that externally they aren’t damaged. As a side note, after pressure washing the brake assemblies I’d recommend removing the adjusting screw assembly and disassembling it and thoroughly cleaning/lubricating them. I’d be willing to bet that water made its way into the threads and will corrode/lock up the adjuster.