

Geronimo John
-
Posts
1,418 -
Joined
-
Last visited
-
Days Won
36
Posts posted by Geronimo John
-
-
Massive rewrite with GSMBear's eureka.
But the extra wire shown below would be an ideal splice point. Then may be run the line via the abandoned drain line to a remote location as suggested.A does not connect to B.
GJ

-
On 10/23/2023 at 5:56 AM, MAX Burner said:
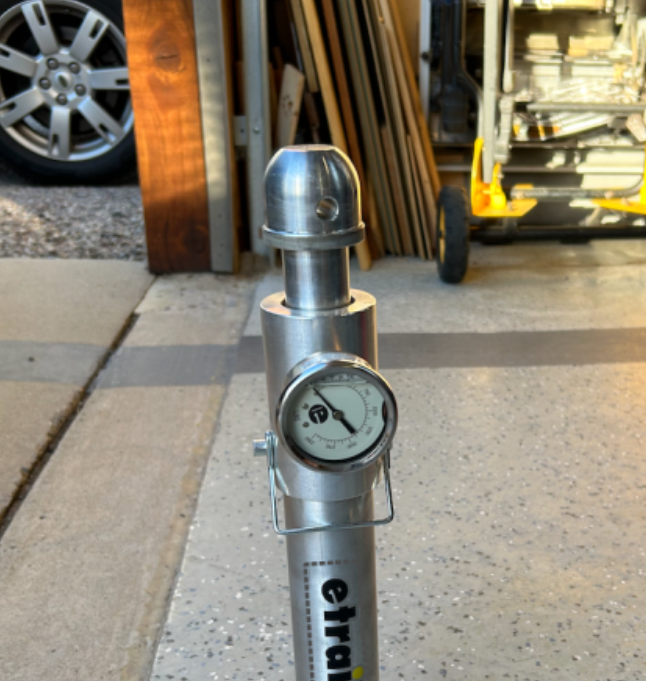
To get a good idea of actual tongue weight we use one of these - real easy to get a quick data point; especially if you're configured differently than the previous trip (tank levels, bikes, etc.).
This past Summer while visiting at Max Burner's lovely home, Art asked what I thought my tongue weight was. I guessed 600+ pounds. He whipped out his tongue gauge. I was pleasantly surprised that our Ollie's tongue weight was just 540 pounds. Really good info to know. Excellent tool to bring to any Ollie gathering!
GJ
-
 1
1
-
 1
1
-
-
3 hours ago, Rivernerd said:
The moral of the story: when flushing the black tank, always leave the drain valve open.
Your initial reason for closing the black tank drain valve is a good one. Your down fall was relying on the electronic gauges.
My process is to stand on the toilet tank flush valve and to observe the water level in the black tank while flushing. The advantage of my 2018 OE2 is that it has a manual water shut off valve just a few feet from the toilet (Under the front dinette seat). This allows me to slow down the fill rate as the level in the black tank approaches full. Then when nearly full, I turn off the water flow at our valve.
Sadly, OTT decided to not install said shut off valve on newer models.
GJ
-
5
-
-
Had the same problem. Seems that tree branch ate my Furrion rear camera antenna.
Worth a glance.
GJ
-
2
-
-
For long haul days and a pre-cool Dometic 3-way, what is the average amp draw you are seeing? Or what is the average amp hours are you seeing in your SOC system at the end of a long day?
GJ
-
On 10/9/2023 at 4:11 AM, topgun2 said:
I've never actually tried to draw directly from my tow vehicle and use that water inside the Oliver at the same time. My guess is that you can't do that.
GJ NOTE: This response is written for newer owners or those not well familiar with our OTT water systems. For the OTT Pros, it is overkill.
The Freshwater Port (On the street side) is designed to flow water directly into the OTT 32-gallon water tank. My experience is that it can flow via gravity or a shore provided pressure system/pump. To flow via gravity, you need a several feet of pressure head. I.E. the tank on your TV needs to be a higher than the top of the OTT water storage tank. The higher the pressure head the faster water will flow. On occasion I have put a 25-gallon soft flexible tank on top of my bed cover to gravity flow water to the OTT freshwater tank. A friend puts that same tank on top of his ancient Chevy. NOTE: Not all bedcovers or cab roofs will take such loadings without damage. His is made from 1950 real steel, and my bed cover is rated for 500 pounds. If you can't get the head elevation on your rig, then a pump will be needed if you are sucking water from a non-pressurized source. I tried putting the flexible tank in the bed of my F-150, but it did not flow much water. I suspect that the pressure head was insufficient to overcome a check valve in the Freshwater Port line. It is possible to draw water out of the tank using you OTT pump and fill at the same time via gravity or under citywater pressure.
The Citywater Port that is located adjacent to the Fresh Water Port. This port bypasses the OTT water storage tank and when connected to shore pressurized source will send water directly to the OTT faucets. Do not use your OTT pump as the pressure is provided from outside the trailer (Your pump or the City System). There are significant risks in using the Citywater port. I.E. the city or well may be pumping out water at a pressure that our plastic pipe will not handle. Personally, I own a pressure reducing valve and still very very rarely use this port.
Freshwater and Citywater Ports Caution: Under very high shore water pressure or if you oversize your supplemental pump, there is a potential for over pressurization of the freshwater system. Be sure to check the flow rate/pressure at the fill point after it has been filtered by your blue filter. Also, as the freshwater tank fills, it is wise to also slow down the fill rate as you approach the capacity of the freshwater tank. No point in over pressurizing the systems and risk of damage as a result.
The Boondocking Port is my primary go to when boondocking. I purchased a stiffer 6-foot garden hose that is cut near the middle to provide two hoses. The side with the female end stays in the TV. The side with the male hose bibb connection stays in Ollie. The one in Ollie is longer than the one in the TV. This allows me to elevate the 5-gallon water jugs to the tailgate of my TV for faster water transfer. WHY? To provide greater pressure head to the OTT pump when onboarding. To boondock onboard water you have to flip the valves and use your OTT pump. No, you cannot draw water from the faucets while using this Port.
PS: Recommend you cut the 6' hose at a 45-degree angle. Helps prevent it from sucking down onto the sides of the water jugs.
I hope that the above is useful.
Geronimo John
-
1
-
1
-
-
On 10/11/2023 at 5:16 PM, SeaDawg said:
The zamp connector connects directly to the battery bank, via an inline fuse to protect against over-voltage.
The inline fuses I know about protect from over amperage, not over voltage. By simple math, to a point, that can be interperted as a power control method, as Power = V * A. But the failure it protects is amperage.
Also, the typical inline fuses often have a 250 max voltage limit. Not a level we want to see anywhere in our OTT's.
GJ
-
2
-
3
-
-
4 minutes ago, Rivernerd said:
Also available from Amazon if, like us, you live a 1+ hour drive from the nearest Walmart. The one linked below is 1/2" thick, the size I prefer to work with.
H
I have purchased that board as well. I also like the extra thickness.
Key points are using a strong mounting board and well securing it..... especially for the very heavy 3000 watt inverter.
GJ
-
1
-
-
12 hours ago, Galway Girl said:
I’m turning in a service ticket on this issue of short cycling and extreme temps in belly.
A potential source is that one or more of your ducts have come apart. This happens often in flex duct applications.
GJ
-
4
-
-
Many of us DYIers use wallmart poly cutting boards and cut them to the desired size. Cheap and easily found. I recommend buying their thicker ones. Also I JB Weld it in place with thru wall SS bolts with fender washers.
GJ
-
3
-
-
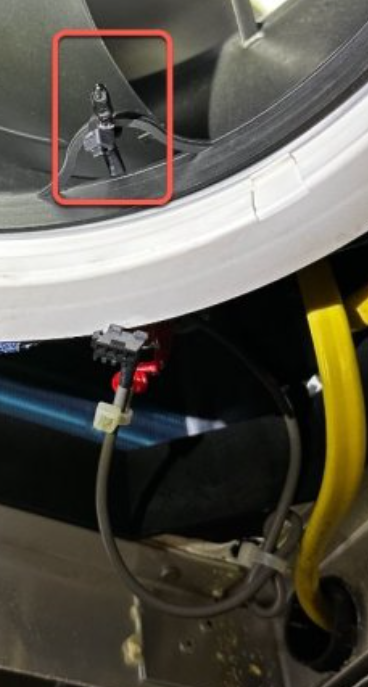
On 8/22/2023 at 11:11 PM, NCeagle said:
I'm interested in moving the thermistor as well as a long term solution, but it does seem risky to completely disassemble the Houghton and install a new thermistor that may or may not work as we expect. I'm waiting for one of you brave souls to try this before I do!
Simple Path Idea: Can we intercept the thermistor wire from the underside. Extend the wire as JD has suggested. Then route the wire through the OTT drain line back to the attic. Cut the drain line and pull the wire and thermistor to the street side cabinet surface. Drill a small hole to poke the thermistor end into the cabin just above the Smoke Detector. There it would not be much of a visual issue.
Your thoughts?
GJ
On 8/24/2023 at 3:19 AM, John E Davies said:Buy this one and put a new battery in it annually.
Emerson 1E78-140 Non-Programmable Heat Only Thermostat for Single-Stage Systems
I second JD's suggestion this T-stat works exceptionally well to fire up the OE2 furnace.
GJ
-
1
-
2
-
-
Hope you have a great trip. Some pearls that were found on our forum that we gathered and mostly followed:
- Get mud flaps for the front and rear tires, and another set at the rear of your TV.
- Protect the front flanks of your trailer as presented in several posts.
- Beware of wet puddles in the roads, They can be over a foot deep.
- Do not go north much past Fairbanks with your Ollie. Doing so can be extremely exprnsive in harm to your rig.
GJ
-
3
-
Several have had the flush shaft break. Several posts on that topic.
For a 25 cent part we get to replace our entire toilet.
Not an impressive Dometic decision not to stock basic repair parts for ALL their toilets.
GJ
-
1
-
 1
1
-
-
On 9/3/2023 at 12:03 PM, Townesw said:
Chains. And custom ball mount. And anti-rattle Hitch Vise
Now that is a sweet solution!
GJ
-
1
-
1
-
-
19 hours ago, Mike and Carol said:
Add electrically conductive grease to the 7-pin connector, if you have not already done so.
19 hours ago, Mike and Carol said:Dielectric grease applied.
Mike: Good catch. For sure Dielectric Grease.
GJ
-
2
-
-
On 8/16/2023 at 5:34 AM, GSMBear said:
I'm definitely in agreement with John's remarks about soldering an equivalent gauge wire to the thermistor to extend it. The problem is, without the ability to easily feed the wire from the rooftop section to the interior section (the issue described above), there isn't enough slack wire to get it to an easily workable area with a soldering iron. It's pretty tight quarters up in the return air duct
First my assumption is that we are using the former Dometic thermostat wires to control the gas heater and have done so using a new thermostat at the location of the old Domet stat. That said:
Your assessment matches what I observed. That path is not worth the effort. HOWEVER:
I believe that the thermistor wires end up at the control board. My suggestion is to disconnect or intercept them at the control board and then connect a new one (with a much longer lead) in its place and locate the new thermistor in a place that better represents the cabin temperature.
GJ
-
1
-
-
55 minutes ago, MAX Burner said:
They both look like (maybe) #2 Phillips screws. The bottom screw may secure the cord itself to the plug assembly. The center screw likely removes the cap to expose the individual 30Amp wire connectors.
Using a DeWalt Impact Driver would be my tool of choice.
GJ
-
1
-
-
On 8/6/2023 at 11:51 AM, GSMBear said:
Unfortunately, it's a little misleading about how to get wires from the exposed portion of the rooftop unit into the sealed portion that can be seen by looking up from the inside when the plenum is removed.
GSM Bear:
The thermister wires pass from the control board and then down into the Return Air path "tube" (inside the 14 X 14 roof penetration). For a non-ducted system it can be seen from the cabin with removal of the inside air distribution panel.
I suspect that splicing in a long section of wire (As presented by John Davies above) at the roof penetration level in the 14 x 14 penetration would leasily give you a path between your two hulls for mounting of the sensor inside the cabin.
GJ
-
On 8/10/2023 at 10:24 AM, John E Davies said:
You can extend any thermostor/aka temp sensor a reasonable distance, just use HIGH quality connections (solder and heat shrink) and use an equal or heavier gauge (smaller number) wires. Then no worries - you won’t see any significant resistance increase. Especially for a sensor that has a range of 15,000 to 30000 ohms like the Zamp solar one!. Adding a few ohms to those figures is irrelevant.
John D.
Thank you for the above response. Great to know that there is a path forward.
GJ
-
3
-
-
On 8/6/2023 at 11:51 AM, GSMBear said:
I'm not sure I understand your reference to "relocate the room air relay from the supply air duct to the ambient area.
GSM: I edited my post above for clalrity. You were correct as I used the wrong word.
Cutting and splicing Thermister Wires: It has been a really long time since I was playing with thermisters, so my foggy memory may need your update.
My recollection is that the thermister changes resistance based upon temperature. The mother board of the unit is set up to interpert resistance and map it to a temperature setting and unit response. If we cut the wires to the thermister and extend them, that would change the overall resistance of the thermister and original wire resistance as seen by the mother board. Would that cause other issues?
GJ
-
Instructions have the info. Basically the transfer switch comes with a super duty plug and that line plugs into the inverter.
You disconnet the 20 amp wire at the breaker that serves the ac and replace it with a longer wire that goes back from the rear dinette seat to the back of the rear bunk. This line goes to the switch input labeled for the utility company supply.
The other switch connection is used to reconnect the ac power supply.
I mounted my second switch aft of the OEM one under the street side bunk. This required me to replace the super duty switch cord that was too short. Some owners elect to mount the switch on the wheel well to avoid this. Personally I like bolting the add on equipment through the fiber glass to a cutting board JB welded and bolted in place. I use small SS fender washers and bolts and it does not detract from the appearance under the bed overhang.
GJ
-
2
-
-
On 8/28/2022 at 11:21 AM, Nancy K. said:
One handy accessory that I made is a bag to hold plastic grocery bags to use for trash. It hangs from a hook that we installed high up in the closet.
We use the cube style boxes from kleenex expressions tissues for our grocery bags. They get stored in the upper cabinets at the back curved section of the roof line. I start the summer with three full ones and add used ones every shopping visit.
GJ
-
1
-
5
-
-
3 hours ago, John E Davies said:
Ollies need a central battery master on/ off switch inside the trailer, not at the batteries...
I respect your opinion on this. If the fire is in the Battery Box, inside is logical. So long as every occupant of the trailer knows where it is.
On the other hand some believe that if there is a fire situtation, get all occupants out NOW and away from the trailer. Then once the family and pets are safe, kill the power source at the batteries or some other outside accessible location. Looking for a master switch hidden under the beds or in a closet somewhere is not time efficient.
However fire fighters will go to the battery box and either cut the 4/0 cable or use the red master switch. That likely will be their first action once finding the buring trailer.
Regardless, your comment begs having clearly visable signage that "Emergency Battery Switch Here" would be advisable for all locations where the switch is located. Personally I show my guests our 350 amp rated Blue Seas master switch as part of our trailer tour.
GJ
-
3
-
-
3 hours ago, Jim and Frances said:
I just requested info from Jason on the springs, and he confirmed the 9150014-02, 1750 lb (each) 25.25 length.
I've not used this vendor, but found these online. http://www.dexterpartsonline.com/product/9150014-02
Looked at the dexter stock number and it has a "LF" in it. For our LE2 are eachof the 8 springs exactly alike or does the LF indicate a left front spring and that we need to order our a LR, RF and RR?
Just want to know for my cheat sheet.
GJ
-
1
-

Leave Black Tank Drain Valve Open When Flushing!
in Mechanical & Technical Tips
Posted
The tip for using dishwasher pod(s) in the black/gray tanks has been around for some time. When I want a really clean black or gray tank, I'll add a pod to the grey tank, and two pods to the black tank. Using "Calgon" brand is not required. I buy the cheapest I can find for this use. As you suggested, a few miles down the road for it to slosh around and break down the solids greatly reduces the time flushing the tanks. This is especially useful at the end of the season.
As somewhat of a minimalist on what I carry, strive to minimize using extra hoses, valves, flow meters. As such, your approach has merit IMHO. Especially for those without a black tank flush water flow valve, you approach makes a lot of good sense.
That said, I would suggest a few cautions for learning the sound change:
A. The sound of a flooded black tank nozzle may vary with the pressure/flow of the water source feeding it. So experiment with the hose bibb valve to recognize this.
B. When learning the sound, get a helper inside with a flashlight to observe the black tank water level. Have them open a window or use you cell phones to facilitate communication. Then have them shut off the ball valve flowing water to the flush valve, and stand on the flush valve foot peddle. Their job is to advise you of the progress of filling the black tank.
C. Before starting, make sure that all items on the bathroom floors (I.E. the lower one with the floor drain, and the higher one where the toilet tank sits) are removed from the area. One of my worst mistakes was having my dirty cloths hamper on the lower floor and flooding the area from gray tank goo. 😞 Cleaning a soiled bathroom floor is easy vs. dealing with 25 pounds of really really bad smelling wet cloths. While boondocking 40 miles from any laundry or water sources.
GJ