Geronimo John
-
Posts
2,384 -
Joined
-
Last visited
-
Days Won
67
Everything posted by Geronimo John
-
 Sorry for the delay. Traveling myself. Short answer is: No. They have one with a long tail and without the male end. This one is like an extension with a male and female ends. Save the $$ and but it with just the female plug for the TV and a long cord to get well into your Ollie. GJ
 -
Friction Hinges - Lippert - Another quick mod.
Geronimo John replied to Ty J's topic in Ollie Modifications
Many plastics exposed to the sun for long durations will harden, shrink a bit, and then when stressed crack. Could those doors cracking be more sun exposed than others not cracking? ???? GJ -
Or you have to replace your refer...... If so, then either you remove the door, or take a saws-all to the ole Dometic inside the cabin. What a mess. Not a good design decision..... GJ
-
Upgrading from a Bulldog 2” coupler to 2 5/16 BD coupler
Geronimo John replied to Patriot's topic in Ollie Modifications
Good point JD. When I leave our Ollie in a location where it could be at risk, I lower the tongue (via the jack) closer to the ground and remove the fuse. If not in use (think power to the frig.) I kill the master switch. The thief would need to pick up the 560 pound tongue or haul it away using the safety cables. Doing so makes our Ollie more of a PITA to relocate. A collar lock and other means is gravy to boot. GJ -
Seeking New Air Conditioner for Hull # 145
Geronimo John replied to ScottyGS's topic in Ollie Modifications
I was lulled by an OTT owner that condensate over the side of our hull was no issue. I went with the Houghton (no internal drain or evaporative solution such as a water wheel). My hull is now stained by the condensate. SO, I fully agree that an internal drain or a water wheel what works in humid conditions is a must. GJ +++++++++++++++++++++++++++++++++++++++++++++++++++ CORRECTION: The quote above was not from RonBlink. Not sure why it was attrituted incorretly. Here is a copy of it: Sorry Ron! GJ
-
RFC: Alternate sanitizing approach
Geronimo John replied to DanielBoondock's topic in Mechanical & Technical Tips
I do as well. Using the white hose of course! GJ -
GOLDEN! Many Thanks! Will digest it this afternoon. 🙂 GJ Owners: Suggest saving this document if you have an older frig.
-
JD: Correct on both. Still in Denver and it always works perfectly for months up at King Mountain where we basecamp at 5,300. I think that well over that elevation we would need the other smaller orifice to reduce gas flow due to lack of O2 higher up. Not the case with ours in Denver now. Currently, we don't get anywhere near the gas flow to even heat the ammonia hot enough to flash to cool. Hopefully one of the owners can respond with info about the gas valve voltage and possible test procedure for it. It's a long shot, but worth a try. I have heard others have had mother board issues, but never heard of the refer gas valve going south. Along the gas thread: I'm also wondering if there is a screen that keeps trash from tank insides or junk from bad propane that could clog or plug the oriface? If so, where would it be located? GJ
-
June and I are wrapping up a family wedding week in Denver. Next we will be heading out to the high country for some boondocking. Will for sure need our Dometic RM 2454 refrigerator for a couple of weeks. Could use some guidance: WHAT I THINK I KNOW o Refrigerator works normally on 12 Volt power supply. o Refrigerator works normally on 120 Volt . o Refrigerator does not work on propane regardless of outside temperature. It seems to hover a bit above 60 degrees in the main area of the unit when using gas mode. Likely about what ambient has been inside our Ollie due to nighttime cooling temps. WHAT I HAVE OBSERVED o The thermistor that activates cooling is operating normally only when using 120 and 12 Volt power. o Control board appears to be operating normally for all power sources though. o When switched to gas, the Control Board is trying to strike. Sends three strikes and then seems happy. o The striker appears to be igniting a dribble of gas at the propane orifice, however, it is less than 5% of what is necessary for heating the absorption unit. ANALYSIS: Leads me to believe that I have a gas problem. Ok, I set myself up for that one...... Thinking it is likely either: o A 95% plugged gas orifice. o A defective gas control valve. o A safety thermistor that would shut off gas flow if no flame is sensed. INVESTIGATE: Thinking I should: o Pull the gas orifice and see if clear. If contaminated, clean in a non-destructive manner. o Pull the gas tube after the orifice to see if any issues there. o Test the gas control valve and mother board: . Is it possible to spoof the main control valve with voltage to determine if it’s operational? If yes, what voltage should I see from the mother board? Can I spoof it to see if it is functional or if the mother board is weak? o Remove gas tube downstream of orifice and look for mud daubers or other such inclusions. o Does the igniter/striker also act as a safety to shut off gas flow if the strike process is not successful? If not how is that safety feature accomplised? Any thoughts, suggestions, recommendations or part numbers would be greatly appreciated. Thanks, Geronimo John
-
Trailer Separation from Tow Vehicle
Geronimo John replied to John Dorrer's topic in General Discussion
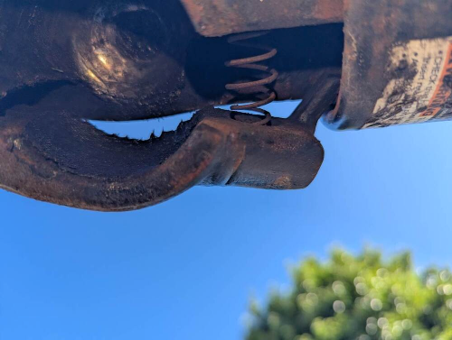
First, I would suggest a serious de-greasing: So much gunk in any hitch can cause it to stick when hooking up. GJ
-
We laid out the gutter in HOT Florida sun, and about half of our installs failed when it shrunk over the following month or so. I have to remove it and will install as RoutLaw suggested above to prevent the hard turn with it's shrinkage issue. GJ
-
Reset 2.0 has started squeeking when backing up
Geronimo John replied to DunnYet's topic in Mechanical & Technical Tips
Good advice. Just be careful not to have any of the four individual trailer tires lock up when doing a panic stop. Apparently my curb rear brake on Ollie locked up last season and a flat spot was the result on the tire. Found it during routine pre-trip annal inspection. I plan on replacing my 2018 Michelin's next season so just put the unused never on the ground spare tire on that location and am good to use the slightly damaged one as a spare for this season. Very happy that OTT gives is a full size matching spare! GJ -
Reset 2.0 has started squeeking when backing up
Geronimo John replied to DunnYet's topic in Mechanical & Technical Tips
I for sure know that "Duhh" feeling. Hope it works out well for you Monday. GJ -
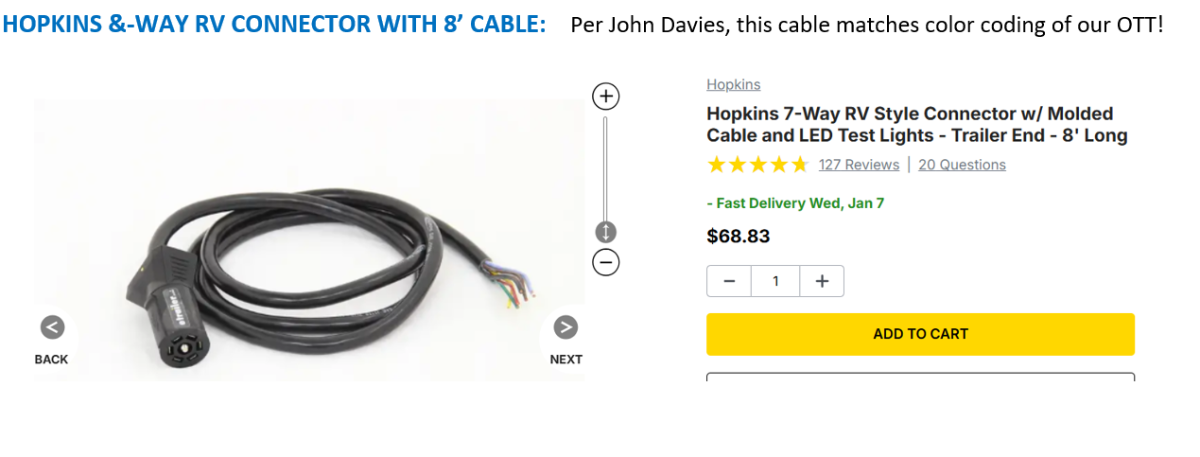
Boudicca: JD is a outstanding standup guy. Comes across some times a bit gruff (Don't we all?), but is pure of heart and giving to a fault. And Chris can sure cook up a wonderfull mountain of pasta as well. I went thru the same process as you, but had the tools and past knowledge to get to the bottom of it. For grins I would suggest you purchase a new seven pin plug for spare parts or use with JD. More than a few ownes like the one below. With or without the cable. It is one that John Davies suggested. If you have a spare few inches in your existing you could just get the 7-pin end. I had those inches and did just the end. Next time I'll have to get the full cable shown below. Amazon.com or Tractor Supply are both good sources for a lot of what we need. The cable connections are easy, getting the "Right" wire into the proper peg of the cord is complex. Having the same color to color at the box makes life a lot easier. Good luck. GJ
-
I have often wondered why JD and others have used "cable loom" for the trans axle brake connection upgrade. I think a piece of 1/2 inch of CPVC (Hot Water, which is smaller in diameter than regular PVC) would work just as well, but give better stone protection. Just musings from a RoF. GJ
-
Missing screws on cabinet cabinet drawers
Geronimo John replied to Gliddenwoods's topic in Mechanical & Technical Tips
Screws are good, but bolts are better...... GJ -
Wow what a difficult time you have had. Frustrating for sure. I had a simular issue with my 2018 OE2. Problem was the male 7-pin. Art and I changed it out and it stopped the rogue errors like yours. Many owners have had problems with the brake cable inside the axles. John Davies used the cable protection like you used and ran the cables outside the axle with a bunch of zip ties. He ran it on the back side to protect it some from flying stones. One thing to try is to hook up your trailer to a different truck and see if they get a problem as well. But finding someone willing to do that would be difficult. GJ
-
Following JD's lead on this: Some thoughts about the 3 way it appears you have done all the common items: Turn the control panel up to setting 5. Park with the curbside door on the north side as much as possible to keep the solar gain off the unit. If not possible, lowering your awning a bit to put the unit into shade. Open the frig door and look in the upper back wall where the aluminum cooling fans are. On the right side of them is a white plastic "clamp" that holds the thermistor for the unit. It will slide up and down on the right most fin. This thermistor controls the cooling system. Moving it up or down will increase/decrease the temp in the box for each of the five settings on the control panel. I don't recall which way you move it go get cooler, but there there is a post on the forum. I'm sure one of the members will remind us on this detail. The Beach Lane Fans seem to be the best fan solution for a warm frig in hot conditions. So regardles of any of the suggestions, if you use a 3 way where it is hot you need the extra cooling needed by the frig. Do plan on doing this if you get yours running. Good posts on the forum on how. So now to get to the gas burner orifice. It is easy to get to and remove. Follow the gas supply valve into the curbside front of the lower access panel. It goes horizontal into a gas control valve. Beyond that valve is an air shield. The outside cover can be bent out to reveal the gas orifice. A small combination wrench is needed to remove it. Done. Hope this helps. GJ
-
Main battery switching, a different approach
Geronimo John replied to Snackchaser's topic in Ollie Modifications
Good write up. But I'll stay with my 350 amp BlueSeas Master DC cut off switch. Why? Less complicated and less maintenance than a Master Switch. When a Master Switch if off, there are no power draws during the 8 months my OTT is lonely. Smart owners always do a brake check when starting a tow. Doing so also hints at DC power to the CO and Propane detectors and referigerator. GJ -
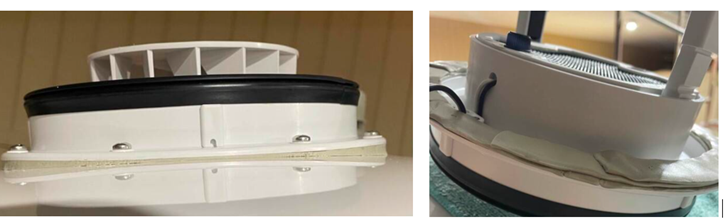
Maxxfan Dome installation (previously orientation)
Geronimo John replied to Townesw's topic in Ollie Modifications
AMEN! Best suggestion of the week! ++++++++++++++++++++++++++++++++++++++++++++++++ Bill: Best installation approach I have seen. Very creative way to intall the fan on a curved roof. Thanks for your time and effort to create a bathroom fan replacement "Best Procedure" yet. GJ
-
Adding a Matching Rear Porch Light and some Front Lighting
Geronimo John replied to jd1923's topic in Ollie Modifications
JD: Great post. Seriously like, and am considering at least the front light install. I would prefer not to have unplug when removing the cover. I have a"glam cam" thru the hull for my DC to DC cables, and the under sink portal hatch. Combined they appear to provide an access pathway. For reference, the belly band is well below the sink cabinet top. What do you think about using the light switch circuit of the jack to provide power to the front light location. Tap the load side of the jack light switch, add fuse and run power under the doghouse area to a cable glam, then inside up into the under sink, and thru the hull to mount just above the belly band? Would it worth the extra effort and possible to do? Thanks GJ -
Furrion Stereo Upgrade: A Sound Choice
Geronimo John replied to Snackchaser's topic in Ollie Modifications
I have a couple of speakers that have given up. Will check power and resistance, but suspect they are blown and need to be reuplaced. Are these the ones you used? Thanks, GJ
-
Missing screws on cabinet cabinet drawers
Geronimo John replied to Gliddenwoods's topic in Mechanical & Technical Tips
Roger, thanks for the flowers... OH with small washers too! GJ -
Made in USA leaf springs
Geronimo John replied to Mountainman198's topic in Mechanical & Technical Tips
Try unloading the fitting and likely you will get it to take grease. Sorry for speed reading this 36 page thread if you already tried this. GJ -
Assuming the valve set up is correct, and the pump screen is not plugged, them many have found that the boondock hose seal was worn or the boondock hose fitting was not FULLY and FIRMLY tightened. As a result, that connection sucks air and little or no water moves on board. Suggest double checking that connection and raising the boondock container as high as you can so reduce the hydrostatic head to the pump. This will assist in getting the pump to self prime. Ours takes about a minute a gallon to boondock onboard. Hope this helps GJ