

Geronimo John
-
Posts
1,442 -
Joined
-
Last visited
-
Days Won
36
Posts posted by Geronimo John
-
-
A couple of thoughts:
- I always take the weight fully off the two rear jacks before using the front jack to bring the Bulldog over the Anderson ball. Doing so reduces the lever arm fulcrum from the rear jack points to the center of the two axles. This significantly lightens the load on the front jack.
- To unhitch, I loosen the chains until their nuts have no threads showing. Much better than having to fish the chains back to the Ollie frame......
- If I am just overnighting at a less level site, I leave at least one safety cable attached to my truck. If I need to use the TV, I re-hook it before retiring. But remember the cable status the next morning!
- Finally, my 2019 F-150 receiver chain "eyes" and the Ollie safety cable hooks are always angry with each other. Basically a PITA to connect the curly cables up to the truck. I added one of these on each F-150 eyes and this problem is resolved. NOTE: If I were to do this again, I would check on a 5/8" size for added strength. Just test fit it to the TV and Ollie before buying.
GJ

-
On 5/14/2021 at 6:29 AM, Ray and Susan Huff said:
On 5/14/2021 at 6:29 AM, Ray and Susan Huff Said: "Your Oliver's brakes must work better than mine. I know mine don't work as well as I'm used to because when I slide the manual knob on my brake controller over to max, the brakes barely grab and slow me down."
Ray:
I am glad you articulated the "Barely grab and slow me down" assessment. I too have observed this and pondered the same thoughts. I'm going to search the forum and see if this topic. If not, I'll start a new thread.
GJ
-
JD: His stove is working perfectly.... not likely a tank or regulator problem.
Several days at altitude and the larger jets leads me to wonder if you have carbonized the igniter and possibly the burner tubes. Look to see if there is a lot of carbon black in the area. If so, brush and blow it out... of course with the propane turned off for safety.
GJ
-
 3
3
-
-
@ QuestionMark: It looks like there is about 4.5" between the springs top and the bottom of the frame.
Just tossing out an idea for bump stops: How about adding two spacers shackled to the springs on either side of the axle. Mount a bump stop on each shim. Size the shims and bump stops so that the stops ride just below the frame. You would not increase the clearance any, but you could get significant dampening.
Another approach would be to add the shim blocks and bumper to the frame and let the axles bounce up into them. Would put the collision forces on the springs and they may spread the forces some.
Ok Pro's jump all over this one! 🙂
-
21,560 Miles during four summers.
I keep a log, but my F-150 does a much better job of keeping track of my Oliver miles.
-
2
-
-
John: Very correct.
The intent in my post above was directed only towards charging wire size between TV and Oliver. You bring up other equally important concepts that those wanting to use a newer TV's with smart Alternator to charge up their trailer batteries.
Direct connecting TV to Trailer where you have L.A. to L.A. or AGM to AGM can be done as Raspy posted a couple of years ago (Battery to circuit breaker to Anderson Connection to Trailer batteries). The reason is that the two systems operate at the same voltage and have the same charge profiles. The voltage drop (I.E. a measure of cable resistance over its length) from the front battery to the back batteries will to some degree self limit the amount of power that could flow. This in turn provides a good measure of protection to the TV electrical systems.
However mix a L.A./AGM TV to a Lithium Trailer batteries using direct connecting will really cause grief for several reasons:
- The internal resistance of the Lithium's is insignificant to that of the AGM or L.A. batteries. This would allow HUGH currents to flow from the TV to Ollie. If properly fused at both the TV battery terminals you would just be inconvenienced a lot. However, you are still at risk of damaging the TV charging/battery.
- Lithium batteries generally require a three program charge process that a direct connect does not provide.
- A smart TV alternator varies the output voltage to match the need. As a result, it will tend not to provide high enough voltage much of the time that the Lithium's need to get charged up.
So to use your TV smart alternator to charge your lithium's, you need a current limiting device, that also acts as a "Buck Boost" transformer, and provides the computer smarts to provide the lithium's their three phase charge program. The unit you suggest appears to do all these tasks at 11 amps. A larger unit is the Victron Orion 12 -12 30. The "12 - 12 30" translates as: A 12+/- volt input providing a 12 to 14+ volt charge voltage to the lithiums, with up to 30 amps continuous (if needed), with current limiting and smart charging profiles.
If you have a smaller battery bank, and drive many hours a day, a 11 amp charge system would work great and save you $$$. But we are now seeing Lithium battery banks commonly in the 200 to 300 Ah range. And some up to 630 Ah (such as Galway Gal's and the Oliver OEM Pro set up). For those, you likely would want the larger Victron Orion 12 - 12 30 charging system.
Just a reminder these auto smart transformers are not 100% efficient. In the case of the Orion, it can continuously produce 30 amps at the correct voltages as needed, and is listed at 87% efficient. So that would mean your TV alternator/batteries could see up to a continuous 34.5 amp current draw. This means that there will be about 57 watts of power lost to the heat sink. So be careful where you locate this unit, and provide cooling holes/vertical space for the heat to dissipate (See JD's Posting On This Topic).
-
 1
1
-
3
-
Owners;
NOTE 15 OCT 202 updates are in BOLD. GJ
Note that JD's 12-12 charger has an output of 11 amps.
Those going to Lithium may want significantly more power. It appears that many of our owners are using or are looking at the Victron Orion 12-12 30 amp charger. Depending on your vehicle and Oliver cable run length and wire size. For my F-150 Crew Cab the length of wire needed for the upgrade was 108 feet actual (I had purchased 110) 4 AWG as suggested by BatteryCablesUSA.
For the 4 AWG, you would need the Anderson 120 amp or 175 amp connector to handle the diameter of the cables. For running the two 4 AWG cables from the battery back to the firewall, across the firewall (To avoid both the Cat and the right side turbo), zigzagging back under the cab between the frame and body, and back to the hitch is an easy, but long run. Note: I chose to run two cables (Pos and Neg) and not rely on the vehicle chasis for grounding.
I found Mike at BatteriesUSA to be exceptionally helpful. If you think you know your cable line measurement, I highly recommend you add another ten feet! Mike can give you the voltage drop for the various types of copper stranded cable. Specifically you can buy 4 awg welding cables or 4 awg power cables. Both are the same AWG. BUT they are not the same strand count. This can certainly impact which lugs you buy for the same 4 awg size. I chose stranded copper cable, not welding.
Finally, for DC circuits you can go well above the normal 3% voltage loss. So if you are new to large DC cabling, measure twice, add an additional ten feet, and consider giving him a call at BatteriesUSA.
-
1
-
2
-
-
8 hours ago, Wayfinder said:
I'm looking forward to trying the Redline CV-2 grease, when I can get my hands on it. The schedule is tight and didn't want to drive any farther without some sort of new grease. The bearing look great, so that's good.
I enjoyed doing the repack. It's therapeutic in a way. And greatly satisfying.
Wayfinder: CV-2 is stocked by Amazon:
-
2
-
-
John Davies Wrote: "
- Use Redline CV2 and repack every 12K to 15K miles. There is NO need to repack more often if you keep an eye on bearing temperatures. ....
- Use high quality parts, and a high quality lubricant, no worries. ....
- You do need to recheck your hub bearing play after say 1000 miles, ,,,,,,,you may need to tighten one more slot on the adjuster nut. ."
I have run 21,560 Ollie miles in the past four seasons. As a Professional Mechanical Engineer and amateur wrench turner, here is what I have found to work well ... I.E. zero issues on the road during the past four seasons with my 2018 OE2 bearings:
- I use Redline CV2. However Mobile 1 synthetic is likely just as good, and some may say better. All I know that after four cross USA trips in the last four years, the JD recommended CV2 works just fine for me.
- My Chinese Dexter bearings "bothered" me as it does many new owners. I over-serviced mine annually (new grease and seals). The Dexter bearings and National seals ran 16,000 miles with no issues. But this was my personal limit of comfort for them. When I changed them at the beginning of my fourth (May 2021) season , I had a full set of Timken bearings and two sets of National ready for use depending on what I found upon disassembly. I was rewarded in doing so as they were ready to be replaced.
- My recommendation is to keep track of your trailer miles, service the Dexter's annually or every 5,000 miles, and be ready to replace them with better bearings and seals based upon what you see. But have the Timken's and National's in hand by 10,000 miles for sure.
- Buy real Timken and National seals, a bearing punch, and extra CV2 or Mobile 1 synthetic grease.
- When you get in the 10 to 15K zone, replace the bearings with Timken's. You will travel confident knowing you will likely not have to do a bearing/seal job on the side of the road.
- SAVE the best two old bearings, clean them up well, grease them well, and put them into a plastic jar. Wrap them in Sarane Wrap if you like, but keep two just in case. Have your grease and gun with you at all times. Basically free insurance.
- I recommend that once you upgrade t the Temkin's and Seals, you can stretch out the service interval to 10,000 miles or so. Just always have four spare seals available.
- I recommend replacing the Timken's every 50,000 miles just for grins.
- Get a digital IR hand held temperature meter. Just easy to stop and zap the temperature of your hubs. Cheap insurance for bearings or brake issues.
- The ONE item that I have a recommendation that is contrary with John's is rechecking the bearing "play". I recommend stopping after just 100 miles and rechecking your bearing play. I found three of my four too loose after only 200 miles.
- Grease the EZ Flex zerks every 5,000 miles or annually!
Guys, this is about the 4th time in four years that this subject has been asked and answered. Maybe if a moderator has some spare time this winter, all these threads can be consolidated and we can put this subject to bed.....at least until the next crop of owners joins our family. 🙂
For the new owners, here is a nice hand-out to have when you are working your wheel bearings.
Geronimo John
+++++++++++++++++++++++++++++++++++++++++++++++++++++++++++++++++++++++++++++++
-
2
-
4
-
On 9/29/2021 at 1:29 PM, csevel said:
... I was wondering about leaving the trailer plugged in (30amp) and not removing my Duralast batteries.
My Ollie is a 2018 version with Duralast L.A. batteries. We are 50% boondocking and 50% shore power. We are on the road over 90 days a year.
Our Duralast batteries have survived and performed well through 4 seasons. Over winter, they are stored in the battery bay in a barn on top of an Oklahoma mountain. Gets plenty cold there, but so far , the bad cold (Below 10 degrees for over a week) has not hurt them.
Point is just disconnecting them from Ollie and keeping them on a 2 or 3 watt battery tender seems to have worked very well. If we were in a real cold area, I would consider a 10 watt light bulb set on a thermostat placed in the battery bay. Also, would for sure insulate the door as many of our owners have.
-
1
-
1
-
-
7 hours ago, ChrisMI said:
I can’t help but think that will be the new price going forward. A lot of competition going forward and I would expect capacities to rise and pricing to continue downward.
For our country, I hope you are right. But the Lithionics folks sure like their jumbo (316 Ah) Lithium battery. The only place I actually saw a price had it listed at way over $4K. Tilt.
I was primed to go the DYI build my own from components route, but the $150 price cut took me back to American Made Battleborns.
-
Thank you.
-
JPS 190 "As a side topic has anyone replaced the generic lock on the battery tray with something a little more secure? Having thousands of dollars worth of batteries with a generic lock leaves me a little apprehensive."
John:
I was thinking the exact same thought. However, the latch itself would be an easy to defeat pry target.
Somewhat tongue in cheek, a "Let's Over-Think This" off the wall idea, but maybe feasible if the Pantry is tall enough:
OPTION 1: How about reinforcing the back of the latch side of the hatch, and adding horizontal tangs high and low (But for JD one in the middle too! 🙂.) pointing into the battery box. Drill a hole in each tang for a pin to drop through. Add holes in the ceiling and floor of the battery compartment. In the pantry, have a vertical pin with a cord attached to the top of the pin, and a long taper on the bottom of the pin. Pin would be well smaller diameter than the holes in the tangs. Put a pulley on the top of the pantry over the stack up of holes. Run the cord to the front of the pantry so that operation of the drop dead pin (Aka dead bolt) to be operated from inside.
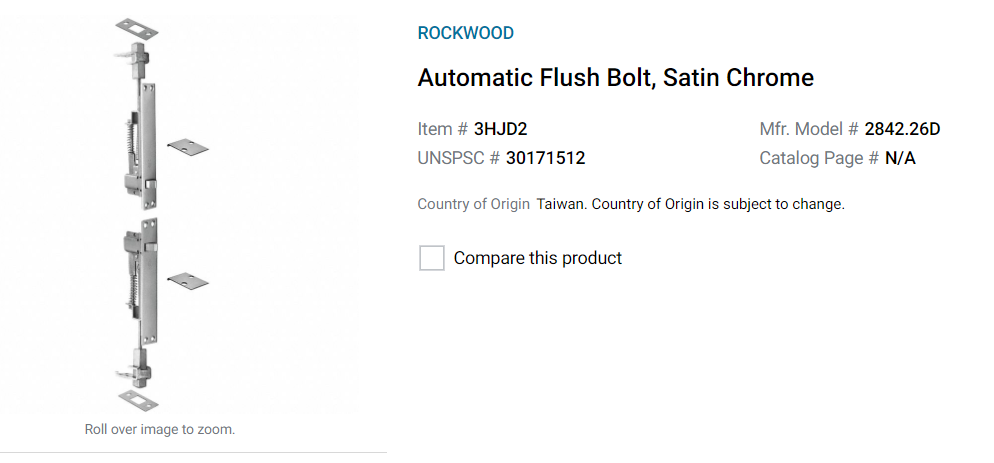
OPTION 2: Less complex would be to just install two of those cord operated automatic flush bolts. Reinforce the battery compartment with the provided latch plates. Add a pulley on the top of the bottom latch, run the top latch cord down to the pulley, then up and connect with the lower latch cord. Then extend a single cord up into the pantry. Once in the pantry, use another pulley to allow the cord to then run to the front of the pantry for easy access for opening the latches. For the professional "over thinkers", add a spring to the battery compartment so that the door will pop open when pulling the cord from the pantry. LOL.
OPTION 3: Add an exploding dye charge to "highlight" the thief. Won't stop the batteries from being stolen, but it will at least bring a smile to your and the Police Officer faces when you describe what the thief looks like.
Geronimo John
-
1 hour ago, Mike and Carol said:
The 16K grain softener I used for a couple of years did not fit in the basement and it was very heavy. An 8K grain would be more manageable, although I’m not sure it would fit in the basement. I checked Amazon and they have our small softener HERE. It’s lightweight, fits in the basement standing up and lasts an entire 6 to 8 week trip. It’s easy to recharge with table salt, and only takes 30 minutes or so. Mike
Thanks for posting the one that has worked well over time. Some operational questions:
- Do you use the water softener only when using city water fill? Or have you plumbed it into the fresh water system. If so, where did you insert it?
- Can this unit be used on our "draft hose" for the boondock water upload port? Or does it have too much flow restriction to do so?
- Do you have yours hard-mounted, or simply in storage for water onboarding purposes?
- How do you winter proof it?
Thanks again,
-
1 hour ago, mossemi said:
This is the second mention of an impeller in the fresh water pump in the last 2 weeks. What kind of pump are you using because my 2017 LE2 OE Shurflo 4008-101-A65 is a diaphragm pump and I never seen an impeller while servicing it?
Mossey: You are absolutely correct. Correct term is Pump Head, not impeller. My error. Thanks for the correction.
-
Earlier this summer mine acted up a couple of times. THANK YOU FOR THE ABOVE POSTS!I
That said, four detectors are failing long before the seven year standard... why reward the MFG for their POS detectors by buying more?
Does anyone have a suggestion for a longer life more reliable CO/Propane detector that will fit in the same space? Or one we can remove and toss into the trash can at 2:00 AM?
Thanks
JD: I LOVED "when you are trying to figure out how to kill power to that pesky alarm at 2:00 AM, with that bed occupied by a disgruntled spouse with her pillow held tight over her ears…." I would wager that more than a few of us have experienced your same "joy". LOL
-
3
-
-
On 9/24/2021 at 2:58 AM, topgun2 said:
On all of the RV's I owned prior to getting my Ollie, I had chains. Hopefully I never have to go back to the "chain side".
The cables are up and out of the way both while parked (unhitched) and while underway. They are cleaner too. What's not to like?
Bill
I find the cables a PITA to attach to my F-150 due to their tension and interference with the Anderson system. Frankly, I would swap the OEM Ollie curly cables for some DOT rated yellow chains in a flash. However the PITA they are, is not yet very high on the improvements list.
But, before changing hooks, I would fix the latch hook. It's a lot less expensive.
-
3
-
-
My Ollie is primarily used out west. Over the previous 3 summer seasons, the water flow from the faucets had steadily decreased. I checked all fittings for air intake leakage (Pump Cavitation) and water loss, water pump screen, and even inspected the
pump impellerpump head. The impact of using well and spring water was the obvious source of my self-inflicted water flow problem. When the boondock draw rate for a 5-gallon container time increased to over 7 minutes, I knew that I had waited a bit too long to effectively address the issue.So at the beginning of my 2021 Summer Tour, I purchased two large Costco jugs of Vinegar and executed the OTT recommended decalcification process. With some modifications, it worked very well. Basically, our faucets/showers water flow "grade" went from a "D-" to a "B+". For MY situation, my waiting three years to de-calcify was too long. As a short-term solution, I have added the de-calcification process to my required maintenance effort at the beginning of each odd year. Long term, a water softener is on the horizon. BTW, they are not cheap....
In the meantime, my future summer improvement priorities for my Ollie are:
A. Lithium Conversion in 2022 (Thanks to Overland for the tip: "...I see that Battleborn have their standard 100Ah battery on sale for $799 right now, which is the best price I've seen since I bought mine in '17". I just purchased three of them. 🙂
B. Houghton Conversion in 2023
C. Water Softener in 2024
-
1
-
-
On 5/27/2021 at 9:47 AM, topgun2 said:
Back in the day when these trays only came with one latch, there was discussion about what was to be done in the event that single latch failed. This led to simply drilling a hole in about the same place as your shackle is pictured and placing a stainless bolt through that hole. It works!
Bill
@ Bill: LoL "Back in the Day". Those single latch trays were used on my 2018 Ollie. Hopefully that ancient time, just 3 years ago, does not qualify for us to be "Ole Timers"!!!!
On a previous post you are correct about "bolting" the single latch and using a nut and bolt. This topic was addressed a couple of years ago, way back in 2019 I think, and I commented that instead of using a nut, to use a RivNut so that we are not having to fish the nut after we drop it. For those not acoustomed to RivNuts (AKA: Rivet Nuts, Blind Flange Nuts, etc.), below is a sample.
If you are not familiar as to how they are installed, send me a PM.
Mahalo!
-
1
-
-
10 hours ago, Overland said:
The tray that Oliver uses is the MorRyde SP60-042 Utility Tray, inside dimensions 14" x 21" x 2.75". There's 12.75" clear from the floor of the tray to the bottom of the aluminum catch for the lock. The Battleborn 270Ah batteries are 21.3" x 11.6" x 10", so I don't see how you'd fit even one without removing the tray. Three of their standard 100Ah batteries will fit easily, and four will fit tightly; i.e., it will take some work to wire them up.
Thank you SOOOOOO much for this data.
Geronimo John
Lives in Hi, Ollie in OK. Somewhat of a PITA for project planning. But it is what it is.
-
1
-
-
2 hours ago, ScubaRx said:
I'd ask the folks at Progressive Dynamics Customer Service 269-781-4242. I have one of the Remote Pendants for the Progressive Dynamics Inteli-Power PD9200 Series Converters. It's yours for the asking if you find it will work for you.
I'll give them a call to see if the PD 9200 series will work with my PD 4000 series. Thanks.
GJ
-
1
-
-
@ ScubaRX: Is that three 270 Ah Battleborns? Or three smaller ones?
Thanks
JPR
-
On 9/15/2021 at 1:22 PM, SeaDawg said:
We have the "charge wizard" pendant on our pd charger converter, but we don't have lithium.
There is a way to manually adjust to any of the preprogrammed modes, with the pendant. It will revert to normal when it senses battery is at appropriate level. We've only used it a few times, to test it. I don't know how it would work, with lithium. In all likelihood, much the same. Not as sophisticated as being able to change settings from your phone, or a screen.
Since you have a four year old trailer, your pd charger converter (like ours) will likely have to be upgraded with a board, or swapped out, if you decide to swap up to lithium. Add that into your estimates.
When/if we swap up in the trailer, we'll likely go to victron gear, like we did on the boat, and several others have done here. You may want to look at the pros and cons, as well. Going all victron gives us a good communication stream, and information. Solid stuff, imo.
There's a lot to think about, in making the change.
I'd also take a long look at Battleborn, and possibly a few other brands, vs Lifeblue, if it were me.
I can't look as I'm 4,000 miles from my Ollie, but one of the technical staff indicated that there is a jumper that can be removed from the Converter and dropped down a hole to switch the Converter from AGM/L.A. to Lithium. The black jumper has two pins that are in the top and middle slot. It is in the AGM and Lead Acid position.
By pulling out the jumper, and putting it into the center and bottom hole, you have set the PD 4000 series Converter to the Lithium mode.
Doing so will still put you about .2V short of the desired equalization voltage for many such batteries.
If this is not what you are speaking of, I would SURE appreciate it if you could post a picture and maybe the ordering info for the Pendent. Thank you,
-
1
-
-
On 6/1/2021 at 7:53 AM, Patriot said:
Here is a pic of our battery tray in our 2020 LEll. No issues to date. It appears quite robust and solid.
@ Patriot: If you don't mind, some questions from a soon to be Lithium owner:
What batteries do you have?
What are their dimensions and overhead clearance? Thank you
Geronimo John


Andersen hitch help
in General Discussion
Posted
Steve and a lot of other newer owners: PLEASE PLEASE go to your account and enter you trailer type, hull number, and tow vehicle info. This info is very helpful for assisting others with problems they may have.
Steve: Assuming your Anderson was set up properly, needing 8 threads is pretty extreme. What is your Anderson ball drop (Height above ground unhitched less hitched height?
GJ