-
Posts
1,442 -
Joined
-
Last visited
-
Days Won
36
Posts posted by Geronimo John
-
-
On 2/25/2021 at 12:38 PM, Jairon said:
I'd suggest Summit Racing Equipment if you want legit parts for cheap. They ship all over the US.
Summit Racing is 20 minutes from the Timken factory and is an authorized distributor. Odds are good they are legit. 😁
Jairon: I have been using Summit Racing for years, and also using Motion Ind. for bearings. I had not thought of Summit for the Timken Bearings.
THANK YOU!
GJ
-
 2
2
-
-
2 minutes ago, FrankC said:
The rubber flaps have molded cut lines and pilot hole locations to trim the top of them as needed to the correct length and punch through the holes to mount to the support arms at the length you’ll need. The as-is length just happened to be perfect for my F-250.
PERFECT. Thank you!
-
@Frank 😄
I note you Rock Tamers are on a Ford Super Duty and are mounted such that the arms are up (Increasing clearance of the flaps from the ground. Since a Super Duty sits "Taller in the Saddle" than my 2019 F-150, I am concerned that the Rock Tamers would be dragging the ground. Your thoughts?
Thanks
GJ
-
I reversed the bolt that had no splines left on the mounting tab. As bhncb states it is a lot easier to inspect.
However if your mounting tabs have the factory splines, then I recommend you not swap the bolt direction.
-
 1
1
-
-
@ JD:
We think alike. I carry the Ruger SP-101 for hiking, but modified it to have larger grips. For larger targets is the Winchester Defender (Pump) 12 GA Magnum. If needed, I have an Utah permit as well.
That said, this is a bit off topic.....
-
 1
1
-
-
On 12/30/2020 at 4:41 AM, John E Davies said:
I have to smile at this. I always turn mine on when towing, even in sunlight.
John Davies
Spokane WA
I do as well. Having the ability of turning on the rear view camera during the day is handy as well. It has answered my question of "What is that idiot doing behind me". Just turning on the trailer lights give him/her a warning as well. More than once it was a 47 HP VW Bug drafting behind Ollie.
-
On 12/17/2020 at 12:12 PM, mjrendon said:
@ mjrendon
"Do they slip over time?"
I have used them for many years and only once did I have slippage. It was for a VERY thin insert into sheet metal.
These inserts have two routes of not slipping.
- First, they are splined. The crushing action of installation causes them to expand against the hole you drilled. Hence very thin metal will not have much for the splines to "engage".
- Secondly, the insert flange is pulled quite hard against the metal. If you fail to crush the insert fully, and by that I mean a lot of force then the insert could have a loose fitting and could slip that way.
I recommend you test one on something that you don't care about. If you mess it up, toss it back into your metal scrap pile. My learning curve was installing four inserts through the roof of my Prius V for roof racks. Messed one up and had a devil of a time clearing the insert as I did not want to take apart the head liner!
For smaller inserts, it is possible to strip out the insert with a long handled tool. Such was my case on the Prius V roof.
if you are using them on an application that you don't want leakage, just silicone the insert underside before installing, add your bolt and silicone those edges as well.
Quote"Do they slip over time?
-
Ride and Fly: As our Ollie is often on mountain fire roads, I have had my concerns about the latch as well. Good idea. Do you bolt both sides, or just one?
OWNERS:
I am going to use "Blind Flange Nuts" (BFN) on mine so that I am not fishing for the washers and nuts behind the frame.
For those not familiar with BFN's, below is how they work:
A. With the battery slide tray locked with the Oliver slide lock, dill a bolt diameter size hole through the battery slide tray and the stationary frame of the unit. This will assure that you have them properly aligned so that the Oliver slide lock and your supplemental bolt lock work together for bolt insertion and travel.
B. Remove the battery tray and drill a slightly oversize hole into the frame to accommodate the BFN. Your hole should ensure that the splines of the BFN "dig in" to the frame material. This gives a tight fit and aids crushing.
C. Insert the BFN into the larger hole. I
D. There are two ways to "crush" the BFN onto the stationary frame:
Use a BFN Crush Tool. I use this when at home.
Make your own BFN Crush Tool. I do this when "on the road" as I don't need to carry around the Crush Tool.
- Start by getting a longer grade 8 bolt (with all threads) and grade 8 nut that have the same threads as the BFN. You'll also need some washers and lubricant. Finally you'll need wrenches.
- Put the nut on the bolt and then your lubricated washers. Insert the bolt/nut/washers though the frame and through the BFN.
- With one wrench, hold the bolt steady. Then tighten the nut against the washers. This will pull the BFN bottom (BNF threaded section) towards the frame. In doing so, the center section of the BFN will be crushed forming a second "flange" on the back side of the frame that keeps it in place.
- Remove the bolt from the BFN.
E. Reinstall the tray, lock it, and insert a bolt and lock washer to fix the tray in place.
On final thought: It would be handy if you procure BFN's and bolts that use the same wrench size as the terminal bolts. Would save having more tools laying around hot terminals than absolutely necessary. ZAP! FLASH1 OUCH!
Geronimo John

-
 2
2
-
Sherry:
I am using solid CONCRETE blocks. But the idea you are conveying is correct. Cinder blocks have no place under anything important or heavy regardless of how they are stacked. Good input..
I especially like your idea of burning the ground contact ones! Some innate pleasure in seeing termites bite the dust. 🙂
Thanks
-
 3
3
-
-
For over 50 years I use cut sections of treated lumber (Recommend washing them with soap before handling). Cheap and replacement over time is easy.
I started out using 2X12 treated lumber on the base and then a stack of 2X6's above. what I soon learned is that when used in soft ground, the trailer weight through the 2x6 stack would break the larger base. Maybe I should have used better wood??? While on the road, I did not have an easy way to replace the broken base 2 X 12's. So I was forced to use two 2X6's as a base. i placed them side to side, and then stacked 2X6's turned 90 degrees to the base ones. Have not had any issues this way. The icing on the cake is that NOW, all of the dunnage can stack side by side in my front tub milk crate.
However, this past year I noted that during our annual 8 month storage, termites were infesting the ground contact 2X6 boards. So much for modern "treated" lumber..... My fix was to purchase three concrete blocks at Home Depot. They are about $2 each, Store SKU #679311, 7" X 7" X 4". i have placed them exactly where I want the trailer to sit each year. Once the jacks are over the blocks, I still use a single 2X6 as a slip pad just in case the trailer gets moved while on the jacks.
I leave the foundation blocks in place while using our Ollie, and have a great target to back the trailer into the dark barn.
(For new Owners,: You need to almost always provide slip pads every time you use your electric jacks! Many jacks have been destroyed by forgetting to do so, and then forgetting to raise the jacks. The more elevation used by your slip pads, the less jack you have extended for leveling of the trailer. So, WHEN you do forget, (as 95% of all experienced owners have done at least once I would wager) the less probability of damage to your jacks. Why did I say "almost"? Some places we are forced to use have elevation changes that make their use not advisable. When this happens, I leave my Ollie hitched and only partially level. I then put a sign on my seat that says "JACKS UP?"
-
 2
2
-
-
The only purposes for the black flush (BF) valve that I can think of are:
- If a jack ass wanted to, he could hook up a hose to your BF hose bibb and flood your trailer with poop while you are away.
- If the black check valve in the BF line were to fail, black water could end up on your hands when you remove the BF hose bibb cove.
- I would wager that a significant number of the owners leave it open anyway.....
On the positive side, not having that valve makes flushing your black tank faster by not having to go inside to open/close it.
Either way, the odds are so low that it would appear that the cost of the BF Valve was not worth the extra.
-
 1
1
-
I average three months a year in our OE2. Sure lots of the above thoughts and ideas are great to dream about. But for the boondocking and high mileage that we cover, our OE2 is just about perfect. My only strong issue with the design is that the A/C noise is horrible. This issue is not a new one for Oliver as it comes up again and again.
My hope is that Oliver is looking at a retrofit A/C units (Heat not required) that is substantually quieter than our existing units. The goal would be for them to offer it as an improvement for the next model year, and as an upgrade to existing owners when our "Hammer Mill" A/C units wear out.
-
 1
1
-
-
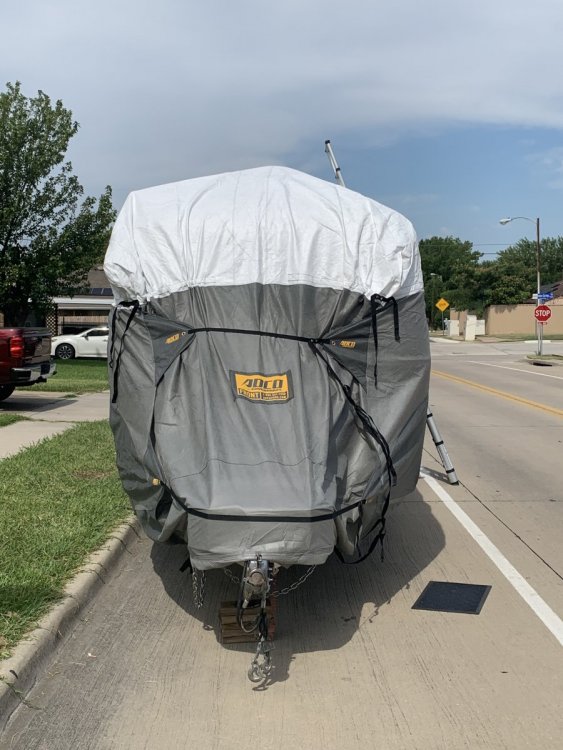
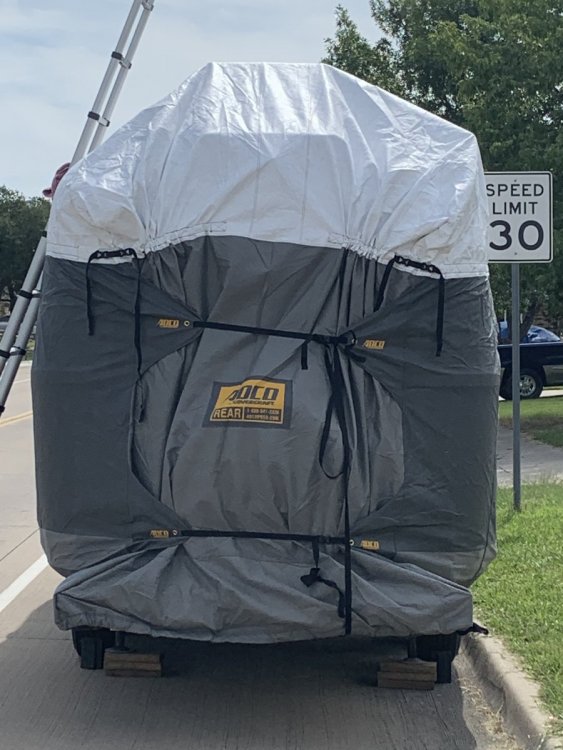
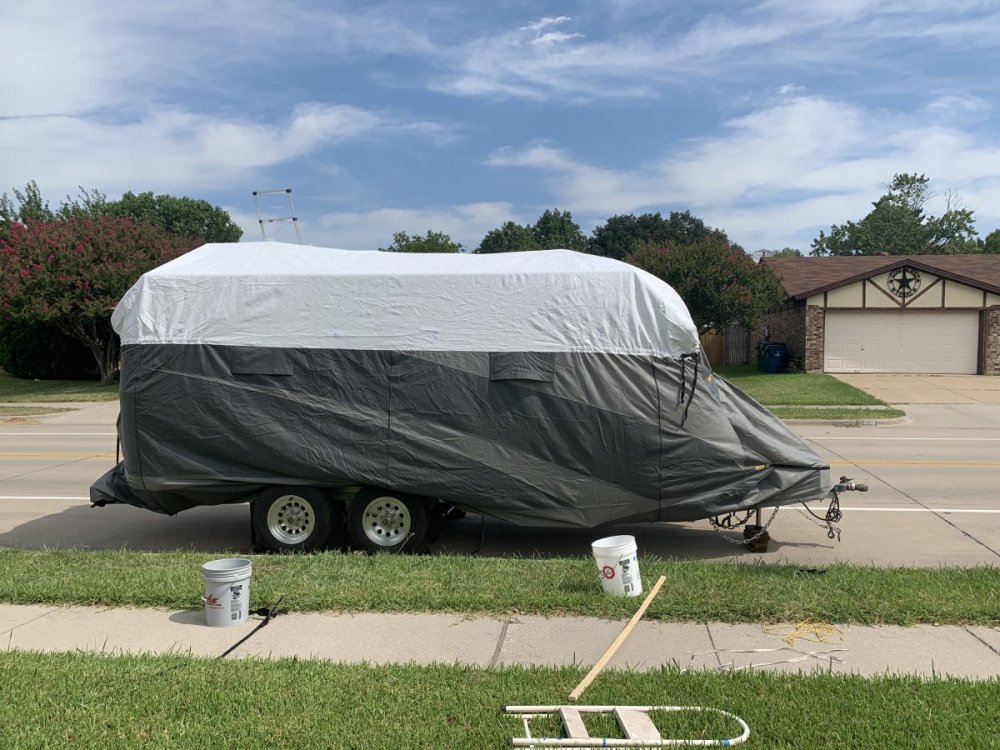
I store my Oliver in a 95% dark barn in Oklahoma. I wanted a cover that would provide insect and bird protection. I went with the ADCO cover, but the one received was larger than I needed. Circumstances required that I use it anyway as my summer flight back to Hawaii was just a day away.
When my too large cover had a warranty issue, Ichose to go with the next smaller size stock ADCO Cover. They sent me a replacement at no cost. The one sent and shown is their 3840 stock number. I did a quick install of the cover just to test fit it. I was not trying to make a perfect install, just wanted to make sure it would fit. Hence the imperfect strapping alignments. For an off the shelf cover, it is still a bit larger than the Elite II requires, but gets the job done much better than it's bigger brother did.
I would be interested if any Oliver Elite owner has tried their next smaller size. Likely to be too small I think.
Yes I would order the 34840 ADCO again. If I did not have a barn, I would go with a metal carport with this ADCO cover.
NOTE: I install my cover and set up the trailer so that the ground points of contact are the tires and three jacks. I do not need to use the ADCO provided wheel covers as it is a 95% dark barn. The jacks are all on 6" concrete blocks. This combination makes it harder for ground pests to get into a position to do any damage. So far, after two winters, no issues.
-
 1
1
-
-
So far, after 30 days, Dexter appears to be stonewalling me on this topic. Despite repeated calls, they have not even acknowledged the issue, or graced me with any sort of reply
I have a list of four Oliver Owners that have had this problem. As mine is a two time failure, so we have six incidents. Once I get back to Hawaii, I will have the time and resources to work this "more vigorously".
In the mean time, if other owners have had this issue, please PM me soonest.
Thank you
GJ
-
 1
1
-
 1
1
-
-
From BHNCB: "If the EZ-Flex center bolt is not properly torqued to the 65-75 ft lb specification, the steel center bushing that is supposed to provide the lubricated pivot point for the two individual arms, will not be held stationary allowing it to rotate directly on the un-lubricated center bolt. The center bolt now becomes the pivot point for the entire equalizer assembly as a single unit. This un-lubricated bearing contact will tend to rotate the center bolt, which will in turn eventually loosen the prevailing torque locking nut."
One additional technical input that I learned from Jason this morning: The Center Bolt flanks (not the threads) should have "Never-Seize" applied during re-installation. Doing so helps prevent the dry Center Bolt from becoming the pivot point vs. the (wet) steel center bushing" that BHNCB discusses above.
Today I spoke at great length with Jason, and also Dexter (Nikki). She has sent up to the Dexter Senior Manager (Mr. Sean Cantzler) the failure of the center bolt locking nut not holding torque concern.
From BHNCB, I think I understand that the EZ Flex center bolt and frame tabs form a simple crush connection. Since there is plenty of room on either side of the frame tabs for a longer bolt, why not change out their shackle bolt Center bolt with longer bolt (with Never Seize) that uses either double nuts, or better a castilated nut with a cotter pin? This would eliminate the single point of failure that at least four of us have had to deal with... fortunately by the Grace of God without injury to ourselves or family.
Geronimo John
-
 4
4
-
-
Thank you for sharing your experience with the EZ-Flex.
I think a call back to Jason and Dexter is in order......
-
On 10/3/2019 at 7:03 AM, BackofBeyond said:
I know I saw this before but could not find the thread.
Anyways, I went to grease the Ollie and found the left bolt/nut that secures the equalizer to the frame hanging by a tread - literally. I tried to tighten it - but the bolt would not hold torque, RB
My EZ Flex heart bolt also came loose in 2018. The nut was no where to be found, and only two threads of the bolt kept the EZ Flex from droping down off the frame mounts. Fortunately a disaster was avoided by my going dead slow up a steep grade. Had Ollie been moving faster and gone "Negative" .... the EZ Flex heart bold would have fallen out with potentially disasterous consequences.
When I talked to Jason and Dexter, neither had any knowledge of such an event happening in an OE2. Now it appears that there may be at least two of us.
Back of Beyone: Please confirm that it was the heart bolt that failed. THanks, GJ
Other Owners: If this has happened to you, or know of other incidents, please reply to this issue. Thanks, GJ
-
Our only suggestion is to update the A/C to a wisper quiet one. Oliver has done a wonderful job of building a super quite trailer, which all goes out the window when the A/C is used.
-
 2
2
-
-
When we were growing up in the south, "PoP" was expensive so we mostly drank “Sun” ice tea. My mom made it very diluted so us kiddos could drink all we wanted. It kept us hydrated and was effectively a low caffeine low sugar beverage. When camping, she would make it in advance and put it into cleaned out 1.75L bourbon bottles (without labels). They were heavy glass so they kept the tea cold in the cooler and also poured really easy as they had a handle too!
During the summer of 1968 (I was 16 years old at the time), we were on the Tchefuncte River camping and water skiing. The retired couple that was camped next to us seemed really nice. But as the day passed, they became quite agitated with us. We could not figure out why. Each time the ski boat returned we would run over to the camp table and guzzle about a pint of weak tea in our Red Solo cups. When the bottle was empty, Mom would bring out another one from the "Ice Chest". Each time, the retired couple would get even madder.
Then a State Trooper showed up at our camp site. I had just finished water skiing and ran past the officer and poured and downed about a pint of our weak tea. The officer asked if he could have some, and I poured him a pint into a Red Solo cup. He tasted it and then loudly said "Wow, this is really good". The retired couple were at this point pointing at the officer and us and were now cursing about how shameful it was "In broad daylight". The Officer ignored them and we talked for a few minutes about water skiing on the Tchefuncte river with its alligators and poisonous water moccasins.
After several minutes, he went over to the couple and suggested that maybe they should just mind their own business as drinking weak tea was just fine. The look on the retired couple's faces was worth a million dollars. Those folks were packed and gone in about 60 seconds.
-
 2
2
-
 4
4
-
 3
3
-
-
On 5/11/2020 at 5:20 AM, John E Davies said:
Has anyone seen or used one of these USA MADE carriers? It is a decent price for a truly well made carrier, that you won’t worry about it falling apart like the $100 bolt together junk ones. Any comments?
John Davies
Spokane WA
@ J.D. Yes. I had one for about 15 years and used it a lot. It was the type with a center stinger. Never had a problem with it. Usually hauled about 80 to 90 pounds. Should I need one for my LEII, I would get the type with stingers on both sides. As you stated in another post, there are significant dynamic loads back there!
-
 1
1
-
-
On 5/11/2020 at 7:00 AM, WhatDa said:
For us:
(2019)
TV+Stereo Remote 2x AA
MaxAir Fan Remote 2x AAA
Dometic power awning remote : CR2450
Dometic power awning wind sensor AA - recommend lithium
Smoke Detector: 2x AA
Our propane/co runs off the 12v system of the trailer
Thank you WhatDa!
-
This topic is intended for determining maintenance/replacement info for all small batteries in the Oliver Elite II.
I do not have access to my trailer (In OK) as I live most of the year in HI. As such, I can't go look. I have also looked on the OTT site and not found such a list, or for that matter much info about this topic as well. Hence this RFI. As such, with your assistance, I would like to compile a list of small batteries that need service, what size they are, and get a consensus of their service life. In this regard, where it is possible to do so, I remove all small batteries from their devices when the trailer will not be used for months on end. This is why I am suggesting a 24 month service life for those listed.
The following are some that I am aware of:
- TV Remote 2 each AAA? Change Every 24 months
- Furion Remote 2 each AAA? Change Every 24 months
- Smoke Detector 1 each 9V Change Every 24 months
- Propane Detector ?????????
- Dexter Brakes Do we have a separate battery in addition to being tied to the 12V Buss?
- Any Others?
Thank you for your inputs!
-
 1
1
-
On 4/24/2020 at 4:07 PM, John E Davies said:
I agree with The Shackelfords that the WD-40 Specialist Dry Lube PTFE Spray would be a good selection. I found it at Home Depot in a large 10 OZ can for less than $7. This lube is dust and dirt resistant. It is my go to lube for bike chains, table saws and other equipment that tends to gather gunk when in use.
-
 1
1
-
 1
1
-
-
Wow John, you read my mind I had been looking for the service procedure and was not having any luck.
thanks for taking the time to post this wonderful "How To"!
-
 1
1
-


Where to buy Timken Bearings
in Mechanical & Technical Tips
Posted
For the less bearing experienced, the "Cup" is the running surface of the bearing housing. Some refer to this replacement surface as the "Bearing Race". They are the same part, and should always be replaced when replacing the bearings. The reason for buying eight seals is that you need to replace the seals at each surface. The Timken bearings will last many many years with good grease and service. The seals generally get damaged in their removal process. They are cheap and saving a few $$ is nothing compared to a seal failure allowing grease into the brakes!
I disassemble, clean with brake cleaner, dry and re-grease at the start of each season. But then I am also covering at least 8,000 miles a season.
The cheap Dexter bearings IMHO should be trashed at your first or second service depending on your use.
For the bearings and seal face, this is the synthetic grease that John Davies recommended, and many of us are using. I also highly recommend it:
Red Line 80401 CV-2 Synthetic Grease with Moly (14 Oz Jars) . It is available via Amazon.
Some owners use a "bearing grease press" to fill the bearings with grease before installation. I have tried some, and found that I waste a lot of grease with them. So, like many older salts, we just use the palm of our hand and a dollop of grease, kneading the bearing into the grease from both sides. This works very well, saves grease, and gives you the satisfaction of KNOWING that your new bearings are well lubricated.
From Dexter, here is the Bearing Adjustment and Hub Replacement process:
Finally, having a pile of rags and a trash bag handy is really helpful.
Good luck and safe travels,
Geronimo John